
Leaderboard


Popular Content
Showing content with the highest reputation on 26/11/19 in all areas
-
Hello all, I have been rather busy working of late but I have found time between working with real aircraft to finish my F-4D. Im sure many are aware that the Tamiya kit is a dream to build and goes together very well, I used Mr Colour paint which I believe are the best on the market at the moment, the colours I used were 303 (FS34102), 310 ((FS 30219) and 320 (Dark Green)……….and black for the bottom 🙂 Sadly the decals were in a poor state and fragmented as soon as they hit the water, so I purchased the Warbirds Decals set (32009) which were superb and set well on the aircraft and into any details very well and recommended. I didn't like the fit of the intakes to the ducting, so I thought it a far better idea to use the Quickboost (QB 32089) set of intake covers. The seats are aftermarket, but I cant tell you who made them as they came free with the kit (from a certain auction site) All the weapon pylons are removable, this is done using small earth magnets in the wings and pylon locations. I hope you like it, it is certainly my best build so far. All comments are welcome, thanks for looking32 points
-
A while ago I made a Reds Hawk with an LED in the nose then I decided to complement it with a Gnat Airfix Gnat finished in Xtracolor 14 Red S&M decals Base is wood & Acrylic tube Master models brass pitot WIP for the Hawk & Gnat Thanks for looking CT26 points
-
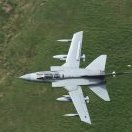
So, after quite a few ups and down and some shocking fit issues and terrible instructions here is my tribute to the loss of a modern legend. The kit is the Revell 1/48 GR4 with Eduard cockpit and UK RBF tags, CMK seats, Master pitot tubes and Scratch built TARDIS display and AIM-132 asraams. Also a shout out to Pete Tasker who provided me with some stunning shots of her on her last low level sortie through the lakes as a reference! edit_C2A1086 by Rob Jones, on Flickr edit_C2A1079 by Rob Jones, on Flickr edit_C2A1064 by Rob Jones, on Flickr edit_C2A1065 by Rob Jones, on Flickr edit_C2A1066 by Rob Jones, on Flickr edit_C2A1074 by Rob Jones, on Flickr edit_C2A1076 by Rob Jones, on Flickr22 points
-
New Tamiya set with a few resin and PE extras. Decals by Model Maker and MRP painst so simply, easy model that needs only half of year. Marking: 303 SQN Polish Air Force, beginning of 1941. Every comments are welcome.19 points
-
Hello every body, here I want to show you some pics of my just finished Stuka B-1 from the Balkan theatre. I used eduard and Quickboost parts, added rivets and used Gunze paints.19 points
-
Hi all. I haven't posted anything on britmodeller for ages. But here goes my first helicopter build. Revell Merlin built OOB. Painted with humbrol and clear coated with Tamiya rattle matt. Had to strip the paint off of the rotor blades a few times, as I rushed the masking.. Fairly happy with the result - I don't know if I will ever build a helicopter again. Who knows. Cheers, Robin Robin17 points
-
Hi Folks,picked this up for a fiver with shot decals but kit in good order,Airfix's little sabre which I remember building when it was released I gave her a spurious scheme from spares which I at least tried to make look authentic.Thanks for looking in.17 points
-
I've been flying back and forward between Bristol and Amsterdam regularly in these little Embraer beauties over the last year and thus felt the need to model one. Jadlam's recent clearance sale of this kit was the catalyst required. They do remind me more of a sports car than an airliner, and indeed the pilots seem to fly them in a slightly more aggressive manner than the Airbuses. Plus, they are much more comfortable than Easyjet's A319s and A320s - and they feed & water you during the flight! Although I previously built a Revell E195 a few years back, this is their recent E-Jet issue, featuring the shorter fuselage of the 190. It comes with rather plain Lufthansa decals in the box, so for this one I used the superb 26 Decals KLM Cityhopper set and selected a serial for one I know flies out of Bristol. Mind you, literally minutes after I ordered these, I found another vendor in the US selling a set that included the current colourful KLM 100 yrs markings, but these still met the bill perfectly! The kit is a fairly easy build with no vices. I added a little weight in the nose and had to fill and sand a few blemishes on the top of the fuselage where the sprue didn't detach cleanly. Unlike my previous build, in this case I managed to keep the tiny antennae intact despite my sanding! My kit was crisply moulded with little flash, although I have heard this is not always the case. For the KLM blue I used Revell 50 gloss enamel. The wings are Humbrol US Medium grey, which in retrospect is a little dark, but it all depends on the lighting of course!!!! As always the kit was hand brush painted enamel, with Klear and Micro Satin acrylic top coats to finish. FredT15 points
-
1/32 Tamiya f-16 Zeus The F-16 demonstration team «ZEUS» displays HAF’s airpower to the public and acts as ambassador for Greece, demonstrating the professionalism and the skills of all pilots in the Hellenic Air Force. The team’s goals is to Provide morale within the Air Force, sister services and to the Greek community, to Inspire and recruit Greece’s best to join the service, Strengthen and grow public trust and confidence in the Hellenic Air Force and Retain the quality force we currently have. Team’s callsign during the Demo Flights is «Zeus», representing the father of the Olympian Gods of the Ancient Greek Mythology. The aircraft used for the performance of air shows is an F-16C Block 52+ . This is an OTB build with the exception of the converted tail I used model maker masks for the patterns, so 80% is painted. And I used Reedoak figures enjoy Mike15 points
-
Hi Britmodeller. Zvezda's sublime 737-800 kit built OOB. As probably mentioned in other threads, this kit includes the correct shaped engines, winglets and correct height for the windows, as compared to the old Revell kits. It goes together really well. Added a wifi antenna. The reason for my choice of this livery, is because I flew this exact plane back in January 17', when I moved from Denmark to Northern Norway. Flew it from Oslo to Tromsø. Painted with Halfords Appliance White, Humbrol and Alclad. The always brilliant decals, are from Ruben, LN Decals. Genereally happy. A few mistakes here and there, but luckily we all keep on learning from our mistakes! Cheers, Robin Here sitting next to my other SAS builds/models.14 points
-
Hello, friends! I show another model. Did it in 2018. This is an old Trotting set Assembled with no additional materials. Painted with Gunze paints. The decals in the set are of poor quality and many of them have collapsed. As pigments used pastel crayons. Enjoy your viewing! photo_1_1525080330 by Andrew Zhi, on Flickr photo_2_1525080330 by Andrew Zhi, on Flickr photo_3_1525080330 by Andrew Zhi, on Flickr photo_4_1525080330 by Andrew Zhi, on Flickr photo_5_1525080330 by Andrew Zhi, on Flickr photo_6_1525080330 by Andrew Zhi, on Flickr photo_7_1525080330 by Andrew Zhi, on Flickr photo_8_1525080330 by Andrew Zhi, on Flickr photo_10_1525080330 by Andrew Zhi, on Flickr photo_11_1525080330 by Andrew Zhi, on Flickr photo_12_1525080330 by Andrew Zhi, on Flickr photo_13_1525080330 by Andrew Zhi, on Flickr13 points
-
Hi All, Just finished this in the 'Year I was Born' GB and thought I'd put a couple of pics up here as well. If your interested then the wip can be found here. I'll be building the Dragon moulding of the same kit soon as I intended to build both in the GB but ran out of time... I'll be starting a wip for that soon. Geoff13 points
-
Hi Britmodeller. Revell A319 built OOB. The Revell kit is getting old, and this was a bit more of a challenge to build, since I recently built a Zvezda airliner. Painted with Humbrol, Alclad and Halfords Appliance white. Wonderful decals by Ruben at LN Decals. Relatively happy - never stop learning though. Enjoy! Cheers, Robin Robin13 points
-
With the issues of brush painting and trouble over canopy I nearly didn't complete. I used "parafilm" and it wasn't that easy to apply.13 points
-
Thanks PC. gulp. Silver pellets?? Eh, what's that Crisp? Gone bananas have you? Hmmm. Of course you could buy a cheap bead lathe, although to be honest they don't go around that slowly Some mojo, some masking: Wait a minute, what are those holes in the roof? Check the instructions… MORE windows! Glued in but, as you can see, they're easy to knock (now straightened) and I'm sure I'm going to lose at least one on close up IG on the turrets: …and I think we're ready to close up.13 points
-
Hi Here is my latest build done for the "In the Years I was born GB" 1975 - Operation Frequent Wind - First F-14 Cruise Grumman F-14A Tomcat Hasegawa 1/72nd with Verlinden cockpit11 points
-
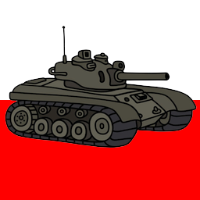
Hi, This is a 1:35 model, the Panzerkamfwagen III Ausf L, German medium tank. This is Tamiya KIT no. 35215. I made it as movable model, to do it I had to replace the road wheels by older ones from older (85'th) Tamiya KIT. Additional parts are the Friulmodel tracks and small accessories. I added a short video showing how does the model ride at the bottom. P.S. The photo light tent really does it job. This video clip presents how this model can ride I'd be glad if you review my remaining RFI-armor posts10 points
-
After viewing tonyot's pictures of his Loft and Cellar, we could judge and compare the sizes of some of them. A few members were amazed by the size of some airplanes. Here are some shots of milestones with their contemporaries : SK 37 Viggen (Heller) / Jaguar International (Hasegawa) Kfir Prototype (Hasegawa) / MiG-21 (KP) F-14A (Hasegawa - early mold) / F-11 Tiger (Hasegawa) FIAT G-91Y (Matchbox) / RF-84F (Italeri) Kfir Prototype (Hasegawa) / Mirage IIIB (Matchbox) MiG-21 (KP) MiG-25 & Tomcat (Hasegawa) MiG-29UB (Italeri) / F-14A A7-E Corsair II (Fujimi) / F-3 Demon F-11 Tiger / F-3 Demon (Emhar) F-4D (Monogram) / Buccaneer (Airfix) Kfir (Hasegawa) / Buccaneer (Airfix) F-106 Delta Dart (Hasegawa) / Mirage IV (Heller) F-11 Tiger / Mirage F-1C (Hasegawa) F-15E (Hasegawa - early mold) / YF-22 (Italeri) YF-23 / F-15E / YF-22 YF-23 / F-117 / YF-22 (Italeri) B-58 Hustler (Testors-Italeri) / SK 37 Viggen B-58 Hustler / MiG-21 B-58 Hustler / F-106 Delta Dart GOBC9 points
-
Albatros W.4, Eduard 1/48 My model number 5 of 2019 is finished, after a light weathering I think it is finished now. This float plane is a Albatros W.4, as flown at Baltic sea at "Seeflugstation Windau". The kit is a very fine Eduards Profipack with PE, mask and decals, released 2003. I added a wooden screw, some brass parts, Gaspatch turnbuckles of different type and a Vector resin engine. I used paints by Alclad, MRP, Gunze, oils and pastels for weathering. The build was pure fun, with a lot of added details! And now the pictures! I hope you will like it! Cheers, Frank9 points
-
Hello All, I have been working on this Academy B-29 on and off for a couple of years. Finally decided to make a big push on it to get it done. In any case I have not decided on the markings yet...but most likely a WWII machine. It has a gloss coat of Tamiya black as a base and many hours of polishing before putting on the the Vallejo aluminum...which is outstanding. I have a few panels I will be doing in varying shades but the overall came out pretty good I think. In any case I hope you enjoy the pictures. Of course any comments are greatly appreciated. All the Best! Don9 points
-
Thanks Giorgio Bit of white on the back of the turrets (as per previous advice) and front turret assembled: Worried that I'd knock the bomb aimers window inside I glued it on one side now: Getting closer…9 points
-
Last step before the paint And the silhouet paint mask for the serials are ready9 points
-
Here we are finally with this small 1/72 Hurricane kit. A had lot of fun with it. Thanks Airfix 😁 Work in progress is here Hurricane wip Thanks for looking Cedric8 points
-
I've kind of ambled into this build, and got rather hooked on the thing, and it's been a great motivation to work up my scratch-building by way of trying to make some improvements on the 1970 tooling. A coupled of years ago I tackled the Revell Red Arrows Hawk in 1.32 and had an excellent time dealing with the plastic at this scale. I'm not a stickler for any particular scale.... some people see it as some kind of "doctrine" thing. I like a good "handy-sized" project, and a Corsair in 1.32 is in the same zone as, say, my Curtiss C46 in 1.72! Now, obviously the modern way to go for a F4U-1A at this size is to get the Tamiya product. Maybe one day I will when I'm rich and famous. I'm using a couple of builds on line of the Tamiya kit as significant reference material, and if I can get SOME of the details and corrections added to this old box of fun, then that's the mission accomplished! And I'm already £100 in pocket... 😁 So, no after-Market products - it's a bit like buying somebody else's skills because you can't be bothered.... The plan so far, is with the flaps down, wings out, control surfaces moved, and I quite fancy a well-used, dusty, coral Island based workhorse. So there's a long way to go! I'll take you back to the start and gradually bring you up to speed with where I've got to so far, which isn't that far! Might be a bit stopstart as this is a sort of holiday break from doing a bunch of Lockheed's Twins, but that's OK because the F4U has a P&W R2800 Double Wasp fitted, which is quite a tidy beast - - And the PV1 Ventura has TWO THEM!!! Now that's the kinda plane I'M talkin' about 🤩 So this is all research for what I'm supposed to be doing 🤓 You're welcome along, of course.....8 points
-
This is my Monogram 1/72 General Dynamics F-16XL. The F-16XL was originally built to test how the cranked arrow delta wing from the commercial SST (Concord) would work on a high performance fighter. Later it was entered into the Enhanced Tactical Fighter competition against what was then known as the F-15SE (Strike Eagle) and having won is now the F-15E. For further information see https://en.wikipedia.org/wiki/General_Dynamics_F-16XL. Based on this http://web.archive.org/web/20041225003945/http://www.habu2.net/vipers/xl/index.html article by Keith Svendsen from the fall 1984 IPMS Quarterly I made the following changes to the Monogram kit: Moved the intake back to the proper location Moved the main gear forward remove the AMRAAM rails from under the wing Removed the gun hump from the left side and replaced it with the correct slot. I made no attempt to change the angle of the tail and I just punted on the extra antennas. Other then that it is OOB and I used the kit decals. The decals worked surprisingly well although I didn't realize until too late that they had slightly yellowed. So here it is: A note on the missiles; I was all set to add all the stripes and stencils to them but, I found several pictures that show them as plain white so I left them that way. Next up the the Flighpath conversion of the Heller E-3 to an E-8 that I had started but had to put aside for a while I waited for a part. Enjoy.8 points
-
Apologies for the lack of updates, life just get in the way. Completed the paint using the Xtracolor, decals are from the S&m sheet, Humbrol Gloss cote and about a year to dry LOL. Mount was made from 5mm acrylic tube same as the hawk and sprayed with Halfords black followed with Alclad chrome. Ready to mount together Ready for the battery box All thats needed is a Pitot probe Ive used the Master models brass probe very fiddly to fit. And I think were done. time for the ready for inspection post Thanks for looking and thanks for the patience CT7 points
-
It's nice to see that my initial question has led to such an interesting discussion. Just to show that your advice bore fruit, here's my rescued/restored FROG Valiant as WZ366. Not an accurate representation, I know - more a piece of 50s nostalgia . Cheers Cliff7 points
-
A few things to watch for that I found while building mine earlier this year : 1. The props are the paddle style found on the prototypes. The tips were slightly tapered on the production aircraft. 2. If folding the wings, don't fold the tips down. This was only on aircraft up to VZ911, after that the tips were fixed. 3 The torpedo wasn't used operationally. 4. The horizontal stabilizers are mounted perpendicular to the vertical tail out of the kit. This was only found on the prototype and early aircraft. Post VW867 there was a 10o dihedral added. A little sanding fixes that. 5. I raised the flaps on mine. A little fiddling and deviation from the instructions got it done. 6. Remember to close the inboard main landing gear doors as they cycled closed once the gear was down. 7. I replaced the exhausts with resin pieces from Quickboost to get more depth. 8. I removed the LH cannon and installed the AS68/APG-5 radar probe. 9. I had to source roundels from the spares box as the red was off centre on my sheet. 10. If portraying it in the operational zone during Musketeer, don't apply the nose number. They were applied after Eagle withdrew and returned to Malta. All in all, it goes together nicely. None of the fixes are that tough to do. My effort that might inspire you. Enjoy your build. Cheers, Rich7 points
-
So, with the new Airfix Bucc on hold due to my 'mate', I decided to raid the stash to apply some newly released markings. This was along way down in the said stash.... I think this was the original release dated 1990 which is about right with them entering service in 89. (Where did that 30 years go ??? Brand new release at Telford, I had difficulty in getting a picture of these as the gloss carrier film is so reflective, which is more than can be said for the kit ones !! As Baldrick might have said, flatter than a flat thing on a flat day. Still they are nearly 30 years old and all I need is to coax the IP's off. Art work for said subject, having searched out ZF293 it looked to be quite a well worked A/C by the time it had these markings applied. Having opened the lid the nostalgia came flooding back just like the cracking builds of the classic US Navy kits, particularly as this was also moulded in white, well it was once !! I guess cream is more appropriate but the surface detailing is so fine,(open can of worms) but I guess this was one of the first mouldings. I think these are currently in the standard grey plastic if any one can confirm ? Now the Tucano has always been a tail sitter and the instructions state 7grms, but whilst removing parts from the box look what I found. Bonus, Now where did they appear from...... These are obviously the same vintage and are probably some of the first out but that means some where in the stash I have a kit with these and the U/C and prop set in.... So cockpit tub assembled rear stick appears to have gone AWOL - will rectify that but this is a build to show off the colour scheme One piece lower wing, again look at how fine those panel lines are Upper wings attached the plastic has almost a resin feel to it, not some thing I have come across before but then again haven't built many 30 year old kits ….. Canopy is nice and clear, just a dip in some Klear should do, cockpit tub off to the paint shop just aiming to get it the same shade as the IP on the Kits decal sheet More to follow6 points
-
Good evening guys, after more than a year, I finally finished my Blackburn Buccaneer. I started it as part of a bigger project involving the types on board Ark Royal carrier during her last deployment in 1978. It took long, but it was real fun. I'm not sure I'll purchase the new tooling Airfix kit, as it would be a bit... sterile after the amount of work I carried out on this one. Should anyone be interested inthe making of this model, here below the link for the wip. The resin seats were courtesy of Perdu. He made a lovely master from scratch for his SA1 and sent me two copies of them. The decal sheet we was courtesy of Scimitar. and of course I had some great support by many I'd like to thank. Now some pictures: Scratch built cockpit. The seats were courtesy of @Perdu, who made them from scratch and sent me acoupleof resin copies. Another area detailled from scatch was the air braking system Wing fold and landing gears And now the finished model. Thanks for watching Ciao massimo6 points
-
Hi all As year slowly move to end, it is perfect time , maybe final one, to slowly finalize my work on many models hibernated in different finishing stages. So this one started almost a year ago, and finished today. Well known Italeri oldie. Rescribed panel lines, added details in cockpit, Humbrol colors, brush painted, very light oil wash and Gunze mat varnish....... I had no issues with it only was not able to fix alignment of the canopy so still some holes here and there.... Hope you will like it Best regards6 points
-
Finally I've got to where I am happy for this to sit on the shelf. I painted the 9L's the wrong grey. The masking was a challenge, but it turned out better than I thought it would, not perfect at all, but that will do. I've made it a little weathered looking as they picked up some dirt during operation. The decals were a bit odd, they had some white along the red areas.6 points
-
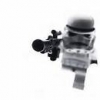
Hi Folks, Apologies.........I lost track of keeping the WiP updated and was in a final rush to get this completed for the SIG display at SMW'19. Anyway, I'm calling this one complete. The Eduard MiG-21PFM went together faultlessly, as one would expect. I was looking to replicate the rather worn 'night fighter' scheme applied to at least one aircraft. The model was first finished with a Tamiya 'rattle can' Silver before applying several very light coats of Vallejo Acrylic. I then used a fine sandpaper to create some of the wear that appeared on the airframe as a result of extended use and the climatic conditions experienced in South East Asia. I would have preferred a little more time to refine the final result but I was pleased with the experiment. I used the L Decal Studio decals and the pilot figure was the superb Aerobonus Soviet Pilot/KM-1 Ejection Seat combination. I hope you like it !6 points
-
Only a little bit... 😜 Thanks, guys! There's going to need to be a tire in there as well as these wires and pipework. You can see the fake "ducting" at the sides, directing air to cool the brake disks -- in theory. So I had to carve off a fair chunk of tire and wheel to get the spare in place. It needs to sit low enough for the front clam to go on with the top intake duct sitting down snugly into the cutouts in the side walls of the front compartment. In real life, I think the radiator on the Mk 1 was more upright, with the tyre lying flat on the floor of the compartment. Later, the requirement to carry the spare was dropped, and the front compartment completely reorganised with the radiator further back and an air box sitting in front feeding the brake cooling ducts. Just checking that the bodywork fits: Paint is Tamiya spray Light Metallic Blue, which I have on hand, and looks OK to me... best, M6 points
-
I put this in the Chopper build chat to explain the principles of VTOL, but given Rich’s above post seems entirely appropriate here too6 points
-
I may have this slightly wrong, but it's something like: Vatican City has the highest rate of pickpocketing per capita in the world, based on its resident population (the logic being that the only residents are 500-odd* cardinals, but the tourists are targets for pickpockets**) *when I say "odd" I don't mean strange ** who presumably are not cardinals at that would be sinful*** *** Cardinal Sin was Primate**** of the Phillippines from 1974 to 2003 **** but not in the sense of being an ape. Though he was, of course, in the sense that all hominids are. Though the majority of the other ape species don't have pockets. That's more a marsupial thing. [it's okay, everyone. we've given him his meds and tucked him away for the night]6 points
-
Since the top fuselage area needed modification, I decided to protect the cabin with a ceiling: The restroom is being prepared. The open passenger cabin door will provide some little visual access to it:6 points
-
Blessed be Sister Heather and praise be unto her for keeping me from the path of error. 😁 Many thanks G. We're getting there gradually... Those whom the gods would destroy.... Gator's Grip - but you raise an interesting point re: contaminants. On a number of occasions (including gluing said transparencies) Annie's sat on the stove near to where dough has been rising for breadmaking. Is it possible a few spores travelled? Seamus Blackley's been baking bread from Ancient Egyptian spores so the stuff is damned persistent: Check the number of legs is evergreen advice for the trouser novice. You're a grandfather for God's sake CC. You're meant to be sitting at the fireside ruminating how the Death Metal of today is not as good as the Heavy Metal of your youth. 🤘 He rides to the rescue! Thanks Johnny, I'll go with that! Exactement. This evocative old Anthony Philips album cover always made me think of the leaving of the sun: I'm going to join in the New Year I think and support their efforts. It definitely won't be the last visit! Quite so. I is having a poke Bill, but timorous-like. The gaff is so full of uprights and diagonals from the internal framing that it's really tight set of angles to navigate. Am going to leave for now and put aside a time later when patient and focussed, just to have another more determined attempt at: Dan and Jake must have gotten off of the pedal generator for a smoke break at the same time, plunging the townland into darkness.... Thanks for those kind words Steve. It's usually that 'difficult second album' but here a case of that 'difficult first Anson'... 😁 Guess who's thread I have bookmarked for study of said process eh what? Or else it turns out I'm just very yeasty... 🧖♂️ Fantastic Mr. P: that's what this forum's all about - a living Wikipedia of Making Miniature Mad Stuff! Now then. I've had occasion to warn you before about such inaccurate self-deprecation young man! (anyone who builds as you from scratch is a source of utmost admiration in my book.) Frames. Those bloody frames for the sliding winders has me driven to obsession point. First attempt on Sunday with plastic strip was but the crudest of embarrassments and hurriedly stripped off again. Plastic looked wrong and the shapes too 'blunt'. Back to the Bigsworth Drawing Board. Have been playing around with Fusion360 lately, trying to learn more in the way of CAD workflows and it occurred to me that as brass was going to be a likely route to frame satisfaction, why not use the etching tip in the Silhouette to draw out the required designs, as worked previously with the aileron hinges. Why not indeed? Top and bottom designs etched in and ready to trim out: Sizing of the parts is about 14mm long and about 1.5mm at widest. First pass with folding these once cut: The top sections worked out Ok using these designs but on closer inspection of reference photos I realized I needed to redo the lower frames in two parts like so: This was largely on account of the impossibility of trying to fold that smaller part through 90 degrees at its apex. Patented 'Altar of Satan' rig for holding that thin triangular part in place during soldering: Having tacked them into place as seen above, a heavy bead of solder was run along the inside of the seam to give the required thickness in that region and making redundant the need to use filler of some kind later. Fiddling around gluing individual top and bottom sections on in previous attempts had convinced me that for strength, these frames all needed to be one single strong structure to avoid falling off again during handling. More study of reference photographs and a simple method of soldering top and bottom together via the diagonal front frame (a region which is visually quite thick on the actual aircraft compared to other bits of framing as it receive the front of the sliding windows on either side) did the job in the end: Test fitting revealed that bar a little bit of filing and bending/squaring up of parts, this should give a decent representation: Bottom frame is a tad visually 'heavy' seen from the side - some light filing/sanding reducing it down by about 0.2mm in height should sort that later. From the rear: -and above though: The amount those sections stand proud of the airframe seem pretty much Ok in dimension and angle. As you can see in the above shot particularly, the nature of these frames is that they work as slightly angled sections allowing the side windows to slide backwards and forwards over the cockpit glazing and snick snugly into place against the front diagonal framing when fully closed. In other news - yesterday's melancholic tone was revived in the evening by generous application of mood-altering substances: Bœuf Bourguignon. Tony6 points
-
This model is the next addition to my RAF Ouston project, and this is not intended to be a full work-in-progress thread. Rather I'm hoping that some kind viewer can help me out with the markings. Please! Here is the progress so far; Devon C1 (1) w by Philip Pain, on Flickr I also bought the "Transport Wings" resin Dove & Devon Seats TWC72041 set, as Amodel does not include an interior for the cabin. This photo shows the completed interior, although the colour scheme and internal arrangement for an early RAF Devon C.1 is something of a mystery! Two words of warning; the seats seem somewhat over-size, leaving no room for an internal aisle. This does not matter too much, as it is the side view through the cabin windows that is important. But in this respect the seat are also too high, and if I did this again I would set the scratch built floor lower. Also "Transport Wings" include templates for the floor and rear bulkhead, but the floor template is too narrow, and the rear bulkhead far too small. Devon C1 (4) w by Philip Pain, on Flickr I chose matt dark blue floor covering, medium sea grey side walls, matt white interior roofing, and dark blue leather seats. The photo of the real aircraft (below) seems to show a 'club-style' front seating layout, and other references state that the RAF Devon was a 7-seater, with J-type dingy occupying seat eight up-front (?). Devon C1 (8) w by Philip Pain, on Flickr Another mystery is the 'white' cockpit roof on some Doves and Devons. Some have it, some not, and then I realised that it is an internal sun-blind that is pulled forward as required. But I could not find any detailed photos, particularly to show if it is one blind, or two seperate ones, each side. I opted for one large blind, which does not go right to the back, there is a gap. VP974, FTCCS, Blackbushe, 31 May 59, Robin A Walker photo by Philip Pain, on Flickr VP974, Odiham, Sept 1964, Mike Hines photo by Philip Pain, on Flickr And here are the two photos I have been able to find of my chosen subject, VP974 of 13 and 11 Groups, RAF Ouston, early 60's. I could not have selected a more difficult Devon scheme!! Highly polished metal, with the dark blue trim outlined in very thin white. Worse still, the fuselage serial VP974 is outlined in white. This serial is where I'm hoping that someone can help me? I don't have the equipment to design and print my own decal for this fuselage serial, nor does it seem worth getting it just for this small job. So if any kind soul would be willing to help, I'd be most grateful, and happy to pay any costs. Thank you.5 points
-
That's sad, reminds me of my last cat Harley. Died of kidney problems. Well put to sleep. I put him in the car to bring him to the vet. He dammed well knew. Very upsetting. Last week though I was in Zimbabwe north of Harare staying in my friend's brother's house. They have two Jack Russell's and two cats. One, Magical was a rescue cat. He is apparently quite aggressive but for some reason he took to me. When it was time for bed he'd claimed the bed. Dug his claws in. Everyone laughed at me but he moved out of the way with a little persuasion. We settled in but it wasn't to last. Suddenly two large buzzing flying beetles crashed into the room, bouncing off the walls falling to the floor. At one point both me and Magical were poking in a corner to try and catch one. Calm was restored and we settled down again. Then something thumped onto my bed. 'Now what? I thought. Turned out to be a large grasshopper/cricket/locust. I flicked it out the door and both Magical and the other cat went after it. We were a good team. I'd have taken Magical home if I could. A hard African Bush cat. My kind of cat.5 points
-
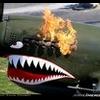
Mr Squid final got his eye last night and is now backlit using a single ice white LED bulb - here's the progress, and Squidie's new shaped body which I have not updated you on yet - he's had a change of colour to make him look a bit nastier. Perhaps a photo in the semi dark might do it a tad more justice as these had overhead lamps when being taken. Thanks for following on - the weekend was spent casting resin and plaster underwater scene rocks in preparation for the diorama5 points
-
Right well it is time to get my finger out and dust this one off and make sure I get it done this time over 4 years keep going to re-start but always end up doing other things so this is how she is doing not so good one of the small whalers is damaged from storage will have to find a replacement. getting this one read inbetween the Sovremenny while waiting for the base to set on that build and to try and clear some of the stuff I have building up on the shelf Luckily I had this handy storage box for the cranes and funnels will have to find some more for future builds I think And now have some good reference to work from beefy5 points
-
Morning folks,nearly there with the Skyraider just a matt coat to apply after a touch up here and there on the cowling number etc. The Tomcat and Viking are under the first coats of gray at the moment hope to finish the painting tonight.5 points
-
Hi to all Finally finished this one. For sure i will remember this build, fighting all the way with every detail, fitting issues, cleaning the almost every part, lot of alignment issues, ....in one word...lot of fun! At the end, i spent lot of time on masking as i did not want to make standard gray/gray scheme, i wonted something different......so...when i sow camouflaged version which honors František Peřina, Czech war hero who fought as RAF pilot in the 2nd world war flying on Spitfire Mk V....that was final. Colors HATAKA, very light weathering with artistic oils, added details in cockpit, and as i was not able to fix issues with canopy, i cut it in three parts and display opened. Also very interesting part was with decals, as i combined British and Czech ones, according to pictures. Only what was not able to finish in accurate manner is Czech serial 6066 which should be 6065. So at the end i am happy but will not repeat this adventure soon. Best regards to all....and pictures at the end, i hope you will like them5 points
-
To my mind, the most elegant of the Supermarine racers was the S.5 with it's amazing Napier Lion engine. The view to the front can't have been good. But what a beautiful plane. Nothing in 1/72 but a firm called MikroMir seem to be talking about making one. https://www.72news.eu/2018/05/mikromir-supermarine-s5.html5 points
-
Thanks Jaime. Thankfully, Trumpeter have done the work for me. All I need to do is to remember not to paint over it! I'm sure it's only a matter of time! I've always been suspicious about the Spitfire's parentage. It looks nothing like its parents Cheers Cliff5 points
-
Now that this GB has concluded, I just thought I'd send one final round of thanks to each and everyone of you for your participation within this GB. The aim was was to celebrate something in model form that traces a link to the year of our birth and I'm happy to say I'm very impressed by the subjects chosen and the excellent and diverse collection of models on display. Now that December is fast approaching, we will soon be celebrating Christmas with our friends and loving family. I'm guessing I'm not the only one that still gets excited by unwrapping boxes of rattling plastic bits, so hopefully that kit you've always wanted and hinted about will finally be delivered. There's every chance I'll bump into some of you during the various 2020 BM GB's, so until then, take care, be happy and do as much plastic model bashing as you can get away with! Cheers and regards.. Dave5 points
-
I witnessed a Mass in St Mark's, Venice a few years ago. The priest was preaching to his flock, and kept his throat well lubricated with red wine throughout. In fact he got through so much, that his two assistants, (I hesitate to call them altar boys as they were young men,) actually stood either side of him to support him, and stop him falling over. This guy had to be Eighty if a day, or the wine had seriously taken it's toll. By the time he finished, he was sozzled, and his carers had to virtually carry him away. We were cracking up by then! He must have downed at least 2 litres while we were watching, and we missed the start.5 points
-
Although we've sold all the first lot we bought in, I haven't seen anyone use this stuff yet. Here's the YX Model 3D printed studded chain anchor cable. I didn't think I could be so impressed with a model chain 😳5 points
-
Hi all, herewith my latest assault on Mount Stash - another subject, hopefully unusual enough to ensure my paltry efforts will not be further magnified by comparison with other threads! A recent visit to my LMS yielded what for me looked a decent bargain - £5 for an admittedly old and battered boxing of this Lindberg kit: From what I could see, the only thing missing was the stand, which would never have featured in my plans for the thing anyway. So, what could possibly go wrong! Well, there's this I guess: I think I will need to prime this thoroughly, if only to suppress the nausea from working with such a hideous colour plastic! That said, there isn't a massive amount of flash, and the moulding seems crisp enough if not overly burdened with detail. For the rest of it, the instructions seem clear enough, if apparently written on parchment (I was expecting the text to be in Latin, with the first letter massive and ornate, and covered with gold leaf): Decals are predictably not in the best shape, given their evident age: No matter, I have already procured some potential alternatives courtesy of the Big H: Also in my corner, I have a potentially useful ally: An old publication which is nevertheless quite detailed with various photos. So with that, it is entirely appropriate that I say: "Tally Ho, Yellow!" Work to commence real soon, so stay tuned!4 points


.thumb.png.03cf829e3ab23b3f04fe2590dd61bc3c.png)


This leaderboard is set to London/GMT+01:00