
Leaderboard


Popular Content
Showing content with the highest reputation on 12/11/19 in all areas
-
Seems like a dog's age since I actually finished anything. Between work, and consolidating everything into my new ManCave modelling has been in short supply. TBH - another son moved out and this time I got the space- no yoga studio/hippie retreat in this room🤨 The cold weather finally hit North Texas this weekend, and I used it as an excuse to sit at the bench for a few hours. Not as much room as I had before, but everything is indoors, AND in one place. Plus, I don't have to worry about much larger, heavier parts from a Big Block Ford (another expensive hobby) damaging anything. Gratuitous ManCave shot(s) - still not finished, but at least I can work on the important stuff - models! On to the model... I built this OOB. No, really. I actually built this exclusively from the parts in the Airfix box, and nothing else. I tried to keep the weathering subtle. And used only kit decals! I thought it would be a Mojo booster to knock something out in a week(ish) without obsessing. Each kit I build, I try to use a new technique/product. I used Green Stuff World' airbrush masking putty. The results were mixed. The putty absolutely does not leave any residue or marks on the previous paint. It can be re-used immediately and doesn't seem to retain paint/solvents in the putty. However, I found that it continues to settle as it sits, and the demarcation lines are not much softer than masking tape. This might make it ideal for smaller kits (1/72 and very small 1/48), but I didn't see a lot of benefits in 1/48, especially on a kit this size. She's definitely a tail sitter. And HEAVY!!! And I had a bit of a "love/hate" relationship with the build. Loved the fit - kit goes together smoothly, and presented "zero" build issues. Other than the intake areas, there is no filler on the kit. Hated the end-result - it just feels 'toylike'- very basic without a lot of detail. I tried to make it look realistic, but not sure I succeeded. I have already started planning for improvements when I build the (R)B-57. Hope you like it. Comments are always welcome. Best, Mark26 points
-
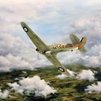
Hi Folks, I started this back in March as a Britmodeller newbie and having been completely distracted by the FROG Group Build, I've finally finished it. Spitfire PR Mk.XIX RM643/Z based at RAF Benson, the home of British WW2 photographic reconnaissance. A few bits of info about the kit and the AM parts used in the build; 1/72 Airfix Spitfire PRXIX Rob Taurus replacement canopy Pavla resin cockpit Aires Quickboost spinner/prop blades and exhaust Barracuda door and crowbar Xtracolor PRU Blue gloss enamel paint, airbrushed on Xtradecal transfers set Barracuda stencils Winsor & Newton matt acrylic varnish to finish The kit has come in for a fair amount of criticism over the years, but I think Airfix captured the lines of one of the best looking Spits fairly well. Obvious errors that I think are noticeable are the fairings over the Griffon engines rocker covers are too narrow, this is especially noticeable when the model sits on the shelf next to my old Fujimi Mk.XIV and the u/c legs that are too raked too far forward. There are other accuracy niggles, but I overall enjoyed the build and think it looks OK. Hope you like it. For those who want more, the build thread is here; Thanks for looking.21 points
-
Hallo again Now I finished my Stahltaube from WNW. Actually it was not an easy kit. My first small fault was a front bulkhead, which was misaligned. Here I had to do some restoration work at the front part of the fuselage. Well, after this my next challenge was the filling process. I usually worked with Surfacer. Here, it did not work at all. So I went on with super glue, as my husband told me to try. This worked perfect. So, after all this, the paint job was next. Here I was in the wonderful situation, to have close examined a replica of the Etrich Taube, some years ago. So I could adapt some ideas for coloring the wings. Well, after a long nerving battle, the Taube I finished yesterday. Happy modelling19 points
-
A very enjoyable build. Excellent fit of parts except for intake nozzles,but that could have been my fault. Attention to detail is superb,especially on the undercarriage bays. Cockpit can be made to look busy with a bit of work. The intake/exhaust innards are quite complex but not a lot can be seen in the finished model. I struggled a little with the decals because they were very thin. I find that a fine line between too thick and too thin is sometimes difficult to achieve. A lot of fine masking is required to get the silver leading edge on the wings and horizontal tail but it's well worth the effort. All in all,well done Airfix. Will post more pictures if required.15 points
-
I bought this resin model from Ebay some years ago, it's an aeroplane that has interested me for sometime a 1930s design that lived on till the end of WW2. These aircraft used by the Luftwaffe for night harassment on the Eastern Front make a change from all the usual 109s and 190s I have built. Onto the kit all the basics are there in resin plus white metal undercarriage legs, injection moulded wing struts, vac formed windscreens and decal sheet. Unfortunately I should have checked the contents of the kit a little more carefully when I received it as some of the smaller detail parts were missing ( good old Ebay!!!!). I managed to get some reasonable idea of the layout of the cockpits from trawling the net. Incidentally it seems the French have an example of this aircraft preserved, it originally was liberated by the French Resistance! The kit detail in cockpits was basic 2 floors, 2 seats, crude instrument panels, two radio sets, moulded interior framework (removed) and a missing control column! I added as much detail as would be seen, the cockpit openings are not that large. Fuselage was glued together and sanded down. The wing was supplied in left and right halves which I joined using small metal tubes to add strength, the weight of the assembled wing meant that the interplane struts supplied in resin were not going to support it, they would have been better supplied in white metal. My solution for this was to fabricate struts in metal using some brass Strutz streamlined wire I've had for many years, this was quite a reasonable solution I'm pleased to say. The joining of wing to fuselage still caused me a lot of frustration and cussing but eventually came together quite well. I painted the wing and fuselage seperately also applying the decals before joining them together. I fabricated the exhausts using 2mm soldering wire as the exhausts supplied were not suitable for a night harassment aircraft. A note about the colour scheme and decals these came from an OWL decal sheet I bought after buying the kit, they were quite thick and a couple of the items broke apart when applying them however I managed to get them on successfully in the end! The aircraft is He46c of NSGr.1, Idriza airfield, Eastern Front early 1944. Not one of my best builds but I highly doubt we'll see an injection moulded kit of this aircraft, watch the Czech kit producers prove me wrong 😁. It would be great to see some of these neglected second line aircraft in kit form (1/48 of course). Thanks for looking Cheers Andy13 points
-
13 points
-
Hi all here is one of my recent work completed : a mirage IIIE 3-IO N°547 based at Nancy Ochey during the eighties : EC 1/3 Navarre. equipped with anti radar missile AS37 and counter measures pods PHIMAT and BARAX. happy to hear your advices. olivier12 points
-
Hi, everyone! It's my next model from excellent Eduard's "profipack" model with additional etched set, resin engine hood, chassis, exhaust and metal barrels.12 points
-
Agreed; reading this you might be surprised or perhaps even puzzled at how the normal reserve of the British seems to evaporate on exposure to our American visitors, but the fact is that Edward, Cookie and Navy Bird Bill are just so bloody nice that you instinctively want the best for them and for them to experience the best of us. It it was a great pleasure for me to meet all of them and I know Jamie was of the same opinion, they are three thoroughly good blokes and kudos to Ced for his hospitality and logistical skills, without which this whole trip would quite possibly have not taken place at all. Even if his trunk is a bit, er, small (could just be the cold weather you know... ) Cheers, Stew12 points
-
Intriguing... Sorry for the radio silence, folks, Telford was a bit overwhelming, and the pace of things since has been such that I haven't had much time to update. I think it's safe to say I've done more social drinking in the last week or so than at any other time in my entire life. I neglected to mention that Gorby also very kindly added to my considerable baggage load on the way home with some books, which was most generous of him. Anyway, where was I? Ah yes. When I left off, we'd just finished meeting up with the Sovereign Hobbies guys, who happen to both produce my favourite paints and also are two of my favourite people, though we'd never met in person until Friday night. Stew I've known through Britmodeller for years now, and I was excited to finally meet him after missing out in 2015, and Jamie has been nothing but helpful with his advice on how to use his paints, and I was delighted to find they're as pleasant in person as they are online. (Jamie is, however, a decisive man of action, and one of the rare Britmodellers to look like an action movie star -- though AdrianMF, who I met at Telford, looks like one of those handsome tanned industrialists who reveal to a badly injured James Bond that they've spent the last ten years in the Orient learning how to make their hands as hard as steel while they hunt 007 through their labyrinthine mansion -- and Cookie and I had an amusing few minutes imagining him rigging a 1/350 ship with the same speed and decisiveness with which he does everything else.) Thus plied with a fairly substantial amount of Glenfiddich, I retired to bed and awoke without a hangover (my one superpower, whiskey doesn't give me hangovers) at 5:30 AM the next morning to get ready, as if anyone can truly be ready for Telford. We all met for breakfast, and then I went with the Sovereign guys to help carry some stuff to the show, which meant I got to ride in a Jaguar (cool!) and watch the huge line begin to spiral out of the stately bulk of the TIC. I also ran into Rob85 as we went down to the line, who was the first of a few people to recognize me unprompted that day. We linked back up with Ced and Bill and Cookie in line (they ended up a few people ahead of us), and as we entered the show itself, I ran into a miasma of truly intense body odour from someone passing near by emitting a human chemtrail, a smell so intense I can only describe it as being not unlike having a #11 blade jammed forcefully up your nostril but stopping just short of the brain. Inside was...beyond description. The largest model show I've ever been to had perhaps 200 people in a single gymnasium. Telford felt almost the size of the Mecca of Dungeons and Dragons, Gen Con, which boasts 70,000 attendees (though, having been to both, GenCon smells far, far worse), though of course I realize it's only about 10,000 people. That still feels like a lot! JD and I opted to split off from everyone else and make our rounds, and one of the first things I learned is that when prepping for Telford, don't pre-order anything from Hannants, as you commit yourself to lugging it around for the rest of the show. I felt much less remorse about reserving stuff from Blackbird and Freightdog, and finally managed to get some resin sponsons for my Revell Sea King AEW.7 from Whirlybird Models. I also, in my folly, got the first three volumes of Arab MiGs for a tenner, and boy were they heavy. At this point, between my Hannants show order and what I'd picked up, I had to sharply arrest my buying as it was both heavy and we were rapidly approaching the limits of what could comfortably contained in Ced's car. (When he said that the T-Roc had "best in class storage space", I asked if the class was "cars with very small trunks", and he told me they only make trunks as big as their mouths here.) My haul: Two or three people recognized me from my posts here, and came up and said hi, and allow me to apologize to you now for how disappointing it must have been to meet me in person. Fortunately, I have a secret weapon: JD. Cookie is nicer, friendlier, more enthusiastic, and a better modeller I am, and he did some great ex officio diplomacy for the USA, which needs all the help it can get right now. I actually found I got fairly tired pretty quickly, as a side effect, no doubt, of stupidly picking up my Hannants order right off the bat and having to lug it around everywhere. Not entirely sure what I was thinking. I didn't take any photos of the models because I was terrified of dropping my phone (which has a bulky battery pack case) on something and turning it into a mere collection of atoms. I met a bunch of you at the IPMS Birmingham stand around 1300, and it was a great pleasure to put so many names to faces. Due to the bags policy, I remained on the ground floor with the baggage, while Navy Bird and Cookenbacher went up to look at the contest winners, and found that the spot I'd chosen to sit in was directly in the path of the immense cloud of toxic fumes being put out by the smokers just outside the TIC, huddled grimly about the open exterior door of the building as rain poured down. Unfortunately, the standard of the winning builds was good, and the boys took a long time to examine them, leaving me feeling quite queasy by the time they returned. Mistakes were made: More later!12 points
-
Evening all. Here is my Airfix A-4b in 1/72. I used decals from Xtradecal x72151 representing a Skyhawk from VA-106 Gladiators. This one has been 90% finished for months so I’m pleased to finally get it done. This is my first Skyhawk and I’ve got several Fujimi A-4s in the stash. The Fujimi ones look nicer in the box but I’ll see when I get round to building one. Cheers Allan11 points
-
So this was my other project to get me back into modelling after a short break. I purchased this one from Aldi last Christmas but it came with the wrong decals, I did contact Airfix and to be fair they did send out the correct decals. This is my tribute to the Tuskegee airmen ( I love that film), I don't know whether this is a re-tool but as with my previous Mustang it went together like a dream. I had two problems with both builds, having completed both builds I gave both models a couple of coats of Pledge multi surface polish and then airbrushed Tamiya Matt to the Spitfire and Semi Gloss to the Mustang and both models had what I can only call a white bloom all over them, having sorted out that problem I then varnished using Galeria and had no problems, I will never use the Tamiya varnish again! The other problems I encountered was with the canopies, normally I use PVA but this time I used Tamaya thin and it wicked upwards, that's a mistake I won't make again. Anyway, here it is, as usual all comments and critisisms are welcome. Thanks for looking.11 points
-
Hi, everyone! This is my next model, which I did in parallel with Spitfire Mk.XVI. Here I used the metal exhaust pipes from the Ukrainian "RexX" and photo-etched parts from the Czech "Brengun".11 points
-
Hasegawa 1/72 F-14A and techmod decal http:// http:// http://10 points
-
Dear fellow Britmodellers, here's my 1/72 Tamiya P-47D Razorback, built from the box, with decals from Xtradecal. The model represents "R3-G" of 410th Fighter Squadron, 373rd Fighter Group, based at St. James, France, in August 1944. The model was painted with various shades of Alclad II lacquers and Gunze acrylics. All photographs by Wolfgang Rabel. Thank you for your interest, best greetings from Vienna!10 points
-
Have not posted for a while due to health problems, so here is my latest, Zveda 1/144 Troop Carrier Ekranoplan A-90, hope you approve10 points
-
Hi Folks, its been a long time since I've posted any builds. That's all down to the fact that we have recently moved house, most sensible people at our age downsize but we broke with convention and went big, very big! But's that's another story. Anyway after setting up my new man cave and every thing else to do with a new house it was time to get back into modelling, I thought I would start simple with a Spitfire and a Mustang. First the Spitfire, I had picked this one up for a tenner from Hobbycraft, and was really disappointed. Raised panel lines and only 34 peices (well what did I expect at that price). Lots of flash, but to be fair not a bad fit when that was taken care of but the cockpit canopy was a terrible fit. It was at this stage I thought I would experiment, I've always fancied having a go at Invasion Stripes so this was going to become more of a paint mule. So here it is completed, apologies to the purists amongst you, I'm fairly certain that no Mk2's made it to D-Day although if you Google Mk2 Spitfire with Invasion Stripes you do see a Spitfire with these code letters having Invasion Stripes slapped on, I know there's a lot of things wrong with it but as usual welcome comments and critisisms. As I said a totally fictitious aircraft, this is another one that will be donated to an elderly aunt who was associated with the Spitfire factory in Birmingham during the war. Fortunately she likes Spitfires in any colour or size. Thanks for looking.10 points
-
Right,.... onto the kit! The box art; The contents; As many will know,.... the entire nose is glazed on this kit, unlike Academy`s other B-24 variants. I shall be using DK Decals again; Construction started with the fuselage halves,...... additional seat covers were added to the cockpit using masking tape to cover a mould mark and the spares box was used to go to town in the waist gun area which looks very bare,.... especially against the bare metal silver interior colour! A bit blurry sorry,..... the light today was terrible! And the wings and tail constructed and ready too; Cheers for now, Tony10 points
-
Stackton Tressel was very well received at Telford and an incredible number of people took photos of it. families particularly found things to interest them (such as the rabbits near the hedges). At one point we had close on 20 aircraft "fly in" and park up for a while, including a few anachronisms such as a beautifully made Morane Rally, a Howard Ike and a DH.4R. Thanks to Kiwi Chappers, and Lazy 8. Both of this parish (forum). Much support was given by Alan Simpson of Glasgow and Gordon Short of darkest Perth shire who besides minding the shop at times also provided a good number of suitable subjects for the fly in. Everything made it back safely with the exception of the Rapide which had a crash landing and will be permanently in the hangar for some time. John The subtleties of the grass are much better in real life than on photos and the Gipsy engine recording on my laptop just vanished in the general hubbub of the packed halls. The steam roller is for the mole hills. All the panels Hinge in the middle and underneath they have special Brackets which clip onto a tubular Tressel.10 points
-
Hiya Folks, The later Liberator`s had larger windows in the navigators station along with larger bomb aimer`s windowsM enclosed, glazed waist gun positions and later style simplified bulged cockpit side windows, plus some had a light weight rear turret and the only kit available is the Academy B-24M which is as rare as ricking horse manure,....... so I`ve been looking for some for some time. One of the aircraft I want to replicate is Glamour Girl of 356 Sqn in India in 1945. Unlike earlier Mk.VIII`s to arrive,.... which had SEAC style roundels applied, this aircraft along with other later arrivals retained its standard RAF markings, but still had the squadron ID markings applied to the rudders, plus nose art, making it a `different' looking subject. Here is the real thing; EDIT,......Just realised that Glamour Girl has earlier style waist windows with opening panels and not the later squared off all glazed units,....good job I have not joined the fuselage halves yet!! Also note the silver X on the fin, which was also white or light blue on camouflaged aircraft. And some similar aircraft, wearing standard RAF markings; And more Mk.VIII`s, but wearing SEAC markings, they were used for bombing raids as far as Malaya and French Indo China, but were often used to drop supplies to agents and later still to POW camps; This aircraft KL654-R-Robert was found crashed in the jungle quite recently? Here is the some of the wreckage,.....RIP; Post-war shot of 160 Sqn KN777 BS-A And last of all,.....the ex 99 Sqn Liberator Mk.VIII donated to the RAF Museum by the Indian Air Force; Another update soon!9 points
-
Hello everyone... Here is the latest build in my quest to build 10 of Josef “Pip’s” Priller’s aircraft. This is an Eduard Fw-190A5 weekend kit with decals from my spares. The drop tank and rack are from spares. The A5 he flew had an early light rack instead of the later Factory rack. Other than that its strictly out of box. And a few with all of my “Pip’s” builds to date. Im not sure which of his planes will be built next. It may be a Fw.190D9 or it maybe something else ? So if you're interested check the link for updates. Here is a link to the build thread. Questions, comments, and or thoughts ? Dennis9 points
-
nothing amazing, but as a 4th car build im happy with it..8 points
-
Hello Britmodellers, this is my newest build this year. Platz Fuji T-1B changed to A-Version number 825, 13. FTW 1993 with actress Maiko Kikuchi taxiing in the wind after PR foto flight for JASDF looking for the camera. I found this in 1993 8 Koku Fan magazine. This girl liked loopings! Cheers, Tom8 points
-
The last four models from Avis' kits -to whom I have no relation whatsoever (other than being a happy customer for their recent civil releases)8 points
-
Here's mine, an Alouette III of the Helicopter Flight, Irish Air Corps, June 1968 and just a month before my noisy arrival. This a/c 195 was the first to be accepted into service and served for more than 40 years in Air Ambulance, SAR and transport roles. Build thread is here but to recap: Kit: Heller 1/72 Alouette III "Securite Civile" boxing Build: Out of box with tape for belts and teabag (!) for engine mesh. Paints: Revell Acrylics with an airbrush, Klear, small panel wash Decals: Max Decals for Irish Air Corps courtesy of @rs2man Heller Alouette III IAC_Done (8) by Dermot Moriarty, on Flickr Heller Alouette III IAC_Done (10) by Dermot Moriarty, on Flickr Heller Alouette III IAC_Done (17) by Dermot Moriarty, on Flickr Heller Alouette III IAC_Done (22) by Dermot Moriarty, on Flickr Heller Alouette III IAC_Done (13) by Dermot Moriarty, on Flickr Thanks to @Rabbit Leader and @Sabre_days for a great GB and here's to the next one. Happy modelling. Dermot8 points
-
Where am I? What day is it? So many things seen and most remembered... Cosford on Sunday and again yesterday morning for the Conservation Centre: That’s CC and son on the left. It was incredibly poignant to stand for the two minutes silence next to the Hampden, still with its bullet holes They also have another Hunter ready for attention. Is that bags of filler I wonder? (It’s not, it’s salt) Then it was a frantic dash to Duxford where I’d arranged a set of stairs in the hope that we’d get some photos of the Javelin rear cockpit. Not too successful as it turned out - cloudy canopy. Still, Bill got lots of shots for his upcoming build: While PC and Cookie had a ‘tour’ of the Lancaster: I’m sure PC will fill in the details. Pleasant evening in The Eagle looking at all the graffiti in the RAF bar: Back to Duxford today for a proper look around.8 points
-
Hi all and a little egg-beater from Heller just finished for the 'In The Year I Was Born" GB here on Britmodeller. This a/c 195 (along with 196) were the first helicopters to enter service with the Helicopter Flight of the Irish Air Corps on November 25th, 1963 and operated in the SAR, Air Ambulance, army co-op and emergency relief roles until 2007. It's a credit to the crews and maintenance teams that 6 of the 7 machines still in service in 2007 were airworthy on their last day of ops, 44 years on. 195 is finished as she looked in June 1968, a month before my quiet arrival into the world 👶 The canopy and rotor fit weren't great and some of the finer parts are a little big but did my best with them. The build thread (and some classic 60's home-move footage of 195 in action that Summer) is here but to recap: Kit: Heller 1/72 Alouette III 'Securite Civile' boxing Build: OOB except for tape for belts and tea-bag mesh for the engine. Paints: Revell Acrylics with an airbrush; Klear; panel line wash. Decals: Max Decals donated by @rs2man Heller Alouette III IAC_Done (15) by Dermot Moriarty, on Flickr Heller Alouette III IAC_Done (22) by Dermot Moriarty, on Flickr Heller Alouette III IAC_Done (21) by Dermot Moriarty, on Flickr Heller Alouette III IAC_Done (10) by Dermot Moriarty, on Flickr Heller Alouette III IAC_Done (17) by Dermot Moriarty, on Flickr Heller Alouette III IAC_Done (13) by Dermot Moriarty, on Flickr Thanks for looking and happy modelling. Cheers, Dermot7 points
-
Latest build finished. Cracking kit with no major problems, apart from getting the nose section to meet up with the fuselage ...a little tricky. Paints are a mixture of Vallejo and Tamiya and aftermarket decals from Xtradecal and the kit. I made a mistake in fitting the underwing night fighter aerial but it's too late to remove now so it will have to say put. Experimented with using a coastal kits background base set but unfortunately the 1/72nd scale one seems a bit too small for medium to large aircraft! 🤔 Photos not the best as they're only off my phone. Thanks for looking 🙂7 points
-
Hi all, This is the New Zealand-exclusive Flying Kiwis rebox of the Italeri A-4E/F kit, which came with low-viz markings decals as work by our Skyhawks from the mid-1990s until retirement, with some surgery and extra bits by me to replicate 05 as she was on the day of the Air Combat Force disbandment, December 13 2001. I've seen photos and heard stories of her display at Sqn Ldr Jason "Easty" Easthope's hands that day so I thought it'd be the best subject. I'd already been saving reference material for a while when a friend and fellow member of the WONZ forum asked if I'd like this kit as he wasn't going to do anything with it. Flying Kiwis 1:72 A-4K Skyhawk NZ6205 as on 13/12/01 by Zac Yates, on Flickr Flying Kiwis 1:72 A-4K Skyhawk NZ6205 as on 13/12/01 by Zac Yates, on Flickr Flying Kiwis 1:72 A-4K Skyhawk NZ6205 as on 13/12/01 by Zac Yates, on Flickr Flying Kiwis 1:72 A-4K Skyhawk NZ6205 as on 13/12/01 by Zac Yates, on Flickr Flying Kiwis 1:72 A-4K Skyhawk NZ6205 as on 13/12/01 by Zac Yates, on Flickr Flying Kiwis 1:72 A-4K Skyhawk NZ6205 as on 13/12/01 by Zac Yates, on Flickr Phil Treweek's Kiwi Aircraft Images website and the book Skyhawks by Don Simms and Nick Lee-Frampton were invaluable references for this build.7 points
-
I'm going to call this one done. I chickened out of adding any weathering, I'll need a bit of research and practice before I risk messing up the finish! I'll post some more pics in an RFI, which being a Britmodeller novice* I guess is what happens next. (*Not counting the FROG GB which occupied most of the summer!) Thanks everybody for your great support and encouragement! Cheers,7 points
-
Vac Day... Halves split without too many tears, 40thou/1mm spacers added to allow air under: New hole, same size as the vac nozzle now! The halves are blutacked to the board and the cockpit roughly filled. The glue should have done its job, but a bit of packing tape to seal the box edges: Note the vent holes behind the steps and in the concave curves. Plastic card secured to frame with staples and heat resistant aluminium tape: Two minutes under the grill, vac on and KABOOM! Removed from the mould: Some mould damage: Stuck to the plastic: Main problem is that it didn’t get down to the corner over the flat top (but it’s a flat top so fixable): Time to test fit: I don’t know what to think yet: * mould damage * somewhat wavy surface * failure to get the top corner (put at an angle next time?) * maybe make a tougher plaster mould from this one But it looks more like an Empire than a blob of melted plastic. Thanks for looking, Adrian7 points
-
Pah! PC is, as those that have met him will testify, one of the most erudite, intelligent and enthusiastic people I’ve met, so there... Even if he thinks my car has a small ‘trunk’... I’m having a whale of a time - the guys are a pleasure to be with - and I’m starting to feel a bit sad that the tour is nearly over. Better make the best of Duxford and Yeovilton...7 points
-
Mitsubishi F-1 3rd Squadron " KABUTO Samurai" 1/48 Hasegawa kit and decals ASM-1 Hasegawa Japanese weapons set Reskit nozzles & wheels Beaver Cooperation PE interior FineMolds Pitot done within the fantastic 80s Frontline Asia GB (public voting is on by the way!, everybody (@BM) is entitled to cast their vote !!) WIP here thanks for passing by and leaving a message! Cheers, Werner6 points
-
I saw this in today's Guardian, it may interest others here; https://www.theguardian.com/uk-news/2019/nov/12/ww2-wreck-of-fighter-plane-off-welsh-coast-gets-protected-status6 points
-
Here is my Revell 1:72 Northrop F-89D-40 Scorpion which I completed back in 2003. It represents 52-1894, “FV-894”, of the 75th Fighter Interceptor Sqn, 23rd F I Wing, USAF based at Presque Isle AFB, Maine, in 1958. I built it OOB. If I recall correctly, the metal finish was by a Tamiya spray can and the red areas were airbrushed. Metallic paints were dry-brushed on various panels to give different shades. The rest was painted by brush. As always, thanks for looking and all comments welcome Miguel6 points
-
ITALERI 1/32 F-104G STARFIGHTER The front cockpit sent by @mirageiv hasn't arrived yet - and I figured it will take a while longer because today the Finnish Postal service went on strike. I couldn't resist starting to paint the airframe - I glued the front canopy with PVA glue so it will be easy enough to swap out at a later stage. I went with grey undercoat and highlighted the panel lines with NATO black. Yeah. I know - not my tidiest work. I'm quite the beginner when it comes to airbrushing I learned this technique watching YouTube videos (what else... 🙄 ) and tried it only once before in my Eduard 1/72 DDR Mig-21MF. And I think it worked nicely so here we go. Not really a problem that it's not tidy - it will be sorted out when you start painting the base colour. If something, it might be even benefical being not TOO uniformal so you get bit more varied effect going on. First layer painted on the forward fuselage with Vallejo USAAF Light Grey. The black shines too much still but it will be toned down with the second layer where we smoothen things out. Second layer painted on. I think it works ok, or what do you think? Creates a little variance in the large mono colour surfaces. Top surface, first layers on all three colours. I was really struggling at getting decent demarcation line working but I got there in the end. By no means perfect, but good enough, considering the scale I suppose. Need more practice. I went with the colours that Vallejo suggests for SEA colour scheme - but looking at the photos, the lighter green seems like a different tone in the Belgian machines. So at the second layer I added some white & Green Zinc Chromate to the mix to get a slightly different tone. I tried tidying up the colour line between the top & bottom - but it didn't go well I couldn't get it tidy enough line and always made a small mistake - and the line kept creeping up and up. I needed to mask it in order to get a decent line. For masking I used this kind of stuff - don't know the english name but you can use it to stick posters onto walls and whatnot. Picked this up at my local grocery store for under 2€. Word of caution though - it can be bit greasy so test it before sticking it onto your paint. It did work great for me, it was on only for couple hours and didn't leave any grease stains. Ready and masked. Here you can see how high my colour line had went while trying to fix it Anyway, idea of the sticky stuff instead of tape is that if you spray at 90 degrees angle you should get really nice slightly blended but still tidy demarcation line - instead of hard cut line. Let's see... Yay - much better! Here you can also see the slightly altered Vallejo Air US Dark Green to get little bit more closer to Belgian colours. I'm just going by feeling here, and looking at the photos - so my take on the colour might be miles off - just to warn you Masking some of the panels to finish off the exterior painting. This is where we stand now - getting close to apply some clear varnish and start decaling! Here are the colours I used for the exterior. Like I mentioned earlier, I slightly adjusted the US Dark Green (which actually - in this case - is LIGHTER of the greens). Sidewinder for the wingtips. Belgians sometimes painted the Aim-9 body green to better blend it with the plane's camouflage. I thought it was perfect as I really dislike painting white Like always - comments & constructive criticism welcomed!6 points
-
Giorgio: you look like you should star in your own detective series on Netflix.6 points
-
Here is my version of the Airfix 1/72 scale McDonnell Banshee aka Banjo, the improved F2H-2 version of which entered service in the year of my birth 1949. Having made the alternative photo recce version when the kit came out, this time I have modelled the normal fighter version in the markings of VF121, the Blue Bolts, as it might have looked when they deployed to Korea a couple of years later. The lighting could have been better but when the sun does finally come out it is low down and rather orange in tone so I took the pics in part shade. Could have been a bit glossier but the varnish was acting up. A nice easy build which brings back a few memories.6 points
-
GasPatch Models is to release a new tool 1/48th Messerschmitt Me.163 Komet kit - ref. 48236 Source: http://master194.com/forum/viewtopic.php?f=3&t=110151 Source: https://www.flickr.com/photos/80229502@N07/49051009031/in/album-72157711742696723/ V.P.5 points
-
Hello all, I have been wondering whether I should add a third build or not, unfortunately when the subject kit arrived I couldn't help myself and immediately started fettling, and dry fitting, and generally thinking about how I would do it and the next thing I know.... BANG! like a low yield nuclear missile I've gone and started on the cockpit. Anyway here I am with Bandai's 1/48ish S.H.A.D.O Interceptor, from Gerry Anderson's UFO...as if you didn't know. The Cockpit base and rear panel replacing the joke like kit effort being detailed. The pilot is an ex RAF (Airfix sqn.) harrier pilot who is living the service moto to the full, however he just can't be without his home comforts so has brought his comfy Harrier seat with him. He successfully completed the strenuous S.H.A.D.O selection process whilst his kite was in transit from the factory in Japan. I know with my current poor start/finish ratio, embarking on another build is not ideal but I've been wanting to do one of these for ages. Additionally I am eagerly awaiting the arrival of the DVD of the series (this is for research purposes only and has nothing at all to do with Gabrielle Drake in a silver catsuit!!) More later, Mark.5 points
-
Another flying boat finished in the Flying Boats and Floatplanes II group build. This is the Anigrand 1/144 Beriev A-40 Mermaid. Another enjoyable build. I'm now moving on to the Eastern Express Beriev Be-200 - build thread for both of these is here. Thanks for looking Julian5 points
-
Thanks to @rob Lyttle, @Courageous, @Biggu and @Adam Poultney for your comments Progress has been a bit thin on the ground in the past month - a combination of domestic things and a receding mojo I suppose. I've resurrected the latter to some extent by doing a small vignette (thread link in my sig below), but I have at least started to get things together. I sprayed the wings with the fluorescent red/orange mix used earlier: Whilst the wings came out fairly well, there was - predictably - a lot of bleeding on the fuselage band. Fortunately, the overflow, once dry, was fairly easy to remove with a sharp scalpel blade - it looks a bit ragged at the moment but hopefully I can paint a straighter line by hand. So, wings and things all attached: A bit of filling needed, then I can finish the foiling. Thanks for watching5 points
-
A little more progress on the Interceptor cockpit: A load more greeblies added to the rear bulkhead, including an X-wing like targeting computer "stay on target!". Its nothing like the 'real' thing but busier than the kit effort. components sourced from all corners of the spares box Pilot, seat and control column test fit, the ex RAF pilot insisted on having a drinks holder installed for his flask of tea whilst on extended deep space anti-UFO sorties. The front console made from some thin plastic card and Milliput and more greeblies added. ....and a test fit of the whole lot. Good fun using a bit of imagination now and again. Cheers, Mark.5 points
-
I finally had a morning free from other jobs and some decent weather warm enough for spraying outside! My first task was to finish making the spray booth. It is built up from 4 sections of MDF which slot together - that way, I can easily dismantle it for storage when not in use. The base and one side: And the whole booth, with spinning fans!: It slots together in seconds and effectively extracts any fumes through the shed window and into the garden. I'm very pleased with it - as long as it's warm enough, I can paint! Airbrushing is a new skill for me and I’ve been practicing on an old 1:32 Venom I had sitting around: Lots to learn still, but I’m enjoying getting to grips with it! The Vulcan will be the first kit I have airbrushed in anger, so is very much a work in progress. This is the box artwork, which shows XH562, the version I intend to paint: I had the model primed and pre-shaded on the underside about a month ago. However, after carelessly dropping it, I had to re-attach the wing and blend it back into the fuselage. This was the state of play this morning - I have masked the bomb aimer’s window with a blob of Vallejo liquid mask. I’m planning to use this later on the camouflaged upper surfaces too, to ensure a distinct line between the two colours. I'm assuming it can be accurately brushed into the required curves without running…? Time will tell! I may have been too heavy with the pre-shading, but that can be remedied with more of the final colour. In particular, I want to replicate a ‘dirty’ Vulcan - I have sprayed heavily around the engines, wheel bays, bomb bay and hydraulic control units. I have also given the whole wing a general spray, picking out some of the raised detail in the process. Ironically XH562 looks fairly clean compared with other Vulcans in all the photos I have found online. I also discovered that I need some sort of guard over the fans, after sticking a wingtip into one - fortunately without causing any damage! That’s all for now. I will leave the paint to harden for a couple of days and if the weather cooperates, return to the shed later this week!5 points
-
I remember reading about this wreck. My personal opinion is that they should try to recover this P-38 and display it in a museum in its current condition, as the elements will surely destroy it over time. The IWM, Air Force Museum, and National Museum of Naval Aviation have done this with several of the wrecks that they have recovered over the years. Perhaps a museum/ display dedicated to all of the aircrew/aircraft who lie in Wales? Mike5 points
-
still no sign of Mr Squid's eye from my China ebay supplier - here how it's looking prior to it's new eye and the clear latex body coating5 points
-
The third of my Japanese aircraft, an Airfix Mitsubishi Zero. Built OOB with H models decals for an aircraft captured by US Marines in June 1944 on Saipan Island. Tamiya painta nd quick oil wash for panel lines. IMGA0795 by neil Connor, on Flickr IMGA0796 by neil Connor, on Flickr IMGA0797 by neil Connor, on Flickr IMGA0798 by neil Connor, on Flickr IMGA0799 by neil Connor, on Flickr5 points
-
Edward, allow me to say that you, JD and Bill were as fine a bunch of ambassadors for your fine land as she could wish It was pure pleasure to meet you and Sir Ced of Bathshire en masse and I hope to last long enough to participate in your next Anglomerrican visit Enjoy (I know you will) the rest of the visit, even though you will feel as if your time here is rushing to the bottom of the tunnel as home time draws closer I fervently hope to meet you guys again, it has been a delight5 points
-
Do suggest a title Tony, please - I'll work on the plot.... Ciao5 points


This leaderboard is set to London/GMT+01:00