
Leaderboard


Popular Content
Showing content with the highest reputation on 02/11/19 in all areas
-
Good evening everyone, Please find below my latest off the bench the Tamiya F-15C Eagle in 1/48 fully loaded,actually probably overloaded.Nice easy fitting kit in my view. As usual painted with the hairy stick with standard Humbrol paints and built out of the box.21 points
-
Hi All, My second modern jet finished. I've enjoyed building it. For sure it is not the last one. WIP21 points
-
The end of a very long build, thread here: https://www.britmodeller.com/forums/index.php?/topic/235022128-blackburn-roc-floatplane-target-tug/page/51/&tab=comments#comment-3486847 Martian 👽20 points
-
First flight Gee Bee R1.20 points
-
Been a bit of a long term project since May, this one, (not continuous mind) but finally finished now (I hope).. Absolutely super kit and despite the enormous parts count everything seemed to be pretty good fit wise. The engine I detailed as per the kit instructions with some wire as I think in this scale it does need it. I also ( for my sins) decided to put a little motor in it and fitted a battery pack and switch in the fuselage with access to it into the open hatch. Trouble with that idea is that it looks really naff with the prop running and no pilot...So someone kindly made me a 3D printed figure (only because they wanted to use the new one we have at work...) for now until I can source a proper Airfix one from somewhere...Anyone got one they don't want??? Thanks. The only extras I used were a set of RB Productions seat belts and a pair of the excellent new brass undercarrige legs and doors from Alistair at Aerocraft. https://aerocraftmodels.bigcartel.com/product/airfix-hellcat-brass-undercarriage-and-wheel-doors Thanks, Alistair for letting me have the first set off the production line to get the model finished! The markings are a mixture of the new Dutch Decal sheet and the Top Notch masking set. I chose not to use the code letters from the Dutch sheet as they're not the correct style. I found the Top Notch ones much better. After some research ( and a post on BM) I also decided to add the dark paint markings on the top of the fuselage. Despite having no information to the contrary I put them on the other side too. If anyone can prove they're not there I gladly take them off. Anyway, I hope you like it and thanks for looking.. 20191101_160328 20191101_160352 20191101_160419 20191101_160439 20191101_160551 20191101_160607 20191101_160726 eabc9ccbeecdbd9cd9402cf8615ddd5520 points
-
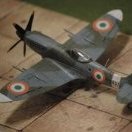
Here is my Italeri 1:72 Supermarine Spitfire Mk.Vb "Trop" in the markings of EP706/T-L flown by Sqn Ldr Maurice Stephens, No 249 Sqn RAF, from Takali, Malta, in October 1942, which I built back in 2006. The kit was built OOB and painted and varnished with airbrush. Thanks for looking and all comments, as usual, are welcome. Miguel18 points
-
This is a recent addition to my collection. It's the Ukranian company Bat Project's offering of this interesting aircraft. It's a limited-run kit and a little pricey at £45 a go, but with some time and patience,it builds up nicely. The model is finished in the markings of Luftnachrichtenschule 6 (See), based at Dievenow, Pomerania, 1940-42. A more detailed build article can be seen here. I hope you like the end result. Regards, Paul16 points
-
My latest effort, Mirage IIIC of Italeri in 32nd. Not a bad kit, but some assembly calls for improvement which is nothing new about Italeri kits. Cheers, Ricardo13 points
-
Another oldie from the garage, finished a few years ago. Typical Matchbox offering, simple and a delight to build. Completely OOB including the decals which surprisingly stood up well. Brush painted with my usual go-to silver... Vallejo Model Air Polished Aluminium. Thanks for looking13 points
-
Last of my 'Silver Wings' trio, the old Airfix Hawker Demon which is soon to be re-released in its old moulding. Great news! This one was a 'bagged kit' and had seen better days but i wasn't bothered about super detail or accuracy, just a fun build. Aftermarket decals from Modeldecal. Thanks for looking. And with its other stablemates (although from slightly different eras)12 points
-
I’m beginning to think this might not end up in tears... Thanks for looking, Adrian12 points
-
Hi gents, Since the Uschi line is taking forever to arrive I decided to share with you my latest build now, an OOB Tamiya's 1/72 Spit Mk.1 and my first attempt at "proper" photography which partly failed and on which I have to definitely work. I am not completely satisfied with the final finish as, again, I have some small orange peel on the paint. 😡 Got to work on that too!!! It's probably the flat and gloss coats which I didn't airbrush but sprayed from the can, since I didn't have any orange peel on the paint itself because it was airbrushed. Any advice would be very much appreciated! Also, as I said in my "work in progress" post, some kind of fogging/staining happened on the inside of the canopy which I can't explain, since I worked in gloves and did not use CA glue. Any ideas about what might have happened? 🤔 The decal on the starboard side is slightly too high and went into the canopy sliding channel, which I just saw now! 😭 Also, the camera now showed me what my eye didn't, and that is to do with the exhaust stains finish which is too strong in my opinion. Couple of lessons learned here! Thanks for looking! Best, Nikola11 points
-
Hi again, This is my latest build. It's looking like my camera skills haven't improved one bit, I need to figure out a better location/setup to take photos of my models, sorry about that. Anyway, this is the build: Kit: Revell F-89D/J (No. 4568) Model: Northrop F-89D Scorpion (USAF) Scale: 1/48 Aftermarket: None Paints: Vallejo Model, Air & Metal Color Weathering: Oil paints, Flory Models Wash The kit was by no means perfect (it's from the early 90's) - nor was my build of the kit ( I can point out dozens of mistakes...) - but all in all I'm still very happy with the overall look. I did not stress about it too much but was just enjoying the build and was in awe how cool a plane the Scorpion really is So I hope you enjoy. All comments & constructive criticism are welcomed! One thing that I'm trying to figure out the best way to weather raised panel line kits, washes don't really work that well. Maybe some airbrush magic? Would love to hear your thoughts on that. And here's a shot with Monogram F-102 Delta Dagger I did earlier this year. Big planes, both of them!11 points
-
The ancient Airfix kit finished some time ago. It certainly won't win any prizes but it was a nice quick fun build. Brush painted with Vallejo Model Air Polished Aluminium and decals from Model Alliance 'Wings of Silver' for Douglas Baders infamous No.23 squadron aircraft. I just love these pre war RAF biplanes, so much colour and heraldry. Thanks for looking11 points
-
I have not seen many spitfires with nose art and have been fascinated by MT841 for a while for its excellent nose art and that too on a RIAF Spitfire! Using the book Spitfires in the Sun and the site bharat-rakshak.com as starting reference points, I found some excellent decals for MT841 from Exito Decals and started of on building the kit. According to the reference material cited earlier MT841 Spitfire was with No.2 Sqn RIAF from 20 Jan 46, and was written off on 29th Jan 1947, when P/O Pat Callaghan belly landed the aircraft at Kohat airfield. The aircraft engine had caught fire after an oil leak in circuit. The Hasegawa kit is a quick build with well fitting parts. It has a basic cockpit, good exterior detail and engraved panel lines. Some have discussed that the kit's outline is a tad off from the real airplane as with Hasegawa's 1/48 scale but frankly I could not tell for this or for that matter - the 1/48 I built earlier. I really enjoyed building this kit. The only mods made were seat belts made from masking tape. Paints are all Tamiya. I started with spraying Tamiya Titanium Silver as a primer. Next step was some salt weathering added to the left wing root before pre-shading with Tamiya nato Black. I then sprayed the standard RAF camo scheme in Medium Sea Grey, Dark Green and Dark Earth. The prop cone was a little challenging to paint and required creativity. Once dry, I scrapped off the salt and added some light chipping around heavy traffic areas (cockpit, cowl...etc) using a metallic silver color pencil. Decals were added and sealed with Tamiya clear gloss and then I applied a black panel line wash using Tamiya's line of washes. I sealed it all with Tamiya flat clear. I do hope you enjoy the pictures. Some were taken indoors - some outdoors but my photography skills leave a lot to be desired so apologies for that. Comments/ questions/suggestions are always very welcome as they help me get better! To start, a picture of the actual aircraft: The Decal sheet came with poster art which is excellent! And a few outdoor pictures in natural light Thank you for looking!11 points
-
Thanks for all of your kind words chaps - time has been agin me of late so my apologies for not responding to you individually. I did >finally< get some free time to look at turning Brown Beauty into Anne of Green Gables, starting with eyeballing the camouflage demarcations: The main outlines for masking-off the extant brown areas were drawn out to scale in Illustrator and then sent across to the Silhouette and rearranged to avoid wasting lots of Washi sheet: Of course this kind of method is only good for generating a plan aspect but it is quick and relatively accurate and you can fill in the adjoning vertical sides of the fuselage freestyle with scraps of Washi left over from the cut: Looking through photos in the last update I'd noticed a nasty gouge behind the stabd fuel tank - hence the filler visible there in the shot above - and a new hinge was added to the inboard port aileron side. First up was some XF61 (dark green) streaked on in a random rectilinear fashion at low psi and quite diluted: This is to give a slightly different (darker) underlying colour that will start to show through again when buffing this subsequent XF81 (raf green) topcoat back later: A couple of mottled coats of that and then off with the masks: I'd expected the paint to lift in those places where you can there was metal foil as I'd had the same issue previously on the Iron Chicken - it's just the price of using smooth unkeyed surfaces to build such surface detailing but is easily repainted later. You can see the disparity between brown (buffed) and green (fresh) appearances in the above shot: such differences would have horrified me not long ago but now that I come appreaciate that there's as much creative potential in reworking and buffing back to unite surfaces to give various textures as well as hues, I've come to enjoy this cumulative approach developing final 'looks'. The rudder looks good in position, though unsurprisingly perhaps you can see that I've lost an outer stbd aileron hinge in removing the masking (good job I'm hetting quicker at making them...): Snout! A couple of the serial masks pulled away with the camo marking - not a problem and reassuring to see the crisp outlines the Oramask produces despite the dimunitive size of the letters and undulating surface: (that rudder needs some more brown too) That's the state of play this evening and Annie'll sit like this curing for a few days before I can get back to her. Another busy week looms (why does November always seem such a frantic time these days?) though this time away from home until next weekend working up in Dublin just round the corner from the Guinness Storehouse. I'm staying in a rented apartment (cheaper than a hotel) so hopefully will be able to keep occupied of an evening with the Avon maintenance manual, working out some designs for building the engines on the forthcoming Sea Vixen build. I want to have one of the Vixens with the panels off and engines fully visible so two complete Avons will be required. PE may be implied for certain details and in consequence one of these arrived in the post during the week: Noxious chemicals and brass sheet in transit too... CSI: Ireland 'Who broke the butter dish and ate all the butter?' (Avoiding my gaze) 'It wasn't us - a strange cat must have come in during the night!' Weather warning here since 2pm yesterday. Constant rain and louring stratus. Off to read: and drink strong tea. Take care me dears until next time. Tony10 points
-
Thank you all for your kind comments/likes. Just goes to show how BM is really just a collection of sandwiches looking for a picnic. Thought I'd better keep you in the loop with the progress ........... Bleached wood nearly there and I've been playing with some Grandt Line bolts, not fixed yet I hope you approve of the above. Just playing with some ideas as to where to go next . . . Cheers Kev10 points
-
Hi everyone, this is the last model that i've finished. I was a bit bored doing only airplanes, so i changed subject doing a D.A.K. Vehicle I don't build AFV's very often, this is the result. Hope that someone will like my work Extras: Eduard PE Set Cheers From Italy 🇮🇹9 points
-
Morning all, Cookie is still asleep (I think -- his door is closed and I've heard no signs of life from behind it) and I'm too shy to go downstairs and see if anyone else is up, but I certainly am. Thankfully, my children have imbued me with a strong ability to resist jet lag through their penchant for waking up at any and all hours of the night, so although it's 3:15 back home, I only feel as exhausted as I do every single morning of my entire life. Ced has very kindly allowed me to have all manner of things shipped to his home (which is lovely, by the way), and so I was greeted by what I hope will be the first of several hauls while in-country: Ah, I see Ced's posted, which means he's awake. Off I go!9 points
-
And yet no other manufacturer ever ventured in doing another 1/72 Vulcan.. wonder if it was because they believe that the market is not big enough for two kits ? Not that the Vulcan is alone in this, as it's a problem for all large aircraft types. How many 1/72 B-52s have we seen hit the market ? Monogram did one in the late '60s, then AMT did another one some 25 years later and finally Modelcollect issued one last year, another 25 years after the previous one. 3 kits for a type that in terms of worldwide recognition surpasses all other postwar bombers. How many B-47s ? Just the one from Hasegawa (51 year ago). B-36 ? Just the one from Monogram (1980, very young in comparison). B-1 ? A couple. One Tu-16, a couple of Tu-22 and Tu-22M.. Even a much smaller bomber like the Canberra, that wore plenty of interesting markings and camo schemes has seen limited success as a kit ! And the comparable Il-28 even less. The problem is that kits of large types take room and are expensive (apart from the Matchbox/Revell Victor..), so everybody says they want a few but when the kits hit the market many of those same modellers see the price tag, wonder if they'll ever build it and pass. Others will buy one and only very few will buy more than one. Just look at the WIP section in this same forum, how many 1/72 postwar bombers can you see ? Not many. And this is a forum where 1/72 kits are very well represented, in others you can see 50 1/48 Tomcats and Phantoms per every 1/72 large bomber... at that point if I were to decide what to issue to make money I'd go with one of these rather than a Vulcan/B-52/Tu-16, at least I know that there's room on the market for another 1/48 Tomcat of any kind.9 points
-
Thanks! Bob9 points
-
Here is the 1/24th scale English Electric Thunderbird Mk2 by KFS (Kit Form Services). I purchased this at last years SMW Telford show and had this idea to be slightly different in presentation being shown at Farnborough 1966 as an exhibit. This is a first for me as I’m normally an Aircraft or Helicopter builder. The kit itself is resin and 114 bits of etch and I used it all, didn’t skip a bit honest. Even in this scale my eyes were on sticks!. The instructions are ok but there is no colour call out on what bit gets painted in what, but some research helped. The advertising sign is a scaled down actual advert and printed off. The rope fence is matchsticks and metal weights for the base. Anyway the photo’s which are not in the best light, but hey ho: 82251088-5E80-410E-B4C3-C0AD8D15FFC1 by Stephen Priestley-Dean, on Flickr 3F5A06FF-3BBF-4137-A379-89D64769B690 by Stephen Priestley-Dean, on Flickr E39198BF-7CFD-449A-8819-67D245B57590 by Stephen Priestley-Dean, on Flickr BEC69FF1-8359-4C21-ABBB-81F201ACE50C by Stephen Priestley-Dean, on Flickr 7DF794B7-67D5-4486-A441-937B71682081 by Stephen Priestley-Dean, on Flickr 969D9A69-9EEC-4710-9E39-C49D0955DE0B by Stephen Priestley-Dean, on Flickr 47E5ED81-D462-4D71-835C-110924765C3D by Stephen Priestley-Dean, on Flickr 24615CC7-0729-4B09-95A2-CEE93F3B65CA by Stephen Priestley-Dean, on Flickr 29BABC3C-5BD4-422F-B481-7FDEE3F70CCA by Stephen Priestley-Dean, on Flickr Steve.8 points
-
... and you’ll be hard pressed to find any of these kits easy to build or more importantly accurate straight OOB. I still think there’s plenty of room for a nice 1/72 fishbowl canopy Canberra to the tooling standards of Airfix’s latest Buccaneer. The list of foreign operators and their colour schemes is longer than my arm... and my knuckles scrape the ground when I walk!! Cheers.. Dave8 points
-
Focke-Wulf Triebflügel MiniArt 1/35 This is MiniArt's new Triebflügel interceptor from their recently launched "What If?" range. It's a very nice kit, although I guess it's a slightly alien scale for most aircraft modellers. The semi-fictional design should mean it will fit in with a 1/32 collection without looking too out of place though. No real issues with the build, although I did make a slight modification to the mounting points for the stabiliser wheels to give them a more secure fit. Apart from that it was out of the box, with the exception of a harness set from HGW. Thanks for looking Andy7 points
-
Main components are being joined together, on the trial fit all looks tight and precise in all joints. Also the separate cowling decking fits nicely and creates an opening in which will be inserted the wind shield.7 points
-
Hello all, Wingnuts beautifully crafted Sopwith Triplane has been fumbled together by me over the course of the last 9 months. For anyone who knows me, that is RAPID! I can't fault the kit. It is pure New Zealand Gold. The only thing I can fault is my need to try to make everything look perfect. I'm sure I can work on that imperfection and as a result build more kits. I have one image for now, but will upload more soon. Cheers my dears Von Buckle KFC 1st Class6 points
-
Hello, With the windshield fitted and masked, the model was ready for the full painting phase (the upper wings were already finished - see one of my previous post). First, RLM65 (Gunze H67) was applied all over and some post shading with that color lightened with some white was applied. Once dried, the sides of the fuselage were masked and the RLM02 (Gunze H70) was applied and post shaded with a mixture of H70 and H336. The next day, additional masks were applied for the RLM71 (Gunze H64). Again, some post-shading with some lightened RLM71 with a few drops of H336. Once done, the masks one the fuselage were delicately removed and a session of molting started, first with the RLM71 and then with RLM02. Can't resist putting the picture again 😇 When everything has dried (and a bit longer, just to be sure), the flaps and the horizontal stabilisers were attached. For the stabilisers, the E version of the 109 has struts to support them. We hit here one of the (maybe only drawback) of this kit. Indeed, Airfix definitely should like to send spare parts to their modeling customer as the way the small parts are attached to the sprue would most generally lead to the parts to be broken. Even by using a red hot knife blade (a technic taught by one of my fellow club member who took pity of me when he saw me trying to remove some very tiny parts from a sprue of Airfix's (again) lovely F4F - thanks mate!!!) So, for the struts, the final score was even: 1 saved, 1 broken. 😓 For the dorsal antenna, Airfix won With some patience, everything was in place and in the end, no glue was applied on the stabilisers. They are only maintained in placed by a tight fit and the struts (that were glued). Everything was then ready and the kit received a layer of gloss varnish to get ready for the decals. I started with the Almark decals. It was the first time I was using them. Hence I started with the black crosses for which I could have found replacement. A note on Almark decals. I think it is appropriate to say that Almark is a "small" decal producer. The sheet I have is printed on a single support, hence one has to carefully cut around each element. This takes time but it prevents any potential silvering. The decals reacted very well with MicroSol and MicroSet solution and complied perfectly with the kit engraved panel lines. In the end, it takes some extra time, but I should say that I was very pleased with the results and I recommend Almark decals, except for beginners. For the stencil, I preferred to use Airfix decals to save time.... Waiting for the decals to fully settle down before trapping them with another layer of gloss varnish, it is time to share with my lovely wife a nice glass of red wine ( a Chateau Neuf-Du-pape 2004 I have completely forgotten we have). 🍷🍷 More fresh news hopefully tomorrow... Cheers, Antoine6 points
-
I’ve been all over the airframe today. First off is the result of the engine refinement. A smear of filler and then rubbed back and this is the result so far. I think I may need some more filler, but it’s already a lot better. Next off, the nose. Having roughly sorted the profile, it was then time to back it out with sprue and card, so as to minimise the amount of Milliput required. At this point I also carved out a triangle in the rear of the cockpit canopy opening, as I’ll be putting in eyebrow windows later. I then laid out strings of putty along the planking. This was then put under a tap and smoothed out so as to minimise the inevitable carving and sanding. Meanwhile at the blunt end, I chopped off the extreme tail and added a sprue rod as a skeleton for the MAD boom. More Milliput has resulted in this... Apart from sanding off as much of the raised line detail from the fuselage, that’s all for today. Mote soonish! Trevor6 points
-
The final touches were completed today, and I present my Airfix 1/72 F-5E finished in IRIAF markings. This started as a background project some time ago, but lately took on a life of it's own. The basic kit is Airfix, with Hi-Decal markings for a fairly up to date Iranian Airforce Example. Resin seat came from the True Detail set TD 72404 for the F-5E, Sidewinders from Eduard and Mk.82 Snakeyes from Kora, although I had to get a replacement set from Hannant's as the first batch were really rough. The second batch were better, but they still needed a lot of work to get them resembling the real thing. Main colours used are Lifecolour Acrylics as follows: UA001 FS 34079 Upper Surface Dark Green UA085 FS 30140 Upper Surface US Brown UA084 FS 30400 Upper Surface Sand UA021 FS 36622 Under Surface Light Grey I really like these acrylics as they airbrush very well. Thanks go to @Selwyn for some invaluable input on the weapon load outs, which enabled me to get her looking as accurate as I could. You may be interested to learn that the wire on the RBF tags actually passes through the Noddy Cap and the red tag itself. That activity last night convinced my wife that I was indeed mad........... oh and the Noddy caps do come off. Fuses on the Snakeyes were scratch built as the Kora one were to put it mildly, somewhat naff.......... The original WIP can be seen here: And finally a quite shot of the Noddy Caps on their own The Airfix kit is pretty old but still builds into a decent F-5E. Thanks for looking Terry PS Some underside shots missing from original post and actual shots to compare colour and weathering (or lack of!) And the real thing: Colour matched to an F-4!6 points
-
Totally agree. The 1/24 Hellcat is a fantastic kit. I would love one BUT where to stick it when finished??? (SWMBO has her ideas but that involves pain and an ability to not sit down ) Hate to say this guys but size does matter. Question..... do I need planning permission for a T2 hanger in the back garden ??? Dick6 points
-
Arrival! (CedB, Cookenbacher and Procopius) I hope my selfies get better (I wanted to get the sign in) and no, we weren't standing in a ditch…6 points
-
Thanks for the kind words. Here are those pictures. Cheers, Bob6 points
-
Because he hasn't made it to 300 yet. Regards, Murph6 points
-
Well, Cookie is on the fifty mile drive from Midway Airport to my house thanks to Mrs P, who is by far the better driver than me; we got nearly four inches of snow today, and even here in the American midwest, where we expect Hoth-like winters that push the bounds of human endurance, this was a bit much. We had but a handful of trick or treaters this year. I've been at home sporadically handing out candy, putting my children to bed, and frantically cleaning my house so that Cookenbacher doesn't realize the squalor I live in day to day. Tomorrow is D-Day: we're going to get on a plane and fly to Heathrow to spend two weeks with Ced (to be joined on the second week by Navy Bird) in one of the more westward and most reluctant parts of Europe. I'll be documenting it here. This will be the longest I've ever spent in another country, my longest paid vacation in my working life, and the longest I've ever imposed myself on anyone not connected to me by marriage. We'll see if Ced is still speaking to me by the time I leave.5 points
-
The last thing that I said in my WIP in December last year, was that I would put it into RFI as soon as I’d done a couple of figures. Well, 10 months later, here it is, but with just the one figure. The figure is part of the Master Box set for British and Commonwealth AFV Crew, but with the head exchanged for one from a Verlinden set for British Tankers. Fortunately, he had his mouth open, which fitted in well with the actions of the figure. The tank is one of the early Centaurs, taken from storage to use on D-Day. I’ve depicted it earlier in the year around April while they were conducting exercises. There is some disagreement as to which battery Seawolf belonged to, 3 or 5. Even decal manufactures can’t agree, so I’ve gone with 3rd Battery. I made the base to loosely represent a sloping harbour wall so that it would show off the moveable suspension swing arms and the Fruilmodel tracks. The only other things that I’ve added since the WIP are some stowage in the open bin, and a compo rations box with some tins in it on top of the left rear track guard. The WIP can be found here; So that’s another shelf queen done and dusted (literally). Thanks for looking. John.5 points
-
This is my rendition of the Sikorsky HO4S-3 helicopter. My goal was to build it as one of the first deployed helicopter ASW squadrons. The kit was the Italeri HO4S-3 #1267. I also the Eduard H-19 interior/exterior kit, the Eduard Mk44 homing torpedo and the Print Scale H-34 decal sheet. I stole the torpedo mount from an Italeri HSS-1 kit and dummied up an ASQ-4 dipping sonar. For Italeri this was a pretty good kit with good fit and detail. The Print Scale decals worked great once in place but were a bear to get there since the much preferred to roll up into a ball then to be positioned on the model. I based my build on this picture, including the sonar peeking out from the bottom: There are no decals, that I can find, for these early squadrons so I used ones from the H-34 sheet that looked appropriate. But from a fictional aircraft from HS-4. There is no indication that there was any actual aircraft marked as mine. If I got it all wrong, such is life. Given that, here it is: I want to thank @Tailspin Turtle for posting his Tailhook topics on this subject https://tailhooktopics.blogspot.com/2019/09/sikorsky-asw-ho3s-3.html Next up is an E-8 J-STARS using the Heller E-3 kit and the Flightpath conversion Enjoy5 points
-
Revell 1/72 Rf-4E, No 113 the Light squdron 113.000 flight hours memorial flight. http:// http:// [url= https://postimg.cc/nMy3J9ts][/url] [url= https://postimg.cc/3y8LqMQn][/url] [url= https://postimg.cc/301NnDXL][/url] [url= https://postimg.cc/rRMz19r0][/url] [url= https://postimg.cc/N9wRnmXY][/url] [url= https://postimg.cc/McBytdvd][/url] [url= https://postimg.cc/YGfQB0NF][/url] [url= https://postimg.cc/G9dkJPrx][/url] [url= https://postimg.cc/64WnWKzm][/url]5 points
-
Thanks Dennis! I'm hoping for a finisher... The wings are pretty much the same but are mounted slightly further out with less sweepback than the Sunderland. I will be putting some card at the tips, filling the whole thing and re-scribing like I did on the Frog Oxford in the Trainers GB earlier this year to get the right aileron and flap lines, and I think the nacelles need thinning out a bit. The cowlings and propellers are pretty crude by modern standards so I will be making my own. The tail surfaces only needed a bit of trimming, so they are done bar a bit of detailing. I've never been too good at carving anything substantial out of wood, and I have "history" with car filler, so it works for me. Exactly what I am doing with a sharpie. In the pictures you can see the black edges looming through the filler as I get close, then you can see the white where I am actually sanding into the bulkhead. Because of my hand-eye inaccuracies, I treat each bulkhead as a suggestion rather than gospel - the main thing being to get a smooth line down the fuselage and a good average. Go for it! But keep your hobby room door closed because of the smell or the whole household will be after your blood! Strictly speaking, only the Fairey Long Range Monoplane (see "shelf of shame" in my signature) but I used to do a lot of figures and horses from plastic padding when was a lad, so I'm used to the smell. Well a Sunderland to Empire is like a Lancaster to a York, so it's a conversion really, just with a jolly big fuselage bit... And here's progress to this afternoon, thanks to appalling weather in London: But sadly I am told that shopping can be done in any weather, so there I have to park it! Thanks for looking, Adrian5 points
-
Thanks - I built the Hasegawa 1/32 kit last year, and it is a very nice model (different boxing to yours though, by the description, I don't recall a comic in my kit) which results in a very good representation of a J2M3 ... but I have to say the detail in this kit knocks the Hasegawa kit into a cocked hat. Obviously I need to wait and see how it turns out, but so far I have no regrets about buying this one. Thanks Ced; I think he's feeling better, he's certainly whinging less though I suspect that might be because the anti-biotics have been making him sleepy; at least as a result of that I got a couple of decent-ish night's sleep. Yes, a trip to the vets - even though my vets are very good and I never feel they are adding anything on or doing anything unneccesary - is always expensive, but in fairness if someone had asked me beforehand would I pay that amount of money to have my dog feel better, of course I would have gratefully forked it over. I applied the instrument decal to the back of the clear instrument panel part - if you find yourself in this position and are tempted to do the same I recommend you study the topography of the back of the instrument panel part as it is not flat but variously faceted and angled, then cut the instrument decal into sections and apply these individually. Then I attached the IP to its mounting frame: After that I attached the side-panel of the IP and did the detail painting - I'm very pleased with how it turned out: Hopefully I'll get some more of the cockpit details painted today. Cheers, Stew5 points
-
Special for @Dads203 and all of you - I take some additional pictures... 😎 View 1: View 2: View 3: View 4: Thanks for watching! 😉5 points
-
I masked and painted the white then remasked and did the DSG. HTH---John5 points
-
Dear members, May I present you with another piece of Fokker history The Fokker D.XVI prototype flew in 1929. In the year 1930 the first of the 12 production aircraft were delivered to the Dutch Army Air Force. As there was no 1/48 model kit, I tried to build a model from scratch, using a fuselage of the Hawker Fury I ( Inpact) and the wings of a Curtiss F-11 C Goshawk( Lindberg). Well the result was not perfect but it was the best I could manage in that time. Years later in 2017, with much more scratch building experience, I build a new one; this time complete in scratch. Fortunately I made a WIP, so you can have a look how everything went together : https://modelbrouwers.nl/phpBB3/viewtopic.php?f=1&t=49923 I hope you enjoy this topic! With regards JohnHaa5 points
-
Rubbish photo but lanc is masked and ready for some green paint over the weekend!5 points
-
Well a cheeky filling session before work this morning: I held a piece of 15 thou plastic card against the filler hard up against the bulkheads while it was drying. It peeled off cleanly, leaving me with very little sanding to do. It has also captured the transition between the vertical sides and sloped nose perfectly. The only downside is that I didn’t have a free hand to drink my tea with! Thanks for looking, Adrian5 points
-
Pretty happy with that: Where did all this dust come from?? Thanks for looking, Adrian5 points
-
... the oil radiator assembly including etched screens in place, all fits nicely. Cockpit is now to be closed.5 points
-
Since work has stalled on my Flying Tigers P-40B waiting for decals, I thought I'd start another kit. I'm still in the mood to do a P-40, so I dug this one out of the stash: I bought it because of the Burma Banshee decals it had for an alternate theme, but I decided that I really liked the markings on the box art. It all turned out great, because my quest for a Burma Banshee, led me to finish my P-40M, which frankly looks way better than the markings in this kit. Not much in the way of parts: and some pretty nice looking decals: Unfortunately, being an older Hasegawa kit, there isn't much in the way of cockpit detail, and no detail on the sides of the cockpit. So, I had to make do with what I had. I painted the sides and just scuffed them up with Tamiya weathering pastels. The cockpit came out a little better though with some Eduard PE seat belts added Now, I'm just waiting for the radiator intake parts that I glued into a fuselage half to dry so I can button up the fuselage....4 points
-
A bit of pre-work tonight - eve of the start day. A good wash with sponge and soapy water. Remove anything else with lighterfuel rag. Removed that canopy I was dissatisfied with. And a last look inside the cockpit. This morning I fitted the weapons bay doors, and undercarriage doors.4 points
-
And now with some metallic bits and a gloss coat - ready for decals:4 points
-
The construction of the wicker chairs begins, printing a double-sided pattern and preparing the parts. More than necessary are always made, to discard the ones that aren't as good: This may seem difficult, laborious and painful, but it is actually dismal, atrocious and soul-wrenching.4 points


.thumb.JPG.2ce06c4ff2300a5faba93aaeacbdab25.JPG)


This leaderboard is set to London/GMT+01:00