
Leaderboard


Popular Content
Showing content with the highest reputation on 29/10/19 in all areas
-
Meteors in 1/72 These are various Meteors built over the years 54 Squadron F.8 from the Aeroclub kit: 23 Squadron T.7 converted from the Frog F.4: 64 Squadron F.8 converted from the Frog F.4 using the old Aeroclub conversion set: 1 Squadron F.4 - Frog kit rescribed and detailed: 25 Squadron NF.14 - the original Matchbox kit:36 points
-
I started this kit over three years ago and ran into a lot of problematic areas with this kit. To say that this kit has now moved into #1 on my most difficult/ frustrating and sometimes angering build would simply be an understatement. It was so bad that I stepped away from aircraft building altogether for those 3 years. Some of it I brought on myself by making things more difficult than they needed to be and other areas were just plain ridiculous the way Hasegawa put this thing together. This kit is touted to be one of the best scale model representations of this iconic plane and on that point I'll agree once it's built. Getting there was the difficult part for me. Enough of that banter though. Thanks go out to all who followed, commented and helped out since its beginning. After 3 long years my Arado is finally completed: In progress cockpit : aaaaaaaaaand engine shot:34 points
-
Early Harriers - Airfix or Esci / Italeri ? Just thought it would be helpful to see both 1/72 Harrier GR.1s next to each other. My own view is that there's little to choose between them. The Airfix kit perhaps has a slightly better shape and cockpit / undercarriage detail is better, but the Airfix panel lines are way more prominent that those on the Esci / Italeri kit, which is quite noticeable o n such small models. As an aside, I was disappointed to see the difference between separate tins of Xtracolour RAF Dark Green as both these models were painted with Xtracolour. Airfix kit is 4 Sqn's XV791. Esci kit is 233 OCU aircraft.27 points
-
Here is my latest model, an AZ Bf109G-4 in the markings of ranking Romanian ace Capt. Av. Prince Constantin Cantacuzino. Son of a wealthy and noble Romanian family, Cantacuzino learnt to fly pre war and was both an airline and private pilot. In 1939 he was Romanian aerobatic champion. At the outbreak of the war Cantacuzino was called up to the airforce reserve and subsequently flew both fighters and transport aircraft in several postings. Cantacuzino was relatively old for a fighter pilot, being 40 years old and still active in combat in 1945. Prince Cantacuzino flew 608 combat sorties including 28 night sorties in a standard Bf109G and 45 transport sorties. In 210 combats he destroyed 42 aircraft confirmed and 11 unconfirmed for a total score under the Romanian system of 69 (multi engined types counted for more than single engined). Included in the total are 7 victories against Axis aircraft following Romania’s change of sides in August 1944. Following the coup of that month, Cantacuzino was sent to Italy to convey Romania’s peace terms to the allies. He took with him Lt Col James Gunn USAF, the highest ranking POW in Romania in the fuselage of his Messerschmitt. When an American pilot crashed this plane, Cantacuzino returned to Romania in a P-51 Mustang! Following the war Cantacuzino resumed his career as an airline pilot before defecting in 1948. He then lived in Madrid where he died in “uncertain” circumstances in 1958. ( bio from Rumanian Aces of WW2 by Denes Bernard, Osprey, 2003) On to the model, AZ Bf 109G-4 with the kit decals, painted with Gunde acrylics: Comments and criticisms welcome. Thanks for looking. AW20 points
-
Hi, my second try on a snowy cammo without airbrush .... otherwise mostly oob, just added a couple of seatbeltzs. Thanks for looking19 points
-
This month's fascination has been a pair of Vietnam-era A-4 Skyhawks. First up was a Hasegawa A-4F from USS HANCOCK, then an Airfix A-4B from USS INTREPID. The Hasegawa kit I've built several times before in different markings, but the Airfix kit is new and I was pleasantly impressed (just as well as I have a few more in the stash!). As always, the kits were brush painted using Humbrol enamels (127 & 130), then a Klear coat for decal application, then an oily wash, finished by a coat of Windsor & Newton acrylic matt. A-4F VA-15 Warhorses - 1973 - USS HANCOCK Yankee Station A-4B VA-15 Valions - 1967 - USS INTREPID - Dixie Station .. and finally, my Skyhawk fleet to date! FredT18 points
-
Another short run kit from Avis of an obscure subject, this time the one-off M.1D racer variant of the M1 fighter. Typical short run, needed a lot of fettling but I quite like the result. A braver man than me would do more justice to that engine piping up front, maybe replacing with carefully bent brass tubing or something, but I used the kit parts and they're not too bad. Anyway: With its Avis Bristol buddy:18 points
-
Here she is. Blackburn T.2 Dart, completed as N9536/86 of 460 Flight HMS Eagle, 1930, quite close before the Darts were replaced by Ripons. The build thread is here https://www.britmodeller.com/forums/index.php?/topic/235049446-esoteric-172-blackburn-dart. Basic parts from the kit (except the beautiful resin engine by Silverwings), the rest either cannibalized from other kits or scratch-build. Brush painted with Humbrol, Model Master and Revell enamels. Decals partly from the kit, partly from various decal sheets in my stock. The wheels should be observed from a respectful distance only. They had not been a wonder of symmetry to start with, and masking and painting the seven concentric circles on each of them was not an experience I would like to repeat too soon. If you do not notice the rigging, it is not that it is so fine, or that your eyesight is not what it used to be, but because it is not there. Those of you, that have been following my previous builds, know that rigging is something I keep avoiding as a rule and I am happy with it. The size of the plane is substantive for a single-seater. Compare with the Vildebeest, which was in principal a three-seater. And you have to admit that Messrs. Blackburn had a certain sustained soft spot for ugly brutes.14 points
-
Latest build. First attempt at an airliner. MarkDSCN3531 (2) by mwsfly9, on Flickr DSCN3530 (3) by mwsfly9, on Flickr DSCN3532 (2) by mwsfly9, on Flickr DSCN3534 (2) by mwsfly9, on Flickr DSCN3533 (2) by mwsfly9, on Flickr DSCN3535 (2) by mwsfly9, on Flickr DSCN3536 by mwsfly9, on Flickr DSCN3537 by mwsfly9, on Flickr DSCN3539 (2) by mwsfly9, on Flickr DSCN3540 (2) by mwsfly9, on Flickr DSCN3541 (2) by mwsfly9, on Flickr DSCN3542 (2) by mwsfly9, on Flickr DSCN3543 (2) by mwsfly9, on Flickr14 points
-
My latest work, Bf 109G-14 in 32nd scale. Nice and smooth kit of Hasegawa, pretty straight build with no major issues, built in about three weeks, simultaneously with some other jet builds which in fact are my natural environment I've built 400+ models so far but not many WWII planes and props, let alone Bf109s and built this for a dear friend on request and he's happy so am I. Hope you like it, too... Speedy14 points
-
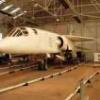
This is the Revell boxing 1:48 Tornado GR.4. It is built to represent ZA600 EB-G of 41sqn RAF Coningsby 2011 in 95th anniversary scheme colours. When researching the aircraft I saw a picture of it flying through the mach loop with a grey/green fuel tank and a LMRT'S pod so I have finished the kit to represent this. The LMRT'S is an Eduard Brassin AN/AAQ-28 (V) Litening pod that I adapted to RAF spec. While I was completing the Tornado, I was also putting together an Eduard 1:48 (Hasegawa reboxed) Harrier GR.9A. The kit was 1166 which was full of PE and resin. I built it to represent ZG478 of 41sqn RAF Coningsby 2006 in 90th anniversary scheme. The base is scratch built.14 points
-
Hi folks. Been away from the modelling desk for a while (insert 'work getting in the way' joke here) but had the itch to get something built by the end of the year. Cue Tamiya's superlative new 1/48 F-14D. I'm one of those Aircraft enthusiasts who was taken away with Top Gun as a young child, so the big 'Cat has always had a dear place in my heart; it's such a good feeling to have a kit as astounding as this to do the Tomcat justice. I'm sure everything that can be said about this kit has been said already, so I'll move on to my attempt at it! The plan was to see how good it built out of the box. That went out of the window as soon as I got the kit in my hands. I firmly believe that as good as the OOB offering is, a kit like this deserves everything you can give it. So I did. So in terms of aftermarket, I have thrown everything I can at it. Additions are as follows: Eduard Big Ed PE set Brassin cockpit Brassin GBU-38's Wolfpack afterburner cans Wheeliant weighted wheels Master Pitot/AoA spike Aerobonus AIM-9 Seeker head covers/RBF tags Fightertown decals The Brassin cockpit was a kit in itself; adds so much to the kit, especially with that big canopy to see all that detail through. I wanted to do as dull a scheme as possible, as not to detract from the weathering that the Tomcat underwent. I know some loathe the TPS scheme, but I think the big 'Cat looks best in lo-viz grey! The kit was finished with Vallejo model air paints and Windsor & Newton Oils. I have the AMK F-14D on order, so I'm excited to see how it stacks up against the Tamiya offering. Needless to say, the bar is set very high with this kit! I'll wrap up my essay now and move on to the pictures! C&C welcome as always, and I hope you enjoy! Daryl. *n.b: Since I took the pics, I have removed the AIM-54C. I overlooked the fact that they were retired in 2004, hence wouldn't have been present in 2006! Just pretend it isn't there!13 points
-
Hi Guys, Greetings, may I present you my Sepecat jaguar Darin, Jaguar has been in service since early eighties after defeating the Mirage F1 and Saab Viggen, as the sole user of the aircraft currently it is being continuously being upgraded and these upgrade aircraft are known as the Darin and Darin III being the latest and will service for another 10-15 years. Talking about the model, the model was build from Hasegawa Jaguar, the built was smooth and relatively trouble free. The nose is mode made and I use a left over cone from elsewhere models and shape the nose according to the Darin nose. The aircraft could have built sooner but have to pause due to decal the kit one wasn't the one we use, I ask the friend but didn't get any respond so I finally got some water slide paper and designed the stencils and printed it and it register well with kit. For the paint I use Tamiya Black, White and Medium Grey which I mixed to get the grey paint of the IAF which was fairly easy. I added Two LGB bombs to make it look for the role it was intended deep strike. Thank you for looking and hope you like what I have done with the kit. Cheers Regards13 points
-
The Rafale is probably my favourite current front line fighter, for no other reason than the displays I have seen. I have had the Revell 1999 boxing of the 1:48 Rafale M in my stash for a few years. It was unmade due to the kit schemes and loadout options being a little underwhelming. When Revell released the kit again with updated weapons I was inspired to finally get it finished. I sourced the weapons from Revell and got hold of a Syhart decal set. The kit scheme represents Rafale C no.126/113-GE - EC 1/7 "Provence" - BA113 Saint-Dizier 2011However, I had seen pictures of the Rafale being flown with additional weapons pylons so decided to load mine up to the hilt. Not a 100% accurate representation but I'm happy with it. Thanks for looking!11 points
-
Almost 20 years ago I started my Trimaster FW 190D-9 after buying an Eagle cal set of decals. The kit had been in my stash for quite a few years and was the best available kit of this aircraft at the time, then Tamiya bought their kit out so I thought why not build them both and do a comparison. Well life got in the way and they both sat in a box awaiting undercarriage and propellers. Earlier this year I got them out and had to decide what to do with them, use them as paint mules, scrap or finish them. Despite a better kit being available (Eduard) I decided to finish them off, so I used Eduard seat belts, spiral masks and resin wheels and here they are. Finished in Extracolour enamel paints they are a bit of a time capsule, but still interesting. Thanks for looking.11 points
-
Hi everyone, Here is my latest efforts, a pair of Sword Harriers. I enjoyed building these two kits although the fit of parts in some areas is not great. The T4 comes with photoetch for the cockpit, the T10 doesn't but there are a pair of resin seats and a vacformed canopy. I added resin intakes and jet nozzles designed for Airfix kits but with a little sanding/fitting managed to get them fit nicely. I also used a Master pitot tube and a couple of SNEB rocket launchers from the spares box. MRP paints were used then weathered with oils and pastel chalks. Thanks for looking, gazza l T. MK. 4 Norway, 4 Squadron 1981 T.MK. 10 Wittering, 20 Squadron 2007 And finally a family line up! Just need GR-5 and a couple of sea Harriers10 points
-
...and we’re back from the IoW, and back on working at Ark’s starboard quarter. Specifically, adding the aft-most boat bay, complete with Tetra replacement boat chocks and extension to deck entirely missed by Merit. Had to remove sone pretty juicy ejector pin marks inside, too. Still, all in a day’s modelling fun. More tomorrow Crisp10 points
-
Hi Guys, I would like to introduce my Great Wall Hobby P-61A. The kit is some kind of Mr. Jekyll and Mr. Hyde... Some parts are great, some parts are not. You have to take your time when assembling, it´s ab bit tricky closing the fuselage. You can see my attempt doing this kit here: pk76scalemodeling.blogspot.com Please let me know your thoughts about my built. Cheers Peter9 points
-
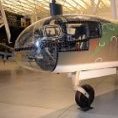
Hiya Folks, I don`t think I`ve posted this `oldie' before,.... built from the old Airfix Bucc kit,... first of,..... here are some pics of the real thing; And here is the model,..... on the real aircraft the Light Stone and Dark Earth scheme was applied over the normal DE/DG/LAG scheme, leaving the rear fuselage in the original colours due to jet efflux and the nose radar radome clear too,...... so I tried to replicate this,..... the scheme was brush painted; Cheers, Tony8 points
-
Hi folks, perhaps all has been said about the story of Alexander Vraciu, but it never bores... Finally I paid off my debt not having it in my collection. Also, the Eduard kit is already well known proven in the time and builds simply well. I added only the raised HGW rivets as without them it can hardly looks like the product of the Grumman Ironworks. Cheers Libor8 points
-
Source: https://www.facebook.com/ArmaHobby/posts/2727649203932086 V.P.8 points
-
Greetings chaps. Finally, more to report on the bonnets. Feeling a bit miffed at my error, I decided to fashion some sort of louvre press. Now, as you have come to expect of me...it's crude. The female tool is made from an electrical plug pin ( good hard brass), into which I cut a groove and shoulders with a needle file. The male tool had to be sharpenable (tool steel), so I sacrificed a couple of screwdriver bits and ground and honed them to shape. I then set up on drill press. A simple means of locking the spindle... Then, my nightmare began.... here's some I made earlier And then finally... I'm still not 100% happy with the results though, so I will probably make another pair....but not just yet, I've had enough of them at the moment, tbh. It's time to get stuck in to the front brakes, upright and steering etc. That's all for now, folks! Thanks for watching. Cheers, H7 points
-
Finally got this finished ,used bare metal foil for the canopy masks7 points
-
Yes! Looking forward to it Bill We do love our house Rob and we're very lucky. It's just down the road from where I was born and not far from where I grew up; being close to your 'roots' is great. Spiders (and snakes) seem to stir primeval feelings in people don't they? I was trained (and have trained my girls) to tolerate, if not like them. That said even I'm wary of those little jumping 'Wolf spiders' after one leapt on my finger and tried to bite me - evil little b*ggers! Wedding planning? I keep thinking of Franck in 'Father of the Bride' - the new one… scary! Thanks Adam - wow, that's a big 'un! Thanks Keith Indeed - too busy for modelling, sadly Ah Bill, we're 1. OK after having 'put something away' years ago and 2. They live too far away, sadly. I'm not sure what it is about English families now that makes them spread so much. Still, nice to see them when they do come home Off to Reading today to see an old mate and avoid the carpet fitters. Tomorrow is moving furniture back in to the bedroom and adding 'the final touches'. Thursday I'm having a dashcam fitted to the T-Roc. I've been thinking about one for ages after having seen the 'Car Crash' programmes on TV and YouTube and thinking I should get one 'for evidential purposes'. Avon and Somerset police are now allowing people to upload videos to 'report offences'! Justice at last! Friday is getting ready to pick up PC and Cookie from Heathrow (exciting) Then we're off on 'the Tour'. Modelling? What's that?7 points
-
Giorgio - I use Mr Metal Primer on all brass, having first cleaned & degreased it thoroughly; not complex - simply brush painted on and allowed to dry. I then use Alclad Black Micro-Filler and Primer as the actual priming layer, again giving it plenty of time to cure (a couple of days, at least). After that, paint like everyone else. The reason I have left the hull on the runner is purely because I know I am going to have to handle these parts an awful lot. They are really big (the hull is 0.7 metres long), and as you’ve already seen there are a lot of added pieces, including inside. The runner gives me something to hold the hull with, reducing the risk of damaging or knocking pieces off. Eventually - probably not that long now, actually - I’ll get to the point where I can set aside the starboard side. At that point I will detach it from the runner (i.e. keep the runner in place while I do all this stuff again on the other side, for the same reason) and put it safely and carefully back in the box. I might even take it as far as a full Alclad black primer layer, even though there is still construction to be done. Ship models (in my opinion, at least) are easiest to do as a set of modules - for instance you should expect the island to remain separate from the rest of the ship until really late in the piece, because it makes handling and painting a lot easier. With a large carrier, each hull side is effectively a module, or even a collection of modules; for instance the starboard side of Ark has four separate inserts to represent the boat bays and other openings containing paravanes, berthing gear, doors, ladders, bollards, hawser reels and so on. I am now adding these internal bays. A few months from now (at the current speed of build!) I will have both hull sides complete with their hull openings done below flight deck level. I’ll also have done as much as I can on the cable deck at the bow and the quarterdeck at the stern (again, semi-self-contained modules)... before the real fun begins of putting the hull together and adding the flight deck. It’d be perfectly feasible to glue the two hull halves together on the first day of the build, adding everything I’ve talked about afterwards. That would make filling and sanding any joins much simpler, certainly... but then you’d have a 70cm unwieldy log with nowhere to hold it while you added hundreds of brass scuttles over many weeks, so you’d almost certainly knock stuff off all the time. Does that make sense?6 points
-
A couple of hours work to alter/ change a few things. I have extended both side wall by placing a door (+window on the right hand side) to bring the front of the building totally upright flat. The kit provides a balcony of sorts with the ground floor rooms directly below. At the rear of the building I have blanked out the top two windows and altered the one to the right of the door, this elongated window ran up the internal stairs to the first floor. The window to the left of the door is for a toilet room and should be a little narrower so If i have a small window I shall change that as well. Looking at the plan one can clearly see the scale of the kit is really small compared to the smallest tower in use with the RAF Because I have extended the building, the roof will need extending but more on that later . . . .6 points
-
Maybe we need to keep these comments a bit more restrained please? Accept the kit for what it is, a new tool Bucc and rejoice. If it takes a little bit of modelling skill to make your favorite one then go for it. Julien6 points
-
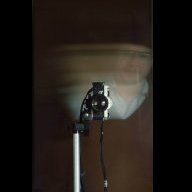
So this is yet another conversion of a Sikorsky SH-3H kit to depict the SH-3D "Old 66" recovery helicopter for Apollo 11. It's the first time I've posted to "Work In Progress". I suspect I'm going to be grateful for input from people with more experience of this aircraft. My starting point is Hasegawa's 1/48 kit: I've also got the necessary short sponsons from Belcher Bits, the Starfighter/Old 66 decal sheet, a set of Montex paint masks, and the Hasegawa 1/48 SH-3D instruction sheet, downloaded from Scalemates. On opening my kit box bought from eBay, I discover I've also got two sets of Quickboost seats (if anyone wants one, drop me a PM and I'll post it to you), and an Eduard photoetch cockpit set. I started by doing a bit of scratch building to produce the camera mount and Yagi antennae. I've been helped with the appearance of the camera mount by watching Todd Douglas Miller's excellent Apollo 11 documentary. The camera mount for Apollo 11 seems to have been a bit more complicated than is often depicted: The lower right image is from NASA / S-69-21723; the others are screen-grabs from Apollo 11. There is certainly something mounted outboard of the two video cameras, wrapped with yellow tape. I've interpreted it as being an SLR stills camera with a motor drive. Here's my best effort to sorta-kinda reproduce the appearances above: In the Apollo 11 images above, there also seems to be a weapons mount point just forward of the camera mount, bearing some sort of attachment I can't quite make out and which I can't find in my reference material. I'm going to need to scratch build this, too. It seems the same sort of fixing was probably present on the aft mount points on the port side too: What was happening on the forward mount points behind the sponsons is a mystery to me. I'll put together another stills camera to mount on the starboard side, but I've no evidence of what this actually looked like, beyond a tantalizing glimpse in about three frames of Apollo 11, as the helicopter drops out of sight on the elevator. The Yagi antennae were a bit more straightforward. Here they are with their attached cables: I used the "free" resin seats and photoetch detailing in putting together the cockpit. It's an SH-3H instrument layout, but it looks better than I could manage trying to detail by hand: The SH-3D instructions were very useful in finding out which lumps and bumps needed to be removed from the fuselage, since that kit used the same moulding as the SH-3H: I also shortened the horizontal stabilizer and filled the locating holes for its supporting strut: The kit comes with what seems to be a depiction of the dipping sonar retracted into its well, so I carved that out and blanked off the upper end of the empty well with styrene card: Finally, I used the Montex interior masks to paint up the inside of the canopy, and added the green panels with Tamiya clear green (which I found something of a nightmare to apply). Hopefully, some actual assembly photographs coming up soon.5 points
-
Hello again, Another kit built a few years back. This is the Italeri boxing of the fabulous Acc Miniatures Avenger. IMHO one of the most buildable and rewarding kits ever. An Eduard mask set though is a no-brainier. As ever Gunze and Tamiya throughout. Oh and a dirty great Alclad torpedo! And then the pics.......5 points
-
Hi.....1\48 AMK kit.....plus a resin seat.....500lt supersonic tanks from Eduard Mirage (with scratchbuilt fins ) and Aim 9D from an Hasegawa kit......all painted less the stencil....Ciao from Italy!5 points
-
If I may ad my 2c worth of putting things to focus.... I have been involved in more than one reverse engineering effort of an aircraft, which involved everything from pen and ruler measurement to top end photogammetry and LIDAR. And it is not a trivial whizz bang process to get the geometry right. My particular case was to engineer a wind tunnel model, so aerodynamic accuracy was CRITICAL to say the least. As wonderful as LIDAR is, it gives you a point cloud, ie a collection of points in XYZ space. Now this information has to be processed to turn it into a surface ( like a NURBS surface, STL wont do) and that in turn into a "solid model" that CAD can understand for further processing into useable components. The fitting of these surfaces is difficult to say the least. Even as LIDAR gives you millions of data points to work with, acurate fitting is still the focus of much, much research in reverse engineering circles. Especially in areas whrere the rate of curvature (like at the leading edge of the wing) is high, do the biggest errors creep in. Then there is also the rendering of the CAD model. As simple screenshot from a CAD program does not convey the true geometry in my experience. It depends entirely on the graphics processing, and other things like screen resolution etc. One will have to "play" with the model interactively to get an idea and actually do further measurements on the CAD model to understand the geometry. And even further there is the fact that something will have to be manufactured in 1/72 scale and injection moulded with preferably only two mould halves. On said wind tunnel model the thing had to be machined from marraging steel and selected parts 3D printed in titanium - all at the large scale of 1/12.5. The approximations that one has to do even at that scale caused many heated debates - with valid reasons all around. So now try to do that a 1/72 and keep everyone happy (dare I say every arm chair modeller...?) I for one applaud Airfix's efforts. I hope the guys there have fun. I certainly did, even though years later I still dream of data points and the Hawk geometry....5 points
-
A few images, to show where this model is at the moment and whet the appetite! This is my first WIP post, so if anything is wrong, such as file/image sizes (or anything else!), please let me know for future posts - I won't be offended. Hopefully I'm allowed to post these before the GB begins...? So to start, a picture of the box. It's a familiar kit to many and a Revell re-release of the original Matchbox kit: Next the fuselage. All buttoned up, but needs some filling and sanding around the transparencies: The inner wings are next. The major issue here will be making the intakes look semi-respectable: The assorted other assemblies: And finally the bits still barely started: Work has been sporadic on this kit recently, but from 2nd November it will be getting some attention again!5 points
-
5 points
-
Here is my Special Hobby 1:72 Messerschmitt Me 262B-2 "3-seater" which I completed in 2007 in a fictitious nightfighter scheme. The main scheme was painted with airbrush. Thanks for looking Miguel5 points
-
Finally cracked that stupid radiator duct gap. It took what seemed like an endless process of filling, sanding, priming but I finally think I sorted it...and all the collateral damage...😐 Ignore the rough bit at the top of the duct it'll be completely hidden by the door. Annoyingly though my sanding has taken a bit too much material off one of the side walls and the door fits with a larger gap on that side. Not too noticeable when the door is in the open position luckily, but it still bugs me 😑5 points
-
Yes Lidar is an excellent tool for the kit designer, but surely they need to do a bit more research and remove these late mods. Its fine if they chose to market as a Buccaneer at the end of its service with late schemes and weapons fit, but Like the Phantom they specifically targeted the FAA origins of the type but didn't do enough research which leaves feeling they were a bit half bottomed in their approach again. The engineering is interesting but I feel they should have included an inner score line for the lower wings, as it would be very easy for the less experienced modeler to make a hash of this. Despite hoping for a 10/10 kit, especially after they set the lead designer on it where they used a nugget to do the Phantom, I can't help thinking they have come out with an 8/10 kit. The limited armament options (why provide an open bomb bay when you don't provide bombs to fill it !) makes me worry about the RAF boxing, it will have the bulged Bombay door, the universal pylons and the RWR for the Tail, the streamlined upper drop tank parts and that doesn't leave a great deal of room for alternative stores unless its just going to be the Gulf War fit. Anything more would require an additional sprue which would then put it up in price. I still have 11 of the kits but some of these will have to await on the aftermarket boys to do the mods to allow an earlier S2, and a later S2D to be built along with expanding the armament options, just need somebody to do the decals to allow more of the 800 sqdn aircraft to be modelled.5 points
-
Box art Source: https://www.facebook.com/mikro.mir.dnepr/photos/a.1416729748404757/2717373908340328/ V.P.5 points
-
Engine - so this is the big part! Having scratch built the 2 engines on the R500's out of wood, plastic etc, machined slots in the cam cover etc etc, I wanted to 3D print these. But that meant drawing a k-series up in CAD. I'm self-teaching, so it was a bit daunting - but once you know where the buttons are, an engine block is not actually so complicated... I took measurements from many photos I have of our engine over the years, and measured the engine outside in the car - which due to access is actually pretty difficult - I could measure the cam cover easily, but that was about it - but long story short, I was able to scale the photos once I had a base measurement. Once I had pretty much finished with the CAD and engine build, I had access to a real engine that was not in the car, and measuring this I found I had been pretty damn close. I drew the engine 1:1 (I can scale when I print) and I have split it into the actual parts - so the block consists of 5-6 'layers' (although I printed the middle bits in one lump) I found out that the easiest way to model and build the engine is to do it exactly the same as the real one - so the alternator is attached with a bracket in the same way as 1:1, coil is bolted on the same way, throttle uses 4 bolts etc etc. I had a few parts lying around - like the sump - which I was able to measure properly and then scale others from that. Richards car has the plastic Rover air intake, which was going to be a challenge to draw for me in CAD. I started roughing out the overall shape - main measurements were the height of each layer in the block. Once I got those correct, I added most of the detail in by eye. I printed a VERY rough block to see if the size/scale was going to work, then a slightly more refined version at different stages. I'm learning about the 3D printing as well, and you learn to design the parts to make the printing process - particularly the orientation on the build plate - easier. The large holes are for the resin to drain - I hollowed out the 'real' one later. example of the 3d printer plate layout/slicing - where you add supports etc - I'm learning! Some examples of parts being printed - there were lots of versions, so these photos cover about a months work from now on! I'd do the occasional print with everything 'turned on' in the assembly, just to see the size etc - in the end, every component, like coil, sump, bellhousing etc was made separately. But it was getting there... Here are some screenshots of the complete engine in CAD... I printed a 1/8th scale block - 'just to see' - ummm - 1/8th scale model.... Eventually I got to the point where I was happy with the block - you can see the progression here: Next I made the ancillaries that bolt to the block - alternator, coil, air intake, throttle, cam belt cover, pulley, starter motor etc etc etc I drew up the alternator in three parts - the casting, the black plastic cap at the end and the center coil. This would make the painting easier, and allow open vents etc. I could have made the pulley separate I guess... I added the new parts to a test block to test the fit... Drilling the alternator bracket... There comes a point where you think 'what am I doing modelling this...?!' - in this case, it was when i was drawing up the crank sensor... By far the smallest part I have printed.. (get used to that pen) Adding paint really transforms everything! That crank sensor needed a flywheel - which needed a clutch (which would be hidden by the bellhousing, visible in only a few gaps - but what the hell - in for a penny, in for a pound!! Forgot the gloves... Testing silvers for the block... I used an oil wash to make it look grubby with.....oil! ..and started to paint and add the other parts - here is the coil being bolted in place... Having tried the 1/8th scale, I thought I'd try a 1/43rd one-piece engine, just to see! Tip time! Metallic paint pens (crafts etc - Amazon) - brilliant for different metallic finishes and easier to apply to details! About £10 for loads... Dip stick next....5 points
-
Airfix F/A-18A RAAF 3sqn, hidecals, painted with xtracrylix grey blue and hataka light grey and finished with Winsor and Newton Matt.5 points
-
The frames were filled with PUR: When it was fully cured I started to give its final shape. First starboard side was completed: After reshaping nose upper half the lower half was copied from existing part using modeling clay and PUR: Finally both halves were glued together to complete new nose: The new nose looks more realistic than the existing one... Serkan5 points
-
Actually I was wondering if, once you finish this one, could you do another three or four in 1/48 and ship them to Western Australia. Then Baby Bandsaw and I will have a complete Hogwarts Express train. That’s a great idea! 👍5 points
-
Hello! Here is another my model! In assembeling I used a lot of aftermarket sets. This is the Eduard photo etching from the kit. Eduards rockets R-13 and nozzle. Pilot tube from Master. The gun, all sorts of small air intakes and flaps of the Quickboost. Airintake of the Mini World, Neomegas ejection seat, R-3R rockets and wheels from Reskit. From myself I added only wiring to the nose gear. I painted the model with NATAKA paints. Top colors from the set, the bottom interfered. Weathering - oil dots, pigments and a wash of dark blue on the bottom and dark brown on the top.4 points
-
These Revell and Mark1 kits make up into great little models Dennis, but if 1/144th scale is not your bag, then I don't think that you will go too far wrong with Revell's 1/72nd offering or the new tooled Airfix 1/48th scale model. I have done bit more work on the 1/72 kit. Having looked at the kit decals for the instrument panel and side consoles, I felt that they did not match up with the moulded detail and so set about picking out the details with paint. I had previously sprayed the parts with some Chaos Black from a rattle can and I have since dry brushed the detail with a lighter grey colour, painting in dials and other details with white, blue, yellow and red. Once the paint had dried I added drops of gloss clear to the dial faces. by John L, on Flickr4 points
-
Last look at the interior before closing the fuse half’s, Started on the painting4 points
-
The masking is off, I have to touch up a few bits, then press on. Humbrol rattlecans, 29 and 163, and Halfords gloss black.4 points
-
Hi Gents, Almost finished. Waiting for the Uschi rigging line to arrive and then on for some better photographs (apologies for the current photo quality as my phone camera sucks). I messed up the canopy somehow, as it fogged from the inside even though I didn't use CA glue. Also, I deliberately left a micro gap between the front windscreen and the movable part of the canopy. Any ideas why it might have happened? I am not happy with the canopy in general. I left the masking liquid on for too long and it was a disaster while removing it. Still needs a touch up. As for the camo, I think that it should have more contrast between the green and the brown, although it is very much dependent on lighting conditions. I used Vallejo BS Dark Earth and Dark Green, and probably overfiltered the camo scheme and lost some of the contrast, so lesson learned here. Thanks for looking! Best, Nikola4 points
-
I fully agree. The below photos show the difference between Italeri/Testors and Revell/Monogram kits: The Revell/Monogram kit has more realistic nose and fuselage shape (circular fuselage sections with circular arc chines) but the cockpit area ruins everything... I will do SR-71A mods on Revell/Monogram kit (using the canopy parts from this A-12 mod). Serkan4 points
-
Hello guys, I applied additional layers of the dull coat and now the figures looks a bit better: As you can see, I purchased a small diorama base, some vegetation and Vietnam Earth pigment - now it’s time to try something new! 😉4 points
-
… and the work continues. I've been finishing off both airframes, filling rivet holes (why do they do this?) refining panel lines, finishing and installing gunsights, and working on the canopies. For the vacuform canopy, I've added inner framework from strip, guide rails for the sliding section (it actually slides open and closed on the tracks) and the emergency canopy release's from brass wire, blobs of 5 minute epoxy, and strip. The smallest item I had to scratch was the mirror for the highback XIVe. Slowly getting there ...4 points
-
While waiting on a new side frame to arrive, I thought I would get on with something that I have been studiously avoiding so far... the diamond windows. Part of the reason for the avoidance is that those windows are very fine, and I was terrified of having to cut the "glass" to fit. When I designed these I tried to keep as true to scale as I could - which meant I only had a 0.1mm ledge behind the frame to rest the glass on. First things first - let's get them painted. Now, not only did I have a ridiculously small ledge to fit the glass onto, I also had a radius of about 1.6mm which had to match very closely or you would see gaps around the window somewhere. To my absolute astonishment, I got this match on a first try Now I had a different problem to solve. The diamond windows on the real Pegasus are frosted/obscured glass. One window on the bathroom and the other window is at the kitchen and I guess no-one wants to know what goes on in either of those locations. But how to create a frosted glass look ? Quite simple really (after a couple of false starts) I found that 1500 grit micro-mesh produces a very passable frosted look after a few minutes light rubbing. The glass was then set into the frame using superglue. As much as I dislike the stuff, the amount of area I had to glue onto was so small I didn't really have any other choice. I applied superglue very carefully around the perimeter on the inside face and let capillary action do it's stuff. Luckily I did not have any catastrophic happenings. There! I think that will work. Then the window can simply drop into place in the side frame. The one above is just dropped in to see what it looked like - it's the side-frame with the window in the wrong location, so it's now my "test" piece As I was painting these frames I saw that my stock of Italian Dark Brown was getting low, so after the modeling session I went to order some more -SHOCK ! HORROR!!! Testors/Model Master have discontinued this color. EEEK !!!!! WTF??? As I am going to need some to paint the new side frame I then spent a frantic hour or more searching t'interweb for a source. Nothing. None at Amazon, None on Ebay, and none on any of my usual hobby website haunts. I found a source in Canada who doesn't ship to the USA, and I found another source about 3 hours away in DE but won't mail paint. Eventually I found a source in NJ who had two jars left so I bought 'em straight away. Of all the things that have bothered my about this build I never imagined that paint would be one of them (at least, not after I found a suitable color)4 points
Wedge-TailedEaglePortraitRaptorDomains.thumb.jpg.41a306d3445a68f0f2df773e01776ea6.jpg)
.thumb.jpg.ad2b820bfdebfdb8541e9255a05f38c7.jpg)


This leaderboard is set to London/GMT+01:00