
Leaderboard


Popular Content
Showing content with the highest reputation on 27/10/19 in all areas
-
Hello! Here is another my model! In assembeling I used a lot of aftermarket sets. This is the Eduard photo etching from the kit. Eduards rockets R-13 and nozzle. Pilot tube from Master. The gun, all sorts of small air intakes and flaps of the Quickboost. Airintake of the Mini World, Neomegas ejection seat, R-3R rockets and wheels from Reskit. From myself I added only wiring to the nose gear. I painted the model with NATAKA paints. Top colors from the set, the bottom interfered. Weathering - oil dots, pigments and a wash of dark blue on the bottom and dark brown on the top.33 points
-
Hi everyone, just thought I'd post a few pics of my latest attempt. It was really enjoyable from start to finish and took about 3 months, I do like to be a bit slow and methodical. I'm still very much making it up as I go along when it comes to certain aspects like weathering and trying to make wood look real. There was quite a bit of rigging on this build but I do enjoy doing it and it is quite therapeutic and satisfying when done. I am still fifty fifty over whether to get an airbrush but am happy with the results of my brush painting. I feel as long as you enjoy it and like your own work that's all that matters. This particular kit came with the Raymond Collishaw figure but as yet I haven't attempted to paint a figure, I don't think I could do the man justice. This is my first attempt at trying to give a look of stretched fabric over the struts. I just shaded them with a brown pencil and I think it looks ok(ish). Though of course nowhere near as good as some of the amazing work on this site. Apologies for the pics, I can never quite master taking a photo. Would love to hear what the good people on hear think. Thanks for looking, Martin21 points
-
Hi All, So off the back of my 1/48 Airfix Spitfire Fr Mk. XIVe build I decided to have a go at another one of Airfix's 1/48 offerings, this time of a navalised variety a Seafire XVII. I chose the Seafire XVII as the majority of the XVII's were built where I work and this specific example, SX156, ended up operating from RNAS Yeovilton just down the road from where I live - so it has a close connection to where I live and work. The build was straight forward, simple and enjoyable - I particularly like the white tail! Seafire XVIII, SX156, of 767 NAS,Deck Landing Control Officer Training Unit, RNAS Yeovilton, 1950. I must admit, the Seafire XVII is now drawing with the Spitfire XIVe as my favourite Spitfire! Now wondering what to build next.... Either a Seafire Fr.47, a Westland Wyvern, or another Spitfire Fr XIV - which one should I build next?! Cheers, Ben20 points
-
Morning all, Have finished my Eduard Mig-21MF. Built OOB, finished using MR Hobby paints airbrushed on after a coat of Mr Finishing surfacer 1500 black..... first time using them and i thought they went on really well. Done as 7600 of the Polish Air Force, as i quite fancied having a go at something silver!!! Eduard 1-72 Mig 21 7600-17 by Jonathan Francis, on Flickr Eduard 1-72 Mig 21 7600-15 by Jonathan Francis, on Flickr Eduard 1-72 Mig 21 7600-20 by Jonathan Francis, on Flickr Eduard 1-72 Mig 21 7600-14 by Jonathan Francis, on Flickr Eduard 1-72 Mig 21 7600-16 by Jonathan Francis, on Flickr Eduard 1-72 Mig 21 7600-11 by Jonathan Francis, on Flickr Eduard 1-72 Mig 21 7600-12 by Jonathan Francis, on Flickr Thanks for looking Jon17 points
-
Fokker DR1 Triplane, 425/17. Roden 1:32 I recently bought this Roden 1:32 kit of the Fokker DR.1, only for Wingnut Wings to announce their own kit to be released later this year. Of course I would prefer the Wingnut Wings kit, so before this one got relegated to back of the stash, I though I'd better build it. It is a perfectly nice little kit, there is nothing wrong with it except for a few simplified details, which are easily corrected. If it is of interest I did a Work In Progress thread on this forum. Anyway, I am pleased to add this to my display cabinet. The figure of Manfred von Richthofen & Moritz (the dog) is from Elan13 miniatures, and a really beautifully sculpted and cast piece. Thanks for looking, John17 points
-
#25/2019 After P-47, F-84, F-86 and F-4, this is my father´s newest addition to our IIAF collection. He used the GWH kit, which is mostly very nice, together with the freshly released decal sheet from Hi-Decal. Painted with Gunze Orange with a touch of red and AK Real Color Aluminium. Seatbelts are from Eduard. Added a pylon for the TT system from an abandoned Hobby Boss F-80 project. Sadly there is no aftermarket stuff for the Ford/Powell LD-4R TT, should there ever be one we will most probably retrofit the model with it. Build thread here https://www.britmodeller.com/forums/index.php?/topic/235059720-persian-thunder148-lockheed-t-33a-shooting-star-target-tug-imperial-iranian-airforce/ Between 1956 and 1965 the IIAF received a bunch of T-33 and RT-33. In the early 60ies, four T-33 and two RT-33 were converted to TT in Italy. When the IIAF introduced the F-5 with their supersonic aerial darts, the TT equipment was removed again from the (R)T-33s. Several IIAF T-33 were inherited by the IRIAF in 1979. One of them was recently displayed as a "drone".. DSC_0001 by grimreaper110, auf Flickr DSC_0001 by grimreaper110, auf Flickr DSC_0003 by grimreaper110, auf Flickr DSC_0004 by grimreaper110, auf Flickr DSC_0005 by grimreaper110, auf Flickr DSC_0006 by grimreaper110, auf Flickr DSC_0007 by grimreaper110, auf Flickr DSC_0008 by grimreaper110, auf Flickr DSC_0009 by grimreaper110, auf Flickr DSC_0010 by grimreaper110, auf Flickr DSC_0011 by grimreaper110, auf Flickr DSC_0012 by grimreaper110, auf Flickr DSC_0013 by grimreaper110, auf Flickr DSC_0014 by grimreaper110, auf Flickr DSC_0015 by grimreaper110, auf Flickr DSC_0016 by grimreaper110, auf Flickr DSC_0017 by grimreaper110, auf Flickr DSC_0018 by grimreaper110, auf Flickr DSC_0019 by grimreaper110, auf Flickr DSC_0020 by grimreaper110, auf Flickr DSC_0021 by grimreaper110, auf Flickr DSC_0022 by grimreaper110, auf Flickr16 points
-
Hello! Just finished this project. A really nice kit, even though not without a few issues. I mean, being a Tamiya I would never expect so many pin marks. And they’re everywhere. Some easily removed, some simply impossible to do so. And some I’ve just noticed after start painting. For instance, the canopy frame had no less than eight of them; easy to remove, but still… Regarding engineering, with the sole exception of the air intake lip, which is a really poor fit (too wide), requiring lots of sanding and scribing in a very detailed area, everything else went smooth. I’ve used only Eduard PE and masks. Hope you’ll enjoy! Chees! George16 points
-
Hi everyone, Here is my latest efforts, a pair of Sword Harriers. I enjoyed building these two kits although the fit of parts in some areas is not great. The T4 comes with photoetch for the cockpit, the T10 doesn't but there are a pair of resin seats and a vacformed canopy. I added resin intakes and jet nozzles designed for Airfix kits but with a little sanding/fitting managed to get them fit nicely. I also used a Master pitot tube and a couple of SNEB rocket launchers from the spares box. MRP paints were used then weathered with oils and pastel chalks. Thanks for looking, gazza l T. MK. 4 Norway, 4 Squadron 1981 T.MK. 10 Wittering, 20 Squadron 2007 And finally a family line up! Just need GR-5 and a couple of sea Harriers15 points
-
Good evening, ladies and gentlemen! Let me present you my next model in 1/48 scale. It's Eduard dual combo kit, but a made this one in US camouflage. The kit is fine, I made only riveting and wing edge sharpening.15 points
-
Hi This is my first model posted here. I've restarted modelling over a year ago and so far built under 10 models. I'll try to post more of those. As to this one it was built as part of the group build with my friends - topic was Westland Lysander, Frog/Novo. As I wasn't able to get a hold of any of those I bought Eastern Express kit which is old Novo and Frog mold anyway. As this is really old and used molding I was ready for things like bad canopy, poor fit, however I wasn't ready for flaky plastic - was really hard to work with. To be honest a few times I wanted to throw "this pile of trash" where it belongs but decided to brace myself and finish it. You can imagine how relieved I feel right now 🙂 Cons: - poor fit - bad plastic quality - no color schema in the instructions Pros: - decal Paint used: Vallejo Model Air (RAF day fighters pre-war to 1941 set), Tamiya Flat Clear This is the first time I tried Vallejo and I really liked it - used straight from the bottle, no flow improver/retarder - I found that with retarder the cure time is really long while I did't really experience dry tip effect. So no need to use a retarder. Although I have to note I sprayed at 15 PSI when most of the sources recommend a bit higher - 20-23 PSI I usually do paint chipping with Prismacolor pencil (on Tamiya acrylic) - that didn't work really well with Vallejo - I guess I need an extra coat of flat but that's for the next project. And now without further due:14 points
-
Where to begin with this kit. Let's start with the pluses. - The molding is pretty good - There is a PE fret with seat belts antennae and some interior bits on it included. - There is a nice interior. - Clear parts are well done. - Decals are opaque, sturdy and snuggle down well. - Included painting guides are nicely done in full color. Now the minuses - Fit overall is iffy at best - In every kit I've seen or heard about, the rear wing fillet is damaged or missing. - The engines don't fit in the cowlings - The wheel mounts are too short so the wheel hubs can't meet them to secure the wheels. - The wings and tails are butt jointed to fuselage, making for a joint that needs some work to fill in and great care on dihedral. - The windows only sort of fit. - The locators for the landing gear V struts are mis-located. They are too far forward. - The cowls are not "keyed', so you don't know where to put the exhaust stacks. - The instructions are of the "part flying into a sort of location" type. - The support struts on the tail, while all the same length, for some reason all need to be trimmed to fit in each location. So, with all that said, here it is.13 points
-
Here is my MPM 1:72 Focke-Wulf Fw 190 V1 which I completed in 2013. It represents the first prototype D-OPZE in Germany on June 1, 1939. This was a tricky build and, yes, I messed up the dihedral when I tried to fix the gaps in the wing roots. I only realized it too late and taking it apart to fix it would have inflicted serious damage so I let it be. The kit was painted with brush and I had to do a partial repaint as I recall a disaster with the gloss varnish before putting the decals. The final varnish was airbrushed. Thank you for looking and all comments are welcome as always Miguel13 points
-
Finished this just the other day13 points
-
Hi there, This is my Eduard Fw190A-4 in 1/48. As others have said, it's a superb kit, my personal favourite in the current Eduard line up ( though I have yet to build the P51 ). I had a go with my version of black basing underneath and I like the effect. I'm not convinced that I got the right colour for the exhaust staining but I didn't want to go for black, I wanted a contrast with the actual dark panel behind the fuselage exhaust stubs. If enough folks think it's wrong I may give it a going over, I'll see. I went with a semi gloss finish as I like the lustre that to me implies metal. Mr Hobby and Tamiya provide the colours. Again, fab kit and I hope to do several more than I actually already have 😀. Feedback welcome, it's the only way we improve. Rick13 points
-
Hi all. I recently finished KP's 1/48 Su-25UTG in the colours of the Russian Navy. On the internet I found photos of real aircraft with very faded paint on it. This is what I tried to reproduce. The resin cockpit is from SBS and I added extra panel lines, rivets and numerous scratch built details. I used Akan paints but all colours were mixed to match those on the photos. Weathering was done with Abteilung oil paints. Thank you for watching.12 points
-
This is Tamiya’s 1/48 Mosquito Mk VI in 82sqn markings. Extras for this build were Eduard’s canopy mask set and zoom interior etch along with Master gun barrels and EagleCal decals. This is the third Mosquito I’ve built but it’s the first one that I’ve been pleased with. Sean12 points
-
My latest. Just a quick build and paint. I hope you like it. Thanks for looking in.11 points
-
Hiya Folks, I don`t think I`ve posted this `oldie' before,.... built from the old Airfix Bucc kit,... first of,..... here are some pics of the real thing; And here is the model,..... on the real aircraft the Light Stone and Dark Earth scheme was applied over the normal DE/DG/LAG scheme, leaving the rear fuselage in the original colours due to jet efflux and the nose radar radome clear too,...... so I tried to replicate this,..... the scheme was brush painted; Cheers, Tony11 points
-
Hi everyone International Rescue is the theme for the IPMS 'Beyond The Box' SIG table at the Nationals in Telford this year. The idea behind 'Beyond The Box' is to take a standard kit and turn it into something other than the manufacturer intended, ideally with a fun factor built in. For my build, I decided to take the Airfix 1/12 'Wallace & Gromit' A35 van and turn it into a fire engine, similar to the Morris Minor fire appliance at the Gaydon Motor Museum. This was my starting point. I chopped off the roof, filled in the rust holes and gave it a nice, shiny red courtesy of a Tamiya rattle can. The wiper blades and A35 badge are 3D-printed parts sourced through Shapeways. The bell used to belong to a Lindt chocolate Easter bunny. The stuff in the back is a combination of Tamiya's 1/12 F1 Racing Tools + children's toys + scratch built items. My twist on the International Rescue build theme was to have a cat stuck up a lamp post - in other words, Domestic Rescue. The cat owner is being interviewed by the local press reporter. Wallace is on hand to oversee the rescue operation. The cat like its owner is scratch built using Milliput. If you would like to see the model close up, it will be on the 'Beyond The Box' table at Telford over the weekend of 9/10 November. The table is close to the Airfix stand. Cheers Richard C10 points
-
This is the scheme that was an Airfix competition winner. It made a change to painting greens and greys camouflage schemes10 points
-
I have been making a 1/1250 Type 22 Batch 3 Frigate, HMS Cornwall, over the past few months and have finally finished it and sorted out some pictures. The build thread is in the Work in Progress section: https://www.britmodeller.com/forums/index.php?/topic/235059421-hms-cornwall-type-22-batch-3-frigate-in-11250/ and there are further details on my blog: https://midlandshipyard.blogspot.com It started off a rebuild and tidy up of a Skytrex model but, apart from the funnel, mainmast, 4.5" gun turret and the Sea Wolf launchers, everything else has been scratch built. The original white metal hull is in there but almost completely covered in brass, plasticard or Miliput.10 points
-
Wasn't sure whether to put this under 'Vehicles' or 'Space,' but it's a ground vehicle, so here goes. During the Apollo program, NASA began using a fleet of (4) M113 Armored Personnel Carriers, acquired from the US Army, as launch-adjacent emergency rescue and firefighting vehicles. This practice continued through the Space Shuttle program, when all members of scheduled shuttle crews -- as a required part of their emergency procedures training -- were taught to drive the M113s, in case some launch emergency (presumably just short of a catastrophic one) should permit the escaping crew to board the empty-and-waiting 'standby' vehicle, to evacuate the launch area with some degree of speed and protection. By all accounts, these 'driving lessons' were one of the most entertaining parts of the astronauts' training. The vehicles could regularly be seen careening around the Cape Canaveral complex's many remote tracks and access roads, kicking up clouds of sand and debris as each astronaut 'trainee' came to terms with the unfamiliar lever controls of the tracked vehicles. In this NASA photo, the next scheduled shuttle launch crew seems to be enjoying themselves immensely as Chief of Fire Training George Hoggard (with reversed cap, making the 'give her the gun' gesture) supervises the training session. I selected Trumpeter's 'standard' M113 in 1/72 scale to build one of these distinctively-liveried NASA vehicles. The kit has a wonderfully-complete interior for the scale, including a respectable engine/transmission and outfitted crew compartment in back...but, oddly, no hint of a driver's position beyond an empty space. I scratchbuilt the basic control details, and added some home-made decals for the various interior warning signs and labels. Externally, I left off or removed various molded-in combat-related and stowage details like the commander's machine gun mount and tool racks and fuel cans. NASA's vehicles were pretty 'stripped down' versions with no need for combat and field accoutrements. The only scratchbuilt details added here were the headlights and their guard frames (to replace the rather anemic kit parts), the empty mounts for the smoke grenades (which were still present, on the vehicle I was portraying), and a rear-mounted 'loudspeaker' horn visible in photos. (Not entirely sure whether this last is a standard M113 fixture or a NASA addition, but it's there.) Paints were mixed from Tamiya acrylics. All decals were home-made. The oddly-shaped 'speckles' (at least in 1/72 scale) liberally scattered over the 'stripe' areas on every surface are the mission patches for each proud launch crew which trained in these vehicles. Of the three oft-photographed APC's, #3 seems to have been the one 'ceremonially' chosen to be decorated in this fashion, since #1 and #2 look 'clean' in most photos. Even on #3, the location and assortment of these patch decals seems to vary widely from photograph to photograph...presumably due to service-wear and ongoing cleaning/maintenance of the well-used vehicles. To display my tiny beauty I whipped up a little vignette base, based on a real photo. While a 'shuttle' oriented locale might have been more appropriate...Cape Canaveral's 'Complex 14' had a cooler sign, and a compelling history. It was the main launch complex used in the early days of the US Space Program, including the Atlas Mercury launches. The 'parking spaces' featuring the Mercury astronauts' names are part of the gate area of the now-torn-down complex, which was restored in the last decade as part of the tourist-accessible areas of the busy base.9 points
-
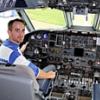
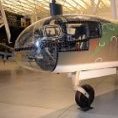
Dear modelling members, Here I would like to show you something american with a british flevor. I build this modell to get more experience in building wings, using 0,5 mm thin plastic sheet. Of course I could have bought the Roden Kit, what I did later( the british version), but I liked to try one in scratch. Also there is much information on the Internet. This american version, build by Boeing, is a rebuild with a new fuselage in a tubelar steel, covered with plywood. I made the marine version ( O2B-1) because I liked the combination of silver with yellow wings. I hope you enjoy the photographes. With kind greetings, JohnHaa9 points
-
Mrs Martian is very often the most useful modelling tool I have. What is the Martian blithering on about you may ask and the usual suspects most probably will. The reason is that Mrs Martian has an exceptional eye for a decent model and is in fact a much harsher judge at Scale Modelworld than I am. I often use this talent of hers as a sort of quality control at various points of my builds. Tonight was one such occasion when I asked her to see what she thought of the sun faded paint effect. She had a good look and said it looked fine but then said to me "But you don't like it do you? Its too weathered for you isn't it?" I had to admit she was right and she went on to ask why I was finishing the model in the current vogue for heavily weathered aircraft when I don't care for it and who was I building the thing for anyway? I admitted she had a point and she replied that I would be daft not to do something about it. Accordingly, the model went back to the Martian cave and the wings, which were the bits I was unhappy about were micromeshed back. I then applied a number of very thin coats of the upper surface colours until I was happy with the effect. I also took the opportunity to replace the upper wing roundels as it had been nagging away at me that the kit supplied items looked a bit too small. I was now a lot happier with model, it now looked the way I wanted. Mrs Martian is now the official wise woman at Martian Towers. The odd thing is that I was fine with the way the fading on the rest of the model had turned out. Cheered up, I then went on to unmask the canopies, attach the winch propeller and finally got to fit the beaching gear that @Ex-FAAWAFU so kindly gave me at the start of the project. There is still quite a bit to do, the guide mechanism for the towing cable and to rig the wires that protected the tail surfaces from the target cable. I also have to make the doors for the under fuselage hatch before she can be called complete. All this of course explains why I am still up at this god forsaken hour typing these words. They pictures are a bit pants but then I was pretty tired to say the least when I took them. Thanks for looking (again!). Martian 👽9 points
-
Here is my interpretation of a Far East Mohawk. It is finished in Dark Earth/Dark Green over Medium Sea Grey, as per the info found in Gerry Beauchamp's books Mohawks Over Burma and Curtis Hawk 75. Cheers Randy9 points
-
Good evening all, This is my latest completion, it started out as a Canada Day quick build back in July but like all builds it dragged on a bit! Although 4 months for a build is quite quick for me lol! So this is the Revell version with a few slight modifications. All the sticky out bits were removed as the fuselage was relatively clean. I did have to make two additions, one on the tail and one under the cockpit. These were made from plastic square section rod shaped appropriately. The seats were reshaped as the kit ones are incorrect and the sponson internals were boxed in. The only extra I added were Airfix intakes as they were deeper and looked better than the Revell offering. I used Model Master Acrylics for the paint finish, the colours aren't 100% accurate but good enough and the decals are from a Cutting Edge set for Seakings. Unfortunately this lacks severely in stencilling which is quite prominent, I used what I could from other sets but didn't go overboard. I also had a major disaster for the "Royal Canadian Navy" decals. While I was doing a little touch up I pulled half of the letting off with tape but alas not much I can do about that. So here she is Seaking 4001 of the Royal Canadian Navy. Cheers now Bob8 points
-
Hi Everyone, Hope you don`t mind seeing another T-28 fresh from the Kitchen table ( I`ve got a thing about Vietnam era T-28`s ) Roden`s 1/48 kit ( actually from the `B` boxing but done to represent a `D` ) Finished to represent an aircraft of the Khmer ( Cambodian ) Air Force towards the end of the South East Asia Conflicts They were supplied to the Khmers under a programme called Project Flycatcher but I`m not entirely sure if this was one of those. Built mostly from the kit but with some weapons pylons made from some from the spares box and some plastic sheet Napalm tanks are modified Trumpy Dragonfly items and a couple of antenna from the stash with wire whip aerial Decals came from AOA`s`Trainers No More` sheet Had a bit of a headache with this one as both fuselage halves were short shot around the nose bear bay but the extra filler helps keep the nose down. Hope you enjoy the pic`s, thanks for looking Cheers Russ8 points
-
Having just seen a wonderful collection of 1/48th oldies here's some 1/72 oldies build for my dear friend JP of Model Art I only seem to have one picture of each so here goes ………... Think this was a Novo CAULDRON - nice they put the name on the tail ….. Revell P47, far too clean ? Heller Hurricane - I was I could give this one the worn look , photographed on genuine sand from the Sahara that we brought back in a film tub, any one remember them.... PJ productions RF84 F. this was the one of the few full resin kits I have built and it weighed a ton. Beautifully detailed with etched perforated airbrakes. And finally for now, Revell Hunter looks like with vacform canopy and metal seat. This one has a special connection to me, any one who knows me well will know it if any one gets it I'll buy em a pint at Telford These were all built between 2005 - 2007 fortunately I thought to photograph them as I went along, To my dear friend JP , as Del boy would say " BONJOUR" Paul8 points
-
Got the first side done and roughly boxed in with balsa: Pretty happy with that. I’m torn between lightly supergluing the other side on to do the other bulkheads or slapping on some auto filler and getting to grips with the shape. Time for a break, anyhow... Thanks for looking, Adrian8 points
-
Latest off the bench is the Eduard kit of the Bell P-39F of 24 Squadron RAAF late 1942 Decals by Eagle Strike. Not a bad kit but showing it's age.....like me Recommended. On to the pics. Please feel free to comment etc. Thanks for looking Dick8 points
-
A variety of T-33s on the Edwards AFB transient ramp. T-33A 52-9667, 123rd Fighter Interceptor Squadron, 142nd Fighter Interceptor Group, Oregon Air National Guard out of Portland IAP, September 1981. T-33A 53-5811, 194th Fighter Interceptor Squadron, 144th Fighter Interceptor Wing, California Air National Guard out of Fresno Yosemite Airport, August 1981. T-33A 53-5950, 123rd Fighter Interceptor Squadron, 142nd Fighter Interceptor Group, Oregon Air National Guard out of Portland IAP, August 1982. T-33A 57-0767, 84th Fighter Interceptor Training Squadron, 26th Air Division out of Castle AFB, August 1984. T-33A 58-0529, 95th Fighter Interceptor Training Squadron, 325th Fighter Weapons Wing, Air Defense Weapons Center out of Eglin AFB, March 1985 T-33A 58-0591, 95th Fighter Interceptor Training Squadron, 325th Fighter Weapons Wing, Air Defense Weapons Center out of Eglin AFB, March 1985 T-33A 58-0610, 5th Fighter Interceptor Squadron, 25th Air Division out of Minot AFB, January 1984. T-33A 58-0613, 48th Fighter Interceptor Squadron, 23rd Air Division out of Langley AFB, March 1985. T-33A 58-0618, 26th Air Division out of Luke AFB, January 1982. CT-133A Silver Star, 133542, unit unknown, Royal Canadian Air Force, March 1981. CT-133A Silver Star, 133467, 414 Electronic Warfare Squadron out of CFB North Bay, September 1981. Thanks for looking, Sven7 points
-
Tiger I 1/35, straight out of the box, except the ropes, they are from something office copy machine. Impression from the model,... it's my first and last model from this manufacturer. Very soft plastic, a lot of pin marks even on a small detail, but nevertheless fitting are ok in general. Thank you for looking, and by the way it's my first attempt to make a tank model,... so any comments are wellcome.7 points
-
Another project, a rather larger one than expected but it's coming.7 points
-
Newelty from Dora Wings7 points
-
Hi guys. Hope you have all had a splendid weekend? I hoped to have the big bird finished over the last two days alas with kids scout camp and meeting up with old friends it just wasn’t meant to be. There was some work over the week but not enough to edge her over the finish line. Let me explain. 😎 First of the missing UC parts got made and painted and weathered. that should make it easier to not flap around in the wind. 🤪 It was really hard to try and see how these things were going to fit and stay fitted in one piece so I decided to fot them boot at a time. While the first leg bits dried I sprayed the nose. don’t worry it’s not a mistake or a Messerschmitt for that matter. I remembered to spray yellow before red to give that juicy colour tone.❤️ Everything was going so smoothly, something just had to give. 🤔 This was it. There seemed to be a blob of water on the wing underside after flying the UC legs. So I mopped it off with my finger. 😱😱😱😱😱😱😱😱😱😓😓😓 it wasn’t water. some TET must have dipped off while I was mid glue. 😓😓 straight through to the blue plastic. Sad but not un-fixable. I decided not to wallow but press on and fix up. The UC wheels and legs got fitted and glued. They actually feel quite strong. The nose got a top red blast. ooooh lovely. After This I set about fixing the wing. Sanding and paint. This shot was taken after I decanted a small amount of TS13 and applied with a brush. That needs to dry. 💪💪 The not quite slotted together UC legs got squeezed in and... bang! They looked pretty much solid. 😇😇 I also drilled that oil drain hole thing. 😇🙌 After a night drying she was able to do this. ❤️ How cool is that? 😇😇🙌🙌🥳🥳🥳 you can just see the rear view mirror on the cutting mat after it’s first coat of black paint. The wing still needed sorting so. a little flory aaaaaaand. done. You can see it if you go looking but it’s good enough and to be fair it could have been a lot worse. And that dear hearts is where we’re at. I managed to Flory the nose after a gloss coat this morning. And that is it. 😫 I did take a nice pic of her in the autumn sun. and that is where she will be until next I’m at the bench. Thanks for dropping my friends. Take care and as always. Happy moddeling. I’m off to bed. Sweet dreams. Johnny zzzzzzz😴7 points
-
Got the construction on the Mossie finished last weekend, eneded up going together better than i had expected given its age. The gun troughs underneath were filled in as per the pics i found. Followed by some painting. Extra Dark Sea Grey and Dark Slate Grey on top, Sky undersides. All Xtracolor. Decals are from a company called Vingtor Decals. This set provides markings for the 6 original Mk VI aircraft operated by BOAC from mid 1943 as well as 3 replacment aircraft recieved in 44. While the first 6 had the Sky undersides, these were re-painted black after several months of operations. The 3 replacments came with black undersides. I have done one of the original 6 in its delivery scheme. The larger outer strips on the underside did not conform well to the large hinges for the flaps. The decal sheet recomends the Tamiya kit and looking at the one i built last year, i think these would work much better on that kit. Weathering will be limited to some light exhaust staining as i want to show an aircraft as delivered.7 points
-
... the oil radiator assembly including etched screens in place, all fits nicely. Cockpit is now to be closed.7 points
-
I know Stew, I know! Better class of people though, largely… In other news, younger daughter got proposed to yesterday! Happy days… To-be-son-in-law had asked my permission last week; that's both chaps that have been 'traditional', which I like but always surprises me in this day and age, old f*rt that I am. They actually asked, you know, in person! For some reason I expected a text or WhatsApp… great guys and I'm proud of them all. It's about time actually. Sophs and Shane are huge travellers and, for the past year or so, there have been expectations that THIS trip would be the one where he popped the question. He waited though until he could find just the right romantic beach, this one in Sorrento. Of course the girls are busy sending photos and messages about the ring. Shiny rocks, cuh! No worries for me - we put a bit in a savings account for weddings some time ago - just happy for them. Apart from the next few months of wedding planning. Best stay out of it…7 points
-
I finally put the finisching touches to my 1/10 scale young miniatures RAF pilot bust It's my first figure in this scale and i had previously only painted some 1/72 and 1/48 scale figures, and a long time before that some warhammer tabeltop wargame miniatures i'm glad it turned out the way it did. the kit has quite a few parts for what looks like a simple bust, mostely the seat and backrest parts, but also some hoses and a mask. the only parts i replaces where the electric wires for the headphones and mask as these had to be bend but where difficult to mine up and rather than to fight out that battle with superglue i twisted two metal wires together, wich gave the same look as the kit parts but was much easier to work with. the figure was screwed to a wooden base, I will probably hide the visible thread at some point with i find a suitable tube to slide over it..Perhaps i drinking sraw or something. it's been a nice to try something different from building aircraft and i'm looking forward to trying something similar sometime IMG_20191025_103557(1) by Jan Legrand, on Flickr IMG_20191020_190637 by Jan Legrand, on Flickr IMG_20191026_142633 by Jan Legrand, on Flickr IMG_20191026_142635 by Jan Legrand, on Flickr IMG_20191026_142632 by Jan Legrand, on Flickr6 points
-
Hi folks, perhaps all has been said about the story of Alexander Vraciu, but it never bores... Finally I paid off my debt not having it in my collection. Also, the Eduard kit is already well known proven in the time and builds simply well. I added only the raised HGW rivets as without them it can hardly looks like the product of the Grumman Ironworks. Cheers Libor6 points
-
Another display build a very simple ( boring some may say ) Colour scheme. Think this was the first kit with etch struts. Rigged with stretch thread Finished with Extracolor RFC Green Side on with background And a couple with out colour Can't decide if I prefer B&W or sepia ? I have a very nice set of 48th figures mastered by Tim Perry which I must find to put with this6 points
-
Congratulations everyone we are on the polling list for 2020, thanks very much @Enzo Matrix That's amazing from a standing start on the 14th October to being in the Poll 13 days later ! Please don't forget to vote for this one when the poll opens. Cheers Pat6 points
-
True story: when I asked my father-in-law (a burly guy and a lifelong member of IATSE, the stagehands' union) he barely looked up from playing Angry Birds on his iPhone and said "sure". Only 8 years this past July for us, though, so we'll see. Planning my wedding is in fact why I've joined you all here on this site. Mrs P and my mom didn't get on (my mom called her a "sociopath", and the then-future Mrs P called my mom a "compulsive liar") and to have something else to think about, I decided I'd buy a few 1/72 scale models online and see how it went...6 points
-
Getting close now! I am getting close to two critical parts of this build; painting it and sticking the top wing on. Neither are likely to be easy and both, I believe, will test my skills rather severely. The whole 'biplane' thing is fairly new to me (I've done one or two kitsets but that's about it) so I'm not entirely comfortable with how to attach the top wing and do all of those struts and so forth. So I've been doing a bit of testing regarding how to go about this. The most successful test is shown below. Here some magnetic Formica (a thin metal sheet with Formica bonded on either side) has been chosen as the material to make the struts from and a sheet of plywood simulates one of the wings - it doesn't really matter which one. A couple of slots have been cut into the plywood and the struts glued into place. Note the outrageous 'leaning forward' raking angle on each strut, that's kept me awake at night. This approach seems to work OK, although the Formica is very hard to sand to shape where it sticks above the top wing and below the bottom wing, so in the final case I might replace it with some thin strips of hardwood so that I can ensure smooth final surfaces. So with the basic method of attachment decided on, I can get cracking. First mark up the locations of each strut position as carefully as possible. Drill a hole at the marked point. In fact drill a pair of holes at the attachment point (top and bottom wing) of each strut. Now - using a very fine jeweller's saw - complete the slot between each pair of holes - make the slot the correct thickness to ensure a tight friction fit. Glue will be needed for these struts but I want to use the smallest amount possible. While we are here and have the Dremel handy we might as well drill some very fine holes at the strategic locations where the rigging will be anchored. And whack some holes in where these 'bonging hoops' must go. 'Bonging hoops' because they stop the wing tips bonging the ground. And now - except for the fact that some masking must go back over those central struts - we are ready to prime. The main reason I put this photo in is because in the foreground you can see a hardwood strut dry fitted into it's intended final position. About 30 minutes after this photo the final prime was completed and touch dry. Here's what it looks like after the primer with all of the completed parts dry-fitted together for a preview. There's still priming needed on the undercarriage and so-forth, but the main airframe is now ready for paint! The stitching looks a lot better now that it's blended into the background. Here's what she looks like from ahead. and behind, and here's the overview complete with the top wing standing by - ready for paint. So that's what I've been up to this week. Drilling lot's of holes and spraying some primer. Expect some procrastination before a proper painting update. I'm not very brave with an airbrush. 😨 Best Regards, Bandsaw Steve.6 points
-
I'm calling this one finished, although I may add a little more oil staining on the underside. Decal are all one, I used the kit ones from various of the four options provided, as I only needed the black crosses. One thing I did need to do was get the correct serial number on, which is 425/17. Fortunately I had a decal sheet in the stash with just the right size numerals and very close to a matching font. All I had to do was use the kit 'Fok.DR1 477/17' and replace the numbers. Also, I wasn't sure whether or not it had the weight table on the cockpit side. One of my references showed it in an artwork, so I went with it to add a little extra interest on what id otherwise a plain finish. Here it is, 425/17. Manfred von Richthofen, and Moritz, his dog. Thanks for looking, and the comments along the way. I hope this may be of use to anyone contemplating building this kit. I would say that at full retail price in the UK it is somewhat expensive. I got mine for a reasonable £30 from an Amazon seller, making it a worthwhile build. No doubt the forthcoming Wingnut Wings kit will surpass this one in every way, but this one is still worth it if you can get one at a good price. More pictures in Ready For Inspection John6 points
-
Hi chaps, I think the experiment worked out with quite interesting results. Here is the start which looks like I’m sponsored by Tamiyas tape marketing division 😄 With some medium gray and a touch of ak xtreme metal pale burnt metal applied Just pale burnt metal at the rear I lightly sanded that painted area down so it got duller, Then applied ak xtreme metal polished aluminium everywhere except the rear end. I’m really thrilled about the result but its impossible to capture on an iphone. Here i’ve shot it in lots of different light conditions to attempt to portray it. I really like it in the flesh its not too over shiny and the preshading is visible. The masked parts have a really nice subtle difference the other areas. My airbrush spit a few times so I have absolutely no idea how to remove those marks? 😢🤔 Theres a small one here below in the centre but there are bigger nasty ones. And the metallic paint finish is a tad ‘fleck-y’ really close-up but otherwise it looks pretty cool in the flesh i consider. Maybe more thinners was needed. I think if i were to do it again though I would do the opposite and mask off the dull parts and spray the rest darker gray as the dull parts would have ended up feeling shinier than the shiny parts without the sanding. I should have shot it against a starfighter i have on the backburner. It had a gloss black base and an extreme metal polished aluminium overcoat. Thats really shiny too much I think - I want this to feel used. But anyway, i think next step is to figure out how to remove the ‘spit spots’ then i might experiment with this stuff in some panels... not sure...6 points
-
The second stabiliser was glued in place and thick tube glue used to do a little gap filling on the underside. I then applied some filler, thinned with a strong acrylic solvent that I normally use for assembling parts. The parts were taped in place to hold it all still while the glue hardens up over night. Here you can see the vertical stab false trailing edge with filler applied and also the fairing leading into the tail gunner's glazing. I'll probably get primer on and check the look of everything before I consider fitting the tail glazing.6 points
-
The last twenty four hours or so have seen me pretty much in Wibblesville as I tried to get all the decals together to carry out the scheme I was describing in post #1239 (Have we really been wittering on that much?) I finally managed to get all the necessary decals together from the old decal bank, kit sheet and the new decals I purchased. I was sorely tempted to go for the C type roundel on the fuselage but seeing as the one picture we do have of a Bermuda Roc has an A type, I went with that in the end. Next up having decided that this model did need some weathering, I fought of my natural instinct to go for a pristine model and sprayed lightened tones of the two grey over their respective areas, followed by a light misting of the two grey in their neat state to blend it all together, thus creating a patchy and faded effect. One thing I did do which, in retrospect was not worth the effort was to spray a gas waring panel on the port wing. By this stage of the war these panels had either pretty much faded away and/or been painted over. I chipped away at the yellow of the panel and the lightly airbrushed over it. It's only possible to see if you look at the model really closely so another time I would give this a miss. Thanks for looking Martian 👽6 points
-
evening ladies so, it's been raining all day here, so what better excuse that to spend the day at the bench here is the task - something else I have been quietly dreading as it's so distinctive... ..the B/C doors are very different to the D, so this pic of Lopes Hope is super valuable reference.. I started by getting the PE templates I had made a while back along with lots of other bits & bobs after scaling the drawings - once I had these I made up laminates of sheet stock until I had the thickness right and dremmeled out the wheel disc and started to prepare the indentations... ..further refining the shapes and a quick test to see how the skin responds to the plastic core shapes.. seems ok so we press on... ..once the core is finished and has cutouts for the retraction arm etc added, it was lightly CA'd to a perspex sheet to start the skinning process... ..after one try where I split the sheet, I CA'd the core to the PE door template and then CA'd that to the perspex - after working it some details start to be added.. ..the sheet was then removed from the core so the raised rivets can be added.. ..the outer skins were made up.. ,,and after making the covering strip & painting it, the doors were assembled & detailed with brackets etc.. ..this side has a strut mount in a semi-circualr indent.. ,,and this side has the retraction strut mount.. ,and in place will look something like this.. ..thats it for now, lets hope it rains again tomorrow TTFN Peter6 points
-
Ciao Marco, benvenuto! Thanks for the praise, much appreciated As far as the kit goes, it's my first Revell in a very long time, and probably my second overall. I think this particular kit suffers of a bad engineering but also shows that the moulds have probably worn out a lot. I have a Revell Tornado in my stash (which I also intend to do as an AMI airframe), I just hope it won't be that troublesome Thanks Cookie, glad you like her More shades of grey went on, see below. After a five days long exhibition and a hectic second part of the week, I finally managed to get to the bench today; I first did some masking for the U/C bays These were airbrushed with the same off-white I used for the intakes (Tamiya Flat White with the addition of a few drops of Tamiya Sky Grey). Same of course for the U/C bay doors interiors and for the intake lips Then a second round of masking for the canard leading edges, the intake lips front edges ... ... the fin frontal edge and the intake edges I also masked the radome and the wing pod tips; those are of a different color with respect to the other bits I masked. I then airbrushed a lighter version of the base coat (obtained by adding a few drops of Tamiya Flat White to the initial mix) on the first group of masked objects, while the radome and pod tips were airbrushed with Mission Models Light Gull Grey, thinned with water. After unmasking One of the intake lips needed touching up for the off white area, but apart from that the lighter grey looks about right to me. In fact, you can see it's different from the base coat only looking at it at certain angles, just like the real thing - happy with it And here's the aiframe So, how many shades of grey have we encountered so far? Primer, German Grey for pre-shading, base coat, lighter base coat for some edges, Light Gull Grey for the radome and pod tips ... and the off-white for the U/C and intake interiors. Oh, let's not forget the cockpit, a mix of Dark Gull Grey and Light Gull Grey . Seven shades, if I'm not mistaken. I think we're done with grey, minus the panel washes. Next I'm going to paint the metallic areas - more masking Prior to that, I'll spray another protective gloss coat, also to blend in the newly sprayed areas. That's it for tonight, all comments welcome Ciao6 points
.thumb.jpg.a3c1d5bbcebc79ab61805be20902890f.jpg)


.thumb.jpg.d17ff607fc7e89ed057e63fcb6f2a888.jpg)
.thumb.png.03cf829e3ab23b3f04fe2590dd61bc3c.png)


This leaderboard is set to London/GMT+01:00