
Leaderboard

.thumb.png.03cf829e3ab23b3f04fe2590dd61bc3c.png)


Popular Content
Showing content with the highest reputation on 22/10/19 in all areas
-
This is the first start / finish build of the year, better late than never. I started it earlier in the year but lost my mojo and it went back in the box. I started it again last month and flew through the remaining stages. A lovely kit although the clear parts fought back a bit. I've got decals for a Finnish aircraft on my next one. Done with the Xtradecals of 44 Sqn K7133 although the decal instructions are wrong going off photo's I founds in a book. It was built from the fighter kit and so I struggled with the location for the fuselage bomb racks and think the front one should be further forwards. OOB apart from seatbelts and the SBS riveter to add more interest. Cheers Neil48 points
-
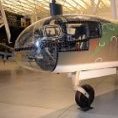
I've not been able to build anything for a while having moved house in the Summer from London to Flintshire but finally managed to get a workshop set up in the spare bedroom. I stumbled upon Revell's Wright Flyer in a bits and bobs shop in Mold, paid far too much for it (don't ask) and took it to my new home in anticipation of a relatively easy build. How wrong could I be? This was an absolute ig-pay to put together! I'd looked at the plans and the parts and thought, I can handle this, I'll have a look at the Britmodeller site and see if anybody's done it so I can pick up a tip or two. Right now I have to give many, many thanks to Bengalensis who put his excellent build on the forum abut 5 years ago and without who's help mine would have been in the bin after the first few sessions at the bench. As I looked through his procedure and the way it varied from the instructions I saw the logic of his process and decided shamelessly to copy as much as I could. With a confident cry of "Onward and upward!" I donned the magic glasses... When I got this far... ... I began to suspect a phone call had been made... ...but I soldiered on. I've never tried to rig a biplane before but I thought, this is a big scale, 1:39 (Excuse me? 1:WHAT??? What kind of wacked out scale is 1:39?) so how hard can it be? By the time I got this far I'd stretched my vocabulary, honed over 40 years in the music business, 20 of them at sea, to the limit and the cats were wearing earmuffs lest they die from shock. Fortunately the missus is a working class lass from Liverpool so she was unaffected... I couldn't make head nor tail of a lot of the rigging despite having several pictures and diagrams available at my googletips and the excellent pictures on Bengalensis' build so my attempt went progressively from "I wanna rig this right on the nose" to "Let's get it really close" to "Maybe I can get it reasonably convincing" finally settling at "Well, it's near enough for rock n roll". All in all it's the hardest build I've attempted to date but I think it can get through the "Two Metre Test", even with clean glasses. I've never attempted any sort of diorama work before either so I used a bit of hardboard for the base figuring it was a decent facsimile of sand colour and did a bit of Jackson Pollock to mucky it up. Here she is, all done and dusted. Wilbur came out looking like my dad, although I can't picture the old boy running with so much energy. I think the last time dad ran at all would have been in RAF boot camp in 1940. I'd thought a successful engineer and businessman like ol' Willie would have worn a watch but when I considered my chances of painting a fine chain across his waistcoat I decided he just kept it loose in his trouser pocket. And is it my imagination or does Orville bear more than a passing resemblance to Super Mario? That moustache gave me a lot of headaches and went to the point of "Stop, Pete, before you make it even worse!" I know it won't win any prizes at the model shows but I'm betting it's the best Wright Flyer on my street, if not all of Buckley. There are four kits waiting for me in the shed including the new(ish) Airfix Wimpy that's supposed to be the cat's pajamas but the workshop has to get removed from the guest bedroom for a couple of weeks in anticipation of a visit from my sister so you're all spared from viewing more of my bodging a little longer. A table cluttered with paints, glues and the other various accoutrements of plastic sticking is not the sort of thing an old lady likes to see in the morning before she's had the first cup of tea. Cheers, lads, as usual I hope the prose gave you more to laugh at than the pictures.38 points
-
Whilst searching for some of my daughters pictures I found a folder with these in. It was built for Display in GeeDee models in Nottingham , now sadly closed like so many Local model shops. This was built back in 2012 when first released, I remember laughing as my little girl had hold of it, when it was part finished ( 3and a half then) zooming it around the sky making jet noises. I stopped laughing as she 'landed ' it at what would of been about 30g if it was real and a ROD that snapped off all the U/C. Fortunately a quick call to Airfix had replacement parts on rout and it was repaired, painted and put on display before she got a second trial flight. Seam to remember it was as nice kit, about time for a re release as I understand they are fetching quite a bit, most of them stashed away no doubt. Finished in all over white courtesy of Xtracolor enamel. Would like to have got some shots with a better background but time was against me. With a just started Gnat for scale A bit of inspiration for Timmas I hope Paul37 points
-
Hello guys... Here is my work, done for my great friend, Renzo Bortolotto, dedicated to my favorite airplane... UK obviously I used a Fujimi 1/72 box and OOB builds Cheers for looking ciao Silvano34 points
-
A build from a couple of years ago. I can't recommend this kit highly enough. For the price it's a fabulous little build, virtually falls together. The two tone blue scheme attracted me to it in the first place. Paints were a mixture of Revell Aqua and Vallejo brush painted, although i can't remember which exact ones. Not one of my best efforts but thanks for looking anyway 🙂22 points
-
Hi all She was delivered in bare metal dress by England to Yugoslavia. The kit is really complex for the integration of photo etched flaps and it was hard to achieve a decent result. Cheers Pierre21 points
-
I present my Revell Airbus A319 in the new livery of American Airlines N800IN. The build was OOB with the addition of Braz Sharklets and aftermarket decals from 26Decals and Authentic Airliners. It was a straightforward enough build, with the usual removal of the additional flap track fairings for the A321. I’ve had this model on my bench for a long time, but just never got round to finishing it off... so I’m trying to get through unfinished projects before starting anything new. I still think it looks quite strange seeing an A319 baby bus with sharklets... The paint mix I went for was mixing Revell light grey 371, Revell white gloss 04 and a touch of Revell Silver 90. It was a case of keep mixing until I found a shade I was most happy with. It was then brush painted. Wings and stabs are Revell 371 with Revell 374 coroguard section. Was then clear coated several times with Humbrol Clear, and then finally glossed once the decals had been applied. Thank you for looking and as always any constructive feedback and comments are welcomed. Next up to finish now is my Germanwings A320. Regards, Alistair My model against the real thing...16 points
-
Another shelf of doom rescue. This was a nice little kit, went together with no problems.16 points
-
Been busy today taking pics of a few models finished recently. Hasegawa's 1/48 P-51D OOB except Albion Alloys gun barrels and Aussie decals P-51 Mustangs Europe WWII - RAAF (A48003) Another sweet build - love it when there are no snags to halt the build. 3 Sqn RAAF based in Fano, Italy 1944 converted to the P-51K Mustang giving them a colourful blue rudder with the Southern Cross. Colors were U.S equivalents of the RAF's Dark Green and Ocean Grey over Medium Sea Grey. Mixed from Tamiya colors to be slightly different from their own versions of RAF day fighter scheme colours. Please enjoy15 points
-
Another of last year's builds. Cracking little kit although i found the undercarriage assembly a little tricky, but that might be my fault. I've the Royal Navy one in the stash so I'll see if i can do any better next time. Used a bit of artistic licence and swapped the small fuselage roundel in the kit for a larger one from the spares box as i seem to have seen both variations used at the same time in photos and i much prefer this look. Brush painted by Vallejo Model Air and Model Color, plus their matt varnish. Panel wash by Mig and some Tamiya weathering powder to finish. Cheers for looking.15 points
-
Following on from my build of the old Airfix Savoia-Marchetti SM.79, here are the pictures of the completed model. Build thread here: https://www.britmodeller.com/forums/index.php?/topic/235048734-savoia-marchetti-sm79-lebanese-style/13 points
-
As you may know I was rather critical of a certain editor a few years back, and I will stand by those comments about that time. However, one thing did strike me and that was the notion of the armchair critic who finds it easy to mock but is unwilling to assist; and by that I mean in all walks of the hobby, not just print magazines. So in an effort to atone and secure my place in Plastic Kit Heaven, I have over the last few years released my own decals and now I've started writing articles for magazines, which some of you may have seen. So here is my take on what's what, and I'd be interested to hear from other members who also write articles as to how much they concur or diverge. The first thing you have to realise is that magazines are not put together by huge teams. Editors will expect contributors to provide their own text and photos with captions, and at about 500 words per page when one allows for some pictures too, it is amazing how soon one runs out of words for say an average 2500 word piece, if one is trying to give a decent balance between detail, interest and readability. I think I re-write my articles 3 or 4 times before I get them down to this. The notion that writers will pad out articles to get payment for an extra page might have happened (we are all human and capable of venality if so inclined) but for me, if I'm asked to write 2500 words then thats what I aim for. If I'm asked for 5000 I can be more detailed and describe things in depth. My last article was 2545 words, and I think I spent 3 hours getting down to that from 2600. Believe me, at this level every word matters! I write in Google Docs which will spell check and context check if you want it to too. I would encourage any contributor to spell check and context check. Spell checking and context checking can be tricky with technical language. Mention RLM colours or FS numbers and see what happens. Contrary to what you might think there is not some huge resource of proof readers and spell checkers on hand to do this for you at the magazine. You are an adult. Have some pride in your work and submit something that is spell checked. Editors will proof read and rewrite if required, but they do miss things as you lot are quick to point out!. If the number of people that some of you think worked on these publications actually did exist, we'd all be paying about £40 a copy to cover the salaries! If you think it's easy, try writing an article for yourself. Make it 2500 words and try not to repeat the phrase "then I assembled", or "I glued x to y" more than 5 times too! In between building the model pause at regular intervals to take several shots of each construction phase. Shots must be properly lit, on a consistent background and with decent depth of field. Now do this while not building a model that you would normally make and keep the text interesting. Hell keep the build interesting too. You have three weeks to do this. You aren't allowed to give up, shelf of doom things or just decide you can be a week late because you cant be bottomed. Your three weeks will include research on the kit subject so you can be familiar with what you are making. You might miss details that a real expert would spot, but then they have spent many years fathoming the intricacies of their pet love. If you are fully 'genned up' on the Avro Lancaster for example, get yourself to a similar standard on the Mig 17 so you can state with certainty which Zavod the C variant with the 5% larger airbrakes came from; model that on the kit, and paint it in a scheme that is as accurate as you can make it. Three weeks. I assure you it is not easy. I find that writing articles and building for such is a completely different ball game to building for one's own pleasure. Now consider the editor who must compile the humble offerings of his contributors, select images and generate his own content too. My experience is that the average working day for these guys is a lot more than eight hours. Probably more like 12, with up to 18 as deadlines draw near. It is a job. They do it to the best of their abilities, and they are not paid a fortune either. An old saying states never to turn a hobby into a career lest it become neither. Well these guys do, and they do it well. You get a typo, yes – that is annoying. Does it detract from the article? Most probably not. Will it annoy the editor they have missed it? Yes. It will and it does. But it does happen. If you think they are just slack, or can't be bothered, or are incompetent, or are too busy fondling lots of "freebies" then you are wrong. Utterly wrong. You do them a great disservice to think that. So, dear reader. The next time you find the spelling a little off in an article, email the editor to let him know. Be polite and proactive, and you will most likely get a reply apologising and promising to try harder! If you think the standard of writing is not very good- then why not have a go yourself? Editors are always looking for new contributors. Surely it's better to add something creative and positive to the hobby than just sit there and mumble over your keyboard? Ultimately your money is required to keep magazines going, and we still live in a free country where purchase is at your discretion, so the ultimate criticism you can level is to not buy of course. We all grumble, we all like to moan and whinge. It's human to do so. But perhaps cut editors a bit of slack from time to time. They are human too.13 points
-
Two Seat Harriers TAV-8B and Harrier T.2 Both of these were built in the early 1990s. Both are 1/72 scale. The TAV-8B is the Italeri kit built to represent Bu No 162747 coded SD 626 of the US Naval Air Test Centre which took part in the 1988 Farnborough show. The RAF machine is the Heller / Humbrol 'Bobcat' kit with quite a few modifications to represent XW267 / T of 233 OCU based at Wittering in the early 1980s13 points
-
Now that I know what Spitfires I'm building, I was able to look up their serial numbers, and Doe's X4036 and Hughes's X4009 were part of the same Eastleigh production block in July of 1940, and so likely would have had the plastic/bakelite/whatever-but-it-was-orangey-brown seat seen on many Battle of Britain-era Spitfire Ias. I painted mine with a tin of red-brown Humbrol enamel thinned with hardware store naptha, and discovered in the process that my trusty Badger 105, the M3 Grease Gun of airbrushes, needed a new spray head, but amazingly, I had a spare on hand. Luck was with me! Luck being with me always makes me nervous. Battle of Britain-era Spitfire Is had the head armour which the Airfix kit very thoughtfully omits. At first I thought I might have some leftover PE head armour from an Eduard Spitfire, but it seems I don't, so I did minor surgery and sanding on a styrene plate left over from one of the many Eduard IXs I've built, and grafted it to the kit part, after drilling out the lightening holes: Erm, that's it. That's the whole update.13 points
-
I present the Hasegawa Embraer 170 in the well-known “Krakow and Malopolska invite” livery carried by SP-LDC between 2009 and 2012. The tail features Leonardo da Vinci’s painting “Lady with an Ermine” which is one of Poland’s national treasures. Although the kit has been around for many years this is the first time I’ve built it. It was seriously overpriced on UK release but several years ago I managed to get a couple at a sensible price via HobbyLink Japan and they’ve been in my stash ever since. It seems that currently the kit is only available in Japan and various Japanese sellers have it listed on eBay at prices ranging from £26.52 to an utterly ridiculous £108.01. The kit fits well and the scribed detail is generally good. However some areas are basic, notably the undercarriage. There is a PE set available from Extra Tech but I’ve never really liked PE and my eyesight is no longer up to assembling nine microscopic parts to make one undercarriage door for a small aircraft like the Embraer 170 so I contented myself with thinning the kit doors and adding a little detail. I did use the PE to improve the undercarriage bays and also to add pitots. Apologies for a bit of a rant but it’s beyond me why most PE makers can produce scale sized hinges for undercarriage doors but then give you pitots resembling part of the radar array from a WW2 Luftwaffe nightfighter. The Extra Tech set was no different and much fiddling and cursing was needed to get things looking reasonably presentable. Paint is Halfords Appliance White and Racking Grey with Tamiya and Revell metallics. I was going to use a set of Nazca decals which I’d bought at the same time as the kit but I discovered that some of the lettering was over-scale to the point that you couldn’t make an accurate model with it. Fortunately BOA have covered the same scheme so the tail decal is Nazca and everything else is BOA. Detail decals are from the kit sheet and windows are by Authentic Airliners. Thanks for looking and as always constructive criticism is welcome. Dave G12 points
-
Hi! Here's another one of my builds - a ww2 corsair, heavily used with exposure to sun, sand and salty water.12 points
-
This is my Sharkit 1/72 X-31. The X-31 was a joint venture of Rockwell International and Messerschmitt-Bölkow-Blohm and was designed to test; vectored thrust using 2 carbon-carbon composite paddles, flight at high angles of attack, and post stall maneuverability. For more information see https://en.wikipedia.org/wiki/Rockwell-MBB_X-31. This was my first Sharkit kit. It was all resin with a vacuform canopy. I would rank the resin as on par with Anigrand although I spent a bit more time in "pinhole hell" then I am used to. I know that many of you love vac canopies but, I hate them and this one exemplified all that I dislike about them. There were actually 2 canopies included but they were not 2 copies of the same one. One seems to be for having the canopy closed and the other for the canopy opened. The one for canopy closed did not have the frame included since it was molded into the fuselages, while the canopy open included the framing so it would have required major surgery to the fuselage to remove the moulded in frame. None of this was specified in the instructions so I am guessing. In both cases there were no, or poor, indications of where to cut or panel lines. The parts list on the instructions included something called "canopy resin help" but I couldn't find it. Since I usually do canopies closed I first cut out that version. Without any indication of where to cut this added to the usual difficulty of cutting out vac canopies. What I ended up with was a little too small. Next I tried the canopy open version and that came out too large. After hours of trying to trim it down one and trying to stretch the other I finally ended up with a passable fit. But there was a very ugly seam. So more hours were spent trying to blend that in. This resulted in clouding the canopy and at one point blowing completely through it. At that point I considered trashing it and waiting for the promised Modelvit version to come out. But I soldered on and came up with what you see below. The decals appeared to be printed on a medium resolution inkjet printer and for the most part held up well but there were a couple spots where the color rubbed off and needed touch up. So, here it is. Next up will be the Italeri HO4S-3 that I will be building as one of the first ASW helicopters Enjoy.11 points
-
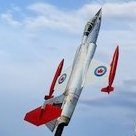
Hi all, This is my 1/72 Hasegawa CF-104 Starfighter. The CF-104 Starfighter was a modified version of the Lockheed F-104, built in Canada by Canadair under license. Canadair manufactured 200 aircraft for the RCAF. The CF-104 entered Canadian service in March 1962. Beginning in 1983, the CF-104 Starfighters were replaced by McDonnell Douglas F-18 Hornets (CF-18s). The last CF-104 was phased out on March 1, 1986. This particular plane (762) entered service on May 1, 1962. It crashed on June 9, 1981 when the aircraft struck trees on a simulated tactical delivery. The pilot ejected safely. About 110 CF-104/CF-104Ds were lost in accidents. My model is painted with Vallejo Metal Colors. The decals are from Canuck Model Products. Cheers, Mark11 points
-
Boeing 727-31C Trans World Airlines, early 1960s Revell 1/144 727 kit with all surface detail sanded off and rescribed Finish is Halfords Appliance White, AK Extreme Metal Polished Aluminium and various Xtracrylic greys Decals from Classic-Airlines.com This is the scheme in the early Airfix 727 kit and I think it's one of the most attractive 727 schemes. Not entirely happy with the nose and nose gear areas on this one. I shortened the kit nose leg and fitted some smaller nosewheels which improved things.10 points
-
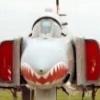
The model I've always wanted to do. It's nice, it's old, but I always like the Phantom Italeri. I am pleased with the end result. Here's the picture.10 points
-
Brengun's resin Renault FT is a remarkable little kit!10 points
-
A FROG Comet was one of my contributions to the Classic FROG Group Build that ends this evening. A joy from start to finish. The build came out of the blue, with a quite amazing offer from Cliff who donated the kit to anyone who fancied having a crack at it. I caught my jaw before it hit the ground and replied before my next breath! The build was as smooth as silk. Not too many parts in the first place, the usual early FROG excellent fit and a straightforward out the box assembly made for a completely hassle free build. The BOAC scheme is so nice it is almost impossible to get it wrong. A beautiful cheatline, very smart blue and white paintwork and all that lovely polished metal just want to make you go the extra mile on the thing. The metalwork would have stalled a bit as my weapon of choice for this sort of finish is the long gone S 'n J polishing powder. I was just about out of my ever diminishing stocks when rescue came from a very kind offer from Charlie, who sent me a near full bottle of the magic powder. Thanks Charlie, you and Cliff were stars here. I made a simple base out of card, sprayed with auto primer misted on and a basic grid ruled off in fine marker to give me a hardstanding. Yet another helping hand, Mike Dean in this case, turned up the Matchbox Commer van for me. A strip down and refinish in generic BOAC colours got me a bit of ground support equipment to sit alongside the plane. An internet purchase of a bag of 1.100 scale figures got me a pair of pilots to add a bit of life to the scene. I think pictures taken in a coal cellar would have come out fine with this build, the thing just loves the camera! Those polished wings catch the eye regardless of light source or exposure. Enough of the rambling, here's the finished model... The build thread is here...9 points
-
Ah Keith, Yellow Fever… that's the one injected into the muscle with the thick needle - nasty memories! Thanks Bill, very helpful, especially the two I haven't snipped. I won't (ahem) be modelling the mechanism but the racks will get some attention Thanks hendie Thanks Johnny, getting there Thanks SD, kind of you Bombs are done: …and in need of some racks. The instructions say use PE8 and PE9 on both sides of the racks but… … they're numbered 8, 9, 10, 11. No worries, they're obviously pairs and my new bender made short work of the bending job: Note that one bit of PE has holes and the other doesn't. The bit with the holes goes on the side with the short racks, like this: Don't glue 8 & 9 to one rack first or, like an idiot, you'll have to rip one off and stick it on the other rack before the Gator's Thin dries. Not that you would of course. Just sayin'9 points
-
I recall many decades ago someone much more clever than I suggested that aliens would never visit Earth. The logic was somewhat along the lines that in order to get here they would have to be cleverer than us, and anybody cleverer than us would already know what we were like, and therefore have no desire to come here.9 points
-
Sea Harriers FRS.1 - Falklands War period - May to July 1982 Back in the 1980s we had only the Matchbox Sea Harrier kit to work with, and both these builds used that kit as a basis as they were finished sometime in the mid Eighties. I well remember the 1982 Yeovilton Air Day where many Sea Harriers were on display, both those just returned from the South Atlantic and those being prepared for the next deployment down south aboard HMS Illustrious. I based my upgrades of these kits on those superb drawings by the late Mike Keep which appeared in Scale Aircraft Modelling magazine, as well as my own photos. Mike was relentlessly in search of accuracy, and I know that he drafted these drawings in front of a real Sea Harrier at Yeovilton. My chosen subjects were XZ457 coded 14 as part of the HMS Hermes Air Group, and ZA193 coded 254 of the reformed 809 NAS. XZ457 was finished in the overall Extra Dark Sea Grey scheme and scored three kills during the conflict, these being marked under the port cockpit as two Skyhawks and one Mirage. It is modelled in the static configuration with upper auxiliary intakes open, undercarriage doors open and tailplane in the 'at rest' state. ZA193 was finished in the Medium Sea Grey / Barley Grey scheme and joined HMS Illustrious for its post-conflict mid 1982 deployment to the Falklands area. The model is finished in the taxi-ing configuration with pilot in the cockpit, all the auxiliary intakes open, undercarriage doors closed and tailplane in the neutral position. It also has the larger drop tanks fitted at this time, which were made from cut down and reshaped Airfix Hunter tanks: Both models were fairly heavily modified, including filling in the famous Matchbox trenchlines, new crash-moulded canopies, opened intake doors, airbrakes extended, antennas and lights added, stores added from other kits, replacement pitot tubes, and probably some other things that I can't remember after all these years. They both survived a few house moves and storage in the attic for years and years and it was good to see them again recently for a photo session:9 points
-
Thanks for the kind words guys. Glad you’re enjoying the build so far. Thanks for that John - I used some copper wire with a blob of crystal clear to make it - painted it and installed it. A nice little bit of extra detail - thanks for the suggestion 😀 With that, I was finally able to close off the fuselage. I had done lots of dry fits so there was wasn’t any issues. Everything fit very nicely together and aligned correctly. So far, this is a very nice kit. You can just about see the flaps lever buried in the cockpit:) I did a little sanding and filling / using Tamiya white putty and sanding it off after a few hours dry time. This is just a first pass - some primer will show any issues. Turning now to the other area I wanted to modify - the wheel bays - the kit provides a fairly good but simplified version typical of most kits - the real version looks like this: This is a modern refurbished example but provides an idea of how crowded this area actually was. I’m not intending on replicating this exactly but I wanted to acknowledge it with some additional details. So some copper wire and CA glue - This is still a work in progress and is only part of the wheel bay - but I think I can busy things up a little. It’s pretty tedious work but I’m sure it will look nice when its all painted up. The eduard pe provides wall over lays for the wheelbay and should cover the seams between the 2 sections nicely. To be continued... Cheers John8 points
-
Priming the Pepelatz I was thinking that modern resin kits have become too boring, too crispy, too accurate, too well fit. Then I recalled that somewhere in the vaults lurks a bulb of resin called Gonzoid Aliens APC that fits this GB perfectly so I fetched it for the challenge. This is an Old Skul resin kit, one that mothers scare children with, the like that made Resin a bad name. Good kit, I like it! The biggest problem are the wheels - too skinny with wrong protector pattern. I'm thinking about building wheels from scratch. Using my usual "paper+superglue" technique to fix chipped edges. A revealing coat of primer. Next to boring Pepelatz. This thread is certainly an inspiration.7 points
-
Evening everyone, This is my Eduard 1/48 weekend 109E. Painted with Mr Hobby and Tamiya and using the decals from the dogfight duo Airfix 109 as I thought the yellow nose looked so cool. I was pleased with how the exhaust came out and the restrained mottle. She was a fiddly build around the engine and I didn't care for the tail and main gear attachment points which seemed very fragile. That said she has been built a while now and is still a 3 pointer so I guess they are stronger than they looked. Any thoughts welcome. Thanks for looking. Rick7 points
-
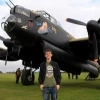
Cheers P. Knitting is done... ...and the nets are on. Attention now goes on those aerials . Stuart7 points
-
7 points
-
This is a a Dragon German 3t 4x2 Truck w/2cm FlaK 38 (2 in 1), kit number 6828. Its a beautiful kit rich in details. Some scratch building in the engine compartment. Radio is from a Tamiya kit. Personal equipment is from another Dragon kit. The headphone and microphone is from Royal Model.6 points
-
Hi again, This is my latest build. It's looking like my camera skills haven't improved one bit, I need to figure out a better location/setup to take photos of my models, sorry about that. Anyway, this is the build: Kit: Revell F-89D/J (No. 4568) Model: Northrop F-89D Scorpion (USAF) Scale: 1/48 Aftermarket: None Paints: Vallejo Model, Air & Metal Color Weathering: Oil paints, Flory Models Wash The kit was by no means perfect (it's from the early 90's) - nor was my build of the kit ( I can point out dozens of mistakes...) - but all in all I'm still very happy with the overall look. I did not stress about it too much but was just enjoying the build and was in awe how cool a plane the Scorpion really is So I hope you enjoy. All comments & constructive criticism are welcomed! One thing that I'm trying to figure out the best way to weather raised panel line kits, washes don't really work that well. Maybe some airbrush magic? Would love to hear your thoughts on that. And here's a shot with Monogram F-102 Delta Dagger I did earlier this year. Big planes, both of them!6 points
-
Cheers Guys for the comments, I've been plugging slowly this week but not as much bench time as I would like. Not much to show apart from a scratch built fire extinguisher bracket and few other bits that I've working on. First up is the bracket, sitting by the back door. Painted up the scratched extinguisher, decal came from the Mike Grant 48th scale cockpit decal set. Just out of the spray booth is the radiator, I think these were green but I'm not sure on actual radiator matrix and housing, I'll probably run with gun metal? The housing is MRP Forrest Green, dry ready to mask up in about 3 minutes, gotta love the stuff !! Cheers for dropping by Dan6 points
-
This will be the next one in my list 🙂 The whitebird not the lady 😁 Serkan6 points
-
Hello Please check out my newest project. It's Akagi in 1:350 scale from Hasegawa plus tones of PE. Cheers5 points
-
Inevitably, my 1940 interest bubble must include smaller players in the larger events of the year. In another thread, I've started working through the French Air Force. Having completed the single seat fighters, larger aircraft are in the stash, and I fully expect to add naval types there in due course. My collection is also beginning to include Dutch and Belgian types operational in 1940, and this thread will cover the latter country's airborne defences. The Belgian air wing had little in the way of truly modern aircraft at the outbreak of World War Two. Purchases from the likes of Italy and the UK, as well as licences acquired to build aircraft such as the Hawker Hurricane, came rather too late to make much difference. There was only one native Belgian manufacturer, Constructions Aéronautiques G. Renard, and the only Belgian design to actually see active service in 1940 was the Renard R.31. Designed for reconnaissance, the parasol winged, fixed undercarriage R.31 was powered by a Rolls-Royce Kestrel inline engine. The forward fuselage was covered in metal, with fabric to the rear fuselage. A crew of two, pilot and observer, was carried. None of the type survived the war, although a full-sized replica has been reported to be under construction from original drawings. When Azur announced they were producing a kit for the R.31, I had to have one. I picked it up at the IPMS Telford exhibition in 2018. I was casting my eye over my stash, while convalescing after a short illness, wondering which model to build next, when I alighted upon the blue Azur Ffrom box and my decision was made. The box art is attractive, and shows an R.31 doing what it was intended for: aerial observation. The instruction booklet is printed in colour on a glossy paper, with text in French and English. It follows the usual Eastern European style of exploded diagrams, with colour callouts, being a little vague in some places. Part numbers are referenced on a sprue layout. Decals cover three aircraft, one pre-war trainer and two planes operational up to the end of May 1940. An erratum slip was included, explaining the instructions show the wrong decals on the wrong planes. That may have been corrected if there have been subsequent production runs of the kit. For my interests, I shall be choosing one of these two options. No complicated camouflage for this model, thank goodness! The construction sequences are shown in isometric form. The drawings are fairly clear, but sometimes a little ambiguous about exact placement. A small sheet of PE covers seat belts and sundry detailing. Clear parts consist of two windscreens. The main parts are found on just two sprue frames. The moulding is light grey plastic, with fine detail, as we have come to expect from such manufacturers. Interior detail, such as the instrument panels, is basic but adequate. Cockpit sidewalls are detailed to represent the steel tube framework. More than adequate for this scale, I would suggest. My intention is to build the model pretty much out of the box. Photos, and the box art, show bracing wires between the undercarriage legs, so I shall hope to replicate that if possible. The provided decal options suit me, so I'm not going to look for alternatives. Construction may be slow, but this isn't a particularly complex kit. I hope not to find any problems along the way. While casting around for references for the R.31, I found a web site called Belgian Wings. Not only does the site owner, Daniel Brackx, cover current Belgian aviation, he has collected photos of many of the types operated by Belgian forces since the start of the 20th century. The site has been bookmarked, as it gives a list of the planes used by the Belgian air wing in the period I'm interested in. What more does a collector need! One question arises. The colour callouts in the kit are quoted in the Gunze range. I'm a bit of a stick-in-the-mud when it comes to paint, and I like to limit the different manufacturers I stock. Gunze is not on my radar, so I would appreciate a pointer to a conversion chart for the colour numbers to other ranges out there, such as Humbrol, Revell and such like. Thanks!5 points
-
Can't find anything anywhere else than this one source, but it looks like Valom are releasing a 1/72 Vickers Valetta. Box art is by Aviation Art ZM on Facebook but I can't seem to link it. Cheers, WV9085 points
-
Hi to all. I wanted to recover a model Bf 109 E-1 on a 1/32 scale from Eduard downgrading it to version B (Berta) through the conversion set proposed a few years ago by Alley Cat Models for models on the Spanish Civil War theater and part of the Legion Condor: The set is really well made with a finely detailed quality resin. The complete instructions propose a rich information on the optional versions (4) on the conflict to which the German machines found themselves operating, therefore news of historical relevance but also technical, or indicating which parts of the Eduard kit to correct and which to eliminate. Also on the colors the attached "Guide" provides general guidelines with its own precise indications with reference to the chosen version. The decals are a masterpiece, well defined and very precise. Let's take a closer look: After carefully and gently dismantling the Eduard model, I study and try to identify the parts that will be removed: Proceed with a light sanding (ultra-fine grain) to remove the decals and remove the color. The operation ends with a light washing with non-aggressive aquaragy and a final wash with warm water added with degreasing agent (Chanteclair) I apply the corrections indicated in the instructions on the panels relative to the new version "B": Fixed Alley set resin sub-wing oil cooler : I correct the slats length and replace the flaps adapting them to the B version: I modify the blade grafts to the propeller hub, making them in metal (Albion) with a more robust and precise seal: I change the ogive by adapting an optional Eduard kit to that provided by the Alley set: Final results: Coloring of wood-effect blades with RB Productions stencils: base color light brown acrylic: transparent amber color diluted with 10% thinner: Preparation and fixing of the mask RB: result: The coloring is not yet complete, the parts will be treated with Future wax (polishing) to be uniformed and will undergo a light washing with a mix of oil / resin 'Mussini' asphalt color but after a careful drying. MWP (Metal Work Panels): I proceed as usual through the systematic cloning of the original panels and rewriting on the aluminum strip with the novelty of performing the resin technique instead of plastic: preliminary cleaning of the panel cloning: this particular operation guarantees the correct rewriting of the copied panel with all the information contained on the original: Final session gallery: for more info & pics about this work and the MWP technique please : https ://www.adventurephotomodels.com thank you for the attention and interest. George5 points
-
"Qu'il avoit cainte Escalibor, la meillor espee qui fust, qu'ele trenche fer come fust." [For at his belt hung Excalibur, the finest sword that there was, which sliced through iron as through wood.] -- Chrétien de Troyes, Perceval, le Conte du Graal (c.1190) thene he drewe his swerd Excalibur but it was so bryght in his enemyes eyen that it gaf light lyke xxx torchys [Then he drew his sword Excalibur, but it was so bright in his enemies' eyes, that it shone like thirty torches.] -- Sir Thomas Malory, Le Morte d'Arthur, Book I, Chapter IX The name of it said the lady is Excalibur that is as moche say as cut stele ["The name of it," said the lady, "is Excalibur, that is as much to say as Cut-steel."] -- Sir Thomas Malory, Le Morte d'Arthur, Book II, Chapter III "The flash of the Spitfire's wing, then, through the misty glare of the summer sky, was the first flash of a sharpened sword; they would fight, they would hold out." -- Vincent Sheean, Between the Thunder and the Sun On 18 August 1940, the day on which losses in the Battle of Britain were highest for both sides, the Stukas of Luftflotte 3 were detailed to strike south coast targets in England: the Coastal Command stations RAF Thorney Island and RAF Ford; the RDF station at Poling; and the Fleet Air Arm in Gosport. Poling aside, none of these targets were essential to the air defence of Great Britain, but as a prelude to invasion, the destruction or attrition of the Fleet Air Arm and Coastal Command would be essential to the success of Operation Sea Lion -- assuming, of course, that the British didn't just give up after a week or two of the Luftwaffe pounding the home islands. Over a hundred Ju87s from StG77 and StG3, the largest concentration of dive bombers to attack Britain so far, were escorted by over a hundred 109s from JG27 and JG53 and preceded by a frie jagd of fifty more from JG2 to sweep aside the RAF. Hard-pressed already, 10 and 11 Groups scrambled sixty-eight Spitfires and Hurricanes to meet the enemy, though through misappreciation on the part of the controllers, the fighters were mostly out of position initially. The eleven Spitfires of 234 Squadron were directed to intercept the enemy south of the Isle of Wight. I/StG3, on its way to Gosport, was protected by close escorts and a twenty-five strong top cover, both supplied by I/JG27's Bf109Es. The jagdgeschwader's gruppenkommodore, Major Eduard Neumann, leading the close escort, heard garbled radio calls from his top cover above, as 234 came into action against more than twice their number of Bf109s. Outnumbered, but not outmatched, 234 had at its disposal two of the Battle of Britain's leading RAF aces: twenty-year-old Robert "Bob" Doe (14 and 2 shared between 7 August and 7 October 1940) and twenty-two-year-old Paterson "Pat" Hughes (14 and 3 shared, from 8 July to 7 September 1940), who betwixt the two of them shot down three 109s out of six from I and II JG27 brought down by the squadron's Spitfires, while Hurricanes from 601 (County of London) Squadron and Spitfires from 602 (City of Glasgow) Squadron and 152 (Hyderabad) Squadron tore into the Stukas. It was a bad moment for the Luftwaffe on a long day. For my next trick, I'll be building some Spitfires, because I think things tend to go a little better in the world as a whole when I do, and right now, I think we can all agree it needs the help. I have an idea of which specific Battle of Britain Spitfires I'd like to do, but don't have the decals, so will make a final determination closer to H-Hour, as it were. In any case it's almost inconceivable that I'll finish these puppies up before I leave for England with @Cookenbacher on 1 November, and thence to Telford with noted raconteur @CedB and the wise and mysterious @Navy Bird. So perhaps I'll get lucky on the decal front. In any case, we all know the new but getting older Airfix Spitfire I. I experimented earlier this year with using a syringe to fill the panel lines, but ultimately decided it wasn't worth it; the way I paint, the panel lines don't look all that deep anyhoo. Despite their age and the fact that Airfix has probably sold a cool billion of these kits, the latest issue of the Spitfire is still pretty devoid of flash save on one part: The starboard landing gear leg. The flash around the mounting point was quite thick and required careful carving to get it into shape; this was true for both kits. Close enough, I hope. Tonight I had just enough time to drill out the holes for the locating pins on the fuselage to save on heartache later, remove the fuselage pieces from the sprues, and begin, almost imperceptibly, work on the cockpit. Eleven days until I leave for Albion. Looking forward to seeing you.5 points
-
Some newly delivered F-16Cs temporarily assigned to the F-16 Fighter Weapons School, 57th Fighter Weapons Wing at Nellis. Awaiting authorization for the 64th Aggressor Squadron to relinquish their F-16As and take on F-16Cs? 86-0251 86-0271 86-0272 87-0319 87-0321 87-0323 87-0325 87-0327 Thanks for looking, Sven5 points
-
Hiya Folks, The Arma Model Hrricane is a little gem of a kit and here is my latest one, with decals from DK Decals to represent Hurricane Mk.I, P2722, VY-H of 85 Sqn, RAF in the Battle of Britain usually flown by Canadian Flt. Lt. Harry Hamilton,..... who was sadly shot down and killed on the 29th August 1940 near to Camber Castle in Sussex, he was 23 yrs old and had been serving with the RAF since 1936 and is buried at Hawkinge. Here are some photos of his regular Hurricane, P2722,.... which has has Sky undersurfaces applied on unit and with quite a bit of flourish; And here is my portrayal of the aircraft,...... brush painted as usual; Cheers, Tony5 points
-
B.w. have statistics about most biggest chat GB on Britmodeller? This topic have 50 pages now, have any more? Pete, sorry, but You very optimistic. First need finish begun on Britmodeller! Of course first it will be a Typhoon, next - first generation MiG-21 family ( MiG-21F, MiG-21F-13, Ye-2A, Ye-5, Ye-50U) then La-15. When this program was ending, then i will think about Swift F.2/4 + Swift F.Mk.7, Hunter family (FGA.9, P.1099B, P.1083), BAC Lightning F.6 (with teeth!!! only with teeth!!!) and Vampire + Venom. So, this my manifest. Sorry, but this model aircraft unsuitable for FROG-2 squard GB! 🤗 B.R. Serge5 points
-
Just checking. Yep, still awesome.5 points
-
So, as my wife takes an afternoon nap and Oscar sleeps between feeding and changing I've been able to do a tiny little bit of work and finished the turrets: Updates to follow slowly5 points
-
The paint begins!5 points
-
I'd like to echo that Pete. Was my first GB and a great experience. FROG models were an important part of my youthful modelling, I enjoyed going back to those roots and learned a lot about FROG kits in the process. Absolutely Steve, and literally true as we just got back from a holiday in Wales. Felt a bit at a loss on Monday , but as I've said before, 'it's an ill wind'... I may now be able to finish my Airfix Spit XIX ! Looking ahead, there are plenty of forthcoming GBs that look fun to take part in (and thus an opportunity to increase my stash to even more unrealistic levels). Thanks everyone and especially our hosts.5 points
-
I’m calling this finished. Had a few hiccups but that happens. Considering working on the backdrop so that it looks like an airfield at least. What do you guys think?5 points
-
OK here's another little factoid from Astro physics...… Every bit of iron in the universe is the result of dying stars! Iron is the heaviest element that can be created by fusion in a star and, by the time the star is fusing Iron it has pretty much run out of fuel and is about to collapse in on itself and go super nova. All the heavier elements are believed to be created within supernovas. Now for a really shiny one... One of the biggest supernova's ever witnessed in the universe is believed to have produced more Gold than the entire mass of the Earth. I have heard many people theorise that Aliens have visited our planet in search of water or gold or even because we have nuclear weapons. In a universe where gold can be found in trillions of tons after supernovae have popped, water in one form or another is virtually everywhere and quasars can fire out a trillion, trillion times the power of our biggest nuclear weapons in a second all those theories are just ridiculous. The only reason aliens would have for visiting Earth is sheer curiosity or for a good laugh at the primitive residents.5 points
-
Before I add the upper wings, engines and booms I’ll have to paint the upper parts of the lower wings and the underside of the upper wings as it’ll be difficult to reach them once they’ve been fixed. As far as I’m concerned the only real option for a camo’ scheme for this aircraft is a splinter scheme, I had toyed with the idea of an all red aircraft al-la the Red Baron but I think I’ll save that for another build. I first thought of a ‘normal’ green on green splinter however, when DalekCheese and Hook confirmed that the early tricolour camo’ scheme was from the legion condor and then Troy showed me the Hungarian scheme I have to go for a tricolour splinter pattern. In the October(2019) Eduard info magazine they showcased a Finnish Blenheim Mk.1F built by Robert Szwarc with a black and green camo’... …I really like the contrast between the black and green. My insignia is based on a ‘merger’ of a German cross with a hint of Swastika So the scheme I’ve come up with is this… Base colour will be RLM76 light blue with the upper splinter colours of RLM02 grey (which looks greenish to me) and German grey (almost black) Wing insignia will be white outlines and the boom (side) insignia white outline with a black centre, the aircraft number/letters will probably be white although I’ve not decided on what these will be. Next I’ll be adding rivet detail and re-scribing some panel lines. until next time as always, any suggestions, criticisms or comments will be gratefully received. rgds John(shortCummins)5 points
-
Thanks Pete. Small update for you. Mind you, it's only a small step, but lots of fiddly making. Started on the diamond pattern closer to the hand grip. I don't think this section is going to be super accurate to the screen bat, but it's the best I can do. Painted a section tamiya flat white, had about 10 coats to attain coverage. Don't think it helped that in the past I must have thinned the entire jar for airbrushing. Measured round the circumference of the bat, and divided it out to a nice round number. Started by cutting narrow strips of cheap masking tape, each one is 3mm wide. Wove an alternating pattern with the tape to create diamonds. What a pain that was. Just got to paint the diamonds blue, then peel it all off, to remask the diamonds, so I can paint the rest red. Not looking forward to that I can tell you! Started to bulk out the gaps between the ridges in the hand grip, so I can put a fake binding on it. Hope you are all enjoying this. Matt4 points


This leaderboard is set to London/GMT+01:00