
Leaderboard


Popular Content
Showing content with the highest reputation on 06/10/19 in all areas
-
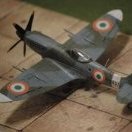
To combat the threat of Japanese submarines off the Australian east coast, the RAAF raised three new maritime patrol squadrons in 1943, equipped with Ansons. AW665 was repainted RAAF colours of Foliage Green/Earth Brown/Sky Blue after repair work. During October 1943 this 71 Sqn Anson was experimentally camouflaged at Lowood Qld with matt white vertical surfaces and gloss white undersurfaces. It was flown in company with a normally camouflaged Anson and assessed for visibility. The white was determined to give an advantage in hiding the aircraft from surface observation but RAAF Command felt that the effort was not warranted and AW665 was ordered to be re-camouflaged and was scrapped in 1946. Pioneering aviation historian Geoffrey Pentland produced profiles of this aircraft in the full RAF Coastal Command scheme of Extra Dark Sea Grey, Dark Slate Grey with Red codes and this has been faithfully copied by many profile artists and kit and decal manufacturers and is now regarded as “fact”. However Ian Baker’s Aviation History Colouring Book series contains, in Vol 75, an article looking at the RAAF documentation from that time, based on a National Archives holding - He notes the only colour mentioned in the document is white. As there was no relevance to the visibility from below or written reference at any stage to re-camouflaging the upper surfaces one must question whether it would have been done – it would have been a complete waste of effort as the aircraft was soon repainted to match the rest of the squadron. Even more problematic are the red codes. Red was ordered to be removed from roundels and fin flashes in July 1942, due to instances of confusion with Japanese markings. While red was briefly used for RAF Coastal Command markings, an Air Ministry Order actually called for Light Slate Grey for code letters. While the full Coastal Command livery makes a strikingly different model the combination of available evidence, common sense and wartime expediency points to the Anson’s actual colours being as shown here. The 1/72 Airfix kit was introduced in 1962 as a Series 2 kit in a plastic bag. It has been re-issued many times since then, the only improvement being a box and different decals. For some reason, after the first production run, the wings were modified to have an imaginary fabric finish. At the time of writing Airfix have no plans to update the Anson but if they did, a look at a real one would show the wings are plywood covered. This build was intended to be more-or-less out-of-the-box but the Flightpath and Tasman updates pushed it into the well and truly modified category. The ailerons were reduced and the flaps extended in span, the undercarriage tidied up a bit, the Falcon canopy used in conjunction with Flightpath’s very complete interior and window frames. The cowlings were drilled out using a Dremel and router bit so that replacement engines from Tasman would fit neatly and the Falcon turret was used. The fabric effect was removed from the flying surfaces using Mr Surfacer followed by mild sanding and the wingtips and tailplanes were reshaped. The underside was sprayed with White Knight Gloss White enamel and masked so the upper surfaces could be painted with Humbrol 98 and 149 which are good matches for the camouflage colours. The sides and tail were later matt varnished. Decals came from Red Roo sheet RRD7273 which includes this aircraft and two other mid-war Ansons. https://www.redroomodels.com/product/raaf-ansons/ (There's also a 1/48 version) A few notes - an expanded version of this post will appear in the modelling magazine ModelArt Australia - https://www.facebook.com/groups/420186691329185/ Valuable contributions were made to this build by @rossm and @Juanita29 points
-
Привет. Он давно закончен незаконченным, но очень хотелось дождаться «золотой осени». Так первая версия с ракетной моделью была сфотографирована в мае, а вторая - «Борис Веремей» в начале октября. И теперь это все. Это две разновидности Ту-160 на одной плате. Согласно хронологии, в честь Бориса Ивановича Веремея, первым летавшего на Ту-160, борт 342 был переименован. Расположен в Жуковском. Легко читать о самолете где угодно. О проекте Бурлак-Диана, например, здесь: https://pikabu.ru/story/tu160sk_i_kompleks_burlakdiana__dlinnopost_3670963 Из улучшений, конечно же - это макет ракеты, выполненный на заказ и напечатанный на 3d принтере. Из особенностей конструкции - переделать самолет, его надписи, немного изменить ретушь, снять ракету, приклеить новую наклейку - это было не очень просто. Большое спасибо за надписи и номера Алексею Буцкому. В целом я остался доволен работой, хотя, конечно, не мог избежать ошибок. Всем нравится смотреть.23 points
-
So this build was more emotional than trying to make a great model. I even remember a little squabble with my older brother over this kit as kids. Back in the early 80s this was the second kit I ever built. Revisiting this kit now I just wanted to do a decent job of building it again the way the younger me could not. I tried my best to stay true to a straight OOB build including the decals. The underside of the fuselage however is just too bare and I added bits and bobs from the spares box - mainly leftovers from Airfix and Italeri SHAR builds. Enjoy and comments are always welcome Paints are all Tamiya. I also took a picture of it next to my last Airfix SHAR build to compare experimenting with Tamiya field blue for this build vs gunship grey used on the Airfix. I added the Aden gun pods (Airfix) from the spares box as the underside was too bare and the strakes made it look more so. And one with the Airfix Thank you for looking23 points
-
Model F-86D from Kitty Hawk scale 1:32. In terms of the model itself, I can write one I don't like KH models. In my opinion KH it is a desire to show on the box that there are many parts, so it makes to divide the hair into four. The plane itself is beautiful to me so this model could not be missing on my shelf. Model as always made straight from the box.22 points
-
Hi all I hope this is not too cheeky as it was built as part of the Fabulous Frog Group Build. There have been may beautiful kits built in that group build. I am very pleased and proud of this build. I hope the GB mods and participants don't mind. The Cockpit is pretty much scratch built as there is not much in the kit and there are the radio sets in the rear although they can't be seen when assembled . The seat is part of an Airwaves Photo etch set for Spitfire and hurricanes and therefore is not correct but it was all I could find at the time. IP is scratch built as is the floors, side frames, rear seats etc. The raised panel lines were scraped off and rescribed leaving the lovely rivet details . The engine was replaced by an Aeroclub AW Tiger engine in white metal and the moulded pushrod tubes were scraped off and replaced with brass rod. The Aeroclub engine comes with a lovely exhaust collector ring and propeller and so the kit exhausts were cut and bent to connect to it. The kit was missing a couple of struts, one of which was scratched and the other was built from one of the Float struts was used with some modification. Various parts such as hinge covers for the ailerons were made along with their actuators and the elevator actuators were also made. Rigging is from Invisible thread along with the aerial wires. the Vickers K gun is a lovely bit of kit from Miniworld . Navigation lights were made from Lazer bond UV glue and plastrut and the bomb rack mounts were made from the an Airwaves PE fret inserted into holes drilled in the wing and then CA'd into place. There are other bits I have forgotten to mention I'm sure. The initial decals failed me and a new set was kindly sent by @PeterB and they went down effortlessly again a real testament to Frog, thanks Pete. Also a big thank you the Moderators on the forum @Rabbit Leader and @JOCKNEY and to all who have offered encouragement along the way. I hope they don't mind me posting this here, but I am very proud of this kit. There are many kits built in the GB and they are all wonderful and there are loads of kits that I had not realized Frog had made, check them out you will be amazed at the beautiful results. I have really enjoyed making this and the Kit actually fitted together beautifully and is a testament to the wonderful world of Frog Kits. Thanks for looking in All the best Chris21 points
-
Well here's my latest, the recent Airfix 1/72 Hurricane with the early fabric wings in the markings of 85 Sqn during the Battle of France. A really lovely kit, went together well, although the undercart is a touch fiddly. One thing, I absolutely loathed the canopy - framing was wrong, sits funny, the angle on the front screen doesn't look right at all - so I used the glasshouse from an old mould Airfix Hurri I had sitting around. It's too thick but still looks better IMHO. I changed the decals as I'm 99.99999% certain from looking at photos that the original aircraft was coded "G" but with this style G. Anyway I'm happy with it. Paints are all Humbrol enamel, 163 for the Dark Green, 29 for the Dark Earth, and 33 and 34 for the Night(Black) and White respectively. Gloss and matt coats were my newly discovered Oceanlack varnishes which are simply amazing. Weathering is a panel wash, pastels and a silver artist pencil. Antenna is smoke coloured invisible thread. Not perfect by any means (none of mine ever are!) and there was a bit of silvering but overall I'm happy. Thanks for looking! Tim20 points
-
Finally this is off the shelf of doom. This was a nightmare kit - I really love the AZ Model 109s and I really enjoyed the G2 (can be seen alongside in the photos) I made previously but this G-6AS kit has serious fit issues. They can be semi-resolved by following this thread: https://www.britmodeller.com/forums/index.php?/topic/235010494-az-model-109-g-6as-fit-problems/ The fit issues had knock on effects joining the fuselage and wings together. Then the canopy wouldn't fit without some surgery and a lot of putty. Then I lost the cowling machine guns as they are tiny so had to buy metal replacements Painting was laborious due to me choosing the complex box art scheme My mistake - the red stripe is too dark due to not using white as a primer which makes the "2" seem a bit bright now. So close to ditching this one! But at least its done and I didn't hurl it in the bin....so this an aircraft flown by Friedrich-Karl Muller August 1944 of 1./NJGr.10 according to the box:15 points
-
Started in the (NZ) summer and then sent to the 'Shelf of Forgetfulness'. Brought it back to the bench last weekend and grabbed thirty minutes here and there through the week to get it finished this afternoon: Everything you see is what came in the box, I mixed my own (contemporary) JGSDF camouflage colours using the always (un)reliable Mk.I eyeball method and possibly some witchcraft. And to be honest there's not too much else to say - typically Tamiya, a two-weekend project that took ten months ! - Please feel free to hurl abuse, make any suggestions / comments or ask any questions. Have the rest of a great weekend folks, best from NZ. Ian.14 points
-
Calling it done - Piaggio P.166 in Australian markings - as a Snowy Mountains Authority aircraft in the early 1960's ex G-APVE. This model has been 9 months in the making and am happy with the result - a few speed bumps along the way but got there in the end. It's 1:48 scale so wingspan just under 300mm. Build pictures in the 'on the workbench' forum ... ...12 points
-
Hi All Although I've been very quiet on the forum over the last month or two due in part to work being manic, but also partly due to a "blip" in my motivation, I've not been entirely idle. This is the forgeworld hobbit hole set which out of the packet consists of the front wall, two windows and two chimneys. The main structure is built from blue foam offcuts skimmed with cheap ready mix plaster before being covered with my usual sand and shot blasting powder mix. Once painted I covered it in static grass using my machine. Foliage was a mix of model railway packs (mostly woodland scenics) with some grass clumps and flowers I bought from Ebay. The fence, runner bean frame and log rack were all scratch built from bass wood or cut down matchsticks. Logs were dried dandelion roots. Cabbages, broccoli, and the runner beans were model railway accessories. Apples were balls of green stuff on a scratch built tree. All in all it's taken about a month of work on and off and has been the most fun model I've made in a long time. Was really pleased when forgeworld contacted me to see if they could use my photos on their website. Can you spot the apple stealing hobbit under the tree that the others are shouting out to get back to chopping logs? All the best Ben11 points
-
It's late 1978 and fresh from being "zapped" whilst aboard USS Saratoga, XV590 has been posed shortly before an open day: Mike11 points
-
Good afternoon. 😀 it’s been quite a pleasant weekend here at castle spadgent. Apart from the sad news of Ginger bakers passing this morning. 😔 most of yesterday was spent on chores around the house. can you spot what the chickens new dust bath shelter is made from? also watched this. bitter sweet and had me in floods of tears at the end. 😭 wonderful movie. On top of all this I managed some plastic action. Hey @Procopius Look what arrived. 🤩🤩 Thanks for the tip. I’ll use the crap out of that later. first though I sprayed the panels silver like @Troy Smith originally suggested. I’ll post shade and knock them back later. By the way two coats of vallejo extreme metal looks ace! 🥳 That all got trapped together and some extra padding added. So on to the main course. I have done this before in different ways but decided to try out @spartacus2000 super watered down method. Here’s pass one. what do you mean? There on the wing. 🤪 then pass two. 🤔 I can see the appeal but this wasn’t working for me. This was a 80% split with thinners. So I went to my usual camo 3 to 1 ratio of paint and thinner. I guess that’s 33.333333% split. that have me a slightly better coverage. I decided to stick with that adding light coats until I was happy. Closer. Not forgetting the nose panels. That was getting more where I wanted. took a few hours, with stops in between to cook breakfast for the kids and zom over to my wife’s office to do some boring I.T related gubbins. 🙈 After drying I couldn’t resist making up for the second bit. I couldn’t decide about the squadron putty so I stick to blu tac for now. Wwoorrmmss. aaaaand at last the huge Tamiya tape. 😍 This stuff is great. 😇🙌 eventually we arrived here. I has to pop back to the office to check All was well, which is where I am now trying to update windows on an old windows 7 machine. 😭😢🤪 well fingers crossed I’ll get to the green later on. Hope you’re all having a lovely weekend. Thanks for dropping by. All the best and as always, Happy Modelling. Johnny brown paint.11 points
-
McDonnell Douglas F-4C Phantom II 63-7576, 17 FIS, Michigan ANG 1986 Kit: Hasegawa 1/72 00798 "Mig Eater" Decals: Caracal CD72023 Build thread: https://www.britmodeller.com/forums/index.php?/topic/235057333-michigan-ang-f-4c/11 points
-
McDonnell Douglas F-4E Phantom II 3-6570, 31 TFW, Islamic Republic of Iran Air Force 21 July 1982 Flown by Lt.Col. Abbas Dowran and Capt. Mansour Kazemiyan on a mission to attack the National Conference Center in Baghdad on 21 July 1982. While approaching Baghdad airport, the crew was surprised by an Iraqi Roland 2 SAM-site and the aircraft hit. Capt. Kazemiyan ejected safely and was captured, but Lt.Col. Dowran flew his aircraft into the control tower. Kit: Revell 1/72 04875 "Phantom Pharewell" Decals: Print Scale 72-202 Build thread: https://www.britmodeller.com/forums/index.php?/topic/235057571-how-blue-was-my-phantom/11 points
-
First stage gloss coat is on! And some of the other bits and bobs are painted. It's been a long week. My favourite co-worker in the history of ever (well, former co-worker, we shared a cubicle until I changed departments earlier this year and then when my old boss got fired, she got promoted to replace her) got a job at United Airlines and yesterday was her last day. My former department (which now reports to my new boss) asked me to help organize her going away party, principally because I have a corporate credit card, and we can spend up to $500 of company money on these things. I'm actually, I think, pretty good at organizing parties (in another life, I demo'd miniatures wargames for a company), even if I'm really quite shy personally. Unfortunately, the two of my former coworkers who were most involved were the two who ruin every party. $500 worth of pizza is a glorious thing, but oh no, they wanted cake instead, because it would be at 2 PM, even though people are perfectly capable of eating pizza at any time of day or night (trust me on this one), and then they decided they needed me to pick up two sheet cakes for a total of 80 people and bring them in. Now, I live an hour's train ride from my work, and it's three-quarters of a mile on foot from the station to my office. Sheet cake, as you may not know and as I recently learned, is excruciatingly heavy if you're carrying two of them stacked atop each other, especially over this distance. Almost overcome, I had to set the cakes down on a park bench and text a colleague to come down and help me get them into the building. My old department also wanted pizza, it now transpired, so I ordered some, now having enough food to feed a small army and having used only $300 of the $500 budget, only to discover they'd bought $220 worth of cheese and vegetable platters for which they fully expected to be reimbursed for, oh, and would I get some ice cream and plates (on my dime)? Forty dollars later, I put the ice cream in the freezer on their floor, since the freezer on my floor was full, and it was then promptly thrown out during the 1 PM Friday cleaning which I was wholly unaware of. Ho ho ho. Anyway, it all ended well, but I've carried my last sheet cake and my old department can take care of things themselves from now on. It's a glamourous life in a large not-for-profit. Today I cleaned the house prefatory to my mother-in-law arriving for a week, only to have my spotless kitchen defiled by small children treated to chicken-fried rice, which they duly scattered over the entire room. I did have a moment of grim satisfaction when, after having her overrule me on making them sit down (rather than stand) on their chairs at the big table, both boys proceeded to fall off in quick succession, like penguins dropping under the arctic ice.11 points
-
...With Heller's lovely (but occasionally flawed) 1/24 Ferguson TE-20 tractor. This is out of my normal shopping zone but given we were on holiday and my eldest son, now a paramedic, has had a lifelong interest in tractors and dad was suitably oiled after completing a 'gin trail' tasting challenge, the scene was set for a little online purchasing. A few clicks later and the kit was priority delivered to our self catering property. All seemed very promising with the contents and the potential for weathering was obvious, so I set myself a simple brief of 'well worn but fully functional in a usually dusty environment'. The steering wheel's had a bit of 'flat' sprayed on since but this is how it otherwise is. A nice, crystal clear acrylic case and base is on order from a quality outfit in Brighton and this'll grow a rutted, single track base, maybe with a bit of rustic fencing and so forth; we'll see, as I'm a dio novice and need to play catch up. It's often said in modelling circles that wandering away from your usual subjects is a good thing in growing experience and keeping things 'fresh'. That was certainly the case here and what appears perhaps to be a rather mundane piece of engineering is actually hugely interesting once you do a bit of history sleuthing on the web - the little Fergie was Sir Edmund Hillary's choice back in 1958, when he took three to the South Pole - check this out http://int.masseyferguson.com/antarctica2-hillary.aspx Fergies coming off the line in Coventry between 1946 and 1956 were grey. Mine has wound up with a funky farmer, who fanced theirs in a more fetching shade of 'russet'. This is what 'cha get when you hard weather that colour... TTFN Steve10 points
-
Hello all! Here are some photos of my recently completed model, Revell's Ju 88A-1 in 1:32. It was a fight from start to finish, some pieces, such as the rudder pedals, didn't live to see the end of the project. I take all that to my own poor construction methods. I won't build another 32nd bomber again.10 points
-
Please feel free to express yourself through the medium of modern interpretive dance instead Bill! 🕺🙌 Ta Ced. That bedroom was actually the pilot's berth on the Sunderland you know: better sharpen up your wood effect skills! 🖌️ As a result we have very shiny walls in our house G! The older I get the more primal and satisfying fresh bread seems. You can't call the pre-packaged keep-for-three-months supermarket loaves bread at all. (Except for the cheap white rubbery loaves of the kind you used to get in transport cafes and which are - of course and without brooking any argument on the matter - irreplaceable for the humble bacon sandwich) (Don't tell that over-remunerated mantesticle Bezos though Pete) Both manually operated Ian? Oh God...you had to mention paint didn't you! (Thanks for the kind sentiments as always chaps) Busy week and an equally busy Saturday taking the eldest to look at university courses so this morning was the first opportunity to really pull a shift at the bench to work some further items off of the snag list. We're really down to the last few bits at this point and try as I might, pigmentation looms. Let's see what got ticked-off today then. Started out with a comedy of errors in moulding some 'bumps' for the fuel tanks. Not sure what they cover exactly but they sit outboard of the access panels I'd added previously from foil. I'd made a basic teardrop blank by shaping some scrap plastic (actually another repurposing of an undercarriage strut from the Iron Chicken) and jabbed this into some plasticine to some moulds: Having mixed and poured some resin into those and waited 30 mins without it curing I assumed that as the resin mixtures were about 18 months old, we were well past their use by day so started again and tried moulding from straight CA. The results were so ghastly that I abandoned the process and went on to further jobs. About 2 hours after this fiasco I noticed that the waste resin I'd poured away had set very nicely in the wastepaper bin! 😂 Mix a fresh batch. 2 hrs. later it cures and we have sufficient fairing to be able to pick the best examples from and add in a later session: I'm so inexperienced with resin. Does it take longer to cure as the ingredients age? It says on the bottles: - a shelf life of only 6 months. In and around this little performance I realized I'd neglected to make thus far the transparent cover for the landing lights and channelled my inner @perdu with a straightforward plunge mould of said item using scrap PET onthe corresponding section of the opposing wing: This was then measured against the opening, the outlines scored-on and then my goto for jobs like this, the heated scalpel blade: I find this gives nice cleans cuts v. rapidly and without any of the torn edges that my clumsy sawing off of the part would leave. A few licks of the file to finesse it in and: Another item off the list. In anticipation of paint I'd also intended cutting a new set of masks for the cabin windows but was somewhat disgruntled to find that on my usual settings for Orasmask, a mangled set of outlines emerged from the blade: 'orrid. Usual culprit for such a mess would be materials residues on the blade which - as I'd been cutting foil a lot in the previous session - might have left adhesive and foil clinging to the cutting tip. I removed the blade and gave it a good clean yet got an identical result. Head-scratch time. Eventually, checking the software settings revealed that the outputs had been inadvertently (i.e. me!) been set to those for a Cameo (rather than the Silhouette) at some point. It must differ greatly in pressure and sensitivity as returning to the Silhouette setting all was back to normal crispness: I'll stick those on when I'm less tired than today. Also needing attention were the aileron operators: There's two on each aileron paired upper and lower, with the upper ones having a prominent mass balance on the end: Originally I'd intended soldering these to the aileron but as you can see, after trimming these to the correct height you can see that they fit nicely enough into the corresponding recess in the trailing edge of the wing so I'm just going to epoxy these in after paint. The actual control lines I might make from stretched sprue or hair to give me something thinner than the EZ-line and fishing line I have at this scale. The lower operators though fit flush on to the underside of the aileron and so this was definitely a job that required soldering for strength: As with many features on the Anson, these are too distinctive to skip: The ailerons with these attached will be painted separately and added after the colouring-in is finished. I'm going to adopt a similar method for the flap trays. These will only have their final detailing added and be painted once the bulk of the painting is done, for similar reasons due to the likelihood of breaking-off all those fiddly little PE parts. Off for a read of this: and an afternoon kip now whilst a beef variant of a Tamatar Gosht bubbles to fruition in the slow cooker: Parathas may be implied....😁 Thanks for stopping by. Tony10 points
-
Hundreds of T-40 amphibious tank were used in the first period of soviet-german war. Some of them survived to the end of the WWII and were used primary for reconnaissance missions. Lack of radio made it tricky to deliver discovered information. A very simple but still nice kit from S-Model. The weakest part of it is the one-piece chassis with tracks. I've replaced the kit's headlights with the ones from ELF BELARUS. I apologize for the quality of the photos taken with my old camera. And you can see how small it was compared to Sherman in the same scale. Best regards.10 points
-
Hi everyone, another new release Airfix build, this time it's the much anticipated 1/72nd Buccaneer S.2C. This is an early test shot that I built back in June and appeared in last months issue of Airfix Model World. A great little kit with excellent fit, good detail, easy assembly and an accurate overall shape, thanks mainly to LIDAR. Having said that there is a slight issue with the shape of the rear tailplane fairing which should be a smooth cone on the S.2C. The Buccaneer was fitted with three styles of rear tailcone fairing during it's life and unfortunately the kit part depicts the later 'stepped' version, fitted following the ARI 18228 RWR upgrade program (a simple matter of reshaping). Also, with regard to the decals, if you look at yellow hatching that runs around the canopy, there are way too many segments...there should be only five along the canopy sides (plus two 'L' shaped end pieces), four at the front and three at the rear. I just applied them and then carefully painted those out that weren't required. Minor issues. As no kit decals were available at the time of building I was sent Xtradecals sheet 'Buccaneer Collection Part 2' which, while excellent, didn't include any stencils. Fortunately Airfix managed to send me a test sheet just after I'd finished painting and decalling so I was able to add said stencils in time. Just as well as many of them, particularly the highly visible white ones, are unique to the Bucc. The model was painted using a mixture of Mr.Hobby H333 Extra Dark Sea Grey and MRP-113 Dark Sea Grey and highlighted using MRP-112 Medium Sea Grey. While Abteilung 502 oil washes, AK leaks and stains and AMMO MIG pastel powders were applied during the weathering process, everything was kept to a minimum as the Senior Service tended to keep these aircraft in tip top condition even in the rough conditions suffered aboard ship. Personally, I don't particularly like the look of the wing slipper tanks, so I modified the war load a little by replacing them with an extra pair of 2in rocket pods and moved the two 1,000 pounders into the weapons bay. Along with reshaping the rear RWR tailcone fairing I also drilled out the lightening holes on the faces of the airbrake petals, which adds a lot more to the look of the finished model. To me the only real disappointment was the cockpit which is really very basic, relying on decals, (though thankfully the seat off set is included. I did what I could with the seats and added seat-belts from Aizu tape and ejection seat firing handles from lead wire. I chose to use Mike Grant's British jet dial decals for the instrument panels and Airscale items for the side consoles. Just an aside, to get me in the mood (as if I needed any encouragement) and prepare for the kit I was lucky enough to be offered another back-seat ride in the real thing at this year's May Cold War Jets event, courtesy of the hard working folks of the The Buccaneer Aviation Group at Bruntingthorpe, (Thanks Colin and Mike!). This time in XX894, and although actually an S.2B, (the pregnant belly and nosegear light gives the game away) she's been appropriately repainted as an FAA machine...now this is what I call inspiration. If you're a fan of this great aircraft (and what decent upright British aviation nut isn't) then this is a must have purchase........now come on Airfix, you know you can reissue it in the proper scale! Hope you like it and thanks for looking. (now where's that 1/24th blighter hiding?) Cheers Melchie9 points
-
Hi everybody, My first model here at BM. I hope you like it. Thanks, Ricardo8 points
-
Here is the other of my Sweet 1:144 tropical Hawker Hurricane Mk.Is which I built in 2009. It represents P3731/J, flown by Sgt F N Robertson, of No. 261 Sqn, RAF, from Luqa, Malta, in December 1940. It was completely painted by brush and only the matt varnish was airbrushed. Thanks for looking Miguel8 points
-
Made from the Airfix kit and painted as the Admirals Barge using Xtradecals from Hannants. I like this one for its uniqueness. There's quite a variety of different shades used for models of this plane. I think mine actually came out a bit too dark..... Oh well. Dave8 points
-
Dear fellow modellers, On 7th of October 2019 the \KLM celebrates its 100 Year Jubilee. I thought it was fitting to show the last Fokker, that flew the route to the Dutch East Indies. Here is a link for the history of this plane: https://en.wikipedia.org/wiki/Fokker_F.XVIII My model was built years ago but the wingcovering began to deteriate, the glue dried out, So I had a big problem. I removed the wing from the fuselage but it was far gone. I had only one solustion; I had to make a new wing. Carved from a solid piece of wood, I covered it with selfadhesive aluminium tape and over it went a silver paint coating. With all this repare work I could replace the upper part of the fuselage in the same time, there were some sink marks issues, I had used too much glue with the 0,5 mm plastic card. After this extensive rebuild the model lookes again as it was new. I hope you will enjoy the pictures ! With kind greetings JohnHaa8 points
-
Hasegawa 1/72 F-4n VF-84 Cheers Allan8 points
-
I finished painting the parts for the landing gear and the turrets. I used Eduard Brassin tires: ... painted with MIG acrylics, and with a bit of pigment powder for weathering. Lancasters changed very little between variants, but details such as the colour of the landing gear components did change. I based the colours of my model of W4308 on the configuration of W4783, which also served with 460 Squadron. I blocked off the insides of the gear bays with sheet styrene painted a dark red to represent the wing fuel tanks. Not 100% sure of its accuracy, but I went with dark red for the oil tank as well. As I suspected, the nacelle fits around the landing gear: Frankie was skeptical about this idea at first, but she now concedes I was right. Finally, the turrets also painted. Again based on photos of early-ish Lancasters I painted the turret interiors metallic. Thanks for looking - comments always welcome of course.8 points
-
First job was to give it a coat of primer, using Halfords grey primer. For the base colour, I used Vallejo’s UK Bronze Green set, from the Model Air series. This is a set of six 8 ml. Bottles, consisting of six different shades of green, one grey primer and one semi gloss varnish. I’ve only ever used the greens before and was happy with the result, but for some reason, the airbrush kept clogging this time. Maybe it’s because they are a few years old now, or maybe it’s just me. Anyway, the job’s done. I started off with and overall coat of the first green, which is No. 018 Black Green. This was followed by a misting of No. 250 Bronze Green. No. 252 First light was sprayed onto the centre of the panels and lastly No. 225 Light Green along the edges and also in the centre of the panels. The contrast is a bit stark at the moment, but with some washes, it should all tone down a bit (he said hopefully). I know that it looks a bit greyish in the photos, but that's just the lighting. Now all I need to do is search through my boxes for some suitable decals. John.8 points
-
Here is my Dragon 1:72 Heinkel He 219A-0 Uhu which I built in 2000. It represents “G9+BB”, W. Nr. 190070, flown by Hauptmann Manfred Meurer, of Stab. I/NJG1, Luftwaffe, from Venlo, Holland, in early 1944. This was my second go at this kit and I managed to pack enough weight to get it standing on its own legs! Main scheme painting and varnishing was done by airbrush. Thanks for looking Miguel8 points
-
I'm having a bit of a ponder over on the TID Tug so . . . Now I'll be truthful, nothing was further from my mind than a 1/350 boat ( I was given this model by a good friend who always seems to be leading me astray). I was looking around for something from the etch set that might help the tug. No joy on the part but I got to looking at the detail Dragon had included with slide moulding Now with things on hold on the tug, the fact that I've never built anything smaller than 1/200. There are some very nice multi media kits out there in 1/350. The fact that I have an involuntary tremor in my left hand which is never going to get better (I mean that as an encouragement to others, not an excuse). There was no time like the present No promises that this can be completed but here we go ....... Start of main guns Superstructure So far so good Thanks for looking in Kev7 points
-
I have taken this Eduard weekend edition kit as far as I wish. The purpose of the build was to try an idea I had to emulate the uneven surfaces seen on stressed skin aircraft, and chose this particular aircraft as I'd already built an Eduard Hellcat and knew how it went together, but this overall Glossy Sea Blue aircraft would particularly benefit from something to add visual appeal to an otherwise featureless finish. If interested in the experiment itself, here is the Work in Progress thread: The kit is close to being Out-Of-the-Box, but did receive Airscale cockpit instrument decals to improve the panel, and substantial improvements to the cockpit purely from adding an Ultracast resin seat with seatbelts, new wheels and Ultracast's much improved Hamilton Standard propeller. In addition, Master brass barrels were added. All paints are Colourcoats enamels, and the antenna is Infini Model 40 denier (0.068mm) lycra rigging line. The base is Eduard's injection moulded Essex class aircraft carrier deck section, although strictly speaking the aircraft was from USS Enterprise CV-6, a Yorktown class. If anyone made it this far and is remotely curious to see how ACUS34 - ANA623 Glossy Sea Blue compares to our parallel paints ACUS07 - ANA606 Semi-Gloss Sea Blue and ACUS33 - ANA607 Non-Specular Sea Blue, often all claiming to be matched simultaneously and/or referenced to FSx5042 which matches none of them, here's the GSB Hellcat and my earlier "by the book" tricolor F6F-3 together: Thanks for looking in!7 points
-
Given the number of questions that have come up, I'll put this here for general reference. Feel free to chime in with corrections or anything I miss and I will edit this post accordingly. All of this is from memory so please correct me as needed. The variant designations - S.2, S.2A, S.2B, S.2C, & S.2D - denote Martel capability. The pre-Martel era Mk.2 Buccaneer, the S.2A and S.2C are not Martel capable and the S.2B and S.2D are. S.2As and S.2Bs were RAF aircraft and S.2Cs and S.2Ds were FAA aircraft. Before the RAF had Buccaneers, there was just the Mk.2 Buccaneer. The changes required for Martel involved longer, more widely spaced pylons, the control unit, tv display and the removal of the fifth from inboard vortex generator which was over the outboard pylon in its new location. Some pictures to illustrate: The black controller and arm rest on the right and screen in the middle of this picture of the Nav's office are for the Martel system. An illustration showing different pylon spacing. Long chord pylons for Martel And the pre-Martel short chord pylon. Now that about does it for the variant specific differences. The many other variations of equipment were associated with upgrades and modification programs over the years. Many of these differences apply to As, Bs, Cs, and Ds. Examples of each of these modifications can be seen on different aircraft at the same time. The OCU for example had S.2As in its inventory right up to the end. So there are no bright line rules and, as is the usually the case with these things, you should try to find some photos of the subject you wish to replicate. 1) The airbrake petals. The kit comes with pre-Mod 1503 air brakes. There is a substantial reinforcement plate on the outside. This would have been applicable to ex-FAA aircraft in the XN, XT and XV serial range. The XWs, XXs and XZs were post-Mod 1503. The XKs were converted S.1s and had a different type of stiffening panel. I don't think we will see new air brake petals in any future releases so I think we will likely be on our own here. This is a post-Mod 1503 air brake. And this illustration shows stiffening plate which is depicted in the kit. 2) Nose gear light. This is an easy one. The RAF adopted a head light for the nose gear. One is in the kit. 3) Tail fin bullets. RWR gear was installed in the mid 70s. This is the old style. The light is located on the point of the rear bullet. This is offered as an optional part in the kit but the bits for the later version are not included in this release. This is the RWR installed on the tail fin bullet. Note the light relocated to the rear of the cap above the bullet. I am not sure what the second bump is. And the front bullet with RWR. Also note here the base of the antenna that was installed on either side of the fin. 4) Aerial on either side of the fin. This was an early to mid 70s modification. This was a bolt on piece. Sometimes it was not installed but the base was visible (see picture above). 5) Intake fairing. Installed from the mid/late 60s on. Applicable to most RAF examples. Without fairing And with the fairing. 6) Antenna on spine. From the early/mid 70s onward the antennas were different. Before After 7) Anti-collision beacon. They were changed to a pointed style late in life. I think this started appearing sometime in the late 80s. 8 ) Wide band homer. These were attached to the wings but were removable and not always carried. This is the older round style. And this is the newer version which has a flattened oval cross section and stepped point. 9) Wing fold inspection panels. This is not so much a modification but just something that varied over the years and in different contexts. There are photos of Buccs from the late 60s onward with open hatches, closed hatches or just the front one open. The FAA seemed to have the panels on more often than not which makes sense I suppose with the potential for corrosion. Both front and back panels are removed here. It looks like the kit provides an option for this although the current release is silent on the subject. 10) Slipper tanks. I don't intend to address payloads in this post but the slipper tanks were carried so often that I tend to think of them more as part of the airplane than an external store. These were revised in the mid 70s. The new style had a sharper edge on the fairing on the top of the tank. The current release of the kit has parts for the older style. This Bucc has the older style tank as provided in the current release of the new Airfix kit. Another example of the old style tank. This is the newer version. 11) The seat. The older style is offered in the kit. The older seat had a D pull handle and the newer version had a B handle. Older version Newer version. The parachute pack was revised in addition to the different pull handle. Note also the splayed thigh guards. This is a rear seat; the front seat was not splayed. The splayed thigh guard was to allow some room for the Martel tv display between the navigator's legs. 12) Under water ejection system. This was deleted in the 70s. Buccs that had it fitted had a third red triangle on the port side. Not a great shot - it is a still from an old 8mm film - but it shows the shape to good effect. 13) Canopy MDC. This upgrade happened in the 70s. 13) Blade aerial/light on belly. A blade aerial was placed where the strobe ahead of the bomb bay was formerly located. The strobe was relocated to the electronics bay access door. This happened in the mid 70s. The electronics bay hatch is hanging open in this picture. You can see the relocated light well in this picture. The light is flashing in this picture. The aerial is visible just ahead of the bomb door. It is black with a white dot on the front. The profile is clear in these pictures. Another view of its position. In this picture the 2nd and 3rd Buccs have the new blade aerial and the 1st and 4th do not. Note also that the light has been relocated to the electronics bay door on all four examples. This picture is from mid 1973. The picture of XT270 above with the older style slipper tanks also has the relocated light but no blade aerial as of yet; that picture is from the same time period. That's all I can think of off the top of my head. Please post corrections and additions if you think of any. - Jack7 points
-
Thanks chaps! Aside from weathering, which needs fresh eyes, I'm calling this done. I will sort out proper piccies and get an RFI done during the week. Thanks for all the comments and help - especially @Selwyn for the bomb bay info, although I didn’t use it in the end: it might prove useful if I ever build the 1/48th Blenheim . I wonder what will fall off the stash shelf next…7 points
-
Nearly done. Impatience gets the better of me sometimes, though. Much paint retouching after dabbing fingers in wet paint! With props to fit and antenna wire to do, followed by a smidge of weathering, I’m almost there.7 points
-
A bit more progress to post. Fuselage is complete and I've started constructing the wings. I've had to go a bit off piste with the costruction sequence because of my one wing open one closed arrangement. I cut the wing 'spar' in two and have built the port wing (to be folded) separately. The excellent fit of the parts makes this quite simple. Another real plus point of the kit is that the wings are split, made up of an upper and lower half. As you can see I have built the port wing without the upper and lower wing panels fitted. This will make the rigging so much easier. Before assembly I drilled the wing panels to accept the rigging lines, now its 'simply' a process of sewing the lines in place. [url= [url= I've chosen the silver and grey FAA sceme and as you can see have done some initial painting using Xtracrylix and Vallejo acrylics. Back with more soon, thanks for all of your comments. Bob7 points
-
For all the talk of the "error" with the wing, who is actually going to bother? A handful of purists in internet sites like this or, the no doubt thousands of others who will simply snap it up regardless because they're getting an otherwise nice and reasonably priced replica. How many people, upon seeing what is actually a very small model are even going to know one way or the other? Personally, I don't see what all the fuss is about. It's unmistakably a MiG -17, warts and all. Now, if some believe the kit is fatally flawed, unbuildable and, unbuyable then, that is their prerogative and I won't presume to debate their wisdom. I'm not going to get bogged down in a debate about the why's and wherefores of how it happened. Airfix has doubtless made a commercial decision to get the kit out there and, if it sells well then, the decision is justified. I'm not going to condone or condemn Airfix. I'm just happy to ( or will be) to get my grubby mitts on this kit in quite large numbers!😊 . Others will disagree. I respect that. Let's just enjoy the kit. We're all modellers after all and, we don't all take the same approach to the hobby. I am by the way, genuinely sorry if the model disappoints some of you Allan Ps, I am a fully paid up member of the T L A R (That Looks About Right) school of thought!😂 ( Cue cries of "send him to Specsavers!" )7 points
-
The upper 2 pictures are of the early version of the type 6MSB seat. The para pack area of the seat structure has side walls to protect the cloth covered para pack. Similar in design to the type 4 seat in Lightnings etc. It also has taller canopy breakers, as MDC was not fitted then to pre break the canopy perspex. It only has the single loop face screen firing handle. The seat straps are for use with the separate body harness, as it has koch fasteners on the shoulder straps. I think this is the seat that is represented in the new Airfix kit. The lower 2 pictures are of the later seat, still a 6MSB. The para pack was now in a hard fibreglass shell, so the upper structure side walls were removed. It has the combined "simplified" harness and para pack (fitted after 1981/2) The canopy breakers were smaller and its the double loop face screen handle. The seat is actually the type 6MSB Mk 5 with the splayed thigh guards for rear cockpit use, so the nav could get his legs either side of the TV monitor for Martel and Pavespike operation. Rob.7 points
-
Hello Here is my Mc Donnell Douglas F-4E Kurnass #618 of the Israreli Defence Force in October 1973. This aircraft was shot down over the Golan Heights on October 13th and crashed in the Mediterranean Sea. Both crew were rescued. This is the 1/72 F-4F Revell kit with slated horizontal tail from a Fujimi kit. At this time this Kurnass and many others had slick wings. W.I.P. Patrick7 points
-
Hi all Just finished my first attempt an at AFV and I chose to kick off with my favourite tank-the Matilda. Really find the early war tanks interesting compared to the late war stuff- thinking of attempting an A13 MkIV next so if anyone has any recommendations for a good kit then please let me know. So after watching lots of YouTube videos, buying a few books and visiting this site, I've tried all sorts of techniques for the first time including using pigments, hairspray chipping, oil streaks/washes, pin washes. Big learning curve but I'm very pleased with the result. Picked up plenty of learning points, like I should have clear coated the rust/chipping layer before applying the hairspray as I've rubbed too hard in a few places and revealed the base coat, and if anyone has any advice for my next project I'd be grateful. I also think I was a bit too heavy on the final spray of buff and toned things down a bit too much. I'm just starting on the diorama for it now, so I'll post more pictures of the finished piece when I'm done.6 points
-
DH.2 'Lanoe Hawker' 1:32 Wingnut Wings The DH.2 entered service in February 1916, putting an end to the 'Fokker Scourge' of Eindekkers that had been dominating the Western Front with their synchronized machine guns firing trough the propeller arc. Highly maneuverable, the DH.2 was a good fighter despite it's fragile looks. Lanoe Hawker was already an experienced ace and Victoria Cross holder when he took command of 24 Squadron, and led them to France in 1916. On 23 November 196, flying 5964 (the subject of this model) with 'A' flight, Hawker encountered Jasta 2 and in particular Manfred Von Richthofen flying a twin gun Albtaros D.II. A lengthy dogfight ensued, with Hawker eventually breaking off due to low fuel. Richthofen fired one last burst before his guns jammed, and Hawker was killed instantly, becoming the Red Barons 11th victim as 5964 crashed to the ground. Wingnut Wings have released some of their superb kits with equally high quality resin figures to depict famous aces and their aircraft. I just had to have the brilliantly sculptured figure of Lanoe Hawker, holding a map and with his coat slung over his arm. The figure is absolutely perfect, beautifully cast and a pleasure to assemble and paint. The DH.2 is a real beauty to build, but complicated to rig, and I was forever thinking I had finished when I spotted a bit I had missed. I think I have finished it now though, I will create a proper base and case for it, as it deserves to be properly displayed with the figure next to it. On with more photos: Weathering is subtle, I did some chipping around the cockpit area where the dark green was scuffed away to reveal the grey beneath. You may just notice the clear tube fuel gauge on the upper wing tank, showing the tank nearly full! I masked and pained the see through effect of the upper wing roundel on the under side of the wing. Sunlight from above would have created this effect as 5649 was delivered in clear doped lined, and later painted with dark green PC.10, painting around the roundels. Thanks for looking, John6 points
-
Sitting on its own wheels, pilot in, canopy and prop masked. The aerials and pitot are already painted but I'll wait till the canopy is painted and I've fixed the arrestor hook and got the tail doors on. Near enough done and should be in the gallery soon.6 points
-
My whole life feels that way, some days. Well then, Have I Got News For You! I resolved to test my major decals: the Xtradecal bombs to let me know if I'd be making the c.1943 version of Phantom, as I wished, and the far superior Kits-World nose art sent to me by brother @06/24 (thanks, Jonners!), since it's more accurate than the Xtradecal nose art. So far, so good! And very seasonally-appropriate, thanks to the fact that it's taken me EIGHT MONTHS to build this kit so far, a personal worst. I might have gotten more decalling done, but this morning we woke to discover the rear starboard tire on the Procopiomobile (a 2011 Subaru Forester) had gone flat. How ever could this have happened? Oh. I'm far from a handyman, about as far as a man can be -- I have the complete works of Aristotle on one of my bookshelves, for crissake, but I'm pleased to say I managed. Even put the spare the right way on, first try! Next stop, the tire place.6 points
-
As ‘normal’ I’m starting the build with the cockpit. Now this will be a little bit different from the instructions as I’m going to alter the radio operators/rear gunners area to allow for the minigun. I’ll also be adding flight crew, I’ve got some in the spares box I’ll just need to identify which ones to use. After studding the cockpit I have to say I’m a little disappointed with Arfix, the plastic is very soft, almost rubbery, and the mouldings aren’t very crisp, this could be because of the type of styrene they’ve used? There are a lot of ejector-pin marks, look at the floor of the rear cockpit… The fit of the pilots seat wasn’t very precise and the rear gunner/radio operators seat was more by luck than judgement. The side panels are a nice idea, once again the details are very soft, also there was quite a bit of flash, albeit very slight, and if you weren’t look closely you might miss it, this could cause alignment issues? The radio details are quite clunky… …and the rear of the radios is like this… …dry-fitting the radios shows that you’ll be able to see the rear of them once fitted, very poor from Airfix I think. Anyhow, nothing that a new scalpel blade and strips of styrene can’t fix, I just think that if I were just starting in the hobby this lack of attention to detail might put me off when it’s such a “new” kit. Backs and a bit of wiring added to the radios. As I’m not using the kit supplied gun magazines so I’ve removed them from the side panel. I also wanted to add some extra wiring and photo etch, airscale PE48 DET, to the side panels just to dress them up a wee bit. next I’ll be sorting out some of the ejector pin marks and painting the cockpit. until next time as always, any suggestions, criticisms or comments will be gratefully received. rgds John(shortCummins)6 points
-
A bit more done, Torsion bars and rear hubs on. Front and middle hubs and steering gear next. A fairly straightforward build today. The rear torsion bars were to long (cue the knife) but cut down ok! I may have a problem coming with the steering bar pivot! It was fitted to the hull where the markings on the hull said but they fouled the torsion bar,minor surgery needed there,but they might be to high. Won’t know till I start the steering gear. Ivan6 points
-
Here is the Eduard Kittyhawk IV (P-40N-20) NZ3220, No.18 Squadron RNZAF, Bourgainville, 1944. The model is pretty much out of the box, Eduard added some nice photo-etch and resin detailing to the original kit (i cannot recall who made the original mouldings). The only thing i changed was to use home-made masks for the insignia and white identification stripes. This is quite an expensive kit (mine was a Birthday present!), but i think the quality of the kit, the instructions, choice of markings and different variants you can build justify the cost.6 points
-
A most interesting purchase. The wood appears to be Box, Lime or Beech . I don't think that they are masters but that they are turned up for particular models probably solids, by someone quite skilled with a wood lathe. They remind me of the stuff that the late W.O.Doylend used to make for his beautiful solids. His book Aircraft in Miniature (not to be confused with a modern company) is one of my treasured possessions. He was a customer of mine many years ago but I seem to recall he lived then in the south. Turned hardwood, wooden parts also featured in a number of balsa "Solid" model kits in the early 1940's so equally they might be old stock from such a company, when I get time I'll try and look through Aeromodeller for any Manchester based model kit manufacturers. John6 points
-
A selection of AP drawings showing diferant parts of the airframe, if there is any particular part you would like to see let me know and I'll see if I can find it. John6 points
-
Hi all, I thought it was about time I took on another resin kit, as the last resin model I built was the DFW T28 'Floh' from 'Planet Models'. I've had the 'HPH Models' 1:32 scale Aviatik 'Berg' D.I in my stash for quite awhile, so thought it was about time I gave it a go. Already I've encountered a couple of things that may cause problems. 1. The instruction manual, normal I think for 'HPH Models', consists of a small booklet with photographs and arrows showing where parts fit. However these illustrations leave a lot to be desired, especially those for assembling the engine, which has many parts and the smallest in the entire kit. Some of the call out illustrations for parts are not the same as the actually resin parts supplied in the kit, which is a bit confusing. 2. More of a concern is that the kit is supplied with mask sheets for painting the lozenge - not the easiest route to take. So I ordered the optional decal sheets. These arrived in polythene bags and without the normal tissue paper protection sheets. Consequently the bags stuck to the exposed decals and despite being careful extracting the decal sheets, some were chipped where they's stuck to the bag. Also the bags had left an imprint across every decal, which I'm not sure will show after the decals are applied. Thinking this might have been a 'one off' I ordered another set of decals, but these packaged the same way and in the same condition. I emailed 'HPH' and suggested they revise how the package these decals - I haven't had a reply!! Anyway we are modellers, not assemblers, so on I go. I decided to work on the engine first, contrary to the instruction manual. Unless I'm very carefully, some of the tiny engine parts may end up feeding the 'carpet monster' - we'll, but at least the kit is supplied with some spare parts. I'm using 'Alclad' lacquers on the engine and have dulled down the copper water jackets on the cylinders and the intake manifolds by applying 'Tamiya' Weathering Master (Set D - Oil Stain), which gives the copper an older, heated look. Long way to go on this one I think, Mike5 points
-
It's been a bit cold and wet to get outside and spray this thing so I've confronted my demons and brush painted it 👿: The decals are pretty good, slightly out of register but you've got to look closely. Once again I used the old square bottle Humbrol Decal Cote 1&2. which is a bit gentler on these old sheets and will hopefully get rid of the carrier. I messed up the ejection seat triangles so they'll need to be replaced. John5 points
-
Declaring completion. Diluted white acrylic paint over the green camo for the Arctic side. Undercarriage, jetpipes, weapons, pitot - all came together last night. And the Desert side. New spy satelite photo - showing nav lights. And underneath, showing missiles, guns, RF probe, hook, undercarriage and that shark decal.5 points
-
I can't really add much to the technical side of things, but these my halp in some way. John5 points


.thumb.jpg.158e2e086d45b8f96b7d93b8bee8dc21.jpg)


This leaderboard is set to London/GMT+01:00