Leaderboard
Popular Content
Showing content with the highest reputation on 29/09/19 in all areas
-
Kit - Hasegawa 1:48 Paint - Cockpit, seat etc all acrylics - Camouflage all Xtracolour enamels. Decals - Eagle Strike Extras - True Details resin seat, Eduard kit-specific 'Zoom' set. Fuse wire, fibre-optic cable and plastic card details in cockpit, air-brake and undercarriage wells. Canadair Sabre Mk. 4 Assigned to Sqn. Ldr. T. H. Hutchinson C/O 3 Squadron RAFG Geilenkirchen, 1955/56 So, a thirty year old kit, painted with thirty year old enamels and wearing twenty-five year old decals.... bit of an 'old skool' project wouldn't you say ? There honestly isn't too much to say, the kit really does fall together and is (happily) typical of those superb Hasegawa releases from the early 1990's, crisp detail, faultless molding with fuss-free engineering and construction - I really wish they would tool-up again and release some new kits, I know that's not going to happen, but there's nothing wrong with hope is there ?. The Eagle Strike decals behaved as if they were printed yesterday - utterly flawless and superbly printed by Cartograph, again, a company I really do miss. That's just about it. Please feel free to criticise, ask a question or make any sort of comment. Have the rest of a great weekend folks, best from Middle Earth. Ian.30 points
-
I built this in the 80s front line asia gb, to represent red 23 from the Afghanistan conflict ,built oob The zvezda mi-24p kit 1/72 And here with another helo i built in the same gb,the hobby boss 1/72, mi-17 hip23 points
-
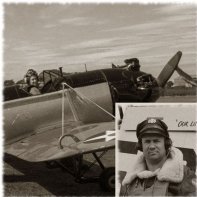
I finished this a few days ago. The Pavla Models kit, from the Czech Republic, was unknown to me until I was given it to build. Cutting and fitting the vac-formed canopy was a challenge and the inside of the fuselage needed to be thinned quite a bit for the resin cockpit but it turned out a nice little model. I made my own graphics for the new decals which were printed by John at http://www.precisionlabels.com/ I've included pictures of the fullsize aircraft, based at Breighton Aerodrome, for comparison.21 points
-
I've been checking out this website for a while. Seeing a post awhile back on this subject I thought my method might be of some interest. Using an airbrush were most of the responses. I use chalk pastels. Here are some photos of my Italian Breda 88. Same method of mottling, Just a different nation. Here is a Bf 109 I built some time ago. go. Thanks for looking, -Bert20 points
-
Another F-4 crops up, this is a 43 Sqn FG.1 from circa 1970, the well documented XV574. Remember the photo being on the cover of an issue of Airfix Magazine back in the day, stalking a Soviet 'Bear'. From the currently still running STGB . Fujimi 'Silver Jubilee' boxing. OOB, I had to carve away the electronics fairing off the Tail-fin. Xtradecal markings, Eduard 'Brassin' Sidewinders, PJ Products Pilots. Xtracrylic's paints airbrushed over Ultimate Grey Primer. By no means perfect, I still have trouble airbrushing these particular paints, but happy with the overall finish. I did weather the bottom a bit, but it doesn't really show in the photo's, was a bit scared to go over the top even though photo's show they get really dirty underneath! Comments and queries welcome. Davey.18 points
-
This month's project has been the futuristic looking Piaggio Avanti of the Italian Navy (as seen at this year's Yeovilton Airshow), using the AModel kit. As with all AModel kits, it needs a little care to complete, but captures the "Gerry Anderson" looks of the real thing well. Indeed, I briefly thought about painting it white and using a set of spare Spectrum decals instead of the kit ones! The kit includes a comprehensive interior layout, but this is a little wasted due to the small and not entirely clear windows. ... and the real thing at Yeovilton: FredT18 points
-
Adapted from the newer Airfix kit, painted using Vallejo paints and finished with Xtradecals. The fuel filler points were altered, windows blanked, and two blades altered so they hung the correct way. Although we were more used to seeing the Yellow Crab cabs in East Anglia, I do like to RN scheme. And lets be honest - if you needed one you didn't care what colour it was! I hope I got the yellow blade in the correct position for when they're folded. Dave17 points
-
HI all, Not been posting for a while so this is the first of a mass upload of completed models... The Airfix 1/72 Phantom. Painted using Tamiya Acrylics. And the 200 odd stencils..... I don't normally load my models with weapons but for this one I went all out. Dave16 points
-
Tamiya Spitfire Mk1 downing an Airfix BF109 Over the channel during the battle of britain.14 points
-
Here's my Freightdog Models 1:144 BAC (EE) Canberra E.15 I built back in 2010. It represents WH948, of No. 98 Squadron, RAF, based at RAF Cottesmore, UK, in September 1972. It's the OzMods kit repackaged with a new decal sheet. The kit was painted with brush and the varnish was airbrushed. Thanks for looking Miguel13 points
-
Hi all, Next up is the Special Hobby Fairey Barracuda Mk2 in Home Fleet finish. Painted with Vallejo this time. Bit of a fight with this one, but I'm more than happy with the end product. First time using EZ-line for the wires, what a good product! Dave13 points
-
Hello Everybody! I recently finished the 1/48 Hellcat Fighter in the rarely seen scheme which is the British Fleet Air Arm version. OOB build but some scratch details like seat belts, gun barrels and engine wiring are added.13 points
-
Sorry for the drama title but it's close to what happened here. This is the story of my 20+ year old (forgot actual purchase date) 1/12 Tamiya Caterham cycle fender. Started by assembling the chassis and then languishing while I went overboard on 1:1 projects, it has slept in the basements of two homes I've lived in. Certainly there have been presented here better and more detailed Cats of late, by experts. So why bother now? Especially after I've 'resigned' from modeling after the Rolls? I have recused myself because my worsening health issues had convinced me that I could not work to my standard anymore. Indeed, I declined to finish dear Paul Calvert's wonderful Eagle for those issues and enlisted the capable help of Ron and Sam. But of late, other voices have led me to wonder if I could work through my maladies as others like Thierry have. At least they tried just to see if they could. My undying respect to him and them for now I know the struggles involved when you do not have all your body's tools. So after passing by the Cat downstairs for years, I plucked it as a likely candidate to try. A relatively simple kit of 300-odd parts, and a large enough scale as to be manageable (the Eagle is smaller 1/16 and Paul had added minute rivet and other details-a seeing and handling nightmare) and I didn't have to go buy this now- expensive though reissued kit. So - how hard could it be? Heh, heh, heh,,,,it kicked my duff.... Enough blather - this is not a WIP but shows some steps and pitfalls along the way: Chassis started two decades ago. A milestone kit by Tammy with .025 ally body panels and many-screw construction. A bit of simplification but not much, inviting scratch details as others have accomplished. But I decided beforehand to cut my usual un-cut corners - not any hidden details when closed, simplified wiring, no brake lines, caliper detail or electrics. Loving the look of the car closed, that would dictate my direction. I felt a miracle if I just got paint, screws and glue on it and damn the smoking details. Here primer being applied - red lead style. Paint and primer by MRP. Clear by Testors. Bare body panels ready for prime: Rosso Corso at 12 psi straight from bottle goes on as thin as ink, which preserves details like louvers: Decanted clear cut 1/3 also at 12 psi: Alclad pale gold shot straight at 8 psi on Replica and Miniatures resin Minilite wheels. I had bought their aftermarket PE kit (OOP) but now found I could barely see much less handle their tiny, thin parts: The disturbing thing (but really the nature of the real car) is that you must mount finish-painted body panels before assembling the bulk of the suspension and small parts TO them. This invites handling finished paint with the accompanying 'hand damage' or possible scratches from slipped screwdrivers (easy to do on this: the bulk of the screws are 1.2 x 2.5MM) . Plus turning the chassis over and over to get to things and install minuscule stamped steel brackets and screws. I put down a thin foam base and used chunks of thicker foams to support while working. Plus I was lucky - because the shaking was fatiguing me constantly: After a while, I went back a bit on my original intentions; I tried plumbing the hoses and wires as much as I thought I could just to see how bad my conditions are. Held 'feet-to-fire' despite hating the struggle and taxing my vision. I learned I was right to swear-off and decline Paul's model for this was more than challenging my patience. Trying for an hour to get one screw in place (many times) almost had me ready to epoxy everything instead. But with breaks between, I persisted. I was not liking the results I was getting and the struggle did not feel as good as solving the Rolls' challenges, when I was physically better. This nice kit would take at most a few weeks to build especially OOB but it took me over eight. Tamiay's legendary joins and quality were present in this milestone kit. It has a nice weight to it and feels like quality. It mates nicely with my 935 and GT. A spritely little scamp among dreadnoughts. Importantly, it got rescued from the basement oblivion. Here's an example of my whining; the spring that holds the bonnet 'closed' gets looped onto a stamped latch. This get screwed to the body (in an impossible place) and then HOOKED onto a bit of the bonnet which is stamped out of the panel. It took me about four hours to get to the point where I CA'd the spring to the latch, screwed (1.2 x 2.5MM) to the body and hooked the latch to bonnet. Then I layed a drop of clear parts cement on it. Shaking like an earthquake is not fun model building. One huge difficulty was the inability to place that screw, paint brush or glue drop precisely where it needs be : I'll conclude with a few finished pix. I wound up doing a (rare for me) near OOB build. I scratch built better seat belts, and grille screen and monkied with the exhaust (which I hate) a bit. I had visions of doing a whole Cobra side pipe like mine with collector and flanges but despaired. I did cut one coil from each spring to lower it - but - forgot to shorten the inner rod of the shock - duh. I even found I could no longer take photos as well as I used to and that's clearly evident here. My apologies. But my purpose here is to salute those who work through their maladies and handle the stress so much better than I. Hats off to you all. I'd give myself maybe C or C+ grade for this. I certainly wouldn't put it on the same table as the real-deal Caterham guys...12 points
-
Hi all, Here's my latest build, He 219 A-0 Uhu of ZM in 1/32nd scale. Propellers are not so much of my area of interest and I built it just to try something other than jets. Hope you like it, thanks for looking. SpeedyGonzales12 points
-
First attempt at 1/72 in 20 years. All comments welcome As ever all comments welcome Sweaty11 points
-
Hello There is another one Japanese aircraft, Mitsubishi A6M5c "Zero" (Tamiya scale 1:48, the old one from 1983). Like my "Betty" with some parts from Eduard and Master Model, and painted and weathered with Testors and Revell colors. The pilot is from Plus Model. Best regards Peter11 points
-
This was made from the Trumpeter kit, and like all Trumpeter kits it isn't 100% accurate. Strangely, they don't give a wing fold option in the kit. but include the wing end blanks! I made some hinges from brass strip bent to shape, and the wing support rod (The red poles) from brass rod inserted into holes drilled in the wings to support them. Painted using a mix of Vallejo and Tamiya, using Montex masks for the windows and main markings - which are useful as Trumpy give you white underwing serials!?! I also reduced the size of the canopy window for the Observers coal-hole to the correct in-service size. Dave11 points
-
11 points
-
Another golden oldie from my collection, I received this model as a Christmas present in 1973 from my dad. I originally built it as the Coastal Command option but a couple of years later I repainted it in the first of a number of Bomber Command colour schemes that it would sport over the many years. This boxing is the same as mine was with the parts being moulded in white plastic. I could never understand why the nose turret has two guns. I thought my model was wrong at first. The typical inspirational FROG full colour painting guide on the back of the box for the two optional versions in the kit. I made a new bomb aimers nose glazing from clear plastic, and opened up the entrance hatch underneath. I replaced the kit's nose turret windscreen with a turret from an AIRFIX Anson. I replaced the kit's prone bomb aimer with a seating one and built a bomb sight. The kit's bomb aimer looked like he was frightened of heights the way he was peering over the edge of the floor. Extra glazing added behind the turret aperture Bomb aimers window, entry hatch and camera porthole. I scratchbuilt a rear turret using the kit's turret glazing and guns. The original white plastic and the kit's wing spar visible I can display the model on the ground or in flight mode by using the kit's optional landing gear configurations Brush painted with Humbrol Matt Black and depicted in the markings of 10 Squadron based at RAF Leeming in Yorkshire in 1941. Caught in searchlights at Scale Model World That has been my 46 year old FROG Whitley. regards, adey11 points
-
Cruiser tank Mk.VIII, A27L Centaur CS Mk.IV 2nd Battery, H Troop, Royal Marines Armoured Support Group Tilly-sur-Seulles, Normandy. 13 June 1944 Kit: Tamiya 35232 Build thread: https://www.britmodeller.com/forums/index.php?/topic/235056541-rmasg-centaur/11 points
-
Thanks Steve but I think that one's enough at this stage! If the truly demented need to compare the two then I'll leave it up to them to go through this thread..... Paint will be soon Ced I can promise. Just need to go round finishing the snag list, of which more done today. 😄 Only a few items remaining uncicrcled now! Also useful in power cuts! 😆 Ta very mooch Ian. The foil I generally use is this stuff from Coralgraph (unfortunately sold out here): https://www.amazon.co.uk/Coralgraph-Inc-Aluminium-Insulation-Adhesive/dp/B01HF3EF0U It's thinner than the roll of 3M metal tape I also have and conforms really nicely to even quite complicated curves. Good strong adhesive on the back too. We're lucky to have a restaurant about a half hour drive away run by an Italian family and it's the best in the area by far. Went on the Olive Marinati to start with followed by Tagliatelle Brasaoicola (sp?), all washed down with a long cold glass of Peroni. Yum! 😋 Today I've been mainly obsessing about nacelles, or rather, finishing the foiling of same that started yesterday. Al told it took about 3 hours of concentrated effort to get them to my satisfaction to the both the range of adjoining compound surfaces involved as well as cutting out and applying multipe panels to a cylindrical shape. Some were cut freehand in situ and others standardized on the Silhouette; with all the toing and froing (plus the repetetive nature of the job) I didn't bother with any 'in progress' shots. Here's a synoptic view of today's results first: Below: Straight-up confession that those wheel bay panel lines aren't completely accurate. They should come in closer on either side to those 'notches' that allow the wheel axles to retract up into the nacelles; when making the brass starboard nacelle underside I had to leave a wider margin in that vicinity (about 1mm either side iirc) otherwise the thinness of the metal at this scale would simply have buckled at the slightest pressure upon it. You can start to see the individual panels in this shot, plus the way that the fairings on the rear of the nacelle curves outwards and onto the wings inboard and outboard: The port outboard view also shows the entrance hole for the starting handle, plus an access panel just behind it that I've long ago forgotten the purpose of: Also note the angled nature of the front panel seam there to match the angle of the firewall behind it. I haven't gone utterly mad with burnishing the entire nacelle to a pristine flatness as in many shots of operational aircraft there are lots of signs of Messrs. Dent & Ding that I've tried to retain in places for visual interest. Under primer of course what you see here wil become more subdued. Finally a self-indulgent front view to finish with as a way of bidding 'Adieu' to what turned out to be a quite intensive set of jobs: Off to poach some cod for the tea. Milk, bayleaf and a few black peppercorns for 30 mins on low. Gentle tea for the knackered foiler.... I wish you all peaceful Sunday evenings. Tony11 points
-
Hello Here is my first post of finished work, it is the Mitsubishi G4M Hamaki Typ 11 "Betty" in scale 1/48 from Tamiya (with some parts from Eduard and Master Model). Painted and weathered with Testors and Revell colors. Best regards Peter10 points
-
My Hurricane on a small universal stand. Actually, Laysander from Matchbox lives on her10 points
-
Cruiser tank Mk.VIII, A27M Cromwell Mk.IV C Squadron, 5 Royal Tank Regiment, 22nd Armoured Brigade, 7th Armoured Division Normandy, June 1944 Kit: Tamiya 35221 Build thread: https://www.britmodeller.com/forums/index.php?/topic/235057210-down-the-rabbit-hole/10 points
-
I love all of the century series fighters - but If I had to choose only one, it would be Starfighter. I recently built three different models of the Starfighter - not only different versions, but also different model brands. The models are as follow: Italeri 1/72 F-104C Starfighter (No. 1359) [Based on old Esci F-104 from early '80s] Revell 1/72 F-104G Starfighter (No. 03904) [Revell new tool 1995] Hasegawa 1/72 F-104S Starfighter (No. 00447) [Hasegawa new tool 1989] I can't really say about model accuracy but ALL are good models to build with different strengths & weaknesses - and honestly they are pretty even. For example Revell has the most details (by a small margin) - but the details are also bit soft compared to Hasegawa. Panel lines are crispiest in Italeri and it has the most detailed wings - but it has no details in the wheel wells and generally is the least detailed overall. Hasegawa cockpit can be opened and is the most versatile kit with general good quality feel to it all around. They are all in the same ball park - but if I had to choose one - it would be Hasegawa. All painted with Vallejo paints (except silver with Tamiya spray can). Dirtying up using oil paints (panel line wash) & Vallejo weathering effects. Comments & constructive criticism welcomed. Hope you like 'em! From left to right: Italeri F-104C, Revell F-104G and Hasegawa F-104S.10 points
-
... here you go, Airfix Blackburn Buccaneer S.2C by James Thomas, on Flickr Airfix Blackburn Buccaneer S.2C by James Thomas, on Flickr Airfix Blackburn Buccaneer S.2C by James Thomas, on Flickr Airfix Blackburn Buccaneer S.2C by James Thomas, on Flickr Airfix Blackburn Buccaneer S.2C by James Thomas, on Flickr Airfix Blackburn Buccaneer S.2C by James Thomas, on Flickr Airfix Blackburn Buccaneer S.2C by James Thomas, on Flickr Airfix Blackburn Buccaneer S.2C by James Thomas, on Flickr Airfix Blackburn Buccaneer S.2C by James Thomas, on Flickr Note, there appears to be a landing/taxy lamp included (part 2 on the clear sprue) for the RAF versions, and both the short and long wingtips are included on the clear sprue, there's not a lot to stop me building non pregnant RAF Buccs here. As you can see the detail is superb, even down to the insides of the undercarriage doors. Really hope aftermarket produce a decent S.1 conversion set for this kit Apologies for the pics quality, short on space here at the mo.10 points
-
Lockheed P-38J Lightning 'Lou-E-Z-Ann' 392nd FS/367th FG USAAF. 1/100 Eldon kit made OOB with just a few additions (mainly the superchargers). Decals were scanned/reduced/reprinted from a 1/72 SuperScale sheet. The build thread is here. Cheers Cliff9 points
-
Hello folks - another update before the weekend comes to close... leaving off from last time I put some filler on those tail boom joins... Again with the Tamiya filler... that was sanded off after a few hours and this seemed to do a good job of hiding those seams. Getting a little closer to primer time I wanted to sort out the canopy - on the actual aircraft, the front section has a slight dark green tint. I wanted to recreate this - so went about tinting my first canopy. I mixed up some Tamiya clear smoke and mixed in a little clear green - this was thinned with Tamiya lacquer thinner - about 30/70 paint to thinner - I then sprayed the inside of the canopy very lightly - in a few seconds I had this: I probably went a little heavy even though I was trying hard not to:) Colour is probably a little too green but otherwise I was happy enough. This was then masked up using the precut masks - which fit pretty well. I added some details to the rear of the cockpit with some copper wire - just add a little more detail - I’ll paint this up later- added the gunsight also... I then glued the front section in place with Tamiya extra thin - I glued the rear section in place with pva glue so I can remove it later. It then occurred to me to test how nose heavy the model was with the @clive_tmethod - I blu tacked a round pen at the point of the rear under carriage... Yay! She’s actively trying to face plant. With my fears allayed I was finally able to move in the knowledge I wasn’t building a tail sitter. The canopy was a pretty good fit but not without some little gaps so I put on some perfect plastic putty and wiped away the excess... With that I decided to pull the trigger on the primer - I knew there would be issues still but I wanted to get a good idea of what needed work and what didn’t... so I mixed up the usual mr surfacer 1500 black - thinned with mr leveling thinner. I put on one light coat which gave me a good idea of where the problem areas where - before I thought to take a photo, I attacked the model with sanding sticks, smoothing out the rough areas. I also did some re scribing on spots where I’d wiped out the panel line. I use this tool from Tamiya which works great on those curved areas - I push it lightly along the panel line until I get a more solid path - then pull it until the line is sorted. The second coat of primer then went on. This time putting down 3 coats... So the results where mixed I think - on one hand those gaping seams are gone - however my over zealousness with the filler application resulted in some slight putty “hills” going over the wing joins. These are more obvious in some places- but other than this I think it came out okay - it was an experiment trying this so I’m chalking it up to experience. Hopefully it wont detract too much from the overall model. None the less there were still areas that needed fixing - mostly small scratch marks that I hadn’t picked up on earlier so more a sanding I go... Well I got to the primer stage which I was happy about - I’ll just be remaining stuck on the primer stage for another wee while - however when the next coat goes on, it should be the last. Then we might actually be close to getting to the fun part😀. Thanks for checking in! Enjoy the rest of your Sunday John9 points
-
Just finished this one today (2 in one day...!!!). The old and bold Trumpeter 1/72 IL-28. These kits can be picked up for peanuts. Fit is a bit off in places but with the usual effort scrubs up pretty well. Do not follow the instructions for the pilots cockpit as the seat would be way too low. I wanted something to go with my Vietnam collection so used spare decals from the stash rather than the box options. Airbrushed using Tamiya paints (which I totally adore for airbrush work). Weathered using a Flory dark wash. EZ Line used for the radio wire. Very pleased with the way it has turned out and has decent presence on the shelf. Here we go with the photos: Cheers all, Phil8 points
-
Made from the Airfix kit and painted as the Admirals Barge using Xtradecals from Hannants. I like this one for its uniqueness. There's quite a variety of different shades used for models of this plane. I think mine actually came out a bit too dark..... Oh well. Dave8 points
-
Airfix Dakota Mk.III converted to a C-47a. Decals were Kits-World Warbirds KW172124 C-47A 42-100882 'Drag em Oot' 87th Troop Carrier Sqd, Greenham Common Sept 1944, Now resides at North Weald as part of the Aerolegens fleet operating out of my local airfield Headcorn. Glad to now have made an aircraft ive been in, just need to to the Spit and the Harvard now. Just 3 photo as my flickr account has reached its limits even thought ive deleted albums within in grrr. Will upload more as i think it needs to refresh. Build Thread here DSC_0023 by stuart wellard, on Flickr DSC_0019 by stuart wellard, on Flickr DSC_0015 by stuart wellard, on Flickr8 points
-
8 points
-
Okay, I'm getting there - starting the painting. ¨ There are some white details so I'm painting white first. Also the red really needs a white primer. There are decals for the white details but they are easy enough to mask them so I rather do that instead. Especially as the decals seem very dry & yellow bordered. Most of the yellow I got out of by taping the decals onto a window and letting them have some sun. I'm using the decals as a guide for the masking tape. Here they are all masked up, ready for red. Red done! Next step is to mask the red and paint the aluminium.8 points
-
Indeed. That is definitely going to cause me problems going forward. Why couldn't it have been a flat dull blue like BR ? Thanks Heather. I've emailed Steve so we'll see what he responds with. Ced, with such a high gloss finish I'm too scared to try a layer of dullcote. What will be, will be. I guess. Thanks BigDave. I got something right then. From there, on to today's escapades. I can forewarn you that I did actually get some of yer akchul real construction completed today - it seemed so strange! To celebrate I took loads of photo's to bore you with and hopefully didn't miss anything important. Starting with the vestibules, nicely glossed, completed wiv stickers n everyfink. (another strange feeling). I also dug out bits and pieces salvaged from previous failed vestibule ends that must have been a couple of years ago by now. First job of the day was to remove anything from the vestibule which wasn't very vestibulic. Namely, the passageway entrance. In a rare moment of planning ahead, when I originally did these, I had the passageway entrance scored in the plastic but not removed. That made it a simple, if still somewhat scary, to gently score the ehrr... scores with a fresh blade. The scores were on the reverse side from that shown here, so there was always a fear in my mind that some paint would decide to part company with the plastic leaving me lying on the concrete floor, whimpering like a child who's just had his lolly stolen. Gently does it... a bit at a time. And if the gods are willing, we end up with nothing... a space. Just what we wanted! Emptiness! Next step was to gently file around the edges at an angle to cut back any hard edges of the paint - I didn't want my clumsy digits peeling back any of the brown stuff after all this time. I'll deal with the small white edge later Looks like we are finally getting somewhere on this build. I had some clear acetate (or acrylic) sheet which I purchased who knows when, but when I looked at it from a "window" perspective, I wasn't completely happy. Yes, it was nice and clear, but like most of those thin films, when it caught the light you could see small striations which showed the surface wasn't completely flat. You had to look, but it was there. Fortuitously, I had also bought some 0.030" Lexan (plexiglass) and this appeared to be much better - and it could still be cut with a blade. The windows were glued in with GS-Hypo, then the interior was glued on top of that using E6000. I had to make new interior panels but you already saw me doing that several years ago so no need to show again. Finally, almost 5, yes 5 (count them!) years into the build and we have a vestibule end complete with windows and interior paneling. I got so excited, I made two! With that excitement over, it was time to mangle and destroy that perfect finish I had worked to hard to achieve. (This is where the more exciting buildy stuff starts to appear.) It's diaphragm time folks! Since the diaphragms are going to be literally hanging off the end of the car, I thought it prudent to and provide some positive fixings for them, and not rely solely on glue, so, rough up the surface and start drilling some holes in it Why ? Well, I though using some brass rivets would come in handy to assist in positioning and fixing. Once I had drilled the vestibule end, I transferred the holes to the diaphragm and popped in some brass rivets. 4 in total. Next up were the bellows for the diaphragm. If you have a really good memory, you will recall that I made these many years ago from the foil paper inside cigarette packets. Surprisingly they have stood the test of time, though they did have a few cobwebs and loads of dust I had to clean off first. Cut to size and glued to the diaphragm, they almost look convincing. Well, convincing enough for me. - and that's what counts I guess. The bellows and top cover had some superglue gel smushed over the surfaces (and superglue normal to hold the rivets in place), then the rivets were guided into their mating holes on the vestibule end and the whole shebang clamped together. The s/g gel gave me some wiggle time to position the diaphragm relative to the doorway. Are we there yet ? 'Fraid not. Still more gubbinses to attached. Strangely, for me at least, I managed to find things I had made a year or two back without too much trouble. Normally my 'safe' places go walkabout the moment I turn my back. Anyways, there are some electrical wotnots to be added. Sorry for the poor photo, but you can see the small roundish thing just below the window, one on each side of the doorway. There is a small tube protruding from the bottom end - that will get some electrical cable and a plug when I get around to it. Next, another electrical power socket thingy. Things are really starting to take shape now. It's amazing what a splash of color can do to a build. and there we have an almost complete vestibule end 'cept for some cable and a plug, and a few other bits n pieces. you also get to see some nice greasy fingerprints all over the place. Warning: and photo's after this point are completely gratuitous and posted for purely selfish reasons. - 'cos I took them. So what does it look like in situ then I hear you ask? I really should have stuck on a sideframe or two to take these shots, but that would have meant tidying up my workbench and putting tools and stuff away, so no side frames I'm afraid... just use your imagination. that's all for the time being folks. See you at the next stop8 points
-
Willys Airborne Jeep (Airfix 1/72), 6 Airborne Division, Normandy 1944. Humbrol enamels, following the Airfix instructions. Some Wilder Oils and Citadel paints for the weathering.8 points
-
Somewhere in the Soviet Union... This started as a build of an old Tamiya T-34 kit to test the hairspray technique. The model was left for two years before I found the inspiration to complete it again a couple of months ago. Figures are Miniart.7 points
-
Some more progress on the Swift after finishing the Bristol 138 in the Frog Group build. Tailplanes have been added and most of joint lines etc. have been eliminated, the new rear fuselage proved a little harder than I had anticipated. A coat of primer shows most of the model is OK. Since the photos wee taken I have added the wing fences, these are needing some work to blend into the leading edge. Once they are sorted the rear part of the canopy will go on and work can start on painting it in Dark Green/Dark Sea Grey and Aluminium7 points
-
So, the rest of the build is fairly straightofrward. "OOB" for lack of a better word, now that all major reconstruction is complete. I'm not planning on doing a super-detail job here, I feel I've spend the effort I wanted on this project where it really needed to be spent and now want to complete it as cleanly and neatly as I can before my inspiration runs out. However, that doesn't mean no more updates. As I said, not doing anything super special but some may find some of my techniques interesting, particularly brush painters. I always start painting my ships with the deck, and for a wood deck that means getting out my trusty tub of Humbrol 71 for the base coat. I use coloured pencils to make a wood deck effect. First, a fairly even (but not too even) rub with a yellowish ochre colour to bring out the scribed planking. Then more deliberate localised rubs with dark brown and grey; the aim here is not to draw on individual planks, but just to create the overall effect of an itermittent light/dark pattern. As a last touch, since I don't like masking except as an absolute necessity, I use a mechanical pencil to trace the edges of large deck details such as barbettes, breakwaters, superstructure bulkheads and the edges of the wood planked area. This will act as a guide and physical barrier to paint running when I paint these details. And finally, I use my trusty 00 detail brush (of which I clearly need to buy a new one) to paint all deck details freehand. I also took the opportunity to paint the boot stripe. This one will be masked to get a straight edge when I paint the hull sides later. Since Repulse and Renown sat quite low in the water after their various 1920s refits, the Tamiya hull is just tall enough that the boot stripe would be showing. So painting it on is necessary despite this being a waterline model.7 points
-
Always useful to have a propre reference; there are of course a lot of pics on Internet about the Eurofighter, but determining the timeframe they refer to risks to be a wild guess sometimes, and the Typhoon received quite some updates during its life. Cheers Stix, thanks Late night (in this neck of the woods, that is) update my original plan to refine the windshield was to use some leftover milliput I stored in the freezer - though, being it already reused for at least four times, this time it refused to stick to anything. So I just threw it in the bin and, being impatient, i decided to go with CA+flour. The windshield had been previously coated with a protective Aqua Gloss coat (by immersion); plus, I normally pour a small amount of CA on a piece of alu kitchen foil, so that the fumes evaporate quickly. This way I avoid frosting the transparent parts - or so I hope .... Anyway, here's the deal I then resprayed Tamiya Flat Black on the lower windshield frames While this was curing, I tackled the exhaust area; at this link you can see that there are some metal plates (sort of petals, really) surrounding the back part of the fuselage http://www.drivefly.it/walkaround/eurofighter-ef-2000-a-typhoon.php I briefly considered using some alu tape to reproduce this effect, but after a quick test on the spare fuselage, I discarded the idea and set to scribe this detail. So with the help of Tamiya Tape for curves Time to glue in the radome; I stuck some fishing lead in it, wrapped into kitchen film Then I put a blob of blue tack on top of it, to help keeping it in position while gluing with TET Another notable missing part of the kit is the tail sensor; again, see this link http://www.drivefly.it/walkaround/eurofighter-ef-2000-a-typhoon.php Luckily, some of the sprue gates of the kit are 2mm in diameter, so I cut one and rounded one side by putting it into an electric drill and using a file to give it the right shape. I then put a 1.1mm brass rod in it to help the positioning and have a stronger bond. I also drilled a receiving hole in the back part of the fuselage I put a drop of CA on the brass rod and, once in place, added some TET along the joint Almost time for primer ... All comments welcome, as usual Ciao7 points
-
The first bump in the road with this kit; the join between the upper and lower fuselage runs right through an engine access panel but it’s not a massive issue. But rather thoughtfully there are tabs on the inside to keep the surface aligned. At this stage the instructions need careful review because the wing fold options are detailed here; I crossed out the assembly steps not to be followed. Make sure that the correct holes required for any external stores are drilled out per previous step instructions, the wing spar stiffener fits over one of the holes. In the photo below you can see the intake trunking and rear bulkhead with the exhaust ring fitted. The airbrake is is nicely moulded but a selection of drills made for an improved look; Before... After...7 points
-
Well, despite the saying "No man can serve two Masters", I seem to have achieved the impossible! I'm serving up my second Miles Master, back converted to a Master II with an SBS Blenheim cowling and a propeller from the FROG Blenheim, with a Falcon vac canopy: Build thread here. Thanks for looking, Adrian7 points
-
6 points
-
Hi! This little bust (the size of my thumb) has been sitting on my desk for a couple of years, just waiting for a catastrophy to happen. Guess it was time I finished it. I don't know who makes (made?) it. Bought cheaply on ebay four years ago. Hope you like it. Ciao Iwik PS It's as big as my thumb...6 points
-
Just finished this full resin 1/72 Anigrand VAK 191B. This was a commission build and is an aircraft I had never even heard of. First ever full resin build. My personal thoughts are that resin is great for smaller items like ejector seats, cockpits etc that allow the extreme detail come to life. I don't think its suited to a full air frame as injection moulding allows much finer details. Build instructions were for an in service machine rather than a prototype. Anyway, here is a link to the Wiki about the aircraft and a few photos: https://en.wikipedia.org/wiki/VFW_VAK_191B Cheers all, Phil6 points
-
Tamiya M8 Greyhound, with a couple of extra figures from the MiniArt US tank crew set and a selection of stowage from Redog. Front wheel hubs removed, pinned and reset at an angle. .50 coaxial barrel drilled out to give a better impression of depth. Painted with Ammo mig US Olive drab and colour modulation achieved with lightened tones of OD, weathered with various Ak and Ammo mig products along with a little Mig pigment. Stowage secured with E Z line. Typical Tamiya no problems with construction and decals worked fine. Hope you like it and thanks for looking. Cheers Darryl6 points
-
Home straight now. I glued the headlamp brush guards from the Eduard M4 set using super glue gel. This had the bonus of filling in the holes that Tamiya give for gluing the plastic items in place. I added the sockets for the headlamp blanking plugs to the brush guards from plastic sprue. Something that I did previously, but forgot to mention was the two front track guards. I used the kit items instead of etched brass as I prefer to use plastic when I can. By scraping the leading edge, the appearance can be improved a lot. I added the fixing strips to the insides against the housing, from thin card. Something else that I used plastic for instead of etched brass were the attachment strips for the sand shields. I cut strips of 10thou card, 1.5mm wide and then drilled the fixing holes before gluing in place. The headlamps will be fitted after painting as they already have the lenses glued on. I had salvaged just about all of the stowage from the old build, so there was no reason not to use it on this one. It was a mixture of Accurate Armour, some items from the Tamiya kit and whatever I had to hand. Finally, and these are not fixed in place as they need to be removed for painting, the tracks. A lot of 1c’s were fitted with T48 rubber chevron tracks, and I found a set from a Dragon kit of T48’s with duckbills, from a M4(105mm) kit, but unfortunately, they appeared to be too long, so I reverted to the tracks in the Tamiya M4 kit. They are still pretty good. Once this was all in place, it was time to visit the paint shop. I’ll be back when I’ve something to show. Progress on this may slow down considerably, as the T54/55 GB starts next week and I have a Tiran 4 to build. Thanks for looking. John.6 points
-
Drilling in progress : Searchlights, the one in front is original HB proposition Glass will be polished after painting. Thanks for watching Mick6 points
-
Howdy Everyone, Just finished my attempt at building my second Dutch B-25 Strafer from Monogram`s 1/48 B-25J kit Finished in the markings of `Lienke` of the ML-KNIL/RNIEAAF, No 18 Squadron, Based at Batchelor Field, Australia, 1944-45...... ... to complement my earlier B-25C I built a little while ago. Incorporated a few modification to the kit, the main one being that Dutch `J`s only had two nose guns as opposed to the four guns fitted to US examples....... ......to make room for a bomb sight I believe. The only other mod`s were the position of the nose venturii, seat armour and an extra aerial. Added ignition harness, brake pipes and aerial wires. Decals are a mix of: Dutch Decals sheet DD48056, Flevo Decals sheet FV48002 and the kits Noticed from photo`s these were very weathered with lots of areas where the previous owners markings were painted out This was Lt Hagers second `Lienke` the first was a B-25D. Hope you enjoy the pic`s, thanks for looking Cheers Russ6 points
-
gosh seeing some of these planned Whiffy inspired builds ....... I soooo want to build one but don't have the time now the beast has taken over the bench/life! She's over 20" long (the rotor at least 30")with +1000 bits of PE!! Otherwise I'm sure I could have wangled Heinkel He-477 Zwilling "Frankenbeast" into the GB some how!6 points
-
F203 (1973) - English Electric (BAC) Canberra B(I)12 - "Kiwi Konfrontasi" Frog's second attempt at the Canberra, this kit first appeared in 1973 and has been issued many times in many other manufacturers boxes. Numerous add ons and additions were included which can all be seen in the accompanying build thread. Modelled as one of the RNZAF's eleven B(I)12 aircraft, these were initially delivered in an overall High Speed Silver finish but were camouflaged a few years later. During the Indonesian Confrontation, six Canberras from No. 14 Squadron were sent to Singapore in September 1964 with forward rotational detachments sent to Laubaun Island, Malaysia. I've based this model on the few photographs available for this 'Konfrontasi’ period. These show that during this deployment, large white NZ serials were in use and the aircraft were armed with underwing silver conical shaped nose coned Rocket Pods (sorry, I'm not sure what make these are?). Anyway, I'm glad she's finished and now finally on display. This has been a cracking GB and I thank each and every one of you for taking part and contributing wherever and whenever possible. Cheers.. Dave See - even our gravity defying RBF (Remove Before Flight) tags show we live ‘Down Under’!6 points
This leaderboard is set to London/GMT+01:00








.thumb.jpg.0bac681e0da8e4ed7557610e98fda908.jpg)










.thumb.jpg.d17ff607fc7e89ed057e63fcb6f2a888.jpg)
