
Leaderboard


Popular Content
Showing content with the highest reputation on 26/09/19 in all areas
-
Trying to figure out how to get pics uploaded so bear with me.35 points
-
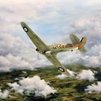
The first time that I saw photos of the Shackleton MR3 s was when I was at Primary School in the late 1960s. These were in aviation and RAF magazines that my father would bring home from the NCO's mess at RAF Bawdsey where my dad served. It was here that I also started building FROG models which I bought from the village Post Office, and I noticed that the Shackleton was illustrated on the side of the kit boxes as one of those made by FROG. The village Post Office did not sell the big kits, so it was during a shopping trip to Woodbridge that I first saw a FROG Shackleton on sale in a toy and model shop on the High Street. I so wanted one but for some reason it would be a few years before I did get one. The fabulous and exciting box front of the FROG Shackleton as I remember it. The Air-Sea Rescue title on the box always seemed a bit out of context considering what it has just done to that submarine. I suppose they would have needed rescueing after. My father took me to the air show and open day at USAF Bentwaters in 1970 and during the display it was announced that a Shackleton was on its way. I was so excited to see a Shackleton for real. Unfortunately it did one fly by at quite a height and that was it, the only time that I would ever see a Mark 3 flying. And this is the actual photo that my dad took. And here is a magazine I have kept from October 1970 still with the coffee stains from the Mess at RAF Bawdsey with a Mark 3 in beautiful colour on the front cover. Christmas 1973 and I asked my dad if I could have a FROG Shackleton. They were getting hard to find by then but he found me one with in a squashed box and a few broken parts inside. But I was so excited, at last I had one. And here I am on Christmas Day with my FROG Shackleton. I built it pretty quickly and not very well unfortunately. I left the wings and tailplanes unglued so they just slotted on and came off for storage. The rear of the box showing the typical FROG full colour painting guide for the two versions. A number of years later I decided to pull the fuselage apart, scratchbuild an interior and rebuild and repaint it. Here we have a drawing I made of the interior of my Shackleton before I closed it up. A photo taken sometime in the early 1990s. It depicts a Phase 1 aircraft armed with nose cannon. Hand painted fuselage lettering and numbers. On display in flying mode on our club table at Bridlington Spa. I made a stand from MDF that slotted into the open weapons bay. Then I repainted her in the overall sea grey scheme that she first entered service in at RAF Aldergrove in 1958. Scratchbuilt ground equipment. Depicted as a new aircraft in 1958. And as she is now after another repaint. On its dollies ready to be slid sideways into the T2 hangar for servicing. On display on our Club table in recent years She has appeared at many displays over the years. The sort of photo that inspired me, a Shackleton MR3 Phase 3 in its natural element. I hope you have enjoyed me sharing my 46 year old Shackleton with you. adey31 points
-
Howdy Everyone, Just finished my attempt at building my second Dutch B-25 Strafer from Monogram`s 1/48 B-25J kit Finished in the markings of `Lienke` of the ML-KNIL/RNIEAAF, No 18 Squadron, Based at Batchelor Field, Australia, 1944-45...... ... to complement my earlier B-25C I built a little while ago. Incorporated a few modification to the kit, the main one being that Dutch `J`s only had two nose guns as opposed to the four guns fitted to US examples....... ......to make room for a bomb sight I believe. The only other mod`s were the position of the nose venturii, seat armour and an extra aerial. Added ignition harness, brake pipes and aerial wires. Decals are a mix of: Dutch Decals sheet DD48056, Flevo Decals sheet FV48002 and the kits Noticed from photo`s these were very weathered with lots of areas where the previous owners markings were painted out This was Lt Hagers second `Lienke` the first was a B-25D. Hope you enjoy the pic`s, thanks for looking Cheers Russ27 points
-
Hi all, here some pics of my new Kinetic F-104G Starfighter. Pretty good Kit, I added some PEs (Eduard), Pitot (Master), Nozzle (Brassin), SUU-21 Bomb Dispancer (Daco) and Decals for an AMI aircraft of 6.Stormo (Sky Models and Tauro)25 points
-
I love all of the century series fighters - but If I had to choose only one, it would be Starfighter. I recently built three different models of the Starfighter - not only different versions, but also different model brands. The models are as follow: Italeri 1/72 F-104C Starfighter (No. 1359) [Based on old Esci F-104 from early '80s] Revell 1/72 F-104G Starfighter (No. 03904) [Revell new tool 1995] Hasegawa 1/72 F-104S Starfighter (No. 00447) [Hasegawa new tool 1989] I can't really say about model accuracy but ALL are good models to build with different strengths & weaknesses - and honestly they are pretty even. For example Revell has the most details (by a small margin) - but the details are also bit soft compared to Hasegawa. Panel lines are crispiest in Italeri and it has the most detailed wings - but it has no details in the wheel wells and generally is the least detailed overall. Hasegawa cockpit can be opened and is the most versatile kit with general good quality feel to it all around. They are all in the same ball park - but if I had to choose one - it would be Hasegawa. All painted with Vallejo paints (except silver with Tamiya spray can). Dirtying up using oil paints (panel line wash) & Vallejo weathering effects. Comments & constructive criticism welcomed. Hope you like 'em! From left to right: Italeri F-104C, Revell F-104G and Hasegawa F-104S.21 points
-
Hi there! Just finished this nice Tamiya kit. Everything OOB and the only real flaw was one of the decals sheet, the smaller one, most stencils. Without exception, all of them cracked as soon as I tried to move them. I used warm water, cold water, decal solution, you name it, with no success. In some cases I was able to join the pieces and have them in place. But, as I said, a very nice kit. Hope you’ll like it. Cheers! George17 points
-
... not the new one, sorry This is the 1989 version of Airfix Buccaneer in 1/72 painted in the Gulf War scheme. Spiced up with few extra parts - such as resin nose & tail, etch details in the cockpit & air brake. Making the airbrakes open up was bit fiddly as they clearly weren't meant to be displayed open. But I think I got it figured out eventually. Painted with Vallejo paints using brushes. Dirtying up using Tamiya panel liners & pigments. Model was bit on the more challenging side to build, it felt like older kit than -89. Most of the plastic was pretty soft & clunky but I'm pretty happy with the results. Hope you like it - feel free to comment & post constructive criticism.15 points
-
Revell 1/72 kit and Babibi decal. Turkish Air Force No 113 Squadron "The Light" http:// http:// http:// http:// http:// http://15 points
-
Hi, Fan of English planes i could not miss the exit of the costal command Liberator by Eduard. Having time in the last few months so I went to the assembly, hope you like it. Cheers Joel12 points
-
Update #12 - Finally Finished! Yes, it's hard to believe however this Canberra is now finished! I'll post some pics in the gallery a little later on however here are a few teasers just to fill in some time! I'll also show a photo of what our Dining Room table has looked like of late! Now as you can see, I do have a messy accomplice in the shape of my artistic daughter Eva, who turns 14 tomorrow. As you can imagine, Mrs RL has not been too pleased, however I think she has given us a little latitude as we've both been busy, quiet and hard at work. The unfinished cat painting is Luna, our very charismatic Ragdoll that leaves white fluff everywhere and we have to vacuum daily! I also want to say a big thanks to @PhantomBigStu, who kindly donated this Canberra's bomb bay, wheel doors and some other bits to help this project along as well as @Graeme H who happily sent down some kiwi silver fern decals after I naffed a couple of roundels. Now to celebrate this momentous model finishing event, I've already downed a couple of cold ones, so think its best I lay off the keyboard for a while! Cheers.. (a finally satisfied) Dave.11 points
-
Here’s my Christian Pearce inspired Rat Bird. Mine isn’t an exact replica of Christian’s drawing, more of an “inspired by” and I hope a reasonable tribute to his excellent art work. I’ve added my own personalisation by way of aircraft markings and ‘nose art’, I hope Christian would approve, for anyone interested JHC are my initials. The build consisted of a number of first’s for me… First kit-bash. First ‘hairspray’ chipping. First ‘home-made’ decals. First ‘replacement’ panel. Two ‘donor’ kits were used, Tamiya 1:48 Republic P-47D Thunderbolt “Bubbletop” and Vought F4U-1A Corsair, as well as a number of items from the ‘spares box’, decals, bombs, pilot and PE. This has been one of the most enjoyable builds I’ve had since returning to the hobby, it certainly won’t be the last kit-bash I attempt. Here’s some photos… Build log… https://www.britmodeller.com/forums/index.php?/topic/235058242-148-rat-bird-kit-bash/ Thank you for looking. until next time as always, any suggestions, criticisms or comments will be gratefully received. rgds John(shortCummins)10 points
-
ZY-Y - 247 Sqn. France, June 1944 This was part of my project for the D-Day GB. The kit is by Hasegawa but re-boxed by Italeri with new decals. There are some fit issues with the kit in a couple of places but other than those it was a fun build. As can be seen from the photos I decided, as it was going to be part of a small diorama, that I would have the prop motorised. The motor I used was from Airfix. I also used the PE set for this kit from Eduard. Kit: 1/48 Italeri/Hasegawa Hawker Typhoon Mk.Ib Paints: Humbrol, Revell, Citadel and Railmatch Acrylics all applied by brush Extras: Eduard PE set, Airfix motor and Airfix pilot The WIP can be found: Here The diorama can be found: Here The Tiger 1 RFI can be found: Here Please excuse the blue colour of the support as these were taken before I knew how the final appearance needed to look. Before fitting to the base the blue was toned down a lot! With a sky background: One over the base8 points
-
This is quite a basic kit by Italeri with custom masks made for the current aircraft that flies out of Goodwood in West Sussex, UK. I did quite a lot of scratch building inside the cockpit, and the overall finish reflects the tiredness of the current scheme, including the crazed and opaque windows panels. She is due a new scheme over the winter months which should quite striking.8 points
-
Making a start on this tonight, going to do a 12 or 208 sqn jet if I can figure out what the differences are between them and the S2C. From what I’ve read and heard the differences are minimal. I have the Eduard interior set for the old tool Buccaneer so I’ll see if it can be used with this kit. The Air Graphics CBLS panniers will be used instead of the kit weapons, I have a Freightdog designator pod but maybe I’ll save that for a Granby jet later.7 points
-
It is with a little trepidation that I start yet another Lancaster topic in here, not least because I’m rubbish at meeting deadlines (usually in BM group builds) and because there are some really good examples in here of lovely Lancasters. The reason for this one is because I have foolishly offered to build a Lanc for an RAF squadron, to celebrate their move into a newly refurbished building which will be named after a former member of the squadron with a quite remarkable story. My plan is to build the aircraft in question, but more of that later. The Squadron hopes to move in sometime in November, so I’ve got about 6 weeks to try and do this!! No pressure 😳 Before I start I should say a big thank you to @Alpha Delta 210, who kindly agreed to sell me his Airfix B.II after I missed out on a couple on E-bay. Thanks L 👍🏻 To kick off, a few pictures of the kit and some extra bits corralled so far just to set the scene. Oo’er! That’s a lot of bits!! More to follow....7 points
-
My next project is the Antonov 74TK-300D. Quite a special aircraft since only two of this variant were built: the two prototypes. One of which ended up in Iran and other is used as the presidential aircraft of Ukraine. The An-74TK-300D is a variant of the An-74, which is a further development of the An-72. The most important characteristic of the An-72 are the engines, which are mounted half-way in the wings in order to obtain excellent STOL qualities (thanks to the Coandă effect). The nickname of the An-72, by the way, was Чебурашка (Cherboerashka) after the well-known Soviet film figure: The An-74 is in fact an An-72, but then intended for use in arctic conditions. This later formed the basis for the An-74TK, which was intended for passengers instead of cargo. The -300 was a special variant of the An-74TK as it was originally intended for civil passenger transport, with the most striking feature being that this time the engines are suspended with pylons under wings as STOL was not necessary for the intended application. Potential customers, however, saw more in a clean sheet design, which ultimately resulted in the (not entirely successful) An-148. I made the An-148 four years ago, see also: https://modelbrouwers.nl/phpBB3/viewtopic.php?f=46&t=46870. The An-74TK-300D has not actually transported any paying passengers, but it does have a civil registration as it is used by the government of Ukraine (similar to our Dutch PH-GOV or its predecessor PH-KBX, of which it is forever a shame that it did not go to the Aviodrome). Anyway, as said only two An-74TK-300D aircraft were ever build, but still there is a kit, that of PAS models. I already had experience with PAS, since I once made a 757 from them. And indeed I was not disappointed by the An-74TK-300D as well, although the fit of the fuselage wasn’t too great. Anyway the pictures (I’m aware that I used two different registrations on the model. That has since been corrected, but I didn’t feel like taking new pictures): And lastly a picture with it’s granddaughter (the An-148): My next model will be the Authentic Airliners BAC1-11 in KLM colours. Thanks for watching and see you next time.7 points
-
7 points
-
I have chosen to step outside of my comfort zone again and have decided on a naval subject for this GB. Two of my favourite films when I was growing up were Battle of the River Plate and Sink the Bismark, and once I became interested in sticking bits of plastic together I built a few ships with HMS Ajax being one of them. I'm sure that it would have ended up with gluey fingerprints all over it and with the paint roughly applied, not much different to my modelling standards today , so I thought it was time to revisit the subject. by John L, on Flickr by John L, on Flickr6 points
-
Hello everyone, This is what happens when a bunch of T-60 and T-30 hull produced in a vehicle factory fail to receive the turrets expected from another factory. Only thing that's for sure is you're not going to lose a war over this. You mount surplus BM-8-24 rocket launchers on them and send them on their away. Tiny little vehicle, lots of fun to built. 200 pieces just for the launching mechanism!6 points
-
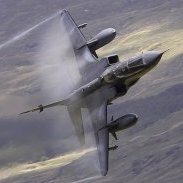
Dassault Mirage F1CR French Air Force / Armée de l'Air Escadron de reconaissance 2/33 Savoie Balic Air Policing missions Šiauliai in 2013 here you can find the quickbuild: WIP 1/48 Italeri kit Mission Mark Decals FM resin for cockpit, 2200 l tank, refueling probe, chaff/ flare dispensers, front landing gear ResinArt wheels Eduard Brassin Matra Magic 2 missiles AML resin nozzle Master pitot some photos I just took yesterday, some slightly older ones: Magic II missiles are BRASSIN one from Eduard Sharkmouth group build gallery: - worth a visit! by the way, voting is open for everybody - until Spt 29th - please do so and support that way the GBs hope you like her! cheers, Werner6 points
-
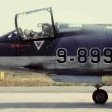
Spanish Airforce - Ejercito del Aire CR.12 aka RF-4C Recce Phantom Torrejon Airbase - Madrid / Spain Hasegawa 1/48 ALA 12 - no le busques tres pies...... low viz scheme with decals from Series Españolas with refueling probe (Wingman models) Master pitot Brassin wheels and nozzles here she is and with its former fighter colleague: WIP is here, Cheers, Werner6 points
-
Hi all. Quack's back....... This is my second build on BM. I had initially hoped to work through a WIP and started it here.. Unfortunately my brain self destructed and I forgot how to post pics (or summat changed in the land of Flickr) and I found I couldn't continue. Having redicovered the means to post pics again it is clearly time once more to inflict damage on everybody's precious retinas...... The source is a Revell repop of the Airfix 1/48 Jaguar and the plan was to finish it as a Granby kite This was my second build and I used the opportunity to try some new (to me) tricks. This was my first time applying surgery to a kit to install a resin cockpit. Resin intakes were also used - another first for me. I also tried modifying the rather unconvincing fuel dump pipe with a bit of carving and brass rod, and tried also to scratch build in a minor / beginners way (FOD covers). The large Naca intake on the spine was carved out and floored with plastic card. minor stuff really just to have a go. Finished with Xtracrylix and pinwash/ oil / pastels to muddy things up. Aaaaaaand here's the result - second kit in errr....40 or so years. 100.jpg by Niall Robertson, on Flickr 80.jpg by Niall Robertson, on Flickr 94.jpg by Niall Robertson, on Flickr 82.jpg by Niall Robertson, on Flickr 82.jpg by Niall Robertson, on Flickr 88.jpg by Niall Robertson, on Flickr 86.jpg by Niall Robertson, on Flickr 96.jpg by Niall Robertson, on Flickr 98.jpg by Niall Robertson, on Flickr I'm broadly happy with the construction side of things. I've definitely improved since my last build. I'm really not happy with the finish however. I think the Desert Sand (Xtracrylix) is a bit dark - I should have lightened it up a bit. I also tried using the Hairspray method to wear away the top layer to reveal cammo green / grey underneath but the top layer simply would not budge - hopefully somebody will tell me the correct way to do this. I'm also a bit disappointed with the Pink Spitfire figure (Xtradecals) which seems to have no facial colour resulting in a bit of a washed out white appearance and lacks definition. I'm already thinking of totally re-doing the finish on this one. So Questions as follows. 1/ do I need to take the finish back to plastic? 2/ could I just remove the decals (how best?) and spray on top? 3/ any tips for successful hairspray weathering? 4/ anybody got an old set of 1/48 decals for The (avid) Guardian Reader???? Cheers all. Q6 points
-
Ready for swivelling bushes After trimming to length Yes some things are done by eye but you still need to keep a check when scratchbuilding bits of gear The actual angle is 120º but the protractor moved when I took the picture Would I lie?6 points
-
SWASH PLATE BEGINS... The plate needs to be cut away except for the end pieces which will hold the swivel joints It will be cut at the centre to allow the tilting plate to operate The plate has a dish built-in Not for gravy or cauli cheese though Ced Sure it would all run out through the central hole...6 points
-
Thank, Charlie! Getting started with decals ...6 points
-
Moving on to the engine. The kit engine is a mess (though still better than most kit engines). Luckily North Star make an awesome resin engine with PE parts. Only thing you need to add is the double ignition wires and the valve rods. I used copper wire for the former and 0.3mm brass rod for the latter. I used the kits exhausts, which I had to drill.6 points
-
Thanks John - always good to hear that my equipment has impressed someone (fnaar!) Alan you tempter! I did have a look at the link (of course) and had a flash back to the 'finger sander' I bought for the Concorde. Bit big innit? Phew… Ah, "Gud moaning" Ian Sorry, forgot his name… We did Bill, we did! LSD? Is that some kind of filler (ahem…) Thanks Keith and John I must point out, of course, that for copyright reasons it was supposed to be 'Boss Cat' in the UK… didn't work did it? Just for you… oh OK then, for me really but I like to share: Which is Bill's photo of the real thing? Oh, OK, it's pretty obvious but you get the idea. Worth the effort? We shall see… Certainly needs a tidy up. In other news I've been thinking about the 'glass' for the windows. Remember this? I bought it for the… er…(quick search)… Nimrod to 'make a template' for the intakes. Didn't work. I think it will work for 14 bits of glass cut using the Silhouette Portrait and I can use the same design to cut the masks. I knew it would 'come in'…6 points
-
Zvezda is to release in 2020 a 1/48th Mil Mi-24 "Hind" kit. Probably the start of a family of Mi-24: D/V/P etc. Fingers crossed. Source: https://www.britmodeller.com/forums/index.php?/topic/235061306-zvezda-2020/ V.P.5 points
-
Beautifully clunky, or clunkily beautiful, the Junkers Ju-52 is known by all. Historical notes pertinent to the Argentinean machines and model construction intricacies can be found in the building article: A product of the great mind of Hugo Junkers -who the despicable and utterly rotten nazis ousted of his own company and basically pushed to death- the Ju-52 became a symbol of roughness and endurance, flying even today. I have chosen for this model a more uplifting role and destiny, a nicer guise under which its industrial lines can be better appreciated, with a colorful scheme used in the southern routes by Aeroposta Argentina, in vivid red and metal to make it as conspicuous as possible during cold weather there. That high-vis scheme saved many lives on July 1946, since Ibaté had a panne on the snow and ice during bad weather, but was quickly spotted by another Aeroposta plane. It took a few days for a land-based rescue party to arrive and evacuate the crew and passengers (during that time they stayed inside the plane), and some more days of walking and horse-riding for all of them to arrive to safety. The plane was later repaired in situ, and eventually flown off to continue its service. The incredible saga of Aeropostale -and its successor Aeroposta Argentina- is a wonderful tale of adventure and daring, a romantic endeavor elevated to mythical proportions, and its pilots, French and Argentinean, legendary for their skill and courage. All of the available 1/72 kits of the Ju-52 need many corrections to depict the truly civil version of the type, since the kits in the market (and many of the converted real machines) are just ex-military frames adapted to civil use (which poses for the modeler a doors and hatches issue). The necessary set was commissioned from Arctic Decals, no model would exists without them. So here it is, a strange metallic bird flying over the Argentinean coastal and Patagonian landscapes, bravely enduring the harsh weather conditions and the scarcity of resources, aptly and boldly flown by its pilots.5 points
-
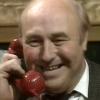
Harking back to exciting books of my youth when everything smelt of mothballs, boiled cabbage, linseed oil, leather and polystyrene cement I had a cunning plan.... Major James Bigglesworth, retired after the Second World War was invited to start a group of flying Police...Hence, Sergeant Bigglesworth CID... He flew a fast two seat prototype fighter aircraft, The Spur! Hmmm, I wonder what I could use to make one of those 🤔5 points
-
Hi! Here's a buffed-up version of Batman from Frank Miller's Comics. I tried to exagerate the contrasts to give him a more Comic book look. Hope you like it! Ciao IWik5 points
-
Dropped my subscription of SAM about a year ago due to to the annoying little mistakes and typos that were becoming the norm and the articles were not very good or detailed. For some reason every few months or so they keep sending me an unsolicited copy with a nice "renew your subscription" letter attached. The October issue was on the mat when I got home from work, so I thought I would give it a fair look to see if there was any improvement. What instantly caught my eye was that there was a feature on the F 84F one of my favourite jets. To my horror the "Feature" wasn't a feature at all but a build article on the PJ productions F84F by Steve Corvi, and not only that, the title of this article is in big letters F84F Thunderflash, and this title is used throughout the article. It is I must admit a nice build but spoilt for me by the raging howler of a title. So well done Mr Meddings on another editorial masterpiece, You really need to brush up on what a F 84 Thunderjet , F 84F Thunderstreak, and the RF 84 Thunderflash actually are! And in particular you desperately need to brush up on the technical term "proofreading." I suppose I should have been forewarned when reading the contents list, as the built kit picture on page 4 says its a F-84F and the contents list on page 5 describes it as a F84-F! My mistake, I was optimistic that SAM may have improved, but it It appears its actually getting worse. Selwyn You will be pleased to know that the SAM renewal letter has just made a very satisfying noise as it worked it way through my document shredder! I hope my neighbours hamster has a warm winter with it!5 points
-
Hi all, here some pics of my new built Airfix Hunter F.6 in 1:48. Add some Eduard PE`s, pitot by Master and Xtradecals for a No 12 Sqn Hunter. Replaced the whole landing gear with those from the old Academy kit. From the same one I used the 4 fuel tanks.5 points
-
I try to avoid private commissions in 1/144 scale nowadays but occasionally its worth the journey if the subject fits - I have almost completed the build as a commission for a happy Emirates passenger who flew on one of their A380-800's last year down to Cape Town from Dubai - I can't confess to having my heart 100% in it and it certainly is no where close to competition standards but it will do for the purposes intended Pointing out the obvious here - 26 decals have been used as opposed to the kit's supplied Airbus House Colour livery 1 nights work left to add the last wing and remaining undercarriage pillars in the wings5 points
-
While I toiled away on my Sword Harrier 2 seater I decided to build something straightforward that actually had parts that fit, as both a mojo restorer and for some airbrush practice. I had bought this Hasegawa Wildcat some years ago at a show, it was second hand but I started, complete but bagged not in a box. Any way the build went together without any issues, out of the box other than some plastcard bulkheads to close off the vacant space in the wheel well. Decals are from Superscale set 72-287 and represent one of the aircraft of VMF-121 flown by ranking Marine ace Joe Foss ( although Boyington was credited with more victories a number of these were with the AVG in Burma before the US entry into the war) on Guadalcanal in October 1942. Painted mainly with Hataka acrylics and weathered with a light misting of light grey wash to simulate the fading that was so apparent on Guadalcanal aircraft, and some staining with black and umber washes and a spray of a Tamiya smoke. I am pretty happy with how it turned out, although I notice that the aerial wire (Uschi Rig that Thing) has lost some of its tension overnight. Enough blabber, here she is: Thanks for looking AW5 points
-
Hello ,,, This is the progress of my current project, Fresco of Indonesian Air Force. I made a weathering just on my imagination. The challenge was how to make the extreme weathered plate on silver old aircraft. The real aircraft now monumentalized already. What do you think?5 points
-
Here we are after three thin coats of Midnight Blue and I have just finished adding a fourth and final coat. I will now leave it for a couple of days before masking up for the yellow. by John L, on Flickr by John L, on Flickr5 points
-
No, reported 100% Zvezda new moulds https://vk.com/wall-114983756_110262 V.P.5 points
-
Thank you very much again gentlemen! And I, what can I say more? A challenge too... After jokes, as promised, steering box. A big one for a small car, look at that: So, a big one in 1/8 scale: Note the arm between the chassis and box... As usual, lathe, mill, soldering, and settings before paint. Well, next the engine! A big challenge, a real one! Dan.5 points
-
It’s weird stuff. It is an eggshell decal that dries white. You don’t have to protect it before you put it in water.If you coat it with water based varnish it stays white (ish). Oil based varnish makes it go clear (not very successfully for me). Turpentine or Tamiya green cap makes it go clear more reliably. Instructions are here. it’s a (discontinued??) product called Lazertran inkjet water slide decal paper. I bought a 5xA4 pack almost 10 years ago and I’m about half way through it. I’ve learned how to use it and it works well enough for me. I tried other papers at the time but they were either blurry or smudged easily so I’m sticking with the devil I know. I do have clear laser decal paper that gives slightly better results, but that means taking it in and setting up at the office, so if I’m home I use the inkjet one. So it’s really a question of inertia. My hobby is building models, not shopping for alternative supplies Regards, Adrian5 points
-
Cheers Chris, I think I'm going to plump for a DH Hornet F.3! 😁5 points
-
The mast has been really enjoyable to build so far. Considering my average skills, it has come together really well. There was a small issue where the bottom resin part was really unclear about which way to install the top mast. I ended up drilling a hole in the top, as it looks like the bottom is where the top of the tripod mast meet. The instructions could have been much clearer on this point. I also had to sand the top of the mast to get the top rings through, but aside from that it was lots of fun putting together. There is much more to go on this mast section, but at this stage I'm unsure just how much to assemble and fix in place, as I want to keep components separate where necessary to make painting easier. -For anyone building one of these in future, it's worth noting that finding the right pieces of brass can be troublesome, as many look alike and they are not numbered. However, the images of the front instruction page are 1/1 scale, so it is much easier to find the right one by lining it up with the image. -The ring holes that attach to the brass masts do not have detailed instruction on how to fold them, but upon close inspection they are pretty self explanatory. -All Photo Etch is numbered, and all the mast parts required are on the one fret, as are the parts for the AA guns, quad mounts etc. This does make finding the parts much easier and less time consuming. -Also, pay close attention to the resin part at the top of the mast (see above)5 points
-
The windows required a few light passes with a sanding stick to fit in: As it is often the case with this type of kit, neither the bulkhead nor the cockpit floor fitted properly, being too big, and thus impeding the fuselage halves to be get together seamlessly. So out again with the sanding stick:5 points
-
“Achtung Raketen!” – Tiger 1 and Typhoon Mk.Ib This small diorama features a Tiger 1 - Ausf.E (Late Production), Turret Number 313 of 3./s.Pz.Abt. 503 (3rd Company 503rd Heavy Tank Battalion) and a Hawker Typhoon Mk.Ib ZY-Y of 247 Squadron. The Tiger - ‘313’ - would become famous as the one which was overturned at Manneville during the Allied heavy bombing at the start of Operation 'Goodwood' on the 18 July 1944. Three of the crew actually survived that bombing. My version is modelled before that date while the detachment was still fighting against Allied tank forces during the battles around Caen. My scene depicts a close call for the Tiger 1 during a rocket attack from the Typhoon. Kits: 1/48 Skybow Tiger 1 and 1/48 Italeri/Hasegawa Hawker Typhoon Mk.Ib Paints: Humbrol, Revell, Citadel and Railmatch Acrylics all applied by brush Extras: Typhoon - Eduard PE set, Airfix motor and Airfix pilot Extras: Tiger 1 - Hauler Grill set, Skybow track links, Stetched Sprue arial and Vallejo Mud Base: MDF, polystyrene, filler, Woodland Scenics Trees and Turf, Army Painter Tufts, coffee stirrers and Tamiya figures The WIP can be found: Here The Typhoon RFI can be found: Here The Tiger 1 RFI can be found: Here4 points
-
Thanks, Thom. Airbrushing is one of the few things i'm confortable with. The rest is still trial and error. Here's a beginning on the weathering. I think i'll put a coin next to it next time for scale. index by Nick N, on Flickr4 points
-
And some more progress. 20190925_193813 by Nick N, on Flickr Applied the preshading over the black base. I airbrushed every panel individually and tried to go lighter from top to bottom on each panel. I also added some streaks. This is still the grey base. 20190925_193839 by Nick N, on Flickr 20190925_200708 by Nick N, on Flickr Added a misting of a yellowish grey. The real yellow will come after I apply a wash. 20190925_212113 by Nick N, on Flickr To paint the darker grey and red patches, I used Vallejo liquid mask and then sponged on some chipping fluid for the chips (got that from Andy). 20190925_220449 by Nick N, on Flickr I will adress some of the chips to make them smaller.4 points
-
Hi folk's,last one before the gallery,little more work on the fit and paint on the canopy then tone down the paintwork weathering wise.4 points
-
I have the small crescent shaped landing gear doors on. It's slowly getting there.---John4 points
-
Close to a couple of years between posts looks like I have to install all pic's again, (got rid of photobucket) Have been working on it here and there these past couple of months while working on my Bluenose Schooner, so here is a little update better late than never eh Made the other small box which went in front of the radio from brass. Then made the fairlead bracket for the control wires to the rudder and elevators Then changed the back wheel bracket to Brass also inserted a brass tube into mount so I think this will not break, also have since painted inside aluminum trying to get so that I can finally close up the fuselage. Thats it for now hope it is not another two years for a update Regards Richard4 points
-
This will be the finished article - in time. Our society Honourary President's former machine.4 points
.thumb.jpg.0bac681e0da8e4ed7557610e98fda908.jpg)
.thumb.jpg.d17ff607fc7e89ed057e63fcb6f2a888.jpg)


.thumb.jpg.185722f59f1fa4bdb30ac86c07b06d0d.jpg)


Wedge-TailedEaglePortraitRaptorDomains.thumb.jpg.41a306d3445a68f0f2df773e01776ea6.jpg)


.thumb.JPG.ca9d91d3c605f2ca36aeec8f5a1b648a.JPG)

This leaderboard is set to London/GMT+01:00