
Leaderboard


Popular Content
Showing content with the highest reputation on 25/09/19 in all areas
-
Hi, Fan of English planes i could not miss the exit of the costal command Liberator by Eduard. Having time in the last few months so I went to the assembly, hope you like it. Cheers Joel63 points
-
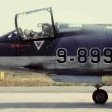
Hi all, here some pics of my new Kinetic F-104G Starfighter. Pretty good Kit, I added some PEs (Eduard), Pitot (Master), Nozzle (Brassin), SUU-21 Bomb Dispancer (Daco) and Decals for an AMI aircraft of 6.Stormo (Sky Models and Tauro)29 points
-
Beautifully clunky, or clunkily beautiful, the Junkers Ju-52 is known by all. Historical notes pertinent to the Argentinean machines and model construction intricacies can be found in the building article: A product of the great mind of Hugo Junkers -who the despicable and utterly rotten nazis ousted of his own company and basically pushed to death- the Ju-52 became a symbol of roughness and endurance, flying even today. I have chosen for this model a more uplifting role and destiny, a nicer guise under which its industrial lines can be better appreciated, with a colorful scheme used in the southern routes by Aeroposta Argentina, in vivid red and metal to make it as conspicuous as possible during cold weather there. That high-vis scheme saved many lives on July 1946, since Ibaté had a panne on the snow and ice during bad weather, but was quickly spotted by another Aeroposta plane. It took a few days for a land-based rescue party to arrive and evacuate the crew and passengers (during that time they stayed inside the plane), and some more days of walking and horse-riding for all of them to arrive to safety. The plane was later repaired in situ, and eventually flown off to continue its service. The incredible saga of Aeropostale -and its successor Aeroposta Argentina- is a wonderful tale of adventure and daring, a romantic endeavor elevated to mythical proportions, and its pilots, French and Argentinean, legendary for their skill and courage. All of the available 1/72 kits of the Ju-52 need many corrections to depict the truly civil version of the type, since the kits in the market (and many of the converted real machines) are just ex-military frames adapted to civil use (which poses for the modeler a doors and hatches issue). The necessary set was commissioned from Arctic Decals, no model would exists without them. So here it is, a strange metallic bird flying over the Argentinean coastal and Patagonian landscapes, bravely enduring the harsh weather conditions and the scarcity of resources, aptly and boldly flown by its pilots.24 points
-
Hello modellers, I´m quite happy to be back with a new project finished. This build took me nearly half a year from start to finish. Originally intended as a refurbishment project for my old 1/72 Bobkit Super Puma, it went a little out of control... Things started when I rediscovered the original decal sheet in the spares box. I bought the kit back in 1986 but wasn´t enthisiastic about the civilian version at that time. Read about the oil rig shuttles in the Aeroplane aviation magazine and thought it would look nice in bright colors on a little helopad base with a few LEDs. I started with the helicopter, sanded smooth the thick paint coat and added a lot of details to that rather simple kit. A complete interior with crew and passengers was scratchbuilt and a lot of broken parts had to be fixed. The helicopter pilots are reworked Hasegawa ground crews, the passengers are from the Revell Nato pilots set and from the Airfix astronauts. Polishing the clear parts took a great deal of time as the cabin windows couldn´t be removed anymore. The oil rig landing deck consists of a piece of styrene sheet, strenghtened with collected wooden shafts of New Years rockets. Except for the green LEDs, nothing was purchased and everything came either from the spares box or from the trash can... Fly screen for net and fences, toothpicks, needles and fingerfood sticks for the superstructure, sewing yarn, aluminium tape and stretched sprue. Even the battery case was scratchbuilt and the switches came from broken electric devices. The platform is powered by three rechargeable batteries and has three lighting modi as I wasn´t sure if i could take photos later with the floodlights on. The base was sprayed with a rattle can from a local hardware store and then shadowed by airbrush and pigments. The markings were airbrushed using templates. I´m quite happy with the result and wondering if there are aftermarket decals for the Bristow helis as it would be nice to have another one... Hope you like it Mario16 points
-
This is quite a basic kit by Italeri with custom masks made for the current aircraft that flies out of Goodwood in West Sussex, UK. I did quite a lot of scratch building inside the cockpit, and the overall finish reflects the tiredness of the current scheme, including the crazed and opaque windows panels. She is due a new scheme over the winter months which should quite striking.14 points
-
Fokker D.VII I have not shown my latest project here. This Fokker D.VII was my contribution to the "Des Delatorre International Memorial Group Build". I used a Eduard weekend kit, Aviattic decals, LMGs by Master, Gaspatch turnbuckles and airspeed indicator, a self made wooden airscrew and some brass. Paints are Alclad, MRP, Gunze, Tamiya and oils for weathering. The Fokker don't reached the first places, but was awarded with a Roden kit and two sets of Pheon decals (Thanks to the sponsors). So let's start with a original Source: ttp://fighters.forumactif.com My interpretation: And some overall views: I hope you will like it! Cheers, Frank12 points
-
The first time that I saw photos of the Shackleton MR3 s was when I was at Primary School in the late 1960s. These were in aviation and RAF magazines that my father would bring home from the NCO's mess at RAF Bawdsey where my dad served. It was here that I also started building FROG models which I bought from the village Post Office, and I noticed that the Shackleton was illustrated on the side of the kit boxes as one of those made by FROG. The village Post Office did not sell the big kits, so it was during a shopping trip to Woodbridge that I first saw a FROG Shackleton on sale in a toy and model shop on the High Street. I so wanted one but for some reason it would be a few years before I did get one. The fabulous and exciting box front of the FROG Shackleton as I remember it. The Air-Sea Rescue title on the box always seemed a bit out of context considering what it has just done to that submarine. I suppose they would have needed rescueing after. My father took me to the air show and open day at USAF Bentwaters in 1970 and during the display it was announced that a Shackleton was on its way. I was so excited to see a Shackleton for real. Unfortunately it did one fly by at quite a height and that was it, the only time that I would ever see a Mark 3 flying. And this is the actual photo that my dad took. And here is a magazine I have kept from October 1970 still with the coffee stains from the Mess at RAF Bawdsey with a Mark 3 in beautiful colour on the front cover. Christmas 1973 and I asked my dad if I could have a FROG Shackleton. They were getting hard to find by then but he found me one with in a squashed box and a few broken parts inside. But I was so excited, at last I had one. And here I am on Christmas Day with my FROG Shackleton. I built it pretty quickly and not very well unfortunately. I left the wings and tailplanes unglued so they just slotted on and came off for storage. The rear of the box showing the typical FROG full colour painting guide for the two versions. A number of years later I decided to pull the fuselage apart, scratchbuild an interior and rebuild and repaint it. Here we have a drawing I made of the interior of my Shackleton before I closed it up. A photo taken sometime in the early 1990s. It depicts a Phase 1 aircraft armed with nose cannon. Hand painted fuselage lettering and numbers. On display in flying mode on our club table at Bridlington Spa. I made a stand from MDF that slotted into the open weapons bay. Then I repainted her in the overall sea grey scheme that she first entered service in at RAF Aldergrove in 1958. Scratchbuilt ground equipment. Depicted as a new aircraft in 1958. And as she is now after another repaint. On its dollies ready to be slid sideways into the T2 hangar for servicing. On display on our Club table in recent years She has appeared at many displays over the years. The sort of photo that inspired me, a Shackleton MR3 Phase 3 in its natural element. I hope you have enjoyed me sharing my 46 year old Shackleton with you. adey11 points
-
Dassault Mirage F1CR French Air Force / Armée de l'Air Escadron de reconaissance 2/33 Savoie Balic Air Policing missions Šiauliai in 2013 here you can find the quickbuild: WIP 1/48 Italeri kit Mission Mark Decals FM resin for cockpit, 2200 l tank, refueling probe, chaff/ flare dispensers, front landing gear ResinArt wheels Eduard Brassin Matra Magic 2 missiles AML resin nozzle Master pitot some photos I just took yesterday, some slightly older ones: Magic II missiles are BRASSIN one from Eduard Sharkmouth group build gallery: - worth a visit! by the way, voting is open for everybody - until Spt 29th - please do so and support that way the GBs hope you like her! cheers, Werner11 points
-
When I was a kid (55 years ago) I built a B-58. Last year I thought that it would be fun to build another B-58. Was I ever wrong. I bought a 34 year old Monogram B-58 from ebay. After working on it for two months I was so frustrated with the poor engineering of the kit that I put it on the Shelf Of Doom. This past June I started working on it again. I finished it this year on September 22. It took a lot of time and many sheets of Bare Metal Foil. Following are some photos. The aircraft carried five nuclear bombs. Four small nuclear bombs (if there is such a thing as a small nuclear bomb) were mounted under the wings. One large nuclear bomb shared a fuel tank and was mounted under the fuselage. The plane had no interior bomb bay. Monogram did a nice job on the landing gear. I like the way the four baby nukes look! The finish on the elevons and dark areas of the engine pods was due to a mistake that turned out to be good. I painted the elevons with Testors' Metallizer Aluminum with Testors' Metallizer Titanium as a top coat. Those are lacquer paints. I used an enamel based wash and guess what? The wash partially removed the lacquer paint!! However. the result looked really good so I used the same technique on the engine pods.11 points
-
Let’s go the whole hog. Some seaweed and a dead fish should do it.11 points
-
I model at a glacial pace. I started this back in early 2014!! Anyway, here's my Matchbox Mosquito built as an NF36 of 39 Squadron based at Kabrit or Fayed, Egypt in the early 1950s. The uniquely shaped late NF exhaust shrouds are from HiTech's Stage2 Merlin set. The props and spinners are from Aeroclub and the decals are by Freightdog. The drop tanks are from Paragon. I wasn't happy with the shape of the canopy and reworked it quite a bit. The vac canopies I had to hand were either poor fits for this kit or not any better shape than the one Mbox provided. This is obviously a simple kit but parts fit well and it looks like a Mosquito to me. Comments and suggestions welcomed. David10 points
-
What if? What if the Confederate States of America had survived the American Civil War? What if the CSA had survived right up into the present? Well, that's the premise behind this aircraft. I created a scenario in which today's CSA co-exists with the USA here in the 21st Century. For brevity's sake, I won't bore everyone with the whole story, but I envisioned CSAF squadrons that were named for Confederate war heroes. I imagined four Maritime Air Stations; Norfolk, Charleston, Tampa and Biloxi, Miss. These squadrons are named after famous cavalry commanders of the Civil War. This CSAF Mirage F-1 is assigned to the Nathan B. Forrest Squadron based at Biloxi. Their primary mission is anti-ship interdiction. My "what if" Confederacy requires imported aircraft due to an aircraft industry that still hasn't reached maturity, nor any sort of parity with their neighbor, the United States. I guess I might flesh out my what if scenario a bit. A negotiated cease-fire, and subsequent, somewhat uneasy peace, left the United States and the Confederacy sharing what had been the USA. A continuing reliance on agriculture still retarded economic growth and manufacturing technology in the CSA. Faced with a long coastline to defend, the Confederacy, with its new capital in Atlanta, turned wary eyes seaward and made maritime vigilance both a priority and a tradition. Texas seceded from the Confederacy in the early 20th century over economic issues and concerns about the intrusive reach of the Confederate government. I'm still working out how this event plays out geographically, with current possibilities including Texas "annexation" of Oklahoma and possibly a Republic of Texas reach for Pacific ports (and all that that might entail). Confederate forces have been involved in several incidences in the recent past. These would include clashes with Venezuela and Cuba in the Gulf and Caribbean as well as joint missions conducted with Republic of Texas forces against insurgents/narco-terrorists in Mexico. The Maritime Air Stations share defense of the coast and other airbases throughout the interior of the South maintain bomber and interceptor squadrons. The choice of the Mirage F-1 for the role shown here was based on economy, simplicity and of course availability. France had been a supporter of the Confederacy from its beginning and provided various models for purchase by the CSA. The United Kingdom is the other major aircraft supplier for Confederate needs, having sold Hawker Hunters to the South as their first high-performance jet fighter. In these pictures, we see a CSAF Mirage F.1 at a small airfield in the Republic of Texas (yes, there's a "what if" story there too, lol. At some point in the future we may see a Republic of Texas Vampire), making an unscheduled lay-over for some unspecified reason. The kit is the Italeri Mirage F-1 in 1/48 scale. The Exocet she's carrying came from the Monogram Mirage 2000, the rails and Sidewinders from an old Testor's F-18 and the drop tank from something long forgotten, and modified for its role here. I guess I might mention an experiment of sorts. I dipped the canopy in Future colored with MM teal acrylic to get a tinted look. It worked alright here but the first test canopy from the scrap pile actually looked much better. Oh well. I learned a new trick, thanks Swanny! The low-viz markings were created by me and drawn by my son on an Autocad program and I printed them on our home printer. Primary colors are Humbrol enamels, Gull Gray and Lt. Ghost Gray. What-if exercises can really free up one's creativity I've found. Freed from the bounds of reality and real history, it's fun to imagine different outcomes to history. I make no political statement with this build I assure you. I don't defend the Confederate ideology or actions. But for one or two different outcomes in battle or politics, the scenario of Southern survival might have been real history. Anyway, I hope you enjoy my little exercise in alternate reality and thanks again for your interest. Gary9 points
-
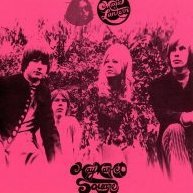
This is the Pegasus Hobbies 1/350 Moon Lander as conceived by Wernher von Braun in the early '50s. It's a companion of sorts to my adaptation of Lindberg's old Moon Ship kit, to bring it closer to Von Braun's "round the moon" design from the same period. You can see that kit here: The lander was a monstrous object, 49 metres high, weighing 4000 tonnes, with a crew capacity of 25. The spherical crew compartment was at the top of the structure, so the crew needed a crane to lower them to the surface. Astronautix has the full specifications here: http://www.astronautix.com/v/vonbraunlunarlander.html The box art shows the kit configuration, which is unrealistic in terms of the original mission design. The large spherical external tanks were used for departure from earth orbit and then discarded. During trans-lunar injection the landing gear was designed to be stowed out of the blast from the 30 rocket engines - folded upwards in the case of the four outer legs, or telescoped in the case of the centre leg. The "real" landing configuration was portrayed in Bonestell's cover art for Collier's in 1952. I elected to portray the spacecraft shortly after landing, so needed to remove the kit's external tanks and apply a bit of scratch building to tidy up the "stumps" of the support structure. I also used some of ParaGrafix's photoetch details, a few of Tamiya's 1/350 crew figures modified to look like astronauts, and some decals saved from various old projects. I deviated from the kit's painting instructions, which render the fuel and oxidizer tanks in various shades of blue, red and yellow - this scheme seems to have been copied from Bonestell's paintings for Collier's, which in turn seems to originate from a set of colour-coded diagrams in the same article. So I opted from some plain white tanks instead. Quite a complicated kit to assemble, as you can see, but the parts fit together well. The kit's outer engines can be vectored in one plane, as in the original spacecraft design: I see I haven't quite got the crane cable for the crew lift to hang straight yet. Sigh.9 points
-
Revell 1/72 kit and Babibi decal. Turkish Air Force No 113 Squadron "The Light" http:// http:// http:// http:// http:// http://9 points
-
Managed to get the base and the figures done. So calling this one finished. Here is some pics of the finished vignette. Thanks for looking.8 points
-
Progress..... First coat of paint applied, a mix of spray (grey) and brush for the green. The panel effect shows up quite strongly. Next is to lightly sand down and apply a second, thin coat. After that a coat of gloss before applying transfers and so on before matte varnish and some weathering. As a tropical carrier based a/c some fading is needed on upper surfaces, also a whitish dried salt spray effect on leading edges, etc, although this was washed off regularly. Still a lot to do. It is getting big, and heavy.8 points
-
I am sure the airmen pulled in the anchor and cable and placed it on the floor with great delicacy so as to avoid any possible scratching to the floor paint. In fact they probably protected it with their jackets to avoid any damage. (Edited to add) I should have added a smiley to this but I posted from my phone and almost lost the will to live waiting for them to load. I think you could moor a Sunderland faster...8 points
-
Hi there! Just finished this nice Tamiya kit. Everything OOB and the only real flaw was one of the decals sheet, the smaller one, most stencils. Without exception, all of them cracked as soon as I tried to move them. I used warm water, cold water, decal solution, you name it, with no success. In some cases I was able to join the pieces and have them in place. But, as I said, a very nice kit. Hope you’ll like it. Cheers! George7 points
-
Just finished the Greek aviator, https://en.wikipedia.org/wiki/Michael_Moutoussis 60mm white metal painted with oils and acrylics.7 points
-
XX242, delivered to the Red Arrows on 2 November 1978. This is her 2014 livery. DSC_0001 by Richard Linnell, on Flickr DSC_0003 by Richard Linnell, on Flickr DSC_0002 by Richard Linnell, on Flickr DSC_0004 by Richard Linnell, on Flickr DSC_0005 by Richard Linnell, on Flickr DSC_0006 by Richard Linnell, on Flickr DSC_0008 by Richard Linnell, on Flickr DSC_0009 by Richard Linnell, on Flickr7 points
-
Except the anchor was only used at away bases (where normal mooring was not available), so very little if any chipping etc. would be on/around anchor Normal mooring was by way chain/rope through the mooring bollard to the mooring buoy in the Buoy Trot as in below Regards Alan7 points
-
Here is the side view check. And the close views of side and top views: From above drawings moving cockpit area forward by 6.15mm, correcting chine shape and nose cone will fix the issues. Another solution is to add an 6.15mm insert to the end of nose part and reshape only chine and nose cone. This requires reinforcements at nose and chine area from inside before starting reshaping. To me the second option is easier than moving all the cockpit area forward. Serkan7 points
-
This just doesn't cut it Utterly, ridiculously wrong so as you all expected we have to play a different tune with similar notes Off with its etch and get out the Evergreen channelling DSPIAE circle cut out and three pieces of channel glued at 60º underneath it, these can be carved now to more closely simulate the swash(?) plate horns for the pitch change rods Three angled brackets glued to the rotor head gear which allow the blade to rotate And a close up of it all aligned for carving out This shows how the upper bracket and the pitch change rod horns will align when its all carved out Wish me luck7 points
-
The detailing of the interior proceeds. The two tables with brass edges are added, and then the typewriter, newspaper, book:7 points
-
Hello everyone, This is what happens when a bunch of T-60 and T-30 hull produced in a vehicle factory fail to receive the turrets expected from another factory. Only thing that's for sure is you're not going to lose a war over this. You mount surplus BM-8-24 rocket launchers on them and send them on their away. Tiny little vehicle, lots of fun to built. 200 pieces just for the launching mechanism!6 points
-
Ignition leads are done (finally). That Humbrol gloss clear seems prone to fingerprints which need polishing out all the time. Need to make my own I think... (I don't even have greasy / oily skin!) The cowling is now glued on, and I've done some more work on the exhaust staining.6 points
-
The work is nearing the finish 🙂6 points
-
Since this is also a "zoom in" model, some macro shots: Happy modeling, Frank6 points
-
One has to consider what does it take to design and manufacture a 1/48 V-bomber, judging from the comments made on this site, it would seem there are no shortage of armchair critics and armchair generals that belong in the armchair theatre comedy of errors. What is particularly fascinating is how some modellers are quick to criticise subjects they know very little about or think they know about and the reason is this: photographs will usually only show a particular perspective, so a lot of information is missing and when viewed from a particular angle, you will inevitably end up with what designers refer to as perspective distortion; similarly when using line drawings or plans, the origin and office that compiled them needs to be determined. Manufacturers don't always put all aspects of a design on plans, so checks have to be made, to verify any irregularities. The point being made, there are no 'experts' (a dubious term) or authorities here that can claim to know the V-bombers (insert Vulcan) design more than others, this is after all a forum, where the floor is always open to discussion and useful criticism is always healthy but bare one single fact in mind, it took an entire team of engineers and scientists to both design, test and construct the Avro Vulcan and not armchair critics who know nothing and believe me that is exactly what the knowledge level is, NOTHING!6 points
-
OK, 14 opening windows I count in Alan's post. I had said that the tube would fit in the mitre block but actually it sits a bit proud and it's easy to get things out of line: Rats. Luckily I have spare blades. I found it easier to tilt the blade at about 45o on the edge of the bench and gradually rotate it level. Soon done: I don't have a 5.2mm drill ( or a 7/32" one) but a 5.5mm drill still gives a tight fit. Two done: I can see there that I need to tidy up the edges a bit more and will do so on the others. I've also dobbed some Klear in the panel lines / rivets around there; can you see?6 points
-
Just a quick photo update to support the above. Here is the clear part with the door area removed and the scratch replacement temporarily held in position with Tacky Wax. by John L, on Flickr And the model with a primer coat on, this has since had a light sanding followed by a first coat of Humbrol Midnight Blue applied with a hairy stick. by John L, on Flickr6 points
-
Released - ref. 48281 - Douglas B-26B-50 Invader, Korean War American Bomber http://www.icm.com.ua/news/626-b-26b-50-invader-korean-war-american-bomber-100.html https://plastic-models-store.com/ICM-48281---B-26B-50-Invader,-Korean-War-American-bomber-1-48-scale-model-kit--11783.html V.P.6 points
-
Morning folks, A few rubbish pictures but wanted to share last night's progress. I'm hoping this rain clears up so I can get some decent natural light to show the effect properly but seems unlikely at the moment.6 points
-
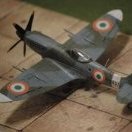
Picked up the Eduard Dual Combo kit on Saturday and just had to have a go at it straight away. Kit comes with two 144th Spitfire Mk.IXe with marking and wing options. One each of elliptical and clipped wings, so you can't build two identical spits from the kit, but wasn't an issue for me as I wanted one British and one French. There are markings for 2 British Spits and one each of Czech, Norwegian, French and Israeli. The decals are beautifully printed (there is a correction sheet for the Czech roundels included in the kit, though I had to look really closely to see why) and respond well to MicroSol. There are masks for the canopy and wheel hubs and they are superb, though I didn't use the hub masks as I built mine 'in flight'. Construction is very simple - only 19 parts in total per aircraft. It's designed to be displayed wheels down, but some simple modifications make it into an in flight aircraft. A bit disappointed that there is absolutely no interior detail, but it didn't affect this build as I've greyed out the canopy to match the other aircraft that are going to be displayed with it. This will be one of the two escorts for my Revell Concorde (that's why I want one British and one French). Paints used were as follows: Upper and lower Camo were Alclad MIL-SPEC enamel colours - Medium Sea Grey, Ocean Grey and Dark Green. All others were Lifecolor acrylics. Camo was glossed with Alclad Aqua Gloss for decalling and then Matted with MicroFlat. Thanks for looking. Kev6 points
-
Hi All started last year, finally i got time to finish it. Well known Airfix Zero, so i will not waste words explaining details. Model represent machine from the end of 1944 (decals from Tamiya great A6M2 8 decal options pack) without arrestor hook and in overall green camouflage. I used Vallejo colors, and for weathering what ever i got :). My idea was that early Zero should be a quite weathered in late days of the war, so i tried to achieve that look, not sure that i completely succeeded, but i am happy whit this Pictures taken during cloudy day so last two are with flash (trying to show different colors). Hope you like it. Best regards6 points
-
Thanks Ian I like that graffiti, definitely in… Thanks Keith - I have enough Polyfilla in my 1:1 life But wait… Cracks? What cracks? Good enough for the ceiling? I know I should have let things dry but hey, 'Bake Off' is on. Of course I now have a wing that's a complete mess: …but far less messy than filler, sanding and re-scribing. Thanks Hendie - you're a star! I'm not sure that 'aged white' is going to be used though… perhaps for some variation? Thoughts? Now then, there a several fnaars to be had from the anchor but I will avoid them and just show you this: Tamed the beast! I think I will rust up the winch a bit and wash the floor with something, just so it look 'less modelly'. I've also scanned the ceiling, imported it into Inkscape and tried some graffiti: I'll be printing it on decal paper and I'll have to cut out the 'bricks' but it looks doable. Honestly, the things we do for fun… BTW that was printed on the Canon printer I bought for decals - remember the £30 offer a while ago. It hasn't been on for ages (since Wacky Rabbit I think) and it looks about four minutes to warm up and clean itself and four second to print that page. Still, can't complain…6 points
-
I've had this kicking around the stash many years. I really like the Revell Luftwaffe '46 kits and wish they'd have done more of them. I just like how absurd this thing is, two seats, twin 30mm in the cockpit, 20mm barrettes and a forward firing 20mm in a mini turret thing. It's great lol I lost the decals to it, but that doesn't really matter, hell I might even make it Hungarian or something. I've also gotten rid of the box as it;s one of those horrid side opening things that get crushed in the stash, although the artwork is cool, fighting B-29's and all. I'll build this in between my larger project which is a 1/32 Su 25.5 points
-
Have loved this car since seeing THE SPY WHO LOVED ME as a kid, still have both Corgi die-cast scales. Am planning to add a small bit of diorama after the main build, dependent on that goes, but the kit seems nice enough, Fujimi 1/24.5 points
-
Here’s my Christian Pearce inspired Rat Bird. Mine isn’t an exact replica of Christian’s drawing, more of an “inspired by” and I hope a reasonable tribute to his excellent art work. I’ve added my own personalisation by way of aircraft markings and ‘nose art’, I hope Christian would approve, for anyone interested JHC are my initials. The build consisted of a number of first’s for me… First kit-bash. First ‘hairspray’ chipping. First ‘home-made’ decals. First ‘replacement’ panel. Two ‘donor’ kits were used, Tamiya 1:48 Republic P-47D Thunderbolt “Bubbletop” and Vought F4U-1A Corsair, as well as a number of items from the ‘spares box’, decals, bombs, pilot and PE. This has been one of the most enjoyable builds I’ve had since returning to the hobby, it certainly won’t be the last kit-bash I attempt. Here’s some photos… Build log… https://www.britmodeller.com/forums/index.php?/topic/235058242-148-rat-bird-kit-bash/ Thank you for looking. until next time as always, any suggestions, criticisms or comments will be gratefully received. rgds John(shortCummins)5 points
-
Dear Modellers, In search for classic trucks, I found this site: TrucksPlanet.com. There I found a Mach truck which I had not seen before. They were build in only limited numbers. I specially liked the squarish and bullish impression you get of this model. After long searching I found more photographs and a brochure with the main dimensions. Not much to work from, anyhow I drew a 3-view drawing to build the model. Later I discovered that somewere along the drawing, I made a mistake with the upper part of the cabin. The proportions of the windows, doors and the cabinroof did not match the photographs. Some modifications were necessary, I lowered the roof, made new lower doors and shortened the windowposts. After this surgery things looked much better. I printed the decals on my PC, I made up the company name …😉 I hope you like this rather unknown Mack truck. Thanks for watching, JohnHaa5 points
-
Decals going on..... After a couple coats of Humbrol No.11 silver... which reasonably replicates a dull silver for the aluminium dope overral. Note the black decal section replicating the side windows. The blue square will divided up to four small winows with silver decal stripe which I will also use for the cockpit framing. I'll also try to represent the hinge for when the hatch is slid forward( tracks represented here with wire lengths)and opened. National markings going on. Am planning to do this as a RNZN nachine just need to find suitable serials and codes. Have seen images on line and will use those as a basis. The upper wing roundels are supposed to be 65" dia. and the decals do so but look too big but are right. Sadly only one pair are on the sheet so have gone for the 60" ones for the wing underside. 25" ones for the fuselage.5 points
-
I've done a few desk ornament type builds before Dave. This Airfix 1.48 Javelin got smoothed right out and finished with S 'n J polishing powder... And this Matchbox Dornier got backdated in a similar fashion to the Whitley for the first GB I joined in on...5 points
-
Hi Jean, Thanks for your kind comment. As for Tacky Wax, it is a Deluxe Materials product that I find useful to help with positioning small parts when gluing them in place, especially if they are in a spot that is hard to reach. You have to make sure that you take care to remove it before painting, which can be done with soap and water. I usually rub a bit on a cocktail stick then use that to pick up the part, it is also useful to hold parts temporarily in position when testing the fit as with the door in this case. To be fair tweezers will do a lot of the jobs that this does but when your mouth is already holding something and you need an extra hand this helps. All of the figures on this 1/144 scale EA-18G launch scene are held in place with Tacky Wax. Regards John5 points
-
The swash plate and the pitch change arms ready to be joined soon Once these are 'mated' I can put a tiny blob of glue over the ring-link to represent the ball joints Sorry Rog these wont be pivoting in use on here Fake engineering at best before I can think of forgetting the details I need to add droop stops (Complete ones Andy, not the remaining balance weight bits as in the previously shown picture) and BIMs Moving slowly on...5 points
-
Thought I'd try a Blederunner theme and fool around with LEDs and electronics while doing so. This whole thing started with Fujimi's 1/24 (or maybe 1/25) Deckard's Sedan and the corresponding PE set by Paragrafix. Thought I would a couple of LEDs and ended up making a scratchbuilt base and building, adding 40 LEDS, a 5inch TFT display to play a video I edited with a series of ads and a Raspberry Pi Zero to run everything. A shot of the electronic mess that runs it: And a video to show it in action:5 points
-
Not as good as the academy kit but the Hasegawa Mig-23 kit does build fast. That said, I always get thrown off by kits that are a mix of raised and engraved panel lines because it makes it a little more challenging for me to make the paint job more interesting, especially since I was going for a Tipnis Grey finish. This was a straight OOB build. I broke the pitot tube early in the process and when I couldn't get a metallic pin to stick as a replacement, I fashioned a new one from my spares box. - I believe an old matchbox SHAR pitot tube. All colors are Tamiya. I used Sky Grey (XF19) for Tipnis Grey and gave it a black wash before sealing. The decals are mostly from the Hi Decal sheet for the MiG-23BN as I assumed they will be fairly similar. The Serial numbers are Berna Decals. I chose SK434 as it is still around as an attraction at the Indian Air Force Museum in Delhi. I hope you like this build. Comments are always welcome - thx for looking!5 points
-
Thanks Bill Thanks hendie Trenches, what trenches? With your Klear tip they will be gone! Thanks Phil Last night's work this morning: I'll need some wash in those floor trenches. Will the tube arrive today? Plenty to do putting Klear in the 'trenches'… and a haircut.5 points
-
And in the box it goes, but with two friends to make company. Some times I hear them conversing during the night.5 points
-
Thanks Keith Since when did 'no one listening' stop us, eh? Thanks Giorgio It's looking good… Hey Rob! Thanks Thanks Bill Ah well, just the casing eh? And the anchor… Thongs for the memories John and Bill Now then, this graffiti ceiling: Part 2c it is. I thought 'Reversed View' meant that it was back to front but wait: It means upside down! So the ceiling is the floor! Grrrgggnnn… I think that means that, sadly, the Graffiti FLOOR is just going to be even more silly than the ceiling, so it's NOT going to be I'm afraid… sorry chaps. here's where it got to: Sometimes the madness gets subdued…5 points


.thumb.jpg.0bac681e0da8e4ed7557610e98fda908.jpg)


.thumb.JPG.3498f40362ff13ebfc4b2e45abbd545e.JPG)


This leaderboard is set to London/GMT+01:00