
Leaderboard


Popular Content
Showing content with the highest reputation on 29/08/19 in all areas
-
Hi comrades! This is my take on Javelin. The build is here Many thanks to @Antti_K for his help! His subject knowledge and modelling skills are fantastic! Hope You like the weathered look of this machine. Thanks for looking!25 points
-
Hi Folks, yes another from the Frog GB,thanks to Pat (Jockney) I was at last able to build a Vengeance,It is a cracking little(well not so little) kit only a very poor canopy lets it down most would choose a replacement but I stuck to an OOB build.19 points
-
Hi all, so it’s only taken me just over a year to complete all three models in my Westland Trio, however here’s the final one – Italeri’s Westland Wessex HAS3. Straight out the box, no fancy extras, just a simple build and paint! I really fancied modelling Humphrey, as seen at Yeovilton Fleet Air Arm Museum, however I much preferred the yellow and blue/grey colours. Painted with Humbrol 79 blue grey and Halfords Rover Inca Yellow rattle can (which is actually a really good match to the RAF yellow as used on C1 decals to my eye – more on that in another RFI). I was also lucky enough to see the Wessex, flanked by two Wasps, open the display to this year’s Yeovilton airshow – the first time, in fact, that I have seen a Wessex flying, being young enough that by the time I went to air shows, no Wessex’s were left flying. I really fancy making a 1/48 Hu5 now to sit on my desk at work with my 1/48 scale Lynx I had hoped to get photos of all three models in the Trio together, however, the British summer has had other plans... Cheers! Ben16 points
-
🇨🇳🐲 Calling it done! Time for display base and others. DreamModel 1/72 PLAAF Chengdu J-20 'Mighty Dragon' In-service stealth fighter, straight out-of-the-box. Straight out-of-the-box. Fully new tooling from DreamModel. Pros & Cons listed below: Pros: • Nicely detailed easy-assemble kit which suitable for all levels of modellers. • The upper fuselage is moulded in 1-piece so you don't need to worry about fitting problems, glue marks or some unpleasant outcome during assembling. • 100% movable & 360° turnable canard, tail fins can be adjust into your desired angle. • Two nozzle options and they're detachable which makes you can switch the nozzles from time to time between AL-31F M2 and WS-10. • Optional to open/close the weapon bay, same goes to canopy. • Full weapon set is provided: PL-15 x6 and PL-10 x2. Cons: • Bottom fuselage is not moulded in 1-piece but the fitting is good, don't worry. • Landing gears have to be install before assemble both upper & bottom fuselage, not after which I think it's quite hard to • Minor fitting problem between the joining point of fuselage and nozzle housing. • Because of the canards & tail fins are 100% movable & 360° turnable so you need to install it before assemble the fuselage hence you will having some troubles during spray work. • Countless masking but stay calm DreamModel is developing masking set for it. ' Available soon in Hannants I think!16 points
-
Eduard 1:72, Syhart decals14 points
-
Hello all, Here is my recently completed 1/48 Hasegawa F-4F Phantom in the markings of Jagdgeschwader 71 (JG 71) 'Richthofen,' German Air Force during the mid 2000's. The build thread is here. Extras used included Quickboost resin seats Eduard etch, Phase Hangar Resin FOD inserts, Royal Resin unslotted stabilisers, Master Pitot and AoA probes, Aeromaster stencils, New Ware masks, AIM-9 Sidewinders from a Tamiya F-14 and AIM-120s AMRAAMs from an Academy F-15. The actual markings were with the kit when I bought it but I've no idea of the company. Paints are all Mr Paint and I went for the heavily weathered look so often seen on Luftwaffe F-4s toward the end of their service lives. Beside the last F-4 I built (about 2 years ago) - Turkish 2020 'Terminator': Thanks for looking Dave13 points
-
Hi All, As some of you may know, I used to be a regular and prolific builder of Spitfires here on BM, particularly Mk XIV's, but in 1/72 scale. Well, you can imagine how I felt when I stopped building models as much (due to university and other hobbies) and then Sword announced a new tool Spitfire XIV in 1/72 and Airfix, a new tool XIV in 1/48 scale. At last! A decent Spitfire XIV in 1/48 scale! So I have begun the switch to modelling (mostly) in 1/48 scale now (for piston fighters at least) as I'm not building as many models, so those I do build might as well be a bit bigger... Aside from the 1/48 Lynx I built myself, which proudly sits on my desk in the Westlands design office, this is the first 1/48 kit I've built in about 10 years! As much as I like the overall silver of the BAFO scheme, I couldnt help but model the 414 RCAF example of Squadron Leader James Bernard Prendergast, if only for the nose art, spinner and silver canopy! I had also made his previous mount NH648 Lazy Lady "IV" in 1/72 scale, five years ago when I'd just started university! No WiP for this one, I've just been enjoying building models recently, without the added hassle of WiP's. The kit was simple and straightforward to build, aside from the tank cover, forward of the canopy, and the wing roots (which has a step in them) - anyway, I'm happy with the final result, weathered subtly. Spitfire FR.XIV ‘P’/NH902 flown by Squadron Leader James Prendergast, 414 Squadron RCAF, May 1945. Lazy Lady "V" Thanks for looking Cheers, Ben13 points
-
Well, it's been a long haul but this one is finally in the display case. Short wings, small tail, and early style tail gun set up. The model was rescribed. Eventually I will have to build a stock Monogram kit, but not today! Overall OD is 34086 from Model Master, as close to OD 41 as I can see, with fading using Faded Olive Drab and 34087, also MM. Matte finish is Alclad II. Oils used for weathering and a silver pencil, Tamiya Smoke for the exhaust. The torpedo installation and decals are from Lone Star. It is a B-26 used in the battle of Midway, and flew down the deck of Nagumo's flagship carrier, strafing it. Here is a link to a narrative of the attack by the B-26's. 2 of 4 returned to Midway, but Susie Q was scrapped due to the damage incurred. https://www.pacificwar.org.au/Midway/USArmy_at_Midway.html13 points
-
Evening folks,Here's the Donetsk toy factories release of Frogs Vengeance,great fun only a very poor canopy spoiled it.12 points
-
Canberra B.2 98 Squadron, RAF Watton, 1968 This is the S&M Canberra kit finished in classic 1960s silver-and-dayglo. Here is the original inspiration: This is or less OOB, though I did emphasise the control surface engraving so that it looked more definite than the surrounding panel lines. Having seen some photos of models finished from this kit I thought they had a little too much of a tail-up stance, so I shortened the main gear legs by about 1mm or so and gave the wheels some flats, and that seemed to give it a roughly level stance. If you make one of these don’t under-estimate the amount of nose weight needed. I packed the forward engine nacelles as well as every bit of space around the forward fuselage and still couldn’t prevent it tail sitting. In the end I added more lead weights on the bomb aimer’s floor which just balanced it – its all black in there anyway so you can’t see much of it. It’s worth mentioning the canopy on this one. The whole upper forward fuselage including the canopy is moulded clear and it works very well. An unexpected benefit of this is the minimal distortion around the canopy edges which means you can clearly see the cockpit detail, so it’s worth putting in the effort here. I made my own dayglo strip decals by spraying white, orange, red and dayglo orange in that order onto clear decal sheet, then cutting out the strips using a new knife blade. They were never going to bend around the leading edges so I sprayed those rather than use the decals. The decals were fairly thick, but then so was the original. I was pleased with the way it turned out though. Canberra wing walkways challenged me a bit. I think I’m right for this era by using black dashes to indicate walkway areas, in fact it looked to me that the small panels engraved in the kit upper surface in front of the flaps were not panels at all, but were in fact these walkway dashes, though I can’t be sure about that. Black lines didn’t seem right – I think they came in with the Light Aircraft Grey scheme, and certainly the later yellow/red stripes are not right for this era.11 points
-
my last built, enjoy: voila voila11 points
-
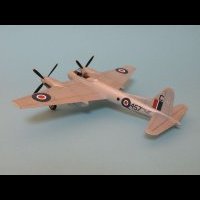
This Attacker was part of the HMS Eagle air wing in the early 1950s. The type had a fairly brief career with the Royal Navy, withdrawing from front line units in 1954, however RN Reserve squadrons continued to fly it until 1957. The Attacker was unique among British jet fighters in having a tail wheel, which made it difficult to operate from carriers. Huge thanks to @perdu for the canopy and decals. I also used some extra decals and added a few aerials, etc, and scooped out the cockpit and wheel wells. Other than that, pretty much oob!11 points
-
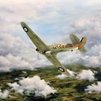
Hi, When I was a teenager, I read a book called "Pumas on the ground and in the air" written by a former Hungarian fighter pilot, Tibor Tobak, who flew during WWII. He belonged to the 101 fighter group called the Red Puma. At the time, I was very impressed by this reading and decided to pay tribute to Mr. Tobak and to the Red Pumas. Some 20-ish+ years later, I finally decided to give a go to this project and to use the brand new Tamiya 1/72 Bf109G-6 as a basis, using the decals provided by AZ-Model (BF109G Danubian user, ref AZA7030). This was my first kit from Tamiya and it was a real pleasure to build. Everything fitted perfectly. The only place I had to do some filling was at the rear junction of the lower wing with the fuselage. Apart from that, it is a beautifully engineered kit. I just added some PE seat belts as I preferred those to the decals supplied with the kit. AZ decals were placed with no problem. I also used another set of decals from AZ Model for the spiral on the spinner. There I needed to apply quite an extensive amount of decal softener. The stencils came from H-Model. The quality of the decals was good but some of the ones shown on the instructions were missing… Finally, I painted the model with Gunze acrylic paints, using my trustworthy Badger 150 (it will be 30 soon). Now it’s time for some pictures. Hope you like it. Cheers, Antoine10 points
-
Competed Wellington by Maquette, never issued by Frog and judging by the sprues the moulds were not finished! So OOB apart from; -Quickboost tail wheel, air scoops, main wheels, prop hubs. -Scratchbuilt cockpit interior, undercarriage, aerial, gun turret interiors and guns, engine fronts, nacelle gills. -Airfix spare canopy -Falcon front turret and crash moulded copy for the rear. -Peter B's hand cast resin DF loop housing (thank you) Think that's about it but I think the overall shape is very good and had it been issued would probably have sold well. Off to Flying boat GB next!10 points
-
Some DE applied: Not helped by the 'one side only' scheme but hey, it'll be good enough for the ceiling9 points
-
Solder is drilled on one end, and attached to a pin that is part of the exhaust ring of the engines. Once in place it will be bent according to photos. The two lower ones had what looks like silencers, perhaps for the benefit of the passengers: Four new elements (diagonal streamlined braces and rods going back on the wing) were added to the L.G. assembly, as well as the two lower oil coolers:9 points
-
Morning folk's.Frog's Skua from the Novo bagging.Spurious scheme as was Novo's release!9 points
-
Hi everybody. Here is my take on the Frog Grumman F8F-1B Bearcat. Leroy Grumman tasked his designers to produce a plane the same size as the Wildcat and with better performance than the Hellcat, and they did pretty well. Unfortunately the Bearcat arrived just as the war with Japan was ending, and had been replaced by jets by the time the Korean War started, so it only saw combat service with the French in what was then French Indo China, now Vietnam. Another of aviation histories "near msses". It's a nice little kit and even the decals worked. I hope you enjoy these pictures as much as I enjoyed building it - thanks for watching. 4 down 3 to go.9 points
-
As the proverb says, "Idle hands are the devil's workshop", and after finishing my Northrop YB-35 flying wing just in time for our local show, I felt a need to do something smaller, quicker, and definitely NOT with a natural metal finish. Looking through my stash, I heard this kit singing to me: Like some dogs, there are some airplanes are so ugly that they're beautiful, and you just gotta take them home! Searching through the BM forums, I discovered TheBaron has posted a 58-page WIP on this very kit, and I was at first hesitant to do a WIP of my own. But, what the heck, here we go! I began by completely ignoring the recommended construction sequence, and assembled the wheel wells so I could get them painted along with all of the interior parts: Special Hobby has done a fine job with the interior details. Here's an example: After painting the gray-green base coat, I gave the interior a wash of "streaking grime" to give a well-used appearance: I put only a minimum of effort into the instrument panel, as it will be barely visible once the fuselage is closed up: My first impressions on this kit are that the detailing and fit are very good, but the instructions (although beautifully done from a graphics standpoint) are often vague about where things go, and sometimes completely wrong. For example, if you follow the instructions you'll be gluing the control stick (C45) onto the floor-mounted compass: instead of between the compass and the pilot's seat. Otherwise, the interior went together without any issues: Before closing the fuselage, I found it essential to do much test fitting and trimming. For example, the instrument panel is slightly wider than it should be, and I had to snip off a corner to make it fit: Likewise this panel on the belly needed some sanding, plus some added reinforcement at the join: The test fitting paid off when it came time to glue the fuselage halves together. Fit was, for the most part, very good! The belly has some minor gaps that needed filling, especially around the piece for the arresting hook mount: Once again, I'm putting my trust in sprue gloop to fill these seams! Test fitting and trimming also ensured the wings went together ok: Special Hobby's design for mounting the wings to the fuselage at first gave me pause, but more test fitting convinced me the fit is very precise and should give a good, strong join: (The fit is actually much better than the above picture might suggest) Not bad progress for three day's work!8 points
-
Hello everyone, here are the photos of my most recent model, Accurate Miniatures Yak 1b in 1:48. Since I don't know anything about the Spviet Air Force's camouflage colours, I used RLM 71 for the green, black and RLM 65 for the underside. The model was completely brushpainted with Revell acrylics. My next project may be Hobby 2000's MC 202 or Hasegawa's Ju 87G in 32.8 points
-
Wharehouse now 3D and I turned to the red clay roof tiles, more than a thousand of them The tiles are 1 x 1mm Various spot colours, washes etc etc etc Moving on I thought I needed a ladder for the jetty. Microstrip and stretched sprue and placed in position Thanks for looking in Kev8 points
-
Time to make some update I decided to start with the build of the nose gun bay, home of the 0.5cal browning machine guns I used Eduard photo etched set. Everything fits great! Ammo belts and boxes will be also made from Eduards set.8 points
-
Had these figures for sometime,I bought the figures on horses,which are all lead Warlord,bought them because I do not have many ranking British figures on horse back,and I have a spare box of Victrix figures I use from time to time,just as a fill in,was going to place them on a small Dio,but decided to mount them single so I can place them where I like. Cheers Jim.7 points
-
Thanks Bill - I got lucky! Thanks Giorgio Thanks Stew - off to the Osteopath this morning so I'm sure he'll sort me out Thanks Heather - hopefully the lost items will be easily replaced. I had no option; I'd run out of useful bits on the PE! Sorry Ian - the equilibrium was a bit out yesterday afternoon, but maybe that was the Merlot… Thanks Bill - I'm sure it'll be sorted Thanks Ben, and for the Jethro Thanks Tony The actuators were included with the kit but (as we now know) with no spares. I did think about soldering some, briefly! "Ding back" - what's that Jont? If you mean going back over areas (perhaps after sanding) I don't need to worry about that too much as the Colourcoats coverage is really good so I only really need primer to cover different materials like the filler. The grey primer for me let's me vary the coverage a bit - I haven't got on with pre-shading, sadly. Thanks Crisp! Masking done. Washi tape on the edges, arcs from previously cut circles on the bendy joins: Other bits covered with cheap tape: Ready for brown. Oooh look, Flickr now has a 'buy prints of this photo' icon! I guess if someone wants to pay them to print things, go for it! At least 'Camera Roll' is back , finally. Makes it much easier to add new photos to the appropriate album.7 points
-
I have now got to the stage where the rigging is about 90% complete. This is something of a miracle as near disaster struck yesterday evening. I was happily working on the rigging for the mizzen mast when I noticed that it had become very bent. I had been a bit concerned about the mast since I started this build as it looked very flimsy. Uttering unprintable alien swear words, I cut the mast and all it's rigging away and did what I should have done in the fist place: scratch built a new mast from Albion Alloys slide fit brass tubing (whatever did we do before this stuff came along?). If in any doubt on future builds, I think that this will be the road I will be going down from the start. Next up will be to start thinking about how far I want to go in detailing the canons and fit the anchor. Thanks for looking Martian 👽7 points
-
The flaps and flap recesses are built and painted:7 points
-
Hi Folks, a bit of progress... If there was going to be a prize in this GB for 'least OOB kit build'... it would probably go to @Rob S and his Avro Lincoln! But I reckon this might come second. Whether its going to have been worth it, or I'll finish the bloomin' thing by the 22nd Sept, time will tell! The wheel wells are rather a bit of fantasy, they ought to have more longitudinal ribs, but better than the bare boxes they might have been. The Resin Pavla prop was a bit of a pain, the blades are held on by cryo and needed a bit of thinning down - causing them to break off the hub, even when I'd enlarged the holes in the spinner. Next is go back over some of the scribing and a bit of primer to find the flaws in the filler. Then some proper paint. Better crack on! Cheers,7 points
-
Hi All, Some of you may have seen me asking questions regarding colours for various bits of the early Car door Typhoons as I am slowly building the Airfix beast. It is a masterpiece of design and engineering however the parts do require a great deal of cleaning up to remove mould lines and a great deal of test fitting to ensure all is square before committing to glue. Generally spraying the major assemblies with Tamiya cans and various shades of black to try and provide some contrast in the interior and on the engine a little. Also applying the Roy Sutherland home made wash to lift some details. I am often referring to the revised How to Build guide by Brett Green which includes a car door build by James Hatch and I would recommend the book to anyone attempting this... Apologies for the standard of images RB Productions radiator grille used which is an improvement on the kit version. Airscale individual instrument decals used Eduard seat belts fitted but maybe a little two dimensional in hindsight? Some other parts in progress; next stage is to attach the radiator and then the lower wing to the main cockpit assembly. All comments welcome. Mike6 points
-
Hi mates, During the height (depth?) of my chemotherapy back in 2015, a very fine gentleman from Australia sent me the fantastic 1:32 scale kit from Tamiya of the Supermarine Spitfire Mk.IXc. The generosity of this man was unbelievable and at the same time a beautiful gesture to someone going through a difficult time. I will forever be grateful to him. It took me a long time to start and finish the model, but at last she is finished. Although the Tamiya kit is amazing right out of the box, old Navy Bird never misses an opportunity to spend some of his children's inheritance on aftermarket goodies. These are detailed in my summary below. Project: Supermarine Spitfire Mk.IXc BS152 AE-W, 402 Squadron RCAF, flown by Lorne Cameron, DFC early 1943 Kit: Tamiya Kit No. 60319 Scale: 1:32, a major departure from the norm in Navy Birdland Decals: EagleCals 32-116; stencils and other miscellaneous decals from kit Resin: Barracuda - Spitfire Seat 32001, Cockpit Upgrade Set 32003, Rocker Covers 32004, Five Slot Main Wheels 32005, Starboard Cockpit Sidewall 32008, Cockpit Upgrade Part II 32011; Quickboost Fishtail Exhaust QB32-143 Photoetch: Frets included with kit; Eduard - Mk.IX Exterior 32249, Mk.IX Interior 32670, Seat Harnesses from LooK set 634005; Yahu Instrument Panel 3220 Turned Brass: Master Model Hispano Cannons AM32016 Masks: Eduard JX103; Montex 32105 Paint: Colourcoats - ACRN07 Ocean Grey, ACRN11 Dark Green, ACRN04 Medium Sea Grey, C03 White; Gunze H3 Red, H4 Yellow, H74 Sky, H77 Tire Black, H90 Clear Red, H94 Clear Green, H95 Smoke Gray, Interior Grey Green (mix), Gold MC217, Brass MC219; Tamiya XF-69 NATO Black; Alclad ALC314 Klear Kote Flat Weathering: Some colour modulation and a light panel line wash, a bit of pastels on the main tyres Improvements/Corrections Detailed the cockpit with Barracuda resin bits and Eduard photoetch, added hydraulic and pneumatic lines Drilled out lightening holes in bulkheads and seat frame Added canopy lock mechanism Detailed the engine with ignition harnesses, oil lines, coolant lines, hydraulic lines, etc. Added chafing strips to cowling framework with Eduard PE Added spout/breather to the oil tank below the engine Added scratchbuilt wing gun heater duct-work to rear of radiators Added "cheese cutter" IFF antennae from 0.008" Nitinol wire Probably something else that I forgot - hey, I'm old! Elapsed Time: Only two years and four months! Yikes. The build thread can be found here. I know, you want the pictures. OK, here they be. An in-process photo of the wing gun heaters: To get a better view of the cockpit, we need to see it before the fuselage was closed up: Really a great kit, and a pleasure to build. highly recommended. Cheers, Bill PS. And a really big Thank You to the gentleman from Australia!6 points
-
While I'm waiting for the paint to dry on the Whitley I thought I'd play with some foiling, inspired by Rob's G-IRTY build. As the main effort will be in the foiling and stuff I chose something easy to assemble with an appropriate scheme: Now I know it's not very shiny so you'll have to allow me some artistic licence - although there won't be much 'art' going on here I'll warrant. Materials: I want to see how the expensive (£7 per sheet) compares to the £5 per roll builders tape - the AK paste is there for when I get bored of foiling. Shots of the sprues / part trees in the box: Nicely packaged as always. Out of the box: As always this will be wheels up and I know these kits are sometimes, ahem, tricky when trying to get the doors to close so I started there: Hmmm. Reference shots show that the doors on the leg seem to be in two parts so the kit bits were cut up: … and the first bits glued in after some chopping: Do-able. I stared at this for some time: … before I decided that the missing part A22 had probably been moulded into the fuselage so I just glued in the headrest A23. As you can see the thing's practically finished already! And no, I won't be bothering detailing the internals, such as they are, as I want to get on to the outsides!6 points
-
To make the external exhausts I found an old sprue that would suit my needs. The exhaust lengths were cut from the sprue and cut to the approx. size. Holes were drilled in the end to suggest hollow exhaust tubes. Firstly a small pilot hole was drilled which was then enlarged to a 2mm hole. A pilot hole was drilled in the cowl flap. This was enlarged to 4mm. Which was then filed to the final size. I painted the hole edges with black oil paint to suggest burnt paintwork. One of the exhausts blue-tacked in place. The exhausts were given a coat of UMP/Stynylrez black primer and then vallejo 70.814 burnt red was splogged onto them to give the effect of rust, the ends of the exhaust were left black. To enhance the rust idea I used gave them a coat of Tamiya brown panel liner, to act as a ‘glue’, and applied some vallejo pigments from their rust and oil set, burnt umber, burnt siena and dark red ochre. The exhausts were then dry fitted to the airframe. Although I like the look of rusty exhausts I think they look a bit thin, so I cut some brass pipe to length and then used some aluminium tape to cover them. These were then super glued to the exhausts, holes were drilled and thin brass rod used to join the exhausts to the fuselage and the engine/cowl sub-assembly was then cemented in place. Next I’ll be turning my attention to the bomb load. until next time as always, any suggestions, criticisms or comments will be gratefully received. rgds John(shortCummins)6 points
-
Hello Oriskany, we have one "Red Star" P-39Q in original condition here in Finland. I have quite a lot of photos of her but unfortunately not a single one showing radio installation. I also conducted some colour research as the paints are original. I can post more pictures if you consider them as useful. Cheers, Antti6 points
-
About 30 odd pieces of PE and brass per mount, and about a month of lunch times to complete. Onto the 20mm Oerlikon's now..6 points
-
I was very lucky to receive this beast for my birthday from my boys..... I should add that the first kit I ever built was this exact kit (I love the Vulcan), and have been saying I bet if I made another I could make it a million times better! Well I guess the proof of the pudding will be in the eating!6 points
-
Hi folks,here's today's progress only a few odds and sods to do now,6 points
-
Over the past couple of weeks I’ve done quite a lot of experimentation with how to build the 2 (arguably even 3) types of rectangular scuttle/opening - lead, very thin brass, aluminium tape... all showed promise in theory, but in the end they’ve been trumped by good old styrene sheet. One of the main reasons for that is the need to be consistent - aluminium (plumbers’) tape looked great in a single item, but I found it impossible to get a consistent looking series, and they need to look consistent to be convincing. Styrene, however, wins because it can be cut consistently using my indispensable scratch building tool... The Chopper... this: And below is the result; quite a lot of additions this evening. The 10 white styrene panels (eventually to have a central round scuttle in the middle, once everything is nicely cured), plus 6 new ‘normal’ round scuttles above on 2 deck, plus 2 new scuttles either side of the gash chute (right of photo under the 4.5” sponson), plus 7 new grilles of assorted sizes along 3 & 4 decks. Slowly but surely it’s getting busier and more cluttered... which is what real ships look like. And here once more is the same part of the real ship: More soon Crisp6 points
-
Purists and those of a nervous disposition- don't scroll down! It's here in all it's lurid redness, but if you want to see how it got here- then this is the build thread Spanish Civil War, Republican Forces a/c. As rendered by Frog, though nowadays the how red it was is questioned... Thanks everyone for everything, a proper build follows straight after this...6 points
-
Hi fellow modellers, Here's my last build, a Tomcat (or rather a Bombcat) in 1/32nd scale, which I have built in about ten days. Well, I guess I have to live up to my nickname Thanks for looking... SpeedyGonzales5 points
-
My name is Alexander. I want to join your community. Here are some of my recent designs. 1/72 Lockheed P-38L Lightning (HobbyBoss) 1/72 Messerschmitt Bf.109E-3 (Tamiya) 1/72 Supermarine Spitfire Mk.I (Airfix)5 points
-
Evening All, I have been building this over the past few months: there is a build log in the under construction section if you are interested. The Caproni Ca 5 was designed in 1917 as a replacement for the earlier successful Ca 3 series of aircraft. The Ca 5 was slightly larger than its predecessor and the early versions were powered by Fiat A 12 engines developing between 200 and 300 horse power. Radiators were fitted in front of the engine on the booms, but in the nose of the fuselage for the middle engine which was in a pusher configuration. Three engines were used because of the nature of the terrain, (most of the bombing raids had to pass over the Alps), and distances involved: a third engine gave both increased power and a better chance for the crew to return in the event of an engine malfunction. Later variants of the basic design were powered by Fiat, Isotta or Liberty engines which meant slight redesign of the nacelles, and in the case of the Liberty engined variants, the nose radiator was replaced by one mounted in front of the engine at the rear of the fuselage. Defensive armament consisted of a machine gun in the nose and one mounted on a platform above the engine in the fuselage and behind the top wing. Most of these machines were operated by the Italian Air Force but a small number was also supplied to the American Air Service where they were deployed over the Western Front. Plans to build 1500 machines of this type in the US were cancelled when peace resumed in 1918. The type was used with some success as a bomber from late 1917 and through 1918 and after the war it continued in service with the Italian air force until the mid 1920's. At least one machine was fitted with floats and Liberty engines but this was not delivered until 1919 and so did not see wartime service. Some machines were converted to air ambulances in the post war period - they could carry two stretcher cases, one in each nacelle behind the engines, and up to 4 sitting cases in the fuselage: the fuel tanks were reduced in size to accommodate the seats. In terms of overall performance the design was a little disappointing as it suffered from constant engine problems. The fuselage engine was difficult to cool, and all of the engines tended to have a low reliability because of the poor quality control in the engine factories in Italy. Production was also hampered by the lack of skilled workers to make these complex aircraft in Italy at that time, but the type earned respect from its crews for its rugged qualities and powers of endurance which made them well suited to the conditions in which they had to operate. The use of three engines seemed to have established a trend for larger Italian and some German interwar designs as a large number of trimotors were built and used in this period and during WW2, making use of the advantages of this particular engine layout. Here are the pictures - I hope that you like them. As far as I am aware there is no kit of this aircraft type - so scratch building was my only option to add one to my collection. Thanks for looking. P5 points
-
Hello, this was suppose to be completed for the Specialist group build but l was unable to complete it till now. The kit is from Airfix and the decals from Caracal. l ended up using 2 sheets from Caracal as l messed up the walkways on my first attempt. The decals are excellent and the white is really solid. lt is painted with Xtracrylix Gloss Sea Blue and matt coated afterwards. I added the heat shield on the underside of the exhaust. Hope you enjoy it.. Robert5 points
-
i was given this Classic airfames kit already built but paintwork partially stripped...so i finished stripping it and missing a few parts...i got the decals out of my classic airframes kit in my stash(i plan using the other set when i build it) the scheme is an early scheme with the half black underside..the prop blades are cut down P39 ones. 69796366_1047756945419677_1491301529519390720_o by paul sabin, on Flickr 69536220_1047757008753004_9131222276568514560_o by paul sabin, on Flickr 69329737_1047756965419675_8967622952174485504_o by paul sabin, on Flickr 69231119_1047756865419685_4278284174143520768_o by paul sabin, on Flickr 69127483_1047757065419665_2557998219879514112_o by paul sabin, on Flickr 69104648_1047756912086347_5435333176681562112_o by paul sabin, on Flickr the silver one is the much maligned Trumpeter kit with a couple of simple improvements 69298189_1047757092086329_6562739534713323520_o by paul sabin, on Flickr 69942466_1047757038753001_482981192832909312_o by paul sabin, on Flickr5 points
-
Hi guys, thought I would show you my latest build its the 1/32 Italeri F-35A, OTB with the edition of the Eduard seat belts, its a poor kit, that's all I will say about this, I have used Reedoak figures, and the MJ1-B loader from video aviation, and MRP paints enjoy Mike5 points
-
Gentlemen, you are most welcome🙂 I was earlier talking about the green colour in gear bays with Mike. I was confused because the colour doesn't match with "Interior Green"; it is more "pure" green and also darker. Mike then suggested that this colour could be known as "Bell Green". The correct shade (using the Swedish NCS colour standard) is: S7020-G70Y (closest FS equivalent 34097). Olive Drab is S7005-G80Y and closest FS equivalent 36134. It was VERY interesting to note last week that RAF Dark Green (as observed on a Folland Gnat fighter) is also S7005-G80Y! Neutral Gray is S5502-B (FS 36270; the actual colour is however clearly darker). Mike: I feel lucky indeed as last week I rode in DC-3 for an hour and then I was able to examine a MiG-3 in original Soviet paint, the remains of a SAAB B17A and confirmed that the Finnish AF Dark Green used in "War Paint" scheme is perfectly re-produced by Lifecolour. Some more photos: Cheers, Antti5 points
-
Sounds like someone desperately needed to get to the museum to take photo's of the Javelin? Selwyn5 points
-
No wonder his back hurts if he rides around the place with virtually no clothes on, waving big pointy sticks. Act your age, man! I love that song! Thanks for putting it back in my head this fine morning.5 points
-
Well, OK @Corsairfoxfouruncle, since you asked nicely.... Warning! Picture heavy post ahead!!! So I'm sure everyone knows about Flying Heritage Collection, but for those who don't--It is Paul Allen (of Microsoft fame)'s personal collection of warbirds. The most exciting thing about the collection is that every one of them is airworthy, and the vast majority of them are flown on a regular basis for the public to come and watch. The other exciting thing is the degree of authenticity they go to. They will scour the earth to find an authentic part and do loads of research on every paint scheme, instrument, and interior detail you can think of. Some examples are the only airworthy craft of their type in the world, and some are the only one of their type in the world and they will not fly them, despite being airworthy (the Ki-43-Ic Oscar, and the FW-190-A5). I encourage you to have a look at their webpage -- https://flyingheritage.org/Explore/The-Collection.aspx -- just so I don't go on and on for hours... A couple exciting additions coming up are an airworthy Stuka, and an airworthy Me-262 using the original engines! This weekend was "Luftwaffe weekend". My earlier post was in error, they have a Sptifire MkVc, not a Mk.IX -- I was thinking of Historic Flight Foundation, which is a similar museum across the runway. Planes are usually scheduled to fly way ahead of time, but different conditions will keep them on the ground, and alas, the Mosquito did not take to the air. But that's OK... lots of other neat things to see! We had a bonus, when a An-124 took off from Paine field. I only had enough time to whip out the camera and get this shot: I have pictures of all the planes in the museum, but I only took pictures of the ones that were flying the last time I was here, which were these: Il-2 Sturmovik: FW-190D: And the P-40C, which did not fly last time I was there, but I couldn't get a good side-shot of: Of course, I took a ton of pictures of the Ju-87 in restoration: The planes that were going to take to the air were: Hurricane Mk. XIIa Spitfire Mk.Vc P-47D Thunderbolt (picture from the last fly day I went to): Fi-156-C2 Storch and the Bf-109-E3 (inexplicably, I didn't get a picture of this on the ground, so here's a photo from the last time I was there): And... In the air! What a beautiful sound. Man... it's awesome! I took tons of pictures, but this is a pretty good sampling. And you couldn't ask for a better day, especially for the Seattle area!5 points
-
Commiserations on grief over the old tent pole (back) Ced but heartened to see that it hasn't dented your roguish charm with waitresses. Were those actuators part of the original kit - they look pretty good? Loving your work on turrets and paint. Discovered an etching of you confronting the CM;5 points
-
Last touches (they seem never to end): A gloss white coat is laid down in preparation for the light blue. Painting of props and antenna fairing is done:5 points
-
Sorry.... it's already in the rules. The Blitzenbuild chat thread is now up in future Groupbuilds.4 points


.thumb.jpg.942668eda22ef4e1cceffe7cdb75061d.jpg)


This leaderboard is set to London/GMT+01:00