
Leaderboard


Popular Content
Showing content with the highest reputation on 26/08/19 in all areas
-
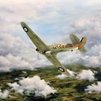
610 Squadron during the Battle of Britain 1/72 Airfix kits, Coastal Kits Blurred base effect. Prop blur via Flickr photo editor25 points
-
Hello all, Finished bits and pieces yesterday and had a good play with my camera. Comments and suggestions are very welcome: BANANA FOR SCALE: Many thanks!!!23 points
-
615 Squadron, Battle of Britain 1/72 Airfix kits, Coastal Kits Blurred base effect. Prop blur via Flickr photo editor22 points
-
Afternoon all,I always like to support as many GB's as possible but subject wise the 80's Asia GB had me at a loss,not really much in my modelling sphere of interest.Well I found this little Italeri kit had marking's for the Royal Australian Air Force display team the Roulettes.A simple if basic kit but builds well can't say the scheme was fun but after a few hiccups got near enough in the end.Many thanks for looking in.21 points
-
Afternoon folk's,one of my all time favourite kit's is Airfix's 1970's Spitfire VB,from the box art with Jan Zumbach's aircraft roaring down the field to the blue plastic inside It always reminds me of what seemed like endless school summer holidays as a kid.Anyway built for the Blitz build GB over two days it took about six hours in total,the only decals I had for this later boxing were USAAF ones but despite my aversion to Spitfire's with stars I quite like it.I scored the ailerons to droop/raise as the plastic was nice and soft.Thank's for looking in.17 points
-
Eduard 1:72, Syhart decals16 points
-
Sturmgeschütz IV Sd.Kfz. 167 17th Panzer Grenadier Division - Normandy 194416 points
-
British 1st Armoured Division Humber MKII Armoured Car Hasegawa 1/72 - Stowage by PSC & Tamiya I hope you like it - Steve16 points
-
Hi everybody, this is a Copper State Caudron G.IV, 1/48. Figures come from the Eduard range and some of them were slightly modified; everything else was scratchbuilt...hope you like it...15 points
-
Hi guys, thought I would show you my latest build its the 1/32 Italeri F-35A, OTB with the edition of the Eduard seat belts, its a poor kit, that's all I will say about this, I have used Reedoak figures, and the MJ1-B loader from video aviation, and MRP paints enjoy Mike15 points
-
Nakajima Ki-44 Shoki Hasegawa 1/72 Superhero option 23h55'15 points
-
Airfix starter set Battle of Britain Bf-109E-3 France 1940 9 hours All rattle cans by Tamiya Another great GB!14 points
-
After an absence of forty eight years I've just finished my first build, Well for better or worse, warts & all here she is. First build & paint in all these years & never used an airbrush before.... Never weathered either so, in truth, it's hiding a multitude of sins & cock-ups. I think that I couldn't have chosen a worse first model whilst learning airbrushing, especially with using Alclad airframe aluminium. However, I'm going to call this my 'practice' piece in readiness for my next build. Some of the weathering is somewhat heavy in places but it's helping to disguise my mistakes I suppose. Admittedly, I did struggle at times due to tiredness & loss of concentration etc but persevered. I welcome honest constructive criticism & advice & opinions from anyone. Regards to you all. 😉13 points
-
This time without a link, but with a bonus 🤣 and as the promised bonus: Tamiya Kübelwagen with the repair shop conversion ... Thanks for looking!13 points
-
Not posted any new model here lately because of the less than desirable quality of photo that I can capture at present( I swear I will fabricate a photo booth by end of this month) ; Anyways here is the Tamiya kit , completely built out of box . It is brilliant just like any other tamiya kit . Weathered it a bit heavier than usual and I kinda like how it came out . Intentionally over pronounced the post shading . Thanks for watching12 points
-
Hawker Siddeley Buccaneer S.2B RAF Lossiemouth Gulf Detachment, Operation "Granby", 1991 1/72 Airfix 2x12hr build periods11 points
-
1/35 Zis-5 Russian truck Alan molds, re-released by Dragon11 points
-
My wife and I spent a very hot afternoon at Little Gransden for the annual Children in Need show. Unfortunately, there were a couple of notable late cancellations and the extremely high temperatures might have deterred some visitors because it did not seem as busy as previous years. Compared to Clacton, the displays were generally as close to the crowd as regulations permit. The show was very nearly delayed due to a woman accidentally transmitting drivel on the air show frequency. A few pleas over the public address system embarrassed her into releasing the PTT! The Bell 47 pilot was hover-taxying as the DH.88 Comet was displaying and was told that he was encroaching the display area, whereupon he returned to his parking spot. The Hurricane was beautifully flown and it was lovely to see the Yale, but my favourite display was definitely the Mustang with lots of whistling top-side passes! And now for the inevitable excuses - the sun and the heat-haze made photography very tricky! Thanks for looking.10 points
-
A Gallery? Don't usually get this far Here's my Brengun 1/48 16KhA 'Priboy' missile. Build thread HERE10 points
-
Blitzed this! 6hrs 23 not including an hours tea break. T47 Snowspeeder, my second and much better entry in this BlitzBuild10 points
-
I've officially finished this build of (mainly) Revell's Spitfire I/II kit as a Spitfire Vb Trop ER676. The model is mostly Revell parts, but back to front on the exterior I used the following items for the conversion: propeller and spinner were from leftover Hasegawa Spitfire V bits that were living in my spares box; the Vokes filter is from the Hobby Boss mk V kit; the exhausts are from Quickboost; the cannons are from Master; the tires are from Eduard Brassin; the bumps on the cowl and the wings are from Real Models; the pilot access door from Barracuda Studios; on the bottom of the centre wing are hooks for the external fuel tank leftover from a Tamiya VIII; the windscreen is from Tamiya's VIII kit (leftover from when I built a PR.XI); the wing pitot is from the Hobby Boss mk V kit; and the tail wheel strut was also from the Hobby Boss mk V kit. Bits from the Eduard exterior set were used on the landing gear and the wheel wells. The cockpit has parts from the Revell kit, Barracuda Studios, Eduard, some bits from Hobby Boss, HGW seatbelts and the instruments panel is from Yahu. Build tread here: I tried Hataka acrylics with this build and although I like the colours I didn't like how they sprayed so I won't be using them again. Added some figures (one from Aerobonus - Aires - and another from Master Casters). Fuel tanks and boxes from Miniart. Anyway, on to the rest of the photos: Thanks for looking and as always comments and/or feedback is welcome. Elger9 points
-
Here's my completed Fokker from the May, Blitzbuild 1 GB - didn't quite make completion back in May as I had trouble with the lozenge decals folding up - by the time I had worked it out I had lost some of the lozenges and too much time. Anyway, in an effort to get it done before joining the Blitzbuild 2 GB this weekend I finished it off - the extra time allowed some weathering and rigging which I probably wouldn't have attempted in the GB. All in all a very nice little kit, even with the tricky decals. Hope you like her.9 points
-
Uh, wrong! I need four for the ailerons. Rats. But wait - that PE between the parts is roughly the right shape isn't it? Can you tell which is the cut one? No? Good. Yes? Obviously not out of focus enough then. Ho hum. Some Humbrol filler plastered in the roots: Bit of sanding, fit the loop aerial, supports and pitot and we're ready for primer!9 points
-
Kit - Italeri re-boxed Accurate Miniatures. Paint - All enamels. Decals - Eduard & kit. Extras - Eduard Zoom set. IL2M-3 Sturmovik 23rd Ind. Assault Regt. Soviet Black Sea Fleet Late 1943. First time I've built an IL2 and first time I've finished an AM kit. Engineering is superb IMO, as long as you take the time to read how other folks built theirs AND test fit... especially around the wing-to-fuselage assemblies. All the paint tones are mixed using my favourite (un)reliable Mk.I eyeball method using Humbrol, Xtracolour and Tamiya enamels. I bought a sheet of 'Authentic Decals' but they shattered into molecule sized fragments as soon as they hit the water so I used Eduard 'stars' and the kit supplied bort numbers / guards badge. Not too much else to add, if anyone wants to ask any questions, make any comments or rain-down any abuse, that's all fine. Have the rest of a great weekend folks... best from NZ. Ian.9 points
-
Tam kit, Steel Beach conversion, Fightertown decals. No need for a full write up on this one.8 points
-
1937,China 南京保卫战 Following the outbreak of war between Japan and China in July 1937, the Japanese government at first attempted to contain the fighting and sought a negotiated settlement to the war. However, after victory in the Battle of Shanghai expansionists prevailed within the Japanese military and on December 1 a campaign to capture Nanking was officially authorized. The task of occupying Nanking was given to General Iwane Matsui, the commander of Japan's Central China Area Army, who believed that the capture of Nanking would force China to surrender and thus end the war. Chinese leader Chiang Kai-shek ultimately decided to defend the city and appointed Tang Shengzhi to command the Nanking Garrison Force, a hastily assembled army of local conscripts and the remnants of the Chinese units who had fought in Shanghai. Japanese soldiers marched from Shanghai to Nanking at a breakneck pace, rapidly defeating pockets of Chinese resistance. By December 9 they had reached the last line of defense, the Fukuo Line, behind which lay Nanking's fortified walls. On December 10 Matsui ordered an all-out attack on Nanking, and after less than two days of intense fighting Chiang decided to abandon the city. Before fleeing, Tang ordered his men to launch a concerted breakout of the Japanese siege, but by this time Nanking was largely surrounded and its defenses were at the breaking point. Most of Tang's units simply collapsed, their soldiers often casting off their weapons and uniforms in the streets in the hopes of hiding among the city's civilian population. Following the capture of the city Japanese soldiers massacred Chinese prisoners of war, murdered civilians, and committed acts of looting and rape in an event known as the Nanking Massacre. Though Japan's military victory excited and emboldened them, the subsequent massacre tarnished their reputation in the eyes of the world. Contrary to Matsui's expectations, China did not surrender and the Second Sino-Japanese War continued for another eight years. My latest work, finished last night, I hope you like it.😁8 points
-
Revell 1/112 X-Wing Fighter The first time I've finished a Blitzbuild - thanks to everyone who commented on the build and participated in the GB and thanks to @Enzo Matrix for hosting - great stuff. Here she is - hope you like her;8 points
-
Shout out for the Flory big flat sander: With the excess plastic sanded off a few adjustments and then out with the Lego and tube glue: OK, I have to admit it's 'a bit wobbly' - I think the tailplanes are slightly off - but nothing that can't be cured with some crafty camera angles (ahem).8 points
-
OK - it's finished and 'nearly' dry... Total time elapsed - 16 hours - including a kip from midnight to 4am - phew... Thanks for looking in - Steve8 points
-
Hi guys n’ gals. It’s been a hup ho week but I have managed a little plastic fantastic. I hope you’re all coping with the hot hot bank holiday weekend. 🥳 First up I didn’t go for UC I headed for canopy. Masking to be precise, I wangled a new blade then cut masks using Tamiya tape. then I peeled ‘em off to use as inside masks before making new outside masks if you catch my drift. masked on both ends and cleaned of gate flash I primed. The fit seems ok on dry runs but I need to paint before I glue with gators grip. We have a split family this weekend, my girls have gone camping leaving us boys to fend for ourselves. Not too bad really. In-between life things I managed to prime the intake bit. not bad. I did need to sand the main intake to loose the step. And primed. in doing so losing the river detail. 😕 so via the gift of Mr S and a cocktail stick I added it back. I primed this again to knock it back slightly. I bloody love 1/24 for this. 😃 Aaand that’s pretty much where I am. Fingers crossed for a bit more tomorrow. hope you’re all having a great BH weekend and thanks for dropping in. All comments welcome and as always. Happy modeling . Johnny. 🌪8 points
-
My build thread is here I would say that this was the most enjoyable of my Fog GB builds so far - 3 of the others have been bi-planes. Once again thank for the comments along the way8 points
-
Hi folks I’ve finished this tonight and have taken photo’s in the garage under LED lighting as it’s way too gusty outside. The story of this started for me as a kid spotting at Boscombe Down during any holiday. I vividly remember the Tornado there and it flying locally and over the ranges at Larkhill. Fast forward to modern times and information becomes available that the aircraft I was watching was XZ630. This was the 12th pre-production aircraft so wasn’t the final build standard. These aircraft were given “P” numbers and thus was known as P.12. The kit - I really only build 1/32 kits so when Revell re-released the kit, the spark happened. I gathered the Airies pit, Airbrake housing and Paragon flaps and slats, finally Paragons access ladder. I started this kit just under a year ago with a 4 month break to do a commission build of a 212. The cockpit was constructed but back dated by removing some switches and putting blank panels in. The ejection seat straps on the front seat were placed over the headbox waiting for an engineer to dive in and start her up. The resin airbrake housing was fitted by cutting out the kit part and fitting the resin replacement. A weather seal was added around the airbrake housing as I noticed it in reference photo’s. The resin exhaust were constructed and fitted but it looks like Airies didn’t plan on you using both as there is interference and the cans needs cut down and moved aft of the airbrake housing. The fin was modified as you’ll notice the lack of fillet below the rudder. The vortex generators were removed as it was clean but later they were retrofitted. I did learn that the RWR housing are different shapes for each country. The kit ones are flared outwards at the extreme tips which are for German aircraft, so these were thinned down for an RAF version. The tailplane leading edges were straightened removing the kink and reprofiling the leading edge. The intakes were modified in that there is a hump profile on the upper surface which was removed on production aircraft. There are also 3 visible vertical struts on the rear of the intake outlet. I scratch built the open panels for the ground power and comms on the lower side, down near the gun ports which you’ll notice have been flushed as this aircraft at the time didn’t have them fitted. The wing glove was a poor fit and the Paragon wasn’t brilliant, so I put backing plastic and on the inside, filled it with Plasto filler and pressed the kit part onto the wet filler. Once it was tacky I used a scalpel and created the groove and let it set. The nose leg was cut down as it’s way to high, giving a distinctly nose up attitude. I wanted something different so I wanted to try Engine ground run guards. So through help on here I managed to get a couple of photo’s and ordered some mesh from “the mesh company”. With my bending tool and purely by eye I knocked up these, which look ok. I then added the strengthening ribs and sprayed then red. The period of the aircraft dictated wrap around camo with the tri-country roundels on the fin. The Antenna colours on the fin are a mottled brown colour which was actually quite easy to replicate. The Fin staining was Tamiya weathering pastels, the Green/Grey is Xtracrylix which was Windsor and Newton gloss varnished then decals applied and then Matt W&N varnished. The artistic license bit is the refuelling probe. This can be fitted with the guards but I couldn’t find a photo of it extended, but I wanted to add that key bit of detail. The access ladder wasn’t used as it was from the wrong period. Photography is not my thing and there’s not much more to be said!. C65C9732-232F-4C09-824F-5F2DD69EF3F4 by Stephen Priestley-Dean, on Flickr 07A2E7B2-7E3F-4959-BA7E-E437194D5C05 by Stephen Priestley-Dean, on Flickr D71BFE01-ED62-4B60-A5F4-BED2580249B2 by Stephen Priestley-Dean, on Flickr D957F858-FCC5-4536-94CB-F4EF74AD2915 by Stephen Priestley-Dean, on Flickr BC196558-7E01-4A0A-97C1-CE2E61D21B8C by Stephen Priestley-Dean, on Flickr 1A87F4B5-1FF1-4B69-9F04-9FE6CFE70B78 by Stephen Priestley-Dean, on Flickr D6330E9C-DBB8-46E6-87F5-72DC24FB40FB by Stephen Priestley-Dean, on Flickr 46F17DB6-85E6-424F-B5A7-60A02E455FA9 by Stephen Priestley-Dean, on Flickr 8947E4B8-7DF6-47E7-94E2-2B1622143BD5 by Stephen Priestley-Dean, on Flickr B57C25D2-1685-4EB3-8242-55B6D1528EFB by Stephen Priestley-Dean, on Flickr F4345F25-BB41-42F7-A355-107049E56782 by Stephen Priestley-Dean, on Flickr 34EF27F8-221D-49D7-BBDF-F379E5923D18 by Stephen Priestley-Dean, on Flickr 70D0A82E-928E-4E7D-A6AE-A35773B37C2D by Stephen Priestley-Dean, on Flickr AFDCB954-6B56-44E7-AF7F-39E9CB21CA5D by Stephen Priestley-Dean, on Flickr 7F6598C3-BBA6-4B22-8963-9834923A6009 by Stephen Priestley-Dean, on Flickr F5EDCE22-EF2F-4266-9192-56C40188FD5A by Stephen Priestley-Dean, on Flickr 28D4A7DC-0280-41FB-888E-4163154CA787 by Stephen Priestley-Dean, on Flickr ABC9C2AD-0FB0-4285-8060-936C6989DE94 by Stephen Priestley-Dean, on Flickr Any questions please get in touch. The kit is going to the Boscombe Down Museum in a couple of weeks. my thanks go to, Canberra kid (John), MickE, 71chally, Pete in lincs, Julien. Steve.7 points
-
The Original Airfix Phantom This kit was such a big part of my modelling history that I thought I would build one as Airfix had originally intended. However, I couldn’t resist sorting a few things out – such as the canopy and radome and IR seeker shapes and replacement seats. I also filled the huge control surface gaps and rescribed them. Original decals were used for squadron markings and numbers (note the yellowing!). Airfix got the VF-74 red arrow marking wrong on the fuselage top and I also put that right. Overall though it took me back to around 1970. I also have the very one I built in 1970, now in it’s nth set of markings for a US Marines aircraft :7 points
-
Hi All, Just finished this today, it's once again, converted from the old Revell 1/32 kit. I hope it meets with your approval. Shown here with my P1127 for comparison. All I need now is the Trumpeter GR.7 to make a nice trio. Regards, Glenn7 points
-
TePe brushes are, according to the packet, 0.4mm so I thought they'd be ideal for the 0.4mm nozzle. As happens, they're not long enough Thanks Giorgio Thanks Simon Mols is fine, as always, but her eyelids are still bald… hoping to get the results of the expensive tests tomorrow, at which point they'll probably tell us that most of the drugs aren't doing anything. Just goes to prove one of my GP friends quotes that "drugs are what we give you to keep you quiet while nature makes you better"! Thanks Adrian Silk purses are almost possible! Thanks Bill Thanks Ian I know, weird isn't it - I shall try to get the angle of the dangle right when I glue the cowlings on. I guess that's why she flew 'nose down'? While I'm waiting for the filler to dry off I painted the first coat on the turrets and Nulm Oiled the props and tailwheel. The exhausts have also had some burnt iron brushed on and will get a rust dry brush before I stick 'em on at the end.7 points
-
Thanks John and Keith - too hot! Let's hope it gets a bit cooler soon Final filler in, sticky out bits on, just drying then ready for primer: The cowlings are just held on with BluTak at the moment. Hopefully they won't blow off!7 points
-
Hi folk's Airfix Spitfire Vb about six hour's over the two days to complete.7 points
-
Content withdrawn - I will NOT be threatened by a moderator, simply because I queried the actions of another...6 points
-
So then as you may or may not know Dad203 is a very old friend of mine. has has been pestering me to write up the on going saga of my 2nd build in 30 odd years . I am absolutely awful at the writing , so i hope that you can hang in with me and ignore my terrible spelling and grammar. Early May and I have just finished my Tamiya Chieftain, with my first attempts at PE and weathering. So high on my success ( if you can call it that ) I head on out with cash card and purchase this Well I opened it , looked at it , closed it and put the kettle on . OH my god , an encyclopedia for instructions and enough plastic to cause the green party to have a heart attack. Ok where to start , Tracks- always a good place.....5 episodes of Peaky Blinders, enough holes in my fingers to warrant swearing we end up with this. Drilling each plastic link out the adding vaping wire for the link .. bugger me that stuff is sharp . So Danny would give you a run down of angles , pressures and micro analyse which particular wire he uses , nope , I just crack on . Holes in finger and eventually we get something that looks as i remember a track looking like . ll. Right so i have started , over the next couple of days - damn this thing called work , i will endure to bring you all up to speed on things not to do when making a mini art T-55. Have fun - its your hobby- be safe6 points
-
The last few days have seen me beginning to add the rigging to the ,model. I have been using wooden rigging blocks for the process. These are a tad fiddly as they are the smallest one can buy. Still, all good practice for the larger scale builds that I have planned. Hopefully I will have another update either today or tomorrow, depending on my bad back. Thanks for looking Martian 👽6 points
-
Undercarriage tidied up and completed along with a few other bits. Sitting here it does look like it's ready to 'Fly Right Off the Ground' and the underside. On the home straight now.6 points
-
Crusader Mk.1 Kit: Tamiya TA32541 1/48 Stowage: Tamiya TA32510 Figures: Gaso.Line Build thread: https://www.britmodeller.com/forums/index.php?/topic/235059795-crusader-mki/ <6 points
-
My next build is Airfix's 1:72 Bristol Blenheim Mk.IV, which I was lucky enough to receive for Mother's Day. The box contains a detailed set of instructions, small decal sheet and glass sprue. There are five grey sprues, all with little to no flash and a nice amount of detailing. I have decided to build the aircraft in the markings of Groups Dr Bombardement 1 (Lorraine), Armed de l'Air, North Africa, 1941. I plan to build it straight as it comes from the box, using Vallejo acrylics (because I prefer airbrushing with them). The kit has been washed and is drying, and I'm looking forward to my next challenge.5 points
-
This was my entry to the second edition of the Flying Boats and Floatplanes GB, which I co-hosted. As usual, I didn't manage to finish my entry in the timeframe of the GB, so I'll try to finish it here. Thanks for looking. Jaime ------------------------------------------------------------------- Dear All, As co-host to the 2nd edition of the Flying Boats and Floatplanes GB, I should set a good example. As such, here is my entry: Zvezda's rebox of the Revell 1/144 A-90 "Orlyonok" Ekranoplan: Seems to be fairly simple to build, with only 38 parts and absolutely none interior detail. Even the lateral windows are simulated with round black decals. I think the most challenging part of the build will be the weathering, for which I'll rely on my experience with my Dornier Do-24T build. I'll build the box art machine: an Ekranoplan of the Soviet Navy, based on Kaspiisk Naval Base, Caspian Sea, Dagestan, USSR, 1990. Due to holidays and my D-Day Typhoon Mk. Ib build, I don't expect starting my entry before October. Cheers Jaime5 points
-
Hello all, I’m looking forward to having fellow travellers again on this long journey of mine ... Hopefully you can tolerate me still doddering on with this one! I have a long-running build thread over here ... ... but I propose transferring the tortured narrative back over here for the duration, taking up Enzo’s offer to roll-over builds from the last floatplane group build. My current status, in summary: A collection of subassemblies - including the requisite floats - primed in white ... ... since embellished with a flourish of blue to the fuselage spine ... ... & most recently, back in the tailplane jig after accidentally snapping off the starboard stabiliser - sigh! So, I’m hoping there’s an outside chance I might finish this time around. We shall see ...5 points
-
hello 1:144 fans! for IPMS the Netherlands I have built a test shot of their incredible AN-225, the largest aircraft in the world. And also the largest aircraft I ever built. Complete build report can be found in MIP #3 of IPMS the Netherlands. Enjoy and have a relaxiing vacation.5 points
-
Thanks occa - good luck! If it helps, General Melchett did a conversion of the Airfix to a Mk III here. Not that I'm up to his standard! HTH Thanks Ian and Aeronut - just the sort of detail and background I like Thanks Johnny Always John, always It's the colour that shows the size as you probably know; sadly the 0.4mm are pink… Another coat on the turrets: That'll do. Tomorrow I'll dip the toothpick in the white spirit and clean up (I hope). Oh, and prime the thing.5 points
-
Hi Craig and thank you. Yes it's been far too warm to do much of anything this weekend but I needed to get more done on this or I'm not going to get it finished in time. You can see what I've managed to get done below. Hi Giorgio and thank you. I'm glad it’s a good heat in Paris. Hope you had/are having a great time. Steal away!! Hope they go well. Thank you very much Dennis. You are way too kind Steve but thank you. First job on Sunday, which took most of the day, was to get the camo on. I got the Humbrol Ocean Grey on first which I applied thinned with water and applied with a small flat brush. Once on, I decided it looked too flat compared with the effect on the D-Day stripes, so I stippled on a thinned layer with a stippling brush. Then I applied thinned Humbrol US Dark Green in a similar way. Finally, on Saturday, I painted the wing root tread areas by masking off the areas and stippling on thinned Revell’s Anthracite and then I did the yellow leading edges in a similar fashion but using Revell’s Matt Yellow: This morning I started work on getting a thinned wash in the panel lines. Revell’s Gunship Grey on the undersides: applied very thinned with a small, fine pointed brush. Then I did the upper surfaces. I used thinned Gunship Grey on the D-Day stripes areas and Anthracite everywhere else: Next I need to get some basic weathering on and then I will get a gloss coat on before doing the decals. Comments and suggestions welcome. Kind regards, Stix5 points
-
Morning All - I've been up since 'silly o'clock' - tip toeing around - so as not to disturb Madame X's beauty sleep. I got the decals on / pushed the wheels onto the metal spindles (it actually rolls along) / added some extra 'stowage' / used some 'grime' wash for the bodywork / a 'sand' wash for the tyre grooves... Madame X has just got up - so I've just fired up the airbrush for a final matt coat to seal it all in... I think I've gone as far as I can - so I'll get some gallery shot posted and call it a day in the next hour or so - once the matt coat has set. Then I can go back and enjoy some of the other builds. It's been a nightmare weekend with my old computer going down and you know what it's like when you get a new one - all the keys are 'in the wrong place' and everything takes ten times as long to type. Nearly forgot - I need a 'timed finish shot' - better not spill anything on the laptop though - I'm keeping it well away from the bench - as I reckon a build up of 'modelling dust' hasn't helped the old one over the last few years. Steve5 points
-
Some more slow progress. The main gun frames are now complete. These were quite tricky as they have to be folded and folded again, and it was really easy to accidentally fold them the wrong way- which of course, meant I broke 2 of them and they had to be reattached which was no easy task. Once I learned from my mistakes, the remaining 4 went together quite well. The brass rod is a nice addition which makes the frame stronger. I deliberately left the excess brass on the rod (you have to cut the cylinder & pipe off the same piece), which made it easier to fit.5 points


.thumb.jpg.ad2b820bfdebfdb8541e9255a05f38c7.jpg)


This leaderboard is set to London/GMT+01:00