
Leaderboard

.thumb.jpg.ad2b820bfdebfdb8541e9255a05f38c7.jpg)


Popular Content
Showing content with the highest reputation on 24/08/19 in all areas
-
Revell 1/72 Hunter F6 with Xtradecals İnternational Hunter sheet. http:// http:// http:// http:// http://22 points
-
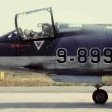
Vertol Hkp 4B 1 Helicopter Division, Swedish Navy, 1986 If anyone reading this was at the 1986 Middle Wallop air show, as I was, I’m sure you will remember these Swedish helicopters as stars of the show and rare beasts indeed in the UK. It sometimes takes a while for all the elements to come together to built a model and for me it was the recent availability of the Swedish camo colours from Hataka that completed the set. I have had the ‘Flying Colours / Aerodecals’ sheet for a long long time, kept in the equally old Hobbycraft Vertol 107 kit box waiting to go. If you like masking, then this is the model for you. If you don’t, sheer perseverance will get you there in the end – or at least that’s how it was for me. I thought the rotor blade camo might be the easy bit, but having to do it all 6 times extended the timescale beyond what I wanted – you can only do so much masking at a time. The Hataka paints airbrushed beautifully and I would recommend them. Next time though I think I would spray the two greens and hand brush the brown and black to keep masking to a reasonable level.18 points
-
This was built as part of the "Sharks Mouth GB", and as per usual for me I wanted to do a scheme that was a bit different. A Hawker Typhoon with a Sharks Mouth certainly fitted the brief! She's a full resin model 1/32nd from MDC with a few extras and corrections. I do have to she wasn’t one of the easier builds I had. Right from the start she had some serious issues with warpage in the wings, fuselage, control surfaces, cockpit internals….pretty much varying degrees of all over the place. The second one of these I have was a little bit better and for a while I was planning to build that one instead. But hey what’s life without a challenge! This was the wing after heat treatment to remove the major warping, it still needed quite a bit of sanding, re-filling and profiling correct the shape. Unfortunately the decal set also caused issues as they did not want to conform at all with the complex shape of the radiator opening. They just fell apart even with decal solution. So I was forced to do these by hand…..well masking and airbrush. In the end I probably should have done the whole lot with masks and saved myself a lot of headaches. In the end she was done and I’m pretty happy with the results considering. The next project (in the future) will be bulding the 2ndone with some bit from the old Revell model to build one of the 3 “Car Door” Typhoons the RAAF tested in the Middle East. Model: MDC 1/32ndHawker Typhoon IB Paint: Tamiya & Mr Hobby Acrylics with Mr Paint & SMS lacquers, Model Master Metalizer Lacquer Extras: AML – Camouflage Painting Masks Aviaeology – Shark Mouth Typhoon Decals Special Hobby – RP-3 60lb SAP/HE Rockets Squadron - Canopy thank you for looking and please enjoy. ...and one of her siblings.15 points
-
Ready for inspection is my Airfix 1:72 D.H. Mosquito FB.Mk.VI. I have built this kit straight from the box, using Vallejo acrylics throughout. The kit was quite a challenge, purely because of the poor quality of some of the mouldings (notably the undercarriage doors and wings). Because of this, quite a bit of filler was required, and some sanding to boot. That said I am happy with the result, thanks for looking.13 points
-
A friend and I decided to take a trip to Clacton on the so-called "Essex Sunshine Coast" for the annual air show. The weather was perfect for sun lovers (and probably pilots), but terrible for photographers. The display line seemed to favour our friends in the Netherlands rather than the crowd on Clacton seafront, but that's enough of the excuses... The pictures below are more for the record, and will certainly not win any prizes! My favourite display was without doubt the beautifully-flown Ultimate Fighters. In order of appearance: Tigers Army Parachute Display Team RAF Typhoon FGR4 The Blades Ultimate Fighters OTTO Specially-marked RAF Tucano Strikemaster pair Fireflies Aerobatic Display Team BBMF Bronco Demo Team Rich Goodwin Airshows Pitts S2S Team Raven Norwegian Air Force Historical Squadron Polish-built SB Lim-2 (MiG-15UTI) and Canadair T-33 Silver Star Thanks for looking.12 points
-
my second try at a Hobby Boss Messerschmitt and a link to some more: https://photos.app.goo.gl/8mthQRy4vPe5r6ow712 points
-
Here's my completed Fokker from the May, Blitzbuild 1 GB - didn't quite make completion back in May as I had trouble with the lozenge decals folding up - by the time I had worked it out I had lost some of the lozenges and too much time. Anyway, in an effort to get it done before joining the Blitzbuild 2 GB this weekend I finished it off - the extra time allowed some weathering and rigging which I probably wouldn't have attempted in the GB. All in all a very nice little kit, even with the tricky decals. Hope you like her.11 points
-
This was a great kit, the biggest challenge being the decision how much of the interior structure to display with the completed kit. Well, as you see I went halfway .... (As you also can see, there is a significant gap on the port side of the plane between the wing and the body, so maybe I should have left that open too 😜) and a link with more pictures of the details Zoukei-Mura included ... https://photos.app.goo.gl/mtDPzdX9gXv5Zv8J311 points
-
This was a special build designed to celebrate the nose-art of the talented SSgt Sarkis Bartigian of the 43rd BW based on Ie Shima, 1945. The right side of the model represents B-24J-190-CO 44-40973 "The Dragon and his Tail", while the left side portrays B-24J-160-CO 44-40428 "Cocktail Hour", both painted by the aforementioned Bartigian. An advertising mural and marquee artist before the war, 38-year-old Bartigian was in his element, painting to order on the billboard-sized slab sides of the B-24. He was paid in cigarettes, alcohol and other commodities available to the Pacific theatre Army Air Corps. The model is the famous Monogram 1/48 built OOB, with Dragon decals from Scale-Master and the Cocktail Hour ones from Zotz. The build is distinctive due to being completely finished in aluminium kitchen foil, with flying surfaces, glazing and leading edges painted with Gunze Mr Metal Color Aluminium. (The leading edges were silver as the de-icing boots were removed from late production B-24s to save weight as they were not required in the low-level, tropical applications of the Western Pacific). I originally mounted it on a "motion-blur picture" stand, but it looked a bit crap so I just sprayed it plain black. The spinning props were cut from yoghurt pots and spun on 600 grit sandpaper, with the propblurs added using pastels. I used the Monogram crew members, slightly modified to be looking out of the left side of the aircraft. This is one of the most satisfying results I've produced since resuming modelling in 2006 - it may not be the most technically accomplished build, but the whole feel of the overall model really appeals to me. Hope you like it too! Alan11 points
-
I've officially finished this build of (mainly) Revell's Spitfire I/II kit as a Spitfire Vb Trop ER676. The model is mostly Revell parts, but back to front on the exterior I used the following items for the conversion: propeller and spinner were from leftover Hasegawa Spitfire V bits that were living in my spares box; the Vokes filter is from the Hobby Boss mk V kit; the exhausts are from Quickboost; the cannons are from Master; the tires are from Eduard Brassin; the bumps on the cowl and the wings are from Real Models; the pilot access door from Barracuda Studios; on the bottom of the centre wing are hooks for the external fuel tank leftover from a Tamiya VIII; the windscreen is from Tamiya's VIII kit (leftover from when I built a PR.XI); the wing pitot is from the Hobby Boss mk V kit; and the tail wheel strut was also from the Hobby Boss mk V kit. Bits from the Eduard exterior set were used on the landing gear and the wheel wells. The cockpit has parts from the Revell kit, Barracuda Studios, Eduard, some bits from Hobby Boss, HGW seatbelts and the instruments panel is from Yahu. Build tread here: I tried Hataka acrylics with this build and although I like the colours I didn't like how they sprayed so I won't be using them again. Added some figures (one from Aerobonus - Aires - and another from Master Casters). Fuel tanks and boxes from Miniart. Anyway, on to the rest of the photos: Thanks for looking and as always comments and/or feedback is welcome. Elger10 points
-
Tam kit, Steel Beach conversion, Fightertown decals. No need for a full write up on this one.10 points
-
Here is my Revell Beaufighter. Two years in the making and finally in the cabinet. There were lots of additions, some scratchbuilt others from aftermarket sources. I it a great kit and and has a great presence amongst it's contemporaries.10 points
-
Finished my latest build. 1/144 Dora Wings kit. Fantastic little kits, I modified and added details.9 points
-
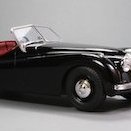
This is a restoration of a glue bomb. The kit has never been re-released and is now quite rare. The chassis and engine were too far gone so I stole those parts and the wheels from the more common AMT 65 GTO kit. The paint is my own mix of Zero colours followed by Tamiya TS13 clear. The tyres are from The Modelhaus.9 points
-
When I joined the forum, I was told it is ok to post pictures of all my former builds, so "the story continues" 😉 The current version is already the second paint job (the link below shows one pic with the first try in a plain grey overall), but I am still not sure if I am happy with it. Basic idea was that this plane would be sitting on its launch tower somewhere near some woods/trees and therefore the cammo should be adjusted to the vertical position (so, e.g. a traditional 70/71 on top and 76 on the bottom would not really be right in my eyes). Well, I am still not sure, so maybe it will get a third do over 🤔 and the link to the album ... https://photos.app.goo.gl/HJPwRzPCrbuw8cVn69 points
-
Polikarpov I-16 type 17 Hasegawa 1/729 points
-
Something with a Polish accent this time. F-105D Polish Glider Set: Trumpeter 1:32 scale, model made as always straight from the box. The model is not simple to build.9 points
-
In no way wishing to hijack Ced's thread, I was worrying about the mismatch between the two undercarriage bays, especially as I had 'flu when I made the necessary cuts to my kit and the work was far from my best. To my surprise they matched exactly. What I did find however was that the wingtips did not match by a good 1'5mm at least and the outer to inner lower wing joint touched where it didn't fit. the cut out for the landing light was even worse. I have put all this right but it set me thinking about Fly kits in general. This is not to criticise Ced's efforts in any way as, as far as I can see, he did everything right. I suspect it is down to the instructions which are not exactly the best I have ever seen. Just be prepared for the fact that if the kit fits in one place, there is a good chance that it will not in another. To get the best out of them, these kits seem to require a different mindset to most other short run kits. This is the sixth Fly kit I have built and I have had really good results from the first five. Obviously they are far from being shake and bake kits but I have found that a different approach to normal tends to pay dividends with them. What I mean by this is that I have gradually learned to accept that a long game is a better way to tackle them. Make a start and keep going until enthusiasm starts to ebb. At this point, put the model away until you feel like coming back to it. Believe me you will as the subjects offered are pretty unique. Do a bit more until the enthusiasm ebbs again and then stop once more. Keep repeating this and one day all of a sudden the model is ready for paint. In other words be prepared for a long but rewarding build. Martian 👽9 points
-
Sometimes a picture seeds an idea. I found this photo when I built my Marine Corsair, and it inspired me to try and model this gun carrier as a companion. Tamiya's 1/48 Jeep was the perfect kit for this task. I used the Eduard PE set and Verlinden wheels, and scratch-built a new radiator grille to represent the early front, and a wooden box to hold the .5 cal Browning M2 machine guns. The box can be removed to have the Jeep perform other duties if needed. The picture below demonstrates the difference between the early radiator grille guard (vehicle in the front) and the more common pressed sheet-metal face (rear). The Jeep's official designation is Willys-Overland Model MB or ¼ ton 4x4 truck. My model served in the Solomons in early 1943 with VMF-124, part of Marine Air Group 12. Six machine guns, each weighing some 84 lbs, and a crew of two are an adequate load for the dogged Jeep, which has in fact a maximum paylod of 800 lbs. I hope you like this digression from my usual aircraft modelling theme, and you are invited to visit more airfield vehicles here. Thanks for viewing - Michael References Pacific War Eagles in Original Color, Jeffrey Ethell / Warren Bodie, Front Royal, 1997 Jeeps 1941-45, Osprey New Vanguard 117, Steven J. Zaloga, Botley, 2005 Pre-Standardized Jeep, Walk Around 5711, David Doyle, Carrollton, 2008 Willys-Overland MB and Ford Model GPW Jeep Technical Manual, Washington, 1947, reprinted by PeriscopeFilm 20118 points
-
--I'm begging you,come home pls ! We all miss you! My new work, I hope you like it😁8 points
-
7 points
-
Enjoyable fun build and after seeing some magnificent builds on this site thought I'd try using magnets. The base is an old Frog base, I might improve this with a clear plastic tube and a proper base. Brush painted with Humrol paints and Revell Matt. Base rattle can plasticity. Hope you like it ..7 points
-
Hi Guys, This was built over 2 and a half years. It's a kit from deag. I enjoyed building this one plus is the only Fully rigged ship I have finished. Hope you like the pictures. Chris7 points
-
Hi Giorgio and thank you. I always think two of the hardest colours to weather effectively are matt Anthracite and matt White. When I did the inside of a WW1 tank and then the engine for a tank, with the engine exposed, they were both supposed to be base coloured white. Photos showed the white look kind of mottled with use, wear'n'tear, etc and I was pondering how to weather them. My first thought was to paint the white and then use washes but I was concerned the washes wouldn’t give the sort of mottled effect. It then occurred to me that if I painted the areas Anthracite first and then used very thinned washes built up slowly using a stippling brush, I would be better able to control the build up of the paint to get some mottled effects....and it worked as far as I was concerned. So, knowing D-Day stripes were often hastily applied I decided to try and get a similar effect. Hi Ozzy and thank you for your comments. Yes we had a very nice time, thank you. Hi Craig and thank you. Still not got to the main camo yet but I have started on the undersides and done the Sky band. Thank you Lawzer! Sorry to see about your dog though. Please accept my condolences. Hi Robert and thank you very much for your comments. Not a lot to report but I have got the Sky band painted and started work on the underside main colour - for which I used thinned Revell’s Light Grey. To finish these areas off I used a thinned layer which I applied with a stippling brush - to try and get a sort of mottled effect again: It's got a bit too warm now to do any modelling so it will have to wait until this evening or tomorrow. Comments and suggestions welcome. Kind regards, Stix7 points
-
Thanks mate. Here's some better pictures.7 points
-
It was the only way to get the battles started and stopped on time...I had a busy social calendar back then, many self-aggrandizing functions to grace and deals to be struck that simply couldn't be affected by sloppy time management... Nice work on the klaxon...does it go 'Beeeeargh' as originally designed or simply yell 'Ahooogah'?7 points
-
I don't think so. Otherwise Mrs Martian would not have spent the last 31 years telling my to grow up. I just tell her that getting older is inevitable but growing up is optional and I have well over 20,00 Britmodellers to prove it! Martian 👽 (The Peter Pan of Mars)7 points
-
How do chaps, Here's my second model in the GB. Dragon Sherman Vc with AFV Club tracks and RB metal barrel. Figures from Miniart. Painted with AK Real Color, Vallejo, Mig, Tamiya and Games Workshop paints. Weathered with Mig Pigments, Games Workshop washes and Tamiya textured paint for the mud. Build thread below.... Regards, Steve 🇬🇧7 points
-
Where have all the Aliens gone? Scratching my SHADO. I'm not into sci-fi models and I can't remember watching 'UFO' when it was on the telly, but I was sort of press-ganged into a groupbuild on another site and had to choose something. For various reasons, rather than the full three months, I only had six weeks to build it. I managed it in five weeks and enjoyed it enormously. It is entirely scratch-built in 1/48. This is the build log: I hope you like it. (Incidentally, aliens dress in orange and white jumpsuits apparently). Thanks for having a look.6 points
-
I always wanted that a/c, but the resin kit was too expensive for my taste, so when it came out as injection, I couldn't resist .... It is actually one of the few of my kits that are only partly painted with a brush: the alu is from a rattle can. (I am really no good with air brush) and a link with some extra pictures ... https://photos.app.goo.gl/r8qaG8MQxEzeXZmd66 points
-
Sorry but not a little blue thing instead I declare with this; Got to be a contender for most under packed kit box category. However... The parts have quite nice surface detail, decent mating faces and even a little trolley to put it on until I build the carrier aircraft. That'll be about 2068 at the current rate And here's a slightly arty shot of the start. I know that there may be 'issues' with the fit but at least the scheme is simple. Green and silver/aluminium with a dash of gunmetal for the missile. Quick bit of primer then a quick errand while it dries. Hope you're all having a great day too i6 points
-
Thanks for the advice. Painting the tyres was quite time consuming. The tracks were painted with Vallejo Panzer Aces Track Primer. I then fitted the upper hull and turret. I like the look of the vehicle without the sand skirts. Maybe that's one for another day. I've now given the model a couple of coats of matt lacquer from a rattle can. I'll give it a couple of hours to harden and then we're onto the weathering. My intention is to use Flory washes. I'll do that for an hour or so which should take me up to the cutoff point for today.6 points
-
2nd Platoon, 506 Regiment, 101 Airborne Division. June 6th 1944, Lt Dick Winters leads men from 2nd Platoon to take out German Guns firing on the men coming ashore on Utah beach. This is the break in of the Gun position at Brecourt manor, with the first Gun position in sight.6 points
-
Hi folk's I got less time than planned for this session as the tiny terror has arrived for the day. Nine o'clock start parts ready. Just before ten wings done,interior and wheel wells painted and other items painted on the sprue. And ten past ten joints sanded wing joint filled and ready for paint,I might get an hour later tonight before the Guiness calls and I have to trudge up the Cricket club so I hope to get at least primer on.6 points
-
I have now got to the stage where the decks and bulwarks are painted. I should have liked to have painted and detailed them before the hull halves were joined but the imperative then was to get everything glued together to strengthen the warped hull and worry about the painting later. The hull has now had a coat of Taniya clear varnish which has had a good 24 hours to cure which should protect the paintwork as I handle the model while doing the rigging. The mizzen mast has been glued to the model but I have kept the main mast loose as there is still a good deal of work I can do with it off the model. There a few odds and sods left to do but essentially she is ready for rigging. Martian👽6 points
-
Well, at least I tried to make it into a C8 (not C4 as I wrote into the topic title).... And a Link to some more pictures: https://photos.app.goo.gl/G296ba76FZtkEY6q95 points
-
Hi folks I’ve finished this tonight and have taken photo’s in the garage under LED lighting as it’s way too gusty outside. The story of this started for me as a kid spotting at Boscombe Down during any holiday. I vividly remember the Tornado there and it flying locally and over the ranges at Larkhill. Fast forward to modern times and information becomes available that the aircraft I was watching was XZ630. This was the 12th pre-production aircraft so wasn’t the final build standard. These aircraft were given “P” numbers and thus was known as P.12. The kit - I really only build 1/32 kits so when Revell re-released the kit, the spark happened. I gathered the Airies pit, Airbrake housing and Paragon flaps and slats, finally Paragons access ladder. I started this kit just under a year ago with a 4 month break to do a commission build of a 212. The cockpit was constructed but back dated by removing some switches and putting blank panels in. The ejection seat straps on the front seat were placed over the headbox waiting for an engineer to dive in and start her up. The resin airbrake housing was fitted by cutting out the kit part and fitting the resin replacement. A weather seal was added around the airbrake housing as I noticed it in reference photo’s. The resin exhaust were constructed and fitted but it looks like Airies didn’t plan on you using both as there is interference and the cans needs cut down and moved aft of the airbrake housing. The fin was modified as you’ll notice the lack of fillet below the rudder. The vortex generators were removed as it was clean but later they were retrofitted. I did learn that the RWR housing are different shapes for each country. The kit ones are flared outwards at the extreme tips which are for German aircraft, so these were thinned down for an RAF version. The tailplane leading edges were straightened removing the kink and reprofiling the leading edge. The intakes were modified in that there is a hump profile on the upper surface which was removed on production aircraft. There are also 3 visible vertical struts on the rear of the intake outlet. I scratch built the open panels for the ground power and comms on the lower side, down near the gun ports which you’ll notice have been flushed as this aircraft at the time didn’t have them fitted. The wing glove was a poor fit and the Paragon wasn’t brilliant, so I put backing plastic and on the inside, filled it with Plasto filler and pressed the kit part onto the wet filler. Once it was tacky I used a scalpel and created the groove and let it set. The nose leg was cut down as it’s way to high, giving a distinctly nose up attitude. I wanted something different so I wanted to try Engine ground run guards. So through help on here I managed to get a couple of photo’s and ordered some mesh from “the mesh company”. With my bending tool and purely by eye I knocked up these, which look ok. I then added the strengthening ribs and sprayed then red. The period of the aircraft dictated wrap around camo with the tri-country roundels on the fin. The Antenna colours on the fin are a mottled brown colour which was actually quite easy to replicate. The Fin staining was Tamiya weathering pastels, the Green/Grey is Xtracrylix which was Windsor and Newton gloss varnished then decals applied and then Matt W&N varnished. The artistic license bit is the refuelling probe. This can be fitted with the guards but I couldn’t find a photo of it extended, but I wanted to add that key bit of detail. The access ladder wasn’t used as it was from the wrong period. Photography is not my thing and there’s not much more to be said!. C65C9732-232F-4C09-824F-5F2DD69EF3F4 by Stephen Priestley-Dean, on Flickr 07A2E7B2-7E3F-4959-BA7E-E437194D5C05 by Stephen Priestley-Dean, on Flickr D71BFE01-ED62-4B60-A5F4-BED2580249B2 by Stephen Priestley-Dean, on Flickr D957F858-FCC5-4536-94CB-F4EF74AD2915 by Stephen Priestley-Dean, on Flickr BC196558-7E01-4A0A-97C1-CE2E61D21B8C by Stephen Priestley-Dean, on Flickr 1A87F4B5-1FF1-4B69-9F04-9FE6CFE70B78 by Stephen Priestley-Dean, on Flickr D6330E9C-DBB8-46E6-87F5-72DC24FB40FB by Stephen Priestley-Dean, on Flickr 46F17DB6-85E6-424F-B5A7-60A02E455FA9 by Stephen Priestley-Dean, on Flickr 8947E4B8-7DF6-47E7-94E2-2B1622143BD5 by Stephen Priestley-Dean, on Flickr B57C25D2-1685-4EB3-8242-55B6D1528EFB by Stephen Priestley-Dean, on Flickr F4345F25-BB41-42F7-A355-107049E56782 by Stephen Priestley-Dean, on Flickr 34EF27F8-221D-49D7-BBDF-F379E5923D18 by Stephen Priestley-Dean, on Flickr 70D0A82E-928E-4E7D-A6AE-A35773B37C2D by Stephen Priestley-Dean, on Flickr AFDCB954-6B56-44E7-AF7F-39E9CB21CA5D by Stephen Priestley-Dean, on Flickr 7F6598C3-BBA6-4B22-8963-9834923A6009 by Stephen Priestley-Dean, on Flickr F5EDCE22-EF2F-4266-9192-56C40188FD5A by Stephen Priestley-Dean, on Flickr 28D4A7DC-0280-41FB-888E-4163154CA787 by Stephen Priestley-Dean, on Flickr ABC9C2AD-0FB0-4285-8060-936C6989DE94 by Stephen Priestley-Dean, on Flickr Any questions please get in touch. The kit is going to the Boscombe Down Museum in a couple of weeks. my thanks go to, Canberra kid (John), MickE, 71chally, Pete in lincs, Julien. Steve.5 points
-
Lt Dick Winters undertook a reconnaissance at about 0830, after which he collected a team of 12 men from his own and other companies. Beyond knowledge of the general location of the gun emplacements south of Le Grand Chemin and without information of the other side of the hedgerow, Winters' team attacked Brécourt Manor, located three miles southwest of Utah Beach and north of the village of Sainte-Marie-du-Mont. There he discovered No. 6 Battery of the 90th Artillery Regiment, consisting of four 105mm howitzers connected by trenches and defended by a company of soldiers. Pictures of the tree line in the grounds today Map of the Gun position. Unfortunately my only reference was the Band of Brothers series, as the chap that owns the manor doesn't let visitors into the field. My build to capture the break in and the first Gun.5 points
-
I’m in with this: I will be doing an early 19 Squadron version with the “19” on the fin and big A1 roundels over the wings. Not sure what my timing will be yet - negotiations ahead! Regards, Adrian5 points
-
Here's my entry for this Blitzbuild. I will start tomorrow morning and again Sunday morning Never done a Blitzbuild before, but I usually am a quick builder so hope to finish, only 7 steps5 points
-
Hi everyone, this is my latest build, it's missing some wirings but i was so tired after re-doing 5 times the camouflage that i left it like this. Hope that someone will like it as it is5 points
-
Well here is another enthralling update for you guys. The hull has been painted a while but need a little touch after being moved around the cave a few times. The paint call-out as per instructions was Humbrol 27 but didn't have any and a trip round 'www' placed EDSG as a best match, so that's what it got; Colourcoats EDSG (ACRN02). You wouldn't think so by looking at the pic but it is. This being a first time in weathering boats, I was a little apprehensive about doing this because it being an RAF boat, it would've been kept pretty clean. So, after the main coat of EDSG had dried, selected parts were washed with 'Nuln Oil', a Citadel shade. I left that to dry while having a coffee break, then dry-brushed DSG over the top. Also demasked the turret glazing and built the tops with their guns. Front end view. Nothing glued down but I needed to place the see what the effect is and to make sure that weathering of these few parts wasn't too contrasty. Mid view. And the back end. Not 100% about how I will weather the deck, we'll see but before I do that I need to get the decals on. What do you guys think, more...less? Stuart5 points
-
My Revell Sea Vixen.5 points
-
It is indeed @Brad with a bit of the starship Enterprise about it. So here we are now after much trial fitting and careful checking. No matter what I tried the wings just won't mate to the fuselage nicely. So out comes Mr Plasto. Halfords aluminium used rather than silver unless the Soviets were really making parts from precious metals. Except for the probe under one wing that's all the missile bits in play. Time for a bucket of coffee.5 points
-
Just for the record my latest Frog Catalogue (1975) lists 59 aircraft kits. To date most of them are on the build list. The exceptions are as far as I can see F237 Spitfire VIII/IX, F392 Zero, F187 Mosquito IV/VI (though I think it has been mentioned as a possible), F208 Boston/Havoc, and F207 He 111. - 5 out of 59. Not bad. Of course there are many older kits not in that catalogue and also the Hasegawa ones, not to mention ships, and even a few Frog never quite built before they went under. With my Folgore, and a Voodoo and Twin Mustang declared as potential builds recently we are very close to the Airfix total of 157, though how many actually get completed by the deadline remains to be seen. At the start I said that I doubted we would get close! I think we all deserve a round of applause, particularly the overworked admin team. Cheers Pete5 points
-
So this one took WAAAY longer than it should have done. Major issues with my (then) choice of primer, Stynlrez - as soon as I started applying masking for the topcoats it all just peeled straight off the plastic. No adhesion what so ever, so a full strip off job (mostly with parcel tape!) and start again. OOB, except for some masking tape belts, Vallejo Model Air, Alclad primer. Enjoy 🙂5 points
-
Time for another update..... Last pic is with V1 and stand posed to give an overall impression. Overall it looks "too busy" and i think it may have looked better with single engines etc. Onwards and upwards, Cheers Greg5 points
-
How long does it take a man to paint a simple off-black coat? A very long time, in my case. It’s a mix of mostly black, dark grey and blue. I will add another patchy scuff coat of a similar mix and then maybe pick out some panels for more scuffing before I get to the decals. For someone who builds faster than a lazy snail this would make a great blitzbuild subject... Thanks for looking, Adrian5 points
-
The door is being dressed, including a placard from the Arctic Decals set: Other parts have been painted and sealed (oil coolers and vents). A garland seen in photos is added to the door, above the placard. The aerial klaxon used in British planes of the time (invented by some @general melchett or other) can be seen in the foreground: Struts, Venturis, generator prop, etc., already painted and sealed:5 points
-
Cheers guys, Smallish update tonight, again working on the pack, I've detailed up what I think is the starter motor. Added a few small details such as the end of the armature and the pos and neg terminals, these will get wired up later. I know that the pack and gearbox area will not be 100% accurate but I'm just freestyling this area and just busying it up and hopefully making it a bit more interesting. The derv powerpack is much different from this petrol version. Added the mounts to the rad And back to the steering box, I've added the steering lever arms to the box, these will get connecting rods to the box later. These connect to the brake bands inside the box, and are what steer the wagon so quite important, a nightmare on the 43's that I worked on. The M113 and 432's are so similar in the way that they worked. Also adding the jerry can holders to the rear of the vehicle. I’ve made a start on the pivot steer tillers which live on the inside of the front plate, quiet a complex set of levers and all from scratch, update later. Enjoy Dan5 points


This leaderboard is set to London/GMT+01:00