
Leaderboard


Popular Content
Showing content with the highest reputation on 16/08/19 in all areas
-
Hello, I would like to present my 1/72 SA.330 Puma in Bristow’s livery. Based around Sumburgh, Shetland & Dyce, Aberdeen circa 1979. Airfix kit with Whirlybirds resin conversion for the radar and sponsons. Decals were a mix from my spares. Certainly not my best effort but I am pleased with it. Thanks for looking Aaron23 points
-
Hi Folks, I was reluctant to start this Mig-21 in Indian air force color as there are many MigNazi here but a good friend name Ratish who is also a member here will always help me out and encourage me and finally able to build this kit. It is an Academy kit labeled as Mig-21MF which actually is a Bis. There are two aircraft with a yellow and black stripe on the tail, one is the Oorial and the other the Lancer, since I don't have the decals for it has omitted it, however making the Oorial will be easy to design so in future, once I get my decal paper will print and apply it. Here are some shots I took yesterday, hope you like it and thank you for watching. Cheers22 points
-
Finally done, full WIP is available HERE. I hope you'll enjoy Cheers Mick15 points
-
Hi, Here is my Italeri Blackbird Original panel lines are raised. So i do at first a sanding on all the plane and the panel lines were engraved I use Tamiya & Gunze Acrylics for painting Wheathering was done with pastel and oil. [15 points
-
Simon, Keith, I've started having withdrawal symptoms from not building Phantoms ... Anyway, time for some progress report. Where were we? Ah yes, intakes. Two warnings before I start a) lots of pic to follow b) I didn't intend to replicate the full intake trunking, just something that would give the illusion of seamless intakes at this scale So out came the Stabilo eraser gum This can be easily shaped with blades and the usual sanding tools, so after marking the outlines with a fine marker, I carved out and sanded a vacforming template I inserted a rod in it (it's actually a straightened paper clip) to give it some rigidity and keep the curved shape then used some 0.3mm styrene sheet for the vacforming, obtaining these (2 good out of 4 attempts ... ) First dryfit to get something like this The trunking was held in place with some blue tack, so I could glue it to the kit intake with TET As you can see, I glued them in proud of the kit part, and reinforced the join with CA, as a filler. I then used a rounded file and sandpaper to get this Another dryfit with the fuselage showed that the trunking side edge would be pretty visible so I decided to add a length of styrene (this time 0.2mm and hand bent against a round brush shaft), kept in place by an external reinforcing "plate" (all glued with TET) Of course this edge was also visible I intended to blend it in once fuselage and wings were mated, but then I thought it would have been complicated (not an easy spot to reach, also for airbrushing), so I decided to add another length of styrene, enough to reach out to the intake external side edges I determined the shape of this additional segment by placing some tape inside the intake outer sides and running a pencil on the edges; I then removed the tape, stuck onto the styrene sheet and cut accordingly. After a few more dryfits I got this Some filling and sanding was in order, so I applied milliput along the joints and again, after some sanding and polishing (and some PPP to complete the job, especially towards the front part of the joints) Seamless "intakes" ready Well, not quite: there's some sort of sensor inside port intake, visible here So I scratch built it What I did was to punch out a 2mm plastic disc from very thin styrene (from a yogurt cup, hey it's the first time I bring that out in this build ) and glued it in place with TET. Then the sensor was built from 0.1mm brass sheet, bending a strip around a short segment of thin copper wire and soldering it to fill in the voids. The resulting chunk of metal was reworked with a Dremel sanding disc, and glued in place with CA. You can probably see it better here Here's another shot of this dryfit with regular light Looks good enough for the scale to me. Of course the fore parts need to be glued to the kit sides and then blended into the outer edges, but that is going to be quite easy, once I glue the fuselage to the wings. Here's a pic using flash Again, it looks good enough for me, but I'd really appreciate your comments on this. Ciao12 points
-
My next build is the venerable Airfix F-80C: This was part of my mid-90's stash-building spree. It may be my favorite straight-winged jet of all time (even over my Banshee!), so I'm super excited to build this. Plus I will be trying AK interactive extreme metal for the first time as well. Not that there's anything wrong with Alclad -- I love it -- but I've found that I can't quite get the "Almost-shiny-but-partly-worn" look from Alclad. Mirror finishes and really worn finishes, yes, but that elusive in-between... no. Here's an example of what I mean: Lockheed F-80C 47-545 (11488799454) Bill Larkins [CC BY-SA 2.0 (https://creativecommons.org/licenses/by-sa/2.0)], via Wikimedia Commons I've tried lots of pre-shading ideas, but they either didn't work or weren't consistently reproducible. I suppose I could experiment with some post-painting effects, like maybe some dot filtering or something. I don't know. Back to the AK paint, however -- I saw several builds using the stuff and it looked closer to the picture above than I can get with Alclad, so I thought I'd give it a shot. I've also looked at lots and lots of photos and have a pretty good idea of how to shade the different panels to match the metal shades I see. More on that later. So, weeknights are busy and I typically only have about 10 -30 minutes to do anything at the bench. So, I started Sunday night but only now have had time to post any progress. Sunday night I painted all the Zinc Chromate parts, and painted the landing gears with decanted Tamiya Silver Leaf paint. The seat was terribly inaccurate, so I thought I could make it a little less so after looking at some reference photos. Here's the original seat: I added some arm rests with sheet styrene: Monday night I did an oil wash on the zinc chromate parts, then sealed them with dull coat: ... and a little detailing in the cockpit tub: and painted the seat. The seat in the photos I have looks like it was olive drab against the zinc chromate cockpit floor, which seemed odd, but that's what I went with. Tuesday night I painted the details in the landing gear bays. My reference photos showed that many of the lines were silver, but the lines don't match between the photos and the model, so I had to wing it. Last night I did some dry brushing and silver paint chipping on the seat... And fabricated some ejection seat handles to put on: Of course the opening for the cockpit is small, so all this detail maybe for nothing.... I also epoxied some lead fishing weights in for nose weight. I hope to get the fuselage buttoned up tonight. I've heard good things about this kit and it seems like the fit will be fairly good. I also heard that the intakes can give some trouble. The raised detail is incredibly fine, and I'm sure it will get wiped out when I do any sanding on the seam. It is so fine I won't be able to replace it,so I may have to just sacrifice some of it. @Stalker6Recon and @Corsairfoxfouruncle -- you asked to be tagged on this one... so here you go!9 points
-
Hello! It is my first model on this site. This model I received as a gift. It was assembled many years ago. This is an old set NOVO/FROG. I got it broken. The model was disassembled and assembled again with modifications. It was done very much: cockpit, canopy, landing gear, control surfaces and brake pads. Painted with gunze Mrobby paints. Sorry my English... 1 by Andrew Zhi 9 by Andrew Zhi 8 by Andrew Zhi 7 by Andrew Zhi 6 by Andrew Zhi 5 by Andrew Zhi 4 by Andrew Zhi 3 by Andrew Zhi 2 by Andrew Zhi 78 by Andrew Zhi 73 by Andrew Zhi 51 by Andrew Zhi 39 by Andrew Zhi 21 by Andrew Zhi 12 by Andrew Zhi 8 by Andrew Zhi 6 by Andrew Zhi 2 by Andrew Zhi 1 by Andrew Zhi 01 by Andrew Zhi9 points
-
Hello, I would like to present my 1/72 Avro Rota C.30 in Swiss livery. RS Models kit out of box apart from the addition of PE seat belts. A quick build; nice little kit so I have another on the bench 😊 Thanks for looking Aaron9 points
-
This is my build of Fujimi's Kaman SH-2F helicoptor. These served as the ASW helicopters on ships too small to carry the SH-3 Sea King and were replaces by some variant of SH-60. This is a very old molding from Fujimi from the 70's, and may boxing looked to be that old. While it had recessed panel lines the fit and detail were only so-so and the plastic was very brittle. The left fuselage broke into 3 pieces while removing it from the sprue, with a sprue cutter. The decals were toast. I tried to use the instrument panel decal but after soaking for 15 minutes in very hot water I concluded the paper would disintegrate be for the decal would let go. So instead I used Microscale set 72-396. These worked pretty well except where they had to wrap around so compound curves and a less then perfect color alignment. Total build time was 11 days (who counts the hours?). So let's take a look: I would like to do the Italeri HSS-1 Seabat next, but I don't have decals for the HS-x ASW squadrons and no one seems to make them. @CaracalModels has an H-34 sheet "coming soon", but I don't know how soon or if it will have the marking I want. So I will probably go with the CyberHobby SH-3D Sea King. Enjoy9 points
-
The current state: The next steps are going to be a bare metal coat on the wing roots, followed by ACUS23 yellow zinc chromate on top of that, then the overall ACUS34 ANA623 Glossy Sea Blue top coat.9 points
-
I've had one of those 'Oh, get on with it' moments and decided that this: … is good enough for the ceiling so I sanded the edges of the wheel a bit and stuck it in. That allowed me to fit the nacelle 'as best I could': Now I have to do the other side!9 points
-
Following is a much condensed history of the events depicted in the attached photos. The Battle & Sack of Aberdeen, September 1644 James Graham, 1st Marquis of Montrose is one of the most quixotic military commanders in Scottish history. Which is quite a sweeping statement considering that would include, for example; Malcolm III, Alexander II, Robert the Bruce, The Black Douglas, James IV, John Graham - Bonnie Dundee, (or Bloody Claverhouse depending on your point of view), Sir Colin Campbell, and a great many others. On the outbreak of hostilities between King Charles I and Parliament, which would become known as The Wars of the Three Kingdoms, or The British Civil Wars 1638 – 1651; Montrose had been appointed Captain-General of the Royalist forces in Scotland. His campaign during 1644-1645 would be marked by the savage sectarian hatred demonstrated by both sides in the conflict. Having already won some minor victories earlier in 1644 against the forces of the Covenant who were loosely allied with the Parliamentarians in England, Montrose appeared before Aberdeen on 12 September with three Irish regiments totaling 1,500 men, 100 MacDonald Highlanders and two troops of horse commanded by Nathaniel Gordon and Sir Thomas Ogilvy. On 13 September, the burgh was summoned to surrender. During the negotiations, a soldier from the city garrison is said to have shot and killed an Irish drummer boy accompanying the heralds, infuriating Montrose and his troops who swore vengeance on the Covenanters. The battle commenced when a Covenanter force under the command of Lord Balfour of Burleigh marched out and deployed along the crest of a flat-topped ridge about half-a-mile south of the burgh. Burleigh's infantry comprised around 2,000 men; two regular Covenanter regiments (his own and that of Lord Forbes), the Aberdeen militia and some local levies. He also had around 300 cavalry, including three troops of regulars. The Royalist forces attacked immediately and Burleigh’s line collapsed as his infantry regiments and the militiamen turned and ran back towards the town, pursued and slaughtered in the streets by the furious Irishmen. Aberdeen was then subjected to a three-day orgy of murder, pillage and rape which Montrose made no attempt to stop. He may have wanted to make an example of the city for resisting him, but the atrocities committed in his name greatly damaged his reputation and alienated potential support for the cause of King Charles I in Scotland. My small diorama depicts the fatal moment when the drummer boy was shot and killed. All figures are 54mm.8 points
-
Well, another wonderful little kit by Avis of an appealing subject rendered in great detail, with sound engineering and molding, which makes for a pleasurable build in all departments. The step-by-step build is here: Even as a short-run kit, these last civil releases by Avis have raised that bar in that category high up. As you can see, I built three of their recent kits in a row, something I seldom do, but I was enchanted by the subjects and the quality-price ratio. The care on the details, the good instructions, clear and at a readable size, the good decal sheet, the printed clear parts, the accessories included, what a delight! There is a minor issue with the decal placement under the wing, please refer to the WiP for correction. As I said elsewhere: It warms the cockles of my heart!8 points
-
Any of you kids of a nervous disposition would be well advised to look away Now Matchbox and Italeri (which I presume means Airfix and probably Revell too) make the framing far too prominent on the Wokka Screen surrounds As in When the actual real actual screen surround framing is far less obtrusive, as here in a photo stolen from the interweb (all rights of the owner acknowledged) Do ye see that there? Almost flush framing, I've seen bulkier framing on fast jets Now I know Maurice Landi was a genius, one of my heroes back in the day along with Alan Hall and Dick Ward, but I am not sure he actually arranged for his mould makers to add thick framing just so when I took it off I would have a windscreen that was just recessed all round in the nose of this Wokka Hence damn my inability to focus but to the touch you can feel the slack at the back whilst the other side sits flush against the body All this action does leave lots of scope for the polishing fiend inner man to let rip Or was that RIP? Onwards and up..?8 points
-
Hi there fellow modellers. First time post in ready for inspection. It’s my second build with my new airbrush (Revell’s basic set, single action) and my tenth build overall, so I ‘m still figuring things out. Overall I’m happy with the result but there are things that need improving. First of all when I painted the fuselage paint looked nice, really happy with the result. Then I gloss coated it before putting on the decals (with Vallejo gloss acrylic varnish 26.517). After coating the paint didn’t look that nice/smooth anymore. In hind side I don’t know if the paint never was that smooth to begin with and the gloss coat just accented it or that I simply messed up applying the coating. (perhaps more/less coating?). I do know that after the coating the plane feels a bit sticky, even after 24 hours and is a dust magnet. After coating I did cover the plane with a shoebox to prevent dust falling on to it. Thinking about using another brand of gloss next time. The second thing I struggled with is putting the separately painted small parts on to the fuselage without messing up the paint or leaving glue residue. I know the preferred order is first gluing and then painting but with some parts I just don’t see any other way to pull it off. I guess experience and gaining more modelling skills will lead to improvement in this area. Then there is the fr#@k!ng canopy. For me without a doubt the most difficult part of a build. In videos I see all those people cutting maskingtape like it’s the easiest job in the world, but now, for me free brushpainting and scrapping the excess paint with a toothpick works best. I see a lot of improvement compared with my older builds but still a whole lot to gain. The Corsair purists among you will notice the paint color is a bit of. I think I messed up the color mixing percentages, but considering the points I mentioned above, it doesn’t bother me that much. My last build I started to use Tamiya panel line accent color but the panel lines on this kit are so shallow that I didn’t think the result would justify the work I had to put in. Well, all the disclaimers are in place 😉 so plane is ready for inspection!7 points
-
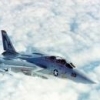
Finally got around to writing this up. This particular aircraft was operated by 1771 Squadron Fleet Air Arm (FAA) from HMS Implacable in 1944. It was lost during an attack on the Rorvik port in Norway on the 26 October 1944. The pilot Sub Lt R.M Shaw (RNZN) and his observer Sub Lt G.M. Smith were killed during the attack. Full details with more photos at my blog but here's a couple of photos7 points
-
Supermarine Spitfire FR Mk.XVIII, TZ233, 208 Squadron., RAF, Fayid, Egypt, 1948/49 The aeroplane is painted in the short-lived ‘Post-War Desert Scheme’ of Dark Earth and Light Slate Grey over Medium Sea Grey. Anecdotally, the scheme was rushed into service to reduce confusion and aid identification during the Israeli War of Independence, when the Israelis, the Egyptians and the British were all flying Spitfires! 1/48 scale Airfix Spitfire FR.XIV kit, modified to Mk.XVIII by leaving the wingtips on, using the large rudder, modifying the wing panel lines to remove all traces of the outer gun bays, and cutting the under-fuselage camera ports. I also added an Ultracast seat, and a Gyroscopic gunsight, courtesy of an Eduard Spitfire kit. Decals from Xtradecal sheet 48-127, paints by Colourcoats, applied with a Sparmax Max4 airbrush.7 points
-
A coat of ANA623 on the undersurfaces needs to dry before I spray the topsides.7 points
-
Generally speaking all large vessels have two fog lights. I've seen more modern vessels with exactly the same type of light; even made a small collage once7 points
-
I'm back from my trip and I have lost time to make up for. When I left Tuesday, I had cleaned off my workbench so my contractors could install a much-needed ventilation fan. So, my first task was to return my bench back to working order From this: To this: Returning to The Wing, I finally remembered to install the small exhausts on the turbosupercharger bulges. You can see below how I used a rotary tool to open up the exhaust outlets -- previously it was totally flat, just like the larger exhausts had been before I drilled them out: Next, I finished up the engine warm air exhaust ducts at the rear of the wing: Here they are with the driveshaft fairings in place: Last item for today was to begin doing the panel shading. It's easy to go overboard on this, so I'm trying to be subtle and referring to photos as I go along: Tomorrow I'll do panel shading on the underside, and a few other items.7 points
-
I've been reading up on the Round -the-World Spitfire project and I have to say I'm mighty impressed! And the images I'm seeing show a very good looking Mk IX with some great looking graphics. Some of you will know that buffed up bare metal planes are just the thing for me! So here's my Statement of Intent.... I'm going to do one! I've been down to KB Models in Havant today, quite spookily close by to the Boultbee Base at Goodwood. And I've got one of these.... The box includes the Pointy Tailplane parts and various other options for wheels, exhaust stacks etc, and there may even be enough bits and bobs left to give my old derilict ICM Mark IX a makeover. I've got a few loose ends to tidy up first here, before I pile in to this, but it would be nice to get the build done before the end of epic flight schedule - back at Goodwood Aerodrome. They're going to be a while.... There's even a 14 day stopover scheduled in Hong Kong. They may need to reconsider this particular phase!! 😮 Quite a bit of coverage on the Net including a live feed flight tracker function, and copyright issues need to be born in mind, but I'll have a go at putting some links on. Right O. I'll be back on the case shortly.... 😎6 points
-
I'm a little late in starting this as I'm already part way through so I hope you'll forgive the lack of "before" photographs. This is based around a second hand model so there are none of the traditional box shots either. I've always liked the T22B3 Frigates for their elegant lines and powerful, for their day, armament. Eventually I hope to make a model of every RN escort type from the 60s onwards though at the current rate that might take me a while. Tribal Class frigate, County Class and T42B3 destroyers are done so that leaves quite a lot on the to do list! I bought a Skytrex / Triton model T22B3 a while ago off Ebay. The assembly had been rather hurried and the paint thickly applied so my plan was just to clean it up and repaint but, as with my HMS Manchester, when I actually came to compare the Skytrex model with scale plans and photos, there was a lot more that needed to be done to make a satisfactory model. The Skytrex parts that didn't need much modification were: the 4.5" gun, Sea Wolf launchers, masts and funnel. Everything else - oh dear. The Skytrex hull was much too short (114mm when it should have been 118.5) mostly in the mid-section, and narrow but the biggest error was that the sides - noticeably vertical in the original - were flared and not symetrical. As with my model of HMS Manchester, I wanted to have the openings at the stern properly open but with the bigger overhangs on the Type 22, I thought plasticard would be too fragile so built a new flight deck, including the characteristic widened section, from brass - thus giving the correct overall length. I cut a waterline outline from 0.020" plasticard to give the near-vertical sides around the middle then filled in with Miliput. The next job was to plate the sides with more plasticard to give a smooth finish, correct the beam and get an even transition on both sides from the flared bow section to the more vertical middle. Finally, I made a new stern piece from more brass which allowed me to have the corner pillars realistically thin but still quite strong. The forecastle deck also needed a lot of changes. The gun was slightly too far back, the bulwarks far too thick and not extending far enough back and the anchor arrangements were nothing like those of the real ship. I corrected the bulwarks by adding a blob of solder on both sides to extend them aft then a lot of filing and carving. I cut off or filled the anchor chain handling details (the chain itself wasn't represented at all) and made everything from scratch with brass rod for the bollards and cotton thread. The final bit of hull detailing was to make new anchors by cutting and filing flattened brass rod. The finished anchors are 2 mm x 1.7 mm. The forward superstructure was too short, the bridge too narrow and lacking in detail so I made a new one from plasticard. The Sea Archer electro-optical trackers were made by filing some 0.75mm brass rod, held in a pin-vice - I really should get a miniature lathe! The Skytrex masts weren't bad - I just had to make the cross-spars, the extension to the mainmast (from 0.35mm brass rod with some short rings cut from brass tube to suggest the UHF antennas) and a replacement 967/968 radar (from soldering a T shape of brass rod to rectangular-section brass) with the platform cut from scrap plastic sprue. I carved the BAE Systems / Halmatic Pacific 22 RIB from plasticard. Starting with a strip of 0.20" sheet, cut and sanded to the correct width, I shaped the bows then cut a drilled two small holes and linked them up to make a channel that would become the inside of the boat. I rounded this off to make the circular cross-section of the inflatable part before cutting it off, sticking the hull on (a wedge-shaped sliver of plasticard), shaping that and the stern then adding two more small pieces for the transom and a rectangle representing the seats and engine. For reference, a Pacific 22 is 6.75 m long with a beam of 2.44 m so 5.4 x 2.0 mm in 1:1250. Since these photos were taken I've given the hull a spray of primer which highlighted all sorts of blemishes, blobs of super-glue and stray bits of fluff that all had to be cleaned up. I've started on the last bit of the forward superstructure now to go behind the foremast. After that, it'll be on to the details like the Sea Wolf Trackers, 40mm guns and Corvus launchers. There is a bit more detail on my midlandshipyard blog with higher resolution versions of these pictures. Edit: I've replaced the pictures here with the bigger ones from the blog. https://midlandshipyard.blogspot.com https://smallitalianwars.blogspot.com6 points
-
Some Duralumin on: ...and some Yellow Zinc Chromate6 points
-
Hi, everybody! It's my next model from excellent "Hasegawa". I used two etched set (interior+exterior) from "Eduard" and "Miniworld's" gun barrels.6 points
-
Well, as promised here is the top of the wing with decals on. Of course, as is so often the case, as soon as I was half finished I got hold of the instructions for the Revell Shackleton and they have a different take on the markings compared with Print Scale, but it is near enough. I am not sure what the chordwise black lines are for and there may have been another shorter pair outboard of the roundel, but I have not bothered with them as sources vary. Thankfully there are only 4 decs for the underside of each wing, but they will have to be very carefully aligned.6 points
-
Thanks Stuart. Cheers Kev Thanks Murdo, considering it is the first time I have used the AK stuff, I am quite pleased with it. Well if the plonkers want to spend billions of dollars on the long flog to Mars when all they need to do is follow your very sensible advice, then that's their lookout. Show them this post, all they have to do is book an appointment. I don't come cheap but I am a great deal cheaper than a full blown space program. Martian.👽6 points
-
Thank's JM.a lot were culled recently as damaged or poorly done but I got a nice sized box to put the saved 1/72 scale kits in. I'm lucky as now the family have moved on the loft room's mine,there's two shelves of about 30 1/48 builds and about 20 armour builds on a corner shelf trouble is since being banned from the new kitchen I have to model up there too and the dust is treble what it used to be especially when spraying! That's my meagre stash but a fair bit is half built stuff and upcoming GB builds.6 points
-
Yes, sir it is Thank you for the kind words, Really appreciate gents. Outdoor shoot6 points
-
Hello Martian, I work as a Geologist in the Pilbara region of Western Australia and consequently was invited to a conference last night with a couple of folks from NASA and some University boffins. The purpose was to discuss strategies for searching for life on Mars. The NASA folks were surprised, and appeared to be a little confused, when I suggested going to Poole in the UK and trying to lure Martians out of hiding by scattering freshly moulded 1/72 scale kits of HM Customs boats about the countryside. We also discussed the possibility of sending a contingent to the next Scale Model World at Telford, where numerous sightings have been recorded. The response was at best lukewarm, so it looks like you are safe for now. I’ll keep you informed if I hear anything more. Bandsaw Steve Martian hunting advisory board6 points
-
I didn't want to leave the undersides without representing the bomb recess and arrestor.6 points
-
I'm starting to develope this fear that in my sleep I'm going to turn to the wife and mutter "I'm going to sand your buttock lines to better contours" I now keep a sleeping bag in the shed, just in case... Started a wee bit of work on the superstructure:6 points
-
This is my recently completed Fairey Seafox , L4526, 702 Sqn, FAA, HMS Asturias, 1942 Life started by using the dated Matchbox kit and was updated some what to include more detail: Cockpit deck added and seating positions corrected. The observers pit was updated with black boxes, MG replaced with Miniworld option and mounted on a corrected mount. Moulded-on landing lights removed and scratch clear options fitted. Oil cooler replaced by scratch option. Engine intakes hollowed out and scratch engines added. Moulded-on exhausts removed and scratch options fitted. Moulded-on venturi removed and resin option fitted. Control horns and lines added to float rudders. Flaps removed and fitted for 'landing'. Colourcoats enamel paints used externally and painted in the 'Shadow Scheme'. Some kit decals were used but roundels and codes were Xtradecal. Rigging was Uschi line. All mounted on a sea base depicting 'touch-down'! Work in Progress here: Thanks for looking. Comments and critique welcome. Stuart5 points
-
Yet another long term stash resident gets built. This is the old Esci Tu-22. I have no idea on its accuracy but it builds quite nicely and needs only a small amount of filler. One build note. Leave the engines off until after it's painted.... It's finished using Iraqi decals from the Revell version of the kit. The colours were a bit of a mystery so I've gone for a green scheme that appeared in a few photos. z20190814_195950 by Derek N.Ferguson, on Flickr z20190814_195924 by Derek N.Ferguson, on Flickr z20190814_195913 by Derek N.Ferguson, on Flickr z20190814_195903 by Derek N.Ferguson, on Flickr5 points
-
A rather different J-21... Cheers / André5 points
-
“Admiral’s” lights, again. No idea. Yes, bells and gongs are indeed specified in IRPCS - but they were definitely not permanently rigged in any ship (of sufficient size!) in which I served. The Buffer (Chief Boatswain’s Mate) rigged them when we anchored - and it most definitely isn’t the RN way to leave anything rigged when not in use... which brings us back to those lights. I too never saw a light cluster like these in my 20 RN years (& I wasn’t only a wobble-head: I did command a ship too, so this isn’t merely some WAFU demonstrating yet again that a little learning is a dangerous thing). So they clearly haven’t survived into the present day, but there does appear to be ample evidence that late-30s / early-40s RN vessels had them, and that they were called “fog lights”. Interesting from Victorious (I have that book; I must take another look). Broadly sounds similar to Ark, which would make sense; in many aspects of the design the early Illustrious class were “improved Ark Royals”. The station-keeping lights is an intriguing idea, but what would “fog” lights offer that normal “stern” and “overtaking” lights did not? I’m not entirely convinced by the idea of specially bright lights for working in close proximity in a pea-souper, to be honest. When entering restricted visibility, even the Royal Navy tends to default to the safer option of opening out the stationing distance... not simply turning on brighter lights. . In any case, by the time Ark & Victorious came along only the most die-hard of battleship men would seriously expect them to sail in the line of battle - they wouldn’t be doing much station-keeping; they’d be the main body, with escorts keeping station on them. And they’d be very disinclined to sail around lit up like a Christmas Tree in U-boat territory... There are numerous aspects of late-30s carrier ops that are more than a little opaque to me; these “aircraft signalling booms” (starboard side of the island and port further for’d). OK, so in some of the instructional film on YouTube we see them in use (by day) to signal by flag in a pretty normal RN way (albeit horizontally). But how did the system work? What did they add that wasn’t provided by the “affirmative shutter” on the rear of the funnel, used by Little F to clear an aircraft to land? And what on earth were the rows of lights labelled “recognition” used for (you can clearly see them in the view from right aft that I posted yesterday - above the quarterdeck hull openings)? Surely not the maritime equivalent of the coloured “downward ident lights” in some contemporary aircraft? Assuming, that is (and it’s not a small assumption) that the “aircraft signalling lights” were the night equivalent of the booms. The short answer is that we (at least I) don’t know. But it’s fun trying to work it out!5 points
-
I've applied a couple of coats of Tamiya Silver Leaf from a rattle can, once I've added decals and some matt varnish it should be a good representation of doped fabric and gloss on the nose panels will be a nice base for the metal panels. I have also had a test of the wing struts which will need some slight adjustment to improve the fit. by John L, on Flickr by John L, on Flickr5 points
-
Plastic is cut! I thought I'd better tackle the first obvious issue head on, in case it was a no go. The cannon blisters are moulded into the upper wing panels and need to come off. First effort at trimming out the blister itself proved tricky and I realised the simple way was to take out the whole panel. Straight lines and much easier to get a fit with the replacement part. I pressed a bit of a curve onto the poly piece over the edge of the table, a little bit of fine tuning with the emery board and in it went. 😮 Thin glue on the inside to try to keep the top surface clean, and it's a relief to clear that up 😅5 points
-
Finally, all forms are ready.5 points
-
Gosh that's a lot of work. It's a step up from the FROG one (which I am contemplating...) but miles behind the Airfix offering. But you are bashing it into shape and I'm enjoying the thread, even though you haven't (yet) got diverted into discussions of unhealthy diverse food types... Regards, Adrian5 points
-
On the 25th June 1955 at Prestwick the Scottish Aviation Twin Pioneer first took to the air. Some 4 months earlier a few miles away in an Ayrshire hospital I made my entrance to the world. So with such close geographical gestation and delivery to the world a Twin Pin seems appropriate. However, my relationship with this aircraft is not just timing and geography. Although my father was a PO airframe articifer in the Royal Navy when I was born he finished his term in the Fleet Air Arm not much long afterwards. He then went to work at Scottish Aviation where amongst other aircraft he worked upon was the Twin Pioneer. So the fact my dad helped build a number of the Twin Pioneers makes this a must do aircraft for me. I bought the Combat Kits Twin Pioneer at Telford last year as I had always wanted to build one as a tribute to my father. I know Valom have just introduced an injection moulded version but it is quite expensive and I suspect it will not just fall together, so I'll stick with the resin kit. I think this is the old Magna kit but on opening the box the resin looks much more refined. Hopefully it should go together with epoxy and cyano with minimal amounts of swearing. On opening the box there are two large bags of resin parts and two small bags of parts. A further bag has some white metal parts and a bag of clear resin parts for the transparencies. Hurray! No vac formed canopies. Instructions are basic but there's a great transfer sheet With transfers for 6 versions, 4 RAF, 1from the Empire Test Pilots School and a civilian version.4 points
-
This is my 50th build which was a present from my wife. The academy kit is quite basic and does need some enhancing. I used Eduard PE and some scratch building and the pilot was from PJ Models. Painted with Vallejo. The base was designed for me by Coastal kit display bases. The full build can be followed on:4 points
-
Cheers it is helping a small bit Yes it is quite a chunk under the waterline this is why I will not be putting it in a water base i would be missing half the ship Anyway small up date glazing done on the main housing and all the small bits fitted to the deck now and starting to mask off the bridge/control cab I now remember why I do not do aircraft This may take some time beefy4 points
-
I hopes you isn't blaming me for that sonny I was away that weekend At Colerne4 points
-
Remedial begins Start made by trimming off the nose side runners to let the Xacto saw get in And add nose panel After checking for fit glued in with Tam Green Now there are some over stated frame lines to diminish, then Millput hits the target laters...4 points
-
Thanks Roger, Giorgio and Ian Thanks Keith. I really like the Humbrol filler. It's nice and 'sticky' out of the tube, spreads well then starts to go off and can be shaped for a while. Dries pretty quickly and sands well. Don't forget you can thin it with Liquid Poly and, at Bill's suggestion, I always put a drop of LP in the top before I close the lid to stop it drying. HTH I've been thinking. Unusual I know. How do I get these bits to fit AND have the wheel poking out a bit without it being glued to the doors? The plan is to fit the doors like this: Glued after some fettling. When that's dry I can work out how to stick the wheel in - probably with some scratch plastic sticking it to the top of the bay. For a break from the puzzle I've cleaned up the empennage bits: After drilling out the hole I filed the fin until it 'sort of fits'. Both sides. Same with the join to the fuselage which does have a locating pin but also excess plastic. Of course. I'll glue those on towards the end. Unless I need another distraction.4 points
-
One more update for tonight, because it’s time to stop; after a couple of hours of filing scrap brass (old PE runner) to shape, I’m Optivisored out. The scrap brass is for the support brackets under the section of island that sticks out above the Carley floats. This bit isn’t parallel with the ship’s side at this point; it tapers outwards gradually, so the supports had to be made slightly longer each time. Fitted by eye, using some pencil marks (measured) as a guide - pretty happy thus far. You can also see that I’ve fitted a ladder at each end of the upper Carley “shelf”. There’s another to add, at the aft (left, in this view) end, going down to the lower shelf. But not tonight. No idea where that glue spillage at bottom centre emerged from - but it’s only Gator’s Grip, so it’ll come off easily enough once dry. I’m at the Test match tomorrow (umbrella ready, given the forecast!), so this will be the last building work until next week. Until then Crisp4 points
-
Hi folk's well as opposed to the Wildcat this ones a dream,she's flown together without hassle did need a bit of filler as can be seen,need to detail the cockpit next.4 points
-
Demarcation line!4 points
-
Hi mates, @Antti_K, yes I am using the Airfix 1:48 stencil placement drawing. I promised some photos to explain my comments on the fin, so here they are. First, the three fuselage sections (Airfix in grey, Frog/Novo in white edged with some occasional yellow, and Plastyk in some kind of a dark swirling morass of a colour): Note that Airfix is the only one who incorporates the bottom of the fin into the fuselage top. The separation line is the bottom of the rudder. Also note that the bottom fin section on the Airfix fuselage is thicker at the back. Now, placing the vertical fins onto the drawing (which has been scaled to 1:72 based on the published dimensions of the wingspan). First, Airfix (note how I aligned the base of the fin at the bottom of the rudder): I think that looks pretty good. If there is an error in sweep-back angle, it's tiny. Next comes the Frog/Novo fin (again note how the bottom of the fin is aligned to the top of the fuselage): The angle looks OK, but the width across the top of the fin looks a wee bit short, as can be seen at the aft end. I don't think this would be noticeable. Lastly, the fin from Plastyk - the placement is a bit arbitrary, as the bottom of the fin is not straight, but rather convex. And you can see that it shares the undersized width at the top of the fin with Frog/Novo, plus it's a bit too short in height. Again, I'm not sure any of that would be all that noticeable. I also measured the thickness of all three fins at their thickest point using a digital caliper - Airfix 5.92 mm, Frog/Novo 4.2 mm, and Plastyk 4.0 mm. So, as mentioned, the Frog/Novo and Plastyk pieces are thinner probably due to being moulded as one piece. This type of error (if it's an error, I don't know the actual dimension) is most visible looking head-on at the fin and comparing the different models. Someone might see it, others may not. I'm not too concerned. Yet. OK, so besides all this malarkey, what have I been doing? I found a picture of the airbrake roof parts from the Airfix 1:48 scale kit - this is what I need to replicate. As promised to @Martian Hale, I cut out a piece of white card stock, placed the photoetched airbrake over the top, and used a fine point marker to trace out the openings. This is done solely to give me a guide showing where to put additional pieces of plastic. I cut out a whole pile of little pieces of styrene, approximately 1 mm wide by 4 mm tall, then selected the best ones to use. I taped a straight edge aligned to the guide markings, and then the tiny pieces were then glued in place. Using this instead of the Airwaves PE part adds a lot of 3D to the roof the airbrake bay. I taped this into the fuselage and posed the airbrake. This will work for me - I like it much better then the Airwaves PE. The 1 mm wide strips I used are a wee bit too wide, and I may try to slice some a little thinner. We'll see, it's probably good enough as it is. The only real problem is I now have to do this three more times! Movin' on... Cheers, Bill4 points
-
It's been a while since I made an update , I actually finished the build but hadn't posted pics.4 points


This leaderboard is set to London/GMT+01:00