
Leaderboard


Popular Content
Showing content with the highest reputation on 04/08/19 in all areas
-
This is not a subject I would have chosen to build. However having been asked to build it I thourghly enjoyed the challenge and loved learning about this iconic, groundbreaking aircraft.27 points
-
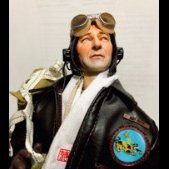
Thanks to those of you who followed my WIP, although small in content, helped me with some inspiration to see this through. I was satisfied with the end result and there is much for me to ponder that I will try and improve on for my next build. Overcoming some challenges in the end made it a success for me. I am glad to share with you. Hasegawa F-4 long nose but some modification needed. Eduard cockpit photoetch set and TrueDetails seats. Most of the rest came from the normal parts included. Paint was a combination of Tamiya and Vallejo, most lightened slightly. Revell paints are not available here in Canada, that would have provided better matches. This is the inspiration for me project, the original photographer was kind to send me an original image for me to use here, thank you Mr Friedrich Becker. Thank you for viewing and appreciate any and all comments. Craig22 points
-
Hi all, Number 8 for the year so far is the insectoid Fieseler Storch. Nice kit, the only let down being the transparencies which are not the best moulded clear parts I've ever used, and a pain to fair in to the fuselage. Paints are from Gunze for a change, as they had the correct RLM colours, but I've painted it up as a modern restored warbird. The painting guide from HobbyBoss was woefully inadequate, so I had to use a lot of online reference for the camo scheme, and that's where I got my inspiration to do a modern representation. Walk around first: A couple of closeup shots: And the traditional 'magazine shots' to finish: Hope you like it, Dean22 points
-
Here is my 1/48 Hasegawa Canadair Sabre MkVI in FAC markings (Colombian Air Force). Un saludo.21 points
-
This is my first posting on this site. There are some great builds and articles here. I thought I would show my Trumpeter 1/32 scale P-38L back dated to a YP-38 (except for the boom intakes - my limited attempts at that surgery didn't work out. Thanks for looking...21 points
-
This is my 1/48 Tamiya F-16C Block 52 Viper dressed up in the markings of the Republic of Singapore Air Force's Black Knights aerobatic demo team. Base kit used was Tamiya's F-16C/N Aggressor/Adversary kit as it has parts to build all F-16C blocks from 25 through 52. I modded the kit by using the metal pitot and AoA probes from Tamiya's F-16 detail-up set. I also scratch-built the smoke system pipe from the centreline station to the nozzle at the exhaust as well as the HMD sensor on the canopy. The seat was detailed using Fine Molds' plastic seatbelts for ACES II seats. Static discharge wicks were made with stretched sprue. I used decals from Miliverse to represent a Viper flown by Lead Solo MAJ Eugene Lim of the RSAF Black Knights demo team. Overall a nice build though the decals did give some problems. Hope you enjoy the photos! Mark13 points
-
And now, in glorious Colourcoats-o-vision First coat of Colourcoats Dark Earth on the upper surfaces. I'm not sure exactly how long the interest in aviation will last, but I'm hoping prolonged exposure will work its magic. My dad and I never did anything together except for lawncare, which he loves and I...do not, so I have no basis for comparison.12 points
-
This is Revell's '60s-vintage 1/32 P-51B Mustang in a 1993 boxing, with the RAF-style Malcolm hood as the included canopy option. The faults and deficiencies of the kit have been well-covered elsewhere; this build was undertaken simply to enjoy revisiting a favorite old kit, 'dressing it up' a bit with a few chosen details. These included plumbing the kit's somewhat anemic Packard Merlin engine with lead wire and assorted tubing and etch left-overs, substituting the gorgeous Aires resin cockpit (designed for the Trumpeter kit) for the kit's rather-lower-relief parts, and adding the True Details resin 'Napalm' set...modified back to their original 75-gallon drop tanks. Paints are Tamiya acrylics; the excellent decals are from Techmod's extensive 'Polish Mustangs' sheet. [BTW, the rough-edges and uneven spacing of the invasion stripes are actually 'toned down' from what photos show for the real aircraft. There's a short clip on YouTube of Horbaczewski 'rolling out' for takeoff, showing parts of the fuselage stripes on both sides of the a/c...and they look like they were painted by a blind man. (Or an aircrewman in a hurry, who had better things to attend to!)] Biggest challenge was the kit's pretty awful clear parts; big square 'hinge holders' (for the original greenhouse-style canopy) had to be carefully chiseled from both windscreen and quarter-lights, and those areas made smooth and clear again. The Malcolm hood part was too short length-wise to be displayed closed, and too short in height to fit in an open position. I ended up adding on extensions in the way of the 'sliding' portion of the bubble to stretch the height a bit, but it's still a very near thing. [WIP for those who are interested may be found here.] The aircraft depicted is the second of three Mustang Mk. III's flown by renowned Polish ace Eugeniusz 'Dziubek' Horbaczewski, C/O of No. 315 (Polish) Squadron. FB382, decorated in full D-Day invasion stripes, was flown through much of June-July 1944, until 'traded in' for the more-frequently-depicted FB387--the aircraft bearing the well-known victory tally for his four V-1 kills. [It is possible that FB382 was marked for one or more V-1 victories as well, though no photographic evidence seems to exist to show them.] The drop tanks are suited to what seems to have been the last combat mission flown in this particular aircraft before it was exchanged, a long-range Beaufighter-escort mission to Norway during which Horbaczewski was credited with (1) Bf109 shot down 'solo,' and another shared with his wing man. The third-highest-scoring Polish fighter ace was KIA on 18 August 1944 during a 'Rodeo' mission over France; he was credited with 3 Fw190s during that flight before he himself was shot down, for a final total of 16.5 aircraft confirmed (and one probable) with 4 V-1 missiles destroyed.11 points
-
So last night, I prised out the Micro-Crystal-Clear with a toothpick and painted the inner rim of the hatches: And, absent anything else to do in the immediate present, got started on the underside: So the goal is not to do all of the Night parts first, just those where paint likely won't reach when I do the uppers. For obvious reasons, I try to do and then mask off the lighter upper colours before doing the Night on the flanks.11 points
-
My latest finished build is the Hasegawa 1/48 Royal Navy Sea King for a group build. Used: Eduard interior/exterior set UMP Primer MRP and Tamiya paints UMP and Tamiya washes Uschi van der Rosten rigging wire Thanks for looking10 points
-
Primer's been applied to most of the top of the Lanc: It looks like all that interminable filling and sanding's paid off! No visible seam. Just waiting for the liquid mask on the astrodome (which is a bee to mask properly) to dry to go over the fuselage around the cockpit. I also dropped in some of that expensive rebottled white glue to make windows in the upper escape hatches: Probably should have painted around the insides first, but they're easy to rip out. Also, primed the props: Judging purely from the various F-35 threads here, there are men who would fight to the death to bring this to pass. Ah, but the Jaguar's exhausts look huge, and, I might add, perfectly proportioned. In fact, their rumps look pleasingly like those of Spey-powered Phantoms: I understand there's some intermittent antipathy in the RAF about the presence of navigators, which to my mind is foolish -- what else are you supposed to eat if you come down in the desert? I've been trying to sell off my stash of Vietnam kits before I become compelled to buy a 1/72 LINEBACKER II B-52, but when I was still gung-ho for it, I absolutely wanted to do a FREQUENT WIND F-14A. Curiously, nobody seems to do decals for it.10 points
-
G'day people, Here is my completed HB Surcouf. This is a great kit that went together without any hassles. The only aftermarket items I used were some 1/350 crew figures as the kit includes a small but useful PE fret. I began this kit in 2014 and it was sitting in the cupboard of doom however I finally decided it was time to finish this one. The Surcouf was an interesting concept but ultimately she was never tested in combat, and the development of the submarine cruiser concept ended with the loss of the Surcouf and all 130 hands. The fate of the submarine remains a mystery to this day as she was last sighted leaving Bermuda on the night of the 18/19 Feb 1941. At the time she was the largest submarine yet built and it was not until the appearance of the Japanese Navy I-400 class that this achievement was surpassed. I wanted to depict that the main armament (the twin 203mm guns) was a separate structure from the main main superstructure so the forward section was separated after the halves were joined and a new interior bulkhead and turret aft sections were added I also wanted show the two aft swiveling torpedo units. The kit lacks the openings for these two units, so I opened these up and scratchbuilt a very crude representation. The Surcouf was initially equipped with a Besson MB.411 observation plane that was stowed in an aircraft hangar aft of the conning tower, however by 1941 the little seaplane was no longer carried. The kit supplies two complete sprues in clear plastic to enable you to build two of these aircraft (however there are only enough decals for one aircraft) so I built the MB.411 to show off against the sub and opened the aft hangar door. The MB.411 sits on its own small base and the handling dolly was also scratchbuilt but it is a complete work of fiction on my part! Meanwhile I finished painting up the hull and added the various bits of deck furniture and the PE railings. Some crew figures were added for scale comparison. So how much bigger was the I-400? A direct comparison with the 1/350 Tamiya kit: The I-400 was not a great deal longer but certainly had a greater displacement, and it also carried three aircraft in her forward hangar, cheers, Pappy9 points
-
A long time in the making but now finally finished, this is the 1/48 Kinetic FA.2 Sea Harrier. It’s depicted in 801 NAS markings as seen at RAF Waddington circa 2001, hence the ACMI weapons fit. The only added extras are the access ladder, ACMI pod, scratch AIM-9 acquisition/ballast rounds, intake blanks and home made decals for pilots/ground crew names. Paints were in the main from MRP. Andrew9 points
-
Stickers on, sealing coat and final masking removal most likely tomorrow (or the next day)9 points
-
Hello everyone, here's a few shots of my Trumpeter 1/35 LAV-A2 kit. Pretty straightforward and easy build, if a little spartan withouth the addition of the Black Dog Stowage set. It ultimately gives a nice effective, though Black Dog have a bit of a habit (in my experience) of flawed moldings. The rear bustle, for example, did not reach fully where it was meant to, requiring some additional stowage placement to conceal the defect, nor do the armour window pieces come with any kind of glass. A big issues is BD not including instructions, resulting in my having to look at pictures of a Voyager set to see how the telescopic ECM unit went together. Still, overall I'm pretty happy with the result Please check here for more images of it in the diorama Gaz8 points
-
U two are too too kind as usual. Am still a long way off from my ultimate ambition.... https://twitter.com/bengeliscious/status/1155878391578529792?s=20 'Mortal Modellers' That so has to become a Russell T. Davies script.... Now you're just blowing things out of all proportion Ian. Paint? Paint? How frightfully completist of you sir. Paint corrupts, absolute paint corrupts absolutely. You should see what passes for transportation planning here Benedikt. It's largely a matter of faith and fatalism.... I fear that this statement is self-contradictory Johnny. Have you been drinking the Flory Wash again? ( btw ) Look at the brass Steve. Watch it glisten. It calls from the darkness. Listen to the voice of the brass, Focus only on the voice of the brass. The brass... 'Ridiculous' is I feel an accurate diagnosis Rob! Hopefully my grandchildren will one day be able to say proudly: 'He never avoided life's ailerons...' Didn't in the end head over to Dublin with Mrs. B today as some kind of lurgy descended late last night in the form of a rotten head cold; not enough regrettably to send you into the 'Wife, I'm dying - bring hot tea and a cool flannel for my forehead.' mode of self-pity, more the "Urrgh I've eaten a carpet and attached a clamp to my head." lethargic fog. I did stumble out of the scratcher and into the studio about midday but after an hour's tinkering had to retreat due to lack of focus. Did manage to mark out the blisters that need to be added back in to the extended wing roots: I spent a good while staring at photos of Anson blisters and they never seem to look the same in any two photographs! That's not exactly true of course, much of that being a product of the viewing angle the photo was taken from. The best gauge was how the front and tail of the blisters lines up with the windows and doors. Despite this, there do genuinely seem to be a couple of examples where the blister is much longer than seen in the main crop of evidence, so my one is based upon shots of contemporary Mk.1s from wartime rather than restoration/museum shots, not leat of which is a nice shot of N9943 (two prior to N9945) showing her port blister as a benchmark. That rough sketch was then translated into a tear-drop in Adobe Illustrator before being imported into the Silhouette for a cut. I'm really glad now that I'd upgraded the Silhouette software from the free to 'Designer' edition as Illustrator is by far the better drafting environment for vector graphics and now I can bring the output in from there as an SVG without having to subsequently trace any outlines in the Silhouette software. Paradoxically it was easier and cheaper to buy the upgrade from this crowd (as opposed to the manufacturers themselves) as you can get a direct download of the authorization code to use straight away. Those blisters were then applied to the wing roots: Just realized I haven't yet explained why I'm doing this! 🤷♂️ That shape will act as a template for me to add a blob of Milliput and form the teardrop shape with wet scalpel and paint brush before it sets. The reason for it being on a tape base is so that when dry, each one can be lifted off temporarily for a foil wing fairing to be added and the blisters then epoxied finally into place on top. Not today though. That's as far as the neurons would stretch. One last thing I worked-out in tests on Steve's MDC is that that default setting in the Silhouette software for cutting certain materials can have a stronger cutting pressure than actually needed. Both for metal foil and for Washi tape I routinely found that it cuts through not only the surface material but the backing paper also, and into the cutting mat. I've now taken to turning the cutting pressure down by 3-4 steps as a result: doing that with the Washi tape above gave a nice cut to the tape itself but not going through into the backing paper. Time to order a new mat I reckon as the adhesive surface is knackered as well... Tony8 points
-
Are you serious? There was an Operation FREQUENT WIND? Were Operations STINKY FART & SILENT BUT DEADLY already allocated? As your countrymen are (irritatingly) prone to say, “Only in America”8 points
-
The cockpit is done up to a point I'm satisfied with it. Not perfect, but it is the best I can do at 1/72 which isn't my scale to be honest. In real life to me I can't see all the uneven surfaces. It always amazes me what photos being out. However it will have to do.8 points
-
Frog Mirage IIIO RAAF, painted with Xtracrylix, varnished with Winsor and Newton Matt8 points
-
Hello! Here are some pics of model that was built last year, but was waiting for the right moment to come out. This is the well known Special Hobby kit, with Vallejo Model Air Vallejo e Mission Models paints. I want to leave a warm Thank You to a fellow Portuguese modeller - Paulo Lopes, for the inspiration provided by his work on this kit, which got me through - Obrigado! Here is a link for the detailed construction and painting process of the Buckeye. https://imodeler.com/2019/08/greek-master-special-hobbys-1-32-t-2-buckeye/7 points
-
Hobbyboss 1/48 converted to strike version A (Nozzle with two deflector, shell covers, other 20mm gun). Added Maestro PE, resin RB04 missile, ejection seat, decals Camo - D as David - F14 Halmstad base Sweden7 points
-
Taken me a while (mainly due to health issues ) but I'm getting back on track. A lesson learnt in scratch building. I'd been pondering for a while on how to attempt the windlass. Coming up with more and more complex solutions. In the end I started with the main barrel assembly, then I needed a frame and it just grew from there . . . . no need for all those fancy ideas Barrel assembly and frame Warping drums Attached Completed and the pen ............. 22 pieces in this sub assembly Thanks for stopping by Kev7 points
-
Dave? Well almost, I did miss part of it near the tail on one side, that line helped so much getting the alignment, thanks so much FROG! On the home stretch, just need to tidy up the props and hook I could not figure out wheel well colours so I painted the 'outlines' a light grey and there are the wheels, which will need another going over I think7 points
-
Junkers Ju 87G Syuka Tankbuster. Great little kit which i attempted to improve by scratching an interior; opening exhausts, gun barrels, adding a twin MG in the turret, and crew access steps. Decals are a mixture of Frog originals plus stuff from the spares box as the balkencruz in the Frog transfers were not the correct type used for late war Stukas. The model is brush painted with Revell acrylics. TFL Cheers Greg7 points
-
Hello everyone Another Tiger from AFV Club , this time the F version. Colors are Gunze and decals are Print Scale 48-113 (IRIAF F-5) The model actually is still incompleted because the seats should be changed with the MB ones. Hope you enjoy. Barzin. The completed family🙂 The real thing:6 points
-
Hi all. I recently finished AMK's fantastic MiG-31 kit. The detail and fit is incredible but I also used the Eduard pe set for extra details in the cockpit and inside the engines. The landing gear was detailed with 0,2mm brass rod to simulate hydraulic piping. As usual, I painted the model with Gunze Aqueous paints over a black primer from Alclad. Weathering was done with Abteilung oil paint and Tamiya panel liner. Thank you for watching. René.6 points
-
Here are a pair of Eduard 1:144 Me 262s which I built back in 2008. Both were the E-Day bagged kits with options to build either a one- or a two-seater variant of the aircraft assembled and flown in Czechoslovakia after WWII. Both were fully painted and varnished with brush. Since no etched parts were included, all aerials and probes were made from stretched sprue as were the radio wires. The only modifications I made was make a little hole in the tips of the engine intake cones and cover the gun ports on the fuselage topside as no guns were carried (the shell ejection chutes remained though). Firstly, Avia S-92 (S-92.2) "V-33", VLU (Military Aeronautical Institute), Czechoslovakian Air Force, late 1947. Secondly, Avia CS-92 (CS-92.3) "V-31", VLU (Military Aeronautical Institute), Czechoslovakian Air Force, late 1947. Thanks for looking Miguel6 points
-
... and not just hoard unbuilt kits, here are a couple of aircraft that I've completed recently. The TSR.2 Eagle was completed a couple of months back and is the Airfix kit with a load of resin bits and bobs and Model Alliance decals. This was the first time i used Hataka paints, and I have to be honest is saying that I'm not entirely happy with them and don't really give a smooth finish, but that could just be me. The B-17E is on the Hawaiian Air Deport scheme that was used shortly after Pearl Harbor for a a period on a select few aircraft and was completed last Sunday. Decals are a mix of Kora and Printscale. The Sperry remote turret conversion is from Kora, the engines and cowlings are by Quickboost. Masking the glazed nose was a right pain and one wonders why no one does a mask that includes the E nose!6 points
-
Continuing my series of ASW helicopters here is my Sikorsky MH-60R Strikehawk built with the Olimp conversion using the Hobby Boss SH-60B kit as the donor. I also used the Eduard SH-60B interior, which you can't really see much of. The Olimp parts are well cast resin that fit well, but they are not the smoothest of casting and can use some polishing. Here is the kit with all the conversion parts on. The conversion kit also came with decals. These were fairly complete complete, but the film was yellowed and sticking them on a sun facing window only partially cleared them up. I emailed Olimp asking about getting another set, but was totally ignored. I had a set of Hobby Boss decals for an HH-60 and ended using those for all the generic marking and only used the Olimp ones for the aircraft specific ones. So here it is Next up is the Fujimi SH-2F Seasprite. Enjoy6 points
-
Time to add a new build to the collection. Over the past few months I've been adding various aircraft, mainly from the Heller Musée collection of twin-engined types. I also acquired the final single-engined type for the collection - the Caudron CR.714. This is the RS Models kit, and with a few RS kits notched on my workbench it holds no fears for me. A good variety of marking options. The Caudron looked like it meant business, but it was a pretty emphatic failure. Nevertheless, Polish flyers made the best of a bad job, and three of the marking options are for the single Polish squadron. The Finns also bought the Caudron, and two options cover the periods before and after the German invasion of Finland. One grey styrene sprue tree and one of clear parts make the sum total for this kit. There's not a lot here, but there is a pretty comprehensive cockpit and some representation of the cylinder cooling gills visible through the front opening. This build ought not take too long, but I reckon painting will be a right 'mare! Some wheel well detail. Overall, the moulding is fairly tidy, including all the really tiny bits that might well be replaced by metal for resilience. Quite adequate cockpit detailing, which I think is all that's necessary at this scale. None of your PE or resin fiddly bits, just nice plain moulded plastic. I will need to research the seatbelt layout, but otherwise I'm happy. Typical RS instructions, which I've already been over marking up the colour options to save me flipping back and forth, and a tidy-looking decal sheet with all the labels and stencils you'd expect from a French plane of this period. I note the designers have opted not to provide a rudder tricolor decal, which is fine because experience tells me it's easier to paint the thing! Right, where's me scalpel and cement gone?!6 points
-
Cheers all, Working on the main rotors and the tail rotor, the optical sensor on the nose requires the underside of the MRB's to have black squares so these are sprayed and masked up. the main blade colour next. Tail rotor will get masked up and the red/black added. Filter has had an oil wash Winch gets some paint soon and then we are almost done, I need to sort out the canopy and pop an oil wash on the sponsons yet Regards Dan6 points
-
The end is near. After 5 years on this project its time to wrap it up. Took few ext. photos today in the 101 degree southern California weather. I wasnt sure about the fuselage color until i took photos outside.6 points
-
It is mostly bunkum, invented by people who make everything up and find nothing out. In this case the nincompoops have even promoted a Polish officer to a position he never held. The name Witorzeńć is conspicuous by is absence from operations concerning Dieppe, Rutter or Jubilee. That’s because he wasn’t there. In the summer of 1942 he commanded the 2nd Polish Wing and never commanded the the 1st Polish Wing, ever. Squadron records and his logbook show that he never flew this Spitfire. Not very surprising as he was ‘up north’ at kirton-in-Lindsey while AA853 was ‘down south’ with 302 Squadron based at Heston. Man and machine were hundreds of mikes apart. At Kirton, Witorzeńć’s personal aircraft was AD192. Orders for special markings for Operation Rutter were issued on 4th and 7th July and removed after 11th July. I have never seen any evidence that they were still around at the time of Operation Jubilee. After Rutter was cancelled, it was not postponed, it was not intended at thte time to run it at a later date, squadrons returned to their home bases. When it was reinstated as Jubilee no orders were issued for special markings. As part of the concentration for Operation Rutter 302 Squadron moved to Croydon where the special markings were applied 6th July. After Rutter was cancelled the Squadron returned to Heston. Because of a series of accidents at Croydon it was deemed unsuitable for Spitfire operations and it was decided not to use it for Operation Jubilee. On the 19th August AA583 was flown by Beyer on air sea rescue patrol, recalled when in the air. In the afternoon it was flown by Urbanski, patrol over Dieppe area covwring withdrawl of troops. On 29th August it is recorded as being flown by Kaminski rescue to Manston 10.35 - 11.00, rescue from Manston 11.35 to 12.40. The following film footage was shot on 6th July during preparations for Operation Rutter. The tail of an aircraft cane been seen about 50 seconds in. There are no stripes on the elevators. The air Ministry always seems to have concerns over painting control surfaces as it might affect their balance. https://www.iwm.org.uk/collections/item/object/1060021075#.WfTA4dmsvrg.facebook6 points
-
I see that Christmas is a more sombre affair in Scotland.... (In all seriousness hendie I love a good bit of sandstone wall me and that example looks especially fine: it must have ben a wrench having to leave something that homely behind. ) Exactly my experience! I know such statements must seem incredibly counter-intuitive to people: the biggest difficulty starting out was simply my own fear and technical ignorance, both of which diminish rapidly with practice. That and the pastoral care provided by yourself and Brother Nigel of Heath. You can't beat a good pond for relaxation Terry (once it's built of course...). Will it be hosting any fish and such like? Giorgio and Benedikt: Simmerit finish on the Anson for extra protection...? You should have seen me Ced. I bestrode the garden like a young god! It what they call on Gardener's World a Water Slaughter Feature... That sounds right grim mate. I'm glad you've plenty of cats to stroke for therapy. Dammit Bill I've got Mr. Burns' voice from The Simpsons going round my head now! I am so sending you some brass sheet for Christmas this year. Guess who trod on one of them earlier Ian and had the trailing edge looking even sharper (as in snapped)? Not to worry, deep breaths and a bit of solder followed by some re-bending... Thanks Simon. There's a depot like that along the river in Galway Benedikt: looks like lunar soil creeping out to cover the surrounding landscape. Reminds me of Stephen Baxter's: Damn cheek! I had it specially soiled for the occasion too! Right. On with matters before this becomes a full-blown pantomime... Took a bit of getting back into benchwork as the exertions of the week's digging and concreting took their toll on the energy levels. Luckily I had an ace bloke on the mixer (youngest son): - and a top finish-man out back (eldest son): Good that they both know how to dig founds and lay a concrete raft now. They did a great job. After marking-up the required spacings for aileron-hinges along the trailing edge of the wing I cut out the notches on each side for the aileron levers: These were accomplished with a heated scalpel blade to to open the cut without disturbing the undeside of the wing, then I used a conical diamond dust birr to hand file the required bay-like opening. Prior to building the aileron levers I had a quick shufti just to make sure that the hinges themselves actually did look OK en masse: I'd been debating whether they should be attached to the wings for painting first or the aileron but on reflection I think the latter as if I can solder the arms of those hinges into place, the aileron and associated fittings can all be painted separately as a single assembly to be glued on in a single operation at the end. For the aileron levers themselves I decided to modify my usual methodolgy for building aerials - to whit - brass rod crimped inside brass tubing. First though the mass balance parts needed to be soldered to the top of the levers at an angle: Despite them looking similar at this stage, the fittings are different top and bottom (with the underside one of each pair lacking the added weight) but I can use identical starting-points to make both. You can see the outer sheaths being added here from 0.9mm tubing: These were then crimped flat around the central rod using flat-jawed pliers, varying the pressure to produce the required tapering profile from bottom to top: You can see the underside sets to the left in the above picture have also had the angled horizontal filed-down as these don't have the larger mass balance weight like the top set do. Here's one of the lower pair tacked temporarily into place to check for scale: The top counterpart being checked for scale along with the hinges: It's a little tall I fancy and will need to be reduced in height but I'm pleased with the way that captures the shape of the original: Again, the levers will be soldered to the aileron in advance of painting (just like the hinges) which method should hopefully give a solution with the greatest join-strength on such thin bonding areas. Won't be tomorrow though as driving Mrs. B over to Bray on the East coast to deliver some of her work. Hopefully a bite of lunch beside the seaside is in the offing then... Thanks for reading as always and have a good evening one and all! Tony6 points
-
Dornier Do 335A-6 Nightfighter. Brush painted with Revell acrylics. A what if subject in reality as only 40 were ever built, and none of those were nightfighters! TFL Cheers Greg6 points
-
Frog F-340P Miles M.27 Master MkIII converted to Miles M.19 Master MkII I had the Eastern Express boxing of the Master MkIII in the stash, and realising it met the Frogspawn criteria for this GB I decided to see if it could be knocked into some kind of shape. With the kind assistance of @AdrianMF, who sent me copies of some scale drawings of the MkIII, I set about modifying and updating what came in the box. My aim was to add some cockpit interior details, then I was encouraged to lower the rear fuselage to correct it, and it sort of snowballed from there. I also decided it would be possible to salvage a Mercury engine and cowling from an old Frog Blenheim and graft it on the Master body to make a MkII. Some old Reheat PE provided more accurate seats, and I fabricated some basic cockpit details. A Pavla MkI kit gave a false hope that the vac-form canopy could be used, leading to some proper faffing about with making and reshaping canopies that almost led to the Shelf of Doom. Happily, Adrian again came to the rescue with a spare transparency moulding, and I've opted for the instructor's canopy to be in the open position to make it easier to put together! Other modifications were limited to scribing the panel lines and substituting some Hasegawa Spitfire main wheels for the misshapen lumps from Russia. The model was brush painted with Humbrol and Revell acrylics, with Humbrol enamels for detailing. The markings come from my transfer stock, and the serial was chosen from a list of MkIIs I found on the internet - whether I've got the camouflage and markings right is academic. WIP thread here:6 points
-
Frog F-153P Miles M.14 Magister MkI The original 1960s period box of the 153P Miles Magister was kindly donated to me by @Ventora3300, and was an obvious candidate for this group build. As a kit, it stands up well to modern standards. A little lacking in interior detail, and with subtle raised panel lines, this little model was ripe for a bit of upgrading. In the end, I concentrated my efforts on the exterior detailing, as there's not a lot that can be seen in the cockpits. Frog based their model on an actual aircraft. G-AFBS was a civilian registration, which I assume may have been used by one of the RAF auxiliary squadrons as a trainer until it was impressed into military life at the outbreak of war. The original 1960s transfers were yellowed, but a few days exposed to sunlight dealt with that. The registration and unit identifications were used without any problems at all. Sadly, the national markings were printed out of register, so I substituted from my stock file. I scribed the panel lines, added some creases to the rear cockpit hood, some stretched sprue for engine hood hinges, and some fine wire for the undercarriage brake lines. Masking tape seat belts finished the ensemble. With hindsight I ought to have fitted bulkheads to act as light blockers in the cockpits. The model was brush painted using Humbrol and Revell acrylics, with Humbrol enamels for some detailing work. An instructor briefs a trainee pilot for his first flight. The WIP thread is here:6 points
-
Another one finished - the 1/350 scale resin kit of an Oberon Class diesel submarine from ebay seller subsmodels..... I chose to finish it as HMS Opossum - wearing a roughly-applied camouflage scheme used when she was on special ops during the Gulf War. She also sported a sharkmouth - sourced as a decal from my spares box. It isn't 100% accurate but it looks OK... I think I may have overdone the 'weathing' a bit on the camo........ The camouflage makes a nice change from the all-black finish normally found on RN subs..... Ken5 points
-
I present the Revell A321 in the current livery of Thomas Cook. I liked the old blue scheme and I wasn’t sure about the yellow/grey when it was first introduced but it has definitely grown on me. The model is OOB apart from BraZ sharklets and a couple of small fairings . White paint is Halfords, Airbus Grey is Holts HL Grey01 and medium grey on the rear fuselage is Humbrol 128. The engines are Revell Aqua 310 Lufthansa Yellow with a tiny spot of 371 Light Grey just to take the “edge” off the yellow. Aeroflex on the wings is Revell Aqua 374 and metallics are by Tamiya and Revell. Decals are by RJS supplemented with detail decals from the kit sheet and the spares box. RJS helpfully provide decals for the yellow fuselage flash and the dark grey sections on the fin, fuselage and sharklets which saves some tricky masking and spraying. You even get a choice of long or short decals for the sharklets. The decals are screen printed except for the actual “hearts” which are laser prints. RJS also thoughtfully provide separate white backings for the hearts in case the modeller prefers to paint the dark grey but I went with the decals. Despite being designed for the Zvezda kit they fitted the Revell fin and fuselage well apart from a tiny gap on the fin leading edge. There was a bit of a mismatch between the decals and the BraZ sharklets (I suspect the sharklets are a fraction narrow) and in hindsight it would definitely have been easier to paint them. However I got there in the end even if it meant using Tamiya Extra Thin Cement (!) as a decal solvent. The only downside of the decals is that the windows and doors are printed across the main titles instead of being separate as on most silkscreen decals. For a consistent appearance I had to apply all the RJS windows then overlay them with Authentic Airliners frameless windows. Inevitably the spacing was fractionally out and I ended up applying the AA windows in pairs, a fiddly job I really could have done without. Anyhow, that minor grump aside the decals are beautifully printed, robust and supported by comprehensive instructions. An excellent product which I heartily recommend; I just wish RJS’s range was bigger. Thanks for looking and as always constructive criticism is welcome. Dave G5 points
-
Who's been busy then ? - another one for the collection. This time its the 1/350 scale resin kit of HMS Tabard from Starling Models..... It isn't actually finished - it needs the addition of aerial wires (as soon as I get some elastic thread)..... This is a superb kit of a T Class sub from Starling models and deserves to sell well - thus encouraging them to make more Royal Navy Submarines.... Although it is at the limit of my skills - given my failing eyesight and lack of manual dexterity - I really enjoyed building it... I'll post more pics when I get the 'rigging' done... Ken5 points
-
Here I present my Swiss A320 built using the Zvezda kit. The kit is OOB except for the decals being from DrawDecal and the Sharklets from BraZ. This was one of my first builds getting back in to the hobby, so apologies if it’s not the best with detail etc. I am missing the Antennas which I may add now that I have some better tools and patience 😂. The Zvezda A320 kit along with the A321 is a great one, as you get the option for flaps extended or retracted, and it comes with different landing gear options to simulate the lack of suspension applied to them when the Aircraft is on finals. The model is painted using Halfords Appliance White, Greys are a variety of Revell Aqua Colours. Red for the tail was Revell Red. I went for the flap extended option on this model, but want to get more tips/practice with ‘weathering’ for the wings etc, as it’s not something I have done before. Would be good to find out what others do to achieve this effect? The decals fitted the model excellently and would have been complimented by AA decals to give that extra ‘real’ effect. Overall I am quite happy with a ‘simple’ livery build for building up experience etc. Thank you for looking and as always any feedback is greatly appreciated. Alistair5 points
-
Bf-109G-6 | 1/72 | Airfix Fliegerkompanie 7 | Swiss Air Force | 1945 I finished this on July 29th, 2019. It is the much maligned Airfix kit. I had to wait for some enamel to cure on my Banshee and decided to give this one a try. I'd wanted to do a Swiss Bf-109 since seeing one as a computer desktop wallpaper, but heard bad things about this kit. After seeing @John D.C. Masters build of this kit and reading how much fun it was, I decided to give it a shot. It took me about 2 days as there wasn't a lot to it. It was ready to paint within 2 hours. Much of the criticism of this kit is deserved. Airfix did something unforgivable by merging the 2 blisters ahead of the cockpit into one, for reasons unknown: I can understand how this would be enough to put someone off of the kit (and even off of Airfix!), but I decided to fix it with an Xacto knife and some sandpaper prior to gluing the fuselage together and it looks good enough from a distance that I am satisfied. It's very hard to take a picture of, but here's the best I could do: Other criticisms have to do with accuracy, but most of which didn't concern me because I don't know as much about 109's as other planes. Others were unhappy with the lack of cockpit (just an inaccurate seat), but I found you can't really tell when looking through the tiny frames of the canopy, so I wasn't too concerned about that either. The good points of this kit are that it is well engineered, so I had little seam work before painting and the parts fit together beautifully. The wings were a bit of a challenge as the wing tops taper in such a way that you can't mate them to the fuselage if you follow the instructions. I had to kind of gently bend the wing assembly into an anhedral to fit the fuselage in the opening. My suggestion is to glue one wing-top on, glue to the fuselage, then glue the other wing top on. Another good point is the decals: with a strong enough solvent, they settle in nicely and have lots of tiny stencils that really add to the build. My only concern was that the red of the insignia was brighter than the Insignia red they have you paint on the fuselage and rudder. I don't know if that was the way they were in real life, but I suspect not. Painted the aircraft by black basing with Mr. Surfacer 1500 black, and used Mr. Color paints, except for the testors enamel insignia red. Thanks for looking! Comments, questions and constructive criticism always welcome!5 points
-
Hallo again The EF-111 is the 1/48 kit from HB. I used the etched parts from Eduard and I think this was all. The a/c is for me interesting in the navigation aids, as terrain following and stellar navigation. The kit is not so difficult; the aerodynamic of the open wing was for me the most exiting feature. Happy modelling5 points
-
If the Heller Caudron is of a certain vintage, I expect it'll be a bit basic on the interior. Nothing, I am sure, you can't sort out. As expected, it's not going to take long to assemble. I daubed some Hu96 about for the blue-grey interior. The tub assembled fairly well, but the rear bulkhead needed some work to remove a moulding gate right on the ridge designed to fit to the rear of the floor. Some dry fitting paid off to work out precisely how the parts then fitted into the fuselage. The part on the left is the nose backing plate with representations of the cylinders. The seat has had a little bit of detailing from an ancient Reheat PE set of various belts, and the instrument panel been painted. I won't bother dropping gloss into the instruments. Like most cockpits at 1/72nd, there's little to see through the transparency. And before I knew where I was, the fuselage was all joined up. Being "limited run" in nature, there are no locating pins to help align things. Obviously, I managed to get the halves just a gnat's out of register, but nothing some careful scraping and sanding can't handle. What needs careful note is some finely moulded raised panel work around the nose. I wonder if I'll manage to get the wings assembled this evening.5 points
-
So finished things off tonight... at least for moment - you know when you get to the stage where you can’t really see the model anymore - you’re just focused on the getting those last jobs done..? I’m totally there. So moving on after tonight- I’ll take a proper look when I go to do the RFI photos - which will be a few days away as I have a few things to locate before doing them (love moving house fallout) I finished off the base - added the static grass to my slice of airfield- I had 2 colours: In my head these were quite different shades but once I got them out and put them side by side they’re not that far apart... I made a mix of both, popped it in the static grass machine. I bought this thing cheap from a Chinese website - cost 40 nzd which is a lot cheaper than what they cost down the local model shop. I painted some watered down pva glue on to the base and went at it with the magic grass machine: I then used pigments and some washes to make muddy stains... the edges were painted black to finish things off... I was reasonably happy with this - I think I’ll look at getting some grass with longer lengths as this grass looks a little too manicured or too well trimmed... next time... I tidied up the aircraft with a few little touch ups - then weathered the wheels and underside so it fit in with the base... just some pigments using the same colours as the base... Then I just plonked it onto the base - finished 😀 Apologies for the standard of the images... these were just taken on the kitchen table under bad lighting- as were all the images in this build - the RFI pics will be better...👍 Thanks all for your comments/suggestions and for following along - as always they’re appreciated. Enjoy the rest of your Sunday. Cheers John5 points
-
With the F-104J done and the Thud in the paint shop it's time to crack on with this (and resurrect this thread from page 5!). I started by cleaning up the doors - getting rid of the rivets and getting them (more) flush with the fuselage. Then I painted the fuselage around the windows gloss white - this is to make painting the Air UK scheme easier later on - then installed the windows. I've decided to keep this build simple so I'm going to live with the absence of internal detail, and painted the insides of the windows black. Then got the fuselage together - not the greatest fit ever, nor the worst, needed a bit of superglue to do it but it's gone together ok. So here it is with filler along the seams ready to be cleaned up: thanks for looking Julian5 points
-
Here we go! It's been a long time since I've used Bondo, we'll see how well it handles this job. Most of the surfaces are large and nearly-flat. I raided the cosmetic's section at my local grocery and bought these sanders. I think they'll be perfect. - Bill5 points
-
Completed! I'll get some better pictures uploaded in the gallery at some point. Thanks for looking! IanJ5 points
-
Thank you for your comments, I have never had any problems with the solutions that I use and these decals before. I think that it may have been a combination of the heat that we have had over here in the UK, the amount of setting solution that I applied and just a little bit of bad luck. Decalling all done now, and I have also painted black around the flight deck glazing as I found some photos from the time period that I am building and most of the C-5s had this applied, so this is why did it. A few coats of matt varnish to apply then it is on with painting the wheels, and then the slats before fitting these and the rest of the parts.5 points
-
Cheers chaps, Hewy, North Wales isn't too bad but I still gravitate toward my home county as often as I can, Good old Cornwall. So main rotors are almost done, just the slinging markings to be masked up and painted, after that a bit of exhaust staining and that part is done. The tail rotor next, MRP white has been put down so I'll mask up for the red and then main blade colour black. Here is where we are at so far. The lighting in the workshop has changed the hues somewhat and some of the subtle shading is washed out but in the flesh it looks better than the photo's Enjoy Dan4 points


This leaderboard is set to London/GMT+01:00