
Leaderboard


Popular Content
Showing content with the highest reputation on 21/07/19 in all areas
-
I think this may be my first completed aircraft of 2019! 1/48th Grumman Avenger from Hobby Boss and markings courtesy of Montex Masks39 points
-
B-57B Canberra | 1/72 | Airfix United States Air Force -- 71st Bomb Squadron, 38th Bomb Wing, Laon air base France, 1957 Finished this on July 19th, 2019. This build is something I've wanted to do since High School. I'm finally making the B-57 I wanted to make when I got the Testor's kit for Christmas in High School. You see, the Testors decals were transparent, and while bright red on the sheet, turned a hard-to-see dark red on the model. I was terribly disappointed since I'd been looking forward to making that model for a while and the manufacturer let me down. So I have finally done it! I looked for decals to match the ones in the Testors kit from the 80's and had no luck for a long time. Finally, I started seeing a few B-57 builds with bright red lettering, and they all had the same scheme, which meant they all used the same decals. But no one was kind enough to say what they were!! Well, one person did, which is how I got them. So if any one is in the same predicament I was: it is Xtradecal X72103. Finishing: Seams filled with CA (superglue), recreated panel lines using Mr. Surfacer 500 (Technique detailed in my WIP). Paints: Tamiya TS-14 Black spray decanted into an airbrush and thinned with Mr. Leveling thinner > Tamiya X-22 clear thinned with Mr. Leveling thinner as an sealer coat (reacted bad with the decals) Decals: Xtradecal X72103 Weathering/Wear: Oil wash in the wheel wells. The landing gear wells didn't have any detail, so I added some using some half-round styrene: The nose gear did come with detail, however! And to show you how bad the original Testors kit was, here they are side by side: Build notes: The Airfix kit seems to be an adaptation of the BAC Canberra kit, which means the bombs were the wrong shape, so I scavenged the ones from my high school kit. Also, the pylons were to too far inboard for a US Canberra Tamiya X-22 thinned with Mr. Leveling thinner reacted badly with the decals, especially the red parts. They wrinkled badly and, while most smoothed back out, a couple didn't and appear to be permanent. Luckily, you have to get pretty close to see it, but it is still aggravating. Thanks for looking! Comments, questions and constructive criticism always welcome!20 points
-
So here's my latest but probably one of my most memorable - my first build painted with an Airbrush. I've had an airbrush for a couple of years but never been brave enough to try it. So a couple of weekends ago, I decided to give it a lash. Practiced a few times on some old junk kits and took the plunge with this one. The build was for an RAF 100 GB over on the IPMS Ireland forum and the build thread is here but to recap: Kit: Airfix 1/72 Harrier GR3 kit A04055 Build: Out of box with tape for seatbelts Paints: Halfords primer, Revell Acrylics with an airbrush thinned with Tamiya X-20A; Klear, Flory Models Wash. Decals: From kit. For it's size, this is a super kit - lots of optional parts, lovely details, 2 decal schemes and a great fit overall. Airfix Harrier 1_72 GR3_Done (3) rs by Dermot Moriarty, on Flickr Airfix Harrier 1_72 GR3_Done (6) rs by Dermot Moriarty, on Flickr Airfix Harrier 1_72 GR3_Done (7) rs by Dermot Moriarty, on Flickr Airfix Harrier 1_72 GR3_Done (1) rs by Dermot Moriarty, on Flickr Airfix Harrier 1_72 GR3_Done (8) rs by Dermot Moriarty, on Flickr Paints used.. Airfix Harrier 1_72 GR3_Done (19) rs by Dermot Moriarty, on Flickr With the other Harriers I've done - Spanish AV-8A (Esci) and Royal Navy Sea Harrier (Italeri) Airfix Harrier 1_72 GR3_Done (15) rs by Dermot Moriarty, on Flickr Airfix Harrier 1_72 GR3_Done (10) rs by Dermot Moriarty, on Flickr Thanks for looking and can't wait to use the airbrush again! Any questions, happy to help if I can. Happy Modelling. Dermot20 points
-
Dear Fellow-Modellers, let me present to you two Hurricane Is that I built in parallel: a very early Mk I (fabric-covered wing, 2-blade prop) from 85 Sqn in Lille-Seclin a late Mk I from 306 (Polish) Sqn One is the Airfix-kit more or less out of the box, , for the other one I used the Airfix kit and the Alley-Cat tin-wing resin conversion. Decals are Plastic Planer Club (for the 85 Sqn) and Techmod (for the 306 Sqn). Specials thanks go to the kind Britmodeller Beard who generously sent me the the 2-blade propeller! Thanks for watching!18 points
-
Nice kit with minor issues, fun to build. Hinomarus under the wings are painted, but the ones on the wings... Just don't ask Hope your like it. Miguel14 points
-
Once errr...this lot is done! List just seems to grow fractally Keith each time I look at the model and then at a photo and then back at the model... In the unlikely event I ever start a punk/folk crossover band Bill , Vestylookingweirdthing will have to be the name! A Goldie Lookin Chain for our times... If only Frederick has heeded those words he'd have saved himself a whole lot of trouble.... Stop cogitating Steve. You'll go blind. Ditto that last part Ced . Dark and damp again today but better be sunny tomorrow as we've got the lads going out on the bog with a neighbour to help bring his turf home on the tractor. Now. If only I can channel your skills for painting it Giorgio! Utter fluke dear boy and no doubt a big dollop of the good luck quotient used up in this instance! Next vacform will doubtless turn out to resemble a waxen Victoria Beckham statue that's been kept in a badger's armpit for a week. All this talk of paint is frankly premature Simon. It's not 2020 yet! FAITH* baby. *Fire Airbrush Into The Hole. (The canopy and rear door are still open so you can it out blow from either end...) Or the brass vacuum cleaner. Obvs..... (Didn't Ced actually buy some kind of miniature vacuum?) I made a start on the ailerons, or more precisely the 3 sets of hinges for the top side each one. Method was as you can see to make up a design in the Silhoutte software and output onto some foil which was in turn stuck onto the thinnest brass I have as a template: These could then be trimmed out with nail scissors and filed into shape as you see in progress here: Still a bit more to do in that the the longer rear section of each needs to be folded in the PE folder longitudinally to make an 'L' in order to form the base plate to mount it in place on the aileron. Mostly over the last couple of days though I've been labouring on finishing the nose as it is such a prominent feature. This involved some close scrutiny and regular comparison with photographs: Not the easiest job to gauge curves accurately on a transparent surface where the transparent nature of the material itself makes it hard to assess the profile unless you turn it repeatedly under a very strong oblique light whilst sanding. Also worth noting that out there on the web are some variations in the nose cone, many having a curved 'lens' to the front window but equally some others having a flat one. Also I've seen two different variation in the size of the lower window at the front. In my case I've gone for a flat circular window and the more common larger lower window. After staring at photos of a Mk.1 nose (for perhaps longer than is advisable for full mental health) is the fact that the underneath at the front does a 'dog-leg' inwards at the chin: The glue visible around the rear of that transparent panel isn't going to present a problem as it will be hidden by the metal panelling that holds the sliding door covering the window in the underside of the chin. It took me aged to get these matters sorted but as a consequence am now no longer afraid of sanding down transparent areas and repolishing to transparency again. I do still find Micromesh useful for getting the initial scratches out of such areas but now use a combination of these two heads, (along with that tan polishing compound you get with Dremel tools) giving as good a final lustre but the space of a minute: The front and side windows also have narrow frames around them. Tricky to reproduce at 1/72 but I designed a set on the Silhouette that were just borderline in terms of 'cuttability' from foil (any thinner in cutting-width and you routinely get tearing). Once applied, I was childishly happy with the visual definition it gives to these regions front and side. The frame for the circular window used the same methodology: A lot of time spent toing and froing and cutting to get those right but happy now with the final visual effect: A lot of that underside view out through the nose will disappear once the sliding panel is in place of course: Why am I seeing Russian submarine conning towers below ?....... Another benefit of using the Silhouette in such cases is being able to go back to the original designs used here and replicate the cut (using Oramask this time) to create any masks necessary for painting duties later on. My bloody eyes hurt now. Kettle on I reckon.... Tony14 points
-
XR751 was built in May 1965 and delivered to 226 OCU. It subsequently served with 29 and 5 squadrons before being assigned to the LTF at Binbrook in July 1982. Made completely oob, with the addition of the DA code (from a Tornado F3) to represent a mid-80s LTF jet. It's a great kit, highly recommended - fits together well with minimum filler required. WIP here: https://www.britmodeller.com/forums/index.php?/topic/235056642-148-airfix-lightning/13 points
-
F/A-18 Hornet | 1/72 | Testors United States Navy -- VFA-25 Finished this on May 24th, 2019. This is a build that had sat 90% finished for 20 years. The full story is in my WIP. This is a model that my best friend gave me in college, having started it himself when he was 10. It happened to be a prior boxing of a model I made in High School. I almost finished it, but then put it aside and it sat for 20 years. Through some luck I found the decals to match my high school build. I built this concurrently with a Hasagawa 1/72 Hornet which I marked as a Canadian CF-188. They are both in the same build thread. Since 80's Navy birds got pretty filthy, I was able to really weather this model. I used salt weathering to get the really sea-spray worn effect. I have lots of pictures of real Hornets in my build thread that I used for reference. Some of the staining came out a little darker than I wanted, so it is still realistic, but probably as a worst case. It seems to match the photos from combat sorties more than from deployment in the '80's, but it's not completely un-realistic. Another thing to note, when I worked on this in the '90's, I sanded most of the panel lines off because I had a lot of really terrible seams that had to be filled and sanded. So, I sanded the rest of them off and then used a 0.3 pencil with a straight-edge to draw them back on at the end. I found that worked very well. I also had to fill in the gaps in between the fuselage and the Leading Edge Root Extensions (LERX) because production Hornets didn't have them and Testors hadn't corrected their molds accordingly. A huge shout-out of thanks to @jean and @Hook for pointing this out before it was too late for me to do anything about it! Finishing: Seams filled with CA (superglue) Paints: Mr. Surfacer 1500 black primer > Mr. Color C308 (top) > Mr. Color C338 (Bottom) > MRP FS35237 > various shades of Alclad (detailed in my WIP) > Mr. Surfacer 500 used to create Ablative coating on bombs Decals: Microscale 72-457 Weathering/Wear: Salt weathering after the decals were put on > Panel lines drawn on with 0.3 mm pencil > oil staining and dirt streaks with Black and Burnt Umber watercolor Paints > Tamiya weathering pastels (black) Here it is next to the one I did in High School. My high school build really shows the terrible seams in the Testors kit. And here it is next to it's sister build, the Hasagawa CF-188: Thanks for looking! Comments, questions and constructive criticism always welcome!12 points
-
Totally OOB. Fun build, full write up soon.11 points
-
What else to be modelling this amazing anniversary weekend, but the Apollo 11 Lunar Excursion Module "Eagle" which landed in the Sea of Tranquility exactly 50 years ago tonight. I'm old enough to have watched this amazing event as it happened , and clearly remember that my primary school had every television that it possessed set up, wall to wall, in the dining hall for us to watch. This was an e-bay purchase of the Airfix 2009 issue, largely out the box (I thought briefly about adding the missing ascent module supporting struts, but I realised Airfix had missed them too late for me to correct them without risking the rest of the model, especially the foil). I have used the original round base rather than the new vacform since mine was missing, although in many ways I prefer the original. In fact its not entirely finished - I haven't completed the final sealing/varnish coats, but couldn't resist a few topical pictures tonight! FredT11 points
-
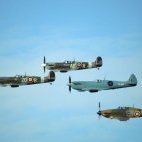
Thanks for all the comments and "likes". Today was a much better day, weather-wise. The Chinook went "tech"; the NATO E-3A didn't participate in the NATO flypast and PdF #8 developed a problem in flight, which meant the display was curtailed. I really enjoyed the special fly pasts, the Finnish Hornet, the MiG-21, the Su-27 and the Harrier pair. Thanks for looking. More to come from Sunday and Monday!11 points
-
Now that I have retired, move to Vancouver Island, built a new hobby room, I have decided to start finishing some of my models which seem to get put aside and this plank on bulkhead hull famous Canadian Schooner will be the first to get finished due to now being so close to the sea. I started this model back in 2006 (did say in my Churchill WIP that I started in 2010 but then I looked in the first picture properties and it says 2006 and was working on it until 2009 and then stopped) so it has been waiting a long time for me to get back to it. To start I glued the three piece center keel together and then added the sternpost which needed to be tapered as per plans, after that was complete I laid out the rabbet, then marked out and cut the bevel on each bulkhead and set up in a jig to hold all straight and square. At this time I decided to machine/drilled two blocks of wood (purple hard wood) to fit into space where the mainmast/foremast were going to go so that mast would be perpendicular from side to side Once that was done took everything apart and cut the rabbet into each side of center keel and formed all bulwark stanchions, then glued each bulkheads to center keel, to keep everything nice a straight I added permanent strut between bulkheads. Next up was to shape the stern blocks out of solid wood and glue into place, add transom framing and horn timbers. Once all the items above where nice and glued I had to feather each bulkhead to the bearding line every bulkhead had to have a smooth flow into the rabbet Hope you all will enjoy Regards Richard10 points
-
Hi folks Just completed my first kit from Takom. T55 AMV with ERA I had my issues with it but I think it turned out ok in the end. Done in Syrian Army colours OOB. Cheers Keith10 points
-
Hi everybody, as I promised yesterday I now post my second finished model. It's my only second finished model this year. You can find the build log here: Here she is: Thank you all for looking. Comments and critiques are welcome! Have a nice day Nick10 points
-
Dear modellers, I like to mention an importent day in Dutch aviation history ; today it is 100 years ago Anthony Fokker founded the Fokker Company in Amsterdam. To commemorate this day, I think, it is fitting to show you the first Fokker passager aircraft, which flew to the Dutch Indies on 1 oktober 1924. No mean feat in those years ! I hope you enjoy the pictures. With kind regards, JohnHaa10 points
-
This the old Revell kit, in the "Hunt for Red October" boxing, from 1990. I built it circa 2005-07 I'd guess. I did use an aftermarket decal set, the SuperScaleInternational set 48-346. It’s pretty much built OOB, with just a few added details. The paint was ModelMaster and Humbrol enamels, applied with my Paasche Model H. So, once again, another “four-footer” from Texas.😉 Thank you for your interest, and thanks for looking in. Please leave comments, good or bad! 😁10 points
-
and here it is finished, in the end good good model very nice and relaxing to climb ... gunze paint and company, aging oil, pigments and daubs! Plane found near Kaufbergen (bavaria) April 1945, III./JG53 More photos on my facebook page French Frog Models (it works also for those who do not have an account ...)10 points
-
This is my 1/48 Tamiya Bf109 G6 flown by Hans Langer, II/JG 51, Italy. This is another wonderful kit by Tamiya and it’s all oob except Eaglecal decals. Thanks for looking.10 points
-
I didn't know boiling your eyes could reduce pain. Y'learn summat new every day I guess Have you thought of using an old blade to "cut" directly on the brass ? Obviously, you won't actually cut the brass but it should leave a nice score of the profile. Several passes on a thin sheet may just give enough of a groove to be able to snap off the unwanted brassness. Trier Beware: I am in no way responsible for the outcome of any equipment, pets, persons, or possessions (including abodes) involved in the execution of any of my ludicrous suggestions. unless they're successful of course, in which case I'll take full credit. Yes, but the pilots refused to use it after he amputated their lower extremities. ... the anticipation builds10 points
-
evening all & thank you back with a bit more Mustang mayhem... ..in trying to get the cockpit 'pod' in a state where it is complete and can be fitted into the airframe, I have had to take care of many small details I had earlier left, thinking 'I will do that later...' first up this sidewall.. ..I had added the straps for the flare pistol cartridge box (the four little beige tabs), the landing gear handle I made from brass in a previous post, some black switch covers in the top switchbox along the canopy slide rail and a completely missing thing - the bomb selector handle & cover (with a red top).. maybe seen better here.. and bomb release lever.. ..the cockpit floor was also finished with the canvas cover under the seat with it's pop-off fasteners, and the control column was added and the boot/gaiter - these canvas parts were made with household 3" masking tape which I think worked reasonable well.. ..then a step right out of my comfort zone... I can make anything mechanical - I take a look, break it down into shapes and make thise bits - here though the parts I needed to make were the seat back life preserver (I think) and the cushion... two completely organic shapes.. ..I thought the life preserver could be made of milliput on a base of lightly curved & distorted plasic card covered in foil tape so hopefully once complete I could remove it as it wouldn't stick to it.. ..then it was a matter of playing with the milliput and trying to shape with cocktail sticks to get creases - the button like things were tiny punched plastic discs.. ..I added some piping from sprue & milliput and tried to paint it (another weakness...) ..same for the cushion, though this time a strap was added at the front from folded tape & foil brass retaining straps... ..I am not 100% on it and may try painting it again, but for now it looks like this... ..and at home in the cockpit... ..getting there... TTFN Peter10 points
-
Dear fellow Britmodellers, here's my 1/72 Crusader Mk.III Anti-Air-Tank with 2cm Oerlikon guns. I bought this kit @ Modelbrno in June, and finished from the box, with the addition of the stowage pieces (one from Quickboost, the other one scratch-built). According to kit instructions, the markings resemble a vehicle of 1st Royal Tank Regiment, 22nd Brigade, 7th Armored Division, in 1944. Painted with Gunze/Mr.Hobby acrylics. Photographs by Wolfgang Rabel (thank you!). Thanks for your interest. Best greetings from Vienna!9 points
-
I built this little kit as a paint test mule for my spraycan of "Rover-Vermilion" from Halford's. I had the 1.32 scale Hawk on the go at the time, and done a scratch built flap makeover on it. So when I looked at building this one, I started wondering what if......? It was a bit more fiddly at this scale, but worth having a go. It's a very noticeable feature of the Hawk that when they're parked the flaps are down, and they don't go up again until the engine is fired up. (BM walkaround pic) It's a feature that is ignored by all the makers, even in the huge 1.32 example by Revell. And looking around on the modelshow tables it doesn't seem to be something that modellers go for very often. Anyhow, I thought I ought to post her on here just to encourage any Hawk builders to reach for the knife and saw! I think it's worth the effort. Thanks for looking 😎9 points
-
Hi all, Just finished this for the Lockheed GB, have been working on it for the last 3 months or so. Wanted to do something different with the F-117a, so not only did I do the two-tone Grey Dragon (trust me, there are two shades of grey on the model!) but I also found this pic: so I decided to try to recreate the black lines/panels as well. Of course, I shouldn't be showing you this pic, as you can then just compare it to the model and see everything I did wrong! Anyhow, it's a Tamiya kit, so an enjoyable build! Used some Eduard PE for the cockpit/canopy and TwoBob decals for the Grey Dragon scheme. Also made a little 'Ladder Guard' that I saw in a couple of pics. Hope you like it, but please do send any constructive criticism my way, it's the best way to learn. And sorry for posting so many pics. Thanks! Kit: Tamiya F-117a Nighthawk Scale: 1:48 Paint & Weathering: Airbrushed with Mr. Paint, Weathered with Pastels. Extras: Eduard PE, TwoBobs Decals, little bits of scratch building Build Log: Here9 points
-
Hi guys It's part 2 of I don't build jets. Apparently I do and have turned out another one. Enjoyed this one, but not as much as the Rafale. Out of box build with the exception of some Eduard belts. Pretty straight forward build which was nice. Model painted with Mr Surfacer 1000 thinned with self levelling thinners for the primer, and vallejo model air for the main colours. Weathering was left simple with a flory wash and a few areas polished so there wasn't an overall even finish as seen on real birds. Flat coat was tamiya clear again thinned with self levelling thinners. Hope you enjoy the photos. I am, as ever, open to any feedback but please be nice, remember I don't build jets...8 points
-
Just finished Italeri's A10A/C in 1/72 for the Shark mouth GB but with warthog tusks rather than the usual shark mouth seen on most A10's. Used the HiDecal sheet no 72010, it has 2 experimental schemes for the A10, one with the Warthog Tusks. Built nearly OOB with just the Master Brass barrel set and I swapped the kits Sidewinder for an Airfix one, painted with Tamiya and Valejo acrylics. The kit has a few issues, seat is to tall for the canopy, engine nacelle fit, incorrect radar warning antennas for an early A10A but its still a pretty good. As usual all comment are welcome. WIP is below8 points
-
The pilots are in their new home. I have decided it's too hard to make a 1/72 resin figure actually grip the cyclic and collective levers' hand grips but I did decapitate the captain and refocus his attention on the HC-130P directly ahead of him.8 points
-
Here is my Anigrand Craftswork 1:144 Horten Ho XVIII B-1 bomber in fictitious Luftwaffe markings since this was one of those many paper projects that never got built. I filled it with weight but in the end it wasn't enough so I had to make a support from clear sprue to keep it from tipping rearwards. The u/c doors were thinned and the guns were replaced by new ones made from metal wire. The kit was fully painted with brush except for the flat varnish which was airbrushed. Thanks for looking Miguel8 points
-
Senior Sex -- This is the funniest thing I have ever read ....... The husband leans over and asks his wife, "Do you remember the first time we had sex together over fifty years ago? We went behind the village tavern where you leaned against the back fence and I made love to you." Yes, she says, "I remember it well." OK, he says, "How about taking a stroll around there again and we can do it for old time's sake?" "Oh Jim, you old devil, that sounds like a crazy, but good idea!" A police officer sitting in the next booth heard their conversation and, having a chuckle to himself, he thinks to himself, I've got to see these two old-timers having sex against a fence. I'll just keep an eye on them so there's no trouble. So he follows them. The elderly couple walks haltingly along, leaning on each other for support aided by walking sticks. Finally, they get to the back of the tavern and make their way to the fence The old lady lifts her skirt and the old man drops his trousers. As she leans against the fence, the old man moves in.. Then suddenly they erupt into the most furious sex that the policeman has ever seen. This goes on for about ten minutes while both are making loud noises and moaning and screaming. Finally, they both collapse, panting on the ground. The policeman is amazed. He thinks he has learned something about life and old age that he didn't know. After about half an hour of lying on the ground recovering, the old couple struggle to their feet and put their clothes back on. The policeman, is still watching and thinks to himself, this is truly amazing, I've got to ask them what their secret is. So, as the couple passes, he says to them, "Excuse me, but that was something else. You must've had a fantastic sex life together. Is there some sort of secret to this?" Shaking, the old man is barely able to reply, "Fifty years ago that wasn't an electric fence." Simon8 points
-
Still nibbling away at the transom ... I've added some more internal detail to the exhaust pipes. The following photo includes a sketch showing the exhaust pipe casing. I'm not going to include any detail that can't be seen. so I opted to build shortened versions of the pipes/casings, by wrapping pieces of thin plastic sheet around a drill bit having the same diameter as the transom exhaust openings. Pieces of plastic sheet were glued to enclose the 'pipe' ends. I decided to add some faux detail at the ends using steel washers. These will be painted out. More detail has been added to the stern shelf using plastic bits, & Archer rivet decals, as shown below; I'm not sure what the 14 little thingies are on the underside of the shelf (couldn't find a detailed photo or drawing), so I just guessed what they might look like. As mentioned above, Archer rivets were used on the stern shelf. I also added these rivets to the exhaust pipe flanges. It was a wee bit of a pain applying these tiny decals, but I'm hoping they will add some nice visible detail after a final coat of paint. Finally, here's a photo shows the transom as she sits today. It should be noted that the Perkasa model's transom includes moulded rivets & structural details that are not shown in the Brave Borderer transom photos. I decided to remove the moulded details and smooth out the transom to match the BB photos. Next up, finish the trim control flap, & add wire steps & details to complete the transom. Thanks for looking. John8 points
-
So as you can probably guess from my user name - my usual modelling territory is in the Aircraft section. However, I decided that I wanted to have a go at something a bit different and having been inspired by all the fantastic military vehicle builds on the BM forum I decided to give one a go. So whilst having a nosy around the Monk Bar Model Shop in York on a recent weekend away - I decided to pick up this kit: There's just something about the Kubelwagen that I like - probably it's simplicity and functional aesthetic. As this was a Tamiya kit, I knew I'd be in safe hands building this as my very first military vehicle. As you'd expect the kit went together with hardly any effort whatsoever and was one of the most enjoyable builds I've done for a while - I think sometimes it does you good to get away from your comfort zone. The kit also comes with a figure which you can have perched half in and half out of the drivers door which I decided to use so I could add a bit of interest to the model. I decided to go with the German Grey scheme (24th Panzer Division - Eastern Front 1943-44) rather than the other 2 schemes (both camouflage schemes like the box art). I liked the idea of completing the kit in the German Grey as I think nothing says WW2 German vehicle more than seeing one in this colour. So enough waffling from me - here's some pics of the model. As always please feel free to offer any feedback or comments - especially as this is my first vehicle and all advice is good advice. Thanks Kris7 points
-
CF-188 Hornet | 1/72 | Hasegawa Canada Armed Forces | Pilot Capt. W.W. Niemi | 410 Squadron Finished this on July 20th, 2019. WIP is here. I built this concurrently with my F/A-18 Hornet of VFA-25. That Hornet is the same scheme as one I did in High School. The Testors kit I did in High School, had 3 decal options and one was Canadian. That scheme fascinated me because of the slightly different colors they used and the false canopy on the bottom. But in the end the VFA-25 scheme won out because the lightning bolt and fist were just too dramatic to pass up. So, I decided to buy the Hasagawa kit and some aftermarket decals to finally do that CF-188! Unfortunately, the decals I got had incorrect roundels and flags (the old "Silver leaf"), so I had to buy new ones, but they were worth it because they were excellent decals! This particular plane had a sad history, according to http://www.rwrwalker.ca/CF18_detailed_part1.html, it was taken on strength 3 august 1983 and "With 410 Squadron when it crashed at Seibert Lake near CFB Cold Lake, Alberta on 11 January 1989, during an airlift support mission. Pilot Capt. W.W. Niemi killed." I'm not sure why the microscale decal set (with the incorrect maple leaf) chose this one, but I stuck with it when I got the Canuck decals (which allow you to choose any S/N you want). Finishing: Seams filled with CA (superglue) Paints: Mr. Surfacer 1500 black primer > MRP FS35237 (Top) > Mr. Color C308 (bottom) > various shades of Alclad (detailed in my WIP) Decals: Canuck Decals 002-72 Weathering/Wear: Panel lines were pin washed with black tube watercolor and some were drawn on with 0.3 mm pencil > oil staining and dirt streaks with Black and Burnt Umber watercolor Paints > Tamiya weathering pastels (black) And here it is next to it's sister build, the Testors F/A-18 of VFA-25: Build notes: The Canuck decals were supurb! The Hasagawa kit had excellent surface detail, but had a sparse cockpit. The seam between the top and bottom halves of the fuselage is terrible, however, requiring sanding to remove a step between the two, and rescribing the surface detail. Thanks for looking! Comments, questions, and constructive criticism always welcome!7 points
-
Highlight of the show for me:7 points
-
Hi everyone, Here's the latest model to be added to my collection - AZ Model's new 1/72 Bf 109G-10 (Erla) finished in the colours of the Aeronautica Nazionale Repubblicana. The model represents "Black 11" as flown by Sergente Maggiore Loris Baldi of 4ª Squadriglia, 2º Gruppo Caccia "Gigi Tre Osei" in early 1945. Paints are Humbrol and Xtracolor, the markings are from Skymodels' "German aircraft in Italian service" sheet with the kit providing the balkenkreuz and most of the stencils whilst the spinner spiral is by AZ Model themselves. I used "Camouflage and Markings of the Aeronautica Nazionale Repubblicana 1943-1945" by Ferdinando D'Amico and Gabriele Valentini as my primary reference with the instructions from Stormo Decals ITALIAN Bf.109 ACES - PART II as a secondary source. I went with Stormo's interpretation of the large wing bulges and broad tyres. It may have had the smaller bulges and narrow tyres but the only photo of this machine is from a bad angle so it's difficult to tell. The model itself isn't all that bad, but I'm afraid to say that it's another one of AZ's near misses as it has shape issues around about the nose which means it's not a good representation of an Erla built machine. The discussion over on the 72nd Scale Aircraft forum gives the lowdown: LINK. Now for the photos: Now that I've completed this model it means I now have a complete Schwarm of Small Axis 109G's! Comments welcome, Mike.6 points
-
Yes, you read it here first; I am felicitous in announcing that, during the past solar sojourn, I completed the styrene based miniaturisation of the steam yacht that is called the Warbler. In other words, Martian actually finished a model! I should have absolutely hated this kit on account of it's gross inaccuracies but apart from a blip about a week or so ago, I actually had a blast building it. As always, it has been a pleasure to model for you. Further pictures will be going up in Ready For Inspection and thanks for looking. Martian 👽6 points
-
At this point, I may be in the minority, but for the mental health of everyone vested in this build, you could pop this on the wings Followed by a nose made from this Minus the ice cream of course, throw some of these on top And we would all celebrate as you hung this wonderment in a place of honor. Then we could all join a twelve step program together, and reminisce about how those sprinkles actually made an effective camo pattern, if ever Willy Wonka's factory needed destroying. I plan to continue the ride, even though my therapist argued against it! Looking somehow insanely great, as always! Anthony6 points
-
Decal fest going on this afternoon, loads of em Still loads of stencils to add to the fuselage but we are getting close. I'm going to make up the socks that fit over the pitot tubes with epoxy putty and add the RBF tags, still have a load of detail painting to go yet to the various bits n bobs and to sort out the crew door. its primed but needs a bit of fettling after I removed a load of detail that is not on any Sea king that I have found. Regards Dan6 points
-
Finished? Currently I have three Britmodeller threads on the go; This one, my Avro 504 and Baby Bandsaw's 'Hogwart's Express'. Thankfully this is the final post for Carpathia - the project's finished. At the end of the previous post, Carpathia looked like this - still looking a bit 'naked' with no rigging or stays in place and no flags. So let's sort this out now. First the stays around the funnel. A few months back I went to the local guitar shop and bought a packet of electric guitar strings. Guitar strings, it turns out, come in a variety of gauges apparently it's something to do with each one having to make a different sound or something - so when you buy one packet you get a variety of different thicknesses. These ones look about right for the funnel stays. Just drill four small holes in the funnel, clip four short lengths off the guitar string, thread each one into it's respective hole and glue the 'dead-end' onto the deck. A very simple operation. Now grab some 'ezy-line' and thread it and tie it and twist it and super-glue it into the correct configuration around the masts and so-forth. It's not too difficult as long as you have done a modicum of forward planning. In this case the eyelet - it's the loop from the end of a fish-hook - has been drilled into the deck above the bow specifically so that the rigging would have a tie-down point. Same with the funny little knobbly bits on the end of each derrick and the large brass loop soldered onto the mast. As a result, rigging the entire ship took less than an hour. Now for the flags. On those rare occasions when our family drinks champagne - normally celebrating some significant event, such as the purchase of a new power tool - I always make sure to keep some of the foil that's wrapped over the cork. It's thin enough to represent fabric, malleable enough to be warped into a convincing drape but strong enough to hold it's desired shape. Both of these flags are made from this foil wrapped around the mast - or staff , folded and glued onto itself and then painted - quite badly - with the desired emblem. This is supposed to be Cunard's rampant gold lion on a red field... and this is supposed to be the 'red duster'. Please don't look too closely it's only a small scale model and there's only so much I can do with a paint brush. 😟 Remember how I keep going on about creating an 'impression' of the subject rather than a super accurate replica - well here's a prime example. Both flags are left essentially fully stretched out astern because the ship was going flat tack on a windless night. So here is the model, finished and awaiting setting into it's ocean base. And here it is sailing heroically across our new composite-stone kitchen bench. I think it looks really good against this background, somehow these colours just work together. Nevertheless, I did not spend all of that time making a sea for the model to sit on our breakfast counter. Here is the base 'sans-ship'. Unlike with AE2, In this case I had made the cut-out a very tight fit and rather than having to screw the vessel onto the base it just plugged into the foam quite securely. Then I used some Liquitex to ensure that the water closed up around the hull. I then sat back let it dry and... admired my work! I'm happy with this one. 😀 If you have not seen the RFI - which contains some more detailed photos and the story of how Carpathia was beaten into second place at the 2019 WASMEx then please click on this link. So that's it - finished! Or is it? There's at least one very significant omission that I might fix one day, if I ever get the time and motivation together. Carpathia had two sets of ratlines running up each of it's masts and I prepared the model to have these fitted but in the end I ran out of time prior to the competition. It's interesting to note that despite the fact that these were very prominent features on the real ship no-one has commented, so for now I'm leaving well enough alone. So depending on how I feel in future there might be 'More than This' to come. Phew - finally got the Roxy Music reference in there! Every 'Bandsaw Steve' thread has to have at least one! Mustn't rely on @hendie posting 'Tomorrow Calling' to get me out of my contractual obligations. Thanks for all the comments and support folks, Hoping to be back on the maritime pages in 2020 - once the Avro 504 is dealt with. Bandsaw Steve 👍6 points
-
Unfortunately, bad behaviour is not just related to low cost and Europe. In the Far East we have just as much buffoonery going on in our cabins, perhaps more. Until recently, air travel in a particularly densely populated country in this part of the world was a new phenomena. Ten or so years ago, flying from the capital of said country and needing to use the facilities, I’d frequently find boot prints on the toilet seat because sitting on a loo is not something many have ever done! Fighting in the cabin is also not uncommon. In particular, First Class passengers all think they own the aircraft and airline and are therefore the most important people who have ever travelled. They can be extremely demanding and if they don’t like their fellow cabin travellers have been known to start a fight! Many Asians find it more difficult to process alcohol so it takes very little for some to be comatose: hence when there are disputes, the folk are usually sober which makes the understanding of escalation to violence even more difficult to comprehend. Then, of course, there was the famous first timer last year, who boarding at an outer bay (no air bridge), thought it was a good idea to throw a pocket full of cash down the engine for good luck! Flight promptly cancelled. Hugely expensive dismantlement of engine required to find the last of the pennies. Theft is also becoming more prevalent on flights. I’ve had a number of cases involving huge sums of money. Embarrassing for the victim as it is illegal to take huge sums of money out of said country. Incomprehensible when it comes to the perpetrator as they are frequently caught and seem to have forgotten about their escape plan! Aviation brings out the best in some, Sully for example, and the worst in others, Jet2 muppet and numerous others. For me there is zero tolerance towards anyone who puts the safety of my crew, my passengers and my aircraft at risk, (that includes toilet smokers or vapers), the police are always called to meet us on arrival.6 points
-
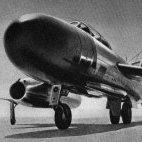
Hello I spent a very wet day at Fairford today, with only three of the scheduled aircraft able to display due to the low cloud base. I can't tell you how frustrating it was to hear the MiG-21 being told by the tower to return to his parking spot because the cloud base was below 1000ft! That was pretty much the story for the rest of the day. The only full displays were by the Spanish Harrier (thankfully), the Chinook (always impressive) and the A400M (always entertaining.) Here is my record of the day, with the E-3A being the sole aircraft in the NATO flypast! Hopefully, the weather will be better tomorrow! Thanks for looking.5 points
-
A short run kit of a pretty obscure subject. A few little issues putting it together but I like the result. WIP here: For scale:5 points
-
Tamiya Willy's Jeep in 21st Army Group Markings from Star Decals. Build thread Regards, Steve 🇬🇧5 points
-
Kind of you to say so but I imagine you would really want it done properly You seem to have mastered it yourself anyway Cheers, Stew5 points
-
Sorry Ced, I forgot to reply to this. Return to work meant my trip away faded to a distant memory and the existential dread and fatigue returned to normal levels by 0830 that morning. The museum is good. They ask for a 50 quid donation towards the new hangar in exchange for access to inside the Mossies, which in the interests of making new AM parts Sovereign Hobbies was happy to pay. In other news, I am still not a figure painted. Should've asked Stew to do it...5 points
-
Hi guys and girls, So firstly I’m not 100% sure this is in the right place, but hey ho here we go anyway! So I’m about to loose the mancave 😭, as our daughter really does need her own bedroom soon and we need our own space back! 😃 But prior to this I want to do a quick project and build three “Cute” planes in order to make her a custom mobile! The chosen kits are the following: Tiger Models Cute BF-109 by Neal, on Flickr Tiger Models Cute Spitfire by Neal, on Flickr Meng Kids Lancaster Bomber. by Neal, on Flickr My wife will be joining in and will be building the Spitfire! Which means a lot to me. Also these kits will be painted up in some nice a bright colours: Pink, Purple, Blue, etc... and will probably have some fantasy camo schemes. That is all for now folks, take care and happy modelling! Neal5 points
-
Time to wrap this one up. The decals went down nicely, a mix of Xtradecal for the markings and Airfix for the stencils. These were followed by exhaust staining and a light flory wash. The masks were then removed and finals bits added. The D/F loop was sctarch built with a bit of wire as the P-2 was not fitted with this and so the kit didn't have one. The markings are a little confuseing. The unit badge and tail code 25 indicate KG 152, the E33 assigning it to the 3 Staffel, 3 Gruppe. But this Gruppe didn't operate the He 111. From what i can find, and according to the decal instructions, it belong to KG 255 and one source says it was one of a number loaned to 152 to make a properganda movie. Apparently this was called KG Lutzow, but from what i can find this was made in 1940. So maybe it was started in 38 and then finished off in 40 after the invasion of Poland, which is part of the movie. And of course, a properganda movie would not be complete without a camerman there to capture the brave crew about to head out, maybe discussing who's going to be the star of the show. Really pleased with how its turned out. A few fit issues, the canopy isn't perfect. But overall, a nice kit. And deffinetly a match for the more pricey Hase kits. Thanks for looking.5 points
-
As this is a ‘fantasy’ build I get to decide on what colour the cockpit interior is going to be. A couple of points for me to consider will be that not much will be visible as I’m going to add a pilot and I’m not sure how much would be visible once the fuselage halves are joined. I’m going to see what it looks like in Tamiya XF-4 yellow green, if it looks wrong I’ll probably give it a coat of grey/green. To start all the components have been removed from their sprue(s) and given a coat of UMP/Stynylrez black primer. Once the primer had dried I gave the relevant parts a coat of XF-4 yellow green I’m not sure that the wing section will be seen, but just in case I’ve given it a coat of paint The instrument panel has been masked Pedals The rear of the cockpit and headrest was painted both front and back The control column will need detail painting Seat support The seat Detail painting will be next and then I’ll make a final decision on keeping the XF-4 as the main cockpit colour. until next time as always, any suggestions, criticisms or comments will be gratefully received. rgds John(shortCummins)5 points
-
Hello guys, Here's my latest finished model: an Eduard Bf-110 G-2 1/72. Excellent model. No problem at all. Easy assembly in a few weeks. I only used the Master PL 37 mm cannon. Out of box. I used Mr Hobby colors. Hope you like it. Send reviews! Cheers,5 points
-
More stuff on Canada's striped Sharks. Chris5 points
-
Walk ways masked up and sprayed, MRP tyre black for this one. And a bit of identity at last Enjoy Dan5 points
-
I firmly believe that a chap cannot possibly have too many photographs, so would be delighted to have them Andy thanks At present I am attempting to make a ceiling which can be slipped in place before the closure And finishing the boxing in of the gear bay ready for building the trailing arms and shock tubes Now to work out the seats How many each side and try to find a flat image I can scan I will have the stepped box up front which it seems are used to stow straps and hold downs for cargo, it'ld be nice to see inside one but as it is going to be a far up front as I can put it it may not matter5 points


.thumb.JPG.ca9d91d3c605f2ca36aeec8f5a1b648a.JPG)


.thumb.jpg.cfc129272ffec824439b15e6013d5952.jpg)


This leaderboard is set to London/GMT+01:00