
Leaderboard


Popular Content
Showing content with the highest reputation on 11/07/19 in Posts
-
Revell Scale: 1/48 Type: Dassault Rafale M Extras used: Eduard GBU-12 bombs, Renaissance MICA EM missiles. Paints and colours used: Mainly Vallejo with AK Xtreme metals where appropriate. Flory Dark Dirt Wash, various oils, Alclad II Aqua Gloss, Tamiya Matt varnish and Flory weathering sponge. Hi again! I'm spamming today, got a few finished off and photographed... So, this is another one I finished a little while ago but only just had a chance to photograph. A lovely kit, only issue is really is around the air intakes. Also the missiles aren't great due to an awkward to clean join, which is why I used resin. Other than that, nicely detailed and relatively straight forward build. If I was to build another one, I'd probably got for an after market seat too. Decals were nice as well/ So here she is: That's it! Thanks for looking! Val24 points
-
AZModel kit (CA) with many upgrades (PE, resin, Armycast set and decals) Camo - 102 squadron "Flying Tigers" - 201221 points
-
Hi guys I used aires resin cockpit and ejector seats, and engines for this build, with majority of my new favourite paint MRP, the figures are Reed oak of corse. Just a bit about the build represents IN FEBRUARY 2015 NUMBER 12 SQUADRON CELEBRATED ITS CENTENARY AND THE MARKINGS APPLIED TO GR.4ZA405 INCLUDING A PANEL LISTING THE UNITS BATTLE HONOURS. ALSO SEEN HERE IS THE SQUADRON BADGE WHICH FEATURES OF FOXES HEAD FAMOUSLY ADOPTED WHEN THE UNIT BECAME THE ONLY RAF OPERATOR OF THE FAIRY FOX IN 1926.18 points
-
CC-138 Twin Otter in scale 1/72 Short Take OFF and Landing (STOL). The Canadian Air Force is (to present knowledge) still using 4 Twin Otters, that are stationed in Yellowknife (Northern Territory). Tasking for SAR, logistics and communication flights. Able to land on: Water (Floats) / Snow (Skis) Rough terrain with kind of balloon tires Can take 20 passengers or 3000 kg. cargo. /Propulsion by means of two Pratt & Whitney turboprop PTA-6A-27 engines. Endurance is about 1400 kilometer with a speed of 325 KM/H. Total max. take-off weight 6350 kg. Max. ceiling 8250 meter. Kit: Matchbox/Revell. Build OOB. Paint XTRA Color Figurines: Preiser UNIMOG FLU 419 SEE =(SMALL EMPLACEMENT EXCEVATOR) Specially designed for the US Army. Withdrawn from service and widely available as second hand item It contains a loader, backhoe and auxiliary hydraulics. Four wheel drive with front and rear locking differentials. Mercedes 110HP diesel engine with 16 forward and 8 reverse speeds. Speed on the road 40 MPH with attachments. Kit: Planet Models Resin (CMK website) Build OOB. Diorama: Yellowknife runway has been cleared by the Unimog and the Twin Otter has been replaced from the hangar to the runway. For another day of service in a very harsh climate. Due to area of operations, skis are attached. The base is from ESCI and can be covered with a plastic top The snow: Build up from wood glue and finished with precision Ice and Snow from Krycell. Regards, Orion / The Netherlands17 points
-
Airfix Scale: 1/48 Type: Messerschmitt BF 109E-4/N Trop Extras used: None Paints and colours used: Tamiya paints (please see build thread), Flory Dark Dirt, Flory Sand Pigment, Alcald II Aqua Gloss, Tamiya Matt Ok this is the last one for today! Again, another I finished a little while ago but have only just got around to photographing. This was actually for last years Mediterranean theatre group build, which was great fun, and I did actually finish her just in time but failed to get her photographed... The lovely Airfix BF 109E-4/N Trop. In terms of detail it isn't a patch on the Eduard 109s, but still nicely detailed with reasonably restrained panel lines, reasonably well detailed cockpit, lovely decals and a simple, well fitting construction. The Eduard 109s are better, but at a reasonable price, this is a quick and fun, generally hassle free build. I chose to use Tamiya paints throughout even though they probably aren't quite as accurate colour wise as the Vallejos I have, as I am more confident to get the fine control needed for some areas of the camo patterns. A great fun build, and a recommended little kit. Many thanks, Val17 points
-
Airfix Scale: 1/72 Type: Spitfire F Mk.22 Extras used: None Paints and colours used: Alclad II High Speed Silver, various Tamiya paints, Flory Grime Wash, please see build thread for the clears Hi All, I finished this sometime ago, but it's taken me a while to get around to photographing here. This is the Airfix kit. It's pretty decent. Nicely recessed details which are a little soft in places. Fit is generally good, but not very positive in places. Minimal filler needed (just Mr surfacer really). Over all a good fun build if you take your time with the fit. I actually made this for a group build on another forum, but missed the deadline in typical Val fashion! On with the pics. The canopy is quite thick, but the cockpit details aren't brilliant either so not really worth worrying about. It's only 1/72 after all. The decals were brilliant, btw. Thanks for looking! Val15 points
-
Having broken the old Italeri RF-18A kit out of my stash to use the decals in a group build project...I thought I might as well go ahead and build the kit, for nostalgia's sake. It turned out to be a timely notion, since I'd just acquired a set of aftermarket decals--Orion Scale Models' very nice Kuwaiti AF F-18C/D sheet--for which the past-its-prime Italeri offering would be perfectly-suited. The '80's vintage kit has options to build either the then-current single-seat A-model fighter or the 2-seat B version. It also comes with the (R)F-18 reconnaissance-nose option which was originally prototyped and tested for the US Navy--as a single-seat recon platform--but which never went into production. What lifts the last bit from mere 'what if' curiosity is the fact that kit-included recon palette is virtually identical to that used for the USMC's more recent (2000-onward) two-seater ATARS (Advanced Tactical Airborne Reconnaissance System) modification; a cutting-edge real-time digital recon platform replacing the Corp's old RF-4B/C Phantoms. The mod can be fitted to any later-production F/A-18D, simply replacing the nose gun...but still allows the modified aircraft to carry both dropped ordnance and offensive and defensive missiles. Kuwait has operated numbers of both single-seat and two-seater Hornets in two squadrons since the years following the Gulf War, in a distinctive wraparound 3-color camouflage scheme (which is nicely documented in the full-color Orion instruction sheet). I decided to build the Italeri kit as one of their two-seat -D models 'upgraded' with a hypothetical ATARS-like recon capability: basically the kit parts as provided, 'juiced' with the now-standard LEX fences and a few add-on antennae and sensors to more closely resemble the USMC machines. Great fun as a quick build...and a useful test 'mule' for what I hope/plan to do as a much more accurate and carefully-built Kuwaiti bird to come. Enjoy the photos.15 points
-
75 years ago In November 1944, the 53rd Hiko Sentai of the Imperial Japanese Army Air Force was ordered to form a Shinten Seikutai flight of Kawasaki Type 2 Two-Seat Fighters for air-to-air ramming attacks. Aircraft # 98 was one of them. Embellished with the conspicious Karimata arrow, this Ki-45 KAI Tei was modified by removing armament, abandoning the rear cockpit and trimming the antenna mast. It is doubtful, however, if it was ever used for this purpose since the 53rd Sentai was relegated as a night fighter unit in January 1945. 40 years ago I saw Nichimo's Nick for the first time and was thrilled. Unfortunately, with only limited funds I couldn’t satisfy my desire. Then it was gone. Fifteen years later it re-appeared on the shelf of a remote hobby shop. It was my quickest purchase ever! But job priorities prevailed and the treasure was neglected again. 15 years ago I finally started. Meanwhile a young contender, the Hasegawa kit, had conquered the market. I didn't forsake Nichimo, though. Firstly, because I was attached to it after such a long quest, and secondly, because I consider some aspects of this kit, like the riveted surface, much superior. Aftermarket items and scratch-building did the rest. Now I hope that you enjoy the pictures. For me, the Dragon Killer is the most appealing machine in Japanese military aviation and arguably the neatest two-seater of the war - much too graceful for a suicide mission! ハッピーモデル構築 - Michael References The Kawasaki Ki-45 Toryu, Profile No.105, René J. Francillon, Leatherhead, 1966 Japanese Army Air Force Camouflage and Markings WWII, Donald W. Thorpe, Fallbrook, 1968 Slayer of Dragons - The Story of the Toryu, Air Enthusiast Vol.5, London, 1973 Army Type 2 Two-Seat Fighter “Toryu“, Famous Airplanes of the World No.21, Tokyo, 1990 Kawasaki Army Type 2 "Toryu" Two-Seat Fighter, Mechanic of the World Aircraft 6, Japan, 1993 B-29 Hunters of the JAAF, Osprey Aviation Elite Units 5, Koji Takai & Henry Sakaida, Botley, 2001 Unit History: 53rd Sentai, JAAF, Arawasi International Issue 11, Eleftheriou & Paul Thompson, Tokyo, 200914 points
-
Airfix Scale: 1/48 Type: Curtiss P-40B Extras used: Eduard exhausts and wheels, and Montex masks Paints and colours used: Vallejo model air Curtiss Brown, Green and Grey (AV71125, AV71294 and AV71296), Vallejo metal colours on exhaust, Vallejo Interior Green, various Tamiya where applicable, Flory Dark Dart, Flory Mug pigments, Aqua Gloss and Tamiya Matt Clear. Hi everyone, sorry it's been so long since I've last posted. I'm hoping to be back here a bit more regularly. Well, what can I say? What a kit! This is what Airfix can do when they put their mind to it! Well detailed, restrained panel lines, lovely cockpit construction and detail, and a near perfect fit, aided by the darker grey, stiffer plastic. This is, in my honest opinion, as good as an equivalent Tamiya kit (the new Spitfire Mk.I excepted as that is the next level). Painted with the newer Vallejo colours which went down flawlessly. Here's the pics. After watching Phil Flory's build of the Hasegawa/Eduard kit, I did a bit of research and found I'd over-done the exhaust staining a bit. However, I used a bit of Tamiya Buff, well thinned, and I think they look ok. The instrument panel is just the raised kit details with the perfectly-fitting decal. I think it's as good as photo-etch in this scale; nice work, Airfix. I used Montex masks throughout and that includes the markings (except the tiger and the lady). They worked well. but a lot of work on the roundels, which could have probably been ok with the excellent-performing kit decals. The lights on the wings are the only things that aren't great, just a moulded lump. I painted them first silver, then a mixture of clear red or green mixed with Krystal Klear glue. Chipping work was done with Vallejo Metal Color Steel and a torn sponge. The staining work was all done with oils. That's it folks! A fantastic kit, highly recommended. The wheels are probably of from the kit, but the Eduard exhaust stacks are nice. Thanks for looking, Val14 points
-
Having a soft spot for jets of the Cold War I decided to build a (slightly) more modern fighter to accompany my recently built Hawker Sea Hawk. This particular Fiat G-91 is manufactured by Meng to 1/72 scale and whilst it isn’t the worlds best quality kit, it nevertheless builds into a fair representation of the Luftwaffe’s version of this ground attack jet and is nicely decorated with Cartograph decals.The only additions to the basic kit are a resin ejector seat, pilot and a photo etch access ladder. All paints are Tamiya acrylics and the lacquers are Humbol gloss and Humbrol Satin. Shoddy phots by ancient smart(?) phone. Comments, harsh, Micky taking or otherwise well received.14 points
-
Tamiya 1/48 F4F-4 Wildcat with Eduard PE cockpit, Montex masks and CMK Resin Wheels. Finished up this baby today. Been working on it for quite some time and just didn’t want to ruin it by becoming impatient. This was my first foray into airbrushing and I’m happy with how everything turned out. Normally I use aftermarket decals but I kept with the kit ones and they took a lot to snug down around the fuselage so I would get different ones if I were to redo it. Added a little chipping and weathering here and there as I imagine these didn’t see much action early on until they started taking off the red in the pacific. Let me know what you think. I was initially worried about the colours when they were sprayed on but I think with the light in the pics it was quite good.14 points
-
Ta Eugenio I've since found that giving the moulded canopy a good polish with car polish (I used a felt-wheel in the little Tamiya battery router for the job) seems to clear away the discolouration - so it's not the problem I thought it was anyway. I'm getting pretty constant canopy thickness using the dental vac. I think probably just prefer a slightly thicker canopy than, say, Giorgio does. I bought and tried some modellers hydrocal plaster some time ago Keith but I found that it was quite soft after it set and the edges of the moulded canopy crumbled. P'raps the dental plaster sets harder? Or P'raps I got the mix wrong? Or P'raps I was incompetent in any one of a myriad of ways I have not as yet figured out........ Anyways. After a good deal of faffing and avoidance activity I think I've got there there with the canopies. One of the potential problems is that pulling or vac-forming a canopy directly over the kit supplied canopy results in a very slightly over-size canopy. Doesn't matter much of the time but it was causing me problems getting a decent fit/look on the Hawks. Particularly the windscreens. So I've had to allow for this by making slightly undersize masters. Here's the final windscreen master; with the second, cut-down, master I used to help me sand the moulded windscreen to size and a couple of almost finished screen and a - yet to be trimmed -spare And here's one test fitted. And here's a canopy. I'm happy with shape; although it's about 0.5mm to tall still so the sides need a tad more sanding down and this one needs a bit more polishing for better clarity. The canopies hinge open on the starboard side, and I'm gonna pose them open, so actually a precision fit is probably not vital.13 points
-
Sometimes you have yourself a kit that is pretty much faultless, the build goes through without issues and it restores your faith in life. This for me is one of those - great package, great book that comes with it, huge colour profile book (32 to choose from!), perfect fit of parts. Probably only couple of things to say is maybe too many parts/bit over engineered for 1/72 (cockpit took me ages and now can barely see it!). Really wish Eduard would do more of these special boxings in 1/72 but they seem to focus on 1/48 recently. Vallejo model air paints, I chose the following markings: #1 S/L Tom Trimble No. 457 squadron, Sattler Airstrip late 1944 #2 F/O Norm Turnbull No 79 squadron, Morotai, April 194512 points
-
Well, here she is!10 points
-
Ced in “must get new tool” shocker!10 points
-
These days I mainly specialise in inter-war aircraft models in 1/72 scale, but within that rather large field my favourite area is the 1926-41 'Golden Age' of U.S. Civil Aviation. This is a largely untapped field for models (and likely to remain so), which neatly combines my twin passions of scratchbuilding and historical research. Lloyd Stearman was one of America's foremost designers of civil biplanes. Having been the Chief Designer of both Swallow and Travel Air, in 1927 he left to start his own company, initially in California, but soon relocated back to Wichita, Kansas, then known as the 'Air Capital', for its concentration of civil aircraft manufacturers and suppliers. The fourth successful design of his own company was the Model 4 Junior Speedmail (an earlier model was the larger 'Speedmail'), which he described as 'the finest airplane I ever designed'. Intended primarily as a mailplane, only around half the 40 constructed actually saw service in that role (with American Airways and Canadian Airways). The rest were bought for corporate use, or by wealthy private owners. Top of the range were the 4E models with 400+hp P&W Wasp power and finest of all were the 3 specials constructed for Standard Oil of California and used by their flying salesmen up and down the west coast, 1930-35. Surprisingly, around a dozen of the Stearman 4s built survive, including 2 of the 3 SOCal planes. Latterly, I've been building most of my models in pairs, which I've found to be a more efficient and fun way of increasing my modest output. So here are my models of a Stearman 4EM mailplane of Canadian Airways (Eastern Lines), Montreal, 1931 and Stearman 4E Special 'Stanavo 4' of Standard Oil of California, San Francisco,1930. Models are 100% scratchbuilt and were completed in 2017. Both together: 4EM Mailplane: 4E Special : WIP Parts spread: Cockpit parts: One of my favourite 1930s biplanes..........9 points
-
Presenting for inspection my Airfix Messerschmitt Bf110C in 1/72 scale. I seem to completing models in the order that I remember building them when a nipper; in that case it was a Matchbox 110, so there was a nostalgic reason for commencing this build. This took me far, far longer than intended, beginning this at around Christmas last year (2018), and there were moments when I was tempted to give up. I found the fit to be iffy in many places, and should have spent more time making sure that everything slotted together before assembly, but that is a lesson for another kit; I was just deperate to get the bloody thing finished and move onto the next one! Managed to break one of the main undercarrage struts, so concious that this isn't a wholly complete model; I removed the other for symmetry. Also managed to lose the wing navigation light so please ignore the gaping hole where that should be! A number of firsts then with this build; first time airbrushing which proved challenging but incredibly satisfying when looking at the results! First time applying a panel line wash (Ammo by MIG), a satin coat and applying a variety of Ammo by MIG grimey weathering products to try and bring the beast to life...fairly subtle in places, but on the whole happy at how this turned out! Pictures below; all comments welcome Painted using Ammo by MIG acrylics.9 points
-
Oy.....That's my canopy polishing toy tool that is9 points
-
This is my sixth completion for 2019, the Hasegawa 1/32 Ki-61 Tony, representing an aicraft flown by Sgt. Maj. Iwao Tabata, 39 Training Squadron, Yokoshiba Air Base, Japan in March 1945: I got the kit second-hand and was disappointed to find that the pilot figure had been removed from the sprues, but apart from that it was quite a pleasure to build. I replaced the guns with brass ones from Master which added significantly to the cost of the kit, but the cowl guns in particular were totally worth it as they are very much better than the plastic ones supplied with the kit. I also used an Eduard mask set because I am lazy, and I replaced the forward part of the pitot tube with a section of Albion Alloys Nickel Silver micro-tube. The underside was done in a mixture of Alclad Aluminiums, not because I was after a specific look but simply because I didn't have enough Duralumin to complete the entire underside. All the other paints were, of course, Colourcoats, ACJ04 - IJN Interior Buff Green for the interior and wheel-bays, ACJ22 - IJAAF #7 Ohryoku nana go shoku for the uppersurface camouflage, ACJ08 - Mitsubishi Cowl Blue Black for the anti-glare strip, ACJ19 - ID Yellow for the wing leading edge markings and ACJ23 - Propeller Brown for the prop and spinner. I used the kit decals as there aren't that many aftermarket sets available and much as I would like to do one of the green-blotches over silver aircraft it's a toss-up whether I would be defeated by laziness or inability but it would be one or the other. The kit transfers were a bit thick but settled down well with no silvering. The final coat was Xtracolor XtraFlat varnish for the topside and XtraSatin Varnish for the underside. The nav lights were done in Tamiya clear Red and Blue, and the R/T antenna was done with Infini white rigging lycra (110 denier) threaded through a couple of Bob's Buckles eyelets (the 1/48 ones) and fixed with a dab of superglue. Thanks for looking in Cheers, Stew8 points
-
Thanks Simon I think the 10 year one please… Thanks Keith Hi Ben and welcome Thanks V - it does get a bit rowdy sometimes but the locals are pretty friendly I know! I'm using 'strong Linen' thread so it should be OK; you certainly can't break it by pulling with your fingers - I have the scars to prove it. Must be the knots. Things have been painted ready for detailing: I still like brushing H78 for this job as it gives a sort of pre-weathered finish. I promised a photo of the i/ps earlier: Nice. Obviously not glued yet as I'll do that after I've put in the (gulp) PE compasses. Hate those. Daughter and puppy are arriving soon - a good excuse to delay the job!8 points
-
Now some of the detail under the nose:8 points
-
Right back at ya Mr Fritag! Now where were we? Something to do with Wessex... It's been a while since I tackled the insectual big one and this time I wasn't going to beat around the bush. Butchery of the first order was required. But I held back... I only wanted to cut two slots for the nose door hinge. Fly provide some teensy little mites of PE hinges that were supposed to be glued end on to the airframe. The first time I sneezed they were going to fly (no pun intended) off into the darkest realms of the basement. I needed serious hinges. Fortuitously, I had some brass strip that was the same thickness as the kerf of my hacksaw - or close enough. Two sections of brass strip were clamped together for the shaping ceremony Followed by a bit of drilling and some precision filing with the three square. The precision filing wasn't very precise. But once in place, I think this looks a lot more substantial than the kit offering - and is guaranteed to stay in place throughout my clumsy handling. Next up was all the fun stuff, you know - the type of stuff that takes forever and nobody really notices, but if you didn't do it, it would be immediately noticeable. Yes, that stuff. Multiple attempts just to get this far... see that small piece of wire folded into a "U" shape ? Did you also notice the small length of tube that covers about half the length of one of the legs? Well, that wasn't the first U shaped piece of wire, and that wasn't the first little piece of 0.5mm tube that I had cut. These were just the first bits I hadn't gone and lost Even more fun was had by drilling out these little blighters. I find it hard to believe I was actually successful in drilling things this small. Bill, you have just earned even more respect. Well, the reason I had a small piece of tube in the shot above was because I wasn't so successful in drilling other aerials - so I lopped off the offending sticky-outy part, drilled a small hole just big enough to seat the wire in with a dab of superglue - then lopped off the top end sticky-outies and replaced them with another length of 0.5mm brass tube, and that got me this far... Then when it is all assembled, it should look very similar to this. I even managed to find my EZ-line from several years ago -how great was that? The aerial on the right has had the EZ-line glued in place, but the aerial on the left has no glue yet, and the EZ-line can slide freely through the precisely drilled holes. Being not completely stupid, I glues two small pieces of styrene on the free ends of the EZ-line so they could not slip back through the aerial. A slap of black paint and they'll look fine. At least in Auld Nick's scale they will. I hope. The plan being, that once I figure out where the aerials are supposed to be positioned, I can glue the aerial on the right into position, let that cure, then glue the second aerial in position, and once that is cured I can pull the EZ-line taught, glue and <snip> That's the plan that is. for another day though.8 points
-
Canopy masks off, prop in place, as well as the other antennas, wing walkways: Decaling will follow soon:8 points
-
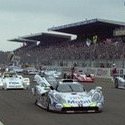
Hello friends! I want to present a small photo session of my new project, Alfa Romeo 8c 2900B Le Mans 1938, made by “Profil 24” from resin. Paint rosso alfa 30-50 years, 2k auto varnish APP. Many saw her in May at the Kiev exhibition. Special thanks to Sergey Gornichenko for the photos. Enjoy watching.7 points
-
Here are the final photos of my Hasegawa P-38J Lightning. If only it was on the correct side If you’re interested you can see my build log here… https://www.britmodeller.com/forums/index.php?/topic/235049976-hasegawa-148-p-38j-lightning/ until next time as always, any suggestions, recommendations or comments will be gratefully received. rgds John(shortCummins)7 points
-
A long time ago, blimey I can really say that- it was! A long time ago when Matchbox released their CH-47D/Chinook HC1 I eagerly bought it and immediately set about refinishing the surface detailing by emphasising some panels and fading some out of the picture with my favourite at the time underscraping technique using Mr Swann-Morton's number two blade Then a short time later with Wokka unfinished I had a crisis of interest and ceased model making of any kind Almost everything I had in my spares boxes, most of any kits I had begun and many other things vanished into the dust bin My first scratchbuilt Sherpa along with a Dakota I had bought, and the Modeldecals for the Farnborough machine and uncounted models I had finished including my Air Portable SWB Landie THE LOT straight into the bin Kaput Anyway leap on over thirty years and dr_gn of erstwhile BM fame awoke my interest in modelling on Pistonheads and I got the urge again so here I am taking up batons I dropped a while back As you may be aware I am in the middle/end phases of two other builds but feeling meself getting bogged down I decided to have another go at The Mighty Chinook I have NOT abandoned the H-19 or the S-61N, but my mo needed a bit of a new jo and what more inspirational helicopter than the Ch-47 can you imagine getting on with? I picked this boxing up at one of the model shows a while back, knowing full well that I have the itch to scratch Here is the rather battered old box With its transparent parts, I have decided to build the windows and nose as moulded so these will be used as they are Probably The box was well filled too And I think the finished model will satisfy my little itch A huge transfer sheet comes with it too Lots of choices here and there is a multitude of other options out there on the net if needed The cabin is a little primitive and does not have the passageway between the hold and cockpit that it should Well it didnt... It didn't have the shelving that holds the comms gear either Then I took direct inspiration from @simmerit's monumental Trumpeter build for the interior along with zillions of interior shots all over the 'web Sorry about the blurry shot, sorting that out soon The starboard side has a heat exchanger-y looking thing with an outlet just behind the pilot's seat on the outside wall tucked away where the shelves are on the port side Can you see it in there along with the insulated silver pipe/hose? And extra comms gear, phew blimey That isnt at all clear is it, another? A few of the cockpit controls placards from Reheat dotted about under paint give a reasonable look to the thingy in there There is a slatted angled bracket across the opening lower down Here it comes A short piece of evergreen channel was opened along one wall and a small triangular fillet was introduced When I come back to this next, maybe tomorrow but I have S-61N canopies to mould tomorrow, I will trim it to size and place it in the lower hole area This is it for tonight, will it do? I want to give full acknowledgement to SI for all his inspirational work with the Trumpeter kit and admit unreservedly that his pictures now grace my hard drive and are likely to be my main resource during what I hope will be a quite short endeavour His work should be seen here I hope he will soon be able to take up where he left it Anyroadup, 'night for now6 points
-
After what @Astir8 just mentioned about the plug cables I thought I’d try some wire. or even better lead. oh yeah!! Lead.🤗 thoughts?6 points
-
half-heartedly! Ta Ced. Once I bury them in paint and pimp them up they should look okay to the uneducated eye Oh yes you should have! 'Tis but a fleeting visit methinks. You can't imagine how much fun I can have here in the colonies using real words. Swarf is always a great one. Bellcrank draws a complete blank, and I throw in Aluminium on occasion just to watch their faces. Even more fun can be had with colloquial Scots - they're never quite sure if it's safe to google or not.6 points
-
Time to recap I feel, I do not want anyone to think that having a new toy on the stove takes this out of my aiming point So we left her here with stuff to do If it looks as if it is masked for paint you are right, the fuselage was in line for a real old @Probert -ing so I masked it off for safety and set off to yellow it all up Halford's yellow high build primer, this will help me get and maintain a decent finish for the paint to sit on Using this allows me to find all the many bad bits and get them repaired before I paint the model Work to do there huh? And here Here too I am hoping to get most of the blemishes sorted quite easily with PPP Needs some at the junction of the fin and the horizontal stabiliser, I took a lot odd ball plastic off this bit the other day Re-shaped the stab thickness at first so sihrsc came into her own As I mentioned not a few days ago the milliput was not taking care of my mould so that needed a rethink Aha I know says I, Fritag's method Take a new canopy with er, issues and add a thick piece of polycard to each face and shape the resulting oddity to where you want to take copies from it More Proberting to get the shape exactly right then into the garage/forge Four mouldings made. one was good enough to work with Pull moulded of course And the resulting OK one The Fritag method needs the buck to be significantly larger than the canopy to allow accurate cutting to the real minimum This one looks right to me So out with a brand new No 10A scalpel blade and trim it off Let's see shall us? Not badddd! I will be trimming this to actual size needed tomorrow, this is enough excitement for one day see y'all6 points
-
Just finished my cat inspired diorama entitled catis slobbish mind you I know how he feels if I could get on the shelf I would join him.6 points
-
Yep. I remembered. And tried copying it for the Hawks. But the Airfix canopies are so thick that a casting of the inside was (i) too small! and (ii) a slightly different contour/shape to the outside - especially the front of the windscreen where it meets the fuselage. Its been a bit of a bu**er actually......6 points
-
Nobby's Javelin build was quite something. The way he manufactured the rear end for his was inspirational as I remember it. I have been gathering Frog/Novo Javelin kits with the intention of chopping the back ends off them to use on my Airfix FAW9 builds however I do have a resin replacement nose or two for the Frog kits so might be tempted to build one of them to completion to see how it compares (I'm not too worried about the lack of cockpit detail in 1/72). If I start on one of these 'cut and shut' conversions you can bet that Airfix will announce a scaled down to 1/72 version of their sublime 1/48 Javelin just as I'm applying the primer so best I get started then! Duncan B6 points
-
Ok, last steps! I had to fix the hinges of the doors and engine hood, I had broken some of them during assembly and still wanted them to work (there is a complete scratch-built engine in there that I still want to show!) So patiently I cleaned, trimmed, relocated the hinges made of syringe needles, glued them with CA and after confirming that they work, I put some tape to keep them closed while I continued working on the vehicle. With that solved, I continued to build the radio antenna with steel wire and some copper wire to simulate the coil on the base. The antenna could be carried extended or bent down onto the vehicle, which is the position I chose for my Cashuat. And painted. Notice the working door hinges issued using syringe needles. To add some realism and "action-feel", I issued some spent cartridge cases simply by cutting brass wire. Quite convincing at this scale, and glued them randomly on the floor of the vehicle and on the street. Quite a battle! The M-60s were added, they swivel and turn freely, a big help to match them to the gunner hands. Both gunners were glued in place. Undersides checked, nothing else to add. Stop lights were painted using Tamiya clear red. Some additional weathering was added to corner and edges using graphite pencil (still needs some more!). And then the nicest part started: finishing the diorama. I glued the figures as planned, then the vehicle and all the "junk" on the street, representing bricks, plastic, empty ammo boxes, cans, trash in general, as typically seen in such scenes. The Cashuat has rammed a guerrilla brick barricade, capturing the position and armament from the terrorists. But beware! One of the Cashuat gunners has spotted danger and alerted the others! Two foot- soldiers are cautiously looking for any remaining guerrilla threat, while the vehicle commander is paying attention from a safe position near the driver’s door. The PRC-77 radio and some grenades, ammo cases, etc can be seen inside of the vehicle. Well and this is my contribution to the brief story of Armored Fighting Vehicles of El Salvador; Cashuats will never be issued as a kit I guess, so maybe this is the only 1/35 one you are going to see for a while. Cashuats are currently still operative in El Salvador, more than 30 years after the first ones were built. I had the chance to see them in action during those difficult times, had the chance to see them several times again on parade, much happier occasions! Will post some better pictures of the finished diorama on the section of finished armor one of these days. I hope that you like this project at least the 1/100th part of as much as I did. Picture of a Cashuat during combats in San Salvador, around November 1989 (picture courtesy of Douglas Cornejo). Marco6 points
-
I've been having a play with the engines today. I didn't realise that the engines on the real H-models have such a 'nose-up' attitude on the wing: (pictures used for illustrative purposes only) IMG_1236 by Thomas Probert, on Flickr IMG_1237 by Thomas Probert, on Flickr So I've been doing some careful trimming of the kit-supplied pylons in order to get both a decent fit to the wing as well as replicating the angle at which they sit: IMG_E1234 by Thomas Probert, on Flickr So far, so good... IMG_1233 by Thomas Probert, on Flickr Sanger have also molded the four pylons as identical pieces - in fact on the real aircraft the inboard/outboard pylons have a different shape due to the change in profile of the wing as you move towards the tip so I've been doing quite a bit of head-scratching today. I'll have some more pictures of my progress soon. Until next time, Tom6 points
-
Now complete, My interpretation of the Japanese secret weapon and surprise aircraft that more than proved its worth during the Pacific theater. It also spawned the US Navy to rapidly develop new fighters to combat the Zero, such as the now legendary Grumman F6F Hellcat. My full build log for Jiro Horikoshi's master piece of engineering can be found here... Alas, the final pictures.....This has been more of an experiment in learning new painting and weathering techniques. Utilising latex maskol for the paint chipping effect, weathering powders and pencils for the exhaust and panel lines etc. I may keep going back to top up and try something new but I have for now left it as you see it today. IMG-20190711-WA0003 IMG-20190711-WA0005 IMG-20190711-WA0004 IMG-20190711-WA0007 IMG-20190711-WA0006 IMG-20190711-WA0010 IMG-20190711-WA0009 IMG-20190711-WA0011 Over all I am happy with how it has turned out. I though the IJN Grey Green paint (recommended by Tamiya) was a little too green to the traditional white you normally see Zero's painted in. Thoughts and pointers are always welcomed Enjoy!5 points
-
Well, it's official - I now have the inter-war civil aircraft bug, and next up is this little guy - Avis' 1/72nd Bristol Racer. 'What the heck is a 'Bristol Racer' I hear you cry? Well, wikipedia says The Bristol Type 72 Racer was a British racing monoplane designed by Wilfrid Thomas Reid and built by the Bristol Aeroplane Company at Filton, England. - and who am I to doubt them. More to the point, it looked like this: Who couldn't love that? Well, apparently the pilots who had to fly it because according to wiki it was terrible and scrapped just a couple of years after it was built. Still, it looks good, doesn't it? Anyway, thanks to Avis for making a kit of such an obscure piece of aviation history. Apparently they're only making 500 of these kits, but I've got one so let's hope I can actually finish it and make it look halfway decent when I do. As is traditional, here's the box: And here's the bits: Moulding is definitely short-run, but I've seen worse. Next time: The amazing invisible cockpit!5 points
-
318 (Gdanski) Squadron was one of the last Polish squadrons to be formed & was named after the city of Gdansk, after the custom of naming fighter squadrons after cities & bomber squadrons after regions. It performed the vital, dangerous but unglamorous work of army cooperation in support of the 2nd Polish Army Corps in the middle east & Italy. It saw intense action at Monte Cassino. Image from Polish Squadrons Remembered. This is my fourth Eduard Spit IX, detail is great but the engineering is over complicated in some ares. I can't understand why the exhaust comprises several parts & the cowling top is split in 2. I used Eduard's resin replacement on this which didn't fit as well as the Barracuda part I used on my other ones! Decals are from Topcolors Polish Spitfires booklet. It represents the aircraft flown by P/O Chudzinski from Tissano in Italy, July 1945. Any comments, criticisms & observations welcome. Pete Thanks for looking.5 points
-
Here is my A320 1/144 Scale I’m currently working on. It’s built using the Zvezda Kit, with the extended flaps option. It has been sprayed using a standard Humbrol Gloss Black rattle can. Wings painted using Revell’s standard recommendation of Revell Light Grey 371 and coroguard is Revell 374, with silver leading edges. Engines Revell white gloss. Decals from Ascensio are excellent, and includes a white under layer for the decal to show through over the black fuselage. I much prefer the Zvezda A320 to the Revell one, I like the option for the flaps, and also the Wing mounting goes together with the fuselage a lot neater and easier. Will post the finished product to RFI when I get it complete. (Apologies for the photograph backgrounds 😩☹️)5 points
-
I quite like that? Edit!!! so I ripped em off and added some single lead textured by squeezing between pliers. kind of back where we started. 🤣 slightly better. Oh my. and tother side. right. I’m off to do some side walls. 🙈5 points
-
The venerable Matchbox Phantom, built for the CBK SIG display at SMW, and now ready for its photocall! Thanks to the much-appreciated support of @rs2man who kindly provided a Fujimi canopy and resin copy of an Esci F-4J radome, it looks a lot more like a real Phantom than the Matchbox does OOB, in either earlier or re-tooled version. To get them to fit requires some judicious shimming and sanding top and bottom, but it's worth it, IMHO. Decals for a 92 Sqn aircraft from Wildenrath celebrating the Silver Jubilee at Wittering in 1977. What a lot of stencils Mr Ward kindly provided. Anyway, glad I got this done just before this whole palaver becomes unnecessary with the arrival of the new Airfix FGR2... This is where you can really see the difference the new canopy and radome make... best, M.5 points
-
And no-one on ARC, so bravely criticising, has access to the actual product. All the photos seen over there are barely usabe to assess anything. In other words: we shall wait and see until we have access to what we like to assess. Until then, let's heed Jeff's advise 😉5 points
-
Hi all, a quick update with a photo of the aileron shims I decided to install (this is still OOB!). Since this photo was taken, the shims have been sanded to shape and both ailerons glued. I want to show the Morane in a climbing turn to the right... an exercise in ESP by the pilot keeping his hands on his knees... To plug the holes by the canopy, I think I will use some sprue melted in liquid cement. Still OOB!!! And still having fun, despite the crazy schedule. JR5 points
-
Hi all. My recently finished 777. Great build, OOB. Decals are from Draw Decal. This particular jet, took me from Doha to Manila last november. https://farm2.staticflickr.com/1620/26033842484_532f90c243_z.jpg[/img Thanks, Robin5 points
-
once the cockpit is done, it can be mated to the engine and firewall sub assembly to give you this. You then build up the fuselage over this frame with the below parts, which join along panel lines just like the real thing. No fuselage halves here!!!. Take care to insure all mating surfaces are free of burrs, and that the outside of the fuselage floor is also flush with none of the radiator mounting pegs sitting proud Take your time to insure the side panels are sitting hard against the floor alone its length. There is no room for error if you want to the parts to butt up against each other with even panel lines The below pic shows the upper cowl just dry fitted as well as the instrument shroud. Im really starting to enjoy this build. It's not for everyone. If you're one that loves to get to the painting stage quickly,maybe build the Revell kit, This kit rewards the modeller who loves the build process as much as the finishing. And that's me!5 points
-
For the last few days I have been driving myself mad by adding the individual ratlines to the model. For consistency, I have been using Slaters' .10 thou' plastic rod for this. One could use stretched sprue for this but I did not fancy driving myself ever more insane by trying to stretch the lengths required to exactly the same diameter. Still a way to go with them but I thought I would share with you where I have got to. Thanks for looking Martian 👽5 points
-
Kind of. The bigger problem was that (pre-Inskip and the formation of the “Branch” in 1937), to fly meant several years out of the mainstream, almost certainly under the command of another Service - or at best dual-hatted. To fly at all (as a pilot, at least) you had 2 ranks; RN & RAF, and they often didn’t align. The RAF rank reflected your flying experience, so it was possible to be, say, a Lieutenant Commander RN and simultaneously an RAF Flight Lieutenant or Flying Officer. (Sometimes the other way round, too: Lieutenant RN / Wing Commander RAF). All this was was not conducive to getting the right reports from the right people in order to do well in your ‘batch’ - essential if you were headed to the very top. For Observers it was slightly different, in that in the 20s & 30s they were attached to ships, not Flights (later Squadrons); flying wasn’t seen as their primary task - the unspoken attitude was that any trained officer with a “seaman’s eye” ought to be able to do a bit of reconnaissance and spotting fall of shot. It took a long time (RAF too) to recognise the non-pilot specialisms; Observers didn’t have their own flying badge (‘Wings’) until mid-War. The RAF still have an element of this attitude (or did in my day, anyway); there was a definite pecking order and pilots were at the top of it. Reverting to being reported on by the “wrong” people, I was warned in the 1980s that doing an exchange tour (which fell through for other reasons in the end) might have a detrimental impact at that stage of my career, because a 206 (annual report) from a non-RN Officer might not carry the same weight in promotion boards. Gunnery Officers were ship handlers; they would have qualified as watchkeepers (including Ocean Navigation - astro, sextants, all that jazz, to you and me) before they went anywhere near the specialist gunnery (“Long G”) course. Same for TAS officers, Communicators etc.; all members of the Executive branch, which then was (& still is) the only way to command a ship... and you must have commanded several ships to get anywhere as a Naval Officer. Otherwise they’d have been fishing in a very small specialist Navigator pool for their Captains. [For an example, see Boyd above: a torpedo specialist in destroyers for much of his early career - like Andrew Cunningham - he went on to command Illustrious and other carriers before reaching Flag Rank.] Gunners etc. are called PWOs (Principal Warfare Officers) now, but essentially it’s the same; it is technically possible, but extremely difficult, to get beyond Captain RN without a PWO qualification. I was a qualified seaman officer (‘X’, in RN jargon) before I started flying (I became ‘X(P)’ post-wings) and did a tour away from aviation as Captain of a minesweeper to keep my hand in / do some real Naval work (delete according to prejudice). But had I stayed the chances of my commanding a frigate or destroyer (which is what matters) would have been small because I wasn’t a PWO. [Edit: it might shed a little more light on the challenge facing a 1940s aviator who hoped to reach the top to point out that it took until 1960 for a WAFU to make 1st Sea Lord: Caspar John. He was just too young for WW1: Midshipman 1921, S/Lt 1924, Lt 1925, Wings 1926, and his active flying days were over by WW2. His first ship command (as a Captain RN) was Pretoria Castle in 1944, quickly followed by the brand-new Ocean in 1945. Arguably he made his name by his stellar performance in mid-WW2, first at the Ministry of Aircraft Production, then as Naval Air Attaché in Washington: in both appointments he was hugely influential in the massive expansion of the FAA (in numbers but especially in capability) during WW2. He was also very early to see the potential of rotary-wing, meeting Igor Sikorsky as early as 1944. There have been 2 other WAFU 1SLs since: Ben Bathurst and George Zambellas. But it is very rare.]5 points
-
The detail on top of the upper wing is being added now:5 points
-
...and just to prove that my life is not all pontificating about history, a small amount of modelling has broken out. As already observed, this Tetra brass is superb! More tomorrow, probably Crisp5 points
-
The school holidays are upon us now so the BUFF has been seeing a little action... I've not been happy with the rear turret set up, and I feel the kit's parts don't accurately resemble the real aircraft. Please excuse the terrible photo here (quick snap with the phone camera that I didn't realise was so out of focus) but as you can see... IMG_1127 by Thomas Probert, on Flickr ... it's not even close to the real deal... Tail Turret by Thomas Probert, on Flickr (Used for illustrative purposes only) So, it was out with the hacksaw, and I removed the kit-supplied turret and began by building up the basic underlying structure with some scrap plastic card and some brass tubing for the gun housing: IMG_1135 by Thomas Probert, on Flickr This was then all blended with filler, and sanded to shape. I then added the radar domes from some scrap 500lb bomb noses as the kit parts were too small: DSC_0172 by Thomas Probert, on Flickr Pretty happy with that - we'll see what it looks like under some primer in due course. As I explained in my earlier update, the kit panel lines are rather inconsistent and they've all been filled and an initial coat of primer applied. I've now begun to scribe my own panel detail onto the model - here's the nose: DSC_0179 by Thomas Probert, on Flickr DSC_0160 by Thomas Probert, on Flickr Undersides: DSC_0168 by Thomas Probert, on Flickr DSC_0177 by Thomas Probert, on Flickr The mid-section join has disappeared which is a bonus: DSC_0181 by Thomas Probert, on Flickr I've begun working on the spoilers - vanes still to be added: DSC_0174 by Thomas Probert, on Flickr She's looking a bit of a mess at the moment, but I can assure to that progress is being made: DSC_0158 by Thomas Probert, on Flickr Until next time, Tom5 points


.thumb.jpg.68dbfcb7df45418b1b83fc1e5bd88ea5.jpg)


.thumb.jpg.0cb281983c298f55509ab7d9a06994bd.jpg)

.thumb.jpg.5639a135fa3a8668e195029ae3d2a489.jpg)


This leaderboard is set to London/GMT+01:00