
Leaderboard


Popular Content
Showing content with the highest reputation on 10/07/19 in all areas
-
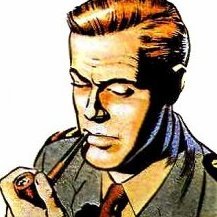
Hi guys I used aires resin cockpit and ejector seats, and engines for this build, with majority of my new favourite paint MRP, the figures are Reed oak of corse. Just a bit about the build represents IN FEBRUARY 2015 NUMBER 12 SQUADRON CELEBRATED ITS CENTENARY AND THE MARKINGS APPLIED TO GR.4ZA405 INCLUDING A PANEL LISTING THE UNITS BATTLE HONOURS. ALSO SEEN HERE IS THE SQUADRON BADGE WHICH FEATURES OF FOXES HEAD FAMOUSLY ADOPTED WHEN THE UNIT BECAME THE ONLY RAF OPERATOR OF THE FAIRY FOX IN 1926.20 points
-
This is the old Heller kit of the famous DC-10. In came out around 1975 with UTA markings and is still available now with Aero Mexico decals. The Swissair boxing came,as well as their 747 kit,in the 80s and offered decals for the earlier red stripe livery as well as the then new brown stripe livery. As with the 747 Swissair decals,the red stripe decals are also on the DC-10 kit way off shape,so the whole livery was painted on and only the logos and markings were used from the kit decals. Heller got the shape of the DC-10 quite right compared to the Revell and Airfix offerings,only the cockpit clear part is a little wrong.That can be corrected by using decals. I added those little fairings on the engine nacelles,seems only Hasegawa in 1/200 and Nitto in 1/100 had them included.All other manufacturers seemed to omit these parts for some reason. I also opened up the air inlets and backed them up with small parts of evergreen plastic under the cockpit as they were only scribed on the fuselage. The APU was also made of a small plastic tube as on the kit is nothing but a circle. The rest of the build is OOB and the parts went together without issues. Its a great kit in my opinion that builds up into a very nice DC-10,although the odd scale doesn't allow comparision to other airliner kits except Heller's . Paints are all Revell enamels,the decals come from the kit,door outlines and handles were obtained from a Revell A380 ! and the cockpit window comes from the 1/144 !! NAZCA detail set for the DC-10... A very detailed and nice decal set,but they went completely out of scale with the cockpit windows.But they match perfectly on the1/125 heller kit Enjoy16 points
-
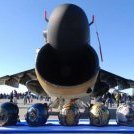
This was a kit I was lookig for for quite some time. Last year I finally found it and started working on it right away.I wanted to do the very first Boeing 747 that went into service with Swissair back in 1971. Heller offered this kit with the Swissair red stripe and brown stripe livery way back in the 80's. Unfortunately the red decalstripes were off size,so I decided to only use the logos and markings and paint the whole livery with my airbrush. The Heller 747 kit very well captures the shape of the originial,I only found the engines a bit off and tried to fix them.Later on I found out that the exhaust cones are sitting too far inside and should have been moved more outwards by using plasticcard.But it was too late to correct this.I will keep that in mind on the next Heller 747.... Detail is ok keeping in mind the age of the kit,its nowhere near of todays standard but it builds up into a nice "Jumbo Jet" The landing gear is probably the most fiddly on this kit and trying to build it in the way its supposed to be when extended is quite some challenge.Heller has obviously designed it to build it with all the doors in open configuration,which leads to some extra work (and cursing) when trying to close the main doors. The fuselage comes in 4 parts as the tail section is separated from the front.Why they designed it that way is a mystery...probably they didn't want to use a bigger box for the parts...? Getting these sections flush is not so easy without sanding off all the panellines. In the end everything came together and when finished its a very large model. Apart from the mentioned problems the build is easy and straight forward.I recently bought some newer releases of that kit which I plan to do in Virgin Atlantic and Braniff "Big Orange" liveries respectively,alhoug wheels up as I won't fiddle again with the landig gear on that kit. Paints are all Revell enamels,ecept for the coroguard panels,this is Tamyia Metallic Grey which I find a good match. Decals are from the kit and from my spares box Hope you like her, And with "something else" the DC-10 will be shown in an extra RFI16 points
-
At long last finished the Cromwell diorama, depicting a recce patrol of the 8th Royal Irish Hussars in the Normandy area, July 1944. Vehicle is the venerable Tamiya 1/35 job. The commander's figure is from the Miniart collection, the driver is from the spares box; Tamiya I think. Diorama is entirely scratch built, mostly from pink foam, and I used clear resin for the water effects.15 points
-
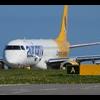
My completed Jet2 Boeing 737-800 in 1/144 Scale using the Zvezda Kit. I really like the Zvezda kits, they go together really well and the detail is excellent, the most intricate part is probably the Nose gear assembly. Fuselage was sprayed using Tamiya Silver Mica rattle can, engines, tail and winglets Revell Red. Wings and stabs Revell 371 with Revell 90 leading edges. After market decals from DrawDecal completed this Airliner perfectly. Thank you for looking and any feedback is greatly appreciated. Alistair14 points
-
Here are the final photos of my Hasegawa P-38J Lightning. If only it was on the correct side If you’re interested you can see my build log here… https://www.britmodeller.com/forums/index.php?/topic/235049976-hasegawa-148-p-38j-lightning/ until next time as always, any suggestions, recommendations or comments will be gratefully received. rgds John(shortCummins)13 points
-
Another market tester, the cheap and cheerful Airfix 1/72 P-51D, which could be had for as little as £2.99 recently. The decals were from an ancient 15 year old Hasegawa kit and were headed for the bin until the miser in me kicked in, apart from needing a new bogus tail code due to some ill advised Daco Red all was well. Paint is Alclad and Mr Color as usual, along with my no hole magnetic stand. No aerial wires and pitot left off as this is a "to be posted" item but a personal one would have got some Uschi "rig that thing" fine that looks right in this scale. Only thing that needed effort were the guns which are Albion tube. So number 12 for 2019 and 2 already for July, loving my build fever right now. As I can't get up any enthusiasm for building anything for the display cabinet, these one-a-week builds are keeping my modelling skills honed til inspiration strikes me and I finish my 1/72 'Nam Spook thats been sat forlornly since March. Mind you would be nice to finish at least 25 1/72 airplanes this year.... WIP here: And beauty shots here: Thanks for tuning in. Cheers Anil12 points
-
Here is my finished EasyJet A319 in 1/144 scale built using the Revell Kit and displayed in the new scheme thanks to Decals from DrawDecal. I have an A320 to complete in this Livery and thing I’ll try harder to work on the ‘swish back’ lines on the fuselage. I have put it along side a BA A320, both aircraft I have operated when I was Cabin Crew.12 points
-
Here is my completed American Airlines 777-300 1/44 scale using the Revell Kit, displayed in the new livery This colour stressed me out for so long, and I kept mixing it until I found a colour that I was happy with taking into account various photos of the real thing under different lighting conditions. Interesting to know your thoughts? The paint mix I went for was mixing Revell light grey 371, Revell white gloss 04 and a touch of Revell Silver 90. It was a case of keep mixing until I found a shade I was most happy with. Wings and stabs are Revell 371. Was then clear coated several times with Humbrol Clear, and then finally glossed once the decals had been applied. Thank you for looking and as always any feedback is much appreciated. Alistair12 points
-
Hi friends! Ta-152V-7 or Ta-152 C-0. HobbyBoss, 1/48. I recently restored this model. Brown wheels made like the FW-190D-9. Unpainted rubber. Too shabby for an experimental plane. At the end of the war, things could have been.10 points
-
Hello all, herewith my latest RFI - deferred by a week due to holiday commitments. All in all this was an OK build. The kit is not the best, I will readily admit - there are several online reviews out there and none of them are particularly complimentary, but that was not the purpose when choosing to build this kit. I needed another test kit for my second attempt at applying metal foil to obtain a metal finish. Of course, this particular subject was unusual in that it was built partly of metal, and partly of wood. This introduced some complexities to the build, as indeed did the poorly moulded wings, which when dry-fitted showed a noticeable anhedral geometry. You can indulge your desire to see the details of all this angst by taking a look at the WIP thread here. In fixing the wing geometry, I inadvertently altered the angle of the undercarriage legs so that they splayed outwards - something I regrettably failed to notice until looking at my RFI pics! I will be honest and say I am not happy with the foiling around the booms - doing them separately before fitting to the wings was not my preferred option, but I felt it was the only thing I could do in order to make everything line up as best i could. I suppose I could have 'cheated' and filled/painted the gap, but no matter. It is what it is, warts and all. Anyway, here they are: So there we have it, thanks for looking in, and for all the comments on the WIP.9 points
-
CC-138 Twin Otter in scale 1/72 Short Take OFF and Landing (STOL). The Canadian Air Force is (to present knowledge) still using 4 Twin Otters, that are stationed in Yellowknife (Northern Territory). Tasking for SAR, logistics and communication flights. Able to land on: Water (Floats) / Snow (Skis) Rough terrain with kind of balloon tires Can take 20 passengers or 3000 kg. cargo. /Propulsion by means of two Pratt & Whitney turboprop PTA-6A-27 engines. Endurance is about 1400 kilometer with a speed of 325 KM/H. Total max. take-off weight 6350 kg. Max. ceiling 8250 meter. Kit: Matchbox/Revell. Build OOB. Paint XTRA Color Figurines: Preiser UNIMOG FLU 419 SEE =(SMALL EMPLACEMENT EXCEVATOR) Specially designed for the US Army. Withdrawn from service and widely available as second hand item It contains a loader, backhoe and auxiliary hydraulics. Four wheel drive with front and rear locking differentials. Mercedes 110HP diesel engine with 16 forward and 8 reverse speeds. Speed on the road 40 MPH with attachments. Kit: Planet Models Resin (CMK website) Build OOB. Diorama: Yellowknife runway has been cleared by the Unimog and the Twin Otter has been replaced from the hangar to the runway. For another day of service in a very harsh climate. Due to area of operations, skis are attached. The base is from ESCI and can be covered with a plastic top The snow: Build up from wood glue and finished with precision Ice and Snow from Krycell. Regards, Orion / The Netherlands9 points
-
These days I mainly specialise in inter-war aircraft models in 1/72 scale, but within that rather large field my favourite area is the 1926-41 'Golden Age' of U.S. Civil Aviation. This is a largely untapped field for models (and likely to remain so), which neatly combines my twin passions of scratchbuilding and historical research. Lloyd Stearman was one of America's foremost designers of civil biplanes. Having been the Chief Designer of both Swallow and Travel Air, in 1927 he left to start his own company, initially in California, but soon relocated back to Wichita, Kansas, then known as the 'Air Capital', for its concentration of civil aircraft manufacturers and suppliers. The fourth successful design of his own company was the Model 4 Junior Speedmail (an earlier model was the larger 'Speedmail'), which he described as 'the finest airplane I ever designed'. Intended primarily as a mailplane, only around half the 40 constructed actually saw service in that role (with American Airways and Canadian Airways). The rest were bought for corporate use, or by wealthy private owners. Top of the range were the 4E models with 400+hp P&W Wasp power and finest of all were the 3 specials constructed for Standard Oil of California and used by their flying salesmen up and down the west coast, 1930-35. Surprisingly, around a dozen of the Stearman 4s built survive, including 2 of the 3 SOCal planes. Latterly, I've been building most of my models in pairs, which I've found to be a more efficient and fun way of increasing my modest output. So here are my models of a Stearman 4EM mailplane of Canadian Airways (Eastern Lines), Montreal, 1931 and Stearman 4E Special 'Stanavo 4' of Standard Oil of California, San Francisco,1930. Models are 100% scratchbuilt and were completed in 2017. Both together: 4EM Mailplane: 4E Special : WIP Parts spread: Cockpit parts: One of my favourite 1930s biplanes..........8 points
-
8 points
-
Another long-term stash lurker. A very enjoyable kit to build with nice fit. Sprayed in Xtracylix RAF Trainer Yellow. The markings are slightly fictitious. The serial is correct but I have no idea that airframe flew in those colours. The rigging was a bit of a faff but worked out quite well. 20190707_195230 by Derek N.Ferguson, on Flickr 20190707_195212 by Derek N.Ferguson, on Flickr 20190707_195203 by Derek N.Ferguson, on Flickr 20190707_195151 by Derek N.Ferguson, on Flickr 20190707_195138 by Derek N.Ferguson, on Flickr8 points
-
It was one of those warm August afternoons some twenty years ago. I had just arrived from my local library with a bag full of “Aeroplane Monthly” magazines. I sat at the terrace with a cup of coffee and started to read. Soon I was flying high above the South China Sea with Flt Lt Edward C. Powles en-route to photograph Yulin harbor at Hainan Island. I hardly noticed the sudden afternoon rain shower; so fascinating was the story told by Flt Lt Powles. When Airfix released their 1/48 scale Spitfire PR.XIX it was clear that I will build PS852, Powles’ favourite Spitfire. After an extensive research and build here is how she turned out. I painted my model with Humbrol 230 and a finishing coat of Humbrol 135. Because I used a paint brush, several coats were required. PS852 was built at Southampton (Shacklady & Morgan) or at Eastleigh (Spitfiresite). It was a Type 390 with pressurized cockpit and RR Griffon 66 engine. Construction Number was (possibly) 6S.594676 (Spitfirsite). On 31st of October 1944 PS852 was taken in charge by PRU Benson. It was transferred to No. 541 Squadron on January 9th, 1945 and again to No. 542 Squadron on May 8th, 1945 (Shacklady & Morgan). After that the literature gives confusing data until 1950s. I couldn’t find any information when PS852 and its’ companion PS854 were transferred to the FEAF. Powles wrote that the two PR.XIXs were made available to him on December 31st, 1950 at RAF Seletar. That gives a hint that these two Spitfires were at MBFE’s (Maintenance Base Far East) custody. In the early 1950s No. 81 Squadron had five Spitfire PR.XIXs at RAF Seletar (PS836, PS852, PS854, PS888 and PS890). According to photographs on RAF Seletar website they were painted PRU Blue overall with D –type roundels in four positions. Orders to paint all PR aircraft with PRU Blue were given in AP 2656A Vol.1 Sect. 6 para. 51 (issued in October 1944). Photographs of PS852 and PS854 confirms this camouflage. PS852 in it's original paint photographed in early 1950s at RAF Kai Tak (Copyright J.E. Steele). A close up shows Flt Lt E.C. Powles sitting in the cockpit of a Spitfire PR.XIX (PS852 or PS854). Note the original wartime stenciling below the cockpit (Copyright E.C. Powles) I used stencils from Kitsworld's decal sheet. However they had to be modified heavily (some very, very careful cutting) because they were pretty inaccurate. For example take a look at the yellow "HOOD RELEASE" text. It should read "HOOD RELEASE ON TOP" but what can you do. Some extremely careful cutting was required when I corrected the oil capacity number to 9 and airspace to 3! I also added the "12 VOLTS" marking; PS852 and PS854 were the only Spitfires at RAF Kai Tak with 12 volts system. Those Mk. 24s of No. 80 Squadron had 24 volt systems. This is my wild guess as I haven't found photographic evidence to back this up. Note also the dark grey exhaust stains that gives a hint that this aircraft has been flown at low altitudes with rich mixture setting and high power. Properly leaned and with correct cruise power set these stains should be light grey or almost white. Here is a photo of PS854. It is possible that Flt Lt Powles himself is sitting in the cockpit (Copyright E.C. Powles). As Powles wrote: "When I was sitting in the cockpit of PR.XIX, with all my safety and survival equipment and with the seat in the lowest level, there was just half an inch between the top of my tropical cloth helmet and the canopy". Note also how weathered the aircraft seems to be. Jim Kiker (see Hyperscale website for Jim's article on PR.XIX build) was lucky to interview Flt Lt Powles who told him that when he asked these two Spitfires to be repainted, no paint was available. According to Powles the other Spitfire was then painted with a mix of Roundel Blue and Post Office Red. Soon after that PRU Blue was suddenly available at RAF Kai Tak! As the Officer Commanding 81 (PR) Squadron detachment Flt Lt Powles flew 107 photo reconnaissance missions out of RAF Kai Tak. In February 1951 he was asked to photograph an airfield in mainland China. The job was a low level oblique line overlap. Powles wrote: " I was reluctant to use one of our Spitfires as they were painted PR Blue." This tells to a modeller that in February 1951 both Spitfires were still PRU blue. A new order concerning aircraft camouflage -AMO A.217/51- came into force on April 19th, 1951. According to the document all PR aircraft were to be painted with PRU Blue and Medium Sea Grey. High gloss finish was required. Two different paint schemes were introduced. Powles photographed the Yulin harbor on May 22nd, 1951. He asked the ground crew to clean PS852 carefully. After a flight time of 3 hours 30 minutes Powles made a Dead Stick Landing back at RAF Kai Tak. Another Dead Stick Landing followed on August 27th, when Powles photographed Haikou harbor. By the end of January 1952 Powles had completed 63 photographic reconnaissance missions and 36 high altitude weather observation flights. On February 5th, 1952 Powles made his best known mission. He climbed to 51.500 ft with PS852 and was forced to made an emergency descent from that altitude. It took three minutes(!) to reach the altitude of 3000 ft! During the dive Powles was flying at M 0,96! PS852 was given a thorough check and was declared airworthy by the end of the month. Powles took this shot of PS854 flying at 1800 ft near Aberdeen fishing village in Hong Kong using the Spitfires oblique camera (the Fiducials are visible in the original print). The pilot of PS854 was Sgt Ken Walker. According to Flt Lt Powles: "...shortly after PS854 was repainted". Sgt Walker arrived RAF Kai Tak in September 1952. So PS854 was repainted in early autumn 1952. The question is: when was PS852 repainted? "Flight" magazine's photographer Norman Macmillan photographed PS852 and PS854 sometime between February 22nd and March 4th, 1953 at RAF Kai Tak. These pictures were published in "Flight" magazine in colour on May 29th, 1953. Another one showing just PS852 but taken at the same time: For comparison here is my PS890 of No. 81 Squadron in MSG/PRU Blue scheme. PS852 and PS854 had also fuselage sides and spinners painted with MSG. Powles confirmed to Jim Kiker that PS852 was painted with PRU Blue and MSG with red and white spinner when he flew his record breaking high altitude mission on February 5th, 1952. Two questions arise: 1. Was the spinner later again repainted with MSG? 2. Red and white spinner was the mark of HKAAF, why would No.81 Squadron had used it? On December 18th, 1952 AMO A.685/52 came into force. It stated that all PR aircraft must be painted with High Speed Silver overall. Flt Lt Powles' "Tour" in the Far East was complete a few days before Macmillan pictured the two camouflaged Spitfires at RAF Kai Tak. So Powles never flew a silver coloured PS852 or PS854. In the end the two Spitfires were painted with HSS with red/white spinners and transferred to Royal Hong Kong Auxiliary Air Force on March 23rd, 1954 (PS852) and on August 6th, 1954 (PS854). Here is PS852 in it's last paintwork: A detail shot showing the propeller: The most common Jablo propeller had it's blades made of compressed "Jablo Wood". These blades were marked with pink discs containing numeric information about the blades. Airfix gives yellow discs which were for the rare blades made out of birch(?) tree. Do not use those manufacturer's winged logos either as they were not used in the 1940s or 1950s. The blade leading edges were mostly reinforced with brass plates so do not use aluminium paint to mark wear unless you are certain about the propeller type used in your particular Spitfire. Note also that Griffon rotated counter clockwise when viewed from the cockpit. I am not sure about the underwing serials. According to the photographs they were rather small but I can't tell when they were painted on. PS854 carried them at least after repaint in the fall of 1952. Here is a photo of PS854 for comparison: Some modellers think that the serials were white but I think they were painted with gloss black. If they were white then also the last digit should be visible. Some versions of this photo suggests that the spinner was white. The spinners of the three other Spitfires at RAF Seletar were painted white just before their retirement from service. The original "wartime"serials on the fuselage are interesting also: the last digits sat higher than the first ones. Take another look at this photo. This close up shows the corrected rocker cover bulges, some added hatches and landing gear down indicators. If you use Kitsworld's stencils remember that the fuel grade was 100/130 octane, not the fuel amount. So my Dear Fellow Modeller You've read so far. Thank You for your time and hope to see you again! Best Regards, Antti7 points
-
A little something I threw together watching the Cricket World Cup the last two weeks. This is Bronco's 1/35 40mm Bofors gun. It's a good kit, well detailed and fitting but with some frustrating points. Some sections are over complicated with detail included that cannot be seen once completed or photo etch that could have been included as molded on detail with a loss of detail. Also make sure you read ahead in the instructions as parts often need to fit into others in steps down the road, if you mess up the alignment you will have trouble down the road. It would also be nice if Bronco included some extra smaller parts as they are easy to lose. It's finished with Gunze Olive drab and weathered with MiG pigments dry mud and European dust.7 points
-
Good man Ian, quite right Thanks Simon - we can always rely on you to keep us (virtually) supplied! PE i/p anyone? Our own @Procopius has had problems with his Xuron PE cutter in the past so I thought I'd post this close up: I find if I use them like this, with the blade underneath and 'under' the part, I can position the top blade and 'snick', comes off without any knubs: Nice. GG Thin to stick the three parts together making sure the dials are visible and then some extra glue in the holes to represent the glass: We'll see how they turned out later.7 points
-
Good morning chaps. … nice thought, but not necessary, as it turned out. For the front cowl, some 40grit sand paper, wrapped around a 40mm tube, soon made a suitable hollow in an offcut of handrail- Not pretty, I agree.., but with annealed ali and my weapon of choice (peen hammer handle), you get this- I'm reasonably happy with the result, although I think the rolled edge could be done better. The wire is 0,2mm nickel rod. A teaspoon became the perfect form for the seat cowl. Edge only folded on this occasion- When placed on the buck, my heart skipped a beat lol... … her form is plain to see . That's all for now, folks. Hope you enjoy and thanks for watching. Cheers, H7 points
-
With two coats of Quick shine gloss applied and dried, the time came to apply the decals. To be fair, there are not many to apply, and they settled well. Next to seal them in.7 points
-
I had started with one of my favorite areas on this build, the cockpit. My other fave being engines , I decided to save that one for the last part of the build. Here we go:7 points
-
Hi all, I've made and painted some of the knights from GW's Adeptus Titanicus range and posted my doings on here earlier in the year. While I haven't started painting a Titan yet, I have built some: Unusually for me I've actually played a game of the new Titanicus rules too! Our local GW was running demos and my daughter and I had a go. It's pretty good, the big titans feel very ponderous and there's a lot of raising shields, cooling the reactor etc. Like submarine warfare with legs. It was very easy to find yourself making the relevant noises which is probably a good sign. Bad sign? Not sure! Anyway, I was lucky enough to pick up the big box of modular building parts half price a few months ago, and I've since acquired the set of spires they brought out afterwards. After some playing around and some smaller buildings I came up with the following: The lower part of the building is from the Civitas Imperialis modular sprues, and the upper part is mostly the spires. I bashed some of the roof pieces into landing pads and used flying buttresses to add "princess towers" to get a silhouette that looks a bit more like some of the old Hive City illustrations from e.g. the Necromunda rulebook. There are a few additional parts from N-scale Green Max kits (ladders, pipes) and my stash of sacrificial Trumpeter bits (antenna and some other small details). Held together with scraps of styrene where necessary. I'm not quite sure how to paint it, but I guess I want to match the feel of the Knight bases, so a slightly overgrown look? Having an excuse to add some green flock is a) always welcome and b) very handy for hiding joins, but I don't know if the Imperium will stand for it? Cheers, Will6 points
-
It was started in 2014. After getting about 1/3 finished, I sat her aside for another project. In early 2017, I resumed work on the model and around the end of February, I took her out to the Cameron airport for a photo session. I messed up the stretched sprue radio aerial loading the model up for the ride out there and just managed to get it back in some sort of shape, of course never as good as previously though. (Go figure…😐) It’s painted with Testors 1/4oz. square bottle flat black, and faded with Humbrol dark gray 32 mostly, as well as a few other grays. I tried out a bit of oil-paint dot filtering on the lower engine cowls but the 45 year-old oil-paint and my lack of experience didn’t help.🤦♂️ The exhaust staining is Model Master intermediate blue, dirtied with pastel chalks. As always, I used my Paasche Model H, powered by CO2, for the airbrushing. I drybrushed the paint damage with Humbrol MetalCote unpolished aluminum and used a silver pencil here and there. The cockpit barely shows so I made seatbelts/harnesses from tape with home-made lead-wire buckles. The exhaust flame shields were made from Evergreen sheet. Let’s see, gun barrels and exhausts were drilled, and tires sanded for a change, 😉. Lead wire brake lines were added with furnace tape clamps. I sanded down the wing light “lenses” and carved out a concave lens with my motor tool, filling that with silver. Overall, she turned out a pretty fair “four-footer” and looks good with her RAF warbird mates and sister Hawker planes in the display. But please, no more Hobbycraft kits for a while…😜6 points
-
Well found this lurking at the back of a dusty shelf,what better reason to have a bash than for a group build. Ancient parchment from the last century Bag still sealed,although a few pieces off the sprue. 38p price tag . As others have noted,the cockpit area is very bare indeed,will just try to "busy it up" with bits from the spares box,intend to follow the original paint scheme with spurious white cowlings and spinners,this is going to be fun! Andy6 points
-
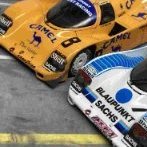
Hi there, Finished this kit a couple of months ago and although fitting the body to the chassis was a bit of a pain the rest of the build was pretty straight forward. One or two of the decals were awkward but on the whole they conformed well. Hope you enjoy viewing.6 points
-
318 (Gdanski) Squadron was one of the last Polish squadrons to be formed & was named after the city of Gdansk, after the custom of naming fighter squadrons after cities & bomber squadrons after regions. It performed the vital, dangerous but unglamorous work of army cooperation in support of the 2nd Polish Army Corps in the middle east & Italy. It saw intense action at Monte Cassino. Image from Polish Squadrons Remembered. This is my fourth Eduard Spit IX, detail is great but the engineering is over complicated in some ares. I can't understand why the exhaust comprises several parts & the cowling top is split in 2. I used Eduard's resin replacement on this which didn't fit as well as the Barracuda part I used on my other ones! Decals are from Topcolors Polish Spitfires booklet. It represents the aircraft flown by P/O Chudzinski from Tissano in Italy, July 1945. Any comments, criticisms & observations welcome. Pete Thanks for looking.6 points
-
Evening Folks,this one was built for the Frog GB,it's the old Hasegawa tooling released by Frog in the seventies as part of a two way deal selling each companies kits in their respective countries.the moldings were pretty good and the decals were usable but as I'd built a NM Sabre in Danish colours I wanted to do a painted scheme and had the decal sheet for this version which served in Djibouti in 1978.These aircraft were well worn and near retirement but the sharks mouth was freshly painted in theatre,thanks for looking in.6 points
-
I don't know who thinks up their ad's but they do some belters...6 points
-
I have been working on the wings, but my wife has taken the camera with her on an outing so I will post some pics later. In the meantime I have made a start on the props. As you can see all 24 blades had red/white/red stripes on the tips. With my failing hands and eyes I did not fancy hand painting them so I made up some decals. I scaled them from the walk around pics. This is clear decal paper so I painted the blades white. The black at the bottom saves me having to paint a straight edge on the black of the blades. Ok, not rocket science but it should work. It is going to be slow as I will do one face of one blade on each prop a day I suspect!. More anon.6 points
-
Part of the slat and aileron mechanisms are added:6 points
-
Nice one Serkan - always good to see more Flankers. I made the P-42 (Pobed [Victory] 1942) many years ago using the old Airfix Su-27 kit.... I used variuos shades of gold paint and hand-painted the silver stripes to represent the sealed joints - the biggest problem was removing the IRST ball from the windscreen and making the nosewheel without the FOD guard! Note the red tape on the canopy to give the pilot the optimum angle of attack for the climb..... I took these photo of the real thing on a rainy day at Zhukovsky in 2004..... I tried to get round the back - but the young conscript guarding the P-42 wouldn't let me - so this is tthe best I could do...... Good luck with your model - and ....... Happy Flankering Ken6 points
-
School project for my son; the brief was to use house-hold items to make a toy to promote recycling projects. Of course he thinks hey my father can help ………... Shampoo bottel and two fruit juice bottles The selection out of the spares box and some old toys of his as basis for the space ship Things starting to take shape; you can never go wrong with rocket engines I say (B-58 donor kit) Whole things stuck together with wooden dowels, masking tape and glue gun The end result painted by his Lordship himself with only a little bit coaching ( hes used the air brush before) BTW he got a A+ for the assignment5 points
-
I present the Revell A319 in the colour scheme introduced by Austrian Airlines in 2002. This is a sort of accidental model. My original intention was to finish the A319 in the multi-coloured “Park Inn” scheme carried by D-AKNF of Germanwings. However that came to an abrupt end when I discovered an unfixable problem with the Nazca decals. Luckily I hadn’t started the long and complex painting job but I was left with a “white-tail” A319 in need of an airline, not to mention about £30-worth of Vallejo and Tamiya paint which I had bought specially for the project. After looking at various other options the penny dropped that the kit had come with a very decent set of Austrian decals and using them would add another model to my growing collection of current and former European “flag carriers”. OE-LDA “Sofia” is the result and it’s probably only the third or fourth time in all the years I’ve been building airliners that I’ve used the kit decals. The model is OOB apart from replacement winglets, a BraZ satcom fairing and a few small details. White is Halfords, grey is Holts HL Grey01, the blue belly is Mr Color H45 and the engines are Revell Aqua 04 with drops of 50 added until it looked about right. The Aeroflex on the wings is Revell Aqua 374 and metallics are by Tamiya and Revell. The Revell decals fitted well. The “www.austrian.com” titles on the engines came from a Nazca Boeing 737 sheet. Photos suggest the A319s got these when the satcom fairings were fitted although bits of the titles were often missing presumably due to parts of the cowlings being swapped around. Authentic Airliners windows and a few extra decals from the spares box completed the ensemble. Thanks for looking and as always constructive criticism is welcome Dave G5 points
-
Hi there, been quite some time since I posted something here. Inspired by other builders and that great Tim Boyd book, I have been down the "muscle car alley" a lot lately. Anyway, I'd like to show my latest build. It's that old AMT kit, built rather out of the box, except for some small additions: I scratch-built the twin exhausts for both sides, using Evergreen tubes. Seat belts have been made from adhesive medical tape, which has been painted black with a pen. Belt buckles are PE aftermarket parts. Sun visors have been scratch-built from Evergreen card. Some flocking has been used to create a black "carpet" look on the floor. Gauges decals are from the parts bin, as are the mirrors. The glass effect on the headlights has been archieved with the aid of a very nice UV glue. The wheels are from the '66 Chevy Nova kit, the redlines were taken from an AMT aftermarket set. The thin silver pin stripe has been taken from a decal sheet. It's application was rather nerve-wracking and, at times, made me breath harder than Hector Salamanca... Your feedback will be welcome.5 points
-
So just a little bit of tweaking and diddling since the last update, I went for the black areas and spent most of my spare time masking it off and trying to get it to look right. I was going for the anti glare strip and the exhaust areas so that resulted in major masking! Then after a nice application of MM black, I carefully peeled it all away and am quite happy with these results. And the other side The flash makes the upper markings stand out a lot more than reality, in fact they blend in quite sweetly! Now them there blades, @andyf117 I have taken what you said onboard. The grey blades did look a little dark when compared to the airframe so I went over it again with my lightest grey, Model Master Camouflage Grey, and it is a bit more reasonable. Going with the "unknown Grey" description I'm happier with it! Again the flash washes it out more but tonally its better. So that's where I am at so far, not much will get done tonight as my Halifax Wanderers play Ottowa Fury in the Canadian Cup tonight (Its soccer) so will be heading down for that, which will hopefully go down as an epic cup tie! So looking ahead I will be concentrating on those sponsons, the tail rotor and painting the main rotor head, I think I'm getting there! Cheers now Bob5 points
-
Is that like a dog licence? Thanks John I'll have to see if we can exorcise it then… twisting head memories anyone? Next step - remove the plastic compass ready for the PE replacement: Of course I could use a scalpel but that's too easy. You know I have this idea that I can compensate for my lack of skill by purchasing tools. What do they call that syndrome? Ah, deluded, that's it… In a vain attempt to get closer to Baronial modelling I bought this a while ago: A Jeweller's saw. Comes with over 100 blades (so I guess they break easily). Tony tells me he uses this all the time now so in for a penny… For those not in the know, they're not like broaches - if you look really closely you can see the blades have 'usual' saw teeth (just really tiny) AND there's a toothless bit at each end: …that goes in the screw jaw thingies like this: Then you realise you should have put the blade through the part before you put it in the frame: I am an idiot. Still. That done though the compasses were removed in a few strokes: I'll know next time. Probably.5 points
-
No modelling yesterday, flying a Piper M500 that was almost brand new for most of the afternoon and then packing up the Spit & 109E for their new owner: Aww look, they're on beds of fluffy white clouds. I must say I'm getting quite sentimental about saying goodbye to these two honeys, Most of my sales/giveaways are to people I know and I still get to see. This the first time that something I've made has gone to someone I have never met or spoken to before and will probably never see again in real life... I feel quite sad, bye bye my little babies...😥 Anil5 points
-
Finished up another couple of buildings - I built these a while ago but have added the spires and details today. The big one is a temple (probably) and the small one I'm not sure - maybe a school or light industry? The roof tank is a Stryker wheel (maybe a bit obviously so) plus some other bits and a sprue corner for the angled pipe. Cheers, Will5 points
-
Yes, immediately before the strike, with the ship into the wind, the wings would have been spread (though while the strike force was being spotted on deck, it is likely, in the prevailing weather conditions, that all would remain folded until the last aircraft was positioned). The most serious complication on 26th May was the weather. Force ‘H’ was steaming into the teeth of a full northwesterly gale. On the Royal Navy scale in use at the time, which rated the sea state on a scale from 0 (Calm) to 8 (Precipitous), Force ‘H” recorded Force 7 (Very High) seas, with waves from 24-36 feet (measured from crest to trough). However, on the more commonly recognised Beaufort Wind Scale, which carried ratings from 0 (Calm) to 12 (Hurricane) the morning was rated Force 10 (Whole Gale) with winds between “48-55 knots” and with “very high waves”. By 1900 when the Bismarck striking force was launched, the weather was, if anything, worse. Ark Royal, with her deck 62 feet above the water, was “taking it green”, and the wind over her flight deck had reached 50 knots. The Captain ordered an officer down to the flight deck with a sextant to accurately measure the rise and fall of the stern section - 53 feet. A second reading gave 56 feet. In such conditions, Lieutenant-Commander Stringer had to double up his flight deck parties, assigning up to twenty men to steady each Swordfish against the movement of the ship. Even with the increased numbers it proved impossible to hold the relatively light weight Swordfish, with its dual high lift wings, on deck with the ship steaming into the wind, and finally Maund had to steer the ship across the wind while the range was being established. At 1845 officer flight crew headed down to the flight deck to man their planes (rating TAGs were already milling about the deck waiting to board). At 1855, Maund turned his ship into the 50-knot wind, reducing her revolutions to produce a speed of six-knots, just enough to maintain steerage way in the tumultuous seas. 818 Squadron Swordfish had been ranged up front just behind the island, with Coode’s 5A spotted first, followed by the rest of his sub-flight, and then Keane’s sub-flight. The deck crews, having removed the double tie downs lashing the planes to the deck, and having spread their wings, struggled to hold the Swordfish against the gale. At 1900, as Ark Royal’s flight deck pitched down into the falling sea, Coode's 5A took off............ By 1910 all fifteen Swordfish had launched.5 points
-
I'm going to build the mi-24 p /f hind in 72nd , it will be a soviet version from the afganistan conflict,and I'll be building it in tandem with my mi-17 in another thread in this gb, i have a choice of markings , but not from 1 decal sheet in particular ,a little research was needed because the kit markings didn't fit with the gb time frame ,and i had no luck searching for after market decals for a soviet 24p/f in Afghanistan, but @modelling minion, craig came to the rescue once again with some wonderfull reference pictures , from one of his books, I'll choose the markings later ,its the 1/72 zvezda mi- 24 p hind kit I'll be using, it's a well reviewd little kit and looks really nice on the sprues ,the box4 points
-
Part of my bench clearance. This is the Accurate Miniatures kit from way back when. Did not realise that the underside should be "blue", but hey ho it's all white on the night. Apart from a lot of filler it was a take your brain out job. Hope you like Please feel free to comment etc. Thanks for looking Dick4 points
-
Having broken the old Italeri RF-18A kit out of my stash to use the decals in a group build project...I thought I might as well go ahead and build the kit, for nostalgia's sake. It turned out to be a timely notion, since I'd just acquired a set of aftermarket decals--Orion Scale Models' very nice Kuwaiti AF F-18C/D sheet--for which the past-its-prime Italeri offering would be perfectly-suited. The '80's vintage kit has options to build either the then-current single-seat A-model fighter or the 2-seat B version. It also comes with the (R)F-18 reconnaissance-nose option which was originally prototyped and tested for the US Navy--as a single-seat recon platform--but which never went into production. What lifts the last bit from mere 'what if' curiosity is the fact that kit-included recon palette is virtually identical to that used for the USMC's more recent (2000-onward) two-seater ATARS (Advanced Tactical Airborne Reconnaissance System) modification; a cutting-edge real-time digital recon platform replacing the Corp's old RF-4B/C Phantoms. The mod can be fitted to any later-production F/A-18D, simply replacing the nose gun...but still allows the modified aircraft to carry both dropped ordnance and offensive and defensive missiles. Kuwait has operated numbers of both single-seat and two-seater Hornets in two squadrons since the years following the Gulf War, in a distinctive wraparound 3-color camouflage scheme (which is nicely documented in the full-color Orion instruction sheet). I decided to build the Italeri kit as one of their two-seat -D models 'upgraded' with a hypothetical ATARS-like recon capability: basically the kit parts as provided, 'juiced' with the now-standard LEX fences and a few add-on antennae and sensors to more closely resemble the USMC machines. Great fun as a quick build...and a useful test 'mule' for what I hope/plan to do as a much more accurate and carefully-built Kuwaiti bird to come. Enjoy the photos.4 points
-
Well, here she is!4 points
-
Last night and today was wasted in a futile effort to get air conditioning working before tomorrow morning, ultimately to be defeated by a poor quality part that doesn't do what it says on the tin. So that means my tolerance for people on the English motorways using lanes incorrectly will be approximately zero once I head south to that sticky, hot and close climate. Yuck. Anyway, MS3 is masked and I opted to go for MS1 next as it's only a few shapes to mask over. That will be all until I return next week.4 points
-
Possible that the adhesive is not right, I cut down the tape to narrow strips 3mm wide and haven't had any issues, I've in many cases used the same bit of tape more than once. So adding the smaller details to the fuselage, the fuel dump pipe gets drilled out. The rest of the PE is getting added to the sides. The engine intakes get some paint. Enjoy Dan4 points
-
Ex-WAAFU: at about 3:15 into this film there are diagrams for spotting Swordfish on an Illustrious class carrier HTH, Richard4 points
-
Today's work while watching NZ beat India - first up all the pre-shading on the Jug Then on with a light coat of Neutral Grey Inbetween sprayed the prop Peter4 points
-
...and slightly afterwards, too, if Jock Moffat’s memory is to be believed; he reckons KGV shot at them even after they’d been told not to. The belief that the Grown-Ups wanted Bismarck to be sunk by surface units rather than the upstart FAA comes across loud and clear in the 3 contemporary accounts I have read (Jock Moffat, Gerald Woods and Mike Lithgow); they clearly felt it very strongly. I am a biased WAFU, of course, but it certainly rings plausible - but at least some of that would have been the surface / battleship fleet’s thirst for revenge for the demise of Hood. Because we know what happened, and understand just how deeply flawed she was, it’s hard for us to picture quite what a symbol / talisman Hood was for the RN (& even the country) between the wars. The professionals understood - Kerr / Holland were closing Bismarck as fast as they could when she was sunk, because they knew full well the danger from long range (& therefore plunging) heavy shells. Because of the way the RAF was formed in 1918, there wasn’t much real understanding of aviation at senior levels in the RN; the RNAS people who would have been Admirals 20 years later largely went to the RAF. There were definite exceptions - Bell Davies for one - but in general the RN was still very much in thrall to big guns; being a good Gunnery Officer was seen as the most likely route to the top (Communicators, too). But in general the full potential of aviation wasn’t universally understood in the surface fleet yet - especially in a high seas action (as opposed to a Taranto-style attack in harbour). To be fair to the Fish-Heads, the performance of Naval aircraft in 1940-41 was hardly enough to strike fear into many hearts. Besides, aviators are young, tend to be noisy, and they are paid more - a sure-fire recipe for disdain. The capacity to look down a patrician Fish-Head Commander’s nose at the antics of the sprog aircrew was alive and well in 1987, let alone 1941! I used regularly to be told in Broadsword that I was merely a weapon system; not really a proper Naval officer at all. But a lot of it was simply normal tactical doctrine at the time. Fleet manoeuvres between the wars concentrated on using carrier aircraft to slow down the enemy, so that the battleships could catch up and sink them with guns. This almost worked at Spartivento, and did work to varying degrees in both Bismarck and Matapan. That was what aircraft were for, in their eyes. It took the Pacific war to prove finally that carriers did not simply escort the High Value Units: they were the High Value Units. But that was still a couple of years away, and anyway was at least partly to do with the conditions / geography of that war. Besides, in view of the difficulty they had in getting Bismarck to sink, it is a moot point whether another Swordfish strike would have done the job unaided.4 points
-
Airfix Fw190 A-8 WkNr 3317 Major Kurt Bühligen Kommodore JG 2 Creil, France, June 1944.4 points
-
Welcome Hendie, Keith, Trevor, Valkyrie, GB, Will, Dennis, Roger and Rob. Get your drinks and settle down please chaps, the hostesses will bring your refills (in my dreams) Thanks John I've built a few (three I think) before so I'm ready! I don't think it's too fiddly… And so it begins: I used the TET Quick Setting for those. Nice stuff. You can hold the parts together, drop a small bit on with the brush, squeeze to get some melting and it flashes off in seconds. Of course if you don't squeeze a bit it just flashes off without doing anything much. You need the Knack Oh dear…4 points


.thumb.jpg.0cb281983c298f55509ab7d9a06994bd.jpg)


This leaderboard is set to London/GMT+01:00