
Leaderboard


Popular Content
Showing content with the highest reputation on 08/07/19 in Posts
-
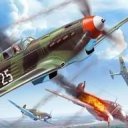
These are Hobby Boss 1/48 kits. Scale 1/48. Me 262 Recon and Bomber planes. I did these for the Specialist group build. There's some excellent builds in it go have a look. The builds weren't all that easy for me. There were several bad moments. The first was the nose not fitting correctly, next came the flat coat disaster and finally I have major issues getting the landing gear on. Here is the link to the build thread. However, in the end it all worked out Ok and both made it to the cabinet thanks to the help from the guys. Both were started at the end of March. The first is the Recon. The second is the Bomber The two planes together. This was taken earlier than the others so the lighting wasn't as good. Thanks to Rich of the Specialist Group Build that made this possible.28 points
-
Hello from Russia! The model from Trumpeter is crossed with a resin set SBS Model. Also use photoetched set Eduard, the brass parts of Master, and the vacuum parts of Pavla Models. Trumpeter kit is very complex and requires cardinal processing to make it look like a prototype MiG-19PM. Alex.22 points
-
Evening everyone, This is Tamiya’s 1/48 Thunderjet in the markings of Lt Jacob Kratt, a triple Mig killer from the Korean War. I used a Tamiya aerosol decanted into the H&S over a black basecoat then a few other shades of Alclad. I quite like how the O/D panels and white window sealant came out (thankyou Vallejo). The markings are from from a Cutting Edge sheet as the box markings had long since expired! Nose pitot and fuel dump pipes were replaced with hollow tube which was an improvement over the kit items. Not sure how likelike she is but an attractive bird in more or less showroom condition. That’s how I wanted her and was pleased with how she came out. Enjoy the evening everyone. I’m going to crack on with the Eduard Tempest.19 points
-
Hello; Latest piece is ready for its inspection. I am prepared for a thorough review, please don't hold back if I've done something that could be improved, especially in terms of accuracy. Almost all the markings are painted, Tamiya and Vallejo for the paints. Airbrush and silver pencil for the weathering. A full description of the build, lots more pics and why I chose this subject (and its context) can be found on my site, Making-History.ca Cheers; Mark.18 points
-
Howdy everyone, Just put the finishing touches on my latest effort: HobbyBoss`s 1/48 FM-1 Wildcat kit, masquerading as a Martlet Mk V Finished to represent an aircraft with 733 NAS, Trincomalee, Ceylon, 1945 Built pretty much from the box contents, with only seat belts, engine wiring, brake pipes and aerials added Decals from Xtradecals set X48104 `Yanks with Roundels Part 2` Had to copy the camo` from pictures on the internet as the image on the instruction sheet was too dark to make out...... ...but I couldn`t find a photo of the actual aircraft. Apparently it was a non operational unit so didn`t weather it too much. Hope you enjoy, thanks for looking Cheers Russ18 points
-
Hello here some pics of my new built GWH T-33A in 1:48. Used some Eduard PE`s and a Tauro decal sheet for a 50th FBW aircraft in the mid 1950s17 points
-
Airfix 1/72 Victor B.2 I finished this one a back at the start of the year however I have only got around to photographing it, the sheer size of it made it a bit difficult. It was a great kit to build, nice detail and good engineering. Thanks for looking and please leave any comments of questions you may have.14 points
-
Hi mates! This is an unusual subject, a captured Me 109 G6 by the americans in Tunisia. The model in from Zvezda in the 1/48 scale. I did some improvments in the engine and P.E´s from Eduard in the cockpit. the decals are from Delta One. Hope you enjoy this project. Follow the pictures : Till the next! Luiz.14 points
-
318 (Gdanski) Squadron was one of the last Polish squadrons to be formed & was named after the city of Gdansk, after the custom of naming fighter squadrons after cities & bomber squadrons after regions. It performed the vital, dangerous but unglamorous work of army cooperation in support of the 2nd Polish Army Corps in the middle east & Italy. It saw intense action at Monte Cassino. Image from Polish Squadrons Remembered. This is my fourth Eduard Spit IX, detail is great but the engineering is over complicated in some ares. I can't understand why the exhaust comprises several parts & the cowling top is split in 2. I used Eduard's resin replacement on this which didn't fit as well as the Barracuda part I used on my other ones! Decals are from Topcolors Polish Spitfires booklet. It represents the aircraft flown by P/O Chudzinski from Tissano in Italy, July 1945. Any comments, criticisms & observations welcome. Pete Thanks for looking.12 points
-
The school holidays are upon us now so the BUFF has been seeing a little action... I've not been happy with the rear turret set up, and I feel the kit's parts don't accurately resemble the real aircraft. Please excuse the terrible photo here (quick snap with the phone camera that I didn't realise was so out of focus) but as you can see... IMG_1127 by Thomas Probert, on Flickr ... it's not even close to the real deal... Tail Turret by Thomas Probert, on Flickr (Used for illustrative purposes only) So, it was out with the hacksaw, and I removed the kit-supplied turret and began by building up the basic underlying structure with some scrap plastic card and some brass tubing for the gun housing: IMG_1135 by Thomas Probert, on Flickr This was then all blended with filler, and sanded to shape. I then added the radar domes from some scrap 500lb bomb noses as the kit parts were too small: DSC_0172 by Thomas Probert, on Flickr Pretty happy with that - we'll see what it looks like under some primer in due course. As I explained in my earlier update, the kit panel lines are rather inconsistent and they've all been filled and an initial coat of primer applied. I've now begun to scribe my own panel detail onto the model - here's the nose: DSC_0179 by Thomas Probert, on Flickr DSC_0160 by Thomas Probert, on Flickr Undersides: DSC_0168 by Thomas Probert, on Flickr DSC_0177 by Thomas Probert, on Flickr The mid-section join has disappeared which is a bonus: DSC_0181 by Thomas Probert, on Flickr I've begun working on the spoilers - vanes still to be added: DSC_0174 by Thomas Probert, on Flickr She's looking a bit of a mess at the moment, but I can assure to that progress is being made: DSC_0158 by Thomas Probert, on Flickr Until next time, Tom12 points
-
Hello everyone, I present you my next model. Molotow Colors were used during the painting. Please enjoy!11 points
-
Airfix Be2c. Rocket-equipped nightfighter to counter Zeppelins, Scotland 1916. Build:11 points
-
Here is my Fiat G-55S Silurante 1/48 Special Hobby11 points
-
Calling it done, it’s not, one black aerial has gone awol, I’m not going to find it late on a Sunday evening whilst enjoying a pint or two so here is my Airfix Nimrod R1 Spyplane, painted with xtracrylix light aircraft and camouflage grey and finished with Winsor and Newton Matt Varnish10 points
-
Cheers, Bill10 points
-
Hi there, So this is my first attempt at a WW1 era aircraft. The kit doesn't have many parts and goes together quite easily though the instructions are not the clearest that I have seen. Did my best with the rigging and was fairly happy with the result though there is definitely room for improvement. All things considered i was happy with the final outcome. Hope you enjoy viewing.9 points
-
Hey you lot. Hope you’re all having a sunny funny weekend. 😇🌞 Amongst the many things stopping me modeling I managed a little modeling. Get me. 🕺 I eventually managed to lay down the interior green. And the outer. Aaaaand tother side. The other side of the tank got envious too. I began to spray the knock out hatch when I noticed I hadn’t pre shaded so. Psssst. Oh and this odd bit needs going in. you’ll never see it so I’ll give it a black blast just in case. All the little bits got primed. I also did the spare tank brick red and glossed ready for some Flory action. The bit of Merlin engine I pilfered from the Cornwall spitfire garden needs to be squirreled away.🐿 seems like a good spot. While all that was drying I painted some pith helmets for the boys end of school show. he is doing the Monty Python fish slapping dance with his friend. 🤣🤪🐟 Any hoo back to the hurri. I Floried the bits that needed it and did various chores while they dried and “of course” forgot to take snaps. 🤔 the IP got touched up. the tank looks good with a first weather pass. more to come. 🥳 First pass on the break out panel. needs highlights and maps. Possibly text too? ☺️ Some of the last controls got added too. I have some Flory to rub out on the other panels but it’s getting late and my eyes don’t work so with that I’ll call it a night. Hope you’re all still enjoying the build. all the best and as always. Happy modeling. Johnny. 🌪9 points
-
Thanks Terry, me too! Thanks Keith Just booked Molly for a trim… poor thing's panting in her fur coat. Er, wossat den? Sorry to keep you waiting hendie, but all was not well: That'll teach me to try and fill the gaps with canopy glue. Oooh, Jaguars. Oi like dem, I do. If someone recommends a good kit for a kit basher like me I might even get one Ah, well, you're talking to someone from the home of 'The Morris 1000 Centre'. In fact, when Charlie first started it up my mate used to do his mechanics and bodywork. When it took off he got his own chaps of course, but not before he tried a 'modernised Moggie' with a 1500cc engine and wider tyres. Didn't sell though; I don't think boy racers by Moggies. No, certainly not. Aww look, baby Beetles Well I've cut the canopy glue off the canopy and touched it up. Then I put some Kristal Klear on the top light: Hmmm. Close ups in 1/72, still a bad idea. Then I put some clear red and green on the nav lights. Then I glued the pylons on: Yes, they are straight and level and… right in the other direction too - it's perspective I tell you. A few tips: Put the pylons on, then paint the nav lights. That way you won't rub the paint off while handling the model. Don't press hard on the tank to level the pylon or there will be a ping and you'll spend time looking for the pylon. Ask me how I know. Anglo-Saxon helps. Just not a lot. I am (still) an idiot. Out tomorrow so those will have plenty of time to dry before I take some final photos.8 points
-
Thanks John - pity the sheep in that heat! Thanks Bill W&N Satin varnish on: Masking off, any minute now…8 points
-
Finally got the remaining stencils on this morning: I don't think there are enough stripes for the tanks - the instructions say four per tank and there are only four on the sheet. I've also think they're short of other stencils so I've applied them to the 'outsides' of the tanks: … and I only have two large ones left, #37, that I can't find on the scheme. Oh well. Once they're dry I'll blast some satin varnish on and then decide if I need some Flory action (or not). Later.8 points
-
Big kit with a big box! I've been looking forward to getting this one since seeing the mockup kit at the 2018 Nationals. I finally cleared off the bench and put this guy on it: The instruction book is a bit intimidating as it truly is a book with 100s of images. But once you get used to the format (each step can feature multiple explanations of exactly where each piece goes!). And oddly - at least for us aviation modelers - construction begins with the engines! And these are a treat - check this out: Pistons! Of course they will be immediately hidden within the cylinders in the first step. To tell you the truth - the construction of these engines has been a lot of fun. The parts fit together perfectly and look great when painted up. I especially like the large exhaust manifold - I "rusted" it as follows First - just Tamiya As-12 Aluminum Spray Then a thin coat of Tamiya Medium Brown and a couple drops of Nato Black (thin... like 2/3 thinner) Then I washed with Mig Ammo Track Wash followed by Light Rust... and then a bit of Tamiya Weathering Powder Rust... all sealed in with a flat coat So the engines are done (I'll have a picture of the mounted engine next time) Next up... the cockpit....7 points
-
Another long-term stash lurker. A very enjoyable kit to build with nice fit. Sprayed in Xtracylix RAF Trainer Yellow. The markings are slightly fictitious. The serial is correct but I have no idea that airframe flew in those colours. The rigging was a bit of a faff but worked out quite well. 20190707_195230 by Derek N.Ferguson, on Flickr 20190707_195212 by Derek N.Ferguson, on Flickr 20190707_195203 by Derek N.Ferguson, on Flickr 20190707_195151 by Derek N.Ferguson, on Flickr 20190707_195138 by Derek N.Ferguson, on Flickr7 points
-
The difference between involvement and commitment is like ham and eggs. The chicken is involved; the pig is committed.7 points
-
Grumman Avenger AS4, Ships Flight HMS Bulwark during the Suez crisis. Hasegawa kit brush painted with Xtracrylix Gloss Sea Blue. Pretty well straight out of the box with a little extra cockpit detail and seat belts. Used Eduard's masks which were a godsend. Looks nice and bright with the campaign markings.7 points
-
Dassault Mirage F.1EQ-5 4577, No 81 Squadron, Iraqi Air Force Qayyarah AB, 1986 Kit: Special Hobby 72386 Build thread: https://www.britmodeller.com/forums/index.php?/topic/235052432-mirage-ship-killer/7 points
-
Hi Folk's,a plane I've wanted to build for years but never managed to do,it was the first kit that came to mind when this GB came about but if you can find one they are usually silly prices as is Airfix's offering,anyway I was looking at King Kit and remembered Eastern Express re popped some Frog molds and lo and behold up she popped so now winging its way North so this is definitely my last entry well there was a certain Kit being sold for £5:99 (which can't be very good) so I took a punt on it and we'll see what turns up!6 points
-
Dear modellers, I somehow have a soft spot for special aircraft. Years ago I read an article in : was it Air Enthusiast or Quarterly ? about the development of the Welkin. Making a model out of plastic, was a bit difficult with all roundings of the fuselage and enginecowlings. So I decided it was the right moment some timehonoured woodworking. Only the elevators, stabilo and the smaller details are plastic. And as often later I learned that there was a model kit of Planet in 1/48. Never mind, I learned a lot tabout woodworking. Enjoy the photographs. With kind greetings, JohnHaa for6 points
-
I am calling this one finished. The gantry crane for use with mine and the clubs RC tanks and vehicles. Top coat in black, was going to use maskol but the stuff had gone off so all the weathering is just surface painting. Si.6 points
-
There’s a better looking collaborative-build mudmover you might consider first Made more efficient use of aircrew too.....6 points
-
F333 Fairey Delta 2 1/72, WG774, SBAC Farnborough airshow 1957 'God awful Purple' Please find attached for your aural consumption, my attempt at the 1964 tooling of the record breaking aircraft, the Fairey Delta 2. When I embarked on this GB, got a couple of bagged kits from my father, but came across this beauty (albeit in a novo boxing). I was looking for decals as the Novo ones are notoriously bad, and came across the example I have modelled here. After a while discussing with @PeterB, I sorted some decals and paint out and started on the kit... there were less around 20 parts... this should be easy! How wrong was I you ask? Very 😂. WIP is here: More time was spent filling and sanding this brute than putting it together, but doesn't that make the end result all the more satisfying? Despite messing up the first coats of paint and having to sand down again I am pretty happy with my representation of this historic and classic aircraft. I think this has got me hooked on post-war British jets as I am eyeing up an SR53! Thanks for watching folks. Ash6 points
-
And we're done: 12th of the year and 2nd for July, oy! Really pleased with this one as it was really a just glorified paint mule to test how to do multicolor metalwork and all the funky masking Mustangs need and see if it could be "productionised"..The decals were going to be binned but turned out great. Only thing I'd be wary of is fitting the wings after painting, the extra layers of paint make it a tight squeeze and that could potentially split seams. Plus not wild about the gaps, and thats after CA and kicker to weld them together. The upside is you get great paint finish with no blow back onto the wings when airbrushing and that whole messy hard to get supercharger scoop area is flawless..compromises I guess. Guns are totally pants in the kit, horribly moulded plus split in half with an ugly seam that runs through them. Figured out how to do the seam and used some Albion tube to replace, quite quick if you can accurately measure & repeat the required lengths. Production ones will get a final buff and polish but even these are fine to naked eye. As usual the Alclad was magnificent, I will not hear a word said against this magical stuff, that is til I try my new Mr Super Metallic V2....Nothing to add on the Airfix kit, the canopy has its good and bad points but is workable, the detail and fit are pretty much the best of the recent 1/72 new tools I've tried and unlike their dreadfully fitting FW190, this is a breeze to build. The small parts issue of huge gates, soft plastic and flash will mean that you should scratch a new radio mast and control column or buy a nano saw like the RB or the Platz Hyper Gate and test your eyesight simultaneously. I've got another 11 of these so am curious to see what punters make of it, the Spit and 109 are already up to £16 each and this beats the pants off either of them in finish. And to think these little ponies were all going in the "give to mates kids to get them started" pile 🤔 Enough yak, this is a modellers workbench not a debating society, NEXT! And the RFI:6 points
-
More little blemishes are corrected: The tailwheel structure is glued in place, the fairings of the landing gear legs are added. These have to be trimmed and carved in order to fit:6 points
-
Anchor arms done after a nice soccer finale... The main part is a simple strip folded around another, glued while held in the calipers, and filed to shape. I used my drill press to add a 0.5mm hole and inserted a bit of Albion Alloys 0.5mm tubing (also in the shank). The tripping palms are a bit of strip and my new best friend: Magic Sculpt.6 points
-
Bristol Beaufighter IIF T3145 KP-K. 409 "Nighthawk" Sqn RCAF RAF Coleby Grange, September 1941 Kit: Airfix 04019 Conversion kit: Alley Cat Mk.II conversion and flat tail set Decals: Print Scale 72082 Build thread: https://www.britmodeller.com/forums/index.php?/topic/235052429-beaufighter-mkii/6 points
-
McDonnell RF-101C Voodoo 56-228, 45 TRS, 460 TRW Tan Son Nhut AB, South Vietnam, June 1970 Kit: Valom 72093 Build thread: https://www.britmodeller.com/forums/index.php?/topic/235052428-dyou-do-voodoo/6 points
-
Me 262A-1a This is my Bomber Me 262. I'm afraid the images are not as good as I would have liked. I had lost the good morning light in my Photo area. Anyway it is this or I wouldn't have made it. Once again I had a lot of trouble getting the gear on this one. I have replaced two of the images with two quick shots I took between the cloud shades. Not perfect but better.6 points
-
time for a new entry here: MiG-25BM Foxbat F "SEAD" ingredients: REVELL MiG-25RBT 1/48 Begemot MiG-25 decals and stencils Metallic Details long type R15-300 exhaust nozzles Cold War Studio BM conversion set and rear fin hook improvement Britmodeller GB spirit and help! thanks! WIP in the Specialists GB ending today (June 7th), with lots of really GREAT entries in the GALLERY: so, some pictures: and some color, equally grey actually and cockpit: thanks for comments, tips and tricks! cheers, Werner5 points
-
Built OOB except for the addition of Eduard seat belts and instrument panel, painted with Xtra Color enamals. Not the easiest kit to build with very tight fit and little margin for error but very enjoyable none the less, Carpet monster eat the co-pilots door! Lynx by peter crossman, on Flickr Lynx by peter crossman, on Flickr Lynx by peter crossman, on Flickr Lynx by peter crossman, on Flickr5 points
-
F333 Fairey Delta 2 1/72, WG774, SBAC Farnborough airshow 1957 'God awful Purple' (duplicate post from FROG squad gallery) Please find attached for your aural consumption, my attempt at the 1964 tooling of the record breaking aircraft, the Fairey Delta 2. When I embarked on this GB, got a couple of bagged kits from my father, but came across this beauty (albeit in a novo boxing). I was looking for decals as the Novo ones are notoriously bad, and came across the example I have modelled here. After a while discussing with @PeterB, I sorted some decals and paint out and started on the kit... there were less around 20 parts... this should be easy! How wrong was I you ask? Very 😂 WIP is here: More time was spent filling and sanding this brute than putting it together, but doesn't that make the end result all the more satisfying? Despite messing up the first coats of paint and having to sand down again I am pretty happy with my representation of this historic and classic aircraft. I think this has got me hooked on post-war British jets as I am eyeing up an SR53! Thanks for watching folks. Ash5 points
-
Here is one of my Sweet 1:144 Hawker Hurricane Mk.Is which I built in 2009. It's a Hurricane PR.I Tropical and represents P2638 of No. 208 (AC) Sqn, RAF at Burg El Arab, Egypt in 1942. The lightning flashes were holdovers from previous service with No. 274 Sqn. This machine was shot down by three Bf 109Es on 24 July, 1942. It was completely painted by brush and only the matt varnish was airbrushed. Thanks for looking Miguel5 points
-
Minor but important progress:5 points
-
Got some washes on, placard decals from the Barracuda set, a little touch up painting, and a final dull coat. My Yahu IP is on backorder, so this is as far as we go on the cockpit for now. Mar on the starboard sidewall is where I had the oxygen hose attached, but realized with test fitting that it needs to go on after attached to that fuselage side. [/url]5 points
-
Flying in the face of convention, I have started the painting by brushing two coats of Humbrol 123 onto the upper surfaces. I felt that because I had added the undercarriage legs in prep for painting the white undersides, painting the darker shade first would make for an easier masking job. I hope to add a final thinned coat of EDSG later today, I should then be ready to make a start on the white tomorrow. by John L, on Flickr5 points
-
Thank you Craig, most kind. Yeah that must have been a big screwdriver - no wonder the Tiger had a weight problem. Thank you very much Ozzy. Thank you Robert - very kind of you. Well really!! I do try - it's just that - as I'm getting older........... Thank you anyway! Thank you very much Steve. You are too kind Glynn, but thank you. I managed to find some time on this during some evenings last week and over the weekend. First job was getting some thinned Revell's Anthracite on the tracks followed dry-brushing some Humbrol's Gunmetal on them once they were dry - the top one in the photo below has been dry-brushed: Then I got some very thinned washes of Humbrol's Desert Yellow and Railmatch's Light Rust on: They still need some mud washes on. I also started to add the first bits of the weathering to the outer sets of the road wheels: I then felt like I wanted to do something other than painting or detail painting so I got the parts for the turret and gun assembled: It really does have some lovely detail: Next I damaged the Zimmerit in a vaiety of places and then added some weapons damage. Of course I then had to get back to painting! I've included a photo below to show how my paintwork looks after the first coat - with a light paint on darker plastic. It is quite hard to paint with thinned paints on this dark green plastic and there is a temptation to try and make it look better too quickly - so I make myself be patient and let it dry thoroughly before adding the next coats: Once fully dry I gave the parts their second and third coats of thinned Revell's Ochre Brown - thinned with water and applied with a medium flat brush: Once this was dry I applied a very, very thinned wash of Revell's Gunship Grey all over - I used a very soft medium pointed brush for this. Again, once dry, I applied a very, very thinned wash of Revell's Anthracite - in and around the detail - using a very fine pointed brush: Finally, for the weekend, I did the dry-brushing all over these parts with a lightened version of the Ochre Brown: The detail did come up quite nicely: Of course I then couldn't resit a test fit with the upper hull on the lower hull with the turret in place - just to check it all matched up: I was quite pleased with that. Next I will probably do some work on the parts that haven't been attached yet before getting onto the camo. Comments and suggestions welcome. Kind regards, Stix5 points
-
Morning folk's,sorry for the late start you can blame the madness over in the Frog asylum,anyway here's the first stages of construction.5 points
-
There are several ways. Build many and keep the best parts. I notice this happens less and less but for some parts this is the only way. I didn't do that here and one these flukes is slightly off-center (bottom right image, 2nd from the left). That is, the palms are aligned with the shank, so it should not be visible once done, but one fluke is a bit off. Drilling template not perfect I always use a chopper to cut my strips. I made an ancient post here: Chopper tips. I do not use this older chopper but the newer one and had the hinge recentered at our workshop at work (because the tool isn't very good... someone should make a decent chopper). By using calipers and strip (and keeping notes!) you can very easily remake a part accurate to 0.1mm consistently. The palms have a slight arc, and this was done using a circle cutter. Simply use a needle scriber to put a center in the strip, cut very carefully, cut to size using a chopper, keep the best parts. Templates. Here I used one for drilling only, but I also use them for aligning and cutting. Takes a bit of polystyrene and additional time... but in the end results in more consistent parts. Here the template was built while being held in the drill press. First drill the hole, then add the strips to the base plate using spacer strips against the drill. This is why the hole is as nicely centered as it is. If you first make a template, then align and drill, I would certainly ruin a few parts! (I am not very good at centering my drill press). I experiment a lot. In this case it went quite well, but in case on the anchor shank I had to start over with an error in the build. Trying and failing is a very good technique 😁 Some complicated parts require several attempts; you spend the day at work thinking about your problem and suddenly you find a new approach to try. I think the most complicated path to results was the plank nibbing techniques for the deck. This also means that sometimes entire weekends of modeling time are wasted on techniques without results. Optivisor. I have good eyesight but notice that with the optivisor I see a lot more. My work is now much cleaner than before. Practice. I notice that my filing and cutting is getting more consistent. I go slowly and check often. The filing of the flukes, for example, was a slow process! It's a bit of a no-brainer, but I can see my older scratchbuild parts are not as sharp as I would like them. I keep replacing parts on the model, hence it is not yet finished... I should really stop doing that... but once the anchor arrangement is redone I'll add primer so that has to be it...5 points
-
Box art - ref. 334 - Convair CV-340 "Hawaiian Airlines" Source: https://www.aviationmegastore.com/convair-cv340-hawaiian-airlines-334-roden-48230177022-aircraft-scale-modelling/product/?action=prodinfo&art=163946 Decals Source: https://modelsua.com/convair-cv-340-n5506k-hawaiian-airlines-usa-1956-1-144-roden-334.html V.P.5 points
-
MiG-25BM Foxbat F "SEAD" ingredients: REVELL MiG-25RBT 1/48 Begemot MiG-25 decals and stencils Metallic Details long type R15-300 exhaust nozzles Cold War Studio BM conversion set and rear fin hook improvement Britmodeller GB spirit and help! thanks! WIP: just in time armed with KH-58 Kilter anti radar missiles form the CWS conversion set . great detail and ease of construction! thanks everybody for your patience! now, I have to start with the Phantom GB CR.12 entry and probably the Asian 80ies GB5 points
-
My 2nd entry... And another Black Widow on this GB! Dragon 1/72 P-61A Black Widow "Virgin Widow" Oob, scratch details and upper turret, kits world decal WIP: The result; It's been fun... Thanks @trickyrich for hosting this Group Build! Cheers, Mario5 points
-
Well here is the Recon Me 262. I'm afraid it isn't as good as I would have like because of all the issues I had at the end. Also I just notice that the canopy isn't sitting correctly. I will fix it, but time is too short to risk the damage it may cause, so it is what it is for now. Canopy is now corrected5 points

.thumb.jpg.d17ff607fc7e89ed057e63fcb6f2a888.jpg)


.thumb.jpg.0cb281983c298f55509ab7d9a06994bd.jpg)


.thumb.jpg.2c282efcc138b7cf7f1e1586a9c534d2.jpg)


This leaderboard is set to London/GMT+01:00