
Leaderboard


Popular Content
Showing content with the highest reputation on 06/07/19 in all areas
-
Well, here she is!49 points
-
Hi all! The plane is a Junkers Ju 88 A4 from Hasegawa on the 1/72 scale, I chose the version used in night operations. The camouflage is a bit dark, but after all it was a plane used at night ... See the photos: Hope you enjoy it! Regards! Luiz.27 points
-
It's been almost exactly three months since I began this project: and I'm finally ready to post this RFI 😀 For details on this build, the WIP can be found here: https://www.britmodeller.com/forums/index.php?/topic/235053675-convair-b-58-hustler-172/ I've got lots to show, so grab your candy &popcorn from the lobby and settle into your seat! Aftermarket items include Caracel's excellent B-58 decal set; Aires afterburner cans and nozzles; photoetch sets from Airwaves and Eduard; and Master Model's B-58 nose probe & F-16 static discharge wicks. Paint is AK Interactive's "Xtreme Metal". I selected markings from the Caracel set for "Rapid Rabbit": Let's go! *** New photos added 14 July 2019 *** *** End of New Photos *** Selected details: Crew compartments were almost entirely scratchbuilt: Pilot's cockpit Navigator/Bombardier and Defensive Systems Operator stations: Unfortunately, not much is visible once installed: Extra detailing added to the kit's escape capsules: Hatch interior details: Panel shading on engine pods: Engine air intakes scratchbuilt: Aires provided the afterburner cans and nozzles: Nose landing gear details: Main landing gear details: Scratchbuilt Vulcan minigun: Position lights added to vertical stabilizer and wing leading edges: Astro-tracker dome added to top of fuselage: Static discharge wicks on wing trailing edge and vertical fin: Pigment powders were used to recreate the "striping" effect seen in photos of the B-58 upper fuselage: The Hustler's unique exhaust staining beneath the wing modeled using pigment powders and Tamiya smoke: That's it! A challenging build to be sure. But I learned a lot, not only about Convair's B-58, but also some new modeling techniques. Thanks to everyone who followed my build (nearly 14,000 views!!!) and for the many comments and suggestions received. Now, I must decide what my next project will be. Maybe an XB-35 flying wing? Forgot to put the nose weight in again, didn't you?23 points
-
Hello everyone! Here is Aoshima's 1:72 Focke-Wulf Ta 152H-0 which I built back in 2013. It represents “Green 3” of Stab/JG301, Luftwaffe, at Stendal/Neustadt-Glewe, Germany, April 1945. This machine was flown by Obfw. Josef Keil on 10 April 1945, when he shot down a P-47 over Kassel. It was also flown by Obfw. Walter Loos on 20 April, 1945. The kit was built mostly OOB. I only replaced the nose piece with a more accurate resin part from Quickboost and added belts from an Eduard etched set of WWII Luftwaffe belts. Most of the decals were from an Eagle Strike sheet with the rest from the kit. Some of the insignia of the former were oversized. The kit was fully painted by brush with only the final matt/satin varnish being airbrushed. Thanks for looking and all comments are welcome Miguel21 points
-
U-2 with Bakshaev sanitary tapes. Model from ICM. Of the additional accessories used resin motor and photo-etched parts. Regards. Alex.20 points
-
This is ICM's Mig 25 in 48th scale. Built out of the box except for a pilot figure from Aerobonus. The kit went together with hardly any fuss, especially if you take into account the unusual method of assembly for the fuselage behind the cockpit. It was made up from side, top & bottom panels with the rear side panels including the fins. I used Humbrol enamels for the overall grey and AK paints for the metallic colours. Thanks for looking. Angelo19 points
-
Well calling it done after more than 2 years WIP link Some close ups to follow beefy17 points
-
Hi guys, The recent Grumman F-9F posts of Gary Brandley and “crobinsonh” reminded me of my own build some 15 years ago which has not been presented to this forum yet – unlike most of my other ones... So, here it is: It took me almost 21 months and It was extensively reworked adding a lot of scratch-built details. BLACK BOX No.48023 resin cockpit set was the only aftermarket product used apart from the decals which is a combination of EAGLE STRIKE’s No.48114 and SUPERSCALE’s No.48-778 sheets.17 points
-
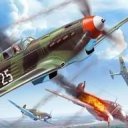
Hi there, I finished this kit a couple of weeks ago and though I don't build many aircraft I thoroughly enjoyed this one. The kit went together well with no real issues and the decals were fine also. I think I may have to build a few more WW2 aircraft as that era is of great interest to me. Hope you enjoy viewing.17 points
-
Hello from Russia! The model from Trumpeter is crossed with a resin set SBS Model. Also use photoetched set Eduard, the brass parts of Master, and the vacuum parts of Pavla Models. Trumpeter kit is very complex and requires cardinal processing to make it look like a prototype MiG-19PM. Alex.16 points
-
Latest off the bench is the Valom kit of the Islander, in the markings of HM Coastguard. The kit is along the lines of a Special Hobby offering. Needs a lot of work and the basic colour of the plastic (beige) does not help. The decals are from the kit and are "thin" to say the least. I did fill the nose with lead believe it or not but it seems happier dragging it's bum. please feel free to comment etc. Thanks for looking Dick15 points
-
I present the Revell A319 in the colour scheme introduced by Austrian Airlines in 2002. This is a sort of accidental model. My original intention was to finish the A319 in the multi-coloured “Park Inn” scheme carried by D-AKNF of Germanwings. However that came to an abrupt end when I discovered an unfixable problem with the Nazca decals. Luckily I hadn’t started the long and complex painting job but I was left with a “white-tail” A319 in need of an airline, not to mention about £30-worth of Vallejo and Tamiya paint which I had bought specially for the project. After looking at various other options the penny dropped that the kit had come with a very decent set of Austrian decals and using them would add another model to my growing collection of current and former European “flag carriers”. OE-LDA “Sofia” is the result and it’s probably only the third or fourth time in all the years I’ve been building airliners that I’ve used the kit decals. The model is OOB apart from replacement winglets, a BraZ satcom fairing and a few small details. White is Halfords, grey is Holts HL Grey01, the blue belly is Mr Color H45 and the engines are Revell Aqua 04 with drops of 50 added until it looked about right. The Aeroflex on the wings is Revell Aqua 374 and metallics are by Tamiya and Revell. The Revell decals fitted well. The “www.austrian.com” titles on the engines came from a Nazca Boeing 737 sheet. Photos suggest the A319s got these when the satcom fairings were fitted although bits of the titles were often missing presumably due to parts of the cowlings being swapped around. Authentic Airliners windows and a few extra decals from the spares box completed the ensemble. Thanks for looking and as always constructive criticism is welcome Dave G14 points
-
I'd best get this inspected before dan gets his very detailed and exellent 1/72 airfix HU5 SEA KING finished, I've built it as part of "the specialist" group build ,its an AEW.2 SEA KING in 72nd scale by dragon ,cyberhobby, i used some of the eduard aew.2 equipment ,cockpit,and exterior pe sets, and made a few little alterations to the base kit , to represent an 849 squadron helicopter, I've made a base to resemble a section of HMS illustrious deck ( unfortunately US carrier tie downs included) ,the wooden part of the base is yet to be fixed as it needs varnishing, Hope you like it13 points
-
Afternoon all, Here is my entry for the 'Specialist' Group Build, Italeri's 1/72 SR-71 Blackbird, pretty much out of the box all bar a brass/resin pitot set and the addition of some astronauts left over from a recent Airfix Lunar Module build. The paint has been weathered using oil paints. The decals aren't that bad and conformed well with set/sol the silvering is purely down to me getting the gloss coat badly wrong with my first use of Alclad II Aqua Gloss. It is not a stellar kit with some loose and ill defined fitting of the major airframe assemblies plus some well documented shape issues mainly around the nose/cheek chine profile. However, that being said I enjoyed the build and am now glad I took the opportunity to add one of my favourite looking aircraft to my collection. Cheers, Mark.13 points
-
Hi Guys Eduard weekend edition Mig-21MF quick build. That was very good set, no problems during build. Slovak Air Force "agressor" painting scheme. Model painted with Tamiya paints, details with brush Vellejo, Revell and Model Master paints. I use Eduard brassin wheels for main landing gear. Comparison with the Zvezda's Mig-21 1:72 scale model.13 points
-
This is my latest model: F-16C Block 52+ , Polish Air Forces. I used rather poor kit of Revell, plus few aftermarkets: Master's sensors, decals of ModelMaker and Techmod, camouflage masks of ModelMaker, Aires exhaust nozzle, Res/Kit wheels and Eduard AGM-154C bombs. Enjoy.10 points
-
I've been working on this particular project for a few years with a build log on ontheslipway.com and a thread on modelwarships.com. I'll just continue where I am now, working on the anchors. I'm slowly preparing the replace the anchor arrangement I have now. Once this is done I can continue adding a layer of primer to the foredeck. The rest of the fore deck in now done Rear deck was already painted (plank by plank, of course) Progress is painfully slow, with taking a lot of time per sub assembly and modeling being a bit of an on or off project. (Hope the images show )8 points
-
hello 1:144 fans! for IPMS the Netherlands I have built a test shot of their incredible AN-225, the largest aircraft in the world. And also the largest aircraft I ever built. Complete build report can be found in MIP #3 of IPMS the Netherlands. Enjoy and have a relaxiing vacation.8 points
-
An older build that finally made it out to the airport. This is the 1/48 Monogram Panther, painted with ModelMaster gloss dark blue. I would’ve liked to take more pics but I was afraid the gusty wind might take her airborne any minute. 😉 (there's that wind again!😁) This kit has a lot of nice detail, especially the cockpit. The framing on the windscreen was way too big so I sanded it all off and masked it with tape to get the more correct size frame. I read about the canopy frame issue in FSM years ago. I was really hesitant to sand them off but I jumped in and gave it a try. Believe me, I was worried that it would never look right again. But my ol’ dad used to say, “Even a blind hog finds an acorn now and then.” And I did find that acorn! Whew, a lot of polishing saved the day! It’s been a long time since the kit was built, but I don’t recall any particular fit issues. I approached the canopy frame issue with great trepidation, but it turned out okay. As I said earlier, the cockpit has some nice detail and features, but one does find that in many Monogram kits of this vintage. I am going to replace the cannon barrels with hypodermic tubing as one of the kit barrels has fallen back into the fuselage since these pics were made. 🤦♂️ The metal parts will look better anyway. The decals are a mix of aftermarket and kit markings. Please excuse the crooked canopy in one of the overhead shots. I left it unattached so I could pose it either opened or closed and I didn’t notice that it was askew before I took the pic. Thanks for checking out my old Panther and thanks for the likes and comments!😀8 points
-
I had today off and unfortunately the wife had to go to work - what a shame. She should be glad though - I put the day to good use. After working for months on the Fly Wessex interspersed with bouts of railway shenanigans I sat myself down today and thought just what am I going to do then? At that point I spotted the baby Wessex that had sat languishing form many, many months without any progress and thought it was about time to give it some care and attention. Way back some long time ago, I had primed then given a coat of dark grey, however, the dark grey was looking a bit forlorn, so I have it another light coat to freshen things up a tad. Then it was on to serious business - add the camouflage colors. I had bought what passes for white-tack here some time ago and pulled that out to start the process - but gave up pretty soon as it was apparent it was the not the same as the white-tack we know and love. I had some grubby old blu-tack and had to resort to that (still not the same stuff though). I had forgotten just how difficult masking was, particularly in this fiddly scale. It took me the beast part of three hours to get the things masked up ready to paint. I did have a couple of false starts though - I kept looking at the reference photo's and repeatedly masked for the wrong color. Is it just me or do other folks do that as well ? Eventually we got to this stage... Then without pausing for breath, well, I did go and get another coffee, the dark green was mixed up and sprayed. I had been using Foquil Flow Enhancer but I always seemed to have problems with it - it seems to separate the pigment from the paint (or so it seems to me) so I decided to go without it today and used some retarder instead. The tip kept drying pretty quickly but I was on the watch for it and kept stopping to wipe it clean. The dark green went on a lot better with the so-called flow enhancer. I must remember to bin that stuff. Being the child that I am, I couldn't wait to start peeling off the masking. So far so good. Now for the difficult part - masking that has been on there for two years or more... Well, it came off surprisingly easy. There are a couple of bleeds but nothing to get worked up about. Touch ups are to become the order of the day (wait for it...) The front end was the worst but I had expected that. I remembered I had some issues masking that and even then some of the paint had fallen of. Bill - I don't know how you do it in this scale, I really don't. Again, touch ups required but nothing too arduous. You will have noticed in the photo above that the white bands went all round the fuselage. That is not the case on the 1:1 - the white band stops short of the underside and a teensy bit of the camouflage is evident at that point. It was just a lot easier to paint them as a continuous band. Out with the masking tape and a couple of coats of thinned colors laid on in between holding the Wessex in front of the fan to aid drying. And there we have the small bands of camouflage between the white and the undersides. Now for the bottom end. I had bought this (Tamiya I believe) tape a few years ago and this was my first attempt at using it. The tape comes complete with some polythene sheeting attached to it. Very easy to use... so why I did not think to use it later (wait for it...) I have no idea. There we have the little Wessex in almost her full glory. Well, certainly looking a bit more Wessex like than she has been for the last year or two. But now we get to the difficult bits - look at that tail rotor! If I had any sense I would have painted the tail rotor before I assembled it. That would have made the job a whole lot easier than it is now. Dumplin' Nothing for it but to attack the beast and beat it into submission. Once again, thin coats followed by a minute or two in front of the fan to dry... The last touch for the tail rotor was to add the leading edge strip. For this I used Alclad dull aluminum. I was so pleased with masking the blades and not breaking them off - masking the rear end of the airframe was done with some kitchen towel. A quick blast of the alclad and I was pretty pleased with the result. Not perfect but considering how difficult it was to get the thing masked I was pretty happy, until... I discovered overspray of the aluminum all down the bloomin' airframe. Idiot!!! Complete numbnuts of the highest order! I had the perfect stuff that I had already used earlier and in my rush to get things done I omitted to mask the entire airframe - something I almost never do. Lesson learned now though. The Hend does not like painting. The Hend can not control an air brush with any degree of accuracy. The Hend can be a complete plonker at times. Like now for instance!!! Oh well. Nothing that can't be fixed. Just a complete PITA. I'm not masking the whole thing again - I've been going over the affected areas with very thinned paint. This was always going to be a warts and all build - the Fly kit was going to be the showpiece (hahaha!) Remember folks... Masking is your friend!!!8 points
-
This is a great kit from Tamiya it literally falls together no issues whatsoever. The decals go down great and there's a lot of detail on the interior as well. For the price I have yet to find a better kit. Hope you enjoy viewing.7 points
-
Some years ago(25~30 years), when the only game in town was the Matchbox Victor (and the aircraft was a long way off retirement) a friend of mine, Keith, asked me to build his kit. Life, work, kids, house moves etc all conspired to get in the way of finishing it off. Well, I have been going through a few "shelf queens" as another friend of mine refers to them and I have finally I got to finish her off. As most of you know, the Matchbox kit has a few issues and I have tried to address a few of them. The kit has mainly raised panel lines and some quirk in the mould design resulted in features on the left side being replicated on the right including the outline of the crew door and "Annie's hatch" down in the rear fuselage. Matchbox also chose to create the impression of recessed panel lines on the inner wing panels with two raised lines! Odd! So all of this was removed and re-scribed. I also scribed the RAT outlet grills, reprofiled the intake at the base of the fin, moved the positiion of the AEO's window and added the fuel dump in the tail-cone The intakes as moulded are horrendous and although it is perfectly possible to rectify with plastic card and epoxy filler, I managed to get hold of and use a set of DB resin intakes - these are now produced by David J Parkins together with a load of fret and extra resin details and are highly recommended. I added a representaion of the Artouste AAPP in the starboard wing route, conspicuous by its absence in the kit. The wing is OK in layout but lacks completely any of the subtle dihedral and incidence changes along it's length. This was corrected with a few careful cuts and twists of the wing sections to try to emulate the rigging diagram I have in my possession. I'm not sure if it's a result of or the cause of the wildly tail-high stance of the model but it results in the main gear being too long and excessively deep fairings for the underwing tanks but at least it would keep the FR pods horizontal. The famous Whitcomb Bodies on the trailing edge also droop (maybe to make them parallel to the ground?) The artificial feel intake and (redundant) TFR antenna fairing on the nose have been rebuilt to slim them down and the tailplane bullet fairing has been slimmed and refined. I also took the opportunity to add the RWR antenna and add the relocated air outlet on the rear of the tailplane faring, blocked when the RWR was installed - the original outlet also incorporated the rear navigation light (white) so a new location was found on the tailplane trailing edge - in fact two as one would be shielded by the bullet when viewed from more than a few degrees off centreline. A few airframe strengthening plates were added to starboard side of the cabin and along the tops of the wings with 5 thou card and bits of strip. The main gears need to be shortened so that the main gear doors run along the top of the tyres - This was achieved by shortening the jury strut and also by removing approx 1.1/2 mm from the top of the gear bogies. The end result is to have the fuselage more or less horizontal though with various fuel loads the stance would change. Whatever though, it was only tail high when braking on the landing run - maybe that's the source? A few things I didn't do include no omega aerial under the tail cone or HDU flood lights either side of the tail bumper. I also added no comms aerials as this model had to make it unscathed to France! Keith was on the Sim Flight at Marham and had a couple of trips (lucky so and so!) so asked for one of "his" aircraft to be modelled. As it turns out it was XM715, now known as Teasin' Tina (and we all know how she has teased!), he asked for hemp finish, door open, HDU and flaps dropped. All this was incorporated and the Xtradecal sheet for the Gulf Subjects was used along with certain kit markings. Anyway, enough waffle, there are other smaller details missing but I was pretty much drained with this one so enough waffle, here're the pics. Hope you enjoy them. I love the Victor and hope I have done it's glorious shape some justice. Comments and criticism welcomed in equal measure. An Airfix one waits for me but maybe a little break first! Thanks for looking! ATB Rick7 points
-
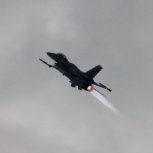
This time the model of a jet plane and so I return to my favorite topic (jets). F / A-18F Super Hornet 'VFA-102 50th Anniversary Trumpeter 1:32 scale set, the model is not simple to build. I tried to do the model without strong weathering. Of course, the model is made straight from the box.7 points
-
As predicted, it didn't take long to assemble this little plane. Over the last week, during spare moments here and there, I joined the wing, stabiliser and fuselage halves. I also decided to titivate things a bit by replicating the raised ridges where the outer wings were fitted, and scribe some extra panels after the RS Models Maggie. Of course, I didn't take any photos of this. I did take a photo as I fitted the stabs and wings today. Here she is, with the wings propped in the hopes they will set level. The raised ridges referred to earlier are the white strips. I've been revisiting them with the sanding sticks in an effort to thin them as far as I dare. That's it for today. The undercarriage has been fitted, and I hope it survives further handling. With luck I might be able to add the brake lines that are pretty visible in most photos. I added an exhaust and the pair of Venturi under the fuselage, carved from styrene rod. Another thing you can't see is the simulated cylinder barrel behind the nose intake. That was just fine fuse wire wound round some styrene rod. After Adrian's Magister build, I also ran some stretched sprue to simulate the hinge lines on the engine hood. I've elected not to let the prop spin, so it will be glued in place once the painting is finished. I think I'll aim to get primer on things tomorrow, and then take my time painting the model. I hope to use some of the original kit transfers for the callsign/serial and letters. The sheet had yellowed a bit over the intervening few decades, so I tried sticking it to a sunny window for a day or three. After the first day, I remembered the replacement double-glazing units in that window had that special anti-UV glass in it. I moved it to the windows that haven't been updated yet, and it seems to have done the trick. Even the weather played ball and we had plenty of sunlight to help things along. The main national markings will come from my decal stocks. The Frog ones are quite bright and, as is traditional, printed out of register! In other news, I think I may have an idea on how to sort out the Master's dodgy canopy.7 points
-
Sorry, its been a while since I've posted any updates on this. I had lost interest a bit and lately I've had to force myself to work on this. I've made some progress and I think I'm starting to get my mojo back. There are now two wall assemblies. As I started to dry assemble things I discovered that I needed to lengthen the walls on either side. Its a bit of a bodge. Hopefully not too noticeable once painted. I also reworked the bottom vents. I didn't like how they looked compared with the top ones, so I tore them out and replaced them. I think it was worth the effort and heartache. All six tubular racks have been bent up. I'm very pleased with how these have turned out. I still need to make the legs and get them mounted. The doors have been assembled and primed. I still have to make the hydraulic greebles that can be seen in the cutout openings. I've also got the padding that surrounds the doors glued up and ready for some paint. A quick fit check. I got some yellow oxide paint down. It looks quite close to the film color, though its a little hard to tell in the photo. I also got the pads for the ceiling built up. All in all, I think I'm back on track. Hopefully the next updates will come a little more regular. Peter7 points
-
Guys I'm sorry, life has got in the way… Mrs B's birthday today and we're off for the weekend but I hope to update something on Sunday. Keep up the chat7 points
-
Hi all. Today I'd like to show my recently finished Airfix Lynx. The kit is very nice with great details and fit. Only the windscreen needs some attention to make it fit properly. Eduard's photo-etch sets were used and some scratch built details. The model was painted with Gunze Aqeous paints over Alclad black primer. Thanks for watching.6 points
-
Latest build. Mark DSCN3447 (2) by mwsfly9, on Flickr DSCN3448 (2) by mwsfly9, on Flickr DSCN3449 (2) by mwsfly9, on Flickr DSCN3452 (2) by mwsfly9, on Flickr DSCN3453 (2) by mwsfly9, on Flickr DSCN3454 (2) by mwsfly9, on Flickr DSCN3455 (2) by mwsfly9, on Flickr DSCN3460 (2) by mwsfly9, on Flickr DSCN3461 (2) by mwsfly9, on Flickr DSCN3462 (2) by mwsfly9, on Flickr6 points
-
I bought the Fisher Patter 1/32nd F-9F Panther in 2003 when it first appeared. This was my first resin model. It was a great experience and I used Vallejo Model Air for the first and only time as the paint was so fragile it just scratched off way too easily the end result being the shelf of doom. Roll on 2018 - the Panther is rolling around on my shelf of doom and I decide to take another look. Woe and behold I find that my lovely wife has thrown the box out with many of the kit parts in it (U/C, doors, wheels, canopy, weapons, PE sheet etc). I contact Paul Fisher and send him a photo of what I have and ask him if I can pay for the missing parts. 7-10 days later a box arrives in the post with all of the missing parts completely free of charge including the shipping to the UK. How is that for customer service! Roll on 2019 and inspired by a post in LSP discussion I decide to finish the model. If you notice the less than fine panel lines in places this was because back in 2003 when I build the major assemblies I had bought a Tamiya scriber and went a little mad with making trenches. I also lightly weathered the model and the large "silver walkways" as can be seen on footage of the real aircraft. Please note that I have fixed the hanging pylon that I only noticed when I took the photographs.6 points
-
These are a few of my highlights from this year's Festival of Speed. 'Car of the Show' award goes to Warwick Mortimer's March 84G, which he brought all the way from New Zealand. It's Mazda rotary-engined, so off to a great start; it also scored because it was a car I'd never seen before, and well it's Group C, so that's the hat-trick! Plus an awesome piece of machinery and by the way, Warwick is also a top bloke, who was more than happy to chat for a good 15 minutes about his pride and joy (he also owns a McLaren M8F, so I'm not jealous at all): Embiricos Bentley. Sublime. Paris-Dakar truck, driven with great gusto: First time I'd seen the ACO's Martini longtail 917 run in anger, so another highlight: I'd seen it in the museum and always assumed it was a non-runner. The winner of prettiest car on show: Abarth 2000SP with Derek Bell on board: I love going to FoS and having a 'WTF' moment (many in fact) and this year I was gobsmacked by this 1936 Avions Voisin C28 Aerosport. Typically quirky for a Voisin, I have to say it was a case of love at first sight. Possibly also the car I'd most liked to have taken home: Mad Abarth OT Periscopo with engine hanging out in a number of places and with novel examples of how you get the air into the engine and the exhaust gases out: This is a bit random but had me enthralled for ages: 3D-printed titanium exhaust on a Pagani Zonda: Cisitalia 202: another example of why I go to FoS: Aston commemorative Q Editions Vantage line-up, each having paint schemes and bodywork tweaks to reflect a key car in A-M's heritage. Left to right are Razor Blade, Ulster, DB3S, AMR-1, DBR9 and GTE. I would liked a bit more red and white and a number '18' on the AMR-1 edition (then I might buy one ) Volkswagen iD-R in Nurburgring spec. Five Abarth sports racers: no more to be said really. There was a strange lack of LMP stuff this year. No LM winner in LMP1 or LMP2; or either of the GT classes, and going further I think it was the first FoS I'd attended where there wasn't a single Porsche 956 or 962. A strange omission in a year when there was (for me) too much NASCAR, too much modern F1 and too much drift. Luckily this Ligier JS P217 made up for it a bit: EDIT: it's the LMP3 car, which looks similar but when it fires up, you know it's an LMP3 - they sound gorgeous! And three Aston project cars. Another 'never again' photo opportunity I'd guess.6 points
-
Ok ok 😎 One "shackle" of chaincable; a bit of soldering including the center stud. These are now nearly done6 points
-
Both of these models are 1/48 Hasegawa Corsairs in USMC markings during the Korean War. Both kits still need armaments loaded and a few more weathing steps performed. The F4U-4 is the old Hasegawa kit (with raised lines) converted to a cannon-armed F4U-4B with parts from the new-mold Hasegawa Corsair. The True Details cockpit (intended for the Academy kit) was adapted to fit the Hasegawa fuselage. The level of detail over the kit cockpit definitely makes it a cost-effective investment. The erroneously-molded windscreen frames were sanded off and painted in the proper position. A simple, yet effective solution! This shot illustrates many of the donor parts incorporated. The engine, propeller, exhausts, rocket stubs, and 20mm cannon are from the new-mold Hasegawa F4U-5/-5N/-7/ AU-1 kit. The wingroot inlets, landing gear, and gear doors are Tamiya Corsair parts. The beautifully-detailed wheels are Ultracast replacements. The markings for VMA-332 aboard USS Bairoko are from Cutting Edge. The second Corsair is the Hasegawa AU-1 in VMA-323 markings. The cockpit was enhanced by the removal of the radar scope (a feature of the F4U-5N night-fighter) and replacement with an instrument decal, swithboxes atop the instrument coaming from the True Details cockpit set, and seatbelts from an out-of-production Promodeller decal sheet. Most of the decals are from Eagle Strike for a F4U-4B. They were positioned to match photos of VMA-323s AU-1s along with additional generic decals for the gear doors. The wheels were Tamiya Corsair donor wheels. A Marine Corsair family portrait. The in-progress posts are here >>>AU-1<<< and here >>>F4U-4B<<<6 points
-
Hi again, Washes and oils are added. I tried to make it a bit more worn and rusty than I usually do. These vehicles were made of mild steel and were used in sea water and moist environment. The photo of the real thing show a pretty faded vehicle as well. And all the other little bits to this model. Of course I won't use all the oil cans, shown here - it would look like a gas station on tracks - but I made few more to choose from later. Kristjan6 points
-
Update #6 With the wings now complete it was time to tackle that banana warped fuselage. Prior to cementing these bits together I made up a rudimentary cockpit from a few spare bits and mounted this onto the kit supplied cockpit floor. I had to adjust the positioning of this a little lower, otherwise the canopy would have been hitting the top of the ejector seat which may have prevented it from sitting properly. Various areas were painted black and the seat embellished with some very basic home made decal seat belts. All this will hardly be seen under a rather thick but reasonably clear kit canopy. The close cockpit tub photo does look kinda shoddy, however to my failing and out of focused naked eyes it'll do the job fairly adequately. Now there's something about kits with open bomb bays, rarely do the fuselage pieces line up well enough to hide the join line and often leave a misaligned gap. My solution to having a nice smooth opening was to slice a piece of plastic card to simulate the curved internal structure. I've then left a sizeable chuck of scrap plastic that will be cut and filed to size using the fuselage curvature as a guide. Time will tell if this is successful, however it'll hide a nasty area that would have been glaringly obvious each time I looked at it. I'm hoping that it will all sort of blend in once the bomb bay doors are in position. Once again it's all guess work and something else that I failed to think about when choosing to open the bomb bay area. Still lots to clean up around the fuselage and then there's that clear nose cone that just looks like trouble to get right!. This kit is going relatively too slow for my liking, however as I've struggled to finish a Canberra kit (two failed attempts in the last few years), I'm determined to get this one home and at a standard I'm happy with. Cheers and thanks.. Dave6 points
-
My open hatch HaroPla Haro and Micro Bearguy pilot. The Haro is a great little kit from Bandai with some nice interior detail that would normally get covered once built, so I thought I would show it off with the open hatch look. The green Haro is the OOB by my doughter5 points
-
Latest build folks. Experimented with gloss finish applied decals and acrylic paints in tubes, then finished off with a Revell Matt finish number 2. Brush painted out of the box job. In the past never did a gloss finish, but cut the decals as close as possible to avoid silvering, but not always successful. The shark mouth decal actually fits pretty well, I had expected problems with that. Struggled with the side windows though and not particularly happy with my result. Enjoyable little build and enjoyed the experimentation. I hope you like it.5 points
-
And yet another from me! . The canopy gave loads of problems and only just passes muster after no end of faffing about. It's a three footer for sure, but I'm happy enough to have the kit to display alongside my other FROG models. Build thread here... And finished model here... I've removed the stand in Photoshop for the second picture. A black stand on a black background base was a bit distracting.5 points
-
Here's the scrap pile Hunter rescue, now with added redness... A rescue, rebuild and repaint of a beat to death old model. The nose got a bit of filler and reshaping to something like the pointed one on the Record Breaker plane. Roundels from an old FROG sheet, complete with slight mismatch to the red centres. Serials and codes from Extradecal and red finish from a rattle can, polished up with T cut. The original canopy had a large crack running through it so it got finished with chrome ink Molotow pen. The finished model is more a desk display type than a detailed build but I'm more than happy with it. Build thread here...5 points
-
All done, loads of fun. Gallery pictures in a minute or two...5 points
-
Well the long ongoing build is now done and I can get cracking with this and a couple of others sitting on the shelf Primed and then painted lower hull antifouling red also added a strip of masking tape to give the noticeable hull side lines and started fitting some ladders and doors from the Atlantic Models PE set Also cut out the moulded raised walkways ready to add the new ones And I have just received these replacement parts for the forward guns and torpedo launchers from Shapeways Will also be replacing the launches with a couple of Atlantic Models 1/350 you can see that there is not that much size difference beefy5 points
-
A quick update on the 'ruined' building... This is where I was up to the other day - when I applied a few different colours to the brickwork... ...and after some 'blending'... ...a gloss coat - then the drain pipe added and some 'grouting'.... I'm pretty happy with the result - considering the starting point.5 points
-
Hi comrades! Here result of my build (full build is somewhere in the "in process" section) Resume: very recommended kit Enjoy and thanks for looking5 points
-
Hi Sitting here in canada thinking about sometime in the future ( hopefully a not to distant future ) about going in a devon pub ordering for dinner, a steak n kidney pudding meal accompanied by a pint of cold cider and a warm pastie for lunch cheers jerry5 points
-
Haha! 😁 That was early 1967. I was either 11 or had just turned 12. The day of the internet critic was a long way off, buying and building plastic models was then the domain of kids, and if I was happy playing with with Airfix's rivet ridden Fortress and Wellington moulded in 'orrible brittle black plastic of the day, just how bad could the Frog Beaufort have been? Simpler times and pleasures. I could lament that it's a shame age has to change that if you permit it. Although I appreciate greater scale accuracy and detail now along with larger scale benefiting it, I do prefer it moulded in as much as is possible, and outside the cockpit. I don't do aftermarket resin generally unless it's in the box, and although I have in the past, I avoid excessive sheets of piddling PE parts which drives me nuts. Particularly the stuff inside the fuselage, cockpit, wheel bays or nacelles which ends up effectively hidden in any hands off display or unappreciated by presbyopia afflicted eyes from more than three feet away. We're all very spoilt today. I have somehow over the past decade managed to accumulate a stash that realisation occurred a couple of years ago now well exceeds STABLE. How did that happen?!!!! 🙄5 points
-
Hello everyone... sorry for the delay. We had unexpected house guests. So a couple of resprays later and this is as good as it gets. Im going to the next stage as i really don't think i can get it any better ? Ive since clear coated the plane in anticipation of decaling. Please share if you have any thoughts, questions, comments, or good stories ? Dennis5 points
-
I don't understand ANYTHING but that isn't such an unusual thing Nice boat Aren't the masts expected to slant away from each other? Shows what I know 😨5 points
-
Italeri 1/72 Lockheed Martin SR-71 Blackbird: Cheers, Mark.5 points
-
Hello everyone... well i thought about and decided to re-mask everything and re-spray the L.A. Grey to tighten up the lines. Its still not perfect but i do believe its within my specs for acceptability. What do you think ? Questions, comments, and/or thoughts ? Dennis5 points
-
I have just started building Airfix's 1/72 Golden Hind and decided to give her a crew, made up from the kit figures (plus some spares from my son's previous build), and RedBox's English and Spanish sailors. DSC_0003 by Richard Linnell, on Flickr After priming them black the colours are going on fairly quickly DSC_0004 by Richard Linnell, on Flickr4 points
-
Too summarize, we have two pink Harriers! Mike, that's my understanding as well. As a slight diversion, I have made a start on the first of my two phantoms, the Hasegawa F-4. I made a start by constructing the seats to compare them with the resin replacements - from left to right Airfix - Resin - Hasegawa Cockpit completed using Eduard etch.4 points


.thumb.jpg.cfc129272ffec824439b15e6013d5952.jpg)


This leaderboard is set to London/GMT+01:00