
Leaderboard


Popular Content
Showing content with the highest reputation on 05/07/19 in all areas
-
Dear members, Remember the Republic P-47 Thunderbolts in 1/48 by Hawk ? Yes the chrome-plated versions It was in the seventies and I was overjoyed, when I saw the model-kits in the modelshop. And you could choose two versions. Because I liked both, I bought two kits. The gloom came later when I discovered, that the cowlings were completly wrong. Disappointed I was left with two engineless Thunderbolts, they disappeared in a dark corner of my stash. Till I read some articles in Wings & Airpower about two prototypes: the P-47J and later the XP-72. At last I found a reason to build the two forlorn kits. The conversions were extensive, deepening the fuselages, making two new engines, new props and more smaller details. And putty; loads of the it. Pity I did not rescripe the panellines. So be it …! Anyhow I learned more about conversions and other scratch work. At last the overall finish; I used an undercoat of Polly-S Acryl Dark Grey, over that went Rub'n Buff Sterling Silver. Enjoy the photographs, Regards JohnHaa Part I Republic P-47J , Hawk, 1/48 Part 2 Republic XP-72, Hawk, 1/4819 points
-
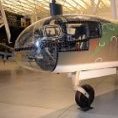
It's been almost exactly three months since I began this project: and I'm finally ready to post this RFI 😀 For details on this build, the WIP can be found here: https://www.britmodeller.com/forums/index.php?/topic/235053675-convair-b-58-hustler-172/ I've got lots to show, so grab your candy &popcorn from the lobby and settle into your seat! Aftermarket items include Caracel's excellent B-58 decal set; Aires afterburner cans and nozzles; photoetch sets from Airwaves and Eduard; and Master Model's B-58 nose probe & F-16 static discharge wicks. Paint is AK Interactive's "Xtreme Metal". I selected markings from the Caracel set for "Rapid Rabbit": Let's go! *** New photos added 14 July 2019 *** *** End of New Photos *** Selected details: Crew compartments were almost entirely scratchbuilt: Pilot's cockpit Navigator/Bombardier and Defensive Systems Operator stations: Unfortunately, not much is visible once installed: Extra detailing added to the kit's escape capsules: Hatch interior details: Panel shading on engine pods: Engine air intakes scratchbuilt: Aires provided the afterburner cans and nozzles: Nose landing gear details: Main landing gear details: Scratchbuilt Vulcan minigun: Position lights added to vertical stabilizer and wing leading edges: Astro-tracker dome added to top of fuselage: Static discharge wicks on wing trailing edge and vertical fin: Pigment powders were used to recreate the "striping" effect seen in photos of the B-58 upper fuselage: The Hustler's unique exhaust staining beneath the wing modeled using pigment powders and Tamiya smoke: That's it! A challenging build to be sure. But I learned a lot, not only about Convair's B-58, but also some new modeling techniques. Thanks to everyone who followed my build (nearly 14,000 views!!!) and for the many comments and suggestions received. Now, I must decide what my next project will be. Maybe an XB-35 flying wing? Forgot to put the nose weight in again, didn't you?18 points
-
I bought the Fisher Patter 1/32nd F-9F Panther in 2003 when it first appeared. This was my first resin model. It was a great experience and I used Vallejo Model Air for the first and only time as the paint was so fragile it just scratched off way too easily the end result being the shelf of doom. Roll on 2018 - the Panther is rolling around on my shelf of doom and I decide to take another look. Woe and behold I find that my lovely wife has thrown the box out with many of the kit parts in it (U/C, doors, wheels, canopy, weapons, PE sheet etc). I contact Paul Fisher and send him a photo of what I have and ask him if I can pay for the missing parts. 7-10 days later a box arrives in the post with all of the missing parts completely free of charge including the shipping to the UK. How is that for customer service! Roll on 2019 and inspired by a post in LSP discussion I decide to finish the model. If you notice the less than fine panel lines in places this was because back in 2003 when I build the major assemblies I had bought a Tamiya scriber and went a little mad with making trenches. I also lightly weathered the model and the large "silver walkways" as can be seen on footage of the real aircraft. Please note that I have fixed the hanging pylon that I only noticed when I took the photographs.15 points
-
After reading so many bad words about Roden’s D.VII I just had to try for myself. Unfortunately I can concur, but although nothing fits the parts are wonderfully detailed and you get a beautiful spare engine and two spare propellors. You might notice the absence of rib bands: I made a firm decision on keeping it OOB, and those bands disintegrated. The machine is that of August Hartmann of Jasta 30, 1918. He was fortunate enough to get wounded very early in his service and thus survive the war. His colleagues later described their planes as orange, while British reports call them brown. I therefore mixed up a colour that you could describe as either without getting your eyesight questioned. One tip regarding construction: I’ve often seen people say about the outboard N-struts, that the front one is too short and the back too long. I found the front one to be correct: put it lying on the drawing (manual is in 1/72) with the frontal lower end in the correct position, then pivot it around that point until the upper two points are somewhat correct. Then just trim the excess. This should righten the otherwise forward-tilted upperwings into the correct alignment (glue the outboard struts first, then the wing, then the remaining struts - some of which will NOt fit). edit: Another free tip. If you plan to build any Roden D.VII with lozenge camoflague, do yourself a favour and buy an aftermarket set! The stuff is extremely brittle and the only way to make it stuck is to drench it in microsol to fuse it into the plastic (and then it gets *really* stuck - trust me, I first put the lower side camo on the upper side: fortunately Roden supplies enough for two and a half aircraft).12 points
-
This is my latest model: F-16C Block 52+ , Polish Air Forces. I used rather poor kit of Revell, plus few aftermarkets: Master's sensors, decals of ModelMaker and Techmod, camouflage masks of ModelMaker, Aires exhaust nozzle, Res/Kit wheels and Eduard AGM-154C bombs. Enjoy.12 points
-
An older build that finally made it out to the airport. This is the 1/48 Monogram Panther, painted with ModelMaster gloss dark blue. I would’ve liked to take more pics but I was afraid the gusty wind might take her airborne any minute. 😉 (there's that wind again!😁) This kit has a lot of nice detail, especially the cockpit. The framing on the windscreen was way too big so I sanded it all off and masked it with tape to get the more correct size frame. I read about the canopy frame issue in FSM years ago. I was really hesitant to sand them off but I jumped in and gave it a try. Believe me, I was worried that it would never look right again. But my ol’ dad used to say, “Even a blind hog finds an acorn now and then.” And I did find that acorn! Whew, a lot of polishing saved the day! It’s been a long time since the kit was built, but I don’t recall any particular fit issues. I approached the canopy frame issue with great trepidation, but it turned out okay. As I said earlier, the cockpit has some nice detail and features, but one does find that in many Monogram kits of this vintage. I am going to replace the cannon barrels with hypodermic tubing as one of the kit barrels has fallen back into the fuselage since these pics were made. 🤦♂️ The metal parts will look better anyway. The decals are a mix of aftermarket and kit markings. Please excuse the crooked canopy in one of the overhead shots. I left it unattached so I could pose it either opened or closed and I didn’t notice that it was askew before I took the pic. Thanks for checking out my old Panther and thanks for the likes and comments!😀11 points
-
Well another week, another finish for the 11th of 2019! Another "production" plane I get asked for a lot. Used the absolute honey of a kit from Zvezda and it was finished yesterday but I needed to let the Mr Color Super UV CUT III varnish ( never get tired of typing that!) harden a bit before a trip to the photo studio. So all in 5.5 hours over 6 days with mild use marks (guns and exhaust) and very light pre-shade to pop Zvezdas delicate panel lines. Sits nicely with my Spit & 109E I think. Used Mr Color/Surfacer 1500 throughout and just did a light dusting of the matt varnish ( did get tired of typing the whole name) to get the sheen that Luftwaffe birds allegedly had. The spinner was a mask cut by my super accurate Cricut Air 2 and decals from a Skys sheet but you'll need the Eduard Royal 190 boxing for details of where to put them as Sky don't tell you despite supplying corrected blue 13s. Man I'm digging this building models thing, I actually gave up the chance to take an Extra 200 for a spin today so as to finish photography for this and for me thats something big, nothing usually gets in the way of Anil K flying! WIP here, Pretty pictures here, Thanks for tuning in Anil10 points
-
This Republic P-47D Razorback, a 1/48 scale Testors kit (a re-pop of the very old Hawk P-47), was built many years ago. The build was inspired by one done by Dr. Paul Budzik of Francis "Gabby" Gabreskis' T-Bolt in an old Finescale Modeller magazine. I remember that his was done in 1/32 and of course, was a magnificent model. I had the old Testors kit in my stash and was motivated to try and duplicate the bigger plane as best I could. This is my humble result. I added quite a bit of detail in the cockpit, on the engine and some brake lines. Built mostly OOB, I did lower the horizontal stabilizers, open the cowl flaps and drill out the gun barrels as well. This kit had the option of building either the razorback or bubbletop version; I went with the razorback because that part seemed to fit a little better. 😉 This was also one of the first builds where I tried to modulate the paint finish a bit but it is almost unseen in the pics. Heck, looking at them now, I can't see it!😁 I’m sure I was too timid in my efforts. The decals mark her as a 84th Fighter Squadron plane with the 78th Fighter Group, operating out of Duxford, Cambridge in 1944 flown by Major Quince Brown. (http://www.americanairmuseum.com/person/173590) Thanks for your interest and comments! Gary8 points
-
Hello and good morning, this is my latest completion. Raptor in 1/72 built oob with no extras, not my greatest but hope you like, as usual all comments etc welcomed8 points
-
This is my recently completed Fairey Seafox 'H9A', 713 Catapult Flight, HMS Arethusa, Kalafrana, Malta, 1939. Work in progress here: Life started using the dated Matchbox kit and was updated some what to include more detail: Cockpit deck added and seating positions corrected. The observers pit was updated with black boxes, MG replaced and mounted on a corrected mount. Molded-on landing lights removed and scratch clear options fitted. Oil cooler replaced by scratch option. Engine intakes hollowed out and scratch engines added. Molded-on exhausts removed and scratch options fitted. Molded-on venturi removed and resin option fitted. Home brewed vacuformed glazing for rear pit fitted. Control horns and lines added to float rudders. Flaps removed and fitted for 'landing'. Painted overall with Tamiya AS12 rattle-can. Kit decals were used except for the black wing markings that were painted. Rigging was Uschi line. All mounted on a sea base. Stuart8 points
-
Here are the final set of shots taken outside on a cloudy day. Glad this one is over - largely my own fault having dropped it and that fact that Trumpeter and the UK distributor off now spares parts service whatsoever (I tried several times with both and received no response). The kit had the very extensive Eduard series of sets, Aires cockpit, exhaust and wheel bays, Avionix cockpit etc There are a number of mistakes - small tanks, early exhaust when it should be the later one. I am sure there are a bunch more. I also noticed post photographing that I have knocked the fuse extenders so that are not all equally spread. I was pleased with the effect of reducing the pin cushion divots that Trumpeter wanted to pass as rivets. Next stop finish the 2 x CMR Buccaneers and 3x CMR Scimitars8 points
-
Hi all! I consider this model, a classic, already....these new tooling from Airfix are really, great! Hope you enjoy it! Regards! Luiz.7 points
-
Hi folk's, another Frog kit for the ongoing GB,like a lot of the builds over there apart from the nostalgia buzz (for those of us of a certain age) it's just a case of building the kits OOB like we used to but hopefully managing a lot better finish than we did back then.This is Modelcrafts rebox of Frogs mold with terrible decals which self destructed on impact with water but fellow member Pete supplied some fine original's.Not a kit I would recommend if you are of a nervous disposition but if you like a challenge and must have a Maryland they are still lots out there.Many thanks for looking.7 points
-
I have posted a photo of this model in another thread, but never in RFI. I built it a few years ago, soon after the kit was released. As far as I can remember, the only things that I added, apart from kit stowage, were the missing rivets on each side of the hull, and the canvas dust cover around the main gun from tissue soaked in dilute PVA glue. I had previously built a 1/72nd kit of the Grant from a Polish company, whose name escapes me, and I used the painting instructions from that kit for this build. The base colour was sprayed, but the brown cammo was brush painted, as was the white surround. The black was applied with a paint pen. One other thing that I've just remembered is hat the tracks (WE210), came from a Dragon Sherman lll kit. Thanks for looking. John.6 points
-
Time to stress myself out a little and go in a different direction, East. This is going to push me a bit further along the line of learning as there are going to be a number of firsts here. 1) Something in Russian service 2) Something that has a lot of etch 3) Two kits at the same time 4) A first attempt at weathering what is going to cause all this? Bella I made a start by opening the box, deciding it was too much and putting it back in the cupboard. I then made a second start by opening the box, unwrapping the sprues and washing everything. So, what is in the box? A glossy instruction sheet Some packets containing etch, A soddin' great decal sheet (the most hateful part for me) 2 sprues for the wings 2 for odds and sods 2 fuselages 2 clear sprues and some masks. quite a bit to get my hands on as they say. As I have not made anything other than factory fresh finishes I will have to decide how to approach a war weary look. A bit of time on you tube may be in order for this one. Hopefully a start will happen this week, mainly with pre painting the cockpit bits before sticking things together.6 points
-
This time the model of a jet plane and so I return to my favorite topic (jets). F / A-18F Super Hornet 'VFA-102 50th Anniversary Trumpeter 1:32 scale set, the model is not simple to build. I tried to do the model without strong weathering. Of course, the model is made straight from the box.6 points
-
This is the Special Hobby Westland Whirlwind fighter that I finished earlier this year. The Whirlwind is fairly well known despite the small number built (114) and equipping only two squadrons and it was an aircraft that potentially could have been more successful but seemed to suffer from a number of 'misfortunes' that were out of the hands of Westlands. the kit is from 2010 and is a mix of injection moulded plastic, resin and photo etch. Mine was built out of the box and seemed to go together reasonably well, although the wings needed some thinning down at the trailing edge and some filler was used on the wing roots and tailplanes. There is good cockpit detail, but the canopy comes in one piece, not that bothered me as I usually build with closed canopies anyway. The aircraft is from 263 Sqn in the early part of 1941. Paints are Xtracrlyix except for the spinners and fuselage band which are from Vallejo. The decals are from the kit and went on with few problems. The surface detail is quite good, but I photographed the model in bright sunshine and some detail has been lost I hope you like the model.6 points
-
Final update: I have worked all afternoon but she is finally completed! Overall I am very pleased with my work, I will upload an album entry and a full RFI on Monday! thanks for following the build Onwards to the Anatra and the Ventura!6 points
-
6 points
-
I decided to take a small break from the air group, & try a bit of the Tetra brass on the ship itself. It fits like a glove & has that feel of quality when you fold it - the right combination of not being too flimsy (so if you’re careful you shouldn’t trash it) while at the same time folding easily in the places you actually want it to! This is one of the many cut-outs in the hull (starboard for’d, to be precise). The section on the right of pic that partially isn’t shown will in due course have a North Star paravane in it.6 points
-
I have been working hard on the Halifax, a minor issue with Photobucket stopped me uploading anything toy threads. Since my last post I have attached the wings to the fuselage, this went well, only a little sanding was required to achieve a smooth fit. I have also built the tailplane, the tail find and rudders will be secured once painted. Finally I have faded some Mr.surfacer 1000 to the nacelle seams, and I intend to sand away any visible seam.6 points
-
RF-4C Recce Rhinos of the 196th Tac Recon Squadron, California Air National Guard, at March AFB. The 196th Tac Fighter Squadron began receiving RF-4Cs in April 1990, but the official unit designation was not changed to a reconnaissance squadron until 1 July 1990. All images are from May 1990 except as noted. 63-7750 63-7757 63-7762 64-1053 66-0393 66-0423, PhanCon 1992, George AFB, March 1992. 66-0444 66-0461 67-0434 67-0454 67-0469 Thanks for looking, Sven5 points
-
Hi there, So I finished this build about six months ago and although there were a few build issues I was happy with the final result. The kit instructions were a bit vague in places so plenty of dry fitting was necessary but eventually it all came together. There are two paint schemes to choose from with this kit I chose the one below because I hadn't seen it before. Some of the decals were a bit tricky to apply but with a lot of patience ( and the odd prayer ) I eventually got them to conform reasonably well. Hope you enjoy viewing.5 points
-
Good evening. Here is my take on the beautiful C-47 sky train, specifically the "Camel Caravan to Berlin", a good story and based in Neubiberg, a stones throw away from where I live. The kit is Revell, 1/48, with various mods and a few table spoons of putty. Enjoy and thanks for looking. CF5 points
-
Airfix Phantom FGR.2 1:72 Hi everyone! Some of you might remember my Airfix Phantom FG.1 build from over a year ago. Well, since I enjoyed that one so much, it was a no-brainer to build an RAF jet when Airfix unveiled their FGR.2 kit. As always with newer Airfix kits, it's generally a really enjoyable build; great quality (and numerous!) decals, great mould quality and a novel construction! However the kit is not without its flaws: the nose should really be moulded as a single part (as seen with Revell's 1:72 Tornado, for example) to avoid seam lines, the canopy mid-section should really have a spare part with the periscope "orifice" already pre-cut (I kept making a pig's breakfast of it, as the periscope would mean that the canopy wouldn't sit flush in-line with the cockpit walls. Those instrument panel decals that are included should ideally be made less "basic" or a moulded instrument panel should be provided (again, see the Revell Tornado kit for how it could be done). I had a set of decals (Xtradecal "The history of RAF 19 Squadron") with a particular blue-tailed scheme for an FGR2 which really appealed to me. For this build I used my trusty supply of Vallejo Model Air paints, along with a brown weathering wash from Flory Models (my first attempt at using a brown wash instead of my normal black wash. I just couldn't resist taking a few snaps alongside the Phantom FG.1 As always, thank you ever so much for dropping by and having a look! Best wishes, Sam5 points
-
Painting has finally started and I sprayed on some Tamiya primer this afternoon, of course that has highlighted a couple of areas which will need some further attention, including a previously missed hole at one of the joins at the forward end of one boom. by John L, on Flickr by John L, on Flickr by John L, on Flickr5 points
-
Hopefully a clearer picture of my reference books for my model ships. The FAA fixed wing are now on the top self.5 points
-
Tonight I have given the Mosquito its second light coat of Vallejo Silver acrylic. I have thinned it down a little more than usual, because I find it has quite a thick consistency. So far it has sprayed really well, and settled nice and smooth.5 points
-
Hello again, Another kit built a few years back. This is the Italeri boxing of the fabulous Acc Miniatures Avenger. IMHO one of the most buildable and rewarding kits ever. An Eduard mask set though is a no-brainier. As ever Gunze and Tamiya throughout. Oh and a dirty great Alclad torpedo! And then the pics.......4 points
-
Need to finish off the base and do some more weathering before I can call it done.4 points
-
Here is my latest classic rally car build. Im really enjoying building these classics and this was a pretty good kit. The build went well apart from the chassis did not want to fit to the body, but after a bit of fettling I got there, the decals were a bit daunting but went down really well.4 points
-
Life has been busy, but the long holiday weekend here in the US gives me lots of bench time. Inspired by @Greg Law's wonderful cockpit shots and the arrival of the Tasmin resin and canopies, I rebuilt the entire cockpit.4 points
-
Thanks for your sage words Guys. You are of course all correct and I should not give up so easily. I decided that if I was ever going to salvage this build, I would have to act now. I went about the job with my trusty scalpel and ripped out most of the rigging from the foremast. Although there is still a slight lean at the base of the mast, I should have allowed a bit of wriggle room when fitting it and not assumed that the tube moulded into the deck was perfectly perpendicular, This did allow me to re-tension things so that the mast looks a bit better. I have made a start on the running rigging and there is a lot of touching up to do to repair the ravages of my scalpel. I need to proceed carefully from now on in. I need to keep the deck houses removeable for as long as possible to leave as much space as possible for working on the running rigging but not so long that I cannot wriggle the deck houses into place. I'm still a bit sceptical about this build but maybe I'm being too hard on myself, it would not be the first time! See what you all think. Martian 👽4 points
-
I’ve been decalling this and it’s taking a while. I decided to use Xtradecal sheet X72075 and finish it at QJP N3249 from 92 Sqn. The decals are mostly excellent but I must have a duff sheet as some of the decals where breaking up which I’ve never had before from Xtradecal. It is only the fin flashes that have been very delicate so far. luckily I have another sheet from them which matches colour and I’m making up little bits of decal to help remedy this. I have now ran into one problem. I usually rattle can finish most my models in recent years with spray varnish from Humbrol or Tamiya. However they have always been brushed in acrylic or lacquer paint and sealed with klear or entirely rattle can jobs. I have only recently gone back to using enamel now I’m using an airbrush again as for the past decade I’ve been only brushing or spray painting. The trouble is I’m fairly sure that rattle cans will crumble up the enamel paint and react. So I’m looking for recommendations for a suitable varnish that is matt compatible with enamels that preferably won’t yellow. I have considered Precsion Paints Matt Varnish as I want a tough finish. Cheers Rob4 points
-
Time to move onto another build step... Engine stuff. The kit part looks decent enough but a bit under-scale so a resin option is taking its place. Seen here is the engine cowling, crank and cylinders and the prop. Cylinders fixed to the crank and the cowling modified to take the slightly bigger engine. 3 out of 5 sets of push-rods fitted by close of play. Chow for this week. Stuart4 points
-
The new shipyard facilities is almost complete, just have some minor works to do like a new storage container for all my weapon system which they all piled up into two boxes atm before I’m ready to restart building again.4 points
-
ACADEMY 1/72 F-16A NETZ Dragon Squadron Israeli Airforce.4 points
-
Have to agree with the others on this we are Brit-modeller,s man er sorry aliens 👽 we do not just give up on something so close to the finish go and have a lie down in a dark place and relax think of good things and then come back to it and if that fails lazer beam it and send it to Davey Jone,s locker Get it done you know you want to. beefy4 points
-
I honestly believe this is as good a plan as any. It's perfectly okay to model something in a way which is plausible but not provable, especially if you are open about which aspects you estimate or deduce. Which is a great thing to put in to a WIP or RFI post. One of the things I like about this particular thread is that Roger's original question, and most of the subsequent discussion, transparently and honestly embrace the ambiguity and doubt around the subject matter. I think a lot of people, particularly new or very occasional posters here and on similar fora, ask questions assuming that it is possible for someone to provide a definitive and factual answer. Sometimes it is possible. But an awful lot of times the proof simply doesn't exist, and the definitive truth of a particular airframe on a particular day in history is not knowable.4 points
-
Have to agree with @Murdo and @ArnoldAmbrose. We've all had these seemingly impossible and definitely very frustrating moments Martian, but you know we don't give up! Took me almost 3 months break before I could go back and properly "renovate" the paintwork on my "ruined" Sabre 4 build early this year. So my advise would be to take a deep breath and as they say, "step away form the vehicle La Fauvette", and resume with a step by step plan to sort it. It's easy from where we are all sitting! Terry4 points
-
Continuing on with the cockpit, ZM give you options for seats with or without belts. I went for the beltless seat, choosing to add my own. Likewise you can choose between joysticks with and without the boot. I went for the one with the boot adding shading from vallejo colours and adding some sponge chipping to the stick, as I imagine it would get a bit of a beating from the pilots boots as he climbed in and out. I added a few bits of wire to the radio and dressed it and the battery up with some generic placards. The tentacle looking thing is the warm air heater hose. Seat belts are from HGW two instrument panels are provided, pictured here is the great plastic one. there is also a clear plastic one which you apply a decal to. My painting looks horrible close up, but viewed at a distance (from across the room, its not bad) The decal sheet also contains some placards for the cockpit sideframes and here's the starboard side frame and panel attached to the floor.4 points
-
Trying to scratch-build an engine 'by eye' was never going to be easy, but I figured it was going to be easier and quicker than taking dimensions from photographs and drawings. The temptation with the latter would be to model every single part, as accurately as possible, and that would take far longer than this GB lasts. Still, I know that I've been less accurate than I should have been. The engine itself is an approximation in all respects and so the auxilliary parts around the engine have to be an approximation as well. And getting those to relate to and fit around the engine and have them all relate to each other and the engine bay isn't easy, However, I think I've broken the back of it and now have the remaining components sorted in respect of their construction, positional relationships and order of assembly. I positioned the engine using the photos for reference, then marked the points where the air pipes intersected the longitudinal firewalls. I then cut into the firewalls and, bending some plastic rod, made the air pipes which connect the cooling fans to the engine, I had to make the 'tops' of the 'towers' (where the magnetos fit) before bending and fitting the air pipes around them. I don't know what these 'tops' are as yet, but I will look them up. So, here's a view of things as they stand at the moment, with everything dry-fitted. I still have to make those magnettos, replace the 3 air-fiters, add details to the air pipes, add some more tubing along the sides of the engine and add all of the wiring. TFL Badder4 points
-
Update 6: I polished the upper wing surfaces as they seemed to suffer from a serious case of hairy brush streaking but the rest of the paint job seemed ok. I have then applied two heavily thinned coats of some old Humbrol gloss cote and it’s looks shiny enough to me! On to decals and finishing this beaut. (Due to the time of the evening the light wasn’t very good so the colour appears somewhat more red than in reality) Cheers, Ash4 points
-
Plodding along, and it's coming together bit by bit. Lots of fun, but way beyond the OOB build I had planned. 😀 Canopy has had a polish and a first coat of Klear, (well actually the third, but I had to strip it as I mucked it up). Knocked a blade off the prop, so that needs to go back on, detailed a made up instrument panel, and there's a gunsight being scratched up somewhere. Tailplane is on, but it was tricky as the two sides were at different heights and different positions on the respective fuselage halves - I assume the problem I had getting the tail-end to join up contributed to this. The stand has had a bit of a Heath Robinson fit - a cradle for the V1, and a magnet for the the Spit - hopefully it will work out. The V1 has had its first coat of light blue on the undersides. The wings are waiting for the canopy to go on so I can get to the inside - just in case. 🤨4 points
-
This one is part of a truck and trailer combination the trailer Will be completed later but for now here's the completed tractor unit.4 points
-
The Tomahawk is back in the land of the living, thanks to a bumpstart from PeterB, who kindly provided the missing decal sheet required. The bare plastic got a hit of good old Hunbrol 29, dark earth, as primer after a bit of filling to the wing roots and tail surfaces. An hour or two sat in the sunshine saw things ready for a bit of Revell Aquacolour for the cammo. I'm not used to the speed this stuff dries at. Despite thinning it right down I found it dragging now and again. I do like the colour though. The rather paint friendly temperatures here at the moment meant that I could start with the decals PDQ. Unfortunately things didn't go smoothly. Pete's decals had a bit of an issue with the red and blue on the RAF version being very dark, to the point of being useless. That's OK, I need the Chinese option. Problems arrived when water got involved. The Chinese roundels shattered on the backing paper. By using my Spiderskills and Zen Bhudism I somehow cobbled together enough of the shattered parts to made them somewhat OK. The wing walkways nearly went on as intended,but a bit of paintwork will be needed to sort things out. A fair bit of care will be needed to utilise the rest of the sheet, but I'm confidant things will be fine. More tomorrow Grasshopper...4 points
-
Cheers Stix. A bit more done. I'm doing the turret all buttoned up so it just fell together. The barrel needed some sanding to remove the seam line (think I'll try a metal barrel on my next AFV build) but other than that the fit was perfect: On the hull, I added some wire running from the headlamp, as it appears quite evident on the real thing: Taking shape: The few extras that I'll be adding: Jerry cans and fuel drum need re-painted. I also popped down to my local model shop and picked up some of Tamiya's new paints: From initial inspection, they look like better shades than the originals with the green more 'olive' in colour than XF-61. I also ordered some Tamiya Red Oxide primer specifically for my German AFVs: I've ordered an Eduard etch set as the Tamiya Grille set does not come with the grilles that are replicated by mesh (which I don't like) in the kit, whereas the Eduard set includes them along with some other nice details. More soon. Dave4 points
-
Here's my 1/48 RF-101B Voodoo. Build thread is here. It's the Kitty Hawk kit with an Eduard zoom set and steel seat belts. I used Mr Paint and this was my first go at airbrushing freehand - not too bad I think. Many thanks to the hosts for an excellent and enjoyable GB thanks for looking Julian4 points
-
Hi Folks This is my recently completed 1/48 Kinetic Hornet. It represents A21-7 as she was circa 2006 with 77 Squadron and finally gave me a chance to use my Afterburner Decals Hornet sheet. I added some extra goodies into this project. Resin Seat, Resin wheels (Nose-AMS resin , Main - Attack Squadron), Resin burner cans (Attack Squadron). AIM-132 ASRAAM from Airfix spares, Litening Pod from Tamiya spares and scratch modified TACTS pod. Eduard etch set in the cockpit abd some epoxy putty intake FOD bungs. Paints used were MRP and SMS Lacquers. Happily for me this model was awarded First place (1/48 Aircraft - Jet - Modified) and also Best Kinetic Model at Australian Model Expo 2019. I hope you like her. Cheers Andrew P.3 points
-
NOOOOOO! You can't stop now, it's looking great! Go man ummm sorry! Go Thingy! Go!3 points


This leaderboard is set to London/GMT+01:00