
Leaderboard


Popular Content
Showing content with the highest reputation on 01/07/19 in all areas
-
Hi all! I consider this model, a classic, already....these new tooling from Airfix are really, great! Hope you enjoy it! Regards! Luiz.36 points
-
Recently completed this F.2b with flat wire rigging! 5395C0AE-B0E7-42C0-B5FD-4190573B239E by Colin Dempsey, on Flickr EF64AA1F-75BF-4A5F-86DA-59C1FF7299B5 by Colin Dempsey, on Flickr 2A92D521-F1DD-474F-AB6E-67BC54C0FEF3 by Colin Dempsey, on Flickr 838F9494-888B-441C-8270-5FD221CBCBF8 by Colin Dempsey, on Flickr A6B34EC8-8E3A-4F09-BF85-35F5B83B70E5 by Colin Dempsey, on Flickr 5317461D-8621-4458-825E-46039C49F932 by Colin Dempsey, on Flickr 121757C7-D7DA-42FF-B2CE-F17566DDC1A3 by Colin Dempsey, on Flickr29 points
-
Evening Folks,this one was built for the Frog GB,it's the old Hasegawa tooling released by Frog in the seventies as part of a two way deal selling each companies kits in their respective countries.the moldings were pretty good and the decals were usable but as I'd built a NM Sabre in Danish colours I wanted to do a painted scheme and had the decal sheet for this version which served in Djibouti in 1978.These aircraft were well worn and near retirement but the sharks mouth was freshly painted in theatre,thanks for looking in.22 points
-
Recenty completed Wingnut Wings Lanoe Hawker VC and his AMC DH.2 E15F6850-CA3A-4122-8E14-B2075D10B3FA by Colin Dempsey, on Flickr 934E6F15-6692-42A2-A950-DA1CAD68C782 by Colin Dempsey, on Flickr 08B6613A-0E45-41C0-B985-CABF87661719 by Colin Dempsey, on Flickr 5ACAF5AD-9A23-41CA-AC94-022615A31966 by Colin Dempsey, on Flickr 580B5F3D-8C1C-4376-9FF1-0D2A67FF8F42 by Colin Dempsey, on Flickr17 points
-
This model was finished in April this year. It is the old Revell kit, which is not as detailed as the newer Zvezda kit. The main Problem is the flight deck front Shield, but by filling and sanding and using a decal it Looks ok. Vueling is a Spanish low-cost carrier and in 2012 they had flown 50 Million passengers and marked this Aircraft with a big !Gracias! on one side and on the other side with "Thanks". The Decals are made by Nazca. The Right side is done very well, but surprisingly there were a lot of mistakes on the left side. So I had to improvise at some Areas with some cutting. You will only notice it by directly comparing to original Fotos. I found an interesting Foto showing how much dirt and oil had accumulated on the Bottom and tried to Imitate that. I also painted the back half of the engines somewhat darker to Imitate the traces of the thrust reverser. The Winglets provided by Revell are too small. So i made them from Scratch using Daco`s photo etched parts as atemplate. Zvezda`s also have the correct size So, please feel free to comment on the model and also on the Things I missed or done wrong. cheers, Norbert16 points
-
Here`s new model for my "Falklands War collection" - 1/72 A-4Q Skyhawk of Argentine Naval Aviation, code 3-A-305 (ex-US Navy A4D-2 serial 144929), Rio Grande air base, Falklands War, May 1982. Built of Airfix` kit A03029, which seems to be a quite nice kit, but requires a lot of work because of terrible and stupid errors (worst of them is bad nose angle). I think that old Fujimi from 1980`s is still much better than Airfix from 2012. I`ve used PE parts from Eduard, resin fuel tanks from Brengun, resin ejection seat from Pavla and decals from Condor Decals and DP Casper. Some scratch building was required (like Argentine antennas, guns etc.). Four Mk. 82 Snakeye bombs and MER are from Hasegawa`s 35001 set. You can see whole proccess of building here (in Polish): https://www.pwm.org.pl/viewtopic.php?f=851&t=8750413 points
-
Hallo again This is my 3rd helicopter. After hundreds of aircrafts. I changed basically my modelling for this issue: 1. I use the new Tamiya glue EXTRA THIN. Why? · It works much faster. It glues rapidly! · It does not harm my color. I use Gunze C colors. · I can glue more tiny parts, as with the common Tamiya glue. · I save a lot of CA glue. · In this built only the etched parts are glued with CA. Nothing else! 2. I do not cement all glazing before the helicopter is fully assembled and sprayed. Also the final clear varnish is sprayed. Some antennas I assemble after the glazing is assembled. 3. The grinding process is kept to an absolute minimum, to keep surface details unharmed. Well, in this case I opted for the IAF UH-1D, but I left it out, because of the camouflage. At the top I used the etched part from Eduard, and I can not mask it at all. The US Army version from Vietnam is absolute not my favor, but I had no other by hand. Happy modelling11 points
-
Hi all! I ´ll show you now one of my last projects. This is an TRIMASTER model, an icon of the 90´s. This is a multimedia kit with P.E ( basically, the cockpit) and pieces of lead ( undercarriege system and exaust stacks) . The P.E are of stainless steel, very hard to deal. This model has an issue that must be corrected, the wheel wells are closed such as the FW 190 A models. The in line engines, used in the FW 190 D´s and TA series had these open. The next photos show, how I corrected it : And the DORA 12 ready :11 points
-
Another straight OOB build for "production" - as per my earlier Spit for presents , fleabay etc. I'm curious what will fetch more a Spit or a 109E? Thats the trader in me I suppose but I wonder if patriotic zeal will win out? Oh and yes the props all spin now... WIP here Thanks for tuning in Anil EDIT: Updated images, processed with the right settings10 points
-
Kit from Eduard. Added photoetched parts and resin parts. Decal from H-Models depicts the exhibition aircraft. Regards from St. Petersburg, Russia.10 points
-
This is the Eduard boxing of Hasegawa's excellent 48th scale Macchi C.202, which has photo-etch and resin parts and a colorful decal sheet, including the markings for the C.202 flown by Italian ace Ennio Tarantola that I chose for my model. The Hasegawa kit doesn't need much aftermarket besides perhaps some cockpit detailing and resin wheels, although being a glutton for punishment I decided to use all the included photo-etch parts...except the few I lost or damaged during the build. Paints are Model Master enamels, dark tan for the topside and light sea gray for the bottom and interior. Mike Grant's excellent 'smoke ring' decals were used. I've had some issues using Future lately for my gloss clear coat so tried Alclad II aqua gloss clear, which is supposed to be similar to Future. I was quite happy with it, and with a liberal coat had no problems with any of the decals silvering. However, I resorted to using Future with Tamiya flat base for the flat clear coat. Anyways, enough talk and on to the pictures, and as always thanks for looking and all comments and constructive criticism are welcome. Cheers, Mark10 points
-
Sea King HAR.3, D Flight, 202 Sqn, RAF Lossiemouth, 1981. This particular kit has sat on the shelf making me feel guilty for the last 18 months. I bought it second-hand, partly started, as a donor for a canopy missing from another kit. A few parts had been assembled and the extra RAF-style windows had been cut out. I couldn't bring myself simply to split it up for parts, so I had another go at rescuing it by crash-moulding a new canopy, this time using its own canopy to make a female mould form silicone, then a male mould from Milliput. I finished up by heating some acetate with a hair dryer and forming it over the male mould. Success.............. Its not perfect, but it works well enough for now! And finally, all my Sea Kings (so far) in one place! FredT9 points
-
One pretty good model of an unusual but nice airplane.9 points
-
This has been close to being finished for nearly a year but to say life got in the way is an understatement! It's the second ICM Foxbat I've built and was just as enjoyable a build as the first, great kits. Unfortunately I've been forced to take photos with my phone as I've misplaced my DSLR!9 points
-
My first aircraft build, after seeing dozens of youtube clips i decided to try. Some mistakes on the build and I got the paint /color scheme wrong, but i somehow like it anyways. I also went a bit overboard with the weathering, but it was to fun to stop. Hope you like it!9 points
-
Just finished these 1/32 RDG figures. Mostly Vallejo paints and oil painted faces. 4C341674-0ED1-4303-865A-4BA4A39BB604 by Colin Dempsey, on Flickr E040FC3C-BB5D-468C-81EF-EF932A732D56 by Colin Dempsey, on Flickr9 points
-
my last built : voila voila9 points
-
Afternoon guys! This post will finish up all the interior detail I needed to do before closing both top and bottom halves of the fuselage and then I can proceed to finish off the detail on the exterior of the fuselage. So what needed to be done was the ammunition belts from the emergency ammunition cans and the oxygen bottle for the gunner. I'll start with the ammunition belts.....By using just paper and wire I'd thought I would show you how I went about this task ..photo by photo... 1. The first task was to cut 4 pieces of paper to the length/width of the belts....I used paper as it will bend like a real ammo belt... 2. As you can see I then cut all 4 pieces..(you will see in the next few photos why I did this!)... 3. I then got some garden metal wire twine (I chose this as it looked the right scale for the rounds)... 4. This then had to be straightened using a flat piece of metal rolled across the top of a length of wire...... 5. After measuring the width of the pieces of paper I then had to cut... (loads!!).... of pieces of wire which would replicate the rounds,....laborious task!...although I don't actually mind doing it!! 6. These were the super glued onto 2 of the 4 strips of paper.... 7. Then the other strips of paper were glued over the top of the rounds This is the time that I bent the paper to the shape I needed.... 8. A couple strips of paper were cut and glued to both sides of the belts to make them look more authentic and I then painted them..... So now all I had to do was super glue one end of the belts to the ammo cans and hook up the other ends on a couple of posts....(the reason for this is that because I have exposed the top of the ball turret I couldn't glue them to the entry point of the turret!)...here are a few photos of the task complete...... The last task to do before closing the two halves was to scratch the oxygen tank for the gunner. I have so far made loads of oxygen tanks for this project so I just made them the same way as before....and that is a sanded down piece of balsa wood with plastic strips glued to them!......here it is.... I then glued the tank onto the post and made a couple of paper straps ....to replicate the securing straps! So here is the finished Ball turret connection structure...... So now its at long last time to place the top to the bottom!!..ha ha! I am now getting close to the end of the Radio room section of this B17G....the external detail will now have to be thought about before proceeding......so I'll see you all the next time around! Thanks again for looking in Fozzy8 points
-
Thanks Chris! more paint, most of the detail bits done: I have another work trip coming up this week so next episode will be when it is! Regards, Adrian8 points
-
Hi Folks,progressing well with wheels painted and fitted, cockpit glass painted and prop and done too,some profiles show a red spinner which may be correct but I've matched a green colour to the 9 on the Revell decal sheet,I need to fettle the fit of the glazing before fixing in place.I cut a thin sliver of Tamiya tape for the spiral and placed it over the spinner after a white coat of paint then overpainted the green.8 points
-
Hi all. My latest build is the Special Hobby 1/48 T-2E Buckeye. I choose the Greek Air Force camouflaged version. Especially the red and white striped rudder and tip tanks look very good in combination with the camouflage colors imo. Lots of rivets and panel lines were added. The model was painted with Gunze Aqueous paints over Alclad black primer. Thank you for watching. René7 points
-
I used only the Aires wheel bay for the Hobby Boss and the Eduards zoom set for a cockpit that was designed for a Hasegawa.7 points
-
Hi folk's forget my phone still takes good photos in poor light so as promised some gallery shots.7 points
-
After finishing the figure first, finally united Lanoe Hawker VC with his own AMC DH2 . Both figure and kit produced together by Wingnut Wings. E15F6850-CA3A-4122-8E14-B2075D10B3FA by Colin Dempsey, on Flickr 934E6F15-6692-42A2-A950-DA1CAD68C782 by Colin Dempsey, on Flickr 08B6613A-0E45-41C0-B985-CABF87661719 by Colin Dempsey, on Flickr 5ACAF5AD-9A23-41CA-AC94-022615A31966 by Colin Dempsey, on Flickr 580B5F3D-8C1C-4376-9FF1-0D2A67FF8F42 by Colin Dempsey, on Flickr6 points
-
I wanted to do something that looked a little different with this build and hopefully pulled it off, it's part of a club compatision where we are all given the same kit and we can put it together however we like. The original kit is a 1/35 Tamiya T-62a Russian tank. In an Alternative universe the 3rd rock from the Sun in known as the planet Zorbachev. Zorbachev has been a unified planet under the Communist party for the last 150 years after the end of the pin-ball wars. The T62-b was one of the most effective weapons during the pin-ball wars, with its high energy recoilless beam cannon and twin mounted 120mm and 50mm machines guns and effect fighting speed of 85kph. The T62-b was designed and built by comrade Brian.M. RPC. Any and all comments welcome. Cheers Brian.6 points
-
Another kit completed due to having many kits on the go. This to add to my collection of USAFE aircraft is the Valom kit which takes a lot of care and attention. The red, yellow and blue were all sprayed as Valom only provide decals for the fin. The stars came from Fantasy Printshop and the black stars l did myself. The cockpit came from a Revell F-101B which l chopped in half and the ejection seat from True Detail and the wheels were also aftermarket from Armory . The aluminium was various shades of Vallejo Metal Colour. TIA Robert6 points
-
Hi guys, I started working on detailing and correcting the 1/32 Italeri Mirage IIIE to a SAAF Mirage IIIEZ. The kit is in need of quite a few improvements and corrections, such as the instrument cowl, Instrument panel, ejection seat, bulkhead, tail fin, exhaust nozzle, JL-100 rocket launchers and their pylons. The length of the intake trunks will also have to be trimmed back a bit. Here's some pics of what has been done so far. Most picture show a before and after of the parts. Cheers6 points
-
I have now completed my Heller 1/48 Mirage IV A, depicting the exhibit seen at the Yorkshire Air Museum. Quite a testing build, a real fighter, and my first attempt at a complete re-scribe (and depicting bird droppings!) A bit annoyed with some silvering, on some of the decals. It didn't come to light, until after they were dry. More a case of operator error, than the decals themselves, I think. Resin cockpit set, and wheels. Metal refuelling probe, and decals from 3 different decals sets, to get the correct markings. Painted with Hataka Orange Line lacquer paints. Ian G-4078 by ian gaskell, on Flickr Ian G-4083 by ian gaskell, on Flickr Ian G-4085 by ian gaskell, on Flickr Ian G-4087 by ian gaskell, on Flickr Ian G-4089 by ian gaskell, on Flickr Ian G-4090 by ian gaskell, on Flickr Ian G-4092 by ian gaskell, on Flickr Ian G-4094 by ian gaskell, on Flickr Ian G-4095 by ian gaskell, on Flickr Ian G-4097 by ian gaskell, on Flickr Ian G-4100 by ian gaskell, on Flickr6 points
-
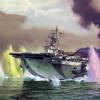
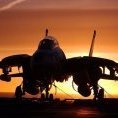
Both the US Navy and US Air Force experimented with camouflage schemes created by aviation artist Keith Ferris, but none of these schemes saw widespread operational service. Lt Commander Chuck "Heater" Heatley of the Naval fighter Weapons School proposed a modification to the Ferris scheme. At first adding a false canopy on the bottom of the the aircraft. Later, simplifying the pattern from the "splinter" pattern associated with the Ferris schemes, running the various shades of grey across the entire aircraft. Despite the Navy findings that the "Heater-Ferris" scheme was not only effective in making visual detection more difficult, but also determining the attitude and direction of the aircraft, only two fighter units adopted the scheme: VF-302 (Stallions) applied the scheme first, then VF-301 (Devil's Disciples) applied the scheme in a mirror image of their sister squadron. VF-301 began applying the scheme in late 1982 and kept it until they turned in their Phantoms for F-14As in 1984. I've only seen a few images of VF-302 in Heater-Ferris, but I did get some 'happy snaps' of VF-301 in 1983... 153904 ND106 155749 ND110 - MiG Killer 155856 ND111 155878 ND100 155893 ND107. Note the progression of the greys is reversed on this airframe. It was later changed to match the rest of the squadron, starting with dark grey at the nose progressing to light are at the tail: And a US Navy image by Bruce Trombecky. 155542 ND103 and 153874 ND104 According to US Navy sources, the colors are: FS35164, FS35237, FS36307, and the ever popular FS36375. Other aircraft in VF-301 around this time: 153814 (ND101), 153824 (ND102), 153884 (ND105), and 155873 (ND112). Hasegawa released this kit about six years ago. I've got one in the stash. What am I waiting for? Thanks for looking, Sven6 points
-
So, a little more done on the Mustang. This is pretty much all Im going to do with the engine as I will have the cowlings closed but rest assured all the parts are provided to build up a very nicely detailed Rolls Royce/Packard The below are all the parts for the cockpit except the instrument panel with the basic colours applied. Washing and dry brushing plus detail painting will follow.6 points
-
I used blue painter's tape to mask the head for a second paint attempt. Paint is Tamiya semi-gloss black from an aerosol can. Below is my rather inelegant masking job on the block. I used 3.3mm plastic tape to define the two areas and then used blue painter's tape and a plastic bag to protect the lower block. The upper block is Tamiya semi gloss black, the lower block is Tamiya gloss aluminum, both from aerosol cans, and the access panels are Tamiya chrome silver. Below you see some components assembled on the block. All are attached loosely with pegs. The water pipe, gaskets, and breathers are from Model Motorcars. The starter's plastic drive was replaced with a brass rod. The construction of the generator was described in an earlier post. I'm still deciding if I will replace more molded Pocher nuts and bolts with brass hardware. The spark plugs are from Model Motorcars. The "porcelain" was painted with white enamel. All parts are loosely in place. The water pipes that run up from the water pump (only partially visible below) are also from Model Motorcars. The blower gasket was made from 1/32" square brass rod. Two acorn nuts and the four bolts that attach the manifold to the blower have not yet been installed. I will replace some of the Pocher molded details shown here with brass.6 points
-
Hawker Hurricane 2c, s/n '624', flown by the Esquadrilha MP, Portuguese Air Force, Sinta AFB, circa 1950's.6 points
-
Evening folk's,happy to call this one finished,well I'm reasonably pleased that I got the worn finish I wanted especially given the lack of recessed panel lines that makes the job easier I'll get some gallery shots as soon s I can I might have lost the light tonight.couldn't resist a photo on a a Frog stand!6 points
-
A lot has happened between then and now...I assembled and attached the landing gear, which was no mean feat. Six pieces, all kind of somewhat not quite precisely moulded...I managed to fit it all well and then let it set up. Then I began the rigging--.005 monofilament tinted with black permanent marker for the majority, the rest stretched sprue. This is how it looked this morning... So then I tackled the control lines to the tail feathers...and the decals on the top and undersides... I neglected to document the small bits of sprue for the lines on the control horns, but they were the last to go on. Then wheels and prop. And I suddenly realized that I was finished! The rest are in the gallery! I have a few days before the 80s/Asia GB begins so I think I will take on a small project, something that bridges the gap between the airplane and the helicopter... It also gets me in the Mother Russia mood! --John6 points
-
Laying down a marker as I can't make a start just yet but although not what you would call front line I'm told it falls into the GB rules as these aircraft were combat capable if required and their pilots certainly were all front line trained,I'm building the single seater in Italian colours and it's a nice little kit so when the chance came to get the two seater I jumped at the chance,this is the first Aussie aircraft I've done since Airfix's Boomerang and that was when it was released!5 points
-
So why would anyone build 7 Fw190A-4’s at the same time, because you can ! This whole build fest all started when I built 2 of the 1/48 Eduard early A’s for a client. There were a ton of decals left over so I picked two for myself and went to work. I decided to build one from Tamiya and one from Hasegawa. That really got me going on my whole Wurger craze. From there I built 3 Tamiya D-9’s and most recently 2 of the Ta152C-1/R14, one Hobby Boss and one DML/Dragon. I found the 1/48 Eduard Weekend Edition A-4 at a very reasonable price at Scale Hobbyist so the next step was to pick the 7 schemes based upon decals that I had and schemes from a couple of my books. After coming up with two dozen, I finally narrowed it down to my picks. There are multiple reviews on the outstanding Eduard 1/48 Wurgers, so I am going to show you what it is like to build multiples of the same kit. After doing 2’s and 3’s I had to give 7 a try !!! Here goes, clear prop !!!!5 points
-
Well, in spite of life doing its best to get in the way, I still managed to finish something ! A bit different from my usual civvie stuff, this is my rendition of Special Hobby's 1/48 SAAB SK-37E Viggen finished OOB and painted with Hataka's Red Line Paint Set (Modern Swedish AF Paint Set Vol 1) The kit was a bit tricky in places and I made a few mistakes.....but hey.....I just did it my way. Thanks for looking. Mike5 points
-
A350-1000 Virgin Atlantic G-VLUX Scale: 1/144 Model: Revell A350-900 Decals: 26decals and authentic airliners This is my attempt at converting revells a359 kit to a a35K stretch. Fuselage extensions were made with plastic piping inserted throughout the whole fuselage. The gaps were then a build up of scratch plastic and milliput then sanded to the same proportions as the rest of the common fuselage. The wings were extended from leading edge to trailing edge by overlapping the top section of the wing against the bottom section of the wing and filling the gaps to regain the original wing edge profile but with an overall 0.4mm extension. The sharklets were built entirely from scrap plastic which were shaped to meet the new larger wing edge. The satcom antenna was basically a lump of milliput and one engine exhaust was also a scratch build after losing the original. together with Zvezda's dreamliner comparison with another conversion project, braz a340-600 The a350-1000 almost dwarfs the smaller a359. This photo also shows a good comparison of the 1000's 'chunkier' sharklet This project a whole myriad of obstacles based on very limited information (the wing extension mainly) but once I knew what i was doing this became a very enjoyable and I am pleased with the result considering its just butchered parts of fuselage and wings. With zvezda's pending release of the a350-1000 kit and I'm really looking forward to someone taking that on. This is the work in progress thread Thanks for looking! Phil5 points
-
Excellent Eduard model, it's really a pleasure to work with such a good model.5 points
-
Bit of progress over the last month or so, in between holidaying in the sunshine Main mast is painted and assembled; Modified the foremast starfish to add the 2 semi circular platforms at the aft end from spare quad vickers bases cut in half; And added the access platform on the starboard side; Spotting top with the moulded windows completely sanded away and replaced with etch, the aft bulkhead needed rebuilding in plasticard; Railings and radar; And doors on the aft end, dry fit on the platform after building up the starfish; Yards assembled from Flyhawk etch and brass rod, the kit bits are too chncky and bendy; Foretop painted up and yard assembled with supports from 0.5mm plastic rod; Front view - the coloured lenses on the bow and port and starboard lights are little decal squares; Made up a couple of lights for the bridge sides as well out of spare etch and rod; She's nearly ready for putting together - honest guv!! Cheers Nick5 points
-
Okay, those of you in the know will remember that the Su-47 was a prototype that only ever appeared in black. I decided to change all of that by finishing this one in a What-if “operational” scheme. The kit was simple enough and the painting wasn’t as difficult as it looks (thanks to Artool Ultra Mask and a sharp blade). I'm afraid the build took a lot longer than it should have, but that's my fault - I'm easily distracted by the flow of new kits into my loft ! Got to admit being a bit surprised with the size of the blighter – it’s a little bit bigger than the Su-27. Here are a few more pics taken at a lower angle Kit : 1/72 by Hobbysboss Decals : Borrowed off Begemot sheets for Su-27s Seat : K36-DM by Neomega Paints : White Ensign Comments welcome mike5 points
-
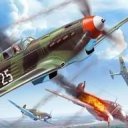
So here are the 7 paint schemes that I picked. Image number 2 is from the Eduard kit itself, the rest are Aeromaster, SuperScale, and other decal sheets will provide the markings. sheets.5 points
-
I certainly hope not Giorgio, the idea is to make the kit canopy a bit bigger so I can file and sand the thing to a better shape, then use the bigger shape to mould from Hopefully that may happen later today The extra lengths will allow a flat overlap on the piece that can be cut back without the plastic curving back under the mould and reducing the effective mould size 😨 🤞5 points
-
The underbelly tank is ready: The succinct interior is ready, windows to be added before joining halves:5 points
-
She's done! More photos in the gallery shortly.5 points
-
The task of correcting blemishes on the mold seems never to end:5 points
-
Like all the best laid plans, mine has had to be changed. The Master build is on hold for a bit while I work out how to make a decent fist of the canopy. So, let's plough on with Maggie. She hasn't got many parts, and those are in pretty fine fettle, so it ought not take too long to build. Like its bigger brother, the Magister was a simple aircraft, mostly made of plywood. The few fine raised lines were quickly scribed and tidied up. The cockpits are open, and there is a moulded representation of the blind flying hood aft of the rear cockpit. It's a bit flat and one-dimensional, so I began to attack it with sharp things to carve in some relief to represent the concertina-like folds. In this picture I'm working on the top half, with the original moulded version still to be done on the bottom half. The other panel lines have been scribed, but I'm not going to make the intake scoops better. I think they're fine as they are. The kit seats are not that bad. I'm hoping to go with the kit transfers, representing G-AFBS, which was a "civilian" Magister impressed into RAF service at the outbreak of war. The seats were generally covered with a dark red leather, but the metal buckets that held the cushions and seat belts may well have been painted interior green. I also wonder whether the upholstery might have been removed in RAF service, as sitting on the standard parachute pack and a comfy cushion might have been a bit awkward. I took a sanding stick to the backs of the seats to accentuate the curved shape more, but it'll be lost in the murk once the fuselage is buttoned up. For the same reason, I'm not going to bother making instrument panels or bulkheads. As evidence to support my decision, aside from being a lazy moo at the best of times, here's my RS Models Maggie. It has all the cockpit fittings installed. You'll just have to believe me. This model should be done by bed time!5 points
-
Agreed, shame it was never adopted over the low vis grey. I got the dark brown on today and unmasked tonight, just had enough masking tape to get it done so a trip to the diy shop needed. Also mocked up the weapons fit less a sidewinder which needs to be painted. I think that is enough rather than hanging the whole of one of Hasegawa's weapons sets. Next up is the Master metal barrel set and gloss coat.5 points
-
Good evening Tamya 1/72 P 47 Razorback Silver Lady 61 FS 56 Fighter Group Pavla Resin seat Yahuu models instrument panel Aeromaster decals Humbrol Metal cote brush painted Build thread here https://www.britmodeller.com/forums/index.php?/topic/235056052-tamiya-172-p-47-d-thunderbolt-silver-lady-61-fs-56-fg-june-1944/ Patrice5 points
-
Many thanks to Jockney for hosting such a fine GB. I'll admit, growing up in America, I didn't build any FROG kits as a boy that I can remember. Mine were always Airfix, Monogram, Revell...So this has been fun and taught me a great deal. The WiP is here... Flying high above my modelling bench... --John5 points
a.thumb.jpg.58d92d116b0315dc55d352fd191d65e4.jpg)


This leaderboard is set to London/GMT+01:00