
Leaderboard


Popular Content
Showing content with the highest reputation on 24/06/19 in all areas
-
Hi everyone. Another one made a while back. A Nakajima Kate in the markings of a machine from the 601st Naval Flying Group off the Zuikaku in Spring 44. The usual Tamiya and Gunze acrylics airbrushed throughout and an oil wash. Post shaded to show some variation in the paintwork and given a light chipping with silver pencil. The huge offset torpedo has also received some weathering effects. Sealed with a satin finish, to impart a bit of sheen and not kill the shading effects. I was really pleased with the effect around the wing roots. Built during my torpedo bomber phase ( check out the Avenger posted last week if you haven't already done so). As ever, comments welcome, make sure I'm on the right track! Restrained with the chipping, could have gone a lot crazier I guess! Tyres maybe needed a bit more work. Cool offset torpedo!! Thanks for looking.23 points
-
Hello guys, final model for now I promise! This is my latest completed model, the old-tool Eduard Tempest converted into a Mk.VI using the MDC conversion. I also used some resin wheels I had hanging around in the spares box, some scratchbuilt additions and Aeromaster decals. I planned to use the alleycat rear fuselage however I wasnt happy with the shape so I extended the fuselage and thinned the tail fillet myself. I have another one of these to convert into a Pakistani Mk.II but I think I will take a break from Tempests before attempting that one! Hope you like it! Chris p.s. I plan to do something about the ejection ports and the non-glazed landing lights! Brain is a sieve these days!20 points
-
Hello everyone, having recently finished a long and stressful course at work I decided to get back into modelling again. Here is one of my most recent finished models, the Hasegawa P-51D Mustang. I used a set of resin flaps and wheels plus Aeromaster decals. With the paint I used various metallic shades to represent the various different materials used, for example the painted wings and unpainted fuselage. Hope you like it! Chris19 points
-
Hello everyone... A few months ago a fellow member gifted me an old Monogram 1/72 F8F Bearcat. I decided to build it as an F8F-2P stationed at Pensacola in 1949. It was part of the NATTU or Naval aviation Technical Training Unit. To make the plane accurate the tail had to be raised 3.5 mm, as the kits tail lies somewhere in between a -1 & a -2. Its not the 1st time I've ever done work like this but its good to keep my skills in practice. This model is the 1st time i ever painted day-glo or International red color on a model. I am here to present my finished product. I do hope it meets with your approval ? The real aircraft was serial #121714. The aircraft still exists and flys regularly in the U.K.. For those of you interested here is a link to the WIP log. Questions, comments, thoughts, or good stories. Dennis16 points
-
Hi all. It's been a while since I posted one of my builds on this forum. Today I'd like to show my 1/48 Italeri (ex Esci) S-3 Viking. This is a fantastic kit, probably one of the best Esci ever produced. Years ago I managed to buy a Paragon wingfold set. Unfortunately these are getting pretty hard to come by these days. The overall fit of the kit and resin wingfold parts is very good. Some exact cutting has to be done to get the resin parts in place correctly. A black primer from Alclad was used as a base for the paintjob. I used multiple mixes of Gunze Aqeous grey to make a basic weathered effect. I used photos of the real plane as refference to replicate the many shades and touch ups. All was done freehand airbrushing. The decals are a mix of kit decals and an aftermarket set from Super Scale. Several grey washes and pastel powders were used for some additional weathering. Thanks for watching. If interested, you can visit my scale modeling Facebook page: https://www.facebook.com/René-van-der-Hart-Scale-Models-250725525692334/16 points
-
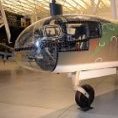
This is a very interesting kit from Tamiya, that one rarely sees built up for the contest table. I thought I'd try a relaxing build for the fun of it. Boy, was I in for a surprise! This is one big airplane! Molded in 1975, the plastic is warped, and it has raised detail that in many places needs to be re-scribed. Also, there is a ton of sanding and filling to do, especially when mating the engine nacelles to the wings. I also painted the plane's exterior with Tamiya rattle cans, which is like spraying a model with a fire extinguisher! But hey, I'm always up for a challenge. So I added 4 Doyusha electric motors, illuminating altitude lights, Eduard photo etch cockpit, sound effects via an MP3 player, and a Coastal Kit Base, and Paul Colombo Wood Bases. If your going to build a difficult kit, why not go all out! Like I said, I wanted a relaxing build!🤣 So I hope you can sit back, relax and enjoy the pictures. ( I even took Silver at the NIMCOM 8 Show last Saturday 22 June, in McHenry, IL, in the Diorama Category.) Double Click on my Name to view videos. PLEASE NOTE THE SCRATCH BUILT BOMB AIMER'S HAND HELD SIGHT NEAR HIS LEFT HAND16 points
-
Hi all, another recent completion, the Hasegawa F6F-3 Hellcat. I used the more detailed engine from the Hobbyboss kit, a resin cowling and wheels, a squadron vacform canopy and Techmod decals. It was my first use of Hataka acrylics and to my eye they look spot on (the photos in the bright desert sun makes them appear more vivid than reality). Hope you like it! Chris15 points
-
Hi guys!! My recent built, the old Airfix Viggen, it was not an easy built. Took me lots of hard work and dedication. I wanted to make the splinter camo version but realized it was based on the early version and can be made into silver. The kit required, lot of sanding and filling, there were some gaps, and I did some minor riveting and re scribing the panel lines as it was raised one. I used mr.color silver 8 and added pinch of yellow and black for different shading or tonal of metal. I really like the way it has turned out, thanks for looking cheers.15 points
-
Another for the shelves. Airfix Spitfire XII of 91 Sqn. Built OOB apart from a set of Eduard seatbelts - oh and I used the major markings from the Victory productions Spitfire Aces of the Empire. This is a fantastic decal set for Spitfire fans with a massive selection of schemes for Mk I/II/Vb/Vc/Vii/Viii/IX/Xii/XIVs. Get one if you can. I used Xtracrylics for the main scheme. Build was straightforward and fast by my standards. I’m pretty happy with the result although the finished aircraft does appear a bit odd to me from some angles although I’m by no means the slide rule type. The sit of the aircraft looks a bit squat and the rear fuselage appears narrow and deep. I don’t know if any of this has drawn any comment elsewhere and I may be completely wrong. Whatever it’s a nice addition and I enjoyed building it. thanks for looking. Steve14 points
-
After many months it's finished a 1/48th scale scratchbuilt Gloster Gamecock in 17th Squadron colours. Wheels and upper wing from a Smer Bulldog, a Resin Engine but otherwise all scratchbuilt including home printed decals.13 points
-
This started life as the Revel Iron Maiden Book of Souls Boeing 747-400 with GE Engines. I replaced the power plant with Braz resin RB211 Rollers and used some Russian (cant remember the make) decals along with Authentic Airliners Revell cockpit glazing decal, I did not bother tarting around with the first class fuselage area nose correction on this kit but have done so on another 1/144 747-400 build which I am still working on which shall be wearing BA's Chatham livery (G-CIVI) A great fun kit, but the decals were a challenge as they all had a white solid lower stencil decal which was not printed in register to the colour decal that overlays it. Thanks for looking in, this was a nice change from my norm 1/200 civil stuff.12 points
-
Hi all. The 3rd build I'd like to show today Is Kinetic's fantastic Harrier twoseater. I added extra rivets and used Eduard's Big Ed photo-etch set for this build. Also'some scratch building was done to the cockpit and canopy. As usual, Gunze Aquous paints were used over Alclad black primer. Thank you for watching. If interested, you can visit my Facebook page: https://www.facebook.com/René-van-der-Hart-Scale-Models-250725525692334/12 points
-
Airspeed Oxford MkI, V3354, No 14 Service Flying Training School, RAF Cranfield, 1940. A 1/72nd scale kit from Pavla, which threw up its fair share of problems over and above the usual limited run idiosyncrasies. This build was my single entry into the Trainers GB. I decided from the off to replace some of the resin parts such as the undercarriage, and added some interior detail and a better rendition of the turret gun mounting. For the latter, I used parts from a Special Hobby Anson as templates. I also replaced the kit Vickers K gun with a better version from the spares box. The undercarriage was rebuilt from scratch, using brass tube and wire, since the kit version was almost completely wrong and would have made the model sit at a very strange angle. I bought the kit second hand, and the original decal sheet had begun to crack. I chose a suitable aircraft from an internet search which had a fairly simple camouflage and markings scheme that could be replicated from my decal stocks and fitted my interest bubble of 1940. If such things interest you, the WIP thread is here:12 points
-
Not up to the standard of youse guys, but I like to build a ship every so often, and I've just done this one. I used some of the WEM PE set I had left over from my first build (9 years ago). A couple of b/w pix She was launched on St. Patricks Day, 1938. Commissioned in early August 1939 shortly before the outbreak of WW2, Belfast was initially part of the British naval blockade against Germany. In November 1939, Belfast struck a German mine and, in spite of fears that she would be scrapped, spent more than two years undergoing extensive repairs. Belfast returned to action in November 1942 with improved firepower, radar equipment, and armour. Belfast saw action escorting Arctic convoys to the Russia during 1943 and in December 1943 played an important role in the Battle of North Cape, assisting in the destruction of the German warship Scharnhorst. In June 1944, Belfast took part in Operation Overlord supporting the Normandy landings. For D-Day she was the flagship of The Commander, Force E.10 points
-
For my final entry in this very fine and very fun GB, I will build the famous Westland Wallace of the Houston Everest Expedition. Wikipedia has a bit of background here: https://en.wikipedia.org/wiki/Houston–Mount_Everest_flight_expedition Here is the box top and the sleeve for the decals from Arctic Decals in Finland. All the parts seem to be present and accounted for, including the stand, which I will be using. Mika's decals look very nice, as usual. High quality goods, these! And his decals guide is very informative regarding diplomacy... I'll start in this evening after it cools down a bit. --John9 points
-
Ok Folks, Go easy on me with this one. This is my first AFV model in over 35 years but I am an avid aircraft modeller (my main interest). I have come over to the 'dark side' for this model since one of my work colleagues is leaving us shortly and he used to 'drive' (actually Command) one or several of these in the Hungarian Army. Over the last three years he has presented some of our departing work colleagues with nice pieces of modern art (his passion) so I decided it would be nice to repay all of that generosity with some more 'traditional' art (well from our BM perspective) so I have just completed this Tamiya kit for him. The kit is pretty much out of the box although I have added the Trumpeter Track links for their T72 family without much difficulty since I do not like the kit 'elastic bands'. I also replaced the plastic 'log' with a piece of real twig and sourced a HAD Models decal sheet for the Hungarian Army markings. After pre-shading, I used a Tamiya rattle can for the overall green scheme and then used a wide variety of washes and pigments. I have applied at least two shades of Flory Models clay washes and then pigments from Pinnacle Modelling (who sadly appear to be no longer in business) and some great new Spot-On shades from VMS. I also used some AK interactive stains and Tamiya weathering masters. I did not go overboard with the weathering - online images show these tanks in varying states dependent on the prevailing weather conditions and time of year - I opted for a tank engaged in operations over the summer months. The relatively simple base was purchased on-line. I lined it with pollyfilla before giving it a liberal covering with two shades of Tamiya Diorama Texture Paint. The top layer is actually quite unique !. It is genuine Hungarian dirt, cooked in a Microwave (to sterilise it - something I learned on BM) and then sieved and fixed with Deluxe Materials Scatter Grip. The final touch was a scattering of grass tufts from a wargame supply company called 'The Army Painter'. Comments and guidance are most welcome - This project has renewed my enthusiasm for AFVs so I am now looking forward to doing something for my own collection next - Probably a Croatian T-55 or a Vietnamese Type 59 from 1975. Thanks for Looking8 points
-
Hi folks, I finished lately this predecessor of the famous Zero fighter, which flown in 1938 in China. An easy build, although the extras in the kit as resin engine, etched or brass are perhaps redundant as the plastic is simply fabulous. I only added scratch built open canopy hood. Cheers Libor8 points
-
Thanks Gents. It’s been a hell of a week and a hell of a day but as promised I did manage a small bit o’ bench time. 🙌 The clips got tidied and sprayed. It took a bit of sanding but I think this will do. I then primed and did a post shade. I also did the spare fuel tank. noticed I lost the fuel cap so made a new one. 😍 After this I was getting all revved up for more paint then I thought I need to do the bits and bobs that get glued on, the break out panel and the whole tail wheel assembly. 😩 rright. what’s that bit? 😶 apparently part 241 goes here. I initially thought Airfix had got the part number wrong so I took this pic, then while posting noticed the number up above. To be fair it’s an easy mistake to make. It does look like part 83. 😬 Swiftly moving on as the bit number. Ahem 241 fits too looks ugly I’ll “cut it off” in true @TheBaron stylee. 🤤 I tidied the pin marks up too. better. 😇 I think I’m going to glue this panel in. I’ll sleep on it. 😴 Talking about pin marks. Glancing at one of the sprews. 🥴 I’ll try and forget I saw that. 🤕 Next all the little office wall parts got tidied. And the tail wheel arm got dry fitted. 🤢 what even? 🤮 Ok sleeves pulled up. I tidied and glued. (Mind the gap) Filled with PPP and sanded. then washed off and primed and re scribed. better. 😯 Something had to get painted before I popped so while I had the black in the pot I did the IP front with a light weather wash and some colour pick out. And the back. I’ll probs add wires to this? Heres the super cool Airscale decal on some pre cut plasticard. This will all get sandwiched together soon. i think I might try that Krystal Klear stuff I bought. Apparently it dries clear. I did a test run. hmmmmm🤔 Oh just before I stopped for the night. I glued in the control column and the compass with decal. 🤗 I’ll pop some of that Klear stuff on if it works. 🤫 That’s me done for a weekend update, fingers crossed I get some time next week for more Hurri action. Thank you for tagging along if you’re out there. It’s much appreciated. Hope you all have a lovely weekend. Happy Modelling you lot. Johnny. 🥳8 points
-
That would be a useful tool for modelling ... I did remember the can fitting thing from your build, so it was an easy fix Thanks for the appreciation What was I thinking? Little progress to show this time, the WE was busy with BBQ and all I fixed the hump with some sanding and polishing of the plastic addition so the gap is gone and a propre shape reinstated and I also tidied up and rescribed the bottom front fuselage After rescribing, as usual, I ran some Tamiya Green Cap along the panel lines with a fine tipped brush, to get cleaner lines. That's all for now, comments welcome Ciao8 points
-
well, after a bit of a hiatus on the Wessex, I fell back into some Fly bashing after the train is delayed waiting on transfers (yes, still waiting...) The MRGB's have been lying around for some time now so I thought it was about time to throw some paint on them. Easy enough job but they do look a bit bland don't they? All much of a green-ness. That was soon cured by the application of an thinned umber oil wash. I did consider some more detail painting but it's just never going to be seen and I have spent long enough on this build. Once the oil has dried it loses that nice sheen seen in the above photo. I think I may give these a quick satin coat to bring some of that life back. Just how much will be seen ? Well, this much... actually, even less once the mesh panel is in place. even less once the rotor head and the blades are in place. I could just have used a wooden stick in there and no-one would know by the time this is all finished. Now the observant among you will have spotted that the windscreen is in place in the above photo. And you are correct - it is finally fitted. Like Herr Baron, there are times when I believe the usual adhesives just don't cut the mustard and a good strong epoxy is called for. I thought I had some of the non quick setting stuff (I always think that is stronger) but I must have ran out and forgot to replace it. However I did have some 10-15 minute setting stuff so that was called into action. Of course, it did mean that I had to sit with my finger on the top end for all that time forcing the windscreen down as it would not sit flush otherwise. Even after that time I was very wary of removing the pressure in case the darned thing *popped* up again. Lady luck was with me this time. But after the 15 minute finger exercise I didn't want to leave the newly bonded joint just sitting under pressure so I found a new use for 1-2-3 (rusty) blocks. That was left overnight to ensure a good full cure. Smoothing and sanding to come later. - After the gaps are filled and some other remedial work carried out. However, now that the windscreen is fixed in place it lets me carry on with other assorted gubbinses situated in and around that area. Namely the sliding windows. Now, it has to be said that Fly made a really nice job of molding these sliding windows, they really did. So why did they do such a miserable job on the main windscreen with its pebble-dash finish ? The sliding windows are crystal clear (until my greasy paws got all over them) and they are nice and thin. It's a shame they are the wrong size (I am being picky though!). I had to sand the top and bottom edges to get the things to fit. While I was doing my trial fit I noticed that the window runner I added months ago was a bit oversize, so off it came. That has since been replaced with something more scale-like but not worth a photo (or I forgot) I have a set of masks that I purchased when I got the kit but opted to go my own way with masking tape for these. No idea why really. I found that going around the perimeter with a nice sharp pencil gave me a nice cutting guide. The inside was a bit more a a faff but nothing too difficult. Now while Fly made a really nice job of the molding, they did a crap job of all the fittings for the windows. These were all supplied in resin - and not a single one of them survived the trip to my abode. Not a one. So, out came the styrene sheet and the resin rivets to add that all important missing frame detail. While making such a cracking job on the molding, they also forgot to add all the rivets around the frame which are such a visual numnumnum when optically surveying that front area. We all know how daft I can be, but daft as daft is, there's no way I was going to drill individual rivets all around the window frame. Instead I resorted to this.... about two years ago I purchased this sheet of 3D rivets in case I could use it on my train build ( and instead used real rivets!) but never used them. This seemed like a golden opportunity to try them out. I can't remember just how much they cost but I do remember they were a lot cheaper than Archer rivets and you get two sheets of all kinds of rivet spacings and patterns. I soon found a rivet line that looked promising. In retrospect, using Alclad black primer was a poor choice when you are trying to lay down lines of teeny tiny black rivets, but I got some down eventually... somewhere! The transfers did lay down nicely though - very easy to use. Even although none of the resin hardware survived the journey I probably wouldn't have used it anyway - it would have been far too fragile. I opted to try and make the outer handle from brass which should be a lot sturdier. The "handle" was made from some brass rod, squeezed in a vice. That flat portion was then bent into the required Z shape. A hole was drilled through the flat end and a brass rivet inserted, and that was followed up by a thin slice of brass tube on the underside. Once soldered, I removed the dome of the brass rivet and we have something that approaches the general shape of a handle. With a bit more fettling and filing and a hole a driiling... and we have clearance of the window when the handle is operated. The inside handles won't be subject to any vigorous handling so I might make them from styrene - we'll see. A coat of dark green was applied -and if you read this Ced - I did exactly the same as you did with the Tornado fin earlier and thinned the paint far too much!!! I ended up having to do light sprays then hold the parts in front of a fan to speed up drying so I could get another coat on them, wash, rinse and repeat until I had good coverage. The railroad rivets seem to have done the job nicely. They are not too prominent but are certainly noticeable. I just hope they stay in place when the masking is removed. While the dark green paint was out, the winch got a quick blast and the 'ook got a splash of orange (yes, I know it should be day-glo, but I'm not buying a jar of day-glo just for that one tiny part) and since I had some dark green left over I decided to finish it off by giving the tail a quick blast over the riveted area I did many moons ago to see how they would turn out. That doesn't look too shabby. I was a bit worried that they would be very in-yer-face, but they're not bad at all. Now, if I could just remember what size rivets I used on what panels so I could start the port side.... and that's all for this session folks! now where's those train transfers...8 points
-
Hallo again After a long break in the forum, here what I did: I finished the model. To build up the main plane, with all the struts, and I rigged afterwards the entire static rigging. No control cables at all! The most important tiny point is to watch out carefully, that no eyelet sticks to far in the hole for the main tail booms. This occurred at my husband’s model! Well, the tail booms mounted and all goes quite fast. Assembling all the parts. Think first, how to proceed and then do it. As you see: The control cables where the very last, expect the canon and windshield and so on. In all, I was astonished to see it all happen, after the tail was assembled, it worked out all so quickly. A very nice designed model. All the model companies can learn from WNW. I will watch out carefully, when my husband starts with his AEG, the Gotha and 0/400…… Happy modelling8 points
-
#17/2019 And the fourth of 5 Emils finished. Airfix kit, the storch legs shortened about 3mm, wrong seat replaced with a Hasegawa one, way too narrow prop blades therefore replacement with a complete Hasegawa prop, a missing E-1 panel engraved, brake lines with lead wire and plastic rods, the latter also used for the landing gear indicators on the upperwing, brass pipe piece for the antenna to fuselage insert, EZ Line and fishing line for antenna wires, kit decals except "black 8" taken from a Fantasy Printshop Luftwaffe number sheet. AK Real Color RLM paints for the 65//70/71/02 camo. Build thread here https://www.britmodeller.com/forums/index.php?/topic/235054802-red-band148-messerschmitt-bf109e-1-jg53/ The model displays a machine of 2./JG53 during the BoB in 1940. Mombeek´s Luftwaffe Gallery No1 as reference. DSC_0002 by grimreaper110, auf Flickr DSC_0003 by grimreaper110, auf Flickr DSC_0004 by grimreaper110, auf Flickr DSC_0005 by grimreaper110, auf Flickr DSC_0006 by grimreaper110, auf Flickr DSC_0007 by grimreaper110, auf Flickr DSC_0008 by grimreaper110, auf Flickr DSC_0009 by grimreaper110, auf Flickr DSC_0010 by grimreaper110, auf Flickr DSC_0011 by grimreaper110, auf Flickr DSC_0012 by grimreaper110, auf Flickr DSC_0013 by grimreaper110, auf Flickr DSC_0014 by grimreaper110, auf Flickr DSC_0015 by grimreaper110, auf Flickr DSC_0016 by grimreaper110, auf Flickr DSC_0017 by grimreaper110, auf Flickr DSC_0018 by grimreaper110, auf Flickr7 points
-
Hello all, Here is my recently completed Tamiya 1/48 F-16C, (Aggressor boxing) marked as a Block 40 from the 555th Fighter Squadron 'Triple Nickel', during Operation 'Freedom's Sentinel' based at Bagram AB Afghanistan, during 2017. This machine, 89-2137 downed three J-21 jets over Bosina in one sortie in 1994, using one AIM-120 and two AIM-9. The build thread is here. Extras used included a Pavla seat, resin FOD cover, Master brass pitot/AOA probes, Master brass static wicks, Attack Squadron BRU-57 rack, Bullseye Decals, Crossdelta fuselage stiffener plates, Academy GBU-38's, Hasegawa Sniper pod and a LAU-68 launcher from a Tamiya A-1 Skyraider kit. Beside my Block 50, 480th Fighter Squadron jet: Comments welcome, thanks for looking. Dave7 points
-
Hi There, It was decided by Innis that our next project would be a Mustang, but an RAF one. I had a couple of Mustangs picked up from Aldi, but no RAF decals. I managed to get some cheaply but they were for a Mustang III. Still, The Wee Manny would like an RAF version so these were used. The kit was finished quickly as he wanted it done before his Holiday and we had a couple of minor disasters. He was doing a panel line wash whilst I was in the Kitchen cooking Enchiladas and I lost track of the time so the wash was an absolute nightmare to get off cleanly. My fault entirely as was spilling glue on the nose when I was fitting the undercarriage which the melted the Sharkmouth decal. I covered it up as much as I could and to be fair it looks ok from three feet away. So, here it is, warts and all with Airfix's famous wonky Mustang undercarriage and a toothpick aerial as the kit ones were so mismoulded and flashed they were unusable and stuck on a base made from the cover to a scented candle from B&M. Thanks for looking. Cheers, Alistair7 points
-
Hi folk's,well Photobucket and I have now officially parted company I deleted 2000 photos last night as the threatened blocking was due today anyway.A lot of kits from joining BM in 2013 are long gone and the only 1/72 kits I had on view were on a shelf in a sorry dusty state so this morning I decided to clear it and box them up. all to 1/72 and had a dust and tidy up so for newer members who might not have seen them here are my better effort's built 2013-2016. Italeri Stukas.Many thanks for looking in. Academy p-47's. Heller Storch. Airfix p-40's Airfix Mustang. Academy p-47. Airfix Hurricane.7 points
-
Thanks guys. Yes, the glazes work really well for subtle weathering, especially on smaller scales. Before weathering the green areas, I attached the casemate and tail, the later with tiny drops of epoxy adhesive for more strength. After that, I worked up the shading on the green camo in the same way as was done over the sand, but with darker brown tones. The decals had also been added at this stage, although the only one on the hull is the code number on the front. Most of the detail painting has also been done, although I missed the sledge hammer on top of the hull, so that still needs doing. The track frames have been painted and weathered in the same way as the hull. These still need the road wheels and other details picking out. (excuse the giant 1/1 scale cat hair, they get everywhere) So, this is how it's looking at the moment, loosely clipped together. The tracks still need painting and weathering, and I've got a length of tiny 1.5mm brass chain which I'm going to attempt to hang over tail, attached via some even more tiny photo etched shackles... hmm, we'll see how that goes. More later Andy7 points
-
Here's my Southern Cross...Lotsa fun! Many thanks for your perusals... --John7 points
-
Or “left” and “the other left, you idiot”, as my Beefer used to tell me7 points
-
Another one off the bench. The venerable Airifix 1/48 Lightning. Still good for it's age. Decals are by Cutting Edge and the nose ring has been wrapped in Bare metal foil. To be honest not my best effort but looks ok from a distance. On to the pic's. Please feel free to comment etc. Thanks for looking Dick6 points
-
Thanks Bill - that Expo drill looks like a tool that lasts. I may have to get one if the screwdriver fails to satisfy John thanks for the picture and I'm always happy for people to post useful things in my threads Masking the fin - tricky. I got out the 'Canopy Masking Rescue' set and found nothing, again. There was what I wanted on one of the other left-over sheets: Standard tape down the line and then cheap painters' tape to cover the rest: Be careful when you're masking in the summer. If you've got your shorts on (as I have) then rubbing the tape on your legs (as usual) to remove some of the stick can be painful! As suggested by Giorgio I ran some Future / Klear down the edge of the tape with a thin brush then blasted on some Lifecolor MSG: I'll rip the masking off later and see how I've done.6 points
-
Hello friends, another old model is over. I am continuing in the spirit of old maketter times. Here's the picture, enjoy it.6 points
-
Thanks Bill I hope you had a good show - a bit far for me, sadly (although I will make the effort for Telford with some American Friends!) I've checked the scheme and this model is of ZA492 so I'll try to add some odd panels as seen in the reference shots; Google 'Tornado ZA492' and you'll see some nice (copyright) ones. Thanks Steve and Dave - great advice; try it first! I promised earlier that I had a plan for a slow speed 'power' tool for use when the Dremel is too 'hot'. What's this? Ta da: My daughter has one similar to this and I've always been envious. For just under £24 on the big river site it's a bargain. You can get other similar ones without all the bits but then you don't get the cool metal case. Of course I now have thousands of bits but hey, you never know when the might come in… To make it useable I've also bought one of these: Not the best quality but cheap as chips and it handles 0.3 - 6.5mm. It's a bit wobbly in the driver but should be good for sanding and drilling. Hopefully. And I've got a cool metal case! Sad man6 points
-
Well it has come to a (im)passe II was at the Midlands Air museum yesterday and availed myself of the opportunity to get personal with their Whirlwind Some niggling shape issues have been holding me back from pushing on with the new top cover so I took a few photos of the upperworks This is an area I need to refine so the present top is now officially dead duck meat There is a taper which begins half way across the window behind the crew seats Although I have a similar shape I need to make the curved sides a fair bit less 'curvy', the defining line is straighter than mine would have allowed so... Normal filing will be resumed as soon as possible Pssssst sihrsc come to daddy and The delay wont be massive but it gives me a chance to finish popping the nose and transparencies on the S-61N Blue roof panels next for that6 points
-
I have added a little filler to some of the small gaps where the wings met the fuselage, or rather didn't quite meet it. Then I carefully glued the canopy in place, this was tricky as there were no locating pins or lines what so ever! But, I went for it and made sure it was right before pressing it down. Once dry I masked up the glass work, and tonight given it a blast of interior green. Next step is to give her a coat of primer.6 points
-
Ok so I’ve gone in at the deep end now and bar a few touch ups this is turning out to be more than acceptable to me. Huge sigh of relief I may now be able to complete this beast On to the rest yay !6 points
-
Last of the "carp" as I show. This is another Wessex UH.5 Italieri 1:48 model As before, the model was made straight from the box. . family picture5 points
-
Hello all... heres my entry for the build. Accurate miniatures F-4C/D which is the old Monogram plastic re-boxed. Im not sure if i will do a Line bird from Vietnam, not sure which unit this belonged to. From what i know its of an early plane repainted in theater, which chipped and flaked badly. From a query in Aviation. "The Phantom is the Mig Killer flown by Capt Swender and 1 Lt 480 TFS, 35 TFW based in Korat Thailand in July 1966." My other option is Illinois or Michigan A.N.G. markings ? But here are the obligatory sprue photos. This hasn't ben unbagged yet so I'm pretty sure it meets the 25% or less mark. Separate bags for canopies and resin ECM pod. And finally the kit decals which include an option for one of "Yeagers" birds, so that also may become an option. Questions, comments, or thoughts ? Dennis5 points
-
The Roden SPAD painted in the markings of B3504, 23 squadron RFC. I added a few bits and pieces to the kit to "anglicise" it - wicker seat and lap belt, British style Lewis gun and ejector chute, fabric stitching (decal) on the port side of the fuselage and pitot tube fixed to the outside strut. Thanks for looking.5 points
-
Hi all, Here's my latest finished kit: GWH's 1/48 Lockheed T-33A Shooting Star with Caracal decals and Eduard seat belts. It's finished in Kcolors 60 Steel. It's a nice straightforward build and I have many more photos and an extensive article here: https://jonbryon.com/great-wall-hobby-1-48-lockheed-t-33a-shooting-star/ Comments welcome and thanks for looking. Jon5 points
-
Hallo This is my Saraf. Kit from Hasegawa with Aires cockpit. The instruction for this kit is a nightmare. Guess…The wing installation on the left side is actually not possible, without cutting the plastic through. Without my own photos, the outcome would have been a disaster. The cockpit glass was glued after finishing all! The Aires cockpit does not match the Saraf. Detail work had to be done! The decals for the step on the right side is purely wrong. Too short! This is my second helicopter. Happy modelling5 points
-
WIP: Just finished.5 points
-
Hi Laurie, Bravo November became our 'resident' (and only) Chinook whilst we were at Port San Carlos during the first days ashore. Later, once the surrender had been signed, my unit was picked up from the Seaplane hangar and we flew forward to Stanley airport, where we were to process the influx of prisoners. We flew by Cninook and the seats were there but folded up so we just stood for the short journey. This was actually quite good as it gave me the chance to look out the windows and take a couple of photo's as normally we would be facing inboard. The flight was low and fast, passing Stanley on our way to the airport. Sorry about the shaky image, I was trying to keep my balance. We then flew over the wreck of the Lady Elizabeth as we turned in to make our approach. Then we could see the airport out to the side as we circled ready for landing. As soon as we touched down and got out the cabs departed, probably to get more troops/equipment here as quickly as possible, as it was going to get very busy. Sorry I don't have any internal shots of the Chinook, it's funny but I never thought that I could be getting detail for a future build, even though I was a keen modeller even back then. cheers Mike5 points
-
Do you see it too? I'm not alone?! Now my doctor will stop giving me Prozac ??? 😁😁 Maybe from this day all about FROG - TOP SECRET??? Blame the aliens! Aliens is green...frog is green too! It is logically obvious that FROG is an alien technology for conquering the planet Earth!! 😁😁😁 .....or it's was a DOS attack fan-hackers old Airfix on FROG? After all, they can’t allow more models to be built in FROG GB than in GB old Airfix??? 😁😁 More conspiracy theories? 😁😁 В.R. Serge5 points
-
I’d been having a bit of trouble getting the steering column and wheel in the right place so I thought I’d have a bash at some proper modelling. A bit of brass tube was CA’d in place, a thinner tube stuck inside and an appropriate hole drilled in the steering wheel. Not exactly high end engineering or an overly taxing problem to solve but I was mightily pleased with the result.5 points
-
Thanks Giorgio I'll give that a try, if I remember! To be honest I think most of the paint came in through the back. Serve me right. White bits brushed with Citadel Model Color Off White: Really hard to get a good photo but at least that shows how shiny the black is 👍5 points
-
Thanks Crisp; is that your left or mine? More black this morning. I'm not going to blame Cookie for this: I'm just going to add to his definition: "I'm not too scientific with the proportions, but it's mostly distilled water - let's say 75% water, 20% Future, and 5% Flow improver and retarder added in 'drops' (I've added more and more retarder as summer has arrived). I use this same concoction with Stynylrez, Vallejo, Lifecolor, Model Master Acryl and Badger paints, all without problems (for Tamiya, I use Tamiya X-20 since it seems to like being thinned with alcohol). Whatever you do, don't leave it in the bottle for months or the Future will clot" Like this: Yuk. Rather than clean the bottle I just put some flow improver and water in the cup and then added H21 acrylic until it was a bit like semi-skimmed milk. Even then there was very little pigment laying down on some paper so I used light coats. Seemed to work. Rob was worried about this masking: … and I was confident that the thin tape underneath had been burnished down enough. Was I right? Almost. I'll need to let that dry well as it needs to be masked up. Fingers crossed5 points
-
This is what I call an honest and objective approach to a scale model. There is nothing to add except that I personally would have compared it with the Mk.XIX, to better show the decline of quality of Airfix in 6 years while the opposite would be more logical. Short Run models of Ukrainian brands are light years ahead of Airfix in terms of finesse and details. The marketing of Airfix is meanwhile much better than the product ... This is also what it serves! One wonders how people are still trapped! P.S. Do not tell me about 1/24 Hellcat. Ending with a twisted fuselage in such a box is completely inexcusable .... Madcop.5 points
-
Latest little bits and bobs. Both excellent Tamiya kits. Dingo tarted up and on a new base. STUG III B5 points
-
Finished the wheels (or at least the main parts - need to add the air valves etc!) Printing the tyres was a pain - tried different angles etc, sometimes they would 'sag' as they printed due to the number of supports - still learning all that! Had a few flats! But once done, and cleaned off - I primed and sprayed with Tamiya Rubber Black (or tyre black - can't remember) - I am going to print a mask to spray 'AVON' on the tyres. I ended up using Alclad Chrome on the rims - but not to full 'shine' effect - just enough to glint a little bit. I did try the Spaz chrome you can see, but wasn't impressed - far more to do with prep. and not fiddling with the airbrush - alclad gave me a 'hint' of chrome over the top of the other... Nothing fixed or attached yet... Lots of small bits next - mirrors, fog/reverse lights mainly... Getting pretty close to assembling these parts to the cars and....finishing!!5 points
-
It's been a busy 24 hours in the Frog GB as this build slipped to the second page in less than a day. Today sees a double update as the phot shows the Vimy and Gypsy Moth together to illustrate the differing approach's to getting the struts in place. In both cases, what seemed to be the most secure sub-assembly (the engines for the Vimy, or structs (the V shaped fuselage struts in the Moth) have been chosen as the initial fixing points.. When the glue has cured I am hoping in both cases that this approach will allow the upper wing to be glued in place and then the remaining struts attached.5 points
.thumb.jpg.eca0c14e328767d0864cd6db01ca9ccf.jpg)


This leaderboard is set to London/GMT+01:00