
Leaderboard


Popular Content
Showing content with the highest reputation on 17/06/19 in all areas
-
Afternoon. Well this went straight to the top of the list and has just been finished. Construction wise it's very nice and easy. I Used Aviaeology's RCAF FR Spitfire's to make MV348 "S", "Violet Dorothy III" flown by Sqn Leader Ken Lawson of 414 Squadron, late April - May 1945. Tamiya & Gunze paints used throughout, with details in Vallejo and Citadel. Final finish is W&N Galleria matt. The kit decals provided everything except the serial number, code letter and name, and they are some of the best kit decals I've ever used. Period. This is a great kit and looks the part. cheers Jonners38 points
-
Hi all! This model is from Special Hobby and in the 1/48 scale...this is a crazy weapon, four panzerfausts in the wings ,used by the germans in the last days of the conflit...hope you like it... Regards for all1 Till the next! Luiz.30 points
-
I continued with my MIG-21 series. Here is one representative of the Cuban Air Force. So much for me now. Here's the picture, enjoy it.16 points
-
Hi everybody; not much time for modelling during the WE; I had to take care of my yard and clean up the swimming pool (and I'm not done yet ... ) Anyway, here's what I did: I almost completely refined the tail fin, cutting away the excess plastic I previously added and sanding everything flush Then a dryfit of the rudder, which shows job to do on it and on the fin So I first fixed the fin: more plastic (styrene sheet, 0.5mm thick) added at the base Then another strip added to the top of the rudder and after some cutting, sanding and polishing, here's another dryfit of the rudder in the intended position I meanwhile also worked on the main intakes: CA glue as filler for the inner side seams Then this set of tools to sand and polish It actually needed two attempts at filling with CA, with subsequent sanding and Dremel-polishing (I nicked that idea from Tony @TheBaron). One word of advice, though: that Dremel tool on the left (I think it's called felt) can be hard on plastic (don't ask .... ) so one has to use it very light -handed and at low speed. Last thing for this update, I glued in the central plate on which the exhaust nozzles will insert This has a triangular mounting peg on the back side, which doesn't fit in the receiving hole (the latter being formed by the two fuselage halves joining there, but one side is clearly badly moulded). I forgot to take a "before" pic, but I had to remove part of the peg to actually have this sitting on the centerline I haven't rescribed the missing panel lines on the tail fin area, yet, because I first want to glue in the spine and airbrake, which are going to cause more filling and sanding. That's it for this update, any comments welcome Ciao11 points
-
I was approached quite a while back via Britmodeller to commission build a two-seat Spitfire using the Tamiya Mk.IXc as a basis. After a long build period I'm calling this done - although looking at the photos I need to dust her again! What is it about model photography and dust? Based upon measurements of a TR. Mk IX fuselage in a jig, along with original Supermarine drawings, she's taken a lot longer than planned - but hopefully my client will like her. Middle and rear canopies vacuum-formed over resin patterns, front cockpit moved forward (as per original) and new interior structure made. Markings are based upon a wartime 'Eagle Squadron' scheme as a tribute to a brave young American pilot with 133 Squadron, RAF, who lost his life days before the Squadron transferred to the USAAF: Gene P Neville Iain10 points
-
lovely kit to build but the Decals leave a lot to be desired as they are heavy and very Matt like. Used a lot of setting solution to get them to bed down as best i could. Used the Aldi rattle can on it.thanks for looking.10 points
-
10 points
-
Hi Folks This is my recently completed 1/48 Kinetic Hornet. It represents A21-7 as she was circa 2006 with 77 Squadron and finally gave me a chance to use my Afterburner Decals Hornet sheet. I added some extra goodies into this project. Resin Seat, Resin wheels (Nose-AMS resin , Main - Attack Squadron), Resin burner cans (Attack Squadron). AIM-132 ASRAAM from Airfix spares, Litening Pod from Tamiya spares and scratch modified TACTS pod. Eduard etch set in the cockpit abd some epoxy putty intake FOD bungs. Paints used were MRP and SMS Lacquers. Happily for me this model was awarded First place (1/48 Aircraft - Jet - Modified) and also Best Kinetic Model at Australian Model Expo 2019. I hope you like her. Cheers Andrew P.9 points
-
Here's the new tool Airfix Spitfire FR.XIV finished and build OOB. I've used most of the decals from the II(AC) squadron but depicted another aircraft on strength. I first saw this scheme on the Fighter Collections' Spitfire MK.14 in the mid-90's. They had applied their actual aircraft's serial in place of the original from SM927 though.9 points
-
Uschi Van Der Rose .003 antenna, great stuff! But don’t drop your cut off piece, it’s so thin it disappears. The flat coat is Alclad Clear Flat, color coats are Model Master with some Tamiya for details. Antennas are reinforced with music wire. Stencils on the fuselage right side are arguing with me. The cowl is from Obscureco, very nice resin. Photos at the end are showing the F6F-3, FM-2, and F4U-1 relative to the A6M2 Zero and each other. The Wildcat fuselage needed to go on a diet!9 points
-
Well, this one was a bit of a struggle.... Although it looks lovely in the box and all the pre release 'hype' I personally found all is not well when putting it together. OK, some of it might have been me maybe expecting more than I should but I'm just not happy with the overall experience...Hey ho.. Anyway, as you can see it's finished in SAAF markings as a favour to a SA friend. The decals (and again these didn't help but obviously no fault of kit ...) are from MAV decals and are rather opaque (so I used 2 sets) and are ALPS printed so tend to be rather (dotty?) for want of a better word. Hopefully someone will do some more? I also wanted to do one with a turret so changed the serial number and code letters. As far as the model goes it's very detailed inside but you can't see much, the engines are nice and so are the clear parts. It's the fit of the parts I found troublesome and some of the 'silly' mistakes such as location and size of some of the windows, and not sure whether it was me again or not but the bottom of the fin is about 3mm shorter than the root it sits on so some gentle removal of the rear of the root was required along with reshaping the rear of the rudder. One of the more annoying points is that when cleaning up the wing joints you inevitably remove the fuel tank detail which is pretty tricky to replace and I'm still not happy with it now.. The two intakes on the wing leading edge between the engines are totally the wrong shape and need reshaping and the landing lights are awkward too. The instructions are nicely printed but are a little difficult to follow at certain points during construction too. There are optional parts throughout (particularly turrets and upper fuselage inserts (another badly fitting part) and I'm sure we can expect other marks in future but I for one will probably give it a miss next time round. The decals though are superbly printed Anyway thanks for looking. S1 S3 S2 S49 points
-
Hope you like her! Blue skies... Iain9 points
-
Thanks everyone! Reading all the comments about my patience made me realise I've really tested all your patience with this WIP thread which has been sporadic at best. Thanks to everyone for their comments, suggestions and encouragement - it's been very much appreciated! This is the last post from me before RFI - a cool two years after I started! For those of you who are of an impatient bent, there's a teaser photo of the completed models at the end of the post. For those interested in the last few details - read on rather than skipping to the last two photos! Having prepared the eight bomb bay doors for the Heyford and dusted off the 500lb-sized 250 pounders I assembled earlier, it was time to get painting. I hate painting ordnance - it's really fiddly and I can never seem to get a nice smooth finish on tiny bombs, especially yellow-buff ones. And as for those little yellow and green bands, well. This was the best I managed. Not perfect but they each have one good side...honest! Following a thread I started in the Interwar section, and various WW2 colour photos, I attempted to mix the buff-yellow shade which is apparently standard for both the interwar bombs and the early WW2 bombs (I always though that the latter were yellower than the former, but you live and learn) Luckily, the 500-pounders are such a snug fit in the bomb bay cells that you can only see the one good side of each one. Here we are with the doors on (not an easy job) and the bombs installed. I'm glad I made the effort with the ribs (last year! last year!) - you can just see them and the doped fabric roof to the bays through the little gaps. A couple of photos back you will have also noticed some 4 1/2 inch reconnaissance flares. These are part of the standard 500-pounder loadout for the Heyford according to the AP. The kit does actually provide them but they're on a level with the rest of the supplied bombs - vague, blobby cylinders with little or no detail. Luckily I remembered that many moons ago I built the Airfix Swordfish as a Taranto machine, fitting only one of the eight supplied flares (perhaps this was a particular Taranto loadout? I can't remember). Anyhow, found five of the seven leftovers in my spares box and decided to fit four to the Heyford. With some difficulty I built the incredibly fiddly and fragile Marabu photoetch Light Series Bomb Carriers and standard bomb racks (in fact, see the last post!), then drilled out some wing holes, and Bomb's Bob's your uncle. The Heyford's props gave me some pause for thought. Revell suggest two-tone natural wood and grey for the Mk. I and II, and plain wood for the Mk. III. This seems to be borne out by photos, but most surviving photos of the Heyford are very poor quality and it's very hard to tell what colour a glossy prop actually was. It's possible that they were all natural wood or all doped - it's certainly hard to imagine why they might stop doping them on the Mk. III (maybe a better lacquer was introduced?). However I think there's a demarcation near the hub in several photos of the earlier marks, plus I prefer the two-tone effect, so that's what I went for. I'm fairly sure that Revell's suggestion of grey hub section and natural wood outer blades is erroneous; as far as I understand wooden props were often doped on their outer sections to protect the blades (rather than the hubs) from stone chips and dirt. So I reversed the suggestion and painted them like this. Nobody could stop me, after all. The wood effect was hard work and I am out of practice - the last I did was for a 2F1 Camel quite a few years ago. But with this little area and most of it covered in grey I think I got away with it. You'll also notice I attached the glazing to the Heyford's nose. The bomb-aimer's windows (out of shot) caused me a bit of grief as they weren't a great fit - but we got there in the end. You might remember last time that I took a saw to the Stranraer's canopy. Well, here's why. Way back in the beginning two summers ago I modified this portion of the hull to remove the cargo door and reinstate the sliding canopy window recess, and here is the finished arrangement, with a window made of acetate and posed mostly slid back in the recess. It's partly hidden by the painted and installed door - but you can at least glimpse that scratchbuilt cockpit, if you give yourself a cricked neck. The Stranraer's engines were not easy to attach while still allowing the props to turn. There's quite a big hole in the front of the nacelles, and the diameter of the crankcase core of the resin Pegasii is not much bigger than the hole - so there's very little surface area to which one has to apply superglue (resin-plastic joint), and the glue has to be very close to the free-turning prop shaft (yes, I am a small child inside). After an attempt which left one of the props seized, I attached a large square bit of plasticard to the back of the engines first, then fitted the prop shafts with retaining nuts drilled thorough this, then used a small amount of much more manageable poly cement to actually attach the engines with the much larger square surface area. Here is the end product, with non-seized props! After another unsuccessful superglue episode trying to attach my home-made glazing for the landing lights (much fogging), I resorted to PVA. Hopefully the inferior strength won't matter in this fairly protected location. More annoying is the slight frosting caused by the varnish around the edge of the walkway decals - I've since drybrushed some silver carefully over the clear sections. Having painted my handmade Scarff rings and the Miniart guns black and gently added some drybrushed weathering, the very last job was to attach them. I'm particularly pleased with how they've come out. So rather unexpectedly, that's that! I'll do an RFI next week as soon as it stops raining and I can get some decent natural light in my modelling room... I'm going to have a break from biplanes, ancient kits, excessive scratchbuilding and WIP threads, and soothe my aching head by building a Tamiya kit I think!9 points
-
Hello again, Another kit built a few years back. This is the Italeri boxing of the fabulous Acc Miniatures Avenger. IMHO one of the most buildable and rewarding kits ever. An Eduard mask set though is a no-brainier. As ever Gunze and Tamiya throughout. Oh and a dirty great Alclad torpedo! And then the pics.......8 points
-
This is a build I did around Christmas in only a few days. It's the ancient and most likely inaccurate Revell kit, and actually went together very nicely. I didn't bother with any extra details or anything, no filler, I just wanted to slap together a model straight out of the box and see how it went. It was also my first 1/48 model and one of now 6 Bf109s in that scale that I have (two complete, three WIP (I have a WIP thread for those currently), and one not started). Picture quality probably isn't great.8 points
-
I agree, I've taped mine together and there is a slight gap which some PPP will sort out without too much hassle. The video reviewer says he can't understand why this is a separate part - I imagine its so the fuel filler and front windscreen dont have a seam down the middle which people would grumble about a-la Eduards IX (which cunningly compels you to get a Brassin replacement). Shouldn't have to do it? Well maybe, but I guess I'm in the minority nowadays raised on Frog & Matchbox stuff, or short run kits where parts have a nodding relationship to each other and the filler needs to be deployed by blunderbuss. That's modelling innit. As gratifying it is to build a lovely Tamiya model where everything fits beautifully, that's at a premium. I guess if you just want to get through the assembly with as little hassle as possible then they're the ones to buy but be prepared to pay for it. Horses for courses... personally I relish the challenge of taming any hiccups and my modelling improves as a result (not by much, granted, most of my models look like they have been assembled by a person without any thumbs) - gives a sense of satisfaction at the end of the day. A few years ago the Classic British Kit SIG produced a wonderful little tube map handout of kits to build before you die - and I've managed a fair number. When you see a Williams Brothers C-46 or Matchbox Heyford on a stand and you've built one, there's an unspoken nod of respect to the builder. Its funny, there are those that worship Airfix or Eduard and those that will bash the former given half a chance. The Eduard Tempest's spinner is all wrong but I haven't heard choruses of disgust about it. You crack on don't you. I love what Airfix stand for, and we all expect perfection - but its 12 people cracking out 'product' and compromises etc will happen. Perhaps we're just in that golden age people speak of where there is so much modelling choice now that anything 100% won't do. It seems like the Spit has been a good seller so Airfix will perhaps continue for another year. I don't know what percentage will actually be made (my Dad who collects old toys, says vintage boxed kits are 'failed toys' as no-one built them when they were new) and what percentage will be stashed. I'll plough me own furrow and try and not get fingerprints on the canopy and deal with any probs in me own cackhanded way. But enjoy the process and not get stressed about it. Its always a shame though when a new release you wait for gets rubbished, it sort of takes the wind out of your sales with an 'oh right' before the box hits your doorstep. I found the thread on One Man Models 3D printed HP42 and SARO Princess fascinating...the poor chap has spent ages designing and producing something no mainstream company would consider then his work is taken apart. It must be pretty soul-destroying. I wonder if it was the same back in the 80's when Aeroclub and Contrail were kicking out esoteric stuff? I dont remember the magazines (for that's all there was then) tearing into stuff, more often suggesting improvements - modellers being hugely grateful to have the Scroggs Wunderplane they were after. Perhaps, like society, there's more entitlement nowadays or maybe just more information or ways to express one's views. Perhaps the solution to worry-worts is to build a short run kit, then a mainstream, problems wont seem so huge then I guess. But then I do still use a brush (which I appreciate is the same as coming out as a serial killer on BM) so proper modellists are probably best off ignoring the above! Happy modelling! TT8 points
-
And now for some 'undressed' shots! 😉 Iain8 points
-
Good evening, 1/25 Batmobile, I used the Captain Jacks lighting kit to spruce it up. not visible in the picture, but the yellow light in the afterburner at the back flickers. Came with a sprue which had been chromed, (afterburner,engine cone at the front of the car, guns, etc) which didnt look right so I gave it a bath in oven cleaner and painted to more realistic colours. DSC_1839 by Richard Page, on Flickr _20190616_171945 by Richard Page, on Flickr _20190616_171722 by Richard Page, on Flickr _20190616_171636 by Richard Page, on Flickr _20190616_171907 by Richard Page, on Flickr _20190616_171809 by Richard Page, on Flickr _20190616_172038 by Richard Page, on Flickr _20190616_172018 by Richard Page, on Flickr _20190616_172125 by Richard Page, on Flickr _20190616_172104 by Richard Page, on Flickr7 points
-
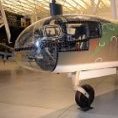
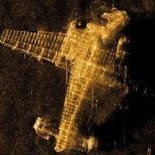
Hi, Some time ago I have bought Broplan conversion set to PBY6A and I had in stash PBY5A by Academy. But I realized, that the more interesting is other variant. I wrote to Broplan and the owner send me parts for hull, what made me possible do model of the the most distiguishable variant of Catalina - the Naval Factory PBN-1 Nomad. I apprecieted very much this possibility. I documented my buiild in WIP thread sorry if not in very details. The Academy kit is fameous for its "said to be" too small diameter of cowlings. So I increased it to 18 mm (details in WIP thread). Majority of Nomads went to Soviet Union. Mine is one of machines from Pacific Flot, used in operations aginst Japan in August 1945 Decals by Techmod (stars) and Begemot ("29" are from Pe-2 set). Since in my stash I had PBY5A (and more proper would be PBY5) the beech u/c is scratch build with help of silicon/resin copying. Here she is : Comments welcome Regards Jerzy-Wojtek7 points
-
Thank you very much Valkyrie - you are most kind! Hi Giorgio. It's a shame you are not taking part - would have been great! No - I did understood what you meant! I have started a bit on the Typhoon but only sorting out the issue around the cockpit inserts. Please see below. Hi Craig. As always - you are way too kind, but thank you. This past weekend I have been concentrating on the Tiger - well on it's....many..... wheels! And this is where I am with them at the moment: Details of how I got to that point can be found here in my Tiger STGB thread: With regards the Italeri/Hasegawa Typhoon - I got the parts all washed in warm soapy water on Saturday morning plus I got some photos taken of the contents of the box. The 4 possible versions that can be made: - I'm currently planning on making the one from 247 Squadron. The infamous cockpit inserts - if you don't know about these already - I will explain below: Clear parts: Decals: Sample of the instructions: The scheme for the one I'm planning to make: As mentioned higher up - I'm going to be using some Eduard etch as well - but not all of it!!: Late yesterday afternoon I decided to tackle the issue with the cockpit inserts. You may or may not be aware that this kit was originally manufactured by Hasegawa. To maximise the usage of the moulds they designed the fuselage halves so that differnt versions of the Typhoon could be built with the variations being provided by different inserts. The problem is that the inserts do not fit very well!!: The photo above shows my initial test fitting with no glue. I decided that I would glue these in place so the centre line is the level part. This results in the gap at the bottom and some of the panel lines being mis-aligned. So to get them to fit as best they would - I first taped the fuselage halves together and sat both inserts in place: This is the gap with the tops level on the starboard side - the one I decided to glue first: Then glued in place - front and back only - not where the gap is: Once the starboard insert was set firmly in place I then glued the port insert in place and taped it firmly to the starboard insert: Close up of the gaps once the glue was fully set: The port insert obviously had the bigger gap. Now at this stage I didn't want to be messing about with filler so I hunted through my plastic strip supplies and found two suitable thickness of styrene. I had to scrape and sand both of the different thicknesses of plastic strip down because - as you will be able to see - the gaps taper at one end. Once I got them to fit fairly tightly I glued them in place from inside the cockit - this was the result: They fitted rather well. I now need to smooth them down level and figure out what I am going to do about the issues with the panel lines. Looking at the inserts from above (they are not glued to each othe yet) I think there is only the front of the port insert that will require some filler and rescribing: More next weekend. Comments and suggestions welcome. Kind regards, Stix7 points
-
OK, canopy masking. I was going to try the Molotow pens but the frames are straight so tape is fine. Curvy stuff to go over the top: (See the #15 blade Steve - just the job. As Paul Budzik suggests, curved blades can be pushed down a line and you can see where you're going) Not the best canopy to be honest. There's a small gap between the parts and the rear is a bit wobbly with a gap at the back: The front part is also a bit 'short'/bent here: …but nothing that can't be filled, probably with some more of Bill's favourite Formula 560 canopy glue: I must say it does seem to want to flow along the part nicely. 3 hours drying time 'to handling' so I'll need to leave that until after lunch.7 points
-
Hello everyone, it's time to add something new The rear gun station is almost finished (except the gunsight ) and tahat how it looks like: Next step was the cockpit. First I've airbrushed polished aluminium on the floor, the second step was a layer of heavy chipping effects. After this the base colour was added. After it was dry I've got it wet wit water and chipping could began. To protect my work before weathering I've put two layers of gloss varnish. Weathering has started with black and streaking grime oils, than aluminium and sepia wathercolour pencils were used to add some more scratches and dirt. After completing this part flat varnish was airbrushed. The last step that I've made was the accumulation of dirt and dust made from europe dust pigment. Here You can see the effect: As i have mentioned in the beginnig of this article, I used Yahu models instrument panel. This product fits great to this model and has fantastic details. To give some more reality I've used crystal glass fluid to make glass effect over instruments. That's all for today, see You next time7 points
-
Hi mates! This is a great model of the Hs 123 from GasPatch in the 1/48 scale. See the pictures : Hope you like it! Regards! Luiz.7 points
-
My first attempt at a WIP here on Britmodeller, a 1/48 Nord Pingouin, soon ended on the shelf. So I'm making a second try, this time with something more straight-forward. The Airfix 1/48 kit of the Spitfire 24 is well known and has been around for over 20 years. I built its close relative, the Seafire 47, shortly after it was released. I like this series of kits really well, even though there is room for improvements. My intention is to build W2-A as it appeared in Hong-Kong in the early fifties. W2-A is an option on the decal sheet that comes with the kit, and a number of photos of this particular aircraft can be found on the web. I also have a copy of an article from an old issue Scale Models with photos of the same aircraft. One of the things that I intend to correct is the shape of the engine cowling bulges. When I built the Seafire, I modified the bulges that comes with the kit, but this time I thought I should go the easy route by using a resin replacement upper nose from Quickboost. Problem is, it is doesn't fit! I think the reason is resin shrinkage. I'v added shims of plastic sheet in order to improve the fit. Still, I think I will need some Milliput to complete the job. It would have been faster just to modify the bulges in the kit. Or use resin replacements from Barracudacast. The cockpit provided by Airfix is simple and possibly not up to current standards. There are resin substitutes available, but this time I decided to just replace the seat with an item from Quickboost, and make some small additions from plastic scraps. Here is a refined instrument panel with a scratch built control stick. I plan to add dials from Airscale once the panel has been painted. I have also added some additional details to the side walls. Partly fictional and not 100% accurate, I have to admit... Regards, Ragnar (from Horten, Norway)6 points
-
OOB, Caracal decals. Write up coming shortly.6 points
-
Dear modellers, My first time on this section. Normally I build aircraft models, but sometimes I have a urge to build a compleet different model, like truck models of the thirties. Just finished my latest model, I hope you enjoy the photographs, just taken outside with the sun shining ! With kind greetings, JohnHaa6 points
-
FROG/Eastern Express, Soviet Spitfire Mk.Vb, 1942, "FROG GB meets Spitfire A-Go-Go..." Here are some finished images. If anything, this build reminded me that aside from the Migs, etc...I have very few Russian/Soviet aircraft on the shelves, a dearth that must be rectified! I must get cracking on some more WW2 Soviet birds! Many thanks to the GB hosts! I'll get into another one presently...back to the Fokker VIIb 'Southern Cross' , I hope... --John6 points
-
Thanks, Cliff. A bit of fun here with the interior but it really brings home to me the precarious nature of flying back then. Smithy says in his book that the Fokker F.VIIB-3M was (as far as he knew) one of the largest aircraft in existence at the time. Even so, with the amount of additional mods done for the long distance flying, conditions ended up being cramped, uncomfortable and noisy. Pioneering spirit required by the container load! Thanks, Steve. That's what drew me to the 'Trailblazers' - they all have a story to tell. Just hope I get it near to right! Getting the fuselage ready for paint now. The seam was OK and just needed a sand but there are sink marks down the top and underside of the fuselage that needed filling and sanding. Windows were masked. Now, what are those 'bumps' on the sides of the fuselage - when I got my eyes into focus, I could see that they are actually raised 'stars', obviously showing the positions of the star decals. problem solved! (Big tick for Frog!) The covering of the nose section appears to be metal plates rather than canvas but that will be painted in Mid Blue as well. The main wing given a coat of gloss before putting the big numbers on - they behaved impeccably so a big sigh of relief. The Instructions actually tell you to put a number on the upper surface of the starboard wing as the painting guide only shows one underneath the port side. Decals backing has yellowed a bit but not so obvious against the silver. Also, warning decals put on the undercarriage legs on the 'shocker' boxes - well done Frog on the sizing. Gulp, paint touch ups required on those wheels and tyres.6 points
-
Cheers both! I am going above and beyond what I’d expect to do for a kit of this age and provenance. However, Adrian shows the way, and if I think of myself as a modeller then I should occasionally bite the bullet and do the graft! Knowing the fuselage shape/profile is incorrect and just building it from the box, and then trying to pass it off as an accurate scale model won’t wash. Besides, I’m also making an effort to convert it to a MkII. Once the fuselage reprofiling is done, and I’ve worked out the cockpit detailing, this little plane should come together fairly quickly - I hope!6 points
-
Radiator flaps will be open, so if you crane your neck you'll be able to see inside. Plus, you can pop a few cervical discs in the process. No work this week as I'm in Delaware for a week at the beach house. Will take my three year old grandson to the Military Airlift Command museum at Dover on Tuesday. Start 'em early I say. Cheers, Bill6 points
-
I'm on a bit of a roll at the moment, yet another gets finished today. Heavy rain at this end means plenty of shed time! This time it's the later version of FROGs P40 Kittyhawk Cleaned up in 1969 as part of a deal with AMT, the engraved panel lines and transfer guides were replaced with fine raised lines and the placement guides got done away with. This enabled more than one decal option and the FROG version got two western desert options. Here's how mine turned out, box stock as usual. Nothing added except paint. I'm new to acrylic paints and it does rather show. I much prefer using old stock paints but I'm not averse to giving the new stuff a go as well. The base is a bit of card with BBQ dust and sand applied over diluted PVA glue. It's cheap as chips and gets the job done for pennies. Tony.6 points
-
Hi all, I’m happy to report the roll out of my latest build, representing McDonnell NF-101A Voodoo 53-2438 which was used in the late fifties and early sixties as a test machine at Eglin AFB, Florida. At the date of the build she was being used to test aerodynamic “shapes” for the Hayes Industries Prometheus supersonic drone programme. As a very early Voodoo – one of the first pre-production batch - she was simpler than the later fighters and thus for me it meant leaving out some aerials, nose cannons, etc. Other than this she is straight out of the box with the exceptions that I note below. Maybe someone out there knows more about her but my year of searching has drawn a blank! Very few photos seem to be available of this aircraft and so my references have been hard to interpret. I have, as a result, had to use a bit of “Modeller’s licence”, particularly when it comes to the layout of the International Red areas on the wings and tailplane. The most widely seen photo is the following: As key feature of this aircraft was, of course, the drone "shape". This appeared to morph over time and so I’ve build a compromise. Examples of this are: So what did I do/use? Well: 1. Kit -Valom F-101A Voodoo 1/72 2. Aftermarket – seat from Aires, Wheels from Aires 3. Decals – Xtradecal national insignia, home drawn and printed serials etc. Xtradecal black and red lining. Mix of Microscale and kit stencils (the white stencils came from a Super scale F-4 set). 4. Paint – Humbrol Polished Aluminium (27002), Model Master International Red (1775DE), Humbrol Steel (27003), Mixes of 27002 and 27003 for the rear end, Humbrol OD Green (155), Humbrol 147 Grey and others. Humbrol Glosscote (decalling and wash) and Satincote (final) 5. Plastruct card and rod for the drone and under-nose pitot So here she is. I hope you like her. Martin My eyes now need a rest....... I'm leaving the International Red and 'Red-Orange on the shelf for a while . Adobe Lightroom doesn't cope well with dayglo either!5 points
-
So thanks to @Richard E who has kindly offered up some decals, the plan is to build a 1/72 airfix mosquito mk vi. I will also be cannibalising an old Tamiya mosquito for its interior detail and better wheels. It was given to me, in a bit of a state, to use for spares by a work colleague. photos etc will go up as soon as I get a moment, but probably after I get back from Malta. Rob5 points
-
Hasegawa's 1/72 scale F-4C/D kit, built SFB as F-4C 63-7618 of 57 FIS out of Keflavik, Iceland at the 1976 William Tell Gunnery Competition held at Tyndall AFB in Florida, USA5 points
-
Hi guys, just finished my F-14B and F/A-18F "Jolly Rogers". The display base is 20cm x 40cm. Flight deck is scratch build with plastic plate. Hobbyboss Tomcat, Hasegawa Super Hornet and Fujimi tractor. I use figures from Reedoak, RBF from Eduard and Tie-down set from Infini-model. 1/72nd scale. Took around 2 months to complete all of them. For sure there're some timeline mistakes between them e.g. tractor and ordnance.'' 1/72 VF-103 F-14B Tomcat "Jolly Rogers" US Navy F-14B Tomcat BuAerNo. 162918/AA100 of VF-103 Jolly Rogers, Operation Iraqi Freedom III, USS John F. Kennedy CV-67 NAG, November 2004. ∙ HobbyBoss #80277 F-14B Tomcat ∙ Dream Model DM0540 for fuselage & cockpit + DM0504 AN/AWG-9 radar etched parts ∙ Hasegawa #35114 Aircraft Weapons: IX pack (JAM and targeting pod) ∙ Infini-model IMP-72001R1 1/72 Tie Down Point & Device Set A (display base) 1/72 VFA-103 F/A-18F Super Hornet “Jolly Rogers” US Navy F/A-18F Super Hornet BuAerNo. 168493/AG200 of VFA-103 Jolly Rogers, USS Abraham Lincoln (CVN 72), CVW-7 2018 - 75th Anniversary scheme, 1943-2018. ∙ Hasegawa #00548 F/A-18F Super Hornet, ∙ Galaxy Model G72018 + Galaxy Model G72004 ∙ DreamModel CDM #72024 ∙ Wolfpack-Design WP72008 F/A-18E/F Flap down wing set That's all for the day, folks. Thank you for dropping by, cheers!5 points
-
Since my paratrooper vignette has reached critical mass I thought I'd start on a scene I've been wanting to build for years. I got this set of Dragon US Rangers a long time ago and have dreamed of building a section of the cliffs at Pointe du Hoc to scale to show how daunting their objective was on D-Day. 100' cliffs means a diorama 37" tall 🤪 Lots of pieces for four figures I painted the heads at the same time I did the Canadian paratrooper heads And started assembling the figures. These will take a while because of all the gaps to fill and equipment to add. I'll make a heavy wooden base and then attach tall pieces of dense foam, carved to look like the cliff. I dug out some foam from the shed and found a muddy footprint on it. 🐿️5 points
-
Are you sure that this shouldn't be a LACK of belief in a universal bond, and that someone misheard the second letter? Ian5 points
-
Wow! That says lots about the constitution of the Baronial psyche. At this point in a build, I would have walked away muttering dammit dammit dammit! and started scouring t'interweb for another kit. Then, in only 3 photo's you bring it back to sublime almost thereness. Astonishing stuff.5 points
-
I just checked "flash" on my second kit, and its there but no where as much as in Paul Budzik's video. It probably on a par with my first kit form memory. As you mention- its easy to fix, but why it's there is a question I think Aunty A needs to address. The fit of the fuel tank cover on my kit was good - nowhere near as awful as in the video. The only filler I used on my model was some mr Surface 1000 brushed into few places where I felt things could be subdues a little i.e around the rocker covers. it's not a bad fit there at all- but it's just a bit obvious. It's puzzling as to why this variation is occurring though ? Airfix need to ensure consistency, and you shouldn't really expect this on a 2019 new tool kit. A modeller encountering a badly moulded or fitting model in the box, when reviews are positive will be left wondering if he was told the truth, rather than questioning his plastic parts. That's bad for reputation, but its also bad for the modellers confidence in his own abilities. It's a shame as I really really liked this model. It built well with just a little cleaning up- as I've said. I'm actually sorry others seem to be having a bad time with it. Cheers Jonners5 points
-
You sound like the Linux Ubuntu naming commitee Cheers, Moggy5 points
-
Update #5 This is the end result after a second Primer session. My priming weapon of choice is Gunze's Mr. Surfacer 1000 thinned with Mr. Color Levelling thinner. The first coat revealed a number of minor imperfections and missed areas, which is hardly surprising after all the cutting and sanding involved. Once these areas were attended too another thinned coat was applied however there is still one minor missed flaw I've now spotted on the starboard upper wing aileron, this should fill up fairly easily. For something different I sprayed just a fine mist layer of straight Levelling thinner over the whole model and this gave it a nice eggshell appearance which I was happy with. I'll next spray a few coats of white primer on the lower surfaces before attacking it with the yellow paint, won't that be fun! Cheers.. Dave (apologies - photo's are a little grainy due to the low level indoor light)5 points
-
A miracle has occured, and its not even Christmas! Amazingly after months of inaction due to a severe lack of correct colours the hull is almost finished!! Couple of touchups and she will be ready for the rest of the build, oh and the anti-fouling paint and boot top. Cheers Warren5 points
-
I've had a crack at fading the paintwork and I think I'm heading in the right direction. As I thought, the application of some fresh Intermediate Blue, scrubbed on with a near dry brush contrasted a bit against the clear darkened finish. Working on the 'If some is good, more must be better' method, I added another even lighter drybrushing in Humbrol Azure Blue. That's got me to here... ... I'll leave it to dry right out and then decide if it needs more. The marks on the fuselage white bar are down to my mistake. I had painted the white areas of the bars with very pale grey, to tone them down a bit. The following dry brushing put too much paint on the white area affected and efforts to clean it up went badly. It can be fixed. There's still the undercarriage and doors to finish, everything is propped in place for the picture, plus the aerials and other pointy bits need finishing. It's getting closer to being done though. Tony.5 points
-
I managed a little more progress, and a lot more styrene dust, last night. I removed the shelves moulded into the fuselage halves designed to take the rudimentary cockpit floors. I'm going to reinstate a ridge later, then build up some side wall detailing before the halves get mated together. The instrument panels and other fittings will be worked out later, once the fuselage spine has been remodelled. The wings sorted their twisting out once the parts were mated. I noticed that the port lower wing section trailing edge was short of the upper part. Checking against the starboard side, which was fine, it seems it was a mould error. I glued some styrene strip along the edge to make up the short section. Careful sanding and filling to follow! While I was at it, I decided there was no reason not to fit the ailerons. They were single piece mouldings, and pretty chunky. Gluing them in while I was sanding all kinds of irregularities meant the wing aerofoil shape, such as it is, can be dealt with as a single entity. In these photos, filler has been applied at strategic points to relieve dimples and odd gaps. More sanding to follow. Test fitting the wing assembly to the currently taped-together fuselage shows a very neat fit. Barely any filler will be required along the wing roots, and little sanding - if any - either. Such a good fit for a nigh-on 60-year-old mould that's been through several owners is pretty good going, I think.5 points
-
I found this website via a thread on pprune. If you click on each unit badge there's some great photos! Not seen many of them before, could be useful reference pics when people are making Lightning kits ... http://www.lightningpilots.com/5 points
-
it is the old Mono/Revell lit with the raised panel lines. it is finished in French air force markings of the Franco-Algerian conflict. it was a nce kit to build but the instructions dating from 81 are a bit confusing plus even the rockets are put on wrong on the picture on the instruction booklet. as usual the NMF was done with the aldi spray can and the decals are from the kit. thanks for looking5 points
-
I've looked through Air Britain's The Anson File to find the Anson stationed at Takoradi in 1946. I found that the 10 Anson C. 12s, serialed PH673-679 and 691 were used by the West Africa Communications Squadron from August 1946 to November 1947. It is most probable that your great uncle's Anson was one of them. I could find only one C.12 photo of PH serial range. Hope this will be of some help. Jun in Tokyo https://www.flickr.com/photos/horaburo/albums5 points
-
Interior complete and installed. A little bare and no seats. Therefore, I will be adding these two eager Sub Lieutenants to fill the void. Fuselage closed up and the fit isn't half bad. No gaps and a little seam for cleaning up. The uppe rear deck needed a little tape to keep it together.5 points
-
Hi Folk's,well got a hour at the bench over this afternoon sprayed my take on the underside blue which dried nicely. Now I know it's a bit rough but trust me after the earth and dark green get a second coat it will look better,once done I'll re-visit the blue and tidy up the demarcation lines.Photos show the fuel tanks in dark green over blue with a wavy demarcation between the two,remember also the large area of rear fuselage that needs painting various shades of metal.All in all a good couple of day's catch up to the Maryland which I'll get on with this week.5 points
-
Well, Heather's only finished one and Tony has only managed a rather meagre two, so I guess it's still quite early in the GB! Here's a Novo re-pop of Percival Proctor F341, build thread here: Thanks for looking, Adrian5 points


.thumb.JPG.2ce06c4ff2300a5faba93aaeacbdab25.JPG)


.thumb.jpeg.512869d47e412449d69d30d0295c1ae8.jpeg)


.thumb.jpg.942668eda22ef4e1cceffe7cdb75061d.jpg)


This leaderboard is set to London/GMT+01:00