
Leaderboard


Popular Content
Showing content with the highest reputation on 05/05/19 in all areas
-
This is my attempt at the old Airfix kit of the Scottish Aviation Bulldog, flying in RAF training colours of the mid 70s. With Mrs C frowning on additional shelf space being made available, kits of the size of the little Bulldog become more attractive - wonder what she will make of my plans to do an RAF Neptune???!!! bulldoga bulldogd The kit is pretty basic but still quite crisply moulded. Mine was an older boxing with a Swedish Air Force trainer on the front. The critical advice is to get enough noseweight into this thing. I stuffed the nose with stell shot but there is very little space to cram much in and it was still determined to tail sit. In the end I hollowed out the back of the spinner and stuffed some Tungsten putty in there which just brought the CoG forward enough. bulldoge bulldogc The nose gear is very spindly and was snapped off early in the build and then vanished into thin air. In the end I fabricated a rather crude replacement from bits of white metal and thin metal tubing but it is just about passable. Decals came from an old Modeldecal set and represent an aircraft from the London University Air Squadron. Paint was Humbrol 208 for the red with Gunze white and Xtracrylic Light Aircraft Grey. I wondered about the instructions to paint the front tips of the blades red/white/red as most Bulldogs appear to have black/white striped blades - however Modeldecal were indeed correct that at the time this aircraft was portrayed (1976) it did have the red/white/red tips. If only you could rely on all decal instructions! Hope you like!! Pat bulldogb bulldogf28 points
-
Hi! This is my Messerschmitt Bf.109E-4 from Tamiya, build OOB with etched seatbelts (Eduard) Bf 109E-4 'Black Chevron and Triangle' flown by Hauptmann Hans von Hahn, Gruppenkommandeur l./JG 3, August 1940 Cheers, Slavi24 points
-
Hi everyone, As i posted a few months ago i lost the end of my thumbs and a couple of fingers and have had to put modelling on the back burner for the moment although i am nearly ready to have a go again.I have however had the chance to move my display cabinets.I thought while i had all my builds out i would take the opportunity to take some photo's of them together which i thought i would share with you.Everything you see is 1/48 and all are brush painted and have been posted here individually at some point.22 points
-
Just finished the Azur Koolhoven FK58 C1, my next for Polish Air Force in France 1940.21 points
-
Hi everybody, here's my second completed model for the year. It's the excellent Tamiya 1/48 HIEN, here represented in the colours of the aircraft flown by Regimental Commander Teruhiko Kobayashi. This kind of aircraft was mainly employed to defend homeland Japan from bombing raids during the last phases of WWII, hence the topic title. The build took me a little over than 3 months, just like my last build, coincidentally a Tamiya kit as well - pretty quick, for my standard Here are some details about the build: KIT: TAMIYA 1:48 KAWASAKI Ki-61-Id HIEN (TONY) AIRFRAME: KAWASAKI Ki-61-Id 24 of 244th Sentai, Imperial Japanese Air Force MARKINGS: Hinomarus and blue stripes airbrushed using self made masks; kit decals for all the rest. PAINTS: Tamiya gloss alu and light blue, decanted from rattle cans; Tamiya JA Green for the mottling; Italeri Insignia Red for the tail and Hinomarus, Tamiya Flat Yellow and Red for the wing leading edge bands, Tamiya Flat Brown and Red for the propeller assembly, Lifecolor Giallo Mimetico for the interiors, plus other assorted paints for the interior details. WEATHERING: tempera washes, black for the movable surfaces and hatches, dark grey for the remaining panel lines. Some oil filtering on the red areas and the spinner/propeller AFTERMARKETS: Quickboost resin cannon and machine gun barrels, Quickboost exhausts SCRATCHBUILDING: Seat belts, with wine bottle foil; gunsight reflectors, from clear acetate The kit is up to the excellent Tamiya standards, beautifully engineered and requiring just a bit of filler here and there, and only along the fuselage halves seam. The level of detail doesn't make you feel the need for AM, even in the cockpit area, IMHO - I indulged in the Quickboost resin gun barrels and exhausts set because they are such a prominent feature on this model, and the kit rendition (especially for the nose cannons) isn't on par with the rest of the kit. Here's the WIP thread, in case you are interested in: My thanks to everybody who followed along, supplying help, tips, insights, praises, etc: as usual, you are a wonderful lot! A special thank you to my friend @Gene K for talking me into building this kit and providing a lot of reference material Let's see some pics (beware: a lot of them! )- with one final note: at the very end of the build I had a relevant mishap, enough to compromise the end result (all my fault, BTW). Those who have followed the build already know, for the other viewers I will not mention it, let's see how bad it looks to you. Hint: more visible in the detail pics. All comments welcome Ciao19 points
-
Hi all, I introduced myself in the New Members section and this is my maiden build on the site. I’d like to share my recent build- Hasegawa’s 1/32 Bf109 G2. This photo recon fighter was from 2.(H)/14, La Marsa, Tunisia, March 1943. I'm new at this hobby so everything was out of box except the decals which are from Kagero. Thanks for letting me share this.17 points
-
When I was making inroads into my stash I had a few large helicopter models to make so I made the thread 'over there' about it This included the Italeri Merlin HM1 and the Airfix CH-53 and I have taken the opportunity to pop out some other helicopters during the build Anyway I cannot remember ever putting an RFI for the CH-53 which I finished as a US Marines 'copter of HMH-262 The Ugly Angels in the Middle East This machine used engine jet pipe blanks with images of the delightful Betty Boop which gave me much amusement replicating inside a tiny-ish hole I scratch built the countermeasures gear and every one of the airframe markings was home printed Finished in a mix of Tamiya Acrylics here she be: Cold light of day images, very chilly for a May morning... But 'nuff of pollytics And on The large fuel tanks were aftermarket because the Airfix kit ones were for skinnier early tanks Betty is visible on the jet pipe blanks here Rotor blade marks were no fun at all but add nicely to the overall look Not great pictures but typical of my poor 'tography abilities sorry I hope you like this Thanks for looking13 points
-
ok no messing around, I’m totally stuffed so here’s a photo of where she’s at…. A bit patchy but the main painting bit is over thank god!!!! What a couple of days………rewind to first thing yesterday, all bright eye’d and bushy tailed already to paint. One final rub down and she’s all ready, got all the essentials already My usual effort of squiggly lines all over the shot, time to mask, decided to fit all the masks so I could paint from light to dark. I have to admit at this stage I was unusually nervous and even had a bit of the shakes….this was make or break time. Ok this is 4 hours later…… I have never felt true despair as I did about a ¼ the through doing the masks……was a truly horrible feeling!! I just didn’t know what to do… so I just pressed on.. …the reason the masks didn’t fit or line up!!! I have a feeling they were designed for the Esci/Airfix model as key lining up points just didn’t! There’s no guide on how you should place them or even where to start, I started on one wing, but to be honest no matter where you’d start they still wouldn’t line up. I though the masks were bad on the Splinter MiG, but these are at another level again. Once they were all on (in the end I just stuck them on anywhere!) time to pint the underside Swedish Army Blue-Grey. As mentioned previously I would be using Mr. Paint Lacquers for the paint, they have a range of colours just for the Swedish Air Force. This paint is the only reason I even attempted this scheme! Ok I skipped some layers as I had new dramas….the primer was lifting when the masks where removed!! I had spent ages ensuring everything was ready for painting, lastly everything was wiped down with enamel thinners to help remove any last oils or greases as I always do but for some reason the primer started to lift in odd spots. It was too late now to scrap all the masks and start again, so I just pressed on. So Swedish Army Mid Green & Tan were the two earlier colours used. The Swedish Army Dark Green had just been shot, you can see a couple of sport where the paint/primer has lifted… Right ready for the final colour Swedish Army Black…again after 4 hours of masking!!! Finally time to remove the masks and see how it looked. Ok there are a few patches I need to redo, as the masks weren’t right and the pattern was a bit off. So I’ll re-mask these areas up and fix these up, plus a couple of the lines are off and a wee bit of overspray as well. But considering the amount of masking involved (and time easily 8-10 hours!!!) I’m happy with the results. Most of the patches where the primer/paint lifted off have been covered with the next colour and you’d be hard pressed to find them. Because this paint is so fine/thin the layers just don’t show so these spots have almost disappeared, plus with the final coat of Mr. Paint Flat Clear any remaining issues with paint layers will just disappear, this stuff is magic! Once I’ve finished the touch-ups I’ll do the Flat Black radome fin tip/leading edge then give her a coat of clear. But I’m going to have a break from her for a bit….I’m totally shattered…..13 points
-
Here's my just finished 1/48 Hasegawa A-4N finished as N432FS, used by BAE Systems Flight Systems on a target towing contract for the Luftwaffe. Build thread is here. The kit is the A-4KU boxing, the extended tailpipe is from Quickboost, and I also used a Quickboost seat and an Eduard zoom set in the cockpit. Decals are from Two Bobs. Nobody seems to produce the RM30 target towing equipment so I scratch built mine. I found some of the manufacturer's promotional material online, which helpfully included a scale drawing, although I had to estimate the dimensions of the target. The body of the RM30 started life as a drop tank from an Eduard 1/48 MiG-21, and the front end is part of a JT3D engine from a Minicraft 1/144 DC-8. The target started out as one of the missiles in the Eduard MiG-21 and the side pylon was one of the MiG-21's pylons. Never tried scratch building like this before, really enjoyed it - I'll be doing it again. thanks for looking Julian12 points
-
Afternoon folk's. Built for the excellent 50's NATO/WARPAC GB is Trumpeter's Seahawk, the W German Navy operated them into the 60's replacing them with the F-104Starfighter.Nice kit this one, easy build and no vice's I ordered the RN version as I'm building Cyberhobbies Sea Venom as well, the wrong boxing turned up and I'm pleased it did as the German version isn't seen too much,many thank's for looking in.12 points
-
This small early French airliner is now completed, it was among the firsts to provide restroom facilities for its passengers. It serviced a line that went from France to North Africa stopping on the way in Spain. It shows that undeniable charm of these pioneers, a bit ungainly but well-proportioned, that make them so attractive. Typical of many designs of the time, the cockpit (and pilot) are located in the aft fuselage exposed to the elements, while passengers traveled in relative comfort in an enclosed and fairly well-appointed cabin. It provided service for a time, but did not reach the popularity or production of other later Latécoère designs that will make themselves and their pilots famous, most notably in South America. Nevertheless, and considering that this was 1921, it its no doubt among the harbingers of the typical small airliner designs that would follow. The WiP can be visited here:11 points
-
This is the last member of ‘FAC trilogy’ composed of previous O-1E and O-2A shown here in the past. It’s the most unusual and less known of three, the ‘pre production’ Lockheed YO-3A Quiet Star. YO-3A was a two-seat nearly silent observation and reconnaissance aircraft designed by the Lockheed Missile and Space Division for use by the US Army at night over South Vietnam during the Vietnam War. Its purpose was to detect enemy activity and direct artillery fire and helicopter gunship strikes upon them. The Observer sat in the front of the cockpit and the aircraft was fitted with a downward looking Night Vision Aerial Periscope (NVAP), infra-red illuminator and a laser target designator to complete its night mission. Unarmed, silence was the only protection it carried into conflict. The bubble canopy was large to enable all round observation capability and it is hard not to notice those long, thin wings (17.3 metre wingspan) which show its glider heritage. To keep the aircraft super quiet it was fitted with a special muffled 210-horsepower Continental Model IO-360D engine that powered a slow propeller to eliminate the typical sound generated by a spinning aircraft propeller (originally it was fitted with a six bladed variable pitch propeller but in 1971 this was changed to a 3 bladed laminated constant speed wooden propeller that was just as quiet but also more efficient at higher speeds). Only eleven were built in 1969 and nine of those were operated from the summer of 1970 to 1972 in South Vietnam. In an attest to the silent design of the aircraft, none were ever shot down or even hit by enemy fire during its time of operation in the conflict and it was proven to be very successful in its role. The hard-to-find second hand kit by Legato in 1:48 was found in Slovakia last Spring. It’s a full resin kit with vacuum canopy and an useful photo etched sheet. It’s a medium quality kit (dated 2005) with poor interior details, I suppose due to lack of images at time… Camo color indications are of pure fantasy as well. Interiors are from scratch, except a revisited floor. WiP pictures taken during these ten months of working were too many to show all you here, so that I decided to get a (large) selection. Model, pilot, extinguisher and plates are painted by Testors/Humbrol enamels. The real 69-18007 is now stored at Western Museum of Flight (California), waiting for restoration. Thanks to Museum’s press office and Quiet Aircraft Association for essential help. Work started June 2018, ended early March 2019. Man hours worked h.378. Cheers, Alessandro Rome YO-3A 69-18007 at Phu Bai (Vietnam), 1970 (photo credit http://www.yo-3a.com/ ) Cockpit, port side Dry fitting - starboard side **********************************************************************************************************************************+11 points
-
Well I did my best with this old kit, and despite my somewhat limited ability and the age of the plastic it hasn't turned out as bad as it could have done. Thanks to @At Sea for the 11 Sqn decals, superb! It fought me all the way this, ill-fitting parts, mismatched fuselage halves and big gaps around the tailfin root to name a few. Oh and terrible fitting intakes. To top it off I ruined the canopy with thinners when trying to clean off paint, so I'm waiting for Airfix's spares team to send me a replacement, hence I didn't bother adding the ejection warning triangles on this canopy. I made my own little forward fuselage aerials and a gun muzzle from bits of wire, and added that tiny aerial on the scoop in front of the fin, other than that she's oob.11 points
-
11 points
-
Hello, Over the last couple of years, I have been building the Airfix airfield vehicles plus some from a couple of other manufacturers, I felt the vehicles needed figures to compliment the airfield scene so I rummaged through my garage and found the old biscuit box packed with bags and bags of old Airfix soft plastic figures! Dug out the Airfix RAF WWII Personnel and chose some suitable lads and lasses to paint. Someone told me that dipping them in Future helped protect against the paint peeling off too easily, due to the nature of the soft plastic they are made from. This seems to work quite well, so far! I also sprayed them with Tamiya primer and that helped the paint adhere to the figures. The sculpturing of these figures is just superb the level of detail is just perfect, mind you they are time-consuming to paint and leaning over the desk to paint them for long periods means a trip to the chiropractor after a while. I used enamel paints, all Humbrol colours. I also assembled and painted the trolley actuator... again soft plastic, I used a mixture of super glue, PVA and liquid putty to bond the pieces together... it is a very wobbly set and that handle is easily flexed and voila there goes the paint!!10 points
-
Hi, here my new GWH F-15C. Nice kit with many details. Add some Eduard PE´s, Brassin AIM-120 und Aires nozzle. Colors are by HATAKA.10 points
-
A RFM kit, good details, bad plastic material, workable track lins is a big plus. Thank you for watching Please visit mu facebook page for more details: https://www.facebook.com/liu.andy.3701?ref=bookmarks9 points
-
Gidday All, this is a model I did last December, finishing very early in January this year. It is a ficticious vessel, a whiffed model converted from an Airfix 'HMS Manxman' kit in 1/600 scale. These ships were very fast mine-layers that doubled up as blockade runners to Malta and Tobruk. This ship was bombed by Stuka dive bombers and suffered heavy damage to the forward boiler room. She survived and was converted to a convoy AA escort vessel with considerably increased AA capability. She also acted as a rescue ship for the crews of sunken ships, hence her generous supply of rafts, either requisitioned from the dockyard or pilfered by some of the more piratical members of the crew. I did quite a lot of alterations to the model. I added another twin 4-inch mounting and HA (high angle) director plus replaced the original director above the bridge, scratch built radar for the directors, enhanced the bridge and masts, removed number one funnel and replaced number two, scratch built twin Bofor 40mm and single Oerlikon 20mm guns and their gun-pits, depth-charge racks and other assorted changes and additions. Ladies and Gentlemen, HMS Antiope, 1943 As a whiff I was able to let my imagination run a bit, but I think she is still reasonably authentic. Plus I enjoyed building her. Regards, Jeff.9 points
-
Hello I would like show to You the first maritime kit i have made after a few years of building aircraft kits. I have chosen USS Mobile Bay, a Ticonderoga class guided missile cruiser because I love the mighty silhouette of these ships! The Fujimi kit is very accurate and includes some PE parts. I used Master 127mm gun barrels and scratch build the main mast. The water effect is made with help of AK Interactive water gel. I tried to show the ship in a tide turn, I hope that You will like it8 points
-
Inspired by my trip to the Yeovilton Air Day in 2018 this is my latest attempt the 1/72 Sova M Dassault Falcon 50 Surmar, typical short run kit lots of filling, the interior is bare except for the cockpit so I scratchbuilt the area around the observers positions to fill the area around the observation windows, the rest of the windows were blanked off as these aircraft seem to fly with blinds drawn down alot of the time. The surface detail is very nice and the decals are very thin which means the walkway lines on the wings are best cut to shorter lengths to prevent them folding over on themselves. Dassault Falcon 50 Surmar 1/72 by Phillip Wilmshurst, on Flickr Dassault Falcon 50 Surmar 1/72 by Phillip Wilmshurst, on Flickr Dassault Falcon 50 Surmar 1/72 by Phillip Wilmshurst, on Flickr Dassault Falcon 50 Surmar 1/72 by Phillip Wilmshurst, on Flickr Dassault Falcon 50 Surmar 1/72 by Phillip Wilmshurst, on Flickr Enjoy, Willy8 points
-
I used to build a lot of WWI planes, some of them were vacforms . Time to have a go at one, no rigging on this one. Decals Three sprues of flashy parts, and there is some very little parts. Have assembled the engine and cockpit ready for paint tomorrow. Thanks for stopping by. Stephen7 points
-
Morning folk's,second build for the Dakota GB is this Italian schemed version from the 1960's,two thing's I usually avoid are white or silver scheme's! Anyway Halford's white and Humbrol silver from rattle can's were used and turned out OK the kit is getting on a bit now but still build's well the only issue I had was the decal's as the white hasn't a lot of density,as I had two set's I was able to "double up" which helped a lot.Many thank's for looking in.7 points
-
Hello After months of hibernation, my cameras have woken from their extended slumber! I enjoyed a Threshold Aero evening and night shoot last night and went to the Shuttleworth Season Premiere Air Show at Old Warden today. Here are a few of my favourites from Abingdon: Thanks for looking.7 points
-
Hi! I present a model of an unusual machine - Flakhetzer, 1/72 Attack Hobby Kits with PE set from NHDetail and Aber gun barrel.7 points
-
I got in through a tunnel. Don't tell the others.7 points
-
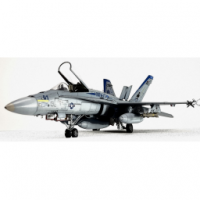
Here is my Prowler & Growler both in glorious 1/144 scale. Wing fold kit for the Prowler is from RetroWings, a great little kit. Brush painted in Humbrol enamels, weathered with Tamiya weathering sets and Mig panel line wash. Thanks to @nimrod54 for letting me have the Prowler kit.7 points
-
Hello all, this is my first post in this section and also it is my first ever built and finished kit in 1:35. I started this kit about 3,5 years ago and continued building it in February. The Trumpeter kit is nice and goes together well. It is built out of the box, no aftermarket parts were used. For the green colour I used A.MIG 932 Russian Base, the light blue is Gunze RLM 76, the outlines and the chassis were coloured in flat black. For the weathering I used dry brushing, black and brown washes, artist pencils and pigments. I completed it yesterday and thought that I show the result here. 😡 After I took the pics I saw that I lost one small part on the front bumper and the other one is not painted properly...oh well...🤬 Anyway - here she is. Thanks for looking! Critiques and suggestiones are welcome! Have a nice day! Nick6 points
-
This is Accurate Armour's CVR (T) Samaritan. The figures are AA too. There are no decals in the kit and my masking skills are not that good so I sourced some red crosses that were about the right size from elsewhere. I had a tough time with the tracks; the ones supplied come in short strips and have to be heated to bend around the sprockets which I didn't fancy, so I bought a set from AFV which didn't fit without a lot of cutting and fettling and don't really ride right to me eye. Anyhow, on with the pics:6 points
-
Hi, My latest model is the very nice kit from Airfix which is quite enjoyable to build. There are some panel lines that need to be filled in and a few things to be fixed here and there, but nothing major. This is a the aircraft of David Lee "Tex" HILL of the AVG for which the decals were sourced from a vintage Aeromaster sheet. Exhaust pipes are from QB. Pitot, gunsight and barrels from Master. Now that it is done, I must confess that I find the wheels ugly and that they would benefit from being replaced. All comments are appreciated. Thanks for looking Antoine6 points
-
must have been a helluva party judging by the wreckage6 points
-
Valom 1/72 North American RB-45C Tornado, from Op Jiu Jitsu 2,6 points
-
Aw man, if I had a dollar for every giant match comment! Okay, my little jam fancies. Here we go again... So, earlier in the week I made this cute little Boulton Paul 4-blade propeller out of styrene strip and painted it with oils. Then I put it in a box and tried not to even think about touching it for a few days. After an expectant (impatient) wait, I was able to get a coat of clear gloss on the propeller this morning. I let it dry for a bit then gave it a light sand with some ultra fine emery paper to remove the slight hairiness of the oils. The gloss was a bit overscale, so it got a second coat of Mr Color 182 Flat Clear which is always more of a satin when applied thinly. The hub is a disk of silver painted decal, with a sliver of sprue in the centre and dabs of artist oils for the bolt heads. I bought some Mr Metal Color 219 Brass to do the metal sheaths on the prop tips, but I'm uncertain now if the aircraft I'm trying to represent had them. I'll leave it for now and see if any other info turns up. I also did some more work on the nacelle, picking out some of the fasteners by dipping the end of an appropriately-sized piece of sprue into some oil paint and touching it to the model. Also adding filler caps and whatnot. The little arched plate below the pilot's cockpit was also made from a disk of painted decal. I suspect the plate formed part of a mount for a swivel gun for the pilot, as there was a small wedge shaped bracket that stuck out at the bottom of it. I tried to add this several times but couldn't apply a small enough quantity of glue that didn't dry out before I positioned the wedge. In the end I managed it though, using some UV-setting glue which I bought a while back from a craft store for around $3. I found I could apply a minute amount and have an unlimited amount of time to position the piece under a desk lamp before wandering outside to give it a couple of seconds of direct sunlight. It worked a treat. Still need to paint the styrene bit, but here is a shot of the parts as they stand today.6 points
-
More 'slowly-but-surely' bits 'n bobs done. Here's what the interior currently looks like: The scratchbuilt instrument panel isn't playing ball, as I managed to get clear varnish where I didn't want it. The heel supports for the pilot's feet are too high - I haven't put pedals in yet and they wouldn't be visible anyway - but it isn't obvious through the cockpit opening. The silver frame structure needs touching up after I added a second coat of light grey to the walls, but that won't take long, and the gunner's instrument panel needs a bit of work. I'm sure that there is plenty more detail that I could add, but life's too short! Closed up, the fuselage looks like this: The white plastic tube below the cockpit is intended to receive a metal rod that I will try to mount in each lower wing leading edge to help with strength and alignment, and will be cut and sanded flush once the fuselage halves are joined. The rear gun mounting stubs will have to be re-done, as one is quite out of alignment. Not a major issue. Meanwhile, I've been using my shiny new cabinet scraper to help with those wing trailing edges. The lower wing has been glued and clamped in an effort to prevent any warping: It is in one piece with no dihedral. The Vildebeest lower wing wasn't a single-piece unit as each wing was joined separately to the fuselage, as far as I can tell, as there was a short level inboard section before the dihedral started a couple of feet out from the fuselage. Reproducing this will obviously necessitate some cutting, but I'll get a decent one-piece wing first before I start hacking if up. The moulded ribs are pretty rubbish: wobbly, ovescale, different heights and thicknesses and they go out of alignment between top and bottom surfaces. I'll probably have to sand them off and re-do them in a more restrained manner; again, a solid one-piece wing will be the best starting point for this. Philosophical question: why am I spending precious time fettling little bits of plastic to create something that will be seen by hardly anyone, and be of very little interest to most of the few that will see it? Hmmm... Jon6 points
-
Just finished this 1/72 Italeri jaguar GR3 for my grandson. Depicted as the final flight from Coningsby in 1990 (although Sgt Vernon's name on the side comes from the final taxi at Cosford I believe?), The kit is very straightforward but the decals are a bit 'challenging' so buckets of microsol were required! Pilot figure is an awful Sword (I think?) figure from the spares box, but all I had at short notice unfortunately.6 points
-
That's a faith I'll always endeavour to justify Bill. Absolutely. With chasers. 🍹 No problem ma'am. PM me an address and I'll get it on the delivery drone later in the week. I've not seen them drop below £95 unfortunately but it can't hurt to lurk in the Amazon basin to see what drifts by... Most kind Rob. I seem to remember that you're no slouch in that area yourself! I concur Keith. Sorry to hear your not producing models at the moment - I really enjoyed that selection of your work you posted a few months back! Exactly! I nearly jumped out of my skin when I first turned it on! I'm unable to tell you Pete since they made me sign the Orifice Secrets Act. Worth the effort Terry in the matter of increasing your ability to adapt kits to your needs . That's it Chris - the perfect name! Ye Waffle Darlick it is! They certainly are. She's a single parent so we had to rally round... A vertical slice down the side of the central door opening lets you prise it off the buck Steve. If you're going to pose it with the door semi- or fully-open you'd cut it anyway; if wit hthe door shut, you can glue it and any seam will be coevered by the runner for the door. Glad you've been enjoying the pickup in pace of the last couple of days. Must say it's pleasing to be able to spend some concentrated time getting the snag list reduced, one item on which was to finesse the rather 'indicative' mount for the kit tail wheel: The actual part is similar to the the rather horseshoe-like sets of arms that grip the axle of the main undercarriage so here I used a similar method starting with 1.2mm brass rod. The pointy-tip tip of the anvil ( Imust find out what the various parts of it are called) was too large to use as a shaping tool but I did find a use for the extravagant collection of broken drill bits I've amassed, to form a mini-anvil: This was then filed and sanded to give the correct profile in three-dimensions of the original. The kit wheel was fine so I cut off and ground out the plastic moulding, adding a 1.5mm disc on either side for the hubs: An upright was then soldered on using 0.8mm tubing: Closer examination of photos and drawing revealed that the steering and shock-absorbing mechanism for the wheel sticks out a little from the underside of the fusealge. Luckily there is a smart little part in the etch that I assumed (having chucked the instructions) to be intended for this purpose, so it was duly soldered into place: Only a fraction of it will be showing of course, but Britmodeller.... After an afternoon nap I got the wind up for a second blast on the turret with some adhesive foil. This turned out to be one of those slightly unnerving jobs that forced you too look very closely at photos taken from a variety of angles because: There are some variations in the A.W.38 framing between that seen on the Anson Mk.1, and the same turret in use on early Whitleys and RAF launches. What appears to be a straightforward set of opposing verticals suddenly looks more complex when viewed from inside and out, leaving plenty of room for error. This took a lot of concentration and an ad hoc jig to let me rotate the turret in order to continually check angles and symmetries: Eventually leading to this: The strips of foil are about 0.5mm wide. The top circle was done in the Silhouette cutter but everything else was hand cut due to the thin lengths of foil tending to clog the blade of the cutter. (@stevehnz - you should be able to see that cut I was rtalking about to release the mould from the buck.) Next task then is to cut out the central door and start building the runners and framing for that. Tired now after those two sessions but pleased to have moved ahead with some substantive progress building stuff again. Have a good evening all of you! Tony6 points
-
Afternoon Folk's,Trumpeter's Seahawk in1/72 scale.I ordered the RN version to go with the Venom but the boxing was for an Indian Navy and German Navy optionand I'm glad now it did as we don't see this scheme too often.6 points
-
Well, it seemed rude not to6 points
-
G-ASLW served with the RAF as WS829 before being sold to Rolls-Royce in September 1963 for use as a photographic chase plane. It was sold in July 1969 and after it was attempted to illegally export the aircraft to the Biafran Air Force ran short of fuel and ditched in the sea off the Cape Verde Islands. This is the old Matchbox Meteor NF14 with home made decals. Thanks for looking. Steve5 points
-
F-15C MSIP II Academy 1/72 My first f-15 build. First time using etched parts (Eduard zoom set for interior). Small corrections. Vallejo acrylics. \5 points
-
Hi just finished these 28mm plastic Prussian Line Infantry Perry Miniatures,with some Warlord metal Prussian High Command,and the Mule with the pack on, is from Wizkids D/D deep cut range,must say they are realy fine figures,it comes with 2 mules in the pack and primed(,it is resin)The figure helping the wounded figure were both scratch built from spares ,I also have a pic of the 95th Rifles a metal set from Warlord I finished just before starting these,Enjoy, Cheers Jim.5 points
-
Hi folks, this is another quick addition to my IAF collection, the old 'n' good Hasegawa kit built OOB except CMK resin wheels and an ordnance taken from my spares box. The decals for 105.sq. machine from Operation 'Kadesh' comes from DP Casper sheet. Cheers Libor5 points
-
Built a few years ago my Hurricane IIB with Airfix figures, ICM Motorcycle and cottage Resin Anti Aircraft gun revetment. n5 points
-
I'm still finding ladies high heels under the carpets in the kitchen Which was weird You know why..5 points
-
Wing finally painted, still have to do some corrections on the leading edge tho5 points
-
You think I've got patience... you should meet my wife!5 points
-
Well I’m rocketing along with the HMAS Vendetta building and I did a few amount of work today. I’ve been scavenging though the two L Class sets for ladders and place them on the ship, the two aft wings for the twin 40mm Bofor Guns fitted along with the associated PE, and I even started on the masts and as you can see the aft mast is done but fw’d mast is causing a few headaches atm so it will be a tomorrow job along with main radar. Just one question, what colour would you normally paint the bridge windows, a Matt Black or Blue or some other funky colour?5 points
-
I was keen on receiving Eduard's new 1/72 MiG-21MF last year and got one as early as I could. 6 weeks and 50000 (not really, but you get the point) decals later, I was done with what I think is the best kit I have ever made.. Its beautifully engineered and has details that would blow your mind, but does make you work hard to achieve the fidelity it deserves. As profiled here before, the Profi-pack boxing comes with a variety of schemes, but I chose to build a MiG that was a true war-horse in the Middle East. Painted in the Znamya Truda camouflage in which several Arab Type-96s were delivered from the Soviet Union, it represents an aircraft of the Syrian Arab Air Force in the days leading up to the Lebanon War when they were outclassed and outgunned by the Israeli Air Force. Not deterred by the daunting challenges, Syrian pilots took the war to the Israelis and made the best use of their versatile and agile MiG-21. SyAAF is a shadow of its former self these days, but continues to be one of the most secretive air arms in the world. Their pilots and their MiG-21s continue to defend the homeland, but the enemy is very very different. If you are a MiG-21 aficionado, look no further than this kit. Parked alongside my old Kopro MF. Incredible how far we have come with MiG-21 kits. [5 points
-
I am getting interested in some of the later colour schemes for the N time for rethinks mayhap Anyway, slowly slowly makee seatee I'm uncertain whether to run with the galley?/bog? up front or whip it out? Out it means I have to find more seats though, a decided incentive to leave it in Some faggling about in the nose gives me a slightly more representative Sea king window layout The instrument panel is slightly Modeldecals-ish so I have made it fit Blurry picture, sorry it's my camera work not your eyes ciao5 points
-
Brutal Steve? Mois? Mais non, zee leetle laydy says she likes the lightening of her burden But since I actcherlley agree to an extent I have been fettling And a whittling And a fingerburningly few recent sessions has given her the much lighter load to carry This looks as if it will do when given a slight wipe with damp PPP in her crevices eek There back in the little recurved section where I may have been overenthusiastic with the Number two SM blade Now I can make the interior and finish Martianing the cabin windows...5 points
-
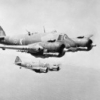
Airfix Blohm & Voss Bv 1415 points


.thumb.jpg.942668eda22ef4e1cceffe7cdb75061d.jpg)


This leaderboard is set to London/GMT+01:00