
Leaderboard


Popular Content
Showing content with the highest reputation on 01/05/19 in all areas
-
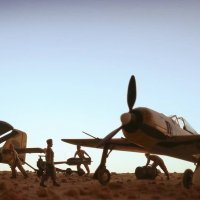
Friends, This is the Hasegawa B-26C Marauder. Notable features of this kit are as follows............. 1. Added Scale Aircraft Conversions metal cockpit, nose gear well, and landing gears ( A must for this kit ). Plumbers putty also added around tight spots from the bomb bay forward. 2. Super Scale decals B-26B / C Marauder ( Sheet # 72-717 ) “Miss Manchester” 441st BS, 320 BG / 12th Air Force Italy, 1944 3. EZ-Line radio antenna 4. Eduard canopy / clear parts mask ( another must for this kit ) 5. Weathered : paints, pastels, & washes. Panel lines & movable control surfaces highlighted with pencils. Chipping done with silver paint. As was the case, I discovered AFTER I completed the kit, that the bomb bay should have been silver / unpainted metal instead of the yellow-green primer that I used. The kit does require some prior experience but nothing is far too complicated. Like most WWII bomber kits, a higher degree of patience is required. I hope you like it. Again, my apologies for the picture quality as my photography skills as they are rudimentary at best. Thank you in advance!!!!!!!!!! Respectfully submitted, Mike29 points
-
Zvezda kit built in the latter part of 2018. This was a practice build (and my first serious attempt at freehand camo work) before I tackled the Eduard kit. A mostly OOB affair, with the Master Models pitot tube as the only aftermarket addition. As always, thanks for looking 🙂28 points
-
Hi All, This is a fairly recent completion - FREMS' 1/48 MB.339. I believe this is the only kit FREMS ever issued. It's very well done, with great details, lots of marking choices, and even turned brass gun barrels. I've completed it as A-115 as flown by Teniente de Navio Owen Crippa. On the morning of 21st May 1982 Argentinian troops around San Carlos Water reported they we watching British ships coming in to the Sound. It was decided to launch an armed recon mission and two MB.339s were briefed to take off from Port Stanley airfield. The aircraft of Crippa's wingman went unservicable so he took off alone. Along his route Crippa encountered HMS Argonaut and gainst heavy AA fire pressed home an attack with rockets and 30mm guns., damaging the ship and wounding several crew. Crippa had remain at low level to evade small arms, AA and SAM fire, but managing to take in enough detail to provide a detailed report, used as the basis for the ensuing FAA attacks. Teniente Crippa was awarded the Medalla al Heroico Valor en Combate. I've replaced the seats, added the Eduard cockpit details, and some of their PE to the exterior. Thanks for looking in, Gareth24 points
-
Hi This is my build of the Mirage F-1C with the Tiger Meet scheme It is the Special Hobby kit. A pleasant kit with no major problem Some other photos at this adress Mirage F-1C "Tiger Meet"22 points
-
Comments Welcome IMG_E1896 by Robert Pederson, on Flickr IMG_E1895 by Robert Pederson, on Flickr IMG_E1897 by Robert Pederson, on Flickr20 points
-
Hi Folks, continuing with my theme of Midhurst (RNAS Cowdray Park) aircraft, I have just finished this Albacore BF612 which was at Midhurst for a time in 1943. It is the Trumpeter 1/48 kit with some Montex Masks and Eduard etch. It is actually one of the schemes included in the kit so the decals for the serial came in handy. The build was easy enough but Trumpeter have really neglected to do this one justice and so there are a fair few additions I have added in. Massive thanks to @tonyot who went for this aircraft a few months back and has a wip on it: https://www.britmodeller.com/forums/index.php?/topic/235046930-148th-trumpeter-fairey-albacore/ So this one then has some of the rear cockpit taken out and Eduards etch added in as well as some plastic card decking, Vickers gun from a Beaufighter and some magazines, table made from plastic card with a wooden decal and some other pieces. The annoying thing is that Trumpeter have put the floor too high so you wouldn't be able to open the door inwards as it is supposed to so you will have to forgive me for having it open outwards. Shes just missing a P-Type compass from the external area behind the door which I may make before it goes into the Midhurst Museum. The cockpit has some photo etch and the side window has been cut out and a new one made from clear plasticard. The carb intake is from a Beaufighter which has been doctored to make it more like the later style seen on most Albacores. Trumpeter really should have included this with the kit. Once again please forgive me as it is not quite right. Rear step added, framing to the Taurus engine added. Props adjusted to go in the correct direction (anti-clockwise) when viewed from the rear. The cowling lip was horrific so I have sanded that back and sanded the top of the cowl. Arrestor hook frame added. I spent some time riveting the fuselage only to find most of it had disappeared once airbrushing had been completed! Thoughts, comments all most welcome. Would I go for another? Nope, stick to Special Hobby instead!19 points
-
The Mbox jaguar T2 kit is really inaccurate, especially around the cockpit, but I wanted something to practice brush painting on and this got elected. So I rehaped the nose as best I could and added splitter plates as I wanted to represent XW566, the prototype T2. As i knew the kit was inaccurate and I really wanted it just for painting, I threw it together in 4 days. I think that's the quickest build I have done since I was 8 years old! The paints are all Testors acrylics US colours chosen because I wanted to see how close they look to true RAF colours . Here it is with the Airfix kit of the prototype single seater XW560 built over 25 years ago and airbrushed with Humbrol enamels. David17 points
-
#12/2019 After the Bird Dog, now another contribution for our homeland collection by my dad. Pilot Replicas kit built oob, MRP White Alu/Dark Alu mix as base colour, MRP White Alu for different shaded panels to have some distortion of the plain metal surface. Build thread here https://www.britmodeller.com/forums/index.php?/topic/235045982-bundesheer148-saab-j29f-tunnan-austrian-airforce/ In 1961 Austria bought 30 used Tunnans from Sweden which stayed in service until 1972 when they were succeeded by Saab 105. Some served also as recce birds. The aircrafts were used by the one and only Jagdbombergeschwader, split into two Staffeln in Styria and Upper-Austria. DSC_0001 by Reinhard Spreitzhofer, auf Flickr DSC_0002 by Reinhard Spreitzhofer, auf Flickr DSC_0003 by Reinhard Spreitzhofer, auf Flickr DSC_0004 by Reinhard Spreitzhofer, auf Flickr DSC_0005 by Reinhard Spreitzhofer, auf Flickr DSC_0006 by Reinhard Spreitzhofer, auf Flickr DSC_0007 by Reinhard Spreitzhofer, auf Flickr DSC_0008 by Reinhard Spreitzhofer, auf Flickr DSC_0009 by Reinhard Spreitzhofer, auf Flickr DSC_0010 by Reinhard Spreitzhofer, auf Flickr DSC_0011 by Reinhard Spreitzhofer, auf Flickr DSC_0012 by Reinhard Spreitzhofer, auf Flickr DSC_0013 by Reinhard Spreitzhofer, auf Flickr DSC_0014 by Reinhard Spreitzhofer, auf Flickr DSC_0015 by Reinhard Spreitzhofer, auf Flickr DSC_0016 by Reinhard Spreitzhofer, auf Flickr DSC_0018 by Reinhard Spreitzhofer, auf Flickr DSC_0019 by Reinhard Spreitzhofer, auf Flickr DSC_0020 by Reinhard Spreitzhofer, auf Flickr DSC_0021 by Reinhard Spreitzhofer, auf Flickr and together with the AZ Model kit DSC_0022 by Reinhard Spreitzhofer, auf Flickr DSC_0023 by Reinhard Spreitzhofer, auf Flickr DSC_0024 by Reinhard Spreitzhofer, auf Flickr16 points
-
Here's my 1/72 Italeri/Wingman C-130J-30 Stretched Hercules operated by the RCAF. It started out as a Testors/Italeri AC-130a 'Spooky' with a lot of scratchbuilding and modifications. I'm very happy with how it turned out, hope you like ... Thanks for looking, Colin11 points
-
G'day All Not wasting any time after returning from my recent trip to NZ attending Classic Fighters, I put the finishing touches to my Trumpeter 1/32 razorback Thunderbolt. Enhancements to the kit were a set of HGW seatbelts, Brassin wheels and master models gun barrels. Model was painted with Gunze RAF dark green and sky. Markings - with the exception of the cowl checks - were all sprayed on using a set of custom masks from Ad Astra Masks (sadly now defunct) to depict "Miss Behave" from the 78th FG. The cowl checks came from an old Superscale sheet. The aircraft looked fairly clean with little or no chipping or fading evident, the only staining seemed to be that huge oil streak back from the oil cooler doors. The pilot does not look a happy chappie, nor do his ground crew! Whilst I enjoyed the build, I would love Tamiya to release the thunderbolt in 32 scale Thanks for looking, all comments welcome Bruce11 points
-
Hi fellas When i check up this thread of ,, Ready for Inspection-Aircraft,, i have noticed that so small amount of german aircrafts, especially in 1/32 got here posted. So i will bring a little change in it hehehe and share to you my ,,widow maker,, how we germans call it in the past. I built this kit when the hype was so big around this new mold Starfighter, we went so eager, so excited when we saw the first pics of it, because the old Hasegawa kit was not state of the art anymore. So the bidders was so crazy this time at ebay and pay a lot of money for this kit, me not, i was waiting a while till the hype goes cold, and when they paid more than 100 Euros for it, so i paid only 56,00 Euros this time, and to be honest, i was a bit disapponted when i hold the ,,new mold,, kit in my hands. I was expecting to see a kit as it made in Tamiya quality, but that was an disillusion and i was a bit sad. But ok, the kit was there once in my stash and i was curious to build it. The fitting was not perfect and some panel lines looks like washed and not sharp. But i thought ok i do my best to get a ,,almost,, good model, not perfect but atleast i have a F-104 in 1/32 on my shelf. The big surprise was the decals, these decals was one of the best i ever work with, really great. I paint it in Bundesmarine, federal navy look which i really like so long time already. I used Vallejo and Tamiya colours. here we go Greets Werner10 points
-
I wanted to complete this build in time for the arrival of the first F35b in the UK. Boy I cut it close. This build was designed to show off the complex internal bay systems and array of weaponry it could carry. Using the KARL cockpit and weapons bay sets really enhanced the detail, along with the dream hobby engine nozzle and eduard PE set for the lift fan and brimstone missiles. All in all I enjoyed the build but need to source a new canopy as I am not totally happy with the finish.10 points
-
Further progress and a couple of minor disasters to contend with. Breaking the tail wheel off was one of those "I knew that would happen" but still let it moments and most of the canopy frame paintwork came off along with the masks. They are currently being handpainted.9 points
-
Hi All, This is my build of Wingman Models’ 1/48 Dagger, in FAA colours. The kit is Kinetic’s Mirage with a big bag of resin parts to convert it to a Dagger. I’ve built mine as C-407, which Teniente Jorge Senn used to attack the landing British forces at San Carlos Water on 21st May 1982. The entire flight of three were intercepted and shot down before they could make their attack, Steve Thomas claiming two kills, and Nigel 'Sharkey' Ward C-407. Some sources say Thomas shot down C-407, but most refer to Ward so I'm going with the weight of numbers. The combat was at extremely low level, but, remarkably all three pilots were able to eject safely. Grupo 6 De Caza lost five Daggers on the 21st, four in the space of 20 minutes. The decals for the rear fuselage serial didn’t match the paint colour I had picked out, so I used my plotter cutter to make masks to enable me to spray them. I purchased aftermarket for the Expal bombs, and modified some spare pylons to mount them. There should be a third drop tank on the centre line for this mission, but Wingman only supply two. I’ll get round to ordering another from them one day. Thanks for looking in, Gareth8 points
-
I recently completed the beautiful MB Austin MKIV armoured car in 1:72 scale and modelled it on a photograph of the same. The car is 2200 of B Company 17th(Armoured Car) Tank Battalion and was photographed in Ennis, Co. Clare Ireland in November 1919 at the height of the Anglo-Irish war. The kit features this and another 17th car based in Dublin in the same period featuring the "Up Sinn Fein" graffiti. Kudos to MB on their homework its a fantastic kit and loads of decals options. I bought another 2 kits and am gonna convert one into a Peerless. I added the headlight as its not in the kit. The diorama base and hump is a €1 jewelry box flipped upside down and the lid glued on top of it The bridge wall is made up using balsa foam and the bridge deck is a resin casting made using a silicon mould I bought somewhere. All figures are Presier Luftwaffe slightly adjusted not great but easier to work than the polyethene figures from Airfix. And just to made a little comical element to the scene I added the local Sinn Fein organizer illegally posting campaign posters onto the bridges sides. Hope you enjoy Brian8 points
-
Friends, Here is the Trumpeter Su-24 Fencer. Ever since I first looked at the hazy and grainy pictures of the Fencer back in the late 70`s (?), I was intrigued by the Soviet version of the F-111. Time has passed since I put this one together and with my memory being as foggy as it is, I cannot recall which sub mode this one is. As for the kit, I had no significant issues apart from the wings having a tendency to sag or droop. I just guessed on the paint color and went with the closest match via color pictures from World AirPower Journal and of course, the internet. I built everything straight out of the box and weathered the strike fighter with a combination of pastels, pencils, and washes. I used Tamiya ( painted ) tape for the seat belts to highlight the well appointed cockpit in a most simple manner. Trumpeter was generous with providing numerous external stores. While Fencers would likely never carry this type of weapons load, I went for the effect of the variety of the ordnance. I used the kit supplied decals. I would recommend the “Flying Suitcase” to those with an interest in Soviet era jet aircraft. I hope you enjoy the results. *Note : The horizontal stabilizers on Fencers would point down in a forward manner when at rest but I opted for the “clean” look instead. Thank you in advance!!!!! Respectfully submitted, Mike8 points
-
I've no problem doing that Giorgio, certainly if it would help others? Such are the times we live in Anthony! That's just what this thread was missing Mark - a bit of 'local colour'! 😂 As a weathering technique, clearly one for the (im)purist..... A busy week continues but our estimable postman Pat Gerry arrived last evening clutching a box which I'd been awaiting with some eagerness. Behold the Waffle Dalek! Having long coveted one of the dental vacformers, their price had always been too exorbitant for me to justify acquisition for the limited basis it was likely to be used. I managed to pick this up however for £30 (believe it or not) as an 'As New' item from that well-known Riverine Retailer. As these are usually items that have been returned for refund with little or no use (this one hadn't even been fully unpackaged) it can be an economical way of acquiring more expensive items, as long as you're prepared to stalk for a long time and/or take a punt. Confusingly, I also found an iPad Mini screen and set of removal tools in the box as well, so presume they were on the Benson & Hendrix in the warehouse that night... Getting home this evening it was natch into the workroom sating out loud: 'Well, the posse on the thread might appreciated a field test' when in fact we both know I was in 8-year-old-kid-at-Christmas mode to switch the blighter on. Some random bits grabbed from around the bench to act as blanks for a quick blast using 0.7mm thick sheet. Originals and mouldings: For jobs this small I'd plump for much thinner sheet as a rule (in the past I've found best results were obtained from 0.5mm when it comes to transparencies) but even with this bulkier sheet you can colour me molto impressionato by the quality of the device in the forming of shape and surface detail. The heating element in the hood is uber-efficient - in fact it took me by suprise that even sheet of the thickness I was using was bowed-down and ready in 20 seconds max. The lower vacuum element itself is likewise nicely powerful, so all-in-all an efficient combination allowing both rapid prototyping and adjustment before moulding the finals. Some sheets of 0.5mm transparency arrived today also, so we should be able to knock out the turret finally during the long weekend to come. Let me say in defence of homebrew methods that the decision to buy said Waffledalek is not in anyway to be construed as being dismissive of said oven/home-rig approach; for me this kit simply produces results more rapidly that's all - in this case less than 5 mins from switch-on to finished mould compared to about 40mins getting stuff organized in the kitchen previously. In addition, one need never be found wanting for dental plates or tiny stormtrooper armour in later life... Finally, in Farming News, the kittens are now two weeks old today: They're so prettiful! We're in no hurry to find homes for them once they're weaned #bankruptedbyfelines.... Ooohh!! I just realized I could make kitten armour with the Waffledalek now! <ahem> <recovers composure> Sorry there's not anything in the way of progress to show on Annie this week, but at least the foundations are laid for a decent sesh at the weekend. TTFN Tony8 points
-
Hello mates Same as at the F-84F Thunderstreak in 1/48, i want share to you new pics what i made yesterday at the abandoned air base from ex-JaboG 43 in Oldenburg, coz it was cloudy weather, perfect for a photo shooting, i hate hard sun light at model photographing. Hope you like it.8 points
-
Back in 1966 and 1967, I made a series of Vietnam based aircraft, F-105, RF-101, F-100, F-102 and an F-4 using the then new Hasegawa kits. Ready mixed colors were still in the future so I mixed my own to match photo’s and FS numbers ten available. I was very pleased with the results and those homemade matches have stood up well to the many “authentics” which have followed over the decades. Then, in March 1968, I arrived at Pleiku Air Force Base to begin my year of service in the Central Highlands of Viet Nam. Imagine my shock when I saw the USAF aircraft that were based there (mostly Skyraiders and various type of C-47). The Air Force had not gotten the memo. The colors were all wrong, unlike my matches or any “authentic “ I have seen since. The tan (FS30219) was distinctly pink and the lighter green (FS32102) was light and distinctly blue green. The dark green was true to my match and toes of the later “authentics”. Now, there were no hangers at Pleiku AFB so the tropical sun had undoubtedly done its work and the effect was quite pronounced and unlike any thing I have yet seen on a model. I’ve never built another Viet Nam aircraft.8 points
-
MiG-21PF, Mojave Airport CA, March 1992. c/n 761811, s/n 1811 c/n 762410, s/n 2410 Thanks for looking, Sven7 points
-
After two months of work, I'm happy to present my Tamiya Leopard 2A6 I bought this kit on a total whim. When I opened it a few months ago, I was indifferent to it. Typical Tamiya - nice sharp plastic parts, but pretty basic looking details. I eventually shaved off all of the plastic tabs representing grab handles and replaced them with wire. I doodled around with a few other details not really worth mentioning. I then started to paint and really took a liking to the kit. I have never built anything in NATO tri-color before, and it was a lot of fun to paint. The weathering I applied was a bit different for me. Typically, I apply dark stains to light paint. Here I had to do the inverse, with light sandy colors needed to stand out against the dark base colors. It was pretty challenging to get things balanced just right. Base paints are Tamiya thinned with MLT. Nearly all of the weathering is thing glaze coats of Tamiya paint and artists' oil. The caked on mud is a wet mud effects product from Vallejo, which I really liked. I'm still working on a figure, but I'd since the tank-proper is done, I figured I'd post a few shots. Also, I'm glad to be finished because almost every time I sat down to work on this beast, this song would get in my head 😄 😄 😄 https://www.youtube.com/watch?v=5es5MQX0VVA&feature=youtu.be7 points
-
This was my most recent build, and my first one using acrylics (swore by MM for years.) Only AM used on this one was the Big ED set. Also, apologies for the lighting, I don't have a fancy photo booth.7 points
-
Was this really last year? Really? Wow As I have been neglecting the old Queen and whilst proof of concepting has been going on in the Sikorsky works I have given the old gal a bit of the time she deserves Principally, it must be admitted, because I found the missing nose unit and have been working inside the fuselage before I get the seating sorted New floor and cabin rear bulkhead Which is never going to be watertight, nor even asked to be There is interior fettling to do and walls and galley sections to make up but now I have the base set up for making seating Colin sent me an assortment of potential seating, I need to organise myself and get as close as possible to the internals of a BEA S61-N Research is ongoing I need nine settees and twelve single seats Fun abounds7 points
-
Hey everyone, I´m new to this forum and I also love cats! The one in the first picture got run over by a car several years ago, she was such a funny little cat: This one is one of the three cats currently living with me, she is sleeping in a box my new motorcycle gear arrived in, her name is Sweety Pie: And here are all three sleeping in their Manson (yes there is a hole in the wall for the cats): Have a great week, Dieter7 points
-
Right, I have finally managed to access more than just the first site page from home, so a little bit of an update is now overdue! First, the fuselages were given their base colours. The E.I white and the E.IV CDL. Then it was a masking marathon. I had to mask the wings and fuselages as the Pfalz aircraft had the wing and fuselage edges wrapped in black tape. My modus operandi for this is to attach the masking tape, overhanging the edges, then trim it back and reposition it slightly inboard. For the wings it's easier to do the leading and trailing edges including the curve at the tip, then the tip separately, as this removes the errors of having two curves to reduce at the same time. The fuselages were done by placing a single strip on each facet, then trimming it back with a sharp #11 blade. The masks were then removed and carefully reduced freehand, trying to stay parallel to the edges. A piece of thin tape was added up front to ensure that all the masks were lined up. Then on with the paint! I left that for a couple of days before removing the masking... There are a couple of small patches that pulled off on the E.IV wings, and the clamps left marks on the E.I fuselage which will need to be sanded down and resprayed. Annoying, but not too difficult to fix. I'm very happy with that, although with hindsight I have a horrible feeling that I should have done all the undercarriage and rigging struts first, drilled the locating holes, and fitted it all before spraying the black. However, it's done, and I'll have to adjust to get it all fitted neatly. We'll see how that works out! Thanks for looking in! Ian7 points
-
Some other pics extract from the galery6 points
-
So to cut a longish story short, here is the truck as seen through my eyes:6 points
-
Wings are progressing too! That issue with the hairline splits finally resolved by the last minute re-cementing. The various sub assemblies - floats, fuselage, wings - are now in a relay from night to night in my (Tupperware) spray booth. The wings have progressed to white primer! Here briefly with fuselage gravity fit over ... For the first time I’m starting to feel like this might have a chance of being finished soon. So much so that I even wrote a list of tasks remaining!6 points
-
OK we have moss and lichen (microballoons / pumice powder) and a @Al Gunthwaite figure for scale. I may well have a go at altering one of these to a fisherman. Time and ability will tell. Unless of course some one out there knows of some 1/72 fishermen ??? Thanks again for your suggestions, I hope you approve Kev6 points
-
I continue with the paneling, decals and weathering of the Avro Lancaster MKIII hope your advice and that you like it as it is being left!! Thanks!!6 points
-
Well this is a bit embarrassing, last time I posted anything in this thread I had one grandchild. Now I have a horde of them! I've actually done a bit and got some jam on the thing. Its needed quite a few touch ups (don't we all 😎) the paint refused to stick in a couple of places and was the sole cause of several profane outbursts. Its had a coat of clear and I'll have a go at decalling the beast tomorrow.6 points
-
Steve, As I understand it, all Spitfire Mk.VIII aircraft were built by Supermarine. They had three main assembly plants, at Eastleigh, Keevil and Chattis Hill. Each assembly plant had minor variations in the camouflage pattern, particularly around the nose area, regardless of the scheme applied. Spitfire Mk.VIIIs in the JF, JG, LV, MB and some MD ranges were finished in the desert scheme. A few MD aircraft were finished in the DFS as were all those in the MT and MV ranges were finished in the DFS. All Spitfire MK.VIIIs sent overseas were dispatched in their factory applied scheme. Early aircraft that were sent to India, initially saw service in the desert scheme. JF835 would have arrived in India in the desert scheme, still carrying standard RAF roundels. It is a moot point as to when it was repainted in the SEAC scheme. You need to check the date when the photo was taken and which scheme it was carrying at that time. A good clue is the tone of the colour through the cockpit area. If it is the lighter tone of the two upper surface colours, it is probably in the desert scheme, if it is the darker tone, probably repaint after arrival. Peter M6 points
-
Invasion stripes painted, there are a couple of areas that I'm not entirely happy with but I'm confident they'll be hidden by the decals.6 points
-
Hi all. well, this is my first proper post on the forum after lurking around reading various topics over the last year or so, having decided that Airfix's Phantom would be a good project to pick up and get back-in to the hobby, having taken a break from it for 30 years ore more. Over the last decade or so, I have dabbled with some railway modelling (correcting and detailing various ready-to-run loco models - toy trains) and seem to have managed to produce some half-decent results... good enough at least to see some articles published in national mags ... but I don't work quickly. My last conversion (a Sulzer class 26 for those that know what I'm talking about) took almost 5 years... and I'm only working in 4mm scale (1/76.2) - starting with oo gauge models - so they're nothing big. But, I worked to the philosophy that if you could reproduce a detail on a good O gauge model (1/43 scale) then you should be able to do the same in 1/76.2; whilst my eyesight has born the brunt of that decision, i try to stick by it. Photo etch components for railway products are maturing nicely now, although it's still quite a new approach for products of extreme fidelity; it's been a great help to have a good friend who produces these (for his own company) as part of his day-job and I've trialled one or two items previously; sharing a love of "Deltics" was a big help there. For switching to aircraft, I will try to see what can be achieved in 1/48 and replicate in 1/72 - yes, i'm probably mad.... but there are so many detailing options out there, that the job is almost done for you (or me). Whilst I picked up the Airfix Phantom (K model FG1) a year or so ago, I decided to wait until some PE parts were produced.. along with (hopefully) some other replacement items to make us for some of the basic product's omissions and simplifications. I've seen some "complain?" or highlight at least that the model is made of a soft plastic, but I've found this to be a bit of a blessing when it comes to trimming small mouldings such as those on the seats ... which, to be honest, is about as much as I've managed so far. I will post a few pics of progress as/when available, and when I think there's something to show. And I'll probably have a few questions as I go along - it seems that the hobby has evolved significantly in the last three decades. For instance... when it comes to paints, I think I must be "old school" having always worked with (and preferred) enamels. For railways, there are companies such as Railmatch and Precision that produce great ranges in appropriate colours that I've used, and I've supplemented these with Humbrol enamels when necessary. But, I see that there's such a move towards acrylics and cellulose? that one day I'll have to have a try (on something spare to practice on) but for now, for the 'toom, I'd intend to stick with what I know (or rather, I think I know ????) Other points that are causing me to scratch my head are simple points such as how much weight to pop into the nose? It would have been useful to see this quoted in the instructions , or in any of the myriad of articles I've seen published - crikey, is it a trade secret? I've some liquid lead to use for this, but knowing how much would be good. So... what have I achieved? Well, I decided to add the Eduard bits to the seats and tubs... but decided also that the instrument panel wiring (between the seats) was simplistically protrayed in the moulded form, and it's very visible in photos - so decided to scour various web photo sources, 1/48 and `/32 model articles, etc etc etc, and make up something slightly more representative using thin nickel wire and 5A fusewire. It's know where near representative of the actual routing, but it gives a flavour of the mess of wiring and pipes behind the seat heads. The moulded seat tubs had a few plasti-card and wire additions based on photos of the MB Mk7 in one of my phantom books (the Haynes manual one I think), and I re-profiled the cushions and parachute box to be more representative.... before painting and adding the PE bits. Wow they're fiddly ! The throttle levers ! Blimey! Anyway... a couple of photos follow. IMG_20190419_190656399 by Jonathan Hughes, on Flickr IMG_20190412_201022881 by Jonathan Hughes, on Flickr IMG_20190427_093632322 by Jonathan Hughes, on Flickr IMG_20190425_193835788_HDR by Jonathan Hughes, on Flickr As mentioned, I'll post more as I go. Hopefully for now, its a flavour of what I want to achieve ... and I hope that I don't balls it up. And finally.... ok, here's one of my last project - a fully sprung (primary -body to bogie -and secondary -bogie to axles- springing), P4'd, superdetailed class 26, based on the Heljan OO model, which took nearly 5 years to work. 26046 - job done by Jonathan Hughes, on Flickr Thanks for reading, and I'd welcome any comments Jon5 points
-
Morning folk's,built as a pair for the Trainer's GB is Airfix's T11 in the Swedish Air Forces historic flight colour's,as this machine is kept pristine I've only ran a pin wash to bring out a bit of detail and no weathering.A great stress free build and nice to be back into 1/72 scale for this and a few other subject's to come,many thank's for looking in. #5 points
-
Focke-Wulf Triebflügel (48A001) 1:48 Amusing Hobby Toward the end of WWII the Nazis were desperately casting around for wunderwaffe, or Wonder Weapons that would turn the ever-increasing tide against their attempt to take over Europe and probably the world. This resulted in some possibly more left-field designs being considered, when under normal circumstances they would more likely have been dismissed out of hand. One such project that has since gained traction in the minds of the Luft'46 community and beyond is the concept of the Triebflügel from Focke-Wulf, which was little more than a rocket body with a rotating set of arms with ramjet engines at their tips providing the motive power. This arrangement was to enable it to take off vertically, which was of greater interest as the front lines got closer, as was the use of the simple ramjet that was propelled up to speed by rockets, all of which used little in the way of strategic materials or complex technology. It went nowhere of course, and had some critical issues that would have needed to be addressed if it had gone further, such as the counter-rotation required to offset the torque of the motors was supposed to be supplied by the cruciform tail pressing against the air, it would have to land vertically with the pilot facing forward and the rear view obscured by the still rotating engines to name but two. Post war the Convair Pogo was to attempt a broadly similar flight profile with similar issues raising their heads and helping ensure its demise. If you've been following the Marvel Avengers film franchise (MCU), you'll have seen Red Skull absconding in a very Triebflügel-esque aircraft at one point, which although undoubtedly CGI could actually be attempted now with our computers and other technologies. Can we convince Elon Musk to give it a go? The Kit This is the first winged project from Amusing Hobby, and it's great to see them applying their sense of the unusual and what might have been to their choice of aviation subjects too. Because the Triebflügel only got as far as a general arrangement design, there is also little in the way of "you got that wrong" that can be said about the subject unless you enjoy being ridiculed for being a know-to-all with a crystal ball. Arriving in a slightly smaller box than their usual AFV kits, there is a dramatic CGI render of a Triebflügel in action on the lid, and inside there are eight sprues in sand coloured styrene, one small clear sprue, a sheet of decals, instruction booklet and two separate painting guides that fold out to provide quite a few options. There's a relatively small part count due to the speculative nature of the design, but what is there is nicely moulded and has fine panel lines and rivets throughout. The sprue diagrams show the centre ring (part 1) attached to the end of the main sprue, but it had been nipped from the runners before dispatch, probably to prevent damage during transit. Construction begins with the cockpit, which is built onto an L-shaped floor and rear bulkhead, with side consoles, rudder pedals, control column and instrument panel, all of which has good raised detail, and once the seat is dropped in, other small details such as the gun sight finish it off, with the nose area closing up around it. The two-part canopy can be posed open or closed, and the rotor base is added at the back of the nose from a cylindrical arrangement of three parts that can be left to rotate so you can show off those rotors. The tapering rear fuselage is made of two halves that close around the large tail-wheel, which sits inside on a platform and is allowed to rotate. The fuselage is completed with a DF loop and aerial, then put aside while the rotors and tail assembly are build up. The three rotors, which I keep wanting to call wings because they are, are all identical and are made from two halves, tipped with the ramjet cowlings that have the simple mechanism inside, most of which I'd paint black or rusty. Each cowling has two halves and an intake lip, and one of the drawings incorrectly has an intake fan drawn inside in step 8, and there is a fan on the sprues, so maybe they were considering making it jet propelled? These are glued into the holes on the centre fuselage section, or left loose for storage or posing later. The tail has four cruciform fins that are made of two halves with a slot down the centre for the landing gear castor, which has a separate yoke and wheel, replicated four times over. If you are posing your model landed, the clamshell aerodynamic covers are glued in place split, while in-flight they are posed closed over the four castors and the big central wheel. That's it! You're done, but part of the fun with this type of hypothetical is the painting. Markings The decal profiles have been drawn in conjunction with AMMO using their paint codes, and there are four choices with absolutely no facts involved, as it's pure fantasy. The world really is your oyster, and with the addition of some home-made hydra decals you could even paint it as the Red Skull's personal ride from Marvel's The First Avenger. There is no backstory to the options provided, so the profiles will have to speak for themselves. The decals have only the Amusing Hobby name on them, but have good registration, sharpness and colour density, with a thin matt carrier film cut close to the printed areas, with lots of different types of crosses, a few unit badges but no swastikas, so if you're stickler for your Hakenkreuz, you'll need some of your own. Conclusion Awesome! Lunatic, with a touch of bonkers, and a hint of desperation. I've had a hankering for one of these for a while, but as this is the first injection moulded kit in my preferred scale, it's been an idle quest until now. I just need to find the time to build it now. Why are you still here? You need to track down and buy one of these at your earliest convenience! Excruciatingly highly recommended. Review sample courtesy of5 points
-
This project has taken over 4 years to come to fruition and completion. I'd always wanted to build a FROG Shackleton and with that in mind bought a couple of Eastern Express examples at the Newark Model Show way back in 2004, along with a very expensive Aeroclub AEW Mk.2 conversion kit and the Aeroclub decal sheets that also cost a bomb. Several years went by and after visiting the Newark Air Museum I decided to start building an MR. Mk. 3. I didn't know anything about the Phase 3 modifications until I started studying the many photos I had taken and noticed the Viper jet engines in the outer engine nacelles. To see how things progressed from there have a look at the build WIP thread on this site. The model ended up on the shelf of doom in October 2015, until earlier this month when I decided it was time to finish this one off at last. The model fought me all the way, especially those expensive Aeroclub decals that fell apart in water. The Aerclub AEW bits have been consigned to the spares box and even more pain was heaped on the project when I read on this forum that Revell are actually going to release an MR.3 version later this year, and a Phase 3 version to boot! Well I had started so I decided to finish it. Worst bit: those damned decals. Best bit: I love the way those side domed windows turned out, its amazing what you can do with a warmed bit of acetate and a paintbrush handle! Thanks for looking. Ian5 points
-
Have occasionally checked out the Eaglemoss 1/16th scale Alien figures,but Ive not really been that impressed,however I recently took a punt on a broken Alien 3 creature going cheap,so thought I would have a look,When It arrived it had snapped off the base,was missing a couple of fingers and the tail had snapped off in to three seperate pieces,Once put back together and primed I was pleasently suprised about what a good little sculpt it is. Now its all painted up I may need to have a hunt for a few more! For scale5 points
-
Hi Finished one more Spitfire, this time Spitfire Mk Vb, in Yugoslav (Partisan) markings, coed X "Slovenac". Spitfire was from No. 352 Squadron RAF, which was a Yugoslav-manned fighter-bomber squadron of the Royal Air Force during the Second World War. The squadron was also known as First NOVJ Squadron had modified RAF markings to indicate that it is flown by Yugoslav pilots. About model....well known as allready long time on the market, Italeri mold, i am not very happy with but at the end looks like a spitfire. Decals from Blue Rider. Weathering done with tamiya pastels, and wash from tamiya also. Done some additional details in cockpit....and that is all. Hope you like it Best regards, and pictures....5 points
-
This is an old build i did when I was still in the military, before I started getting serious about my model building, and before I even had an airbrush! She surprisingly survived a move, mostly thanks to my wife holding her for the entire drive. AM includes the Aires front office and the Big Ed set. Now this was definitely a biggun! I would definitely do this one again knowing what I know now. Thanks in advance!5 points
-
Hallo, here is my last OOB built. NIce kit, without serious troubles. I used Vallejo Colours. Every comment is welcome and useful.5 points
-
Ah Tomo, I see that you are clearly imposing what Ike & Tina Turner referred to as a Nutbush City Vacform Kitty Limit.5 points
-
Finished my self imposed one month posting and forum hiatus but still got this one done for April and my seventh for the year: A sweet but full of casting /moulding flaws kit from Anigrand. I scribed and riveted the surface, Alclad and Mr Color for a "Man in the High Castle" vibe. Decided that post war the victorious Luft '46 boys would have dumped the camo and gone full shiny. Scratched an exhaust and throttle body to distract from the strange oval hole Anigrand presented, then made up some aerials for radar/drone use and drove myself crazy gluing 0.1mm nickel rod. Decals from various Skys sheets and spares box. Fun was had and no styrene was unnecessarily hurt. WIP here:5 points
-
The definitive word on this is 'Spitfires in the Sun' by Vikram Singh. (ISBN 978-81-903591-5-3) He is a serving officer in the IAF and modeller. Page 114-5 of that book reproduces Air Force Order (I) Tech 1/48. This order dated 30.4.48 describes the national markings for aircraft. it quotes '' Note:-Where the roundel is not distinctly visible on camouflage paint a yellow base is to be given from colour identification on yellow stores ref. 33B/179. The circular yellow base should be 3 inches bigger diameter than the diameter of the Chakras' The only mention of Safron is in relation to the 'tricolour flash' on the tail. Regards Phil5 points
-
Once the excised window frame is added, the area is ready to prime and refine. It is possible that a very faint imperfection remains somewhere, but it will be much better and accurate in any case that the totally bogus solution posited by Italeri: My evil plan of using the donor kit for a second model using this time the home-made corrugations to fix the issues (and the hole left by the donation) went south, due to the necessity of having end up cutting three sections to find one with matching corrugations, and in the process chopping up entirely the fuselage side. I still may find a "rescue" kit that lost the transparencies or other important part but has the two fuselage sides.5 points
-
I was out with the airbrush and about to paint some detail parts, when I decided to have a better look at photos, and what do you know, the kit parts showed some inaccuracies, again; so before proceeding with paint, some things were fixed :5 points
-
Hi guys. I finished this build last week. It was started 8 years ago but has been on and off the work bench for many years. But so glad to see the back of it as it was a terrible kit. I haven't installed the Lifeboats as I lost some parts after many house moves over the years. Chris4 points
-
Hi folk's last one before the gallery.Added the various arial's etc and ran a pinwash into the panels(still to remove excess from the underside's u/c door's goingonlater then a matt coat.4 points
-
She is coming... The first bonnet is in place...With inaccurate louvres! The real bonnet: None louvre are identical and all are incurved. One tool for each louvre? Help! Sorry guys... Dan.4 points
-
The Attacker is not dead! I just lost the canopy! I got the Master brass guns for the Fairey Firefly. They are lovely, as Master stuff is, but the diameter is too large even after I filed out the cannon holes in the wing as far as I dared. I chucked each gun in the Dremel and ground it down, finally adding a cut so I could snap off the guns to the correct length. Three steps in the process shown.4 points


.thumb.png.2498aade5f06ec64cf8c0abac73e1be3.png)

This leaderboard is set to London/GMT+01:00