
Leaderboard


Popular Content
Showing content with the highest reputation on 28/04/19 in all areas
-
De Havilland Mosquito FB Mk.VI This particular version is modeled on one that took part in Operation Jericho, RNZAF, No 487 Squadron Finally - that took a while! My first aircraft kit (although I started and finished a Spitfire for a mate in between) and it is a cracker - I know it is expensive, but cannot fault this Tamiya kit. Although I used some Eduard detail kits (engines, guns etc) you certainly do not need these to make the kit amazing. I'm learning the weathering thing, and I know this is a little 'dirty' - but I thoroughly enjoyed it and learning what I did, having been inspired by the masterpieces elsewhere on this forum... ...sorry, I find it hard to edit the number of photos I want to do some more pics with a bit of photoshop play, backgrounds etc.... And finally - I posted the montage below on FB.... ...within minutes a friend sent me this. She made my day and it makes me smile each time I see it.... Build 'WIP' can be found here:48 points
-
Hi comrades! Here is another one of my past works It's GWH Devastator - fantastic kit built OOB with some modifications and Eduard brass, National insignia painted. Most critical areas to update in the kit - wheel wells and main undercarriage legs (must be shortened). Thanks for looking!29 points
-
Morning folk's,built as a pair for the Trainer's GB is Airfix's T11 in the Swedish Air Forces historic flight colour's,as this machine is kept pristine I've only ran a pin wash to bring out a bit of detail and no weathering.A great stress free build and nice to be back into 1/72 scale for this and a few other subject's to come,many thank's for looking in. #28 points
-
Saved from the shelf of doom, I started this kit couple of years ago under rather funny circumstances. It all started with me having a go at the rather modern Hobby Boss F-5E only to discover its biggest glaring issue - the windscreen being way too short. To remedy the problem, I bought a water damaged Italeri kit off of eBay mostly for its clear parts. Seeing that the Italeri had the right shark nose and squared off LERXs seen on most US aggressor aircraft, I wondered if the HB kit was worth proceeding with. Eventually, I used the Italeri canopy as a basis to form a new windscreen for the HB kit and decided I would do a twin Tiger build. Long story short, I ran out of steam midway and both kits were packed away after reaching primer stage. Fast forward to 2019, I was looking for something to 'finish off quickly' and came across these two again. I decided to just focus on completing the Italeri while I used decals from the HB boxing. I made some minor mods to better represent the subject aircraft, nothing crazy. Modifications made were - Seat headrest changed to improved style (using putty to build the headrest buttress), scratch built the canopy lift mechanism and fashioned an ACMI pod using styrene pipes. The canopy lift feels like an absolute must have for anyone building 1/72 F-5s and took the most time on my build to get right. This is quite characteristic of the F-5 and I have no idea why kit manufacturers decided to leave it out. This was finally finished off over the last week since so much work was already done. I was too lazy to use blu tac on the camo and ending up free-handing it at 1 bar psi. I think it turned out OK. Hope you all like it.23 points
-
Friends, This is the Hasegawa E-2C Hawkeye. When I put this one together, I wanted something unique and different on my shelf. The kit was straightforward and I added Scale Aircraft Conversions metal landing gear, cockpit, and gear wells. Because of the nature of the airframe in kit form, it is ripe to be a tail sitter. I am pleased that I was able to get this one to sit properly. With the radome and complex tail, I added a very large lead fishing sinker just aft of the cockpit inside the fuselage. I then smothered the lead weights with plumbers putty and happily, the Hawkeye sat right. I did experience plenty of problems with the decals. I used Authentic Decals ( #72-30 Pacific Fleet ). The first nondescript decal broke apart. I then used the squadron markings and went with standard stars, numbers, and letters from other sources. From the reference pictures I found on the internet, Hawkeyes did not weather much so I lightly dusted the big bird. I would suggest this kit only for modelers with more experience. Thank you in advance!!!!!! Respectfully submitted, Mike18 points
-
Hi, just thought I'd post my latest attempt. I was surprised awhile back when I discovered I didn't have a Spitfire in my stash so bought this Eduard version and enjoyed building it. This is a version flown by the Polish pilot Stanislav Skalski in North Africa, Spring 1943. When it comes to weathering I'm still very much just making it up as I go along, winging it if you like, this is pretty much my first attempt applying washes to a larger surface. It sort of worked. I'm still using brushes to paint my models, haven't taken the plunge into, what is to me, the scary world of airbrushing. I would like to take the gloss off of the decals a bit but dont want to ruin it. Irrespective of how things turn out I am thoroughly enjoying building models and i think that's all that matters. I find it relaxing and very therapeutic when feeling a bit low. I'd like to think I'm getting a bit better each time. All th best, Martin15 points
-
Hi Finished one more Spitfire, this time Spitfire Mk Vb, in Yugoslav (Partisan) markings, coed X "Slovenac". Spitfire was from No. 352 Squadron RAF, which was a Yugoslav-manned fighter-bomber squadron of the Royal Air Force during the Second World War. The squadron was also known as First NOVJ Squadron had modified RAF markings to indicate that it is flown by Yugoslav pilots. About model....well known as allready long time on the market, Italeri mold, i am not very happy with but at the end looks like a spitfire. Decals from Blue Rider. Weathering done with tamiya pastels, and wash from tamiya also. Done some additional details in cockpit....and that is all. Hope you like it Best regards, and pictures....14 points
-
Thanks Bill, Simon and Rob Nice to hear from you while you're away Jont - I hope the storm hasn't hit you too hard 'tis indeed - my favourite! Yesterday was taken up with returning the puppy to her 'parents' on return from their holiday. Although it was nice to have her here I must admit I really enjoyed being able to sit down without a bundle of fur suddenly leaping onto my chest! Mols is a bit relieved too and much more relaxed now her 'pupil' has gone. The lightning has had its sealing coat of satin varnish and the nose attached: Now it's just the pointy thing at the front and the probe to attach after I, perhaps, add some weathering on the camo. These, however, need more work: Not good enough, even for the ceiling. I've now removed the horrid, brushed grey paint and will mask and spray tomorrow. I'm not aiming for Giorgio standard (I still don't have my bottle of patience) but hope to do better…14 points
-
RMS Carpathia - 1/500 Scale - Scratchbuilt I present for your viewing pleasure my recently completed model of RMS Carpathia. She is depicted as she may have appeared on the night of the 15 April 1912, the night that she sped to the rescue of the beleaguered survivors of the Titanic disaster. The model is constructed from wood, brass, plastic-sheet and various other bits and pieces. It is completely scratchbuilt except for the lifeboats that are 3D printed. The WIP thread that tracks the process of the construction of the model and the sea-scape can be found here: I am quite pleased with the result - especially as the project took less than 4 months from start to finish. The model will be on display at next weekend's WASMEx scale model exhibition at Cannington community hall in Perth Western Australia. Thanks to everyone in the Britmodeller community for showing interest in this project. All comments, criticisms and queries most welcome. Best Regards, Bandsaw Steve 👍13 points
-
Last built this kit about 20 years ago & it stands up really well against more modern offerings. There's the more recent Trumpeter kit of course which sells for at LEAST twice what you can pick up this one for & although I've never seen it in the box OR built, I doubt it's twice the kit. Raised panel lines of course which requires care during assembly to avoid loosing them while sanding joints. The undercard is a bit on the clunky side, plus I found the retraction struts a little too long but that may have just been me screwing up the assembly. I attached the windscreen about 1.5mm too far forward but as the canopy was going to be open, no great shakes! Decals from the kit. Really enjoyable build.13 points
-
One of the 2 kits I've been working on. Fw190D-11 from Eduard JV44 combo boxing. Eduard's Fw190D has it strength and weakness. I didn't try to fix any of them. I got this kit at a bargain price and decided to just enjoy it. It took some effort to close all the gun access hatches. The undercarriage is weak and difficult to get into position. Strangely, the stencil and fuselage national marking decals seem to be over-sized. The stencils are almost 1/32. Anyway, here it's done.11 points
-
Fw190 A3 White 12, Uffz. J. Rathenow 10/JG1 Holland( Delen) 1942 Here is a quickie I did last weekend and finished it up Friday evening. It’s the Fw190 A3 from Tamiya; if you want to do a quickie its got to be a Tamiya. Falls together and few parts. Easy Peasy. Decals are from Aeromaster (48095) JG1 . The aircraft is misrepresented as an A4 on the decal sheet but its covered in the Kagero and the Air War Classic publication ""Defenders of the Reich, Jagdgeschwader 1 Vol 1 1939-1942". Hope you enjoy11 points
-
Here they are! I was very happy with both, especially one I came closer to finishing them. In terms of weathering, Black 89 has some sandy FloryWash and a little bit of black FloryWash to bring out the panel lines, especially underneath. White 26 just has the black. Decals on both kits were a cinch and it is interesting to notice the different sides of blue used by each company for the Mogen David. I much prefer the Eduard, yet the KoPro has that touch of indigo that makes them not so much blue as...well, kind of purple. Speaking of blue, I am happy that the Blue-Grey camo colour comes off as more if a very dark blue/black once it is paired with the sand and then weathered a bit. While the Eduard kit is more finely engineered than the KoPro, I still am very fond of these KoPro kits. They offer a no-nonsense Spitfire with a wide variety of markings if one looks at the whole of the KoPro catalogue. Eduard does too, but they seem to be more specific (D-Day, Aussie 8, etc...) Both kits are worth building and investing in. A happy modeller am I. Here is the WiP thread... How about some pictures? Maybe I should build more Messerschmitts...? --John10 points
-
I have a great affection for Russian (or Soviet) civil aircraft and the Tupolev 204 is no exception. Bearing a striking resemblance to the 757 (my girlfriend couldn’t tell the difference), the Tu-204 was poised to replace the Tu-154, but due to political and economic turmoil never became successful as Tupolev’s predecessors (although technically there was nothing wrong with the aircraft) I was planning to build the Rus-air version (also a very nice looking kit), but when Zvezda decided to release the Tu-204, I decided to build that version instead. The kit by Zvezda is great (as always) and comes highly recommended. I wanted to build something else than the Red Wings version (you see that livery on Russian forums everywhere) and since I have never had a livery from South America, this seemed like a good opportunity to build something in the colours of Cubana. The decals come from 8a Decs, with some extra details from the Zvezda decal sheet. The cockpit decals are from PAS. You can find the (Dutch) build report here in case you're interested. My next project will be either the Authentic airliners Convair 990 in the last Spantax livery, or the Rus-Air Antonov 24 in Aeorflot colours if that kit arrives sooner than expected. At any rate, thanks for looking and hopefully see you next time!9 points
-
Hi Folk's,Airfix T11 Vampire in Swedish colour's straight OOB build and great fun.9 points
-
Hi guys. I finished this build last week. It was started 8 years ago but has been on and off the work bench for many years. But so glad to see the back of it as it was a terrible kit. I haven't installed the Lifeboats as I lost some parts after many house moves over the years. Chris8 points
-
Hail fellow and well met! 😆 (I even laughed at Cape Fear...) As Hicks said to Ripley: If you have any very small horses, you know where to send them for shoes... It had to be properly sorted Giorgio, Ian, Roger & Simon. I routinely say this on every build but 'it's job's like that which remind me I'm still only at the apprentice stage' when it comes to learning what works and what doesn't with forming metal in such ways. Sie können nicht all die Schläge mit Hämmern und Fluchen sehen, die in diese Jobs fließen Benedikt.... It does indeed Bill but fear nought, I wouldn't foist shoddy goods upon such expert minces as thine. If you recall from my previous attempt at this part, there is still a cutout (to accommodate the exhaust ring as it emerges from underneath the engine) to add. More on that below. Two fine phrases that I shall take to heart! 😇 Thanks Chris: your steadfast encouragement is much appreciated. Up early, fuelled on Colombian coffee and raring to go. The upper 'lip' of the nacelle is fine in terms of how it's required fit in behind the exhaust ring (in fact that slight Botox pout give a useful little surface to act as a bonding area for latergluing against the inside curve of the exhaust:: As mentioned above though, as well as the undercarriage opening there is a cutout at the front of the nacelle to add, both of them inked out here in readiness: An 18mm cutting disc in the Dremel made short work of trimming out the sinuous curve of the lower lip: Whilst a mixture of drilling, birring, filing and sanding was used to open out the undercarriage recess: Much of the time on this stage was taken up by a constant cycle of measure-cut-check-repeat to avoid errors of symmetry creeping in whilst working a curved surface until we had something that looked convincing enough in situ: I've yet to cut the slot for the opening of the radius arm to continue forward into the new brass section of course but will, I think, leave that until the new section is permanently mated to the wing before sorting that detail out. The oil cooler did come off from the previous version (without suffering any damage) after some heavy heating with the soldering iron, soaside from leveling out the rear of the brass tube and soldering that on, we should be good to move on to whatever else the week holds. Thanks again for looking and for all your comments. Tony8 points
-
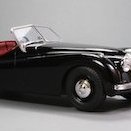
This is the simpler Gunze kit but uses a few PE parts from the overly-complicated multi-media kit of the same car. I cut a piece of wire mesh from a tea strainer to replace the grill - probably not accurate but looks better IMO. Other than that it's pretty much box stock. This and the XK 120 I posted are the only two British subjects I've built, there being not much available in my favoured medium of plastic in 1.24/5th scale. A shame as I grew up in British (and Australian) cars in New Zealand and have fond memories of them. I compensate for this lack with a collection of classic British 1.43rd diecasts. But future posts from me will be mostly American cars. Hosted on Fotki Hosted on Fotki Hosted on Fotki Hosted on Fotki Hosted on Fotki Hosted on Fotki7 points
-
Well - this time I'll try to follow suite and post most of the finished model pictures here. You can follow the build here: Comments are welcomed Ran7 points
-
During the mid-afternoon of 30 April 1943, P-40Fs of the 316th FS from the 324th FG, along with the three P-40 squadrons of the 79th FG and a top cover of Spitfires from 92 Sqn, were flying an anti-shipping patrol off of Cap Bon when they were attacked by Macchi fighters, likely MC.202s from151 Gruppo and MC.205s from 1 Stormo. Although both sides made multiple claims, the only apparent loss was the MC. 205 flown by M. IIo Luigi Caroli of 88 Sq., 6 Gr., 1 Stormo. Caroli was listed as MIA, possibly shot down by Lts. Kim Bolack and Malcom McNall of the 79th fG, who shared in claiming a Macchi fighter, although they listed it as a 202. The tables were turned on 8 July 1943, when a MC.202 severely damaged the P-40F flown by Lt. "Bucky" Buchanan of the 316th FS. Buchanan was able to nurse his damaged Warhawk, coded Y*76, back to his base, where its rudder cable snapped upon landing. Buchanan was unhurt, but Y*76 never flew again. Here are my representations of the fighters involved, both in 48th scale, although I can't say for sure if the MC.205 I've modeled was specifically involved in the scrap on 30 April. P-40F: AMtech kit with resin nose, Cutting Edge cockpit with Ultracast seat (to replace the Cutting Edge one I accidentally damaged), Ultracast exhausts and tires, Eduard photoetch ring and bead gunsite, Sky Models decals, added brakelines and a mirror. I think that's it. MC.205: Hasegawa kit, including decals, Mike Grant's 'smoke ring' decals, Ultracast seat. Very nice kit OOB so not much needs to be added. Thanks for looking, and as always any comments and constructive criticism are welcome! Cheers, Mark7 points
-
Hi All Here 's my last product. This kit is correct and of course we could enhance some parts as we want. My sources to make my kit are mainly: French magazine Wing master n°44 Heinkel He 162: From Drawing Board to Destruction: the Volksjager Spatz Classic Publications / Ian Allan Publishing and a french web site http://memorial.flight.free.fr/He162.html The paint are for the camo RLM 76.....Gunze 417 RLM 82.....Tamiya XF 26 RLM 81.....Gunze 421 Well , I hope you like See you for a next one....7 points
-
Finally finished this lovely little kit. The undercarriage legs are not the same length, mine is not sitting level. The decals are very thin and easily damaged and they don't settle on the model very well. I painted the model with Hataka lacquer paints and replaced the plastic gun barrels and pitot tube with 0.4mm tube. Thanks for looking. Stephen7 points
-
Darn and Drat! I am delayed until the arrival of the donor kit that will provide the replacement area for the inaccurate Italeri cargo door. Of all places, it's coming from Japan. Meanwhile I keep working on a trio of secret projects, here is one of them: A Martian treat (some sort of alien secretion iirc) for the first one able to ID this plane:7 points
-
Hello guys, here is my F-84G Thunderjet in Dutch colours. Except for the decals(from Dutch Decal), it was a completely OOB build. Sprayed with 4 shades of AK Extreme metal. And with it's successor; Erik6 points
-
My next build, a 1/48 Tarangus JA-37 Viggen. Plenty of aftermarket, to build a research and development version. This will also be my first proper commission build, which I am very pleased to have been offered. Untitled by ian gaskell, on Flickr Untitled by ian gaskell, on Flickr Untitled by ian gaskell, on Flickr Untitled by ian gaskell, on Flickr Untitled by ian gaskell, on Flickr Untitled by ian gaskell, on Flickr6 points
-
For those who have endured the WIP for this, it needs no introduction, so let me introduce my 1/48 100% scratch-built A7V tank and base (I may have got a little carried away with the 'basic' base which is also 100% scratch-built and cost me £0.00). It would have been nice to use some figures (preferably in 'running away' poses), but of course none are available in this scale. Thanks to anyone who has offered help and encouragement during the build and particular thanks to @SleeperService for giving me the idea. If you're interested this is the WIP thread. Gorby.6 points
-
My first post in this section and my first successful water effect. I read a book a number of years ago called the Bedford Boys, for those who have not read it. It's about a group of national Guardsmen from Bedford, Virginia, they were part of the 116 Infantry Regiment 29th Infantry Division. They were also the first wave on Dog Green Sector Omaha beach June 6th 1944, on a visit to Normandy last year I went to Omaha beach for the first time. While the rest of my group were in a cafe, I went down on the beach to get some 100% genuine Omaha beach sand for a build I had started the year before. I used Italeri,s LCVP D-Day edition, various figures from Dragon and Masterbox with beach obstacles from Tamiya. There are various woodland scenics products used for the water. Dog Green sector June 7th 1944 Dog Green Sector 75 years on Some of the men from the Bedford Boys who didn't make it back. My build:6 points
-
Pictures, as promised. And, as I surmised, I need to do some rubbing down. Ah well. There are visible lines across the roof at the join and the rain gutter needs sorting, but I think I'm getting there. I found this small chrome grill in the car spares box and just couldn't resist. I've not finished with the front yet! I just didn't want that boring 'seen it a million times' VW look. The new door hinges can be seen here and on the first picture. the lower one has gone wonky! As I've said, the upper hinges have to stick out to give a parallel hinge line. I also had to cut down the drop down side panels. That went okay but I need to clean up the cab rear for a better look. Again on this side the rain channel needs sorting, it was hard to see what was (white) roof and stick on the (white) card strip accurately! So that's me hitting the wet and dry and micromesh today as I have a bit of spare time (amazingly). Then probably more primer. Off to bed early tonight. Up at 03:30 for a delivery trip to central London in the morning. Thanks for watching, Pete6 points
-
Hasegawa's 2018 reboxing of their 1:72 Zero with markings for Yoshika Miyafuji´s (Fuso Empire) striker of the Strike Witches anime. You may remember I already did two models based on this show, Getrud Barkhorn's Fw 190D-9 and Me 262 in 1:48. A fair amount of flash on the kit, even though the base kit of this 2018 reboxing was first done in 1993. Anyways, with all my models being in 1:48, I had forgotten how small 1:72 fighters were. Thinking back, I can´t believe I once built a 1:144 Fw 190 either. Decals were standard Hasegawa, thick but useful.6 points
-
Friends, This is the Fujimi F1M Pete floatplane. I built this kit a number of years ago. While this is the only biplane that I have ever built, I found the kit and subject to enjoyable and interesting. I used E-Z Line for rigging which by now is much too thick for 72nd scale aircraft and has since been supplanted by other types such as Uschi and Infiniti brands. I built this Pete straight out of the box and weathered and detailed it with pencils, paint, and pastels. I decided to be a bit creative with the display base which I use for other WWII Japanese Navy types. I`m guessing that the kit is a bit of a challenge to find anymore but I do recommend it. Thank you in advance!!!!! Respectfully submitted, Mike6 points
-
I've built a small squadron of the of the old Minicraft DC-3's over the years, but this was my first of the newer Roden offering. I must say, it's a lovely kit, correcting several of the former kit's more notable weaknesses, such as the short fin/rudder height and the engine spacing. Mods for the RCAF version were minimal, chiefly cutting off the tail cone of the civil version (which Roden left on this C-47 issue) and slight alterations to the antenna layout. Paints were Tamiya acrylics on the 'topside' and MM grey acrylic primer on the undersides. I used a little thinned enamel wash to take the 'toy' sheen off the NM paint job and to give it a bit of a 'lived in' look, but kept weathering to a minimum: from the photographs available, it looks like the proud crews kept these birds pretty 'tidy' throughout their service lives. This was also my first go at the lovely decals from Leading Edge, who specialize in Canadian subjects. The decals themselves were nearly ten years old (though very carefully stored), but other than being a little 'stiff' here and there, performed beautifully. No signs of cracking or splitting, nice deep color, and they settled down well with minimal setting solution needed. A quick and most enjoyable build.6 points
-
Hi to all This was one of my small experiments in modeling, as generally i am making airplanes mostly. So.....not my best effort but for now i must be happy with it Revell King Tiger Henschel turret, very nice model, with great details. In more experienced hands probably can look much better. Colors Gunze, weathering done with all i can get ... I hope you will like it5 points
-
Here is my recently completed Kaman Seasprite, an enjoyable build of an old kit. I decided to push myself and build a detailed interior, which as it turns very little can be seen. Airbrushed in acrylics, mainly Gunze and Tamiya with some Lifecolour also. This is only my second airbrushed model. The scratch built interior: Thanks for looking AW5 points
-
Bit of a slog but got the Harrier masked up for camouflage, all done with Tamiya tape. I've also re-pre-shaded emphasising the panel lines and marbling in-between. Couple of coats of dark green to go down next, fingers crossed!5 points
-
Got the interiors installed and closed the fuselage at last! I had to glue the fuselage halves literally an inch at a time, starting with the upper join at the nose, moving down the back of the fuselage using multiple clamps, rubber bands, and tape, and then repeating the process along the belly: I also added one of the two red lights I mentioned earlier. It was much easier than I had feared (never having done this before), and looks like the cat's meow! I'll wait until tomorrow to do the other light. First, I want to be sure the glue holding the fuselage together has fully set. Also, this light is in a tough place to work on, and I'll need a good night's rest before taking on that task.5 points
-
5 points
-
Spent a very interesting time talking to Alan Wilson (from Iceland) who produced the 1/48 resin Gannet AEW3 at Milton Keynes today. He has refined and re engineered the masters and improved his clear castings. The Gannet will be available again shortly. Keep an eye on this forum, as Alan intends to join the community as a manufacturer. He also spoke to Julien today and will be contacting Mike over a trading membership. Now, the fun doesn't stop there. This guy is a design engineer, and has manufactured masters for the following - (he had them there and I inspected them) 1/72 scale VC10 1/48 scale Vulcan 1/32 scale Buccaneer 1/144 scale Saro Princess Other masters not present cover 1/72 Hastings and 1/72 Shorts Belfast. He expects to have the Belfast available in around 6 weeks. These will be hollow cast resin, and will require some skills. They are not shake and bake. These masters were taped together and on display. Fine engraved surface detail. He actually produced these decades ago as part of his draughtsman's degree. Now I own one of his Gannets, and there are examples of the 1/144 Bristol Brabazon available now. The casting on the Brabazon is like porcelain! Be prepared to stump up resin prices and do some work, but these beauties exist in the flesh, and will be available direct from Alan in the near future. Just a point. Alan lives in Iceland and email answers - when he gets going - can take a day or two. He has a regular job as well as this sideline.4 points
-
I built a diorama for my fiftieth birthday ... my Citroen4 points
-
The original model was the Burrago as the basis for the construction, the body is completely redesigned, a lot of adjustments in the engine compartment, rebuilt frame, handmade strings and covered with the passenger's sidebar.4 points
-
I decided to pick this one out of my stash to give me something small to do. Plus I haven't built a WW2 German plane before so is a first. The Kit is a few yrs old now but quality is good. Here are the start pics for you . The cockpit looks dark but it actually isn't. Chris4 points
-
163.5 - 100.5 million years ago (Late Jurassic - Albian)4 points
-
I have sealed in the Aluminium underside of the aircraft with Quick shine gloss, and once dry, masked her up. Then came the task of preshading, there are a great many panel lines on this aircraft so it was going to be time consuming, and involve a lot of concentration! I mixed up some Vallejo black with a little thinner and began the task. I have found its important to blast air through the brush after each line /stroke is complete as it eliminates and splatter. I'm pretty happy with the results and look forward to laying down some of the camo over the top.4 points
-
So "And it came to pass that we repaired to an inn the garage for real file work to commence" All the necessary bits from the hobbies room were tooken down into the darkling depths Drawings, calipers, the model and the mould piece that needed reducing to less than the kit size so that the moulded bits will fit the kit were placed on the bench/bonnet The buck was placed into a tube to raise it high enough for a clear depth of pull Once the moulding device was organised I began reducing the buck's oversized ness There cometh a time when sihrsc needs a hand, this is it The resin, once hardened is really very hard and the sihrce begins to have its teeth blunted (time for a new one perhaps although it still files plastic well enough) so I drew on sihrce's big brother to help out The eihrsc was enlisted to help out Meet the eight inch half round second cut file, a beefy friend in need This has been instrumental in whipping the hard resin down to the required dimensions, just a wee bit skinnier than the original model parts The front screen section has been marked and reduced to give me a better defined front corner so the screen will fit easily With this resulting moulding If this works nicely I will consider dropping the moulding on instead of the kit's upperworks, a little reworking of the inner segment will ensue to make a new transmission deck under the new top Now then, where did I put the new Number 11s?4 points
-
After an extended delay (kitchen is wip too) i have some progress on the 177... Basic/main RLM 02 is on and i have started the disruptive cammo, applied with a cotton bud using watered down paint.. This will need a couple of applications and each one will move further in to the core of the pattern to hopefully leave the edges looking faded, we shall see! Final photo shows the propellor boss with painted on spiral. This is because i spat the dummy trying to apply those decals, which broke up on application. Spiral decals are spawn of the devil, and anyone that can use them are obviously possessed 😈lol!. Other progress was getting the canopy attached, building one of the three Fritz X missiles and building the exhausts. Slow progress of late, but i'm getting there. Thanks for looking, Cheers Greg4 points
-
Here’s an update: Karate guy (...remember him?) Well he’s now joined by an apprehensive dog stroker and a suspicious-looking armless chubby guy now. The whole dak has had that dark dirt wash rubbed down - I left some areas with much heavier dirt wash than others, and once happy I applied 3 successive coats of matt varnish to seal it. It’s been a while since i saw those boxes... Exhausts have been drilled out and undercarriage worked on, and painted after this shot... And I couldn’t resist a rough little test with chubby suspicious guy in situ (doors are white tack-ed in place) It’s been a really long build but there’s still a ton to do. Wish me luck!4 points
-
Catching up (nothing new then), and have to say that you would make an excellent blacksmith (or even jeweller with a bit of practice), if you ever found yourself without other gainful employment. That nacelle really is a work of art - and yes the obsession to get it right first time is something we scratch builders have to overcome if we are ever to get any better. You certainly show us how Tony - please keep on doing so - so much to learn. P4 points
-
Good day, ladies and gentlemen! It's my next model from Ukrainian manufacturer - AMP. It's typical 'shortrun' with good detailing.4 points
-
The last couple of days have seen the basic interior colour applied to the model and the tubular structure of the fuselage getting highlighted. I have yet to decide whether to highlight the stringers of not yet. I am off to Oxford for a couple of days and will think about that while I am away. Thanks for looking Martian 👽4 points
-
Fujimi 1/72 KV-107 II-A4 built as a rescue aircraft of the 101st squadron of the JGSDF based at Naha Okinawa. Paint: Halfords, Vallejo and Gunze Decals: Print Scale and kit Thanks for looking in. Craig.4 points
-
4 points

.thumb.jpg.a3c1d5bbcebc79ab61805be20902890f.jpg)


Wedge-TailedEaglePortraitRaptorDomains.thumb.jpg.41a306d3445a68f0f2df773e01776ea6.jpg)


This leaderboard is set to London/GMT+01:00