
Leaderboard


Popular Content
Showing content with the highest reputation on 26/04/19 in all areas
-
Finished at last, just in time for the Milton Keynes Modelkraft show at the weekend, so will take it there for display on the club stand. Been wanting to have a completed model of this aircraft for a long time, pleased that I have now eventually finished it. In Progress build link is below, highlighting the modifications, paintwork, scratchbuilding, home-made decals, my own resin engines etc etc: Of course, the model was carefully assembled with a "Whole Lotta Love" .... (sorry, I know, I just had to say it ...... ).22 points
-
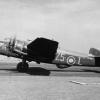
Final one for now, built this at the start of the year, excellent kit, built OOB. Airfix Dakota C4, Middle East Communications Squadron circa 1967. Again photographs taken using my ipad.21 points
-
21 points
-
One from last year, Lightning F3 of 5 Sqn, RAF Binbrook circa 1969. Built OOB, I found the Trumpeter kit excellent so will be building the F1 soon. Slight fogging on the windscreen but have now learnt how to overcome that particular problem.17 points
-
Not my usual subject so I may have made some mistakes along the way, but I couldn't resist building one of these . I think it just looks right.... Basic kit is of course the Revell one and the decals are the new ones from Two Six. I was hoping to add the real aircraft to my flight log on a couple of recent trips but no luck yet.. Thanks for looking. 20190425_133329[/url 20190425_133206 20190425_13321915 points
-
This is the older Revell kit, but despite it's age, it still builds into a nice model. The fit is generally pretty good and you do have the option to fold the wings. This is built straight from the box, with the roundels masked and painted on. The aircraft is one used in the 100 Hours, or more commonly known as the Soccer War between Honduras and El Salvador in 1969. It was the last air war fought with piston engined aircraft, Honduras flying Corsairs and El Salvador flying a mix of Mustangs and Corsairs. Surviving fighters on both sides continued to serve into the 1970's.15 points
-
Here is my recently completed Kaman Seasprite, an enjoyable build of an old kit. I decided to push myself and build a detailed interior, which as it turns very little can be seen. Airbrushed in acrylics, mainly Gunze and Tamiya with some Lifecolour also. This is only my second airbrushed model. The scratch built interior: Thanks for looking AW14 points
-
Hi all Finished F-5 F from Italeri, nice old kit with new decals. Not as good as ESCI mold but i like it. Always wanted to make MIG 28 but as there is no model of it in 1:72 i done this one instead TO be serious, nice model with some small issues, did not wanted to engrave panel lines just wanted it OOB. I had some issues with gloss varnish...but managed to keep it acceptable at the end. Decals are very thick..look nice but even after a 5 or 6 layers of varnish still thick... At the end i have this black aggressor...and i am happy I hope you will like it too Best regards and images at the end13 points
-
As I'm on a role, here's my Airfix Chinook HC1, 78 Sqn at RAF Mount Pleasant from circa 1987. As all my kits, 1/72, built OOB with after market decals. Not great photo's as they were taken on my ipad.12 points
-
This is my Lockheed AP-2H Neptune using the Hasegawa P2V-7 kit and the Blackbird conversion set and decals. The AP-2H's were 4 P-2H (P2V-7) Neptunes converted to a Gunship configuration and used in Viet Nam. They were equipped with a Forward Looking IR (FLIR)sensor and Low Light TV (LLTV) in a pod in the nose, replacement radar, tail turret, fuselage mounted grenade launchers, downwards firing wing mounted miniguns and Side Looking Airborne Radar (SLAR). Bombs and napalm could also be carried on under wing pylons. In addition both the piston and jet engines where equipped with sound dampeners. They were then painted with a 3 color gray camouflage. While there is at least one of these on display much of the special equipment such as the SLAR, sound dampers and armament was removed when they were when they were withdrawn from Viet Nam so, good photographic documentation is almost none existent. The Hasegawa kit is old and shows its age with raised panel lines, flash, and a bare cockpit but, it went together well. I used a combination of the Pavla resin interior overlayed with the Eduard etched brass that I think came out well. One comment is that the Pavla set includes 2 nicely cast seats for the pilot and copilot but, it does not have one for the observer in the nose. So I had to use the kit one spruced up with the Eduard seat belts. The Blackbird resin and decals were excellent, but both instructions were very lacking. The sound dampers were included but there were no instructions on mounting or coloring, and the some total of the decal instruction was a small left side profile. I assume this is because of the above mentioned lack of photos, but some commentary would have been helpful. Also the decals are missing the prop warning stripe and the jet intake warning chevron. I am guessing this is because there was no room on the sheet for them. Both of these are different then the normal red stripes and chevron that are solid red lines. These should be thin parallel lines with a space between them. I cheated and used a solid line for the prop warning, but punted on the jet intake warning. So on to the pictures. So I made some mods; Uncovered the cheek windows, repainted the SLAR and jet engine sound dampers and added some Mk 82 bombs I still have 2 more Neptunes that I plan on building: an OOB P2V-7 and a P2V-5 with the Blackbird conversion, but these will have to wait since next up is the Mach 2 (arrg) Ryan X-13 Verijet. Enjoy12 points
-
Good day, ladies and gentlemen! It's my next model from Ukrainian manufacturer - AMP. It's typical 'shortrun' with good detailing.12 points
-
..... in my box of P-51 spares I hadn't looked in for ages! I built this way back ... maybe late 60's or very early 1970's. At least at the time the Almark decal sheet came out and which I used on this build. Basically the original Airfix P-51 but with very fine rivet detail and raised lines for the controls like flaps and ailerons!. Closed up the u/c as they got broken off but did build up the fin fillet( maybe not quite 100% accurate but works) from Humbrol Plastic Wood... anyone remember the stuff?? I recall I was influenced on the mod by reading Alan Hall articles in the original red mast head Airfix magzines from the mid 1960's!!. Painted with Airfix silver G8 or possibly Humbrol silver no. 11. Decals for RNZAF from the Almark set which also has a P-40 and Corsair. I still have an unused set of the same somewhere still in its poly pack! It needs a wipe down with a damp cloth to rid it of grime accumulated over the decades. The stand is a recent addition coming from my recent Airfix Harvard build. One for me to treasure as one of my earliest builds.11 points
-
After a run of difficult models, I fancied doing something simple for a change, at least that was the plan! So here is Airfix's 1974 model of the Spitfire Vb, which has been released and re-boxed several times. It is a reasonably accurate kit, although much simpler than today's CAD generated models. EN821, 243 Sqdn, Ouston, July 1942 (2) w by Philip Pain, on Flickr EN821, 243 Sqdn, Ouston, July 1942 (5) w by Philip Pain, on Flickr EN821, 243 Sqdn, Ouston, July 1942 (12) w by Philip Pain, on Flickr EN821, 243 Sqdn, Ouston, July 1942 (14) w by Philip Pain, on Flickr EN821, 243 Sqdn, Ouston, July 1942 (16) w by Philip Pain, on Flickr I had to find a replacement for the canopy, as mine had bad air bubbles. Also fitted a larger oil cooler (from a more modern Airfix kit), and scratch built two heating pipes coming out of the rear of the exhausts. The marking became a big challenge, as the real machine had obviously started life with 1941 style roundels (and their brighter colours), before being partly repainted into the mid-1942 scheme. Also the code letters were a funny size, which I couldn't quite find a match for. The letter 'M' is always difficult, as no matter how many M's you have on decal sheets, they never include the one you want, so I made mine using letter 'V's. It is a Spitfire Mk.Vb serial EN821 of 243 Squadron at RAF Ouston, Northumberland in July 1942. It was being flown by their commander Squadron Leader Allan E.Johnston when the "Aeroplane Magazine" took a series of photos, which have since been widely published. Does this one look familiar to you? 243 Sqn Ouston 1942 original by Philip Pain, on Flickr You will recognise it as the following art print that has become the most common Spitfire painting to adorn living room walls; Vickers Supermarine Spitfire Mark VB of 243 Squadron by Philip Pain, on Flickr And then the story of EN821 gets even more interesting. Later on in 1942 it moved on to 65 Squadron, before being returned to manufacturers throughout 1943, for various updates and mods. In February 1944 it was transferred to the Fleet Air Arm, but apparently it was not 'navalised' or hooked, just being intended for shore based training. It was issued to 808 Squadron at RNAS Lee-on-Solent, and then on D-Day 6th June 1944 it was shot down by an enemy aircraft over Le Havre while spotting and gun-laying for Royal Navy warships. Sadly Sub Lieutenant Cogill was seen struggling to bail out, but he was killed. Most versions of D-Day say that the Luftwaffe was nowhere to be seen, but 129 allied aircraft were lost during the invasion. It must have been a rare event for an aircraft to fall to a Luftwaffe fighter. It is not known if EN821 wore navy camouflage, but it would undoubtedly have had full D-Day stripes.10 points
-
Hi There, Right Forum this time..... This has been built as a surprise present for Innis when he comes back from his holiday. I picked it up from those wonderful people at Creative Models when they had it as one of their special weekly offers. I wanted to try using the AK Extreme Metals and Gauzy Intermediate to see how they looked together. The paints used were Ultimate Primer, Vallejo Model Air and Extreme Metals Aluminium and Polished Aluminium. I was trying to do this as quickly as possible between Innis going away and work. I realise now that I need to get the primer absolutely flat and perfect for the NMF so there are some lumps and bumps. I also think that I need to use my H&S with the 0.2 needle to coat the Intermediate Agent as the Sparmax Max 3 laid it down a little thick and caused numerous pools and runs. Well I caused it but the H&s will give me more control I think. still had a blast doing it and am looking forward to giving it to the wee fella on his return tomorrow just before we leave for Perth and the Scottish Nationals, my first time there and really looking forward to it. Hope to see some of you. Oh Yes, really must try to remember to blow the dust away before clear coating after putting the transfers on. The transfers look silvered in the photos but it really doesn't show on the kit. On with the pictures Many Thanks for looking and any advice/criticism gratefully received Cheers, Alistair10 points
-
Not often posted as my modelling isn't up to most on this site but fairly happy with how this turned out. Hasegawa kit with aftermarket drop tanks, practice bombs, ladder and decals. 6 Sqn, RAF Coltishall, XX766 from 1992.9 points
-
Hi all - some photos from the airshow at the weekend - this is really just a small selection of what was on view - It was a great day for it - we went on the Saturday... good thing too as the Sunday was cancelled due to the weather...8 points
-
Morning from Canberra on ANZAC Day Here are a couple of Luftwaffe twins that lived on the shelf of doom for years. I think I started both when I still lived in Sydney, so we're looking at close to twenty years ago! Had no end of trouble with silvering on the Ta154. So much so I'm going to have another crack at the wing crosses some time. Cheers, Matt The Me 410 is the Fine Molds kit, which despite a few fit issues, comes up well. This one is from 14./KG2 in France in 1944 And the Ta154 is Hasegawa's kit, using the Owl photoetch FuG 202 aerials8 points
-
After a modicum of trimmagery This is enticing, first pull from an unfinished block gives us the above Fitted to test If it wasnt too wide at the top I might even be tempted to let in pieces of this above the cockpit See what I mean? I think this could be used on the kit to make accurate window panels Now I can work on narrowing the upperworks of the mould and having another knock The mould is definitely on track, yeehaw8 points
-
Got some paint on Baders face whilst on Holiday last week in sunny Milford on sea;8 points
-
After finishing the Revell 1:32 Fw 190A-8/R11, I decided to tackle Tamiya's Bf 109E-3 in 1:48. Started it on 22/4 and finished it earlier today. I like that Tamiya provided the option for the flaps and slats down, it gives character to the model. And here are two photos of my Airfix Bf 109E-4/N in 1:48, built too as Adolf Galland's aircraft.8 points
-
8 points
-
Hi All I got the gear doors on, and after a while couldn't wait... Nose Sitter! I started thinning down the exhausts a bit But caught the aerial on my sleeve, heard it pinging across the galaxy, and decided to wait and calm down. Comments, suggestions and a kings ransom for the Carpet Monster dead or alive Cheers Steve8 points
-
Just as Airfix announce the new Buccaneer kit, I finish the old kit in 16 Sqn colours, based at RAF Laarbruch. Bit of a dog of a kit, took lots of filling and finally just gave up when it started to look like a Buccaneer.7 points
-
Yet another one finished. This is the Hasegawa kit modified. Decals are from Model Alliance. Rota fold is as per the kit …….. not the best in the world. If nothing else it's colourful. Please feel free to comment etc. Thanks for looking Dick7 points
-
...and in the same resort we saw this guy a couple of times...7 points
-
OK Alan I have the guest house's address and will post to there Shall I search my archival decal bank for anything else you might need? Tell me if there is Now then back on the H-19 front I have been playing at times with the block of resinous blob and being satisfied it can be used I went in to part two of the process I had in mind Having this to hand and the subsequent block of resin I was brave enough to go a further stage With the resin block on the bonnet (temporary workbench in the garage) I carved away large lumps of unwanted plasticene to make a new latex mould of a smaller footprint (Easier carving, this resin is very hard) canopy buck This shows the reshaped plasticene buck and the first resin copy of the newer shape Because using it to make a clear upper section of the fuselage was plan A I inserted a peg (half a peg actually) into the setting resin Fifteen minutes I wont be getting back whilst I held the peg steady in the 'mix' This is nearer the proper shape and as such I simply filed it flatter and tried a 'pull' The size comparison shot here now Looks close Get the acetate warm, then hot And voila, we have Time to practise cutting out now I may be...7 points
-
Here's who I met on my holiday … a cute tropical tiger-stripe, preferring to rest at a side-table in the yard of our resort. I had to pass him by every day on the way to my room, and we quickly became friends. Then, he brought all his siblings to welcome me.7 points
-
Slower pace on the old tug due reading a good book in the sunshine. Bulwarks are eventually on although a bit scappy in places, back-end was a pita, ho-hum. Bulwark top rail now on. ...and with that, I can now think about cutting slots the 'side drains' (or whatever they're called). Then, it'll be tidying-up exercise before moving on. Stuart7 points
-
I finally glued the hull together ... I started the case so here are the pictures 🙂 cheers, Dirk7 points
-
I could see that Thanks Johnny, very kind of you! Now you're being too kind As far as this kit goes in terms of building, I didn't really do much, it's that good! Bank holiday today in Italy, which means long WE ahead and eventually some time for modelling. In fact, I did put on all the decals/stickers/stencils tanks first and their pylons Aircraft The ideograms on each wings are supplied as a single decal, but I chose to cut the single pieces out to avoid having too much clear film to deal with Port side and the tail The big tail decals required multiple applications of Tamiya Mark Fit strong. They are pretty thick (not as bad as in older Tamiya kit, though), and I'm just glad I limited the use of decals to these and the stencils. To properly refine them, once set I scored along the panel lines covered by them with a brand new blade and a razor blade, adding a bit of setting solution with a fine tipped brush right afterwards. The panel lines wash will tell if I did a good job I decided to use the kit decals for the gun through patches, too: I could have painted them on, but I think they look more like actual patches this way, in this scale While waiting for everything to settle before spraying a protective gloss clear coat, I completed the main struts assembly and the exhausts weathering That's it for tonight, comments welcome Ciao7 points
-
17 years ago I emailed Flankerman and asked if he had any pictures of the 1988 Su-27M/Su-35 prototype that was later left at Monino. He very kindly got back to me with a goldmine. The reference photos he sent me were a game changer as he had discovered the disruptive scheme was mirrored underneath and had a bundle of photos to illustrate it. I loved the Ferris like camouflage but also the new Su-27M nose profile with the traditional cropped fins as later Su-27Ms had the squared tips. I did all the hard work expected of an Academy and Sol conversion way back then and put it away; it sat in the box (with the occasional peeks) until this year. I've made a real effort to finish unfinished projects and clear the stash a bit. I'm pleased to say it's the last 1/48 Academy for me (7 built)! I'm now looking forward to all the newer companies much improved kits. Colors were mostly AKAN mixes, Neomega cockpit, Eduard etched details, DANmodels intake covers, Armory wheels and one of Haneto's (Fairy-Hobby) beautiful corrected canopies. The decals were from Begemot except for the stars which were hand made. I s I spent the last few days repairing my Su-37 Terminator so I could take a photo similar to this one of 711 and 701 together. i And finish with a hat trick.6 points
-
Dear Modellers, I was a bit surprised, never thought there was so much interest in old airplanes of the Thirties. Fortunately, for many years, I have built several models in scratch, so in near future I like to show you some more. Here is an american built version, the Fokker F-10A, scratch, 1/48. It was developed from a F.VIIb/3m, the fuselage was wider and longer, and it had also the longer wingspan. The construction of my model is the same as the Super Universal, larger and there are two engines more 🙂 Enjoy the pictures ! With kind regards, JohnHaa6 points
-
Roman I know what you mean about 'holiday cats' - in Samos a few years back we came across the 'mountain of cats'... with the 'king of the cats' on top of the pile... ...what a cutie.6 points
-
Hi everyone, wow does time fly when you are having fun thanks for all the comments have not been on for a while, but very close to finishing my and my dear wife's hobby room not touch a model since last July 😥 Put some laminate down for the floor (no carpet 🙂) then added some cabinets and a small fridge for the CA glue etc, then added a lot of LED lights Put a nice TV in there so that we can watch the hockey games 😂 then started making the frame work to hold the benches Then made the bench frame out of 1 x 3 Fir, started by joining two pieces and made Tee's for added strength 🏋️♂️ This is how they turned out Then added 3/4" MDF for bench tops After that was done added 1 x 2 Fir all around edges Next up was then to glue the Formica onto the MDF and route around edges with 1 1/16 bevel tool Painting of the frames are done did not take pictures of that so now just started to put equipment in so next pic's will be of the finish room Until next time Regards Richard6 points
-
Hi Guys, I just finished my Hasegawa 1/48 Fw190 A4, with the markings belonging to Hannes Trautloft, Kommodore JG54, Russia, at the beginning of 1943. It was built in parallel with an old-tooled Eduard Fw190A5, which is still in progress at this time. Anyway, I'm happy that I finished one of them and I hope you will like it. The entire build log is here, if you are interested to see it. Thanks for looking and cheers,5 points
-
It's kinda cool of you guys to boost my waning ego thusly, but in fact this is the easy bit pulling a piece of acetate onto a raw buck body The next bit might be called mensuration, certainly requiring decent measurement in place A few pictures will show you what is involved, rest assured the real work is just about to begin Not tonight though, it is Friday Now the moulded piece looks decent-ish until you begin measuring The roof needs to be this wide at the upper sill line Pardon my clumsy but I cannot get the shot when the calipers are 'on target' 0.0715" at the upper cill line The moulded piece has some way to go yet And the base measurement should be But misses that target by a mile Metricated friends might like that in Continentale There is some considerable way to go, see you laters5 points
-
Not after what happened last time when you fell overboard... Bloody wrecked it climbing back on board so you did!5 points
-
MiG-15bis Soviet Airforce 59th Air Army Wiener Neustadt West 1955 1/48 here: work in progress as BM is going to move to a new server soon - thanks for that, by the way and your great job! - I am putting up some quick photos here if time allows, I will update those until the deadline -Edit :happened thanks everybody for your great input, hosts and BM for setting up this GB! lots of fun and great info! I am still looking for a photo of Mig-15 actually based in Austria during the Allied Occupation era form 1945 -55, so if anyone of you can give me a hit of where to find on, would be great5 points
-
A belated Happy Easter all! This was finished the other day. AMG's Kingcobra finished with Begemot's decals to represent an French Cobra of GC 1/5 "Vendee" based in Indochina around 1949. AMG's kit is very nice but needs some care in construction to ensure assembly is neat. The clear parts fit well with a little sanding around the door rims ( always an issue for the car door Cobra family) but their clarity is a little bottle glass! The model NEEDS nose weight - I had to add more into the nose gear bay and the underbelly tank as the lead in the nose wasn't enough. This is especially true if you extend the nose oleo to give a typical sit for the P-63. If I was to build another I'd use one of those "liquid gravity" type systems to fill every crevice in the nose and probably the wing leading edges too!! Most French Kingcobras show the nose wheel hub uncovered - so this was scratch built from plasticard and added to the separate plastic kit tyres. Gun barrels were replaced with Albion Alloys' tubing, and extra plumbing added to the wing tanks. Finish is decanted Tamiya silver acrylics, with panels picked out in tinted Tamiya silvers and Vallejo metal colours, the whole patchwork was then heavily post shaded and then blended using a mix of the base colour and Tamiya gloss. The Begemot decals were thin and unresponsive to my usual Mr Mark Setter but eventually settled using good old Micro Sol. They stick like limpets but if you use a little spit ( yep spit - an old Propagteam decal trick I remembered) as well as setting solution, then they slide around like an Ice lolly on a Morris Marina roof in August 1976 Final weathering with MIG Starship Filth oil brusher, and some airbrushed exhaust over the Galleria matt varnish. You'll note that the scale "Mecos" cleaned the engine access panel on one side while servicing the engine, rather than the the exhaust staining going "a la forme du poire" The P-63 was by all accounts a decent fighter that suffered from being 'last amongst equals'. It looks like it means business though, and French roundels always enhance any subject in my opinion. Hope you like her! All comments welcome as ever. On les aura! Jonners5 points
-
I feel I should put a blazer on now after those last few photos Martian, so tres nautical does it look with those fittings accumulating now. From The Journal of May 1896. 'Yachting is the "fierce go" this season amongst women of independent fortune...'5 points
-
Good start, reminds me of the VIIc iI've done few years back. I had that nice Griffon set as well for the earlier version. What goes well with this one is the Preiser Figures in 1:144. Sorry for off top5 points
-
I read a book a number of years ago called the Bedford Boys, for those who have not read it. It's about a group of national Guardsmen from Bedford, Virginia, they were part of the 116 Infantry Regiment 29th Infantry Division. They were also the first wave on Dog Green Sector Omaha beach June 6th 1944, on a visit to Normandy last year I went to Omaha beach for the first time. While the rest of my group were in a cafe, I went down on the beach to get some 100% genuine Omaha beach sand for a build I had started the year before. I used Italeri,s LCVP D-Day edition, various figures from Dragon and Masterbox with beach obstacles from Tamiya. There are various woodland scenics products used for the water. Dog Green sector June 7th 1944 Dog Green Sector 75 years on Some of the men from the Bedford Boys who didn't make it back. My build:4 points
-
Since I've yet to decide what to do with my Italian Sabre, I've decided to take advantage of the Easter holidays to try a "blitz build" of another subject for this GB. Now when I say Easter holidays I should make myself a bit clearer... Easter was the 21st, meaning that Saturday 20th, Sunday 21st and Monday 22nd would have been good days for the hobby. Of course visits to parents and friends reduced this time, but in any case it's better than a normal weekend. Then there was the 25th, that in Italy is National Holiday ! And here comes the "ponte"... Quick lesson of Italian culture: ponte in italian means bridge. Any bridge, but when it comes to holidays, a "ponte" is a bridge between two holidays that are close together. For example. national holiday on thursday, just add a day and stay home til the following Monday. With so many people taking advantage of this, it's become common for many companies to stay closed in such occasions.. try to find a company open today for example... 😁 Now next Wednesday it will be May 1st... meaning another public holiday ! While I've not really exploited any of these "bridges", the fact that most customers are either closed or working at limited capacity means that I can take it a bit easier and so devote some more time to the hobby. A check in the stash showed several potential candidates but clearly a quick build requires an easy kit to build. So in the end the choice was a kit from one of the companies that generally guarantee a good hassle-free build: good old Hasegawa ! The Hasegawa F-86D is typical of the philosophy of the Japanese company: sharply moulded parts with excellent surface detail, generally good fit and relatively little internal detail. The box has a nice picture of two Japanese Ds. As Japan used a large number of these it's only logical that Hasegawa issued a box specifically for the Japanese aircraft Inside the box are 6 sprues, all bagged. Clear parts are bagged with the decals, so no risk of transparencies being damaged by scratches in the box As said before, all parts are beautifully moulded in a hard grey plastic. I like Hasegawa's plastic, is hard enough to retain good details but easy enough to cut and sand. I'd like to see other companies using a similar plastic... The total number of parts is not high, this seems a simple kit even if there are a few options. (don't know why Village decided to rotate these pictures though...) Of course since this is a GB dedicated to the NATO-WarPac confrontation in the '50s I can't use the kit decals and this will be sorted by this old Microscale sheet. In any case Hasegawa offers decals for a good number of colourful Japanese aircraft, I may use them on the Airfix F-86D I have in the stash.. The aircraft I'll build is 52-3946 of the 513th FIS, with red and black tail. This unit markings have fascinated me since I first saw them in Squadon Signal's "USAFE In Color" some 25 year ago....4 points
-
The title says it all, and Photobucket seems to be behaving quite well today! Cheers, Matt4 points
-
I have been experimenting lately with different burnt out effects lately. As you can see in some pics I have tried simulating carbon fibers as they literally tear into almost thread-like material, by using disinfection wipes. It looks 'OK' but not quite perfect. I have added more modulation effects on the cab and more weathering on the overall cab and truck as a whole. I think , I am satisfied with the results , especially, after taking some outside photos of the model. What do you guys think?4 points
-
I've yet to try that with a photograph of that vintage and not arrive at wild results unfortunately. Even when I am 100% certain of the paint I'm seeing I've so far been incapable of finding a digital sample that compares well to the real colour. It's not even possible to trend the differences. Lighting, camera settings, any optical filters used by the kind of photographer that would have had access to colour film, film type etc etc all conspire to render photographs indicative only. They can only be interpretted, not analysed.4 points
-
Some more progress. Everything is now on the model except the small yellow star aerial on the nose and the struts for the Viper intake doors. I'm leaving those till the very end after final glossing so they don't get broken off. The wing decals arrived from my mate in Bexhill so I decided to try some more decaling. I varnished (liberally) the Aerclub decals that I intended to use especially the red and white serials. I started with the "B" on the nose, still the flaming things broke up, it took ages putting them back together. Then the wing roundels, were applied, the white was pretty transparent so I had to double them up. Not ideal but necessary. The fuselage roundels went on nicely as did the RAF titles. I then attempted the under-wing serials, again they broke up terribly and had to be bodged somewhat. The more this model annoys me the more I think I should have waited for Revell's new Shackleton MR. 3 Phase 3 kit being released later this year. I going to finish the Revell AEW Shack I have partially built after this one, just for some "shake n bake" therapy. Next job is the rest of the wing walk yellow lines but it will take me a few days to work myself up to doing them! Thanks for looking Ian4 points
-
Don't involve me in all this.....I remember the sanitary situation very well thank you, I spent most of a flight locked in an Imperial thunderbox on my way back from an exceptionally destructive regimental 'booze tour' reunion in Alexandria in an HP42, during a particularly violent thunderstorm. I seem to recall sheets of gilded lace, a Hercules bicycle pump and a big gold bucket were the order of the day...(Incidentally if I remember correctly Izal came in a variety of grits, depending, of course, on the occasion).4 points
-
With the cockpit completed I could focus on the external parts. First and easiest job was gluing the wings together. No big deal here, the fit of the parts was perfect: Sabre enthusiasts will notice that I've made a clear choice here: the F-86D featured the early narrow chord slatted wing and slats were generally extended when the aircraft was on the ground. Hasegawa does not give extended slats, I could have cut them and placed them extended, would have been a nice touch... however if this has to be a quick build, there's no time to work on the slats. Slats could be kept closed and "my aircraft" had them closed that day... 😁 On the fuselage however I reproduced some proper detail, thanks to one of the options offered by Hasegawa: the Ds featured two different intake arrangements on the fuselage for what I believe is the afterburner cooling intake. The original had a NACA intake in the fuselage sides, these were later replaced by a large scoop intake. My aircraft had the latter so the relevant part was cut from the sprues and placed on the fuselage. This requires sanding the bulged area behind the original NACA intake, nothing major but as the model will be finished in natural metal I tried to avoid scratching the plastic. The picture below shows one side with the original intake and the other with the new scoop in place. The picture above also shows the many vortex generators that these aircrafr featured on the rear fuselage and tailplanes. Hasegawa moulded these as solid plastic, they are a bit on the thick side but it's not easy to mould them. The Special Hobby L and K kits have PE parts but adding all these is a nightmare... in my case I'll not replace the hasegawa parts, it's a quick build afterall... With the intakes sorted on each fuselage half I started preparing these for gluing... first I added the intake/front wheel well (two parts glued together, upper and lower. On top of this I added some fishing weight, glued in place with my trusted silicone sealant. Then I added the two small side panels, again adorned with my home-made decals. Dryfitting the fuselage halves and the nose cone I realised that the latter was very slightly wider than the fuselage at the very top so I decided to sort the matter before assembly: a small thin plasticard wedge at the very front of the fuselage will sort this. Nothing was added at the lower end as fit here looked good. After gluing all parts together and a little sanding around the nose cone and on the fuselage top I had this: Not too bad ! There seems to be a gap behind the wedge ahead of the cockpit but this is actually filled with clear resin. I'll only see if the filler did its job properly after a coat of primer, but should be ok. One thing that can be noticed is howevr that the cockpit is missing... yes it is ! Unfortunately the fit of the cockpit is a bit vague in this kit, and in the end I decided to leave the cockpit out and only glue it in place after the fuselage was closed. This meant removing the side panels and while attempting to fit everything in the main panel also detached... oh well....4 points
-
"MERSU" Messerschmitt Bf 109 G-2/R1 HLeLv 11, Ilmavoimat, Pori 1946 Build thread here AZmodel 1:72 G-several variants kit InScale 72 decalbash Eduard steel photoetch seat belts Humbrol enamel paints brushed on Tamiya rattle can flat varnish on top MT-230 was one of the very few Mersus that received the full olive green-black-light blue "Finnish warpaint" during the continuation war. Mercedes-Benz cars have traditionally been called "Mersu" in Finland, even before the wars. It was quite natural that Messerschmitts, arriving in 1943, got the same shorter and more "pronouncable" name. Thanks to Col. and Enzo Matrix for the GB 🙂.4 points

.thumb.JPG.2ce06c4ff2300a5faba93aaeacbdab25.JPG)

Wedge-TailedEaglePortraitRaptorDomains.thumb.jpg.41a306d3445a68f0f2df773e01776ea6.jpg)


.thumb.JPG.3498f40362ff13ebfc4b2e45abbd545e.JPG)


copy.thumb.jpg.d8f94c146f5d2da12880c4799901d6dc.jpg)
.thumb.JPG.ca9d91d3c605f2ca36aeec8f5a1b648a.JPG)


This leaderboard is set to London/GMT+01:00