
Leaderboard


Popular Content
Showing content with the highest reputation on 19/04/19 in all areas
-
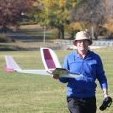
This one proved a lot more difficult than I thought it would, but I reckon the end result is worth it. It's an old 1/72 Matchbox HS125 converted to become the Blue Vixen (Sea Harrier FA2) radar/weapons integration trials aircraft, using putty and elbow grease! The nose was cloned from an Airfix FA2, using silicon and Milliput, to give me: New nose Block unused cabin windows Stbd Cockpit modifications (but only those that can be seen!) Doppler altimeter fairing under fuselage Wing Pylon Various underwing strakes and flap operating fairings Open up and fill landing lights Open up and fill Nav Lights Add new antennae FredT28 points
-
Hi.....this is the last born.....1\48 Gwh T-33A in Italian colorfull dressing.....23 points
-
I present the RusAir resin IL-18 finished as CCCP-75717 an early “Salon” IL-18V. Built in 1961, the real aircraft was initially used for transporting VIPs, who apparently included Premier Nikita Krushchev and pioneering cosmonaut Yuri Gagarin, until that role was taken over by jets. In 1975 it suffered an undercarriage collapse and never flew again, probably being broken up for spares Although I tend to avoid resin kits I make an exception for RusAir. Their IL-18 is absolutely gorgeous and a joy to build. I really can’t speak too highly of the moulding quality and attention to detail which are streets ahead of any other 1/144 IL-18 kit on the market. In the normal style of Russian resins the fuselage is split vertically like a conventional injection moulded kit and not solid like Authentic Airliners or Welsh Models. Rus-Air thoughtfully provide holes to drill for locating pegs to assist with fitting the wings and tailplanes. They even give you slots for plastic tabs to help align the engines. Very little filler was required, in fact one wing root and the number 2 engine needed none at all. The only slightly fraught part of the build was assembling the separate propellor blades and hubs. These need really careful handling. The blades must be sawn off the casting block, trying to use a knife risks breakage as I found out the hard way. It’s also quite easy to get the blades back to front, another thing I found out the hard way. The original plan was to use Revaro decals. They were designed for the Eastern Express kit and preliminary checking with photocopies suggested there would be minor fit issues on the RusAir model but nothing unfixable. However when I actually came to use them the Revaro decals flatly refused to soak off the backing sheet and they really aren’t a product I could recommend. The upshot was that I had to use the kit decals - shock, horror! Slightly to my surprise these turned out to be pretty decent and I ended up wishing I hadn’t wasted money and effort sourcing the Revaro sheet. With the liberal use of Microscale Liquid Decal Film and plenty of strong (red label) DACO solvent around the nose the kit decals coped stoically with many indignities. The end result is by no means perfect but if you want an early Aeroflot IL-18 it’s the only way to go once Revaro is ruled out. White paint is Halfords and natural metal is AK Interactive. There is very little weathering on the model - it's reasonable to assume that an aircraft used for transporting the Premier would be kept clean! I enjoyed the Rus-Air IL-18 so much that I’ve bought another one which will probably end up in Malev livery. I’ve also pushed the boat out and bought their limited edition Tu-114 which I wanted to grab before it went off the market. That should be a challenging, fun build. Thanks for looking and as always constructive criticism is welcome. Dave G21 points
-
hi all, My latest...21 points
-
Built out of the box with Eduard paint masks for the wheels and canopy. This is the original tooling and had a bit of soft panel lines around the engine doors. I didn’t really enjoy building this that much, it’s a bit too big but weathering was fun. Apologies for the lousy pictures but the size of the model made finding a suitable base and background difficult. The observant will spot two missing aerial, they broke off during handling and I didn’t notice until after I’d finished.20 points
-
Not quite finished - needs a few aerials, the wheels need touching up and the canopy needs the side blister panels - but here's a photo of the Lancastrian C.6 as she stands.18 points
-
Built over a number of years mostly due to frustration with the kit/builder interface, even did something else for about 10 months or so, but finally it's finished. Focke Wulf Fw 190V-18 Wkn.0040 CF+OY 1/72 scale MPM Kit No.72033. Built 05Oct2015 to 13Apr2019. The box, A bit of history, "The Fw 190V-18 was originally an Fw 190A-0 W.No.0040 CF+OY that was modified for high altitude work by Kurt Tank originally utilising a Daimler Benz DB603G engine, but due to development probs with the engine the aircraft stood in a separate hangar for weeks so Tank decided to install an interim installation of a DB603A-1 with the TK9AC Hirth turbocharger, designed to boost power output in the rarefied air at high altitude and fitted with a four blade propeller. It turned out that there were not going to be any problems installing the engine, the turbocharger was going to require a number constructional changes. It was fitted below the fuselage with the large air intake, reminiscent of the P-51 Mustang, almost touching the ground! The engineers used a turbine propelled by the engine exhaust fumes, which were transferred by two long ducting pipes' running along the fuselage sides. The turbine propelled a compressor and the compressed air was cooled and delivered to the engine compressor. When all that had been dealt with, the engineers and mechanics stood round their creation to have a look at it. One of them said carelessly "Look what we've created." "A 'kangaroo'" another one replied. The name was unofficially accepted, and from then on, both DB603-fitted machines were called 'Kangaroos' at Focke Wulf. An unfortunate name really as they were really only capable of short 'hops'. Foreseeing flight stability problems, the engineers gave the Fw 190V-18 a broader chord vertical stab and rudder. On 10Dec1942 the V-18 was sent to Daimler Benz at Echterdingen, where factory test pilots could not handle it at all. The aircraft would rather jump than fly. "After all, it's a Kangaroo," one pilot reportedly said. Therefore Kurt Tank instructed Focke Wulf's chief test pilot, Hptm Hans Sander, to personally test the V-18 in flight. On a cold January morning Hans Sander climbed into the cockpit and commenced take-off procedures. Getting airborne correctly he climbed and disappeared into the cloudy sky. Less than an hour later he returned to the field and on landing the aircraft rapidly dropped it's tail the tailwheel hitting the ground. The aircraft leapt just like it's namesake!! If it were not for Sander's experience he would've been killed, but he managed to wrestle the aircraft back to a three point landing as he would have with a normal Fw 190. Even so, the V-18's tail rose a few more times causing some rapid changes of taxi direction before coming to a stop. He switched of the engine, and sat motionless in the cockpit for a while taking deep breaths. When the designers ran up to the cockpit, he got out and discussed the flight with them; unstable in the climb, impossible to trim with a tendency to snake at altitude. He then proceeded to fly nine more take offs and thankfully for him as many landings before he informed Tank the aircraft was a complete failure and indeed dangerous for pilots at this stage. It had multiple stability and power problems, leading Sander to conclude that it was completely unsuitable for flying before extensive modifications were carried out. A special team of Focke Wulf technicians and Daimler Benz engineers were immediately set to work on the problems, just where to start? It was now called the Fw 190V-18/U1 and flew another 30 hours with various mods without any considerable improvement to it's performance or handling. When the V-18 achieved 680kph at 11000m the engineers were delighted but an irritated Sander stated "I could have achieved the same without that damn supercharger!" This was not the end of the 'kangaroo' saga as Fock Wulf built a further five prototypes based on the Fw 190A-1 incorporating the lessons learned by the V-18 during it's flights. Slowly this attempt to produce an FW 190C was abandoned." The finished build, More pics soon,17 points
-
Piper PA 25 235 Pawnee C , glider tug plane - Aero Club Muhlheim an der Ruhr e.V. , Germany. AEROPOXY resin kit, 1/72. OOB , Mr Color gloss white, Revell Dayglo Orange.15 points
-
On the workbench Compared to subject material More comparison to source. Headrest corrected Taking pride of place on the finished shelf Next to my poor Pup (almost reconstructed) This is what it started from, First moldigs in 30 years13 points
-
This is my first go at a 1/48 kit - I've always preferred 1/72 but my eyes are beginning to complain! It's an OOB build which is actually out of the box. Nothing added at all, which I now regret as the wonderfully detailed cockpit that Airfix supply is crying out for some etched seat belts. Oh well.. Happy Easter Hols! Ian13 points
-
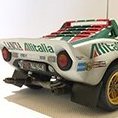
Hi comrades! Here one of my older projects. It's old but great DML kit with addition of Eduard brass. Because most of the available decals (OOB and AM) were for boring (IMHO) schemes - I choose more interesting scheme from attached photo (taken from Osprey book) - all markings were painted with help of Montex (insignia) and custom (individual codes) masks. So: Reference prototype photo: Cockpit stuffed with brass (the Eduard set is HUGE) And - completed model Thanks for looking!12 points
-
Hi all, I feel a bit ambivalent towards this build. I was expecting it to be an easy one, as the Tamiya kit is excellent and I was looking forward to the mottling. But, through my own ham-fistedness a lot of little things went wrong and it became a trial. Not least of which was the problem that I just couldn't get the paint mix and pressure right to do the mottling as I wanted it. I had to settle for a bad job in the end, and then found out my airbrush needle was slightly bent! A replacement needle, and everything works fine now, but it's too late for this build. Even the photography is a bit lacklustre...I took some lovely photos in the sunshine yesterday, only for the memory card to be completely wiped before I could download them. Time to move on... Here's the walk around: Here's the crawl around: ...and the fly around: Here's to the next one... Dean11 points
-
Friends, This is the Airfix P-51D Mustang. I am certain that everybody is well aware of the superb nature of this kit ( and at a very reasonable price too ) so I won`t go into detail regarding that aspect. I found these aftermarket decals ( Super Scale sheet #72-907 / 362, 363 FS - 357 FG ) at the 2017 Columbus ( Ohio, USA ) model show. What interested me with these markings is the rare sight of a Delta ( D ) variant of the famed Mustang in green & gray camouflage colors. Even of more interest was the the 362nd Fighter Squadron used colors from local British supplies. The upper surface is RAF dark green over RAF medium sea gray under surface. Getting the red & yellow bands on the spinner aligned properly proved to be troublesome. Despite all of that, I hope everyone enjoys this unique scheme on a European Theater Mustang. And yes, I highly recommend the kit!!!!!! Thank you in advance!!!!!!!!! Respectfully submitted, Mike PS: Again, my apologies for the picture quality.11 points
-
Dear modellers, I like to show you, how I built most of my models in scratch, in scale 1/48. After building so many model kits, I wanted something different. I always wanted some Fokker models in my collection, pity for me, there are only a few kits. So I figured out a way, to build models in scratch. Of course it took some time, and much trial and error, but at last it worked right out for me. The materials I most use are 0,5mm – 2.0 mm plastic sheet, sometimes wood for the wings and to form difficult pieces with double curves. DVD boxes for clear parts and finally self-adhesive aluminium tape. At last I managed to print my the decals on my PC. Well, as the saying is, a few pictures tell more then many words, I hope you enjoy the photographs and maybe they offer some inspiration : And here the finished model: Happy Easter to everybody ! Greetings, JohnHaa10 points
-
I attach a few pictures of completed in October 2018 model of Convair B-58 "Hustler" from the recently reissued Italeri offering - probably the only one in 1/72 scale. I have used the following aftermarket upgrading: Airwaves PE set, Eduard PE inspection panels and 'Remove before Flight' steel flyers, Aires resin exhaust, metal MasterModel Pitot tube and electrostatic dischargers. I have reworked the crew compartment hatches, crew seats (to the early type) and landing gear. I have used the Caracal decals. The model has been painted with Tamiya acrylic and finished with Gunze and Alclad lacquers. Thanks for watching!10 points
-
Soko G-4 Super Galeb - Aeropoxy resin 1/72 , old YUMO plastic kit, repop in resin. SFR Yugoslavia 1980's Serbian AF 2000's9 points
-
The Blenheim is now finished.9 points
-
Hi Everyone, Just finished the third of my haul from Telford last November, so I thought I`d trouble you with some photo`s Czech Models 1/48 scale Curtiss A-12 Shrike kit Finished to represent an aircraft of No 26 Bomber Squadron, No 9 AG, Chinese Air Force, 1937-38 Which was an option in the kit Built mostly from the box with the exception of the fragile resin frames and flying control actuators which were broken into little bits in the bag and.... replaced with bits of wire, tube and plastic strip. Took three attempts at the rigging before I got it looking barely acceptable and can`t count the amount of times I broke the undercarriage struts. Suffice to say I`m glad it`s all over. Hope you enjoy the pic`s. Thanks for looking, Cheers Russ8 points
-
Recently completed example of the old Revell kit of the North Sea Trawler. This boxing had the name decals for Arctic Corsair and, since i am a lazy, modeller, i built her with that name despite the fact that the kit is based on the Ross Co "Cat" boats. Straight out of the box with only the old net added to give some busyness on deck. My thought was to give her a fairly heavily weathered look as any fishing boat is a working boat and these were side trawlers dragging their nets up and over the starboard side. I did cut out the wheelhouse windows and replaced them with PVA glue; craved the moulded rope from the winches and replaced that with thread and did unspeakable things to the hull...8 points
-
Possibly the finest fitting kit on the market and an absolute joy to build. Straight from the box other than eduard prepainted cockpit.. BTW the nose probe is not fitted as it just fits in the display cabinet without it!8 points
-
Thanks Massimo, hope you have been OK Just popping in? Oh look Stuff to do The windows atop the cabin did not fit in any direction so I sent for new shiny windows These appeared, now it seems I have to sand, file and generally traumatise them I'll report back later The one here was a terrible size, shape and clarity still, supergoo is cheap is it not? Off to tackle these now, laters guys Ciao8 points
-
Here is my rapid build Easter present for my 11-year-old nephew. I had thought I had 4 days, I was wrong. So this build was over 1 1/2 days. As such there are issues, but I doubt he will care. I have added Krystal clear as a filler for the canopy fit issues and hope it dries before my family arrives this evening. If so I will add RLM 71 to hide it. Anyway, I hope you like my little Easter present. I don't like giving kids sweets if I can help it. Happy Easter.7 points
-
Bunch of Aeropoxy SOKO ORAO - IAR 93 Vulturs. Built for aviation museum collection. Soko J-22 ORAO , SFR Yugoslavia, 1980's SR Yugoslavia 1990's Soko NJ-22 ORAO - Trainer , Serbia AF , 2000's7 points
-
Thanks Simon After today's charging about at high speed I'm beginning to think that glueing the puppy down may not be that bad an idea! As long as you're still enjoying the important things in life John, all's well I have Giorgio, thanks. This one was labelled 'Pinot Noir' Yes, but soooooo many coats, and then micro-meshing. I wish I had your brushing skills Adrian I think they'll cover large areas Joseph, with care. When you first apply the chrome there's a sort of fizziness and then it self-levels. As long as you make sure there's no lumps / gaps I think you should be fine Thanks tweeky - but is that an inert missile? I think the colours differ depending on the fuel / explosive. I'm just going to do mine as per the discussions here Second DSG coat on: Micro-meshing tomorrow.7 points
-
And Romanian story, IAR 93 Vultur , Romanian AF 1990's AR 93 DC Vultur - Trainer , Romanian AF 1990's7 points
-
Recently finished this 60mm white metal figure from http://www.greekheroes.gr/ Painted with oils and acrylics. A short biography can be found on wikipedia. https://en.wikipedia.org/wiki/Nikolaos_Votsis6 points
-
The next model that I would like to introduce to you is Intruder Trumpeter A-6A. As in other models, this one is also straight from the box with small additions. Photograph carved from the seats of Eduarda and Aires. I built a model with an emphasis on operation and ventilation The armor is made of magnetic sticks, which allows you to change the weaponry. Painted as usual with the product of Sikkesns Autowave II, this model has brought me many awards and reputations in modeling competitions. I hope that the interpretation of A-6A will satisfy you. Pictures will be on a light and dark background. The effect of dirt and exploitation looks more natural, especially in the pictures on a dark background.6 points
-
After a bit of work on the fuselage seams, I added the remain panels to the fuselage, they dropped in very neatly. Then on to the wings. I followed the instructions to the letter, adding the upper wing half first to the spars followed by the lower wing. Seemed to work very well. On with the main landing gear, again following the instructions to the letter. Left it to set for the recommended 60 min 😁. I dry fitted the tail part and engine nacelles. Stuffed a whole lot of lead and blutak into the nacelles, and it looks like it should be enough. Really happy with how this is going - a really fun build so far.6 points
-
Thurday Evening: Decals done (not going to do stencil decals on this). All went on well except for putting the black wing ones on the wrong wings and having to carefully switch them around (having already been sitting on for almost a day for one of them, it worked surprisingly). Now onto the weathering. Just over 10 minutes later from when the previous picture was taken I had it his far into the weathering. I'm doing her really beat up, as if she's been into hell and dragged back out backwards, and repeated it at least ten times. Sounds about right for World War Two, right? This was done with a cut up sponge and Revell Aluminium paint, dragging it to make the scrapes and dabbing it on for normal chipping Oops, a little blurry. I might get a better picture later. This is after about 30 minutes of weathering. Silver is now in two shades (Citadel Leadbelcher- love that paint- and the Revell Aluminium), and applied along the panel lines, something I love doing and I think when done well looks great- this isn't my best example of it but I'm happy with it (see my 1/48 Airfix Bf109e3 build for a better version) And the other side..... And the underside.... Almost done now, very little left to do. Just the pitot tube left to attach. Maybe a wash here and there.6 points
-
F-5s of the Naval Fighter Weapons School at Nellis AFB, January 1981. 160964 546 160965 547 160966 550 159879 541 159881 543 160794 545 Thanks for looking, Sven5 points
-
Source: http://www.specialhobby.net/2019/04/172-super-mystere-temer-hotov.html V.P.5 points
-
A couple more quick photos of today's progress. I've now assembled much of the pilot's side of the cockpit.5 points
-
The next project is this exciting piece of flying history. I have made a start and have painted the props, unfortunately they look like a great big black blob. Assembled the wings and part of the fuselage which looks nothing like the real aircraft. Some images of the real thing for a bit of a reference. Thanks for looking. Stephen4 points
-
Finally finished a simple-ish diorama for this build, and forgot to post it 🙄 I decided to add the bonnet mounted lights as an afterthought, then realised that I’d thrown the kit ones out! managed to scratch build one from plastic and make do, lesson learned for the next build not to throw anything out 😂😂😂 thanks for looking, and for all of the encouragement and helpful comments throughout the build...4 points
-
Hi Here are some pictures of my recently completed model of Tarangus 1/48 J 32B Lansen nicknamed Lansen Sport. I've used every aftermarket item available from Maestro Models for the Lansen and quite a bit of scratchbuilding, mainly in the wheel wells, landing gears and cockpit plus a full length engine intake. The Tarangus kit requires a bit of TLC but can be made into a real good looking model IMHO. a full wip can be found here (in swedish) http://www.ipmsstockholm.se/phpBB3/viewtopic.php?f=3&t=3276 More pictures can be found here: http://s836.photobucket.com/user/flarpen/slideshow/Sport%20Lansen/Finished best regards Johan Elvin4 points
-
XV480 was delivered to the RAF in August 1969, initially serving with numbers 6 and 41 squadrons before a spell at Wildenrath with 19 and 92 squadrons. She transferred to 56 squadron at Wattisham in the mid 80s and remained with the Firebirds until being withdrawn from use in September 1991. I was very impressed with this kit, I think better modellers than me could get an absolute beauty out of this. It goes together really well with very little filler required and the shape looks spot on to me. If you make a grey one without the coloured tail as I did, remember to carefully trim away the very thin white lines around the fin flash decals. I made mine oob, except for the red 'I' fin code and a tiny aerial under the rear fuselage which is so small you can't really see it. For the dummy Skyflash and ACMI round I just cut the fins off missiles. Any comments welcome as I have another in the stash (and tempted for a third to do as a green/grey FG1!).4 points
-
My dear modeller friends, I've just finished my interpretation of the last moments of the USS Indianapolis. I bought this Tamiya waterline series kit, on an eBay's auction, a few months ago, already provided with Gold Medal photo edge parts. I kept it on my stash for future building, but, when my company sent me on vacation in this period, I couldn't resist building. My plan was to realise the USS Indianapolis last navigation's moment when she was torpedoed by the Japanese I-58 submarine. It was the 12:14 am of July 30 1945, when she was navigating in complete radio silence on the Leyte Gulf. I think everybody saw Nicolas Cage's movie, and so I think the story is quite known. For this realization, that involved the torpedo on water, I explored a new seascape building material, the epoxy resin. A material for me absolutely unknown, and for this reason, I saw a lot of tutorials on the YouTube Channel. My first attempt was using a sea blue painted wood base with a 1 cm. thick layer of light blue painted epoxy resin over. Then when the first layer was cured, I added the torpedos on place and the second thinner layer of same light blue epoxy resin. The result wasn't so bad, but I found the torpedo's shadow on the wood base very annoying. Trying to solve the problem I came up with the idea of placing the seascape on a transparent base, and, for this reason, I used a glass, lightly back painted with a different tone of blues and greens, in order to simulate the Pacific Ocean water, and the same procedure with the epoxy resin as the previous attempt. The final result it satisfies me more, and I think it is more realistic. Anyway I don't want to bother you with unwanted explications and so, this is the result, I hope I'll like it: IMG_20190413_143222 by Franco Segato, su Flickr IMG_20190413_143233 by Franco Segato, su Flickr IMG_20190413_143300 by Franco Segato, su Flickr IMG_20190413_143245 by Franco Segato, su Flickr IMG_20190413_143321 by Franco Segato, su Flickr IMG_20190413_143426 by Franco Segato, su Flickr IMG_20190413_143440 by Franco Segato, su Flickr IMG_20190413_143450 by Franco Segato, su Flickr IMG_20190413_143533 by Franco Segato, su Flickr IMG_20190413_143557 by Franco Segato, su Flickr IMG_20190413_143628 by Franco Segato, su Flickr Comments and suggestions are always very welcome: Thank you and see you soon. Happy modelling! Franco4 points
-
Hi, everyone! It's my next model from "Dora Wings" Ukrainian manufacturer. Kit as plastic is perfect, but strongly need to look photos and drawings of prototype. Instruction is not clear to understanding.4 points
-
Hi all There are a number of 'firsts' here: Posting to Ready for Inspection Model in more than 20 years 1:32 scale model Attempt at airbrushing Attempt at weathering This is a straight OOB build; it was difficult enough without adding more firsts. The kit wasn't difficult but I need to think about the order that I do the construction and painting. I have learnt a lot from this project that I will be able to use in my future builds. Thanks for looking. Graeme4 points
-
Ventilators With the seascape complete and away at the picture framers I now must resume work on the ship itself. Like all ships of this period the Carpathia had numerous ventilators - in this case 'cowl ventilators'. These are the big sticky-uppy pipes with a 90 degree curve so that they face forward and scoop up air as the ship moves along. They are also the same kind that Indiana Jones hid in while the U-Boat crew searched for him in Raiders of the Lost Ark. (See I know my maritime history!) On Carpathia there were three different sizes. Let's call them 'big', 'middle' and 'small' - I hope I'm not confusing any of you with this technical stuff. I had a rummage around the shed and had a small stroke of luck. In this box-set of brass picture framing hooks were two sets of hooks as near as damn to the right diameter for the big and middle sized ventilators and with a convenient 90 degree bend already in place. So using a pair of pliers I just snipped off the excess overhanging bit... and then filed the resulting rather ragged face of the ventilators flat. I then drilled a fine guide hole in the centre of the ventilator's opening and followed up with larger diameter drill to create... the appearance of a hollowed out item. Snipped off the excess threaded screw bit with the pliers. Painted the whole batch white and... brush painted the insides red. This dealt with the big and middle ventilators. The small ventilators were simply made by 'skillfully' smacking small-diameter brad nails with a hammer 🔨 until they bent through 90 degrees. I then snipped off any excess with pliers and filed the faces down flat - much the same as the big and middle ones. They are too small for me to bother drilling out and I haven't included any photos because it's not that interesting. Anyhow - the ventilators are now ready to go and I'm feeling renewed confidence that this will be ready for WASMEx. When I'm getting down to small bits and pieces like this I can't help but think that most of the work is behind me. I wonder how wrong I am this time... 😧 Steve4 points
-
Continued . . . . A very long and involved build but I'm quite happy with the finished product as long as I don't look too hard For those interested in the build saga here's some links, Workbench build here ; faaman-s-workbenches-t47233.html#p707723 Workbench continuation here ; faaman-s-workbenches-t47233-s240.html#p795415 Cheers all 🍻 Neil4 points
-
Gordon Bennett. I just realised we've already hit page five...! After hewing at the lewises I managed to get those dopey looking ears that control the airflow to the radiator stuck on. It is a relief to get those out of the way at last, as I think they were the most difficult part of the build so far. The number of hours spent was out of all proportion to their size. I also made good on my earlier error, and added the missing rib to the tailplane too. Then brush-painted some scrap decal with dark grey and masked it up to make some stripey stock to later represent the narrow walkways on the inside of each lower wing. I have to work tomorrow, but I'm naively confident I can apply the fabric colour, mask the rib tapes, spray the filter, research the PC10 and spray the base for the upper surfaces on Sunday-Monday....4 points
-
More progress: Engine and exhausts in place, the exhausts are a nightmare to install. Had them the wrong way around and glued in CA, took them out and stuck them in the right way with PVA. MGs and pitot tube will be replaced with tubing. The MGs have to have a piece added to them to make them longer, there is no way the glued extensions would stay in place. Have a look at the box art. Engine cover had to be thinned on the inside to fit over the engine and some of the exhausts had to be chopped a tad. Wonky wheel is also fixed. I have snapped the tail wheel off. Thanks for looking. Stephen4 points
-
The next (best?) thing will be to make a decision on which USMC H-19 I will be making I will need to discover which Sea Blue to purchase, it not having been a colour in my usual personal palette Where did I drop that reference Andy gave me for US T.O publications when i need it? I know, its back near page three or four must check the Orders Then get a start on getting the decal sheet sorted, I will not be likely to print any of the predominantly white lettering Busy day ahead huh... 😇4 points
-
I've said elsewhere before on discussions with a "wishlist" quality to them... There are companies out there who will CAD up and tool whatever you want, and even pop the plastic for you. If you're really convinced your must have / will sell thousands / desperately needed in the market subject matter and scale will be a success, then all you need to do is remortgage your house for 3 years and give most of the money to one of these businesses. Hey presto - you're now in the injection moulded kit business entering the market with a kit everyone desperately wants and will be climbing over each other to hand you their money. You'll repay your mortgage within a couple of years of the kit launch providing it's as desperately needed as you think it is. If that seems like a good idea, drop me a PM and I'll put you in touch with companies who will do the donkey work for you. If it doesn't seem like a good idea, then you probably now understand why other companies aren't already doing it.4 points
-
There may be accuracy issues, putting that up front, but it is a Horsa in D-Day markings. Serial matches Pegasus Bridge aircraft and Chalk 91 is under the loading door,Trust Me.😐 I used the decals that Eduard supplied in their small give-away kits. Serials were fromDan Taylor to match the D-Day Pegasus bridge assault. Stripes were done rough on purpose matching most of my reference materials. I used the open section to brake up the LOOOOONNNGG Cylinder of the Horsa. What a large aircraft this was. Last Striped Model for my display in May/June Comments welcome (be nice on accuracy please) Cheers Bill4 points
-
Lovely job, I built this a few years back and spent about 2 weeks on the panelling with lots of tiny pieces of masking tape - I think I did about 6 layers in total with different shades of grey!4 points
-
Done! Will get some proper pics in a couple weeks. Need to do these, the eggcat and some of the updates to my earlier builds.4 points
-
Yay it worked!! Thanks for the hint @modelglue4 points
-
Back to the build yesterday after a week away relaxing. The time had come to attach the nose section of fuselage, and then attempt to align the longer rear section of fuselage to this and the wings. To say a sweat broke out wouldn't be an understatement! Neither fit nice and snug and required a little wiggling, pushing and fettling to hold them in the correct place. To relieve the amount of movement once in place I applied a spot of superglue top and bottom, then used my regular Revell glue around the rest. With force the fuselage, wings and nose were joined. They did require however, a bit of filler! I have applied some more filler this morning and will sand it down once dry. I then masked up the canopy, burnished the tape in with cocktail sticks, and applied it to the fuselage. A spot of filler in places and it's good to go.4 points


.thumb.jpg.d17ff607fc7e89ed057e63fcb6f2a888.jpg)


This leaderboard is set to London/GMT+01:00