
Leaderboard


.thumb.jpg.d17ff607fc7e89ed057e63fcb6f2a888.jpg)
Popular Content
Showing content with the highest reputation on 17/04/19 in all areas
-
I attach a few pictures of completed in October 2018 model of Convair B-58 "Hustler" from the recently reissued Italeri offering - probably the only one in 1/72 scale. I have used the following aftermarket upgrading: Airwaves PE set, Eduard PE inspection panels and 'Remove before Flight' steel flyers, Aires resin exhaust, metal MasterModel Pitot tube and electrostatic dischargers. I have reworked the crew compartment hatches, crew seats (to the early type) and landing gear. I have used the Caracal decals. The model has been painted with Tamiya acrylic and finished with Gunze and Alclad lacquers. Thanks for watching!34 points
-
Hi Everyone, Just finished the third of my haul from Telford last November, so I thought I`d trouble you with some photo`s Czech Models 1/48 scale Curtiss A-12 Shrike kit Finished to represent an aircraft of No 26 Bomber Squadron, No 9 AG, Chinese Air Force, 1937-38 Which was an option in the kit Built mostly from the box with the exception of the fragile resin frames and flying control actuators which were broken into little bits in the bag and.... replaced with bits of wire, tube and plastic strip. Took three attempts at the rigging before I got it looking barely acceptable and can`t count the amount of times I broke the undercarriage struts. Suffice to say I`m glad it`s all over. Hope you enjoy the pic`s. Thanks for looking, Cheers Russ19 points
-
And found yet another one (no, I don't have replicator technology like Martian Hale, it's all hard labor). This is from 13 years ago too, and the only purpose of posting it now is because it offers a good comparison to the much better ICM kit that I posted here before: As you all well know, this is the ex-Matchbox kit re-issued by Revell, now without the colorful sprues that are the delight of modelers of all ages. Plenty of reviews since this is an old mold are already around, so I'll keep it brief. Grey sprues, light, almost faint raised panel lines, chunky molding, some interior, very good decal sheet that caters for the three versions offered, one being civilian, which I personally applaud. I definitely would like more civilian options around. The decal sheet is somewhat cluttered, the more than sixty subjects for the three versions being scattered around. So, get a good pair of scissors and some sight help. The instructions are matter of interpretation. In my first try, what was on my workbench after following the instructions was a tramway, in the second try I managed to build a bridge, but finally I got it right. The landing gear, though, is still something that puzzles me. Some shuffling around with the versions is apparent in the instructions, so check your references. If they are like mine, they will contradict each other, leaving us again in the happy limbo of uncertainty, which is just the prelude of creativity. My only minor contribution was to score the hinge line and deflect the elevators a little bit downwards. I used with the canopy framing the usual sprayed decal paper cut in tiny stripes, this time helped also by the use of a "Pilot" silver metallic marker to deal with all the external frame. It worked well, with no risk of spilling. I discarded all the other transparencies in favor of the later use of Testor's window maker. After a copious application of filler almost everywhere (the fuselage-wing joint being wider than the Grand Canyon) y sanded the model and applied, directly, a spray-can black paint formulated for plastic. After masking the nose y proceeded to apply the metal tones, in three different hues. Handle the decals with care, and you may consider to separate some of the larger subjects (fuselage sides, wing letters) in more manageable pieces. You will have to cut out, once the decals are dry, the window sections, which are part of the carrier film. Some setting solution is needed also to help some of them to conform to the surface (walk sections on the wing root and the nose area). Pay attention to the instructions regarding the small area that should be painted (a diagram for a mask is provided) to offer a backing color to the front of the "arrow" decal -which is transparent- in the civil version. Again the magic of the 30's available for us thanks this time to Revell, at a very convenient price.17 points
-
Started this just after Christmas as a relaxing, no-stress build. I bought 3 different MPM boxing's of Hasegawa's Beaufighter when a seller on E-bay had them at a fairly cheap price, each one has several different marking options, Montex masks and PUR exhausts. The kit instructions cover ALL the decal options and are the same in each box, with colour Markings instructions with the variants in each boxing. This is from the RAAF box and covers Mk I, Mk VI and Mk21 in RAAF service. Each kit includes all parts to do early and late tail-planes, long and short intakes, tailwheels, AI aerials, etc. Also the Sperry Auto-Pilot housing. I chose to do an overall Aluminium finished Mk.21 and on doing a bit of research (unusual for me!) I discovered several Beaufighter's were stripped of their Overall Foliage Green finish. An interesting article here; http://www.adf-serials.com.au/newsletter/ADF Telegraph 2018 Autumn.pdf A8-196 is pictured if you scroll down the page. Of note was the fact that the instructions tell you to fit the long filter intakes and long (PUR) 'Hedgehog' type exhaust's, but the photo shows short intakes and the Mk I type short exhausts. I removed the framing from the later type rear canopy to try to represent the Australian style frameless type (not in the kit), it's not perfect but it'll do me. I left off the rear gun. Modified the starboard wing to the two gun type. Basically filling and re-scribe. Modified the wing tips to show the rearward 'Stem' type navigation light. Vallejo ModelAir Aluminium was used overall with a bit of AK Extreme to a couple of panels to add variation. A light wash into the panels while varnishing, doesn't show up much in the photo's but I'm still learning. The call out for the small Roundel's in the instruction's for the upper and lower wing I think is wrong, but I didn't spot this till this evening while putting this together! I think the photo shows the Larger style. I may change them later, but I might just leave them for another RAAF build (Overall Foliage Green) The kit went together well, hardly any filler used. I think the pilot's canopy looks a bit too tall and the whole fuselage is a bit 'pinched in', especially towards the rear. But, it looks the part I think. Last photo's show comparison with a High Planes kit I did last year. Criticism's and comment's welcome. Davey.16 points
-
Hi, everyone! It's my next model from "Dora Wings" Ukrainian manufacturer. Kit as plastic is perfect, but strongly need to look photos and drawings of prototype. Instruction is not clear to understanding.15 points
-
Built box stock although the instructions are pretty vague. I then Googled the real thing to get close ups of particular part positions. I don't build many helicopters so although they suggest building the rotor assembly OK, but don't fit it until everything else is done including the decals. There is a full interior, and four choices of this subject on the decal sheet.15 points
-
Still trying to clear the bench but more models keep appearing …… This is the latest … The Tamiya Dornier 335, 2 seater. OOB, but the paint scheme is as it should be not as Tamiya say. No real problems,; what you do realise is just how big it must have been in real life. I did manage to see the Smithsonian one up close and personal some years ago. What an interesting development it could have been. On to the pic's. Please feel free to comment etc. Thanks for looking Dick And a single seat one I made earlier.14 points
-
Vampire F.1 5 Squadron, Chivenor 1949 CMR resin kit - 1990s vintage And with something of similar vintage i.e. late 1940s - Airfix P-80 converted from P-80C to P-80B: Heller / Revell Vampire F.3: Frog Vampire FB.9: Frog Venom NF.3 converted from Sea Venom: CMR resin Vampire T.11: Aeroclub Vampire T.11: Frog Sea Vixen FAW.1 conversion: Frog Sea Vixen FAW.2:14 points
-
How about an inexpensive kit built "Out of Box"...This was challenging in its own way but fills my need for a P-47 in D-Day markings. Xtradecal has outfitted a few models for me recently. X72196 has quite a collection of Overlord markings. Are there issues, sure but looks like a P-47 to me. Gun Barrels aren't offset a whole lot, engine is oversimplified(Try seeing though)wheel well details are sparse, interior is non-existant (also try seeing it). Surface detail is nice and construction was about 6 hrs and only a couple of fills need on the fuselage sides. Painted with Vallejo Air Colors and painted on stripes.Uschi powder on the prop spinner boss Should be my last "striped aircraft" for awhile. Thanks for taking a look and feedback is always welcome Cheers Bill13 points
-
.... in white! This build was done in secret alongside the Harvard I just completed. Must have had a rush to the head as it took next to no time to complete. BAsic current 1/72nd Airfix Mustang kit with gun ports removed, waste shell slots underwing filled and resin replacement prop blades by Pavla to get the post war square tipped HS prop. All decals from the limited run Ventura set(fairly expensive here (£11.99)for such a small set but I had to have it and use them! I didn't do anything different in the cockpit because I have no idea what it looked like and being it was an ex RNZAF aircraft presume it as standard... except later it had the head rest removed. Enjoy the pis... The windscreen and front edge of main canopy had white decal stripe to replicate the frame. Not really visible but directly under the nose is a decal (from the set) showing the military serial number of ZK-CCG as NZ2417. Again the Ventura decal worked very well.12 points
-
Here's another completion to celebrate getting my access back through my AT&T device. It's the the old tool Airfix Spitfire Mk.I finished as an aircraft from 66 Sqn at RAF Upwood in 1939. The two blade prop was snagged from the new Mk.I kit as it was going spare anyway. The decals are from a Kits at War sheet. I think the aircraft should have the early unarmoured windscreen, but I can live with the discrepancy. This is one of the few models I've ever painted twice; the first time I painted it, the clear gloss coat crazed all over the bottom of the model. So I stripped it down and started over.11 points
-
I've had a bit of a marathon sanding and filling session over the last couple of days. As usual with these sorts of projects, I've used my trusty P38 automotive filler as it covers large areas well, dries quickly, and is very easy to sand. The only problem is, it creates an awful lot of dust, so to avoid getting on the wrong side of the good lady wife, the kitchen sink is the best place to tackle such tasks: IMG_0962 by Thomas Probert, on Flickr I'm really pleased with how the main landing gear bays are shaping up: DSC_0121 by Thomas Probert, on Flickr The left side bays have been blended in nicely after their move forward: DSC_0113 by Thomas Probert, on Flickr I've also made and added the ALQ-117 pods on either side of the nose: DSC_0114 by Thomas Probert, on Flickr DSC_0117 by Thomas Probert, on Flickr The tail turret has taken a lot of blending, and the panel detail will all need to be replaced here: DSC_0119 by Thomas Probert, on Flickr So here we are now - underside: DSC_0111 by Thomas Probert, on Flickr And the upper side: DSC_0110 by Thomas Probert, on Flickr There's still a fair few blemishes to sort, and I also need to do a full re-scribe, but I think I might tackle the fin next and ensuring a strong join. Until next time, Tom11 points
-
Finally finished this one after ignoring at it on my bench for 5(!) years. The photo-etch rigging totally owned me and I cried mercy before getting it all on there. Would love any tutorial references you may have for photo-etch rigging techniques, though don't know if I'll be attempting it again any time soon, haha. Overall a fun build, but definitely challenged me a good deal. Flickr Album10 points
-
Effin typical. Week off and the back decides to go out on me yesterday lunchtime - damned treacherous lintel! Hopefully a day in bed with some serious painkillers will be enough to untie that irrascible knot of age. Oh, and the stray momma cat we gave shelter to is now downstairs giving birth to her kittens in the kitchen as I speak (four and counting), so all-in-all quite the Carry on Doctor household today. Needless to say there's been no activity on the Byzantine Mask Cutting Expedition as a consequence, but let's see what visiting hours have brought eh? I hear that 'rather you than me mate' inflection in your voice Chris! 😁 I quite like the idea of a TV series called Judge Shabby tbh honest Pete! 😆 Kind of like Judge John Deed but with questionable hygiene standards and a badly singed wig. Or is it? Of course I can do madness Simon; it's getting a sensible result that is my weak spot! 'Tis! I know you know this stuff Johnny (so you're doubtless wincing at my lazy shortcut...) but as all it needs is just to produce a single 'orange segment' of that dome shape in order to modify it as a repeating mask, this is the err...laziest method I could think of! With my master negotiating skills I'd doubtless come out of such a meeting finding that I'd agreed to work as an unpaid intern Tomo.... None of that now young Chris! If I can do it then intelligence is clearly not a factor. My wife is happy to provide written confirmation of this - though the evidence runs to several pages at this stage.... A judicious mixture of alcohol and sedatives seems to be the preferred method of passengers getting aircraft to divert these days Keith. A few Solpadeine and vodka cocktails in the departure lounge should do it.... I've always marvelled at Eisenstadt's shot of inflight repairs to the Graf Zeppelin over the Atlantic in this respect: And then closer to home there's Buckham's work: Positively counting on it dear heart! Will PM yourself & Crisp later to see if we can come up with a time of mutual convenience! 😀 Most kind of you Don! I had already begun constructing the central vertical opening (that allows the gun elevate) out of brass for strength; however, to maintain scale effects for the rest of the framing I'm going to attempt the same technique used previously on a Do-18, which is to form the ridges of framing using a high-build layer of primer before painting. 🤣 The accused may leave the court with his purity and reputation intact. Case dismissed. Until the next time! As neither God nor Giddy Aunts were invoked there Bill I'm inferring a Solomon-like patience to see if this approach to masking will bear fruit or else just turn out to be an old Opal Fruit best left down the back of the sofa... 😄 Sorry there's no pics of progress today: as I mentioned to Don, I have successfully cut out the central vertical strip from the Aeroclub turret to begin constructing what you see this cheeky chappie beaming out from in this lovely IWM shot of a Dutch RAF aircraft: Vertebrae and drugs permitting I might get some time in tomorrow, providing the workroom hasn't been taken over as a kitten nursery by then.... Tony10 points
-
Just getting the hang of Village Photos after the Photobucket debacle. As requested by @CedB here is the Condor in all its glory. The original decals were toast so Ced kindly did a trick for me and scanned the orginal decals before putting them through his CNC cutter. The resulting masks allowed me to produce the engine masking and curve around the nose. Thanks Ced, much appreciated! I sprayed the model black, masked off then applied the Vallejo chrome from their metallic range. Other decals were from LF as seen here https://www.hannants.co.uk/product/LFMC72198 The aircraft depicted is Hitler's personal transport. Not that I wanted to do this one especially, I'd rather have done the Danish version, but I couldn't obtain the decals for it. Overall a nice if simple kit, it went together quite well with no real hiccups. Aerials are EZ line. Precious few reference shots it must be said.9 points
-
#10/2019 So, my dad finished the first of some upcoming Latin American subjects. In 1952, Uruguay purchased a mixed bunch of 12 old Hellcats (-3, -5, -5N) from the US. To avoid the appearance of the US supporting a small South American country, the planes were sold by a private company, Cobell Industries. Therefore, to be a legal deal, the planes came without armament. Twelve pilots were sent to the US for training. During that, two aircrafts (453 and 454) were already lost due to accidents. Back in Uruquay, the planes were retrofitted with armament. Only six aircraft survived until their withdrawal from service in 1960. Eduard kit with Armycast Decals, AK Real Color Air Dark Sea Blue and Off-White for the camo, EZ Line for the antenna wire. With the decals there came a resin football antenna. But my dad is no fan of resin, so he used a plastic one from the sparesbox. Build thread here https://www.britmodeller.com/forums/index.php?/topic/235050845-latin-kitty148-grumman-f6f-5-hellcat-aviacion-naval-uruguaya/ As usual not without glitches, but it looks the part. DSC_0001 by Reinhard Spreitzhofer, auf Flickr DSC_0003 by Reinhard Spreitzhofer, auf Flickr DSC_0004 by Reinhard Spreitzhofer, auf Flickr DSC_0005 by Reinhard Spreitzhofer, auf Flickr DSC_0006 by Reinhard Spreitzhofer, auf Flickr DSC_0007 by Reinhard Spreitzhofer, auf Flickr DSC_0008 by Reinhard Spreitzhofer, auf Flickr DSC_0009 by Reinhard Spreitzhofer, auf Flickr DSC_0010 by Reinhard Spreitzhofer, auf Flickr DSC_0011 by Reinhard Spreitzhofer, auf Flickr DSC_0013 by Reinhard Spreitzhofer, auf Flickr DSC_0015 by Reinhard Spreitzhofer, auf Flickr DSC_0016 by Reinhard Spreitzhofer, auf Flickr DSC_0017 by Reinhard Spreitzhofer, auf Flickr9 points
-
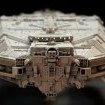
Arr mateys, it be such a great story I wanted to capture it in 1/350! Shortly after midnight on April 1, 2010, the Oliver Hazard Perry-class frigate USS Nicholas came under fire from Somali pirates while deployed in the waters off East Africa near the Seychelles on anti-piracy operations. The pirates mistakenly attempted to hijack the Nicholas, believing her to be an unarmed freighter. Nicholas immediately returned fire and pursued the pirate skiff, disabling it and subsequently seized the pirates, several AK assault rifles, ammunition and an RPG rocket launcher. The Nicholas sank their skiff and went on to capture the pirates’ mother ship where more pirates and weapons were seized. At the specific request of the US Department of Justice, the pirates were detained and brought back to the US to face trial for piracy. In November 2010, a federal jury in Virginia convicted five Somali men - Mohammed Modin Hasan, Gabul Abdullahi Ali, Abdi Wali Dire, Abdi Mohammed Gurewardher and Abdi Mohammed Umar - of piracy, attack to plunder a vessel, act of violence against persons on a vessel, assault with a dangerous weapon, assault with a dangerous weapon on federal officers and employees, conspiracy to use firearms during a crime of violence, and multiple firearm counts, including the use of a rocket propelled grenade. On March 14, 2011 the five were sentenced to life plus 80 years in prison for engaging in piracy and related offences – the first conviction for piracy by a US Court since 1820. This is the modified Academy kit with MK1 and WEM PE, Veteran Models RHIB, SRBOC and 25mm chainguns, Master antennae and 76mm barrel plus Eduard and GMM figures. I put a lot of work into it, but it was a lot of fun to build. Alan8 points
-
Found yet another one, from the dawn of my scratchbuilding efforts, a model from 13 years ago. What is an Archaeopteryx, besides a very good Scrabble word? Literally, an “ancient wing”. And you know that with that kind of name…err, it will look…well, you get the idea. The Granger brothers started to build a plane upon a design of their own -refined by Latimer Needbam- that flew in the very early 30’s. It was influenced by the equally bizarre –read “beautiful”- Pterodactyls built by Capt. Hill. Although unusual, it has a pinch of elegance. The engine used, a two cylinder 32 hp Cherub of very limited power, made take offs very…interesting. Being a small plane of course it renders an equally small model, as you can see in the image with the quarter. The Archaeopteryx –sorry to make you read this word again- is a fairly simple scratch project, no doubt helped by the use of tiny brass “Strutz” for all of the –many- required homonyms. The photo sequence will provide you with a general idea regarding materials and construction steps. As this little moth-like bug flies off your book case into the eerie atmosphere of the room, it will remind you of Tinkerbell, leaving a sparkly trail as it lands, with a subtle shudder, on your building board. A couple of mentions on Flight Magazine (links to their archives) https://www.flightglobal.com/pdfarchive/view/1935/1935 - 1503.html?search=granger archaeopteryx And with a different tail decoration: https://www.flightglobal.com/pdfarchive/view/1933/1933 - 0268.html?search=granger archaeopteryx8 points
-
They keep popping up from my obscure past, in this case from 10 years ago. The model was scratched way before the recent Farman 190 resin kit was released by SBS, a wonderkit that I built and posted here too (you know what they say: "Scratchbuild it and the kits will come": The extensive Farman 190 series spawned a prolific progeny, among them a dedicated ambulance version, the Farman 197S, the S standing for Sanitaire. The 197S had some modifications to better accomplish its task, the most visible being the door/hatch used to load and unload the patients on the left side of the fuselage and of course the furnishing of the interior to accommodate two stretchers and an assistant. It is most likely that the aft door on the right fuselage side was deleted too since it would have been useless. It had a Lorraine Mizar engine instead of the usual power plants for the 190 family. Some research was done to fill the gaps in the documentation, and useful information came from Michel Barriere and Alain Bourret, among others, for which I am indeed grateful. The machine depicted got later on the Uruguayan CX-ABH registration. The images of the in-progress building will give you a view of the techniques and procedures used, and all in all more than 140 parts were fabricated for this project. A few items were adapted Aeroclub Models after-market parts which saved some time, always important when you are spending a lot of it in research and the fabrication of the model. The interior (cockpit and cabin) was taken care of, depicting the stretchers’ holder, interior lights, pilot “gruyere cheese” seat, control wheel, rudder bar, instrument panel and a few holders; as well as exterior details, like the wing tank details, Venturis (two), nav lights, oil radiator, control horns, cables and the multiple struts, about two dozens of them between big and small. Fine wire rings were made and inserted as window sills, leaving enough space for the transparencies to be glued from the outside at a later stage –after done with the exterior painting-. The stretcher hatch and the access door were positioned open. The open door shows the furrow into which a slider runs to open the window, which was depicted half way down. I also carved a wood prop from a Popsicle –replacing the metal one that came with the engine- to be more faithful to the original, adding a photoetched boss. An area that proved to need quite a time was the cockpit glassing. The issue was solved, after a few trials and discarded parts, with a front panel, two side rectangular panels and two triangular windows, as per original. These transparencies have same angles involved, and are wrongly depicted in some plans of the type. At some point during preparations the aftermarket metal Venturis went to the great beyond, so replacements were fabricated as per photos. I spent a lot of time under my desk looking for lost parts and I am thinking about installing some speakers and furnish a pillow for that area. References prescribe a sort of whitish aluminum for the French planes. Wing tanks were painted another hue, and so was an area on the nose, close to the engine.8 points
-
Finally finished a simple-ish diorama for this build, and forgot to post it 🙄 I decided to add the bonnet mounted lights as an afterthought, then realised that I’d thrown the kit ones out! managed to scratch build one from plastic and make do, lesson learned for the next build not to throw anything out 😂😂😂 thanks for looking, and for all of the encouragement and helpful comments throughout the build...7 points
-
This is a 1 72 scale dio of a german 10.5 cm gun on a B E F chassis left at Dunkirk ( U M kit) coming across a massive Russian K V 2 tank that's hit a mine . tracks were that rubber stuff that's a pain to shape and glue, figs are Ceaser7 points
-
Oops, another one, from 5 years ago. The Tunison Scout, flown for the first time in 1928 (by no other than Jimmie Angel!), is a remarkable plane in many respects. Not only it favored the then rare cantilever low-wig monoplane formula, but also used and partially pioneered construction techniques (a plywood-molded wing with no spars, also plywood molded fuselage and trousers, among other things), plus offering a fully-enclosed -but removable- cabin. The way in which today's high-performance aircraft are made, selectively layering carbon fiber, kevlar and such, is exactly the same. In most photos an X-247E registration can be seen, but at least two images show its other X425 registration on the wing. Further down the lane it was re-engined with an inline Miller (which changed the nose shape and also introduced an alteration of the aft fuselage) and re-registered as X13795. The plane was successful and flew at notable speed, and also landed safely and reportedly was pleasurable to fly and control. As many other pioneering endeavors, it did not get the sales it deserved, but got quite a buzz on the specialized press, and I gathered articles from many sources, locally and abroad, among them Les Ailes #398 of 1929, L'Aerophile Feb 1929, Aviation July 13 1929 (This source, by far, is the richest in information and details, and was the main reference used to correct and modify the existing plans, all quite inaccurate in many regards), Popular Science Monthly April 1929, Popular Aviation, Sept 1930, Wings Magazine of August 1978, and snippets and bits on many other magazines. WW1 Aero magazine of Dec 1987 run an article on it too, with a plan that although not really accurate, is closer to the mark than all the others and a pretty good job considering that the author did not have access to sources other than a few photographs. Research on this particular subject was spread through many years, and it took a notable amount of hours, better left uncounted to keep one's sanity. This is almost invariably the case for most of the obscure/arcane/esoteric scratchbuilding projects, and it takes time, effort, dedication and unwavering intent. To give just an example of the subtlety of some features: the aft canopy -and therefore the overextended fin root- were purposely slightly offset to the left-seen from up and behind- to counteract engine torque, a written fact you corroborate looking very, very carefully to photos. I have been scratchbuilding a number of mostly unknown types in the last years, far more than a hundred subjects by now, and I am very pleased that these strange jewels of aviation are brought back to life in 3D form. Aviation is a vast universe, full of mysteries and surprises, way beyond the known types that for some reason are obsessively repeated. The Tunison Scout is not -configuration-wise- far removed from one of my recent projects, the Farman Tourisme 200, and they share the same design concept that brings forth those sort of clunky yet strangely appealing quasi-retro-futuristic lines. They even share the same Hispano-Suiza engine: An Aeroclub aftermarket Hisso engine was used on the model (thanks, Armando!); the rest, regarding materials and techniques, is the usual gig utilized in other endeavors. Decals are of course home-made.7 points
-
Well it's finished hope you like it.7 points
-
Done! Daylight pictures will follow. 20190415_195758 by Lex de Kort, on Flickr7 points
-
Hi folks, Real Life has been getting in the way of plastic-based virtual reality recently, but I can see some gaps coming up ahead and want to keep challenging myself. I've realised that the best way to prevent a project from stalling is to post it as a WiP; even if nobody is remotely interested it still acts as a conscience-prodder! After recently completing my first vacform, a 1/72 Sopwith Snipe, I wanted to try a slightly more involved vacform. I managed to procure this from a well-known UK regal second-hand supplier: The Vildebeest has intrigued me since I was young and saw an article in a very old annual (1930s?) that described how to carve one from wood. I subsequently served two tours as an RAF pilot on 22 Squadron, which took the Vildebeest to Malta in 1935 in response to the Abyssinian crisis and, as a result, incorporated the Maltese Cross into its emblem. Here is what is 'in the bag': Two fairly sturdy sheets of parts, a small bag of white metal bits, a few lengths of rod and strut taped to a piece of plastic card, a pretty comprehensive plan/instruction sheet and a decal sheet...with some dodgy out-of-register roundels for the RNZAF version. The struts/rod and decals: The white metal parts (the exhaust part in particular will need some fettling): The vacform sheets: Yes, that's a vacform torpedo (I should have one in my spares box that will do the trick), and there's a fuel tank for the RNZAF Vincent as well as an engine cowling for a Vildebeest IV. ...and the plan/instructions: I am intending to model a 22 Squadron Vildebeest III with the Maltese Cross markings on the wheel spats. Anyone expecting to see quick results or Moa-like attention to detail may be disappointed, but if our Argentinian friend can tackle a vacform HP42 then it would seem churlish of me not to at least attempt something much smaller! Oh well, in for a penny... Jon6 points
-
Just finished this one, was a nice build and fun to paint. Brush painted using a mix of Vallejo and Tamiya colours, I went a bit overboard on weathering perhaps especially looking at images of the actual aircraft, but I like a ship that's been through it a bit. If I did it again I'd take more care with mold lines and some of the fit, but I didn't want to spend a huge amount of time on it.6 points
-
I'm still working the Hustler's crew stations, today I pretty much finished the Defensive Systems Operator position. Here's the general layout: And some pics of the real McCoy: Forward panel: Left side & console: Right side & console: You may have noticed that there are circuit breakers just about everywhere! I suppose the Air Force thought there wasn't much to the DSO job, so they put him in charge of the aircraft's electrical systems 😀 Anyway, here's where I am. There's not much to the DSO's forward panel, just some electronic warfare gizmos and chaff launcher controls: My panel looks pretty scuffed-up, probably from the DSO resting his feet on the panel while he naps. I was challenged by replicating the station's circuit panel boards. The Airwaves PE had only one small panel, not nearly enough for the DSO's station. I tried scratch building but wasn't happy with the results. After a lot of failed attempts, I finally gave up and printed up some decals instead. It's not the best, but visibility into the crew positions will be limited, so maybe it won't look too bad. I nearly forgot* to add the DSO's most important item -- his control stick for the Vulcan mini-gun in the tail. Here she be: ---------------------------------------------------------------------------------------------------------------------------- *We modelers hardly ever forget the important stuff, right? Well, hardly ever... That's why I wrote myself this note: otherwise I might be building a diorama of this: That's all I have for now, folks! Until next time, Happy Modeling!6 points
-
Next is the window areas. I started cutting CD liners, but since some of the windows had a slight curvature, I switched to polycarbonate of about the thickness of the fuselage walls. Both materials are not easy to cut or sand. A thin interior flange (to be applied) will eventually keep them in place with some glue. The kit's clear plastic is unusable due to yellowing:6 points
-
Thanks Anthony .Silenoz and Col for your kind words . Today i have constructed the Schatton Modellbau 3cm MK 103 . God knows how these are made as the tolerances are so small .Fit of parts gets 100% but took an age to assemble . Do not attempt withouta powerful optivisor ! P1030057 by Alistair Pearce, on Flickr To be sure that the barrel was fixed in the corect position i fired 1/2 dozen AP rounds at a target and useing the securing/adjustment eye centred it in . first rounds high and to the right P1030055 by Alistair Pearce, on Flickr P1030056 by Alistair Pearce, on Flickr The house is now full of blue smoke and theres a hole in the soffa 😭6 points
-
Hello All. This is is my first “go” at posting photos and one of my models here, so hope it works Bear with me if not! A bit of a back story first. I returned to building model aircraft last summer after a long break since school days. Most of the time in between has been occupied with Model Railways but that is another story. This Airfix Mk IX was the second kit I bought. It came from the model shop in Barmouth last July while on holiday in Fairbourne. Since starting up again, a small but growing group of Spitfires and Hurricanes have appeared mostly Airfix but also Revell. I’m finishing an Arma Hurricane just now together with an Eduard Mk IX. Anyway this Airfix Mk IX is one I’m quite pleased with as (far as I know) I’ve not made too many mistakes. Excuse any rookie mistakes. It is finished as VZ-B of 412 RCAF Squadron circa Dec 1943 as flown by George Buerling using decals by Xtradecal. It is out of the box except I sanded off the bulges over the wheel well which I read somewhere are wrong. It was primed with Tamiya rattle-can surface primer and then sprayed with their Dark Green, Ocean Grey and Sea Grey Medium with the help of a vinyl mask by AML. I’ve not had courage to weather anything yet (maybe one day) so it’s is clean. Here are are a few photos take. Outside at the weekend with my phone. Shown for comparison is my JE-J from my school days. Airfix kits have come on a bit since then! Cheers, John5 points
-
Hey All, I'm one of the victims of the ATT DNS denials in the US, so I'm trying to get caught up from a work-trip hotel room. I've been trying a new technique on each kit. The technique I tried on this kit was painting/finishing major subassemblies prior to final assembly. The wings/booms, center fuselage and center tailplane were all built, painted and weathered separately. The final assembly with very little weathering/finishing after. I found it easier to paint and weather some of the compound curves. But gluing the final sub assemblies was a bit nerve racking. Thanks for looking!5 points
-
Boeing 737-400 Thai. 1:144. Siam Scale Decals. This is the Daco/Skyline Boeing 737-400 in the previous livery of Thai Airways, which I think is one of the best ever. It looks lovely on all aircraft it has ever been applied to, it is a shame they replaced with a new livery. My Thai friends very kindly obtained the decals for me from Siam Scale, and I collected them on my last visit to Thailand. They look to be screen printed on moderate thickness carrier film, (rather like those in many Tamiya kits). The colours are spot on, and they go on to the model with no trouble at all. I was quite impressed with them. The only thing I did was to also apply the standard window decals from the Daco kit as they have the fine silver surround that the Siam Scale ones lacked. I hope you like it, this is the only 1:144 Thai 737 model I've seen, so it is something of a rare bird. As usual I cut away the solid cockpit section and replaced it with the clear part. This obliges me to scratch build a cockpit to fill the interior. My 3 Thai friends are crewing this flight, complete with the captain wearing the red LFC cap! The model awaiting the application of the decals: Thanks for looking, John5 points
-
An afternoon of leisurely pottering Gives me this Then a bit of frenzied fettling gets me staggering towards this The port cyclic isnt in the wrong way round but has been pushed out of shape before the pic was taken It's right now My paper version of the Airwaves IP and its surround sit cobbled in place with a dollop of cockpit glue, once dried I can wriggle stuff around and close up the halves5 points
-
Cockpit references ... Start cockpit changes ... I did not like the seats in the kit, so I decided to make my own ... The whole system became functional in the seats ... Tests of new seats in place (the pilot seat is already painted) ...5 points
-
The fuselage is now close I encounter no problem during this operation. The adjustment are very well. I placed a weight in the noise and behind the seat wall for around 10 gramme. I painted the last piece of the cockipt : the sight. Special give a piece in clear plastic. I painted the under side in green. I masked the sight and paint the piece in black. Now I can start the paint. I used the H42 for extrado and alcad semi matt alu for intrado. For the extrado, I used the pre shade technique and for intrado post shade. For the extrado I picked up the shade with sparaying lighter paint alternately. I used a mix of H42 (6 parts) and H11 (4 parts) with a strong dillution And finaly, I paint the tail. My dealer didn't have the Gunze paint. I used Tamiya yellow with little orange yellow. I made a mask with the decals for model To be continued5 points
-
Another model from 6 years ago of a nice little bus from Jordan.5 points
-
Duesenberg Howard Hughes, used to pull a glider at his El Mirage Soaring School in 1947. There is only one photo available, so I just got inspired. The car should give an unkempt impression of being used on the dusty desert runway of the dry El Mirage Lake, California. Even today, the typical "diamond" shape of the airfields is still evident even though there is a new airport there. I used a damaged model of Dusi, on which I built the entire duralumin bodywork, then I created the whole system of winch with the machinist's workplace, finally I made the cover of the driven rosette and added a washer. The model now weighs 1.7kg It is true that the model is different from reality, but the color scheme is not entirely clear. I searched for other photos or information about this particular car and I found out that it was maybe black or dark gray and had a daytony in black or green or perhaps the original chrome strings. perhaps therefore take the model as a free inspiration. Although the winch drive was probably driven by belts, I eventually used a chain drive ... Vinobraní fotografie Můj model z podobného úhlu ...4 points
-
Hello all Here a a couple of Star Wars Stormtrooper DLT-19s I have made from scratch , and is subject of a wip here https://www.britmodeller.com/forums/index.php?/topic/235046346-dlt-19s-or-are-they-mg34s/ I hope you like them as much as I have enjoyed making them!4 points
-
The Hobby Boss P-38 is finally finished. The final step was doing a light weathering of Black on the top surfaces and a mud color on the bottom surfaces. This was a very easy kit to build. Hobby Boss did a great job engineering this kit. There are no gaping seams to deal with and no alignment issues with the two booms. The radiator pods fit perfectly. Hobby Boss did a great job on the canopy. It fit so perfectly that I did not need glue. It just snapped into place. Plus the plastic is very clear with no distortion.4 points
-
Finally - what feels like forever I have something to post. I seem to have been constantly doing bits and pieces in the background but haven't managed to get anything completed for months. The model I've managed to get finished is Revell's 1/72 P-47 D-30 Thunderbolt. There were 2 options in the box so I opted for P-47 - 28 - RE GC II/5 Lafayette, Armee de L'air, Amberien, France 1944 - I thought it would be good to do something a bit different from the usual American schemes. The model itself was excellent and went together without any hassles - the only real issue being the silvery plastic the model is moulded in which becomes annoying when you have to sand it as you end up with two different coloured plastics making it difficult to check seam lines etc. For a 1/72 model - there is plenty of detail which shows up nicely with washes and weathering. I've probably gone a bit overboard with photos so apologies in advance. Feedback is always welcome so please let me know what you think.4 points
-
A major update, the hull got their base coat. So lot's of pictures for your enjoyment 🙂 Hope you like it! cheers Dirk4 points
-
That was me wasn't it? 'Almost out of the box' Hmm I wonder if... This qualifies? Or this? Oh well...4 points
-
Gidday All, the photo in question was very large so I cropped it, You can make out the bracket/frame mounted on the bulkhead behind "A" turret. Below is a photo of HMS Welshman in Malta, with a similar but lighter frame around the bow. As she streamed her paravanes on her way in I assume this is what the frame is for, hence possibly for Exeter also. All this, however, is an educated guess on my part. I hope this helps. As a separate topic, HMS Welshman is wearing her disguise as a Vichy-French destroyer, a disguise she wore on her first two blockade runs to Malta, in May and June 1942. I shouldn't digress any further. Regards, Jeff.4 points
-
On with the trip! It would be easier to work on the intakes– especially on the internal seams without having the wings in the way. Sooo..., the newly-modified intakes are separated from the wings with a saw cut. 😩 More than any other plane, the 101 is full of optical illusions – Voodoo magic?– especially around the intake area. Drawings are useless and walkaround photos –while useful for the details– are worthless because of the distortion they often display. What remains are the period photos of the aircraft 'in action'. A very good source is this site where US modeller Fotios Rouch went out to see a preserved RF-101C in the flesh and made measurements: https://www.cybermodeler.com/aircraft/f-101/f-101_tale.shtml Once the intakes are finished , the stock splltter plates must be replaced by slightly larger ones Stock plates: Cut off at the hinge New plates from plasticard. Rear view The stock inner plates are removed because they are too short and too close to the fuselage New plasticard plates. Note the new shape adapted to the intake opening. This is where we can stop holding our breath. The new intakes are glued back to the wings. Cleaned up. New panel inscribed Note the slight overhang Viewed from above, there's a slight sweep to the intake lips Front view Spreaders are made from plastic strips That's it folks. It's all downhill from now. Hopefully? Cheers, Quang4 points
-
I've been searching through the nightmare that is my storage system for likely candidates for the GB, and there's a fair selection of builders turning up! All bought for next to nothing as and when they turned up, now they are going to get a chance to shine! Pat also kindly sent me a Blackburn Shark that will get built alongside a couple of Penguin restorations of the same plane. I also think I have a couple of started Trailblazers that might fit the bill. Spoilt for choice or what? I doubt they will all get done, although I cracked out a fair few for the Airfix Group Build last year, I'll try to improve on that score if I can. My 'straight out the box' building preference will help here. I can't wait to get cracking! Tony.4 points
-
Dear Folks, Greetings, I have this old Hasegawa F-4Kai 1:72, however, the decals were very basic as it was a simple kit, I kept it for a leisure build. A few days ago from my friend told me he wants to part a decal and so I got this Black Panther's decals. I was really excited and a few days later got the decals and started with my simple Hasegawa kit, built was quick and simple but the thing was it need some sanding and filling and it has lots of pin marks and the details in some area faded. After a few hours, basic shape was done. I use Tamiya white and black, grey was achieved by mixing the two colors, then for the nozzle I use Mr.Color and Tamiya silver. The decals were a bit dated so I need to put in warm water to make it soft and yeah used a bit of decal softner. It is almost done except for a few small parts and painting left, going to do it soon. Here is the picture of what, I have done yesterday. Hope it has turned out okay.4 points
-
the thrust reverser are now waiting for me at home, that's the last bits of the puzzle. So it should be fill steam ahead form now on the rear section. Am excited, can't wait to get back to her! Am a side, I'm now the proud owner of another 1/32nd Fisher Mod & Pat Sea Fury!!! Not quite as cheap as the first one, but not full price, gosh these are getting very hard to find now! (missed out on a F9F Cougar) I'll be going full mod with her, proper brass wing fold mechanism this time. Plus am chasing a 1/32nd resin TBM-3 Avenger as well!4 points
-
Still plugging away on this beast. The inset for the external torpedo racks fits well enough, just need a little sanding and some more super glue to make it acceptable. Engine nacelles on the other had, are going to be a bit of a hand full. Now my previous work on lining up the wings properly has decreased the gap, especially on the upper surfaces which just need a little sand paper to make it all look good. As you can see the under surface fit is where the problem is. It will require some thicker super glue and some caving to make fit. So it looks like I'm off to the hardware store today. It's pretty much the same on both sides, just this one is the worst.4 points
-
The PJ Production pilots have been paint, just a few spots to touch up and they will be ready to go into the cockpit dub. IMGA0777 by neil Connor, on Flickr I have also re-scribed the front upper and lower fuselage section already and will move onto the main sections later. While looking for picture of aircraft showing the weathering I can across this picture of an A12 Oxcart, (first prototype on first test flight at Groom Lake) which I didn't realise was the single seat predecessor of the SR71. If any wanted to do a full on natural metal finish then this would be one to do.4 points
-
Hi John, cheers for that mate.......although I have to admit I was pondering on a feint camo' on her....but held off the urge.... Here's where she stands (no camo'..... ) Got a filter on her. I used an AK for NATO tanks. Thinned slightly. Warmed up dark yellow nicely....... Then some panel lining with a touch of the NATO filter again. Didn't want an abrupt difference in colour. Finally some pigments here and there for shadow and some odd rust lines from well used lug's and shackle mounts. Gave it a quick, very W&N mat varnish (50/50 with alcohol). I'm switch away fora bit, just to contemplate and practice with a VMS mud system I picked up. Need to get the hang of it, before I take the plunge and put in on this one...... So, here we go. Front shot. Decided to go with a red primer muzzle break to go with the new barrel. Picked myself up some of that Mr Metal Color in Iron. Polish's up really nice for the rear Idler and the sprocket teeth on the main drive. The light marks on the exhaust deflectors will be lost when te mud goes on. Going to go quite a muddy look for this one...... Top view with some spare track in the rack. Used up some of the spares from the Friul's. Catch you all later....now going to see which one get's a little attention other than the Stug....... Cheers Simon.4 points


.thumb.JPG.3498f40362ff13ebfc4b2e45abbd545e.JPG)


This leaderboard is set to London/GMT+01:00