
Leaderboard


Popular Content
Showing content with the highest reputation on 15/04/19 in all areas
-
I’ve been following BritModeller for a while, but having seen a couple of Hudson WIP builds, I felt I had to contribute something of my own. This is my version of the Revell 1/72 Lockheed Hudson, which started life as a limited run by MPM, then was picked up by Italieri, before finding its final resting place in Revell’s back catalogue. I was lucky enough to find one in my local model shop in Saint Paul, MN. I chose to make P5120 of No. 206 Squadron, a Mk. I variant from 1940, based at Bircham Newton. The Hudson played an important role in coastal defenses during WWII. An American aircraft, it was adopted by the RAF after a series of hasty redesigns to meet their exacting specifications. Built in the US, one of the first shipments was dragged by mules over the Canadian border and put on a boat to Britain to be outfitted there as a patrol bomber. As reported by others, this kit is not an easy build. Its vintage engineering was a real challenge to my limited skills, requiring shimming, filling and sanding over numerous sessions. Despite this, seeing the iconic shape of the Hudson emerge over time was worth the effort. I wanted to depict it in flight, and as this was not a supplied option, I had to chop the wheels down to fit in the too shallow wheel wells. I added some detail to the cockpit and navigator's area - all completely invisible through those tiny windows! I also added a very nice pilot and navigator from PJ Productions, and used Montex Masks for roundels, windows and gun turret. To finish it off, I replaced the kit guns with Master .303 Browning barrels - tiny brass miracles. Not conventionally attractive, the Hudson’s bulbous silhouette nevertheless makes for a striking appearance. I remember my dad’s Airfix version, built in the 70’s and gathering dust for a couple of decades after. This build is a homage to that memory and all the pilots who mastered this bulldog of a plane.44 points
-
Hi all and finally over the line with this one, my first ever Vacform build. Originally started for the Maritime Patrol/Coastal Command GB but not making the finish in time, you can read all about my adventures in sanding on the WIPs here and here Not my greatest build by a long shot so please don't look too closely. The first Super King Air entered service with the Irish Air Corps in 1977 with the second joining in 1978. Both were operated by Maritime Squadron, No. 1 Support Wing in the fishery protection and maritime surveillance role. A third joined the fleet in 1980 but was used for pilot conversion & training and Air Ambulance. All have been retired and replaced with two Casa CN 235s in the mid '90s. Thanks to everyone who gave me tips and advice on this build and to all the Vacform builders out there, I salute you brave modellers - we all sand together! 😂 RarePlane Super King Air_Irish_Air_Corps (1) by Dermot Moriarty, on Flickr RarePlane Super King Air_Irish_Air_Corps (4) by Dermot Moriarty, on Flickr RarePlane Super King Air_Irish_Air_Corps (16) by Dermot Moriarty, on Flickr RarePlane Super King Air Irish Air Corps_2 by Dermot Moriarty, on Flickr RarePlane Super King Air Irish Air Corps_9 by Dermot Moriarty, on Flickr RarePlane Super King Air_Irish_Air_Corps (15) by Dermot Moriarty, on Flickr Thanks for looking and happy modelling. Cheers, Dermot21 points
-
Afternoon All. This is my latest finished model the Tamiya 1/72 A6m3 Hamp. This is a really nice kit that goes together really well. I can't think of any problem areas at all. The only issues were a self-inflicted decal disaster which ended up needing a complete strip-down and repaint. I always have at least one DOH! moment per kit. Anyways here are some pics.19 points
-
The brief: Take the cheap Italeri Merlin HM1 I picked up at one of the stalls at the Birmingham IPMS Show a couple of years ago and attempt the heavily varied colour effects seen on most of the Royal Navy's Merlin fleet after nigh on twenty years in service The aircraft entered service in the Medium Sea Grey scheme and over the years various panels have needed repairs or replacement which resulted in a large number of versions of the Grey all over them Much of the variation might be down to issued touch up and respray paints having various property changes in service, maybe some didn't get as mixed up as they should and maybe different manufacturers supplied 'off spec' paint Who knows? But the effects of the colour changes are visible all over the Merlin fleet, possibly on the Lynx/Wildcats too I have not looked into their colours Yet Any road up, this is what I was looking for... Pretty and intriguing for me So I present for your critical eyes, with much help from Scimitar and Pinky Coffeeboat and many other helpful friends ZH847 of 814 Sqn NAS The Un - Italeri details you can see dotted around are mostly thanks to kind efforts of Richard who sent me lots of pieces of etch and resin bits and later moulded alterations from redundant (I hope!) Revell kits which have far better detail added to the original Italeri mouldings The cabin interior has its sonobouy launcher and ready use racking inside and also the sonar winch assembly has been scratchbuilt and added The exterior Defensive suite has been scratchbuilt and popped onboard too as has the starboard side mounted FLIR Wescam Slight change of perspective More I hope you like it, I rather do Thanks for looking18 points
-
I started this model very long ago, so it's time to finish it. Every model is familiar, it's old, but I'm always cute old models. I did not want to correct any manufacturer errors, but I did it directly from the box. I did not even change the decals, which are green instead of white. I like it. Here's the picture, enjoy it.16 points
-
This is it! Finished last night. Airfix kit from a poly bag issue(see WIP) Falcon Vac canopy with decal striping for the framing in silver and yellow, scratch made exhaust and pitot, cockpit interior from Pavla resin set and decals by Ventura. Xtracrylix paint for the red and light grey. Almost forgot, I also replaced the wheels as I lost one of the original kit wheels but found a suitable matching pair. Might need to overlay the yellow framing with another set of yellow decal stripes... currently they look a bit dull. Well there you have it. My modelling mojo restored, for how long I don't know but stay tuned for another I put together in between working on this ole feller. PS: The Ventura decals performed really well! Very pleased with them!!!16 points
-
Finally finished this one after ignoring at it on my bench for 5(!) years. The photo-etch rigging totally owned me and I cried mercy before getting it all on there. Would love any tutorial references you may have for photo-etch rigging techniques, though don't know if I'll be attempting it again any time soon, haha. Overall a fun build, but definitely challenged me a good deal. Flickr Album15 points
-
Hi Finished this at the weekend kit went together without issue. Really enjoyed this one no weathering this time wanted the factory fresh look Thanks for looking Bik15 points
-
Northrop T-38 Thunderbirds team These were to use up some old Hasegawa F-5B kits that had been around for far too long. The main changes to produce T-38s were to the air intakes and leading edge root extensions Just noticed the missing main gear door! Odd how you just don't notice these things until it's too late.14 points
-
Boeing 737-400 Thai. 1:144. Siam Scale Decals. This is the Daco/Skyline Boeing 737-400 in the previous livery of Thai Airways, which I think is one of the best ever. It looks lovely on all aircraft it has ever been applied to, it is a shame they replaced with a new livery. My Thai friends very kindly obtained the decals for me from Siam Scale, and I collected them on my last visit to Thailand. They look to be screen printed on moderate thickness carrier film, (rather like those in many Tamiya kits). The colours are spot on, and they go on to the model with no trouble at all. I was quite impressed with them. The only thing I did was to also apply the standard window decals from the Daco kit as they have the fine silver surround that the Siam Scale ones lacked. I hope you like it, this is the only 1:144 Thai 737 model I've seen, so it is something of a rare bird. As usual I cut away the solid cockpit section and replaced it with the clear part. This obliges me to scratch build a cockpit to fill the interior. My 3 Thai friends are crewing this flight, complete with the captain wearing the red LFC cap! The model awaiting the application of the decals: Thanks for looking, John13 points
-
The Petlyakov Pe-2 was the Soviet light bomber used during World War II and considered as one of the best ground attack aircraft. Built over 11,000 units, it is also one of the most produced twin-engine attack aircraft. The Pe-2 was fast, maneuverable and durable and it was also successful as the roles of heavy fighter, reconnaissance and night fighter. The model replicates the aircraft flown by Senior Lieutenant E. Sedov, 40th Bomber Air Regiment, Soviet Navy Black Sea Fleet Aviation, August 1944. The kit is the Limited Edition from Eduard containing photo etch frets, resin parts and a set of canopy mask. It also includes 5 decal and paint options. It was fun building.12 points
-
Hi all, here's one I finished a few months ago that was published in last months issue of Airfix Model World. I didn't need much persuading to get back into one of my favourite aviation related modelling subjects, namely Cold War Soviet-era jets. This is Eduard's superb 1/72nd ProfiPack Edition of their MiG-21MF Fishbed J finished as a Polish Air Force machine, based at Mierzecice circa 1990. It's an excellent little kit, superbly moulded with crisp surface detail and high-quality Cartograf decals (including an impressively large sheet of stencils). It suffered a few anomalies though, such as a couple of panel lines that just seem to end suddenly, deformed RS-2US 'Iron Pig' missile centre bodies and a somewhat hybrid nose shape (somewhere between an MF and a bis) but these were easily dealt with. The editor wanted the kit built as OOB as possible although a couple of aftermarket parts I had in the stash, did manage to creep in. These were Armory's ARAW72049 resin wheels, which were certainly an improvement over the simple and treadless kit parts and Mini World's A7267A metal pitots (long PVD-7 and the smaller back-up probe) to replace the kit's somewhat chunky and accident-prone parts. Both were beautifully detailed with the PVD-7 having extremely thin blades which saved time trying to fit the tiny individual Eduard PE items. Talking of which Eduards own pre-painted PE set for the cockpit and seat parts speeded things up greatly. A few scratch built parts were also added in the form of replacement canopy supporting strut and additional lead wire main-gear hydraulic lines. The model was finished as usual using a mix of MRP lacquer paints and AK Interactive Xtreme Metals metallics with the limited weathering applied using heavily thinned Abteilung502 and Wilder oil paints, AMMO MIG pastel powders and ground graphite powder. All in all, a relatively simple, quick build, (five days) that was a lot of fun made easier by the excellent fit of the kit parts and some invaluable help from my good friend and MiG expert extraordinaire Gabor Szekers (Ya-Gabor). After finishing this one I'm now looking forward to getting hold of Modelsvit's F-13 variant... Cheers, thanks for looking and hope you like it... Melchie12 points
-
Always no time ago I built an ESCI F-5 as a USAF Aggressor. Then another one came up on eBay with the ground crew set. Now I wanted the ground crew, but wasn’t so worried about another F5. And the kit had a vacform diorama base. But I thought what not build the F5 and isle it on the base as per the box art. So this is the first & second F5s on the later box The kit was pretty warped, fairly poor fit, raised surface detail etc This is her heading into the workshop for paint The kit colour scheme applied Back in the shop for decals And posed on the box diorama And finally with the box box for comparison Not built as a high detail kit, but a tribute to those box art pictures & kits they just don’t make any more. Hope you like it11 points
-
As shown in the below thread in the WIP section I have built a Ferguson TE20 "Little Grey Fergie" Heller kit Here are some pictures of the finished tractor.11 points
-
Me too Keith! Though as we had a colour TV I wonder were the BBC screening a cheaper black & white copy.... Given the complexity of the turret framing Adrian I suspect it will end up being a combination of the digital and the handmade.... There's a beautiful photograph here by Herbet Nott that in its sunlit metal seems to sum up flight and skies: https://media.gettyimages.com/photos/all-20000-in-canadas-great-aerial-army-will-be-thoroughly-trained-picture-id499310855?s=2048x2048 Thanks Johnny. NIce to find where you'd got to in the garage with the Torino last night! 🚨 😊 Take note as in 'avoid' or take note as in 'worth a go' Pete? Ooo-eerr. I read that first line and thought 'Bugger! He's from Interpol...' Nicest quasi-religious compliment anyone's ever paid me Tomo.... I shall offer libations of hot chocolate to to promote the fertility of your allotment Tomo. As for the gathering of the Clan Plastique in Telford it's quite possible I may have to miss it again due to being over in Holland for work... Very kind of you Benedikt! As I have this week off I intend it to be very nice indeed - even it a lot of it involves spring cleaning the house and garden... Finally got the masks for the front of the cockpit sorted: and turned into Oramask for both inside and out painting: It's only when you go looking for references that you come to realize how few photographs there are out there of the Anson seen from directly above (at least with the later upright canopy). To matters turretly. Using reference drawings mapped on to photos of the Aeroclub moulding (which is not entirely accurate in the manner that the actual turret narrows inwards at the waist, so my designs are a compromise between the actual and the moulding as a result), I imported them into Maya to act as modelling references: I'm not intending to build a full set of accurate masks out of this (on grounds of the time it would take up) but want to generate a single set of upright masks for that sides that I can duplicate and then hand-make any more elaborate detailing. Basic geometry: Unfolded mesh to produce a mask blank (the shades polygon): If I can get that into the Silhouette sotware tomorrow we'll see how foolishly optimistic I've been.... Tony11 points
-
Hello all, I officially finished the build of Schnaufer's 110G by taking some proper photos. Build thread here: Two noteworthy things about the build; one is that I managed to squeeze in Aires' cockpit detail set made for the Revell kit: Second, I used the AIMS update set - the main appeal is the clear resin cowls that allow you to have the transparent triangular windows. Since Schnaufer reportedly preferred machine guns over the cannons fitted to the nose, I used a machine gun nose from an Eduard 110E kit. I also used the propeller blades and some antenna from a Revell 110 kit. Painted the model mainly with MRP over a black primer base. Weathering with Vallejo and AK-interactive pigments and enamels. All sealed with Vallejo clear flat thinned with alcohol. The figures in the photos are all from ICM - which are really great. The winter base in the photos is from Noy's Miniatures. Thanks for looking! Feedback is always welcome! Elger10 points
-
Hi Folks, Something I have been working on over this past year. After reading 'A Midhurst Flying Field' by local author Tania Pons I was inspired to build Walrus MkII, W3085. She lived at RNAS Cowdray Park just outside of Midhurst in West Sussex. The airfield was used as a storage facility for many FAA types including Albacore, Swordfish, Walrus. Other aircraft including Proctors, Sharks, and Ansons came through here too. John Moffat of Bismarck fame operated out of here and flew many an Air Cadet around the local airfield in Swordfish or Proctors. Over this coming year I am building some of these types to be displayed at our local museum So the kit is the Airfix with Eduard belts and exterior set, resin wheels and Ez-line/Bobs buckles for the rigging. Painted with Hataka top surfaces and Lifecolor RAAF sky blue undersides. She has an engine in sky. This was discussed in another thread: https://www.britmodeller.com/forums/index.php?/topic/235043918-some-colour-questions-of-walrus-w3085/ Inside the aircraft I used some wooden decals for the Nav table. On top of them sits a chart of the Sakishima Gunto and 'Flight Deck' magazine Jan 1945 edition for a little light reading for the crew. https://flic.kr/p/2cUHFFu Here she is on the IWM site with the BPF: Note the RAAF roundels which have been converted to a quasi-BPF roundel. I opted for this on the fuselage but a more standard BPF roundel on the top wing. So W3085 has an interesting history. She was built as a MkII and so has a wooden hull (all rivets sanded off) and flew with the RAAF after leaving Midhurst. Whilst in Australia, W3085 had the water rudder fitted which MkII's did not normally have from the factory. She went on to join the BPF in 1945 and was flown by a RAAF Flt. Lt named Bruce Ada who carried out operations from HMS Victorious. An extract from his logbook can be found here: https://www.tapatalk.com/groups/airfixtributeforum/supermarine-walrus-w3085-darby-hms-victorious-t22562.html An article from the BBC on his story can be found here: https://www.bbc.co.uk/history/ww2peopleswar/stories/54/a6132854.shtml Sadly W3085 was destroyed by Naval gunfire after suffering an engine failure and left to a watery grave. Many thanks to those who contributed to this being built especially @iang and @Magpie22 who provided me with the servicing documents from Darby's time in Australia. Cheers Nick8 points
-
This is something i scratchbuilt a few years ago using free magazine plans: Not sure of scale or if its accurate or not but its about 13inches in length, built from wood plank on frame in clinker style. The cannon barrels were made using rods of P38 car body filler resin moulded in tubes and turned. It could be displayed as it is or with mast raised and bowsprit fitted, but i didn't fancy rigging it at the time. Overall it took about 8 months to complete8 points
-
Thanks John Not that well, although I suppose as expected. Here's the results so far… The pens come 'clean': and need a good shake and pump but then the fluid itself is nicely runny. So runny that it pools: but it goes on much easier than the (thicker) bottled stuff I have from Humbrol and Mr Hobby. I've sprayed it with primer and we'll see what happens later. I did see a video on YouTube where the guy removed it (from paint) using a damp cotton bud. Fingers crossed. Thanks Tony - looks yummy Thanks Keith, Simon and Bob I'm near my best fighting weight I think but the skinny brigade don't, of course, agree! Primer on the Lightning: This is not what you want to see after spraying: Rats. No doubt some cleaning up to do. Back to these two now: I think they're conspiring against us!8 points
-
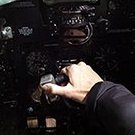
THE EQUIPMENT BENEATH THE RADIO OPS DESK Hi to all! Here is the next episode to this never ending saga! Before I start I want to say that I do realize that this scratch build is not 100% accurate.The interior colours I have chosen are a mish mash taken from hundreds of photos I have collected.The other problem is that it seems that The Flying Fortress's interior used different equipment and placed them in different areas of the aircraft....for example the Tokyo shut off valves. I have placed them on my model beneath the Radio ops desk ...which some of the G variants were... whereas other "Gs" had them on the aft bomb bay bulk head. This of course causes me confusion and I have to go one way or the other. At the end of the day I have to convince my self that this is my own interpretation of this glorious Aircraft and it's never going to be completely accurate and to exact scale as scratch building is really flying blind!! Reason why I am rambling on is because this project is taking so long and at times I feel that I have bitten off more than I can chew and I have to convince my self to carry on...regardless! ANY WAY.............................................. I have scratched all the bits and bobs that seem to be under the radio ops table although as I said ...difficult to know what was and wasn't installed!. ....but starting with the radio ops seat...here it is ready for painting.... here's the scale....... All painted with the seat straps fixed.... I have labeled whats what with the various equipment in the next couple of photos...the usual plastic scraps and wire were the order of the day!............. I attached the top section and tried to poke the camera through the back end and sides to get the shots of the equipment!.... I then glued the seat in position and took a few more photos...... OK....so that's that part done! I am going to go to the rear port side of the radio room now to scratch what ever I see in the photos I have! Thanks for taking the time to look in Fozzy8 points
-
So here it is my RAF Phantom. I used the F4B kit and therefore it's definately not accurate I'd say however I personally can't tell so it's good enough to me. I wanted it on a stand as it appears now as I just think it looks better in flight. Anyway I hope ypu guys like it and all constructive criticism is welcome.7 points
-
Hi, Something much smaller than Clipper. No 4 of this year. The third of Curtiss catapult machined (next to Seahawk and Seamew, which I did and presented here in December), the most secessfull of them. the SOC Seagull. A bit obsolate at start of WWII appeared better then his successor-to-be, the Seamew and served almost till the end of War on many heavy US Navy ships. The old model by Hasegawa was only a bit improved (top of float got courraged surface, I added Venturi nozzle and Pitots tubes, as well as few other details like landing lamp, bomb racks, mass counter ballances of ailerons, steps etc....). I added scratch build trolley. The scheme is based on well known photo of machines from USS Portland in 1944. Decals from drawer (I recognized Matchbox Boston US stars for fuselage and Techmod "white 5", Airfix Duck star for bottom,....) Here she is: Detail view of double riging (with EZ cable) Comments welcome Regards Jerzy-Wojtek7 points
-
Hi All, Here are a few pics of my recently completed Stug. It was an excellent kit. Finished with Tamiya and Gunze paints. I managed to stomp on the PE gunsight cage so had to use the plastic part instead. Not loving that. Anyway, thanks for looking. Some more at: http://www.timboth.com/models/armour/StugF/StugF.htm Tim7 points
-
Something to brighten the day This is the Eduard 1/48 Profipack kit of the X-1. Needs a little bit of work as there are no locating pins. But it's a great kit. No real vices. Paint is International orange and all that has been changed are the pitot tubes which are made from Albion Alloy tubing. Recommended. Please feel free to comment tec. Thanks for looking Dick7 points
-
Following Longshanks' sage words of advice, I promptly proceeded to mess the cat heads up by putting them in the wrong place. I had not taken account of the size of the anchor. Following a particularly fruity assortment of Martian expletives, I ripped them out of the model, opened up some new holes for them in the bulwarks and relocated them. I then let some plastic stock into the old holes and am now waiting for the filler to dry in order that I might expunge any traces of them. Thanks for looking and more soon. Plonker of Mars 👽7 points
-
All done with rigging, enjoy.---John6 points
-
Hello, I finished this early this morning, just added two small aerials to the nose and that was it. This is the High Planes kit, bought decades ago and restarted in 2016. I added two Airfix DC3 engines as replacements for the basic kit engines, scratch built the three aerials and mast, the set of photo-etched fuselage mounted aerials were liberated from the Encore kit (which was just a reboxing of the horrid Frog kit) and needed some alterations to make them suitable for the High Planes kit. The model was finished using Sovereign paints which I highly recommend, harder work than the Special Hobby kit but this is a more accurate kit than the Special Hobby offering!6 points
-
I continue to find models to post from a seemingly inexhaustible modeling well. This is from six years ago and was done more or less at the same time that the 230, posted here at BM: Yet another Morane Saulnier plane used by Michel Detroyat, this time the M.S.225, modified for its use as a racer and aerobatic machine. It was painted in an attractive red/black/silver scheme, and demonstrated its capabilities –and of course those of its pilot- to a great extent. Again an old good Heller kit provides the canvas for this project, the parts being a tad chunkier than the M.S.230 just finished. Some accurizing is needed too but the basics are there. My sample was provided by the ever-smiling, spanakopita-rider, Mr Psarras of Floridian. Thanks again! As you can see in the photos, a new cowl was made, the ribbing and rivets were toned-down, the cockpit was refined and some internal structure added. The engine will need an oil radiator and a new prop, the armament needs deletion, the ailerons need to be completed –as with Heller’s M.S.230 the intrados of the wing has no aileron separation lines- and other details will have to be taken care of. As I always say: look at your reference photos. Heller kits of course are not perfect. But they do have a very logical and practical part breakdown. If you considered when were they designed -during the kit-making stone age-, your admiration may increase even more. The outer upper wing panels follow a real separation on the plane, but you will have to engrave that separation on the intrados yourself. The stabs were dynamically balanced in the original plane, the kit has them wrong, correct as per photo here.6 points
-
Quick update. I nearly made or did make a right hash of the body work tonight.😣 I wanted to knock back the white stripe with a post shade of smoke. It worked really well until I got too close and put to much on and it pooled. 🙄 fatale error of trying to get it off with thinner and s cotton bud. Note to the wise, never do this . EVER. 😲 No pics as I was buzzing around trying to save it. I tried to mask it off and spray white but pulled the decal off with the tape. 😧 Honestly. 🐻 So I put it to one side for a sec and helped the boy make a web shooter out of plasticard. 🕸️ That calmed me down a bit. Everything dried while this was happening so I fingered it couldn’t look any worse so Hairy stick time. Thinned white X1 and a steady hand and it wasn’t looking too bad. I figured a gloss blast will cover a multitude of sins. It did. I can still see the errors but it’s not so bad and I’m more happy with the gloss. Still not Amazing but ok for my first blast at cars. looking at the pics I can’t really see the bad parts so let’s pretend they’re not there eh. 🐶 ( it’s on the top side just before it hits the roof ) 🙊 The gloss is still a bit bobbly but it’s loads better. I’m looking at the pics and feeling better about the car than I was at the start of the post. Rear shots looking saucy. ooh look a chrome pen. I’m goi g to take @CedB‘s advice by shaking, shaking, shaking, then shaking some more. But not tonight. I don’t want any more thumb prints. GOT beckons. 🐺 Here’s a Tamiya pot I doodled on after some shaking action. Looks like a plan. Thanks for popping in guys. Take care and as always. Happy Modelling. Johnny apples. Thanks Simon. 🤸♂️6 points
-
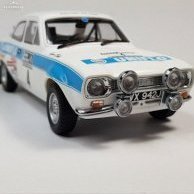
A bit of progress on the Celica this weekend . I ve fitted the wheels , tyres and the spotlights . The rear tyres are slightly taller and wider than the front . I wonder if they ever got mixed up in a rushed service stop ? The spotlights look very realistic . The instructions show only the top spots on the nudge bar , but as a spare set are in the box I decided to make them up and put them under the top set . You can display the lights with or without the covers . I just need to touch up the paint on the light backs . The windscreen running lights have stays . These were very delicate to cut off the spruce . The car looks good now on it’s wheels and stands right . Often Safari Rally model kits have the wrong ride heights , looking more like tarmac cars ! Thanks for looking , Gary .6 points
-
Quick update… I've added another small bit of tape to the bottom of the front canopy after checking references (again). The Platz saw has been shipped: 10-30 days delivery (I'm a cheapskate). @06/24 your tag is working this morning! I'm expecting Samurai performance (from the saw, not from you Jon!) Primer next and the test on the Molotow masking pens. Puppy is arriving today for the Easter holidays so I'm not sure how much bench time I'm going to get if I want the house to stay un-chewed. We shall see… Sit, stay! (Not you guys, the puppy)6 points
-
Quite right Giorgio I've finally found some stock of the Platz Hyper Gate saw and placed an order - I blame that @azureglo and @06/24! No idea why Jon's handle doesn't flag. Ho hum. Thanks Jont Thanks Simon Hi Phil! I don't think the masking pens will get an outing on this one (see below) as I want to get some primer on. Thanks again for the kit. Keen to see the Condor - go on, post an RFI. The diet lets me eat meat and potatoes as long as they're not fried in fat - I'm being guided by my wife and daughter! Canopy masked with film:6 points
-
Thank you, Bigfoot. There's a little update on the rear ramp. The purpose is to have the rear ramp movable so I could display it either closed or open position. For that I first drilled the hinges out and added some magnets to hold the ramp closed in the up position. To deal with the cable, I made a little winch mechanism that is hidden in the rear left storage compartment of the hull. The winch is operated by a little crank just like on the real thing. I added 12 grams of soldering wire inside the ramp too before I sealed it, so it would be heavier and therefore add some tension to the thread. Thread I'm having on it now is only temporary for testing purposes - final one will be bit finer. Thanks for watching, Kristjan6 points
-
Quite a bit today - take your pick from these I think the only car which was a first for me in the flesh though was a Mazda AZ-1 (towards the back of the second photo, unfortunately, I didn't get a shot just of that one). And a few of specific cars. First up, a nice Ferrari 365BB A car I haven't seen for ages - a Dolomite Another one I haven't seen for ages - Volvo 480 A good job the weather was nice, but a thoroughly pleasant way to spend the day.6 points
-
I've been having a play withe the nose radome, which is more pointed on the later G and H models. This kit's nose is more like that seen on the A to early G model, so some surgery has been needed. I did consider slicing the entire nose off, but it actually worked better using the kit's nose as a starting point, and adding the basic shape of the extension using plastic card. The plans Sanger give were useful in doing this, and it didn't take long to replicate a more H-like radome shape: IMG_0916 by Thomas Probert, on Flickr IMG_0915 by Thomas Probert, on Flickr The gaps were then filled with Milliput and when dry, sanded to shape. When the plastic card formers begin to appear, you know you're close: DSC_0102 by Thomas Probert, on Flickr However, there is a problem, as I think the lower nose area (circled below) is incorrectly shaped and is too bulbous - it's almost as if the kit's nose is like a hamster with its cheeks full. However, there'd need to be some serious surgery to sort this - the kind of surgery that I'm not unwilling to take as I do plan to have this model finished sometime this century... Nose by Thomas Probert, on Flickr I've had a bit of a play with the camera fairings on the chin, and the look of the nose is improved with these in place. Note the canopy has not been trimmed to the correct shape as of yet, hence it sits too high at the moment: IMG_0951 by Thomas Probert, on Flickr IMG_0949 by Thomas Probert, on Flickr There's still some jamming pods and sensors to add to this area, and then I'll have a look at how it looks under some primer. Until next time, Tom6 points
-
Hello all, Here is my recently completed 1/49 ICM Mig-25PD in the markings of the 146th Fighter Aviation Regiment of the Ukrainian Air Force in 1995. This jet had the old Soviet red stars painted over and replaced with the Ukrainian insignia. Extras used included a Quickboost ejection seat, Eduard cockpit etch, a mixture of Montex and New Ware masks along with Begemot decals. I went for a moderately weathered jet, based on some pictures that I could find, using various washes and pigments. The build thread is here It's a big brute, so to give an idea of size, here it is beside a 1/48 Eduard Mig-21: Thanks for looking. Dave5 points
-
This diorama is complete~! In 1947, during the civil war in China, a professor was fleeing the city and passing a Japanese tank type 95 that was destroyed in the Second World War. END5 points
-
5 points
-
Hello It's not my main interest but I built something which hasn't got a propeller. Supposedly it flies model- Kinetic + Aires cokpit + exhaust nozzle Eduard-Sniper+ air brakes+ wheels+ GBU- 12 Master- Pitot tube &AOA probes+ static dischargers Decals Techmod Enamel Model Master Enjoy the photos5 points
-
Bridge and upper super structure got their first coat of paint. My main goal for the bridge was to get a nice depth and shadows. I am happy with the result. Lights. cheers, Dirk5 points
-
If Jamie was doing it, yes Joachim-Friedrich Huth would be a better choice, he flew for the Luftwaffe so right air force, and he only had one leg, so would match the kit crewman (though I'm not sure if it would be the correct leg missing)... but in any case, I liberated a couple of these chaps from the Airfix Gladiators in my stash: Sorry for the blurry but I can't get a better picture. I mean I can't be bothered to get a better picture, of course. There follows a rather pedantic little paragraph, please feel free to skip this unless you are really obsessed by incredibly small details on very small plastic figures: This is the crew figure provided and he appears to be a scaled-down and modified version of the pilot provided in the 1/24 Bf109E kit. He's not correct for the RAF versions of the Gladiator as he is wearing the Luftwaffe early-war kapok-filled life-jacket and Luftwaffe flying boots - I'm guessing Airfix's intention was that the be used for the Finnish markings provided in the kit, but I'm not sure that is correct either as while the Germans might well have provided flying gear to the Finnish Air Force prior to and during the Continuation War I don't think they did during the earlier Winter War when the Gladiator depicted in the kit flew, and also it was a Swedish volunteer group who flew those Gladiators so unless the Germans also provided flying gear to neutral Sweden he's probably not correct for that either. However he is a perfect match for a crew member of an early-war He 115 The only question is will painting and installing him and his colleagues be worth the time it will take to do so. I got my paints sorted too: ... and spent a couple of hours masking the clear parts with the Eduard set: It wouldn't have taken a couple of hours if I'd done it in one fell swoop, but I was wandering about and doing other stuff inbetween. The Eduard set doesn't fit perfectly with some of the panes as moulded, a couple on the nose-side sections needed trimming, but it's still an invaluable investment for a kit with this many windows. I got the newly-masked clear parts and the interior parts sprayed in RLM02: Last thing yesterday I got most of the sub-assemblies er, assembled. Or perhaps sub-assembled. Cheers, Stew5 points
-
Hi comrades! My next project will be Javelin in 48th. I'll use aftermarket - Eduard brass (and, yes, probably I'll replace all tiny aerodynamic fences by brass), Armory wheels, Master brass pitot and Quickboost intakes/antennas. I plane to paint the roundels (They are huge, and mast conform to problematic surface...). Specific variant - probably XH893 with bug on the tail. Any advice on the kit problems? How are the Airfix decals? Any application problems? Any tips are welcomed! I'm still on the "plumbing" stage - sand and polish all the "tubing" before painting.4 points
-
Hi dear folks This is my very first effort of bulding a model of F-5 from AFV CLUB.As many of you know the kit is superb and detail is brilliant. I used Martin-Baker IRQ-7A ejection seat that comes with AFV CLUB Saeqeh kit.(Iranian version of F-5E) Colors are mixture of CSI Creos Mr. HOBBY , Mr. COLOR and AKAN paints. Sorry for bad quality photos, I haven’t provided myself a photo booth yet!4 points
-
Hi Chaps, To follow on from my recent R2-D2 build I've started on R2's counterpart; C3-P0. Again this kit dates from around 1978 and is the MPC/ERTL kit under the Kenner label and is approximately 1/8th scale. The kit was purchased as a part started model (two kits came in the box, one built and one in bits) so I chose the best of the parts to build one good C3-P0 and still have enough parts left over to build another C3-XY variant droid if i feel like it in the future. The first thing I did was to disassemble the built kit and go through the parts and clean them up. And that's it, my finished model diorama:- The C3-P0 scrap pile scene on Cloud City from 'The Empire Strikes Back' Thanks for looking..... Oh well, seriously I'd better sort through the scrap pile.... That's better. Better start gluing.... Karl4 points
-
This is the Kits for Cash model of the Angel Interceptor from Gerry Anderson's "Captain Scarlet & the Mysterons". It is studio scale and is a hefty piece of resin! This is it alongside the Airfix kit of the Angel. Thanks for looking Angelo.4 points
-
Hello Folks Haven't had much bench time in the last few months but I just managed to get this one done. It is the truly horrible Roden issue of the Skymaster with extra parts to represent an aircraft operated by No. 4 Sqn Rhodesian Air Force during the Bush War. After embargoes were imposed on the regime at the time by the major powers, Rhodesia turned to French company REIMS who modified civilian Cessna 337 Skymasters. The added weapons capabilities in the form of 2 x 303 Browning machine guns mounted above the cabin and strengthened underwing hardpoints gave the Lynx a formidable close air support capacity in a stable and east to operate platform. The aircraft carried no national markings. The kit is pretty average all round but the worst parts are the clear parts and the decals. Despite a lot of polishing and buffing the windows are barely see through and the decals were rubbish. I used aftermarket brass landing gear legs I got from Ebay to help cope with the metric ton of lead in the nose and some Master metal 303 barrels improved the look of the gun pods. The landing lights under the nose are MV lenses. Here's some pics.4 points
-
Finally - what feels like forever I have something to post. I seem to have been constantly doing bits and pieces in the background but haven't managed to get anything completed for months. The model I've managed to get finished is Revell's 1/72 P-47 D-30 Thunderbolt. There were 2 options in the box so I opted for P-47 - 28 - RE GC II/5 Lafayette, Armee de L'air, Amberien, France 1944 - I thought it would be good to do something a bit different from the usual American schemes. The model itself was excellent and went together without any hassles - the only real issue being the silvery plastic the model is moulded in which becomes annoying when you have to sand it as you end up with two different coloured plastics making it difficult to check seam lines etc. For a 1/72 model - there is plenty of detail which shows up nicely with washes and weathering. I've probably gone a bit overboard with photos so apologies in advance. Feedback is always welcome so please let me know what you think.4 points
-
I will try to explain my method to make louvers . Warning! Cardiacs, purists, timorous, go your way, don't look at what will follow. I don't use a press, I use my mini-mill (Sieg X2) as a press! Remember, 0.3mm annealed aluminum is not very strong... Overview: Tool holder with male tool: Sorry, female imprint is not really clear... And now, wish God help you! Well, when I don't shoot my mini-mill, I'm cleaning the radiator cowl. One side is _almost_ OK: The other side... Dan.4 points
-
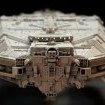
Interesting how it looks when you provide scale: You could live inside that tail, it's bigger than some places I have stayed4 points
-
My latest project is this little glider from Special Hobby. It's exquisitely moulded and consists of probably no more than a couple of dozen parts plus some photo etch.. 4 sets of markings are also included. Although I chose to bottle it with regards to using the photo etch turnbuckles I still rigged it with a mixture of Wingnuts thread and rolled wire. The seatbelts are some generic Eduard ones I had lying around. Thanks for looking. IMG_6015 IMG_6005 IMG_6009 IMG_6003 IMG_6002 IMG_60144 points


.thumb.JPG.3498f40362ff13ebfc4b2e45abbd545e.JPG)


(250x229).thumb.jpg.48a57772b41ed148fdc8d15e3c202763.jpg)


.thumb.jpg.a15df237fd8d56e4265c64c5f8f26d75.jpg)


.thumb.JPG.2ce06c4ff2300a5faba93aaeacbdab25.JPG)
This leaderboard is set to London/GMT+01:00