
Leaderboard


Popular Content
Showing content with the highest reputation on 11/04/19 in Posts
-
This was built for the 2019 NSW Scale Model Shows "Airfix Cup" . I chose a aircraft operated by 808 Sqn Fleet Air Arm Royal Australian Navy during the Korean War. This particular aircraft was flown by a New Zealander Lieutenant Guy A Beange . You can read about him here. It damaged by Typhoon Ruth in 1951 and was ditched overboard. Markings are a combination or masks, kit decals , home made decals and from the Barracuda sheet. There's more on the build and what I thought of the kit along with more photos over at my blog for those interested. Otherwise here are some photos48 points
-
Phantom FGR.2 XT911 228 OCU / 64 Sqn Coningsby, 1970 This is the 1/72 Fujimi kit with Modeldecal markings apart from the roundels, which are Xtradecal. I haven't built the Airfix Phantom yet, mainly because I have a fair stock of unbuilt Fujimis in the attic. I like this Fujimi kit - the panel lines are just about right and the shape and detail are good. I've gone back to the early days of the RAF Phantom with this one. I like the R/W/B roundels and glossy finish, and it now complements my Harrier GR.1 and Buccaneer S.2B in this scheme. Having looked at photos of the new Airfix kit, it seems to provide the tailplane with positive incidence - i.e. leading edge down. If you look at RAF Phantoms at rest the tailplane seems to come to rest the other way round - i.e. leading edge up - and this seems to make a big difference to the overall look. The Fujimi kit gives neutral incidence but I modified mine to give the at-rest look.36 points
-
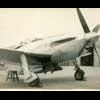
My first attempt at the Airfix Sea Fury (quite a few more to follow) Barracuda cockpit and wheels, Ali's engine cowl Aires gear well and Aussie decal markings.29 points
-
The re-release of the Revell FGR2 gave me a chance to dig out some old decals and have a go at making a 19 Sqn Blue Tailed Phantom, originally a Wildenrath jet, who ended her days just up the road from me at Wattisham. This is her in her later days - XT902 And this is my attempt I had meant to build her as a 56 Sqn red tail, but that will have to wait until I get another one. Thanks for looking19 points
-
Hi, This kit is my 1st attempt at the 1/72 Eduard Spitfire series and I decided on a Weekender to use as a training experience. There are a few upgrades to it though - The decals are from an Aussie 8 boxing which contains more markings than you can shake a stick at as well as a number of extra goodies (resin wheels) the most important being a full book on the different aircraft covered. I also used some bits from this boxing to customise the Weekender including the oil guard etch which is only present in a few airframes including this one. I also added a Yahu instrument panel though having to cut away the slot for the gun sight was a bit messy and using a Eduard panel is a lot easier. The scheme is also quite simple in line with the training exercise driver. In general, the kit goes together very well - I made a bit of a mistake with the wing root piece which made the wing fit more of an effort. Also the nose underside cowling required a bit of work. The plane is a 452 Squadron airframe based in Sattler Airstrip in the Northern Territory and was flown by Desert Ace Ron Cundy. I chose this plane as I'd recently read Ron's autobiography "Gremlin on my shoulder". The plane was kept in immaculate condition so no need for much weathering. The scheme is pretty simple - Foliage Green over Sky Blue with white leading edges. Cheers Michael18 points
-
Hi, This is the 2nd of the RAAF Spitfires I build over Summer, this time the Profipack. I built this one after finishing a Weekender (see other post) so I'd learnt a few lessons in that build and this one was a lot easier. It took a bit more time in some respect due to the more complex colour scheme. I've wanted to build this airframe for a while however none of the previous decal sets were quite right for the code letters and all the Mk VIII's up to AZ kit had their problems (Hasegawa) or were hard builds (Ventura). This is the profipack which had the niceties such as an instrument panel and etch seat armour as well as instrument fittings. I decided to open the cockpit up since it would be hard to see some of this with it closed. This did introduce the problem of the sliding canopy. Eduard do supply an optional canopy with an open sliding hood however as pointed out on here on Britmodeller, this required a compromise to be able to fit over the rear glazing and spine. Basically the canopy is over size looking a bit bulbous from profile. The 2 options are to slim down the rear fuselage and use a cutdown hood from a "closed transparency" or as I did replace it with a vacform (in this case one of the Falcon range). Theonly extras other than the canopy are some Barracuda block tread wheels. Nearly all the photos of RAAF spitfires seem to show them which is not surprising with the roughness of the strips up in Northern Australia and the Islands. The plane is Bobby Gibbes early incarnation of the Shark Mouth scheme which has a smaller "mouth". The scheme is actually a lot more complex than I first imagined, as there are overpaints with Foliage Green and RAAF Dark Sea Grey over the original Day Fighter Scheme. I also tried out some AK interactive chipping on the white id markings to try to replicate photos. Cheers Michael17 points
-
Latest in-flight diorama depicting 8th Air Force Bodney based Mustangs ditching tanks before breaking into the enemy. Airfix 1/72 scale Mustangs and `blurred` base from Coastal Kits. (Prop blur courtesy of Flickr photo editing). Thanks for looking.13 points
-
The second completion of the week, and not much bigger than the I-16, and keeping with the Soviet theme, is the Hasegawa 1/72 Yak-3. Note that the antenna wire goes through the cockpit canopy to the radio box underneath. This model and the I-16 were brush painted using AK Interactive acrylics from their WWII Soviet colour set.12 points
-
Hello gents I recently scored a Matchbox He 115 from ebay for a very reasonable price, given what they sometimes go for. I'd like to do a quick build on this for a few reasons; I think it's a nice-looking aircraft and the kit itself is comparatively simple so I hope to be able to get it finished in time for the Scottish Nationals Model show in Perth later this month (as a representative example of the RLM 72/73/65 Maritime Scheme for the Sovereign Hobbies stand, not to take part in any competitions, and assuming we have room on the stand for it). I built this kit a couple of times as a kid when it first came out and I recall it being a pretty straightforward build. Here's the kit: Looks like mice have been at the box end: Still, all the parts appear to be present, though a few are off the sprues: Also included are a rather faded set of instructions: There is a speckling of coughed-up box dust on the parts, courtesy of the mice: Those will be getting a wash and a bath in IPA before we go much further. The loose parts, clear parts, display stand and transfers are in a sealy-bag: Though the transfers have wed over the years to their protective sheet. No matter, a dimly-remembered idea led me to search the transfer stash... where I found these: A more recent set of instructions with no mouse bits on them, and two sets of transfers which look viable Also, the ultimate gift from a forgotten Past Me; the Eduard mask set for this kit: Anyway only a couple of weeks before the show so I need to get a shove on, it will be a very basic level modelling to say the least, with no additions or corrections... Cheers, Stew11 points
-
Wasted MUCH time & effort with the Flightpath set on this, especially in the cockpit & I have to say that, excellent as that set is it's really NOT necessary in order to produce a superb rendition from the Revell kit, in my humble opinion anyway! I intended to use Xtracolour High Speed Silver on the undersides but on opening both tins I had, neither were in a fit state! Therefore I used AK aluminium which is a bit too "metallic". To cap it all, and this has never happened to me before, the masking tape left a residue on the metalizer that proved impossible to remove & I didn't fancy starting again. Therefore it's presented with a "bit of weathering" on the undersides Kit decals for 56 squadron RAF Waterbeach 1959 I think.11 points
-
Finished. I fitted the rockets which are included and shown in the kit painting guide, I'm not sure how accurate they are for this particular aircraft and in hindsight I should probably have left them off and filled the locator holes. By the time I'd come to that conclusion I had already painted the underneath so ploughed on regardless not wanting to repair the paintwork which would have entailed.11 points
-
Here's the first of two completions in the last couple of days: it's the diminutive 1/72 Hasegawa Polikarpov I-16 Type 24. Finished OOB. Ignore the fact that the cockpit should be painted grey not underside blue. Yes, I did rig the undercarriage retraction wires. Also yes, I forgot to paint the tailwheel tyre 😣 That silver ring around the cowling is a decal and let me tell you that it was incredibly hard to get it acceptably straight.11 points
-
Hi everyone! I've finally finished Modelsvit's 1:72 Mirage 4000.9 points
-
Hello Folks Haven't had much bench time in the last few months but I just managed to get this one done. It is the truly horrible Roden issue of the Skymaster with extra parts to represent an aircraft operated by No. 4 Sqn Rhodesian Air Force during the Bush War. After embargoes were imposed on the regime at the time by the major powers, Rhodesia turned to French company REIMS who modified civilian Cessna 337 Skymasters. The added weapons capabilities in the form of 2 x 303 Browning machine guns mounted above the cabin and strengthened underwing hardpoints gave the Lynx a formidable close air support capacity in a stable and east to operate platform. The aircraft carried no national markings. The kit is pretty average all round but the worst parts are the clear parts and the decals. Despite a lot of polishing and buffing the windows are barely see through and the decals were rubbish. I used aftermarket brass landing gear legs I got from Ebay to help cope with the metric ton of lead in the nose and some Master metal 303 barrels improved the look of the gun pods. The landing lights under the nose are MV lenses. Here's some pics.9 points
-
The rest of the car's now been chipped in the same manner as the turret, again using the base sand colour over the SG and Slate areas. There's a bit of restrained metal chipping on the sand areas using a dark brown on sections that would likely get some wear. The whole model got a gloss clear coat after the chipping to seal the matt finish Real Color paints, followed by a few enamel washes over the bolts and panel lines. The washes were also used to add some general dirt and staining over the model. The next step will be to add some fading to the paintwork, and some sand/dust washees to give more of a North African feel. Andy9 points
-
Welcome Stu, Chris, Giorgio, Phil, John and Roger! Giorgio I don't know much about the type either (there's a Wiki entry here), except that it was the first operational aircraft to be able to climb vertically above the speed of sound and reach Mach 2. A Lightning flying at optimum climb profile would reach 36,000 ft (11,000 m) in under three minutes. Not bad for the 1960s. This was mainly thanks to the two huge Rolls Royce Avon engines, 'uniquely' mounted one above the other. An old colleague was an ex-lightning jockey and was certainly impressed by the performance. Of course it used fuel, gone in (he said) about 45 minutes, but you could go a long way in that time. You weren't necessarily expected to come back though. When I had my brief RAF career we were told that, when in it's expected interceptor role, the Lightning had three weapon systems. Air-to-Air missiles, Avon cannon and then, when you ran out of ammunition, flying the aircraft into the nearest enemy bomber. It got crossed off my list. Not that I would have qualified anyway - at 6'2" any attempt to eject would have taken my legs off at the knees. That stings. Hasegawa re-pop eh? Hmmm. Not many parts on the trees: Nice clear canopy: The pilot's been prepared and primed with Ratskin Flesh as usual: On my other Lightning build (pre-BM) I bought some Humbrol gloss black and sprayed the nose ring with Alclad Chrome. Smelly. This time I thought I'd use my thick Molotow chrome pen: Good enough for the ceiling. That's after three coats and you can see on the paper in the background the results of me pumping the pen after a very, very good shake. Stew and I have both found that if you just shake it a bit you just get a fizzy mess. I think the secret is to shake it, then shake it a bit more and then give it a good shake. Then pump the tip until you get chrome rather than fizzy silver. Messy, but much easier than Alclad IMHO. An email from MJW Models at 23:20 last night ( ) tells me the decals have been picked and will be posted today - great service! Not sure what scheme I'll choose (yet) except that it'll be camo.9 points
-
I've decided my next build should be something easy. Again. Phil ( @HP42 ) kindly gave me some of his 'spare' kits on the understanding that I WiP them here and the next one to go is Revell's acclaimed Lightning F6: (Image thanks to scalemates.com) Just joking. After looking through 15 pages of results from a BM search on “Lightning F6” very few are the Revell kit. Why’s that? The Airfix kit is better? Ho hum… I’d really like to do a camouflaged version as I already have 'a silver one' so I've ordered the Xtradecal X72155 1/72 English Electric Lightning decals from MJW. Starting soon, all welcome - but no sausages this thread thanks, I'm on a diet8 points
-
Hi all. I guess this counts as a diorama. I've built a few of these. This one features a 1/32 Aifix Mk1 Ford Escort and 1/35 scale tools from various sources. Everything else is scratch built.8 points
-
Just chilling let it all hang.8 points
-
OK, let's put this one to bed. Here was my initial result (in defense of my naughtiness, I was so anxious to paint my first roundels that I utterly forgot to ascertain that I was using the correct masks. Or, I just plain cocked it up.) As I was about to pat myself on the back, the naughtiness became apparent. Oh dear! I thought about trying to modify what I had done, but that would involve changing both the red and blue elements, along with repainting some of the grey. Then it clicked - the roundels were done with Gunze Aqueous, and the grey was Colourcoats. A little isopropyl alcohol, and the Gunze should disappear (although it looks rather nasty whilst you're removing it). The isopropyl also removed the Future and the Gunze Smoke Grey, but I wasn't too worried about that. I was surprised that it also bit into the grey quite a bit. This had to be re-sprayed prior to doing the roundels again. Anyway, here is where we now are. I'm not sure the ratios of the red/white/blue are 100% correct with these masks, but I think it's close enough for government work. Now we'll attempt to add the rest of the transfers. Hopefully I will ne'er again cross this Rubicon of Naughtiness. Cheers, Bill PS. Off to Egypt on Sunday, not sure how much will be added by then. I'll try to check in whenever I have wi-fi. Apparently since I have an unlocked Verizon compatible phone (not purchased from them), they won't allow me to add an International plan to my phone. I can make cell calls, but only if I pay outrageous long-distance rates by the minute. How quaint! At least I have a Skype account and can use that over wi-fi (Verizon also won't allow wi-fi calls on my phone unless I use an app like Skype - which is absurd, since the phone hardware is capable - it's Verizon that's the culprit). I probably should just get a new phone, and pay my tribute to the Emperor.8 points
-
Finally finished in the paint shop... Next up a coat of klear and decals, then a spot of weathering. Cheers8 points
-
Thanks Keith, sounds exciting but short - typical! And of a Lightning - fnaar! Rescribe it? I didn't realise it had been scribed… knowing me, what do you think? Please join along Bill - nice to have you. From this morning's session you'll be able to pick up some West Country vernacular Thanks Stuart I think 'a while' is probably right. I've had to strip it off again (see below) and it was still tacky after a couple of hours. Ah, now then. Old Revell kits. Bit like old Airfix but with hard, shiny, **$£%%# plastic! I'd forgotten about that stuff. Nasty. It laughs at most tools, shrugs off sanding sticks and then produces deep "I give in" grooves under a scalpel of chisel. I've decided this is going to be a quick and dirty easy build. Said that before. But this time I mean it. Probably. For example, I have no intention of improving the 'it'll never be seen on the ceiling' internals: Just one dial on the i/p then and no decal. Bet it's a fuel gauge. Painted following the always accurate Revell instructions: … and hidden away: Closed up. That'll teach it: Look at that seam. Easy to sort, you may think. Think again. With this plastic, when you sort the seam you end up with a different colour seam as the underlying, non-shiny plastic shows through: This makes it almost impossible to decide whether you have a dented seam or not. Hate it. Anything else? Well, I don't think the nose wheel doors are going to be much good, even if I get that horrible gate sorted: Didn't think so: Hasegawa re-pop. Don't talk to me about Hasegawa re-pops. I've seen it. It's rubbish. In other news, a tip. If you're using a chrome pen, make sure you don't get paint on the chrome or it'll go dull when you try to wipe the paint off (ask me how I know). However, I think the fizzy bit may be part of some sort of self levelling. I watched it this time and, as the fizz goes, the surface settles down. Here's Mk II after removing Mk I and the paint with IPA: At least I'm happy(ish) with that. You're going to say that the green is too light aren't you? Following orders I was…7 points
-
Hi P I think it is more that after many models and the associated problem-solving, tasks become much easier, and practical solutions present themselves or are remembered and applied. I always say that the more you build the easier and faster it becomes, as in any other field of our lives, but many modelers are deterred by fear of messing up. The fact is, the more you mess up, the more you learn, and the less you mess up. Doing is the only way of learning and becoming confident and resourceful, not so much talking about what may be done or how may be done, or buying more stuff, or start yet another kit leaving the half-way casualties behind unattended. P, what I can say but more "Ps": Persistence, patience, practice. No secrets, I have no more time than any other mortal*, have to work, cook, repair, do the shopping, take care of the plants, like all of us (well, not the Martian, he is a lazy bum that uses mind control telekinesis all the time, against the mandate of Mrs Martian). Cheers *My real advantage: I have no pets, and my sons are grown ups. And now that I live in this overpopulated place I have just the one hobby, this one, having basically given up my free-flight and radio-controlled modeling, impossible to practice here in any meaningful or really enjoyable way. ** ** Oh, the prairies of my youth: a vast green space all to ourselves, no freaking insurance, no stupid city permits, no rules other than common sense, chivalry, good manners, no waiting in long lines to fly for 5 minutes... just a small bunch of modelers, our hand-made models (not ready-made, "ready-to-fly", bought crap), the breeze, the sun (or the fog, or the rain, more the better), the sandwiches, the soft and meaningful talk, the models up there in the sky, the laughter and the joy, the children playing with their little models... forever gone, I am afraid. Sorry, got carried away for a moment there 😉 I was saying I have only one hobby now, and that also simplifies things and focuses the energy. Cheers!7 points
-
Didn't get a lot done over the weekend as had a lot on but have just now finished decalling the Hurri. I made a mistake with the codes on the starboard side where I had to dash off and answer the door and subsequently left the decal sitting in a saucer of water for a few minutes which is far too long. Sure enough the thing shattered in several places when placing. I managed to rectify it to an acceptable level - it's not perfect but better than how it looked! It's also led to a little silvering with this area which I'll have to attack with a needle and some Micro Sol. On the home stretch now, paint touch up on the canopy, attach the underside bits and bobs and undercart and the radio mast on the topside, panel line wash, matt coat, pastel and silver pencil weathering, plonk the prop on and a bit of invisible thread for the wire and Bob's your uncle, Fanny's your gran. Still have to actually do it though Took these just before I stuck the gun patches on as the light was perfect.7 points
-
Just finished another LIDL buy, basically a couple of hours OOB (and probably shows!) I've never built a Hurricane before although I always intended too. I like the look of them and remember seeing one flying at Biggin Hill in the '60's. This model has a resonance to me as it depicts a MK I of 615 squadron Kenley in August 1940. I live a mile or two from the old airfield and often drive past. I tried a bit of lining in the recesses for the first time and it is fair to say that some bits worked better than others. The tail wheel is missing as one of my Grandchildren decided to take it for a test flight! Helpful criticism always gratefully received - I need all the help I can get!6 points
-
If the Greenham Lightning display you saw Kieth was around '77-'78 that would have been Geoff Brindle, who later became Display Manager at IAT. He really did have some Frightening stories to tell. You just couldn't beat a Lightning going vertical at the end of a display, we used to ask for an extension to our airspace up to FL180 ( 18,000ft ) for a Lightning vertical climb but it was only FL120 for a Phantom, sorry Pantom Phanatics but it just didn't have the oomph. John6 points
-
You try being an alien on this wretched planet of yours. Have you ever tried to fix a Haunebu here? I mean, 33.9 million miles minimum to the nearest parts shop, more if only the Clangers have the bit I need in stock. I have to try and keep a certain @general melchett of this parish under control for the general good, Heaven knows what mess I going to have tidy up on my threads when I get back, having left him in charge. Shopping can involve a 67.8 million mile round trip for such essentials as Mars burgers, blue beans, Mars Old Scrotum ale and the ingredients for Pan-Galactic Gargle Blasters. Then there's the hassle of being expected to come up with a different party frock for Telford each year. And while all this is going on I have to try and keep out of trouble with Mrs Martian (yes aliens have the same issues as you Earth husbands) I don't know how I cope, I really don't! Overworked of Mars 👽6 points
-
Hi All Quite a mixed bag these past couple of days, involving realisation, frustration, resignation, trepidation, and elation with a liquid almost, but not entirely unlike, Guinness. First up, I realised that to fit the flaps the fully deployed as I had previously planned, I'd have to alter the wing trailing edge slots for the adapted brackets to fit. Secondly, I became frustrated at the mess I was making of the also previously applied Sky finish while doing the remedial work (yes I know I should have done the work and sorted out a solution before spraying, but what can I say?). No photos obvs. Thirdly I became resigned to mounting the flaps retracted to hide the scar tissue, and also as I'd snapped three brackets and lost a fourth to the Carpet Monster. I've no idea why Revell supply parts to have the flaps half way, there seems to be scant photographic record of them this way in operation. Anyhoo, it was with great trepidation that I masked off and prepped for spraying the Vallejo Model Air 71.048 Dark Sea Grey The result? I'm so happy. So, so, happy. Comments and suggestions welcome Cheers Steve6 points
-
Cockpit is finally finished. Instrument panel is of the film-and-etched-cover kind: I will put some varnish to simulate the glass (ok, *almost* finished the cockpit. In front of the radio the stowed-away bomb-sight can be seen: I also had another shot at the blue primer. This time I kept it simple and just mixed blue, a liitle bit green with metallic aluminium paint and sprayed directly on the bare plastic (because I forgot to prime), and I like it better:6 points
-
Airfix 1/72 Harvard II with Pavla internals (now invisible) and CMR conversion for the exhaust and canopy. Scratched pitot and landing lights. WiP here:6 points
-
Hello, I think this is the third time I have tried editing this post only to hit enter to move the paragraph and down and lose all the writing.. what the hell is going on... In short, this is the GAF Beaufort kit by High Planes, purchased around 1990??? then put away for a couple of decades and then restarted in 2016... challenging kit, lots of extra work but coming to fruition. so photos: The Fuselage Mounted Aerials came from the Encore reboxing of the old Frog Beaufort, I kept the photo etched FMA and the decals then sold the remainder for $5... the P/e FMA don't quite match the High Planes kit but well see for yourself: I'm using Sovereign Paints, Dark Earth and Dark Green... this will be RAAF Beaufort A9 380 as per the kit instructions...5 points
-
Hi everyone ! My latest model ! It took me 2 years to finish it because ( i don't know why , maybe i was bored ) . Anyway , it's now finished and ready to be inspected . Gunze acrylics and some Eduard seat belts . Hope you like it !5 points
-
Hi all Finished this one recently , nice kit to build, built OOB apart from the seat harness. Brush painted with Humbrol Enamels and weathered using Oil paints and weathering powders. There is no Whip as there have been quite a few on the go and did not want to add another. Hope you like Thanks for looking All the best Chris5 points
-
Remember this is Britmodeller: a single-engined fighter that costs more than 2 shillings is overpriced. (That's 10p in modern dosh.)5 points
-
Lightnings apparently carried enough fuel to defend the airfields that Lightnings were stationed at. I read that on BM, so it must be right! These are my very most favouritest jet airyplaney things evahhhhh, and it's grand to see you making one. I did an 'Asegawaha kit in a GB a couple of years back, and while it's no great shakes, it does look pretty much like a Lightning. When you've finished this one, have a go at the new(ish) and much superior 72nd Airfix version. Don't bother with the 72nd Trumpeter one, it's pants. As is the 32nd version... Now, off you go. I'll be watching...5 points
-
Meteor F8 , WK803, 56 squadron RAF Waterbeach 1953 for the NATO v Warsaw pact 50s GB Built from the Airfix 1/48th kit, painted in Tamiya AS12 with decals sourced from a Classic airframes kit and a light Flory wash to finish off. Some fit issues with the intakes and especially nose, but on the whole a nice kit I would recommend Would have been kept clean as it was used on the Queens coronation flypast. Need to sort out a proper setting to take decent pics. rather than phone pics at some point Thanks for looking, any feedback or tips welcome Ian5 points
-
Hello modellers, today I would like you my builds of all three fixed wing gunships used during the Vietnam war. All three models were originally built in the late eighties and early nineties und underwent a different amount of refurbishment recently. The 1/72 Italeri AC-130A restauration took the greatest amount of time as it had to be completely disassembled as most of the guns were pushed to the inside during handling. I took the opportunety to strenghten the wings, sand down the old brush-applied paint and completely rescribe the panellines and repaint it. The flight deck was completely reworked, pilots were added and the clear parts polished. The props were made movable and some of the small parts that had disappeared over the years needed to be scratchbuilt. The original kit comes with large auxilary fuel tanks on the inner pylons which I cut off and moved the rack with the ECM pods to that place. For the outer pylons I crafted some SUU-42 chaff/flares dispensers made from leftover ordnance coming with the 1/72 Italeri B-58 Hustler kit. Biggest problem were the new decals which all needed to be self-printed except for the national insignia which came from an aftermarket sheet. The Italeri 1/72 AC-119 K Stinger gunship had already been part of my “Secret War in Laos” topic which appeared on BM several years ago. Since then, the model was cleaned, got a nose re-shaping and after some paint touch-ups and some additional decals got a new clear coating. The decals had a strong silvering despite a brush painted clearcoat which I sorted out by making small cuts with a razorblade and carefully applying Tamiya´s extra thin plastic cement. The windshield was polished and details were added to the flight deck as well as new and more stable aerials added. The props were already repaired with nails in the past which turned out to be a bad idea because of corrosion which prevented the props from spinning freely again. To remove the props, the whole cowlings had to be removed. My new technique for spinning props using brass tubing and needles is much better and allows easy repairs. The AC-47 gunships is the oldest model and without doubt the oldest kit, dating back to 1966. I bought it in 1988 when the kit was re-released in Monogram´s “Heritage Series”. There is no scale on the box and the model appears somewhat smaller than 1/72. My first intention was only to clean it a little and add some minor details to have the gunship trio complete for the post here in the forum. But then I tried to overpaint the brown areas with a lighter color and wipe off the fresh paint on the decals with a brush and some turpentine. As this worked out so well, the other colors were oversprayed in the same way. For masking I tried a new technique using flexible masking tape from the local hardware store and cut it in narrow stripes of about 3mm. This allowed very narrow curves and the bond on the model surface was better as with Blu-Tack saussages. To give a little fading between the different colors, I oversprayed the borders with heavily diluted paint. As the kit has recessed and raised lines, I used different weathering techniques, using a wash for the recessed areas and some pencil and pastel chalk shading for the raised areas. For the paint chipping, I used a silver pencil and some drybrushing with aluminium paint. The original glass cupola on the roof was lost or never attached, so I had to be scratch-built it as well as all the aerials. Hope you like the trio Mario5 points
-
Tube measures 1,6 cm in diameter:5 points
-
Thank you all, guys. Teeny tiny update of my build too. The roof of the crew compartment is painted and weathered inside. I airbrushed a coat of primer outside as well to see, if my surgery on the hatches need some additional filling and sanding, but it seems okay to me. I work on the ramp winch mechanism at the moment and hope to show you some progress on this soon. Kristjan5 points
-
As an average modeller, I'm pretty pleased how this conversion came out. Built as HMS Phoebe's Wasp when featuring in the 1970's series 'Warship' Can't wait for some of the offerings coming up ....5 points
-
Meteor F8 , WK803, 56 squadron RAF Waterbeach 1953 Built from the Airfix 1/48th kit, painted in Tamiya AS12 with decals sourced from a Classic airframes kit and a light Flory wash to finish off. Some fit issues with the intakes and especially nose, but on the whole a nice kit I would recommend Would have been kept clean as it was used on the Queens coronation flypast. Finished a while back, but first time me and the weather have coincided for picture taking 🤣5 points
-
Hi Folks, Thanks for the heads up whiskey, I may do something similar to Jon's solution as i think the Airscale handles are a bit underscale. Anyhow got a bit more progress done, pit is now firmly in the fuselage, i inserted some 'strengthening' rods made from sprue along the spine as i know this is a weak spot especially as i was going to do re-scribing and riveting along here. Next up after sanding and filling the fuselage halves with Mr Surfacer 500 i moved onto the riveting itself. Here i used MDC's riveting tool and Hasegawa tri-tool riveting templates, to keep it steady i like to stick some old style Dymo tape to the kit as a guide. Once this monotonous task was complete i moved onto a bit of detailing. IMG_5104 First up I noticed some of the Greek birds had a slightly raised panel near the tail i replicated this with some very thin evergreen sheet. I also cut out the anti-collision light on the tail and replaced it with some clear red rod cut and sanded to shape. IMG_5183 Then the fun bit, after adding the nose i did some more rescribing and riveting then i drilled out the gun vent and made a new raised one from plastic stock. Part of the AUP upgrade was a IFF system which meant adding 'bird slicer antennas' to the nose. These are still not finished yet as i need to reduce the height of the blades and shape them but so far I think they look pretty good. IMG_5181 And finally the instrument coaming/HUD, this is also a lot different from your average F-4E firstly the HUD is bigger and i needed to cut out the coaming so i could add the pilots MFD. The HUD is also where the upfront controller sits, you guessed it, in front of the pilot! The hardest part here was trying to not interfere with the windshield, i can tell you there's not a lot of room in there! IMG_5182 IMG_5178 See link below for the real thing; https://www.airliners.net/photo/Greece-Air-Force/McDonnell-Douglas-F-4E-AUP-Phantom-II/2098373 Lastly I've added the GPS antenna on the spine and i noticed a raised ring just behind the WSO's cockpit so this was added also. IMG_5184 Until the next time... Cheers5 points
-
My set was second hand and missing the RAF Leading Aircraft Woman, here are the other three. DSC_0012 by Richard Linnell, on Flickr DSC_0013 by Richard Linnell, on Flickr All the figures seem to be based on the ones published in The ARMED FORCES of WORLD WAR II Uniforms, insignia and organisation, ISBN 0-85613-296-9 Officer, US Women’s Army Corps, 1944 DSC_0014 by Richard Linnell, on Flickr DSC_0015 by Richard Linnell, on Flickr Lieutenant Junior Grade, US Women’s Auxiliary Volunteer Service, 1942 DSC_0016 by Richard Linnell, on Flickr DSC_0017 by Richard Linnell, on Flickr Lance-Corporal, British ATS, 1940 DSC_0018 by Richard Linnell, on Flickr DSC_0019 by Richard Linnell, on Flickr4 points
-
Also completed today is the HobbyBoss EasyKit version of the Curtiss P-40B. This kit looks the part, mostly, but lacks some details: the cockpit is very simplified and there are no doors for the landing gear fairing. But, it makes for a quick build and I had fun with it. Brush painted with Vallejo Air and finished in the AVG markings of Greg "Pappy" Boyington of later "Baa Baa Blacksheep" fame using Print Scale decals.4 points
-
Hello It's not my main interest but I built something which hasn't got a propeller. Supposedly it flies model- Kinetic + Aires cokpit + exhaust nozzle Eduard-Sniper+ air brakes+ wheels+ GBU- 12 Master- Pitot tube &AOA probes+ static dischargers Decals Techmod Enamel Model Master Enjoy the photos4 points
-
Earlier than that John, 73 or 74 if IIRC. Another Lightning 'display' I enjoyed was when I was in my IOT at Cranwell in my also abortive RAF career, & they took us for a 'day out' at Coningsby when the place was awash with Phantoms. A pair of 5 sqn jets had visited for lunch and lined up for a pairs depature - full burner, rotate, tactical break, pull into the vertical and again barrel roll upwards until out of sight! It was definitely a 'follow that suckers' message to the Phantom mob! Keith4 points
-
I might join you along the way Ced, the Frog/Hasegawa Lightning was one of my favourites back in the day Still got two in the box to build along with an old Airfix or two for twin seating, my late summer intended build (Message to Ced... Pen envy... I've got it... Must get chrome pen like that...)4 points
-
I used to consider research superfluous, thinking -in my blissful naiveté- that kit manufacturers dutifully studied their subjects. How deeply disappointed I became after a time, discovering that many of them actually almost never go beyond the very superfluous, not to mention trying to depict something accurately. The bright side of this is that in committing to do some research for my modeling projects, I discovered a universe of history, engineering, wonderful anecdotes and the incontrovertible fact that many things that are considered true are Mickey Mouse fantasies, blatant generalizations, bogus assumptions and hand-me-down misconceptions. Research has become for me entertaining, exciting and pleasurable, not a duty or a burden. And speaking of which: on this photo I found two small auxiliary struts, that are seen in only some of the HP42/45, and not consistently on the same machines through time. Visible on this image is the only roof feature, a vent, instead of the truckload of tin cans and intakes, outlets and such normally seen in this area on HP42/45s. Of note is that the circular porthole in the area of the ladies washroom appears partially covered in many planes, or later on time on the same plane, no doubt to preserve the ladies from the curiosity of...birds? stowaways hanging from the wing struts?, hum perhaps from indiscreet sights form the maintenance crew during pit stops...ah...an euphemism, in the case of one of the sides of this story. Study your subject...and study it along its lifetime, things may change...4 points
-
Pics from the framing session last night: Just need to add yellow strips to the crews sliding sections before fitting out and readying for final throes of decalling.4 points
-
Thanks Roger, John, Giorgio and Ben Now in the gallery here. The final bits… A couple of bits of slide tube for the pitot. Here's a tip - don't pick up the container with the open end downwards and certainly be careful how you pick up the bits or you'll bend it: Careful drilling, a drop of CA or two, some paint and you're there: Thanks again to @Biggles87 for suggesting the Sellotape Diamond: … which, if you don't get your fingers all over it (doh!) makes great light covers: One not in the gallery: Why oh why oh why oh why oh why can't I blend canopies? Oh, lazy, right. I blobbed filler under that TWICE and wiped it off with all the care of a [insert your favourite non-caring person here] Onwards! Thanks to everyone for your help, support and company during this 'supposed to be easy' build. That was before I started on the Pavla internals and bought the CMR stuff. Some people never learn. What's next? No idea. I'll have a ponder later4 points


.thumb.jpg.76f12b87ce9ca9929c9aabdcf8f9d2dd.jpg)

.thumb.JPG.3498f40362ff13ebfc4b2e45abbd545e.JPG)
This leaderboard is set to London/GMT+01:00