
Leaderboard


Popular Content
Showing content with the highest reputation on 13/03/19 in all areas
-
This was a challenge due to trying to make the stripes a little rough. As these were not coming back I gathered they were not Perfect. Pictures seem to verify some straight and some rough. I decided on the rough edges. I had to add the rear tail braces and the guide wires. I look forward to the Horsa (just started) at least a little more Interesting Scheme..OD and Neutral gray..Along with those lovely black and white stripes. Fun and rather easy build, basic modeling skills Thanks for taking a look Comments welcome Regards Bill28 points
-
Got my hands on the Tamiya 1/32 Mitsubishi A6M2b. Completed it a while ago (mid 2017'ish) , but unfortunately, no space at the time to display it, so it has been in its storage box since. Here are some pics of the finished model.28 points
-
Hi Guys, A simple and very old kit yet the details is very nice, however, the interior is very basic not much if I didn't add the pilot it would have look very empty. I will keep it short, painting was done using Mr.color Silver, Vallejo and Tamiya black. Thank you for looking, cheers16 points
-
My dear modeller friends, here I am again with another tribute to the Falklands War veterans. I would like to recreate, with my modest skills, a diorama representing the return of the HMS INVINCIBLE from the Falkland war as was on this picture: HMS Invincible returns home following the Falklands Conflict, 1982 by Franco Segato, su Flickr I used a 1/700 Dragon Premium Edition Kit with the addition of 1/700 Eduard Royal Navy and Passengers figures It was quite difficult to find the celebrating boats around the aircraft carrier, but I mostly used what I had on my stash, so it's not perfectly the same as the picture...😓 Anyway, this is the result, hoping you'll enjoy it... PS: Sorry for the pictures but I don't have a studio with the right lights IMG_20190312_175319 by Franco Segato, su Flickr IMG_20190312_175348 by Franco Segato, su Flickr IMG_20190312_175455 by Franco Segato, su Flickr IMG_20190312_175502 by Franco Segato, su Flickr IMG_20190312_175513 by Franco Segato, su Flickr IMG_20190312_175328 by Franco Segato, su Flickr Now she's resting near the HMS EXETER, my previous work: IMG_20190312_175734 by Franco Segato, su Flickr HMS Sheffield next...15 points
-
Hi all, If you've been following my WIP thread on this, you'll know the trials and tribulations I've gone through to get this finished. The cockpit walls had to be detailed, the flaps lowered and scratchbuilt, a new windscreen home made after the original disintegrated, problems getting the gloss coat to set, decals which wrinkled and refused to respond to MicroSol...you name it. Anyway, here it is after 67 hours work, in the best trainer scheme the Hawk ever wore in my opinion. Excuse the photography, natural light has been hard to come by today... Now, what's next..? Cheers, Dean12 points
-
On the kick, and I had this in my stash. Totally OOB. No Skyflash this time 😝11 points
-
Hi Chaps I thought I would share a few pictures of my Dassault Mystere IV from the NATO 1950s group build, for those who do not venture down to the deeper depths of Britmodeller. A Hi-Tech kit from the last century. Injected main structure with resin details and PE in reducing size. Kit from France, bought in Australia, built in Thailand, posted on Britmodeller, from Vietnam. Small world! Build thread here. Mystere Colin10 points
-
AAAAAAAAAAAAAAAAAAAAAAAAAAAAAAAAAAAAAAAAA! "Láďa Jonáš is finalizing the design of a Spitfire Mk. Vb. Other Spitfire versions - Mk.I, Mk.II, Mk.Va, Mk.Vc, Seafire as well as Spitfires Mk.VI and Mk.VII, are also a part of the project."9 points
-
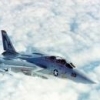
Hi everyone, I've been converting the 1/48 Airfix F.6 kit to a 'T' bird, XL573 Lossiemouth with wrapped around camo. I've left the white painted intakes areas off, I don't like them, but my references show no serial numbers under the main wings, my question is, is this right? P.S. I will post pictures of the finished model sometime this week. Yours fumbling around Greg9 points
-
Good day, ladies and gentlemen! Let me present you my next model from Ukrainian manufacturer "AIM". The kit is typical "shortrun" with its specific defects. "Just from box" making. Only flag on tail made by handmade stencils. Add "Miniworld's" gun MG-15 and rigging.9 points
-
It's a long time since I started a model on the day that I bought it (or in this case, the day that it arrived) but so it was with the Hunter. It was a pleasure to build, needed no filler at all and is from the box. Apart from the 'back to the fifties' nosewheel I can't think of any real improvements. I'm happy with the detail in the cockpit, I don't like my planes to be suffering from hydraulic failure so like the flaps tucked away, and although a gun pack might have been a 'nice to have' I probably wouldn't have used it. I wanted a standard day fighter scheme so went for Xtradecal's 74 Squadrom markings. It's brushed with Humbrol paint. Thanks for looking!9 points
-
Really getting their money's worth out of the graphic, were Airfix. Well, I managed to put the forward spar on backwards, so that's a bit embarrassing. But I'll live. So I began applying filler: I was a little unsure if the blanked-off aperture for the ventral turret/latterly the H2S aerial position would be faired in, but but consulting with the Norman Franks book, it looks like it was still pretty obvious. Still, the filler will serve a purpose there. I'm weighing Adrian's suggestion to cut off the wheel well portions of the spars so I can attach the wings later. It has much to recommend it, I just worry about screwing it up. I've also assembled the outer nacelles and labelled them, as they're handed and it would be awkward to get them mixed up. I've been in a very punchy mood today. Perhaps it's the very low-calorie diet I'm on (I finally dropped below 200 pounds the other day, very exciting), maybe it's the sinusitis and accompanying headaches I'm now on antibiotics for, but I've been extremely irritable and argumentative. Not great.9 points
-
Hi folk's.My build for this GB is Academy's re-boxing of the Accurate Minitures kit which has to be said is a beauty.The kit was a Christmas present from my Mother in Law who sadly passed away less than two week's later so a bit of extra impetus for the build These aircraft were involved in all the major action's of the Pacific war including being involved in the sinking of most of the Japanese carrier's at Midway and the Philippine sea.Box art for now,8 points
-
F-16B 81-0817, F-16 Combined Test Force, 6510th Test Wing, Air Force Flight Test Center, Edwards AFB, August 1986. Can't say much about this one. USAF images. Thanks for looking, Sven8 points
-
Hi All Here’s my latest completion, the Revell 1/48 Chinook HC.Mk.1 depicting ZA671 with artwork celebrating the 75th anniversary of 7 Sqn back in 1989. This one was chosen from the stash by sister who was visiting from the UK and who is well used to the sound of these things whomping away in the distance back home…..thanks Sis ! After the marathon of the two SEAC B-24s of last year, I was hoping that this one would be a little quicker and easier. But while the kit itself didn’t present too many problems, it did still take me about 4 months to complete. Years before I bought the kit, I’d snapped up the Italeri detail set at a pretty good 90% off; I used the relevant parts of this with much of it invisible in the cockpit unfortunately. I added a couple of bits of wire to the searchlight, hoists and hooks, and weathering is pretty much restricted to replicating a dusty floors, tyres and steps. I didn’t get around to fitting the rear ramp actuators, and that suits me fine because I prefer it with the ramp door poised semi closed to show the Chinook shape off a bit better. So, here it is, comments good bad or indifferent welcome as usual. Cheers Gaz Thanks for looking in8 points
-
Decals are on and she's all glossed up. Future this time. Because I only have a few ounces of Gunze GX-100 but a few quarts of Future. I tried a number of different application techniques with the Future. First I applied it using a Q-tip. It's not as hard as you might think; the entire wing top was initially done this way. Then I tried a broad brush, again not bad, but I was concerned about putting on a too-thick coat around the window masks. So I broke out the airbrush and used it to finish up, eventually overcoating those areas that were Q-tiped and brushed for the sake of uniformity. The decals came from a number of sources. First I tried the AIMS Me 321 set. There were some size issues, at least for this particular bird. Then some generic Hakencreuz, and finally fuselage and wing crosses from the most recent Italeri release of the Me 321. I'm guessing these were made from Cartograf, but this is not noted on the sheet. For the first time in years I used Solvatset, which from this point forward I will refer to as "Decal Napalm". Aggressive? Yeah. Think of the creature from the movie "Alien". I exaggerate of course; but only a little. After I removed the horribly deformed underwing AIMS cross, I returned to the Cartograf sheet for replacements. BTW, Solvaset, I mean Decal Napalm, is also an excellent decal remover. IMG_7110 by Barry Numerick, on Flickr IMG_7113 by Barry Numerick, on Flickr Thanks for looking.8 points
-
First iteration for test purposes only But I have rejected it, why? Scale creep of course, playing par as expected no matter how I try Much too big so it has to come off, does look OK for shape though Onwards and ever onwards Smaller cover see, next! Needs its height modifying then I think we're about done for this side7 points
-
Hi all - having seen a couple of builds recently where modellers have painted the rear frame of the Hunters canopy - I thought these pics might be a helpful reference for those wondering what the real area looks like. The rear of the cockpit has what looks like a rubber pressure seal bladder - and this is what creates the seal against the rear thicker section of Perspex which is clear but discernible in its difference form the rest of the canopy ( or that's what I think happens anyway) This is the F. Mk4 nose section from Duxford- but all single seat Hunters are the same cheers Jonners7 points
-
The early days of the later type frame mount The pencil mark shows where I estimate the upper cover will go Abovely Looking at this I will be making the cover bigger all round, this looks wimpy in the overhead view, more design work Bill Round up from the other side The beat goes on...7 points
-
Completed before the house move, this is off to the backseat as it depicts his farewell flight. The Hasegawa kit performed beautifully with an Aires and Eduard cockpit upgrade. Painted with Vallejo.6 points
-
Hi all - some more progress so more to show... You might have noticed the large step at the front of the nacelles in my last post - I meant to mention them in my last post but forgot. Obviously they were a problem that needed addressing: you can see what I mean here: Not sure why these don't line up as everything else does - It's a pretty big step even for Airfix... Anyway, I sanded down the section closer to the wing so they became flush... I used a low grit sanding stick which ate through the plastic pretty fast - then followed up with progressively higher grades to smooth it out. The wheel bays then got some paint - sprayed Tamiya german grey again followed with some dry brushed light grey... These will get more some more attention later on... The wheel bays were plugged with blu-tac in preparation for priming... While I was spraying these, I ran a light coat over some of the seam lines to see how I did on those - they all looked pretty good with the exception of some 'ghost lines' seen below: These were sanded down - I did some 'finishing' sanding / polishing around the rest of the airframe - then everything was cleaned down for the primer... I used Mr Color 1500 black thinned with Mr Color Leveling thinner 50/50 - this stuff is great - you have to spray it wet but it levels out beautifully - it doesn't half stink though so a mask is compulsory. I took this shot after doing some touch up sanding in some spots - around the wing roots and nose cone. My riveting came through nicely Seams are all looking pretty good... Airfix doesn't make it easy to get to this stage but that was expected. I'll be slapping some paint down very soon... Cheers John6 points
-
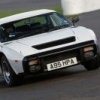
Well it's nice to be thought of thus, but this debate is very wide-ranging as regards armour and the answer is neither short nor simple. Covenanter was a poor design in many respects. By the MkIV, most of the faults had been fixed but by then it was truly obsolete. But without it, 1800 Crusaders would have been held back from the desert to equip home units and training schools. So it served a valuable and overlooked purpose. As did 500 of the equally useless Cavalier and 900 of the slightly less useless Centaur. Yes, the StuG was the most effective tank killer the Germans had once the L/48 gun derived from the PaK 40 was fitted. Pz III production was curtailed in favour of the StuG III, and when production of the III series stopped the StuG IV appeared. The StuG IV mounted the same gun as the later PzIV but, as noted, was quicker and cheaper to build. Such vehicles are less useful in an attack because of the limited traverse but can provide an overwatch fire support capability. They are suited to the defensive battle operating from prepared positions but must be careful of being outflanked and engaged from beyond their arc of fire. The Archer was an overwatch vehicle in the attack, and the British regarded tank destroyers as an Artillery rather than an Armour asset: a mobile anti-tank gun. In defence it would be deployed as an anti-tank gun from fixed positions. The US were really muddled with their tank destroyer concept and it did not survive the war. Arguments between the Tank Destroyers and Armour stifled the development of more effective tank weapons, although neither deployed the 76mm gun until some time after D Day. You could not rely on having the right asset available or on call when you needed it, remembering von Moltke's adage that no plan survives contact with the enemy - and that incoming fire always has priority. Tank destroyers were too lightly protected to be used as tanks, but they often were and suffered badly as a result. Tanks were too poorly armed to tangle with later German armour but had to anyway. You didn't stop the battle while you called up the tank destroyers. That was why the British ended up with the first real MBT in 1945 in Centurion, having finally realised that the Infantry and Cruiser concept was flawed. The US had one too in the M26 but didn't realise it at the time: they still thought of it as a heavy tank. But its progeny in the shape of the M60, via M48, M47 and M46, is still in front-line service today as an MBT. There were only about 1350 Tiger Is and less than 2000 Tigers of all species. Many Allied tank crews who claimed attack by Tigers had actually met Panthers, of which there were about 6500 plus Jagdpanthers. The Panther's 75mm L/70 gun was just as effective as the Tiger I's gun out to 1000m. Yet they still planned to put an 88 on it. The Tiger I could be taken out frontally by the 76mm up to 500m and by the 17pdr at longer ranges. So the Tiger engagement dance in "Fury" is all wrong. The 2nd most effective AT gun the Allies had behind the 17 pdr was the 6pdr with APDS. Hence why a proportion of 6pdr Cromwells and Churchills served in NWE. But the most effective tank destroyer, East and West, was copious tactical air. 20 and 23mm cannon and various rockets. The British 3" rocket weighed in at 60lbs - the weight of a 5 - 6" artillery shell - and was supersonic when fired from a fast-diving aircraft. At the least well protected part of a tank. Despite claims to the contrary by 2 tank units, Wittman may have been taken out by Typhoons: or his disabled tank was attacked from the air later. The Russian tank/tank destroyer mentioned above was probably the T-34/76 and the SU-85. When the T-34/85 appeared the SU-85 was replaced by the SU-100. When 100mm-armed tanks appeared with T-54 (post war) the SU-122 appeared. The Sherman could have been significantly improved and there were many experiments along those lines, but it would have meant a significant production hiatus and so only incremental development was done. Stalin personally forbade any changes to T-34 that would slow production, until the 85mm version appeared in 1944. During the move of production East of the Urals in 1942, some 5000 or so individual parts were deleted from the design to simplify production. British tank design and production was stymied by our outdated production capabilities and a reliance on face-hardened rather than rolled homogeneous armour (RHA). Upgrading production capability would have virtually halted production and even Churchill acknowledged that a bad tank was better than no tank. That situation was not improved until Centurion came along. Sloped, fully-welded RHA hull no longer built on a frame, cast turret, powerful engine, improved suspension with wide tracks, good gun. A very much better balance between lethality, survivability and mobility. Previously we'd had to prioritise one over the others. The availability of the 600+ BHP Meteor engine changed all that.6 points
-
Oops, I picked the Aussie one. Sorry - how about a build a Dutch Buffalo sometime? The sample on the left was Mr. Paint, that on the right was Hataka. ** I opted for Mr. Paint, this being the first time I've ever used the stuff on a model. Being an acrylic lacquer, I figured it would have some "bite", but I first cleaned the fuselage with isopropyl alcohol, and then did a 2,000 grit sanding followed by another wipe down with the alcohol. The Aki resin is exceptionally smooth, and I wanted to make sure that I wouldn't have any paint lifting later on when some masking was necessary. As I mentioned before, Mr. Paint's airbrush-ready lacquer has about the same viscosity as water. I suspect most modellers don't dilute their paint this much, but I've always been one who thinks that thinner is your friend. You can't open up your airbrush and just blast away. Some patience and respect for the viscosity is essential. I found it took about 6-8 coats for solid, opaque coverage with nice colour depth. That sounds like a lot, but these were applied in rapid succession due to the paint drying very quickly. No need to wait between coats - by the time you get back to where you started, the paint is sufficiently dry for the next coat. Some advice, based on my statistical sample of one. Due to the viscosity, I sprayed at 15 psi (1 bar) and held the airbrush about 2 inches away from the surface. This was for the broad application of the colour. I used my workhorse Paasche H single action, external mix, siphon feed, old technology, had already been superseded by newer models when Nero was Caesar, airbrush with a 0.6mm needle. Yikes! However, by closing the air-cap down on the needle so only 4-5 molecules of paint were released per second, I could hold the brush right up close to the surface and make some incredibly fine lines without the airbrush clogging or the paint pooling, "spider-webbing," or running on the model. I was quite impressed with this, so I tried spraying some tests with my other two airbrushes - a Paasche Talon and Harder & Steenbeck Infinity. I was even more impressed with these. It was fun holding the airbrush in position and watching the colour appear like magic. The pigment must be incredibly fine. Now for the other side of the coin. Again due to the viscosity, even after 6-8 coats the paint layer on the model has negligible thickness. This is great news for those who like to do panel line washes, and find that other paints fill in the lines so that the wash won't hold. I don't think you'll have that problem with this paint. But this also means that surface preparation is just as important as it is with metallic finishes like Alclad or Mr. Metal Color. Every little scratch, scuff, and dust particle will show up when the paint is dry. It won't hide anything. So much for that. After the Oxford Blue was applied, I used Alclad for the metal panel behind the exhausts, and Tamiya Aluminum for the wheel hubs (the inboard half of each main wheel is not yet on). Some pix: And I posed the flaps down for a couple of shots (remember, these are hinged - unlike your modeller who is quite unhinged): One question that I forgot to ask involves the lips that the engine cowling panels rest against - should these be Hawker yellow primer as I've done, or should they be Oxford Blue? I discovered after painting that the kit includes two tail wheels, and I of course used the wrong one. Easy to switch, and the one that is now in place matches all of my photos. I wonder what the other one is for? Did the Sea Fury have two different tail wheel designs? The paint is probably glossy enough for decals without having to add a gloss clear coat. I will do some tests first to make sure that decal solvents play nicely with Mr. Paint. Tally ho! Cheers, Bill PS. I suspect these two display aircraft had their guns removed, especially if they were an aerobatic team. Too late about that now!6 points
-
Hiya Folks, Ever since I found a photo of this particular Beaufighter Mk.II, which was used for Fleet Requirements duties by 797 Naval Air Squadron at Columbo, Ceylon in 1945, I have wanted to make a model of it and finally here it is, by converting the Airfix kit using the new Alley Cat resin conversion. Here is the real aircraft following its sad demise,..... note that it has been retrofitted with the later dihedral `V' tailplane rather than the original flat style (see WIP); Here is the WIP; And here is the model, which was painted using a Tamiya rattle can with the decals coming from the spares box,..... the black outlined yellow codes coming from a Luftwaffe codes sheet; Cheers Tony5 points
-
Greetings! Just completed Roman Liburnia Bireme. Starting with the wood kit from Mantua, the model was subsequently modified and enhanced in several areas. Rather than the ornate configuration featured in the Mantua kit, I decided to depict a more austere and streamlined vessel that I imagined better reflected what a commonly deployed Roman warship would look like. Double plank on frame construction with a scratch built styrene ram modeled after the Athlit ram, an actual ancient warship ram found in 1980 off the coast of Israel. Sail is modified from the kit and the eyes are decals I made on my printer. Finished in stained and natural wood, sealed with satin polyurethane. Not certain as to the scale, it seems to be around 1/48 based on my best guess. Many thanks for looking, your questions and comments are always welcome. Cheers, Bill5 points
-
Just added the finishing touches to Airfix's 1/24th Hawker Typhoon MkIb this week: a project I've had on the bench for the last 6 months or so. Admittedly I've picked it up and put it down as and when I've felt like it, but regardless this kit is most definitely a long-term investment in regard to time and effort. I found it an absolute joy to build and thoroughly enjoyed every minute. Fit was exceptional but you must follow the instructions to the letter, especially where the engine and its piping is concerned, as tolerances are very tight. The only after-market was a set of Eduard seat belts - everything else was OOB. PIC 9 by Thomas Probert, on Flickr PIC 8 by Thomas Probert, on Flickr PIC 7 by Thomas Probert, on Flickr PIC 6 by Thomas Probert, on Flickr PIC 5 by Thomas Probert, on Flickr PIC 4 by Thomas Probert, on Flickr PIC 3 by Thomas Probert, on Flickr PIC 2 by Thomas Probert, on Flickr PIC 1 by Thomas Probert, on Flickr PIC 10 by Thomas Probert, on Flickr I opted for the post-war scheme so other than some tonal variation to the paint, I kept the weathering restrained. Paints were Xtracolour enamels with Humbrol flat as a top coat. Decals were from the kit and were excellent, bedding down well over the recessed/raised details without any problems. All in all, a fantastic kit - roll on the big Hellcat! Best regards, Tom5 points
-
Hi, here's the most recent completion. ProModeller boxing of the Monogram kit, finished with Hataka orange line for the metal/silver and Tamiya for the OD, red and yellow areas. Hi-Decal decals for a Greek Air Force aeroplane. Thanks 20190303_105027 by bryn robinson, on Flickr 20190303_104957 by bryn robinson, on Flickr 20190303_104854 by bryn robinson, on Flickr 20190303_104817 by bryn robinson, on Flickr 20190303_104757 by bryn robinson, on Flickr5 points
-
#3/2018 My dad´s third and last Soviet WW2 subject for now. The excellent Zvezda kit, Eduard seatbelts added, EZ Line for the antenna wires. For the AMT-1, -4, -7 and -12 camo my dad used the new AK Interactive Real Color Air paints. Build thread here https://www.britmodeller.com/forums/index.php?/topic/235047253-soviet-pawn148-petlyakov-pe-2-peshka/&page=2 12th Guards Divebomber Regiment in 1944 DSC_0001 by Reinhard Spreitzhofer, auf Flickr DSC_0002 by Reinhard Spreitzhofer, auf Flickr DSC_0003 by Reinhard Spreitzhofer, auf Flickr DSC_0004 by Reinhard Spreitzhofer, auf Flickr DSC_0005 by Reinhard Spreitzhofer, auf Flickr DSC_0006 by Reinhard Spreitzhofer, auf Flickr DSC_0007 by Reinhard Spreitzhofer, auf Flickr DSC_0008 by Reinhard Spreitzhofer, auf Flickr DSC_0009 by Reinhard Spreitzhofer, auf Flickr DSC_0010 by Reinhard Spreitzhofer, auf Flickr DSC_0011 by Reinhard Spreitzhofer, auf Flickr DSC_0012 by Reinhard Spreitzhofer, auf Flickr DSC_0014 by Reinhard Spreitzhofer, auf Flickr DSC_0015 by Reinhard Spreitzhofer, auf Flickr DSC_0016 by Reinhard Spreitzhofer, auf Flickr DSC_0017 by Reinhard Spreitzhofer, auf Flickr DSC_0018 by Reinhard Spreitzhofer, auf Flickr DSC_0019 by Reinhard Spreitzhofer, auf Flickr DSC_0020 by Reinhard Spreitzhofer, auf Flickr DSC_0021 by Reinhard Spreitzhofer, auf Flickr DSC_0023 by Reinhard Spreitzhofer, auf Flickr DSC_0002 by Reinhard Spreitzhofer, auf Flickr DSC_0001 by Reinhard Spreitzhofer, auf Flickr DSC_0002 by Reinhard Spreitzhofer, auf Flickr DSC_0001 by Reinhard Spreitzhofer, auf Flickr DSC_0002 by Reinhard Spreitzhofer, auf Flickr DSC_0004 by Reinhard Spreitzhofer, auf Flickr DSC_0006 by Reinhard Spreitzhofer, auf Flickr DSC_0007 by Reinhard Spreitzhofer, auf Flickr5 points
-
Well after a short'ish time away from the bench I received my paint for the build. Its the first time i've used MRP and I have to say I'm impressed. Very thin and light coats applied but I do like the coverage and the way its gone down and dried. I might have to get some more of these. By now the Mr Hobby Engine grey had well and truly gone off, so its straight into the masking ready for the orange. And after a brief spell of airbrush action it's left to dry overnight. Tomorrow I hope to apply the engine black and the walkways. Cheers and gone.5 points
-
Evening folk's,after a week away from this one I was ready to tackle the area I was dreading, it's been a frustrating to say the least but I had to remind myself this was never going to match the newer more refined kit's available of which many of you are building and it is what it is as far as the glazing is concerned,that aside it's getting there need's more work to do for the final fixing in place,just pushed on for a photo. Those wheel's are poor too need tidying up now I see the photo!5 points
-
Wow, can't believe it's been nearly six months since i last updated this thread, but as usual life has gotten in the way. I'm still working on this albeit at a glacial pace due to working away from home on a regular basis. Anyway onto my progress so far, I've managed to decide on the loadout, so I've gone with 3 drop tanks, a CATM round on 1 pylon and a baggage pod on the other. I've rescribed the wing drop tanks and the pylons and added chaff/flare buckets, nicked a baggage pod from my Hasegawa F-16B and added another access door to the other side and modified one of the kit's sidewinders into a CATM Added some detail to the wheel wells And the undercarriage legs I made some intake blanks from magi-sculpt and lead foil After i added a black base coat of Mr surfacer i added a thin coat of GSI Aqueous JSDF grey for the light grey I'm now in the process of adding the Blue Grey FS35237, again I chose GSI but I found this was too grey and not blue enough so i added a drop of bright blue and lighten it with white. I think this looks about right. I'm still painting the blue/grey at the moment but am also working on the exhausts, still a work in progress Hopefully it won't be so long before the next update. That's all for now.5 points
-
Evening all. So here's where we are, as of now. Gloss coat to seal in decals is on. Next step some post shading an a wee bit of weathering. Decals are kit for national insignia and stencils plus Fantasy Print code letters. The underside serial number large codes were adapted from Sea Vixen codes and black stripe as they are the biggest i had ( pics to come) A top tip for Eduard - mould the drop tanks in grey styrene as well as clear - they are a PITA to deal with when clear! cheers Jonners5 points
-
thanks very much guys. a small update: I wasn't certain, but some photos looked like the top section of windows were tinted so I've applied some Tamiya smoke to part of the pit glazing. I'm in the process of building moulds for the bubble windows. I've cut the the kit parts and masked and glued into their final position. I've also applied a wash and highlights to the cockpit. I used the cut offs as a template and built the frames from plastic card. The bubbles are black milliput which are coated in varnish; they need some minor finishing then I'll attempt to vacuum mould them. * Yes, they are suppose to be different sizes. ** sorry for the poor photo quality. cheers for looking Aaron5 points
-
Ła-9 from Mikromir - Korean War. Added all KompektZip resin plus full riveting. In progress: http://www.pwm.org.pl/viewtopic.php?f=851&t=869775 points
-
Helm or Wheel one thing is for sure with out it you would be up the Creek with out your Paddle. Never to serious just a little leprechaun 🍀 at heart beefy5 points
-
In the Spirit of keeping fresh.. I just finished this WACO and started my Horsa. I do Promise to keep something for 6 June. Thanks Cheers Bill5 points
-
What a pleasure it is to work with a good kit, and how different to the struggle a bad one is. This is a jewel, a noble and nice little kit, one of the best kits I have built lately. I confess without any shame that I bought more of them, something I very seldom do, because I favor variety (as you may have noticed 😵). A good kit, however, does not build itself, and sometimes we need to remind ourselves of the basic principles, and this case is no exception: I had forgotten to wash the parts and therefore the paint on the wheels was lifted by the masks I used to paint the tire, so I had to strip the paint (in no time, easily with an immersion in Simple Green for a couple hours). So I washed all remaining components in anticipation for the paint stage. You may notice that the cabane struts are glued to the upper wing, as well as the water intake for the wing radiator:5 points
-
Bit of a push, and I have a second wing done and fitted. Another very good joint... Hats off to Williams Bros. This is an old kit, predating any computer /CNC /robot /nanotechnology stuff - hand made tooling and manufactured! And it fits like a glove! 😎5 points
-
Thats better, seems like I can post pictures PeteJ5 points
-
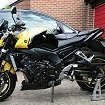
Been saving this for a “Special” Occasion, so Specialists fits the bill. 2 schemes to chose from and as yet undecided though both are same grey on blue colourway. Love a good 190 and a torpedo carrying one at that. It’s an Airfix new tool basic kit with bits for the torpedo and version from the original Revell kit.4 points
-
I am still waiting for the canopy masks for the Vultee Valiant--we have had a national holiday which has slowed down the post. So I'll press on with this little monoplane, by coincidence, another green and orange paint job. This time from Sweden. I like the orange wings and the big yellow numbers... The sprue...not many pieces. --John4 points
-
Here’s my recently completed AFV Club Churchill complete with Mini Art British tank crew on a Mini Art base. The door and fence of the Mini Art base were replaced with balsa wood because the plastic parts would have been very tricky to get looking right. I’ll try get some better natural light photos tomorrow. Any comments welcome. Sean4 points
-
More done today and it was bit of a mixed bag. Most of the sub assemblies were cleaned up and ready to be attached: Intakes were added to the front fuselage: Then the fit issues began as I tried to paid the front fuselage to the lower part of the main fuselage. In summary, it just wouldn't fit, leaving several gaps and a step in the join. I had to remove part of the bulkhead and resorted to removing the intake trunking from the front assembly and adding it to the lower part of the main fuselage. You can see the gaps below: I persevered with it, despite nearly throwing the lot back into the box and into 'never to be built' pile and after a lot of trimming and fiddling it sort of fitted together to allow me to add the sides of the fuselage: A dry fit of the top half of the fuselage has shown that a filling and sanding will be required. The fit up until now had been great so this was disappointing to say the least. I went online and found a few articles that mention the fit issue around the intake area, but then again I've read several build threads on here that don't mention it. At least the R-40 missiles went together without too much of a fuss: Dave4 points
-
It has to be a dirty Tug but nothing better than a good Tug Oh-Err Matron you can tell it is getting close to the holidays beefy4 points
-
Just for you... Taken from forward right and looking aft, left (left wheel is just out of shot on the right of picture) Is that ok or do you need more? Jeff4 points
-
I not sure I have a choice, see earlier voting Coffee mugs !! Coffee Mugs !! What do you think this is a pleasure cruise 😉 Thanks Jeff, Great description . . . or mischievous leprechaun with a big heart. Enjoy your special day Coffee, weathering !! Whatever next . . . . crew?? Demanding bunch aren't you Seriously thanks for all your kind comments Kev4 points
-
Hi all well it's done, another stalled build finished, never been good at planes but quite pleased with this, yes lots could be better and I really should do more research on a subject I know so little about. Well I suppose I can only get better with any I do next (As it happens I've got a flying fortress calling me, I'm thinking of doing it as a cutaway)4 points
-
Hi here is my Bf109G-6 flown by Gerhard Barkhorn the kit is a hasegawa , paints are gunze acrylics4 points
-
a couple more, as I was having a closer look, and wondered if the camera would catch it, which it has. these show the grey wash in the panel lines, which I rather pleased with, as it avoids that hard black look, this one I tried adding some silver pencil fastener chipping, but think that would work better after a matt coat, plus the actual paint chip which is OK as it's on metal 50620609 by losethekibble, on Flickr other side, this shows the aileron emphasis better, but a chip out the green on a fabric panel, and above leading edge light... 50620608 by losethekibble, on Flickr cheers T4 points
-
Here is the first update on the Falcon build, started work on the photo etched cockpit, fitted the parts of the kit of the main cockpit section. I have painted those areas of the model, along with the dish. I'm happy with the method of painting I have chosen as a base, and later when the build is fully complete I will add the weathering. Moved on to building up the upper part of the main hull with the many pieces of this kit that need to be added. and the centre cannon section which fits into the upper hull centre section. I have also built up one of the landing gear, using the photo etched pieces. The photo etched kit is going to add a lot of good extra detail to this model, and will be a very nice touch. Thanks Chris www.wardsmodelbuilder.com [email protected]4 points


.thumb.jpg.87669a5ffb8b13672a3d675087a46d42.jpg)


This leaderboard is set to London/GMT+01:00