
Leaderboard


Popular Content
Showing content with the highest reputation on 15/02/19 in all areas
-
Hiya Folks,........ Something a little different, here is the Airfix 1/72nd Dakota built as the aircraft gifted to British Airborne Forces which resided in Aldershot for so long before it was moved with the Parachute Regiment to Colchester where it has recently been refurbished. During its RAF service this aircraft was a VIP transport and amongst the units which operated it was the RAF Coastal Command Communications Flight at RAF Bovingdon, Herts from 1958 until the 1960`s. I built it for the Patrol and Coastal Command GB and here is the WIP including photos of the real aircraft with one from my own collection showing it wearing its Coastal Command colours; And here is the model; Here is the real aircraft,......in 1958 wearing its Coastal Colours (from my own photo collection); And now as seen outside Merville Barracks in Colchester,.....home of 16 Air Assault Bde; Cheers, Tony25 points
-
A build from 3 years ago: (After this long series of models posted aiming to present the case that there is life beyond the usual modeling subjects, today I post what I believe is the last of what I can offer to you on this matter. I had selected an posted these last months a large number of models of unusual planes and/or unusual media. I left out of this chronology a number of more mundane builds for one reason or another, not considering them relevant in this context. Today I post what you may see as my closing arguments 😉 regarding what I been building during the past 12 years or so, so from now on I hope I will continue to post the normal builds as WiPs or completed models (I still have no fondness whatsoever for the phrase "Ready for Inspection" and would gladly substitute it for RtF -Ready to Fly). Anyway, here we go: I simply can't resist the bizarre. (A photo of the original plane -and the model- were featured in the very informative aviation publication Arawasi International magazine #13, Summer 2017). Long ago, when I saw on a Japanese site this beauty, I took note and opened a folder for it. The folder, in spite of my best efforts, remained after many years with only that one photo. My Japanese friends and the Japanese sites I wrote to, weren't able to find anything on it. As you can see this delightful contraption was based on a Nieuport 24, of which the Japanese had many, some in very nice civil liveries for which you can even get decals (Rising Sun, for example, produces a set for J-BAFC). I also found online an interesting photo of three Nieuport 24 that were apparently raced by female pilots for a demonstration (J-BAIF, J-TEIO and J-BAPB), may be for another model down the lane. After the long wait during which no info came, I decided to give it a go anyway and bought the Nieuport 24 from Roden (Choroszy also produces the Japanese-built version, the Nakajima Ko-3). The kit from Roden is very nice, in line with their known standards, and as an unexpected bonus you get a bunch of spare parts (engine, props, wheels, stab, rudder, little thingies, etc.) since more than one version is packed in the same sprues. No decals are needed for this project, and that makes things easier (if you don't think on the 234 struts and many parts you have to scratchbuild). In fact, very little will be used from the kit, just the fuselage sub-assembly minus the bang-bang bits. Work starts then by intensely staring at the one photo and trying to make sense of it. A sketch was produced based on the proportions of the many elements and known measures of the kit's fuselage. The plane has two vanes protruding from the mid-line fuselage, a bit ahead of the pilot (acting most likely as ailerons) a "wing" on top of the fuselage and then above it two separate panels for yet another wing. This might thus qualify as a negative aspect ratio triplane. The mystery remains: what was it? who built it? and why? Did it fly? is it a triplane? is it a random accretion of parts flying now in orderly formation? Will we ever know? And meanwhile, should we call it Wingzilla? Here with another negative aspect ratio model posted here before, the Flick-Reinig Apteroid:23 points
-
This is Roden's 1/32 Nieuport 28 chasseur, in the markings of Lt. Quentin Roosevelt of the US 95th Aero Squadron, courtesy of Super-Scale decals. Ex-President Theodore Roosevelt's youngest son Quentin dropped out of Harvard to join the Aviation Section of the Signal Corps in May 1917, training with the newly-formed 1st Reserve Aero Squadron on Long Island. Joining the AEF in Europe, he helped establish the major USAAS training base at Issoudun, served as both a supply and training officer, before being posted to the 95th Aero Squadron 'Kicking Mules' as a replacement pilot in mid-June 1918. Popular with his squadron-mates and regarded as a daring (and even reckless) pilot by his commanders, he claimed his first aerial victory on July 10th of that year. Only four days later--on Bastille Day--he was part of a massive aerial engagement at the commencement of the Second Battle of the Marne. After being reported missing, it was later learned that he had been shot down and killed behind enemy lines, and buried with full military honors by the Germans. I'm a big fan of Roden's 1/32 WW1 kits, as they generally have a nice level of detail without being overly 'fussy.' The Nieuport 28 met with great acclaim when it was released...but I hardly ever seem to see one built. This kit is also nicely detailed, though I supplemented the cockpit with the Part/Poland etch set. The kit has one nasty trick up its sleeve--a lower-wing fit issue--but I was able to work around it to my satisfaction (and relief) and the rest of the build was pretty straightforward. Colors were mixed from Tamiya acrylics. The Super-Scale decals were complete, including the unusual squadron cowling stripes, construction stencils for wings and struts, and manufacturer's emblems for the prop; I hand -painted a bit of additional detail to the monotone mule outlines on the squadron insignia, but otherwise used everything as on the sheet, and they went down (as usual) with no difficulties. Rigging was done with EZ-Line and Radu Brinzan's nice etched turnbuckles, which I used here for the first time. Enjoy20 points
-
Hello, I would like to present my Revell / Whirlybirds 1/72 S-61N G-AYOM. This was started as a part of a group build in 2015 but it has sat on the shelf of doom collecting dust. https://www.britmodeller.com/forums/index.php?/topic/234975281-s-61n-cn-61143-g-ayom-bea-helicopters-172/ Finally finished it late last year. Pleased its finished but the painting etc is not my best but I have improved since I started this. Thanks for looking Aaron19 points
-
It's been a while since I started a build thread, and I have been intending to start this one for a long time. Indeed, I have spent far too much money gathering bits for this kit and I think I have reached the point where I feel more guilty about the amount of money spent on unused aftermarket stuff than I do about starting another model. That leads us to here then. The Monogram B-29 is basically accurate. It's a kit of its day and features some nice (for its day) detail moulded in. It's not all the sharpest, and I personally find that makes it a bit hard to paint well and make it look convincing. In addition, it has raised panel detail outside. There is a school of thought that this is more realistic than recessed surface detail. I make no comment on that but what I will say and would happily argue to the point of exchanging punches in a carpark however is that raised panel lines are a real chore to work with. They are the first things to get obliterated when parts need remedial work to fit well and reinstatement is not easy. It's also difficult to work with when trying to achieve more than just rubbing paint over it with a brush or hosing the model down with an aerosol can. I have not yet decided what I will ultimately do about that on this model. I find rescribing about as much fun as a day at the dentist so this will be a balance of what annoys me most. The Monogram B-29 is basically accurate. However, the aircraft which Monogram measured up was one of the Silverplate aircraft of which 65 wartime airframes were built (hence why Little Boy and Fat Man bombs are included in the kit). https://en.wikipedia.org/wiki/Silverplate This means that the Monogram kit is not appropriate for any 3,905 normal B-29s though. To rectify this, I spent a considerable wedge of money on Flightline Engineering's B-29 Super Update Kit which is beautiful, if expensive, and is available on and off when the guy has sufficient interest to warrant another set of resin casting moulds: http://www.flightlineengineering.com/b29-kit.html This set includes new, glorious engines with a million pieces each. Whilst that sounds like a hassle, it should hopefully make spray painting a dawdle without the need for any masking and I will not have to pick up a paint brush which pleases me greatly. I hate brush painting and can feel veins swell on my forehead just typing the words. The set also includes nice resin wheels with separate tyres and hubs which is excellent for exactly the same reasons as outlined two sentences previously. The correct propellers are included consisting of separate blades, hubs and an assembly jig. New turbochargers and exhaust pipework is included which looks lovely compared to Monogram's admirable yet dated relief moulding effort. Lastly, new engine cowlings are included which, with the uncuffed propellers, are the key external visual differences between a standard production B-29 and a Silverplate. On to the wings next. These are, well, big. The Flightline Engineering set requires that I partially cut away the nacelles in order to use the turbochargers which I fully intend to. The cutting will require careful measurement and careful cutting though. I'd have liked a set of flaps and these are available but again expensive. I am mainly concerned about structural integrity though. These wings are big. Despite the kit including around 10 inches of wing spars to somewhat stiffen the wing-to-fuselage joints, when picked up and put down the wings are going to bend. Separate flaps will weaken them, exaggerating this and I am quite concerned that I will have trouble keeping brass flaps attached at both ends long term. Also, they will be very vulnerable on something so, well, big. I do have the Eduard set covering the wheel wells etc though: Lastly then, the fuselage. The B-29 is known for its big greenhouse of a cockpit glazing. I have toyed with the idea of getting vacuum formed replacements to improve clarity, but am worried about getting a perfect fit all round with the fuselage. I have Eduard's seat belts set and front and rear fuselage sets. Some of the front fuselage set is highly unlikely to be used - e.g. those big quilted insulation pieces intended to go into the cockpit. The chances of those brass plates achieving a double curvature to fit in the cockpit are between slim and none. I may hammer them over my car panel-beating dollies with hammers just for a laugh, but there is no way on this earth I'm going to hack out the interior detail in the kit fuselage sides before I prove myself wrong by forming the brass. Likewise the pressure domes in the rear fuselage set. The PE parts look nice, but they are unlikely to work without sheet metalworking skills (which means hammers and a dolly to stretch the middle more than the edges forcing the metal to dish out into a 3-dimensional shape). Lastly for now, the markings. The B-29 is most famous for the only atomic bombs ever dropped on cities. That topic is best not discussed on my thread as it is the subject of much heated debate, but due to the prevailence of Enola Gay and Bocks Car as modelling subjects I wanted to do something different. The aircraft became a bit more colourful after the second world war and into the Korean conflict there are some nice schemes and decals available. I bought this sheet: I quite like Command Decision with the Disney Dwarves and the globe. The overall colourscheme looks quite attractive and balanced. I also quite like Kee Bird though, if only because the International Orange tail is bright and eye-catching, that I have International Orange in the Colourcoats range which I have yet to use myself, and that Kee Bird is also quite famous in that it was almost recovered from the ice by a team led by a man who is not kindly regarded by the aviation world these days. Indeed he has received some severe criticism for unprofessionalism during the attempt and how he just walked away and left the burnt out wreckage after the aircraft caught fire, burned out and sank with 4 new, borrowed, R3350 engines and propellers which were loaned for the purposes of recovering the aircraft and to be returned afterwards. Any interest in the big Superfortress?17 points
-
Hello again. So.. This Hunter thing. It's Revell. It's a nice kit and looks quite good, but maybe we shouldn't look at the shape too closely just in case. I'm glad it's better than the Matchbox and Frog Hunters I did when 'I was a wee lad' which was the last time I built one of these. I expect I didn't get some of the lumps and bumps quite right for this mostly OOB representation of a No.8 sqn RAF Hunter based in Khormaksar, Aden 1963. The instructions show optional parts so it's up to us to do the extra research to see which fits what. I didn't go the extra mile because I wanted to crack on and get it done as fast as possible (within reason), and while I had the time. 😎 I threw a resin seat and wheels on there for a bit of extra interest, replaced the plastic blob of a fuel vent on the rear of the fuselage with a short piece of aluminium tubing (diameter of which I have forgotten), and drilled out the pipes for the spent cases. There's also a couple of strips of stretched sprue for the antennae under the fuselage. Finished with some panel line wash, post shaded and weathered with filters and some oils. This is likely to be my last finished build for a little while as I'm actually having to get on with RealLifeTM and go do some paid work after an enforced break. I hope you find this one pleasing and thank you for looking. Hunter_01 by Jonathan Macauley, on Flickr Hunter_02 by Jonathan Macauley, on Flickr Hunter_03 by Jonathan Macauley, on Flickr Hunter_04 by Jonathan Macauley, on Flickr Hunter_05 by Jonathan Macauley, on Flickr Hunter_06 by Jonathan Macauley, on Flickr Hunter_07 by Jonathan Macauley, on Flickr Hunter_08 by Jonathan Macauley, on Flickr Hunter_09 by Jonathan Macauley, on Flickr17 points
-
Deciding somebody needed to defend Britain against the Luft-46 menace, I present my take on the Revell Vampire: Untitled by Jon Gwinnett, on Flickr Untitled by Jon Gwinnett, on Flickr Untitled by Jon Gwinnett, on Flickr Untitled by Jon Gwinnett, on Flickr Untitled by Jon Gwinnett, on Flickr Untitled by Jon Gwinnett, on Flickr14 points
-
Hello, I would like to present my AMP 1/72 Fairey Ultralight helicopter. Nice little kit, fun to build. Tiny though!!! Completed last year. Thanks for looking Aaron13 points
-
I'm certainly not the only one whose enthusiasm for the Chance Vought F4U is as old as his modelling obsession. This is my latest Corsair from four years ago. BuNo. 02350 arrived on Guadalcanal on 12 February 1943 with VMF-124, the first Marine Corsair squadron in the theatre. As Black (later White) 13 it was assigned to Lt Ken Walsh, who claimed some of the 6 victories of his first tour in this aircraft. 2/Lt Kenneth A. Walsh - VMF 124 1/Lt James N. Cupp - VMF 213 When VMF-124 stood down for R&R in April their Corsairs were handed over to VMF-213 and this combat-hardened fighter started a second life with Lt James N. Cupp. Christened 'Daphne C' after his wife it was now identified as White 7. The faithful Corsair helped Cupp record his first two victories before it was retired in July 1943 when fresh F4Us arrived. The Hobbycraft kit is a reasonably good product for a start. I followed my practice of using what's available in the aftermarket* plus some scratch-building of propeller, wheel wells and air intakes. The dihedral of the outer wing section is too shallow and was increased, and the span of the tail is a bit too short (the original one as well as the CMK option) which I considered negligible and did not correct. The most difficult operation was fixing the landing flaps in the down position. Finally I added a little gimmick by making the upper cowling removable to access the engine for maintenance. I hope my efforts match the performance of this outstanding fighter. Thanks for looking, Michael * After-market parts of this build: Eduard upgrade set, CMK cockpit floor, Eduard cockpit details, Vector engine, Vector cowling ring, CMK control surfaces, True Details wheels, Quickboost undercarriage covers, Squadron canopy REFERENCES CHANCE-VOUGHT F4U CORSAIR, AERO SERIES NO.11, EDWARD T. MALONEY / UWE FEIST, FALLBROOK, 1967 CORSAIR ACES – THE BENT-WING BIRD OVER THE PACIFIC, WALTER A. MUSCIANO, NEW YORK, 1979 F4U CORSAIR IN COLOR, FIGHTING COLORS NO.3, JIM SULLIVAN, CARROLLTON, 1981 F4U CORSAIR, FREDERICK A. JOHNSON, JANE'S, TOKYO, 1983 CORSAIR ACES OF WORLD WAR 2, OSPREY AIRCRAFT OF THE ACES 8, MARK STYLING, LONDON, 1995 CORSAIR 1940-1970 – 30 YEARS OF FILIBUSTERING, BRUNO PAUTIGNY, PARIS, 2003 INTERIOR COLORS OF US AIRCRAFT 1941-45, MARTIN WALIGORSKI, IPMS STOCKHOLM ORG, 2005 MODELLING THE F4U CORSAIR, OSPREY MODELLING 24, BRETT GREEN, BOTLEY, 2005 THE VOUGHT F4U CORSAIR – A COMPREHENSIVE GUIDE, MDF 18, RAFE MORRISSEY / JOE HEGEDUS, KINGSWAY, 2010 F4U CORSAIR WALK AROUND, DAVID DOYLE, CARROLLTON, 2011 VOUGHT F4U CORSAIR, WARPAINT SERIES NO.70, CHARLES STAFRACE, DENBIGH EAST11 points
-
Finally completed. Rigging made with EZLIne and glued in place with CA Glue. Work in progress blog11 points
-
Morane-Saulnier MS-406C.1, No 1019, Groupe de Chasse 21, June 1940 Although lacking in performance compared to its contemporaries, the MS-406 was the most numerous fighter to serve the Armée de l'Air at the beginning of the Second World War. Powered by a Hispano-Suiza 12Y.31 V12 engine, this oddly dumpy little aeroplane could achieve a maximum speed of 486kph. It was armed with a Hispano-Suiza 20mm cannon firing through a hollow shaft in the engine and through the propeller spinner, and a pair of wing-mounted 7.5mm machine guns. Aircraft No 1019 was flown by General Armand Pinsard, and was nicknamed "Le Pirate". It carried a non-standard overall matt black finish. A decorated hero of World War One, Pinsard had been credited with 27 victories in that conflict. Pinsard commanded Groupe de Chasse 21 from the start of the Second World War. He was returning from a mission when his airfield was bombed by approaching German forces on 6 June 1940. Pinsard was seriously injured and had a leg amputated. According to Wikipedia: "After the war, Pinsard was convicted of collaboration with the Nazis and sentenced to life imprisonment. He had served as Inspector-General of the Legion of French Volunteers Against Bolshevism, which had served with the Nazis on the Eastern Front. He was later pardoned." Essentially out of the box, I replaced antennae, pitot tube and wing machine gun barrels with brass wire stock for durability. The main black camouflage started out as Humbrol 85 Satin Black enamel, the undersurfaces painted with ColourCoats enamel. As ever, my paint finishing needs work, and I should do a lot better than this. The work in progress thread for this model is shared by a selection of French types feeding my 1940 obsession.11 points
-
Hi all, my second ju 88 build of the year, in the markings of lt. Udo Cordes. 6 (Eis) kg3 Poltava may 1943. By April 1943 he had distroyed 63 locos and by May 1943 he was also credited with 8 bridges, 19 tanks, 32 artillery pieces, 96 trucks and 9 complete trains making him one of kg3s most successful pilots. He was killed with his crew on 15 May 1943.while flying ju 88 c-6 w nr 360366. By this time he had destroyed 81 locos and 2 aircraft. The kit is revell's ju 88 c-6 kit no 04856 Quick boost mg 81's & pitot tube Resin wheels Scatch built radio altimeter aerials Streched sprue radio aerials Aims decals. (as most references state codes are 5k+rt. I changed the 5k+et codes on the aims sheet) All paint are extacolor rlm 02, 66, 65, 70, 71, (humbrol 154 for the rlm 04 theater markings) Weathering was by pastels and mrp exhaust soot. Thank for looking, as always all comments are welcomed. Nick11 points
-
A build from a couple of years ago, the excellent Eduard Spitfire XVI - built from the box with the addition of a wire aerial. There is some speculation that the serial should be RW394 and not RW393 but the serial is hidden from all but the bottom view anyway. No problems with the kit at all. Many people moan about the 2 piece cowl top but I simply superglued the 2 pieces together and carefully sanded away the joint - not losing too much of the delicate detail on the top. I have build a couple of the Eduard Spitfires and I tend to tack the cowl top on for painting, then remove to insert the exhausts, then replace the cowl top - saves tricky masking. With a bit of thinning of the props and drilling out the exhausts that was it. I acquired the attached picture of the real thing - bought to have a close look at the finish, which was fairly immaculate (obviously repainted for the 1949 Cooper Air Race at Elmdon - now Birmingham Airport- in which this aircraft took part). Unfortunately I didn't look close enough and the model (kit) contains a serious schoolboy error for which I must do some lines! Anyway - it is what it is and it has been around the show circuit for a couple of years and nobody has pulled me up on it! Cheers Malcolm10 points
-
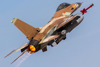
Hello everyone, this my last model I have just finished. Trumpeter 1:48 Mig-21 F-13 Thanks for looking. This is how the plane was painted in Israel before it was transferred to the United States and disappeared. The plane standing at the Air Force Museum is not the original plane that defected from Iraq. Thanks, Ilan10 points
-
Zlin Z-37 Čmelak - KP 1/72 , quick build with some scratch build spraying devices, spraybars and microners/nozzles. 20 Čmelaks were imported in 1967-72 to Yugoslavia, 17 of them was bought for JAT- Yugoslav airlines cropdusting service use and three went to Skopje, now Northern Macedonia, Agrohemizacija service. Last flying Čmelaks are withdrawns from use in early 1980s , one was preserved inBelgrade aviation museum collection. KP kit, despite bad reputation, if treated as basic short run , with some tweeks here nad there , is buildable , and nice looking when finished. Decals printed by myself, Corel draw - laser printer and decal film. Thanx for looking10 points
-
Further progress made in fitting out . . . Nothing fixed yet, need to be able to get in and paint Thanks for the support and looking in Kev10 points
-
It's been quite some time since I last posted something, or finished a kit in general (family and business obligations got in the way). At any rate, my latest build is a PS-84/Li-2 in Aeroflot colours. At first I wanted to build the Eastern Express offering, but that kit is plain horrible. I decided to throw that one in the trash bin and build the excellent Roden kit instead (after all, the only major difference between the DC-3 and the under license build PS-84 are the different engine intakes and the fact that the passenger door is on the other side). I used the photo-etch detail by Bregun for the intakes and some of the antennae. The decals are from the Eastern Express kit and the cockpit and window decals are once again made by me. I wanted to use more metal colour variaton (as I did with my Authentic Airliners KLM DC-10), but it didn't work out quite as I wanted. Next time I'm going to experiment more with different backgroud layers (so not only High Shine black, but also some matt, gray, white, etc.). In the end I simply decided to make the aircraft more dirty and worn. As these were workhorses in Soviet times, I guess that is only fitting. Anyway, the pictures: I will stay in Russia, as my next project will be the Zvezda TU-204 kit in Cubana livery Thanks for looking and see you next time!9 points
-
A very simple build from 9 years ago, as a reply to a question in one of the threads: Some Heller kits are a source of joy, as their molds are very good and compare more than favorable with some current “short run” offers and are most of the time better than their Airfix cousins. While old Airfix kits convey a feeling of chunkiness, old Heller kits feel more subtle and refined. The subject this time is the famous Caudron Simoun. I got this kit from fellow modeler Diego Fernetti, for which my deep thanks go to him. It is a welcome break from the scratch enterprises. The Heller kit has been reviewed already a few times, so I won’t repeat here what you can read somewhere else. No flash whatsoever was present in my kit and the parts were fine and crisp, even the transparencies. The specific plane represented here (F-ANRU) participated in the 1937 edition of the Oasis Circuit race, a remarkable endeavor that started and ended at Cairo visiting a number of other cities in Egypt. Simouns F-ANXJ and F-ANXB did also participate in that race. As said the kit parts are good, but care is needed in order not to obliterate the fine raised detail. You may protect said detail while gluing, puttying and sanding by using masking tape on the concerned areas. I don’t know who made the masters for this kit, but the parts are very clean. For example the prop assembly, which is usually a group of chunky parts in certain kits, is a fine, to-scale-thickness part. The building started by scoring the flaps and lowering them before joining the wing upper and lower halves; the same went for the elevators, all this easy because of Heller’s neat engraving. The interior followed –this area is reasonably detailed, with a good instrument panel too-. By the way, all Simoun interiors are stated as red by the sources. Wheel pants’ halves were glued removing the pins that hold the wheels, since I wanted to add them later to avoid messy masking or touch-ups. Besides, I don’t like rolling wheels since a couple of times my models rolled off the building board and had a not very successful flight that ended abruptly on the floor. The only challenging part of the build might be the windshield, provided as transparent left and right halves that represent also a section of the fuselage. The clear areas would have to be masked and the seam neatly glued, then the whole added to the fuselage trying to obtain a clean transition. Some modelers just superglue those parts and then restore clarity by sanding and polishing. I glued them carefully with the usual styrene cement and bathed them in Future. Beware that the instrument panel is glued to the base of the “windshield” –there are guides on the parts- and not in the foremost position shown on the plans. Side windows are actually left and right-handed; one clear strip has the “sliding” pane marked; that goes on the pilot’s position. I removed the molded-in Pitot tube from the wing to facilitate handling of the model and later on added one made of wire. Heller’s kit has a small cut-out where the stab tongue is inserted in the fuselage and a stub small piece of the stab molded with the fuselage; the real plane had those too because the stabilizer could be adjusted, so you may choose not to putty that area. In order to provide a bit of detail I hollowed the nose part from inside and glued there a spare engine cylinder. Beware of the tail wheel/fairing. It is a very tiny part and mine twanged into the great beyond being recovered be a miracle. Glue it at the very last, and mind that it has a fragile attachment. I inserted a wire where the locating pin was. The decals in my kit were a bit fuzzy, but nevertheless I managed to use some for the necessary bits for this version, printing the remaining ones particular to this model at home. Oh, the Heller Nostalgia!8 points
-
Dewoitine D.520 C1, Number 90 "Blue 2", Groupe de Chasse I/3, Suippes, France, May 1940 The D.520 was an all-metal monoplane, powered by an 820hp Hispano-Suiza 12Y45 V12 supercharged engine. Capable of 534kph, the fighter was armed with one 20mm HS404 cannon firing through the propellor spinner and four 7.5mm MAC 1934 machine guns in the wings. Teething problems with the early production aircraft meant that only 79 D.520s had been accepted into service by 10 May 1940. "Blue 2" was flown by Sergent Michel Madon during May 1940. After the armistice was signed with Germany, GC I/3 transferred to Oran, Algeria, in June 1940. Madon was credited with 11 confirmed and four probable victories during the war. The Hobby Boss kit was a simple one to assemble. The fuselage and wings are moulded as single pieces, so very little assembly work is required. The cockpit is very basic, however, but I opted not to attempt to detail it. The kit contained two decal options for Vichy French aircraft, although I discovered that "Blue 2" only had the white roundel rings and fuselage stripes painted after the armistice. Luckily, the decal sheet included optional roundels for both schemes, so I could backdate the model to represent it as flown earlier in 1940. Painted with ColourCoats enamels. My finishing needs work, and the decals silvered somewhat, despite gloss coats and various potions used to settle them. It will still look nice in the display cabinet as a representative of the type. The work in progress thread is an ongoing one, which will cover lots of French aircraft feeding my 1940 obsession.8 points
-
Trumpeter IL-28 converted to fast mail plane IL-20 / IL-28P ( as "Почтовии"- Mail), used by Aeroflot and SSSR mail service 1954-1964 , from Moscov-Vnukovo , via Sverdlovsk to Novosibirsk, mainly for fast transfer of Daily newspaper press matrices , Pravda and Izvestiya , to print it in eastern part of SSSR without much delay. Complete armament instalation was removed. Crews were mainly AEROFLOT TU-104 pilots. Later same planes were used as meteorological and atmosphere probing platform. Whole fleet of some 20 IL-20s removed from use in mid 1960s and scrapped. Trumpeter kit, basic, with some shape issues, but usable, for such low expectations project. Clear canopy and nose cone parts are sanded and used as a master for vacuformed ones. Decals drawn in Corel, laser printed on clear decal paper, while large wing registrations are sprayed using airbrushing mask. Thanx for looking8 points
-
The 1:48 Scale and F-22 The model comes from Hasegawa, When I build this model I tried to show the specific appearance of the HG coating. Depending on the angle of view, we have the impression that the gray color becomes metallic. For start, a few photos showing the effect depending on the angle of view. The effect is visible when viewed from the front and left or right side of the model. When we look from the back - the metallic effect isn't visible. At the end a few photos of the model.7 points
-
A build from 2 years ago: While doing some research for the previously posted Caudron C.600 Aiglon, which flew with Mme. Finat, I noticed some photos of the record variant, the C.610. Basically the same plane, with increased fuel capacity, the deletion of the fore seat and a revised canopy, plus other details. Two apparently were built/converted: the registration that interested me was F-ANSK, flown by French Elisabeth Lion to some remarkable achievements. The plane's appearance changed quite a bit during its life, so check your references. I am basing my work on some images found on the Net after much researching, and "L'aviation Légère en France", by Roger Gaborieau. I thought it was only fair to build a second plane flown by a successful women. I had first to establish a chronology to sort out the many different schemes the plane wore during it's life: Chronology F-ANSK (const. # 7035) Beginning at the presumed end of its life, the only certain deductive starting point possible: -The plane is appropriated by the invading forces. As such it still wore most of its registration, and had a very light finish, possibly cream, not likely white, or a really whitish aluminium color, and marks in what seems red (which renders a very dark hue in B&W photos). It still has the spinner and the Ratier prop, as well as the three stripes on the external side of the wheel pants, and the last known closed cockpit configuration (that looks like a racer, a bit like a C.430 Rafale's) with "half-moons" extending the view that coincide with the cockpit opening to the sides). The fore position is seamlessly erased, not just lidded over. -Therefore the photos of the plane with Elisabeth Lion posing with the exact scheme (minus the despicable nazi marks) are the last wore by the plane before the war. In that configuration a not too prominent "bulge" can be seen bellow the fuselage due to the tank that provided extended fuel capacity. In one photo Mlle. Lion is wearing a white mechanics garment, and the color of the plane seems close to that, possibly a very light cream. -The configuration that preceded that one, inverts the tones of the decoration. The plane is painted in a dark hue (perhaps blue), and the marks in a lighter hue (perhaps silver, although definitely not white), besides changes in the details of the decoration (different wheel pants motifs, a small French flag, etc). In this scheme extensive windows are seen in what used to be the front seat area. Still the closed canopy is there with it's half-moons to the sides. The inversion of the decoration colors is not the product, as some times happens, of ortho and panchro films, to which many other details in the photos attest. -The configuration that preceded those above had a different, sort of "fighter" canopy, the fore position closed with a visible lid, no Ratier prop nor spinner. A tailwheel is present instead of a tailskid. -In an earlier configuration (July 1936) at the "12 heures d'Angers" (which were reduced to 6 hours due to weather), the two positions on the plane are open and have their windshields. The airscoop at the left cheek of the cowl is still there. A number "83" (the age she will pass away, strangely enough) is visible on wing and fuselage. Mlle. Lion will come 2nd at the 8 liters category. -To adapt the kit for the conversion I started by cutting off the first half of the cockpit floor, since only the aft pilot's position is needed. -I discarded the prop since the variant I want to model had a Ratier prop with a prominent spinner. -Necessary additions are a slim "belly" seen in photos (extended tankage), a new decal set and a home-made vacuum-formed canopy. -Deletions will include the fore position and the intake normally seen at the left cheek of the engine cowl. As you can see this an adaptation that doesn't require special things, and just involves normal skills and renders a model with an interesting "racy" appearance and remarkable historical significance. Here together with the Caudron C.600 of Mme. Finat posted today:7 points
-
Flight over the North Atlantic. Pilot Beryl Markham.7 points
-
Morning all! A few more days of slow progress with bits here and there, then I had another full afternoon at these yesterday. Before I finalised the fuselage I needed to sort out the front end. The kit part for the upper nose was never going to fit. I tried sanding down the underneath to get it to sit flush but it wasn't having any of it, and besides, it was still far too high, and didn't match the curve of the cowling anyway! So out with the .020" sheet and a piece was shaped and bent to as close as I could get it to match the cowling. I sanded the front edge of the cockpit by wrapping a piece of sandpaper around a knife handle. This was then glued to the upper front fuselage and clamped to ensure it retained its curve. It's still a fraction too high, and will need a tiny waft of filler once the cowling is on, but it's far better than the kit part. The next job was to finish the fuselage. That meant filling and sanding (again!) and drilling holes for the brass rod that will secure the wings. I managed to break two drill bits while drilling the wings so I will have to order more. No telling how long they will take to get here! You can see on this shot just how far off the kit wing mounting points are. Also the holes I've drilled are for .020" rod which JUST fits the edges of the new wings. The filled dimples show how thick the kit wings are! That's not bad even if I do say so myself! I didn't pin the E.IV wings when I built it which is probably why they came off so easily, so that too has been done. I thought I'd take a look at the tail feathers too while I was in the mood. They didn't look too healthy, which was not really a surprise! So out with the 20thou sheet again and the black marker. The elevators were clamped together as usual to make sure they are the same! A little sanding, et voila! New tail feathers! Much betterer! That's how they sat at close of play yesterday, I hope to make more progress this weekend. Thanks for looking in! Ian7 points
-
Sadly, I once again to have distract your attention from deliberating on such weighty matters as Shakespeare's Macbeth and General Melchett's battle pants, to bring you news of plastic and metal worrying. I seem to have spent much of today driving myself up the wall by making up miniscule brackets to fit to the kit's undercarriage parts, which in themselves were a right pain in the Martian backside to clean up, festooned as they were with flash. Brackets were added to the main undercarriage legs where the retraction arms meet them and to the retraction mechanism itself in order to take a piston which was fabricated from the ever useful Albion Alloys' slide fit tubing. Doesn't seem much does? it but it took over five hours work for not much to show. It was also very difficult setting up the shots as the assemblies did not want to balance in place long enough for me to take the pictures. Anyway, here are the pictures and our learned deliberations may now resume. Thanks for looking Martian 👽7 points
-
Marcel Bloch MB 152C.1, No 658, Chateaunoux la Martinerie, France, May 1940 Seven Groupes de Chasse were equipped with Bloch 151 and 152s on 10 May 1940. A total of 140 Bloch 152s were in squadron service, but only 75 were serviceable. Sadly, combat with German aircraft showed the type's shortcomings quite quickly. The aircraft were found to be lacking speed, showed an inability to climb quickly, had a short range and had unreliable radios and variable pitch propellers. The MB 152 could, however, take heavy punishment, it was manoeuvrable, and the twin 20mm cannons packed a punch. Pilots flying Bloch 151 and 152 planes claimed 146 German aircraft shot down during the Battle of France, with 34 probables. Something close to 270 151s and 152s were lost to combat or abandoned during the German advance. Forty Bloch pilots lost their lives defending their homeland, and 42 were wounded. The MB 152 was powered by a 1120hp Gnome & Rhône 14N-25 14-cylinder, air-cooled radial engine, which gave a maximum speed of 500kph, and a service ceiling of 10,000m. Armament consisted of two wing-mounted Hispano-Suiza HS 404 20mm cannon and two wing-mounted 7.5mm MAC 1934 machine guns. Hard points for carrying two small bombs were also fitted to some aircraft. Mostly built out of the box, I substituted brass wire for antennae and pitot tube for durability. Camouflage was painted with ColourCoats enamels. I feel my paint finish could be a lot better, and I ended up with some silvering of the decals. The work in progress thread is shared with various other French types feeding my 1940 obsession.6 points
-
Hi all, I normally buy planes but this one was a nice alternative. I enjoyed building it, the kit has a good fit but the manual is different........😁 The manuals was made for two types and you as a modeller have to pick the right parts to get the right build. Nevertheless I used Ammo Pigments, Rembrand Oil Paint, AK interactive white spray can (Veryyy nice stuff btw). Not sure about the accuracy but I was able to find quite a few pictures of the British UNPROFOR Mission in Bosnia in the 90's. Hope you like'm! Cheers, Evert 1/35 Scimitar Fv107 Bosnia mid 90’s 1/35 Scimitar Fv107 Bosnia mid 90’s 1/35 Scimitar Fv107 Bosnia mid 90’s 1/35 Scimitar Fv107 Bosnia mid 90’s6 points
-
Well she is finished... WIP found here This was a little side project that was supposed to be a stress relief and fun build. And it was! The kit had some issues but I think I managed to make a decent model out of it. There were a few things that I would have done differently I was willing to put more effort into it. I tried to simulate oxidized brass for the nameplate and I like how this effect turned out. I used the same to weather the props. Anyway, here's the pictures: Thanks for looking, and everyone who followed the build! Konrad6 points
-
Hi George, it is big. I haven't quite figured out what to do with it yet either 😕 Hi, I'm sorry to hear that. I hate thieves at the best of times. I hadn't ever come across the Paragon flaps. I may do some hunting online for a set of those Hi Nikolay - I hope I don't disappoint you! Hi Andy - me too! I build the B-17G when I was younger and loved that. It was squashed by a suitcase which was thrown on top of it in the loft. Naturally, everyone denied ever touching the suitcase, so obviously a poltergeist threw it on top of my Fortress... I agree - it beggars belief really. I can only imagine being the one being told that my 4 new engines had sank into a lake bolted to a burning bomber because of something so utterly, utterly stupid. Time to cut plastic though. I had to start somewhere, so I have started in the fuselage using the undercarriage PE set. The first step according to the instructions are to remove the raised structural detail under the cockpit floor. This was tackled with two modelling chisels. I needed the pointy one to get the most-forward stiffener off the floor, leaving the bit moulded boss for the nose leg intact. I needed to make two 90 degree folds in the PE overlay before I could check the fit. Much like I used to think I was clever driving around on summer tyres in the snow to prove my car control prowess, I used to think everything in the world of photoetch could be achieved with two blades. There's no denying that having winter tyres is just hugely superior in Scottish winter road conditions though and likewise having a photo etch bending tool does make bending parts without twisting them a quick and easy affair too. To my surprise, it does actually fit really well around that boss. The next step here is to add a load of folded PE stiffeners to all of those relief-etched lines. It should look great when it's done. I am getting careful in my advanced years though and before I glue that brass down and add fragile bits, I'm going to open the forward fuselage interior PE set and find out what butchery Eduard expect me to perform on the other side of plastic floor.6 points
-
Progress on my diorama seems to be being made a few small steps at a time, but at least everything is moving forward, and eventually I'll see the light at the end of the tunnel. I textured the shoggoth's abode using a rattlecan sandstone-texture paint from the local hardware store, then weathered it with washes and dry pigments. Although it wasn't my intent, the resulting structure reminds me of a spider, which is appropriate for this horror-based diorama: It's hard to see the detailing on my shoggoth inside its lair, so I installed a LED: which was a great improvement: The shoggoth's bottom did not conform to the irregular floor of the lair. I fixed this by putting a layer of black Milliput on the shoggoth's belly, which also served the purpose of fixing the shoggoth in place. All that's left now to complete my shoggoth is add a few tentacles:6 points
-
Hi y'all! A while back, I came across LIFE photo archives and found a series of shots of the war correspondents in Tunisia in 1943. I really liked the sand scheme of the early Jeep with the arabic serials. The French miniature company Reedoak released a few months later a war correspondent, who really looked like the one standing in the first photo. Moreover, I also found a small decal sheet from Echelon depicting that very Jeep. A resin roman column and the project started...and stopped for a few days...weeks...months, until 2019 New Years resolutions. I MUST finish some of my begun projects. I've used Italeri's kit with a photoetched set and some scratch as you can see: And here is the final product! Pretty happy how it ended up. Hope you like it too! Ciao IWik5 points
-
Hi All This my 1/48 Airfix and scratch built RB.57F, like the real GD RB.57F this doesn't contain much Canberra, much of what you see is scratch built from various domestic items, a full WIP can be found here. Big wing build Thanks for looking John5 points
-
Hi Folk's,second of the year and continuing with the Naval theme with Airfix's new Sea Fury.Built for the NATO/Warpac GB by virtue of these aircraft serving in the Atlantic and Med prior to seeing action in Korea including the shooting down of a Mig 15 by Lt.Peter Carmichael in 1952.Airfix has come up with another winner here Beautiful molding and fit of part's a couple of issues around the four piece cowl and no gunsight supplied.Many thank's for looking in folk's. Missing the 155 decal under the cowl be on the floor somewhere! Last shot with Airfix's Seafre.5 points
-
This little jet was include in a Kinetic 1:48 Nimitz deck (hard to find always sold out)...at first I removed it from the kit and set it in a corner where it sat for a year. I was in-between the mail arrival of my next major build and my last kit so I decided to start this build. Everything about the kit decals and schemed in a Navy trainer platform was utterly boring. So time to have some fun and just do whatever became appealing. After staring at so much gray on the last few build some colour would be nice. I looked towards the U.S. Navy’s Aggressor Sqn known for their camo schemes there I found so many especially in the F/A-18 E/F Super Hornet in multi blue, green, tans…so also looking at a Saudi BAE Hawk had a interesting desert pattern but I really like the scheme from VFA-122 “Flying Eagles” also VFA-125 “Rough Rider”. Located all the FS colours from “Two Bobs” references in Model Masters Enamels and Humbrol. Converting the pattern to a smaller plane was a challenge. I decided that this was also an opportunity to trial some different shading and weathering techniques. Started with a fine gray lacquer primer then lay on some pre-shading in flat black and a coat of semi gloss white over. I went back with the primer gray/ white to thin out any lines that were too wide or not in line. Next was a base coat of the Tan FS 30279 after a lot of research I found out it was a ratio easy listed above. Thinned out paint and laid over the pre-shading in several light coats. Then added the next three tones lightest first. Then…it’s hard to do... lay another coat of pre shading on a nice finished camouflage job. The reason for this is as the camouflage is added you lose the pre shading from one colour to another because it’s just too many layers. You could thin the paint to make it transparent but then you’re in a battle between low airbrush pressures to keep the paint from spidering and not high enough air pressure to pick up the paint. It’s a struggle on the best of days airbrushing so this is a good work around. I have really high humidly in the winter even with an inline moisture trap its a constant issue avoiding water mixing with enamels. I know acrylics I have tried the Vallejo paints and Tamiya they just don't perform as well as the enamels. After the second pre-shading the camouflage pattern can get a bit lost so it’s worth snapping a few beforehand photos to remind yourself what’s what. Then comes the lighter coating of the same colours light to dark the pattern is already established so a mist in the applicable colour over the camouflage patters keeps the pre shading allows the deep colours to pop. Now onto the finite details post shading with charcoal and a fine brush. Don’t worry about over doing it I find a can of compressed air will allow you to clean up any mess even remove a line you don’t want altogether. The charcoal really gets into the thinnest lines. I tried the washes but was not a fan of the process I find this application gives me the same effect without the mess and cost. I like the washes in certain applications like landing gear bays or a engine where you can be really loose with the application. More to come should be done in a few weeks I found some desert decals that should look good. Made some ground on the cockpit details shading and highlighting the instrument panel this weekend and adding the seatbelts to the ejection seats. I think the comb on the wind screen is just to plain so I’ll have to dig into the photo etch spare parts bin and see what can be made. There are some good detail photos on Pinterest to work from. This kit is brutal nothing seems to fit the windscreen is about a 1/64th shy of the fuselage (as in the photo below) and the canopy is worse I am glad I am keeping it in the open configuration. Other than heating it in hot water to open it up I cant think of a trick to fix it. If anyone has a tip it would be appreciated.5 points
-
You could glue all those big boxes together and row them across the Atlantic?5 points
-
Gotta love my daughter - what a thoughtful gift! An ammo box... And what's inside? Ammo for the soul! Now back to my Sea Fury. Cheers, Bill5 points
-
Wow, and to think its mostly scratch built from Evergreen rod/strip, loo rolls and sticky back plastic....love the weathering, black tones and colour modulation on the screen...(what with the worn wood effect and general antique look, the piece almost looks real)... Well, we'll have to see what can be done about that...5 points
-
This is my recently finished HobbyBoss 1/48 F8F Bearcat in the markings of French service against the Viet Minh in the First Indochina War as fighter-bombers in the early 1950s. _______________________________________________________________________________________________________________________________________________________________________________________________________________5 points
-
First they took a propaganda photo of his broken body lying next to his crashed aircraft and made a propaganda postcard of it, though.5 points
-
Hello Dears, Here I'm again "Wack a mole" for sure…. And I have a lot of burrows from where I can pop up... Still the Hurricane has now a ash taste in my mouth !! Must do better ! Now if the fit of the wing to the fuselage is tight… The remnants of the resin parts are … Let's say approximative !! I received the message from our grand plastic rods master from the outer space… Here's what i get with the heritage fabric wing... Hon hon !! I will not say Nothing else than And So I started to learn the @Martian Hale way, DIY and let the resin apart ! And after some filing and sanding, I got this ! Now, that's the shape, I will detail it in order to have an interior on this otherwise really empty thing… I love to turn oldies into more detailled kit !! I found it rewarding !! Have a great modelling time !! Hope that you all have had a fancy Valentine's day. Sincerely. CC5 points
-
Little progress Cheers Mick5 points
-
Here it is at Hawarden DSC_4723 by Derek N.Ferguson, on Flickr DSC_4747 by Derek N.Ferguson, on Flickr5 points
-
Hi all. Our club theme this year for the annual QMHE show here in Queensland is two seaters and trainers. We're not limiting subjects to only aviation subjects but considering that we mostly build aircraft I've decided on a another jet subject for the display anyway! The more the merrier right??? This is the 1/48 Hasegawa Mitsubishi F-2B. I'm a big fan of the of the F-16 and seeing the F-2 is a close cousin, it was an easy decision to crack on with this build. Additional extras lined up for the build are Afterburner and DXM decals, Finemolds seat belts and pitot/static, Hasegawa weapons and Royale resin wheels. Montex masks will be used on the clear bits. And after seeing the U-125A recently built by @_alfisti_ I just couldn't go past the lovely two tone blue that the modern Japanese jets are famous for. The subject of interest. Some clean up and priming of parts. The full length intake and gear door interiors have some pin marks that I've filled with Vallejo plastic putty. It's good stuff and dries quickly in the stinking heat that we've had recently. The cockpit features nicely raised detail and the Afterburner interior decals registered well with the detail when applied. Below is the pit before any kind of wash or flatcoat. The seats are nicely done though if you don't like black then leave them alone. I tried to dress them up by using black and then varying shades of grey. The stencils near the headbox are from Afterburner and they'll eventually get some Finemolds belts. Again, this is before they've been hit with a flat coat. The intake is full length right back to the face of the engine. Not quite why Hasegawa didn't opt for this construction with their F-16 kits. Tamiya putty thinned with liquid glues has bene used on the interior seams followed by sanding with a long piece of rolled 400 grit sanding paper. Paint is Tamiya flat white acrylic applied with a larger than normal needle/nozzle (0.4mm) through a H&S airbrush. The paint goes a LOT better than with the 0.15mm smaller nozzle I normally use, perfect for applications in a confined space like this. There was a bit of faffing around with the next part to get the top and bottom fuselage halves to fit. I trimmed a variety of spots on the cockpit tub, instrument panel and cockpit interior and I still had to apply a bit more pressure to get the upper and lower fuselage halves to meet around the tub. Not a big issue but annoying nontheless. I left the parts clamped for most of the week to ensure the glue had gone off completely. You can see in this image where the problem was when gluing the upper and lower halves. Wings, fin and others to go on over the weekend. Apart from the above, it's been an easy build so far. Cheers, Mick4 points
-
So my previous build had a bit of a story to it. This one's probably more of a story with a bit of a build taped on. As for that story, it follows three different streams and eventually merge together. First there's the aircraft in question. Malmö Flygindustri's MFI-9 was a small and light little aircraft from the early sixties. It was also license built by Bölkow as the Bo 208, and SAAB ended up making a somewhat enlarged variant called Safari. A military trainer variant was also created and ten of these were rented for trials by the Swedish air force in 1966. Eventually the choice was made to buy the Scottish Aviation Bulldog instead, and the gently used aircraft were returned to MFI. The second place to start the story is with the Swedish count Carl Gustaf von Rosen. Born in 1909 he appears to have been something of the family's black sheep on account of his political views, specifically being very much not a nazi. When you're father runs a nazi party and your aunt is married to Hermann Göring that can apparently make things a bit awkward at times. Instead he took to flying (possibly inspired by his uncle in law, politics be damned), with a strong tendency to do so for what he probably considered worthy causes and often without much concern for his own well being. Starting out as a stunt pilot for a flying circus (an actual circus, not the von Richthofen kind). When Italy invaded Ethiopia he went there as an ambulance flight pilot for the red cross, and got some mustard gas burns courtesy of the Regia Aeronautica. After that war he got a civilian job with KLM. When the USSR invaded Finland he bought a DC-2, converted it to a bomber and flew one operational mission with it against the Russians. He would later help evacuate the Dutch government when Germany invaded the low countries, tried to join the RAF (apparently they didn't want to have Göring's niece around) and eventually spent the rest of the war flying for a Swedish airline company. Notable events after the war includes 11 years as the chief instructor for the Ethiopian air force, and flying the UN secretary general Dag Hammarskjöld around some during the Congo Crisis. Third, we have the Biafran war. Nigeria was (is?) one of those colonial patchworks, and upon its independence in the early sixties things got a bit heated, culminating in full war (civil depending on who you ask) when the south-eastern part of the country declared independence as Biafra in 1967. The old colonial power, England, ended up supporting the Nigerian government with plenty of ammunition and armoured vehicles perhaps largely to ensure BP's continued access to the oil fields near/in Biafra. The USSR saw a chance to gain some influence in the region, and supplied Nigeria with Mig-17 and Il-28 aircraft, which mostly ended up flown by various mercenaries. France thought they could perhaps also gain some influence in previously English-dominated lands, and gave some limited help to Biafra. Strange bedfellows... While Biafra had decent production of overall calories, they were heavily dependent on imports for protein. Nigeria blockaded those imports in an effort to starve out Biafra, leading to a massive famine that attracted the wrold's attention and got a number of western organisation to start flying in aid, despite attacks on these flights by the Nigerian air force. Here the streams start to merge, as one of the pilots who showed up was of course von Rosen. Being somewhat appalled by the way the famine and Nigerian air raids hit the Biafran civilian population he would at first try to get some substantial, official aid form various countries in the west, but his diplomatic efforts failed. Instead he noticed that Biafra had pilots, but at that point no aircraft. So he recommended them to try a "mini-COIN" concept, with very light aircraft flying between the treetops on lightning raids from hidden airfields in the jungle. To prove the concept he himself bought nine of the MFI-9 aircraft the Swedish air force had returned to MFI (with the intent being kept very secret), and talked a pair of Swedish pilots into helping out. The aircraft were shipped to Gabon were they were assembled, painted up, had French rocket pods installed and the passenger seat swapped for an extra 80l fuel tank (at full load these small aircraft could only barely climb up into the hot African air) before flying over into Biafra. Due to the starving children of Biafra being a major part of the pilot's motivation, and the size of their aircraft, these modified MFI-9 were called "Biafra Babies". With this and a local pilot they then carried out four "proof of concept" raids, primarily aimed at the Nigerian air force. Perhaps half a dozen aircraft were destroyed on the ground, mainly Mig-17, more damaged along with trucks, AA-sites and so on, with an important power plant and a major oil pumping station also being hit (something that struck Nigeria right in the wallet), with no aircraft lost or pilots wounded. After this the two other Swedish pilots returned home, von Rosen remained as an advisor and instructor, and another Swedish pilots showed up for a while to help keep operations going while the Biafran pilots were schooled in on the aircraft. At this point the aircraft also switched over to mostly flying "free hunts" against Nigerian ground forces just past the front lines. AT rockets are to have been used exclusively, to minimize the risk of collateral damage. In the end though a Biafra were thousands died of starvation every day could not hold off a British-backed Nigeria, and surrendered in 1970. So, on to the actual kit then. It's very much a short run affair, tooled somewhere back in the eighties. vacuform canopy, some white metal details. Luckily this included the rocket pods, despite there being no mention of Biafra on the box, since I haven't' found anything really suitable from any third party. The decal sheet also includes Biafran markings, but since these weren't added on at first and given the very yellowed sheet I'll be skipping those. Massive sprue gates, so-so details, and around 2mm thick fuselage sides. Oh my. With the gear being very much in front, the amount of nose weight recommended by the manual is... don't bother, just put a clear plug under the rear. Points for honesty I guess. Or if you absolutely must, lighten the rear as much as possible and then squeeze in as much lead as you can in the front, experienced modellers only (you can't stop me!). Doing some math on the torque balance I think I can do this, and so the carving began. The fuselage was taken form about 4.33g to just under 4g, then some pretty hefty gouges had to be taken out of the front as well to fit the engine and instrument panel. The edges of the walls were also thinned down around the cockpit (as the manual recommends) since having them be about 140mm thick in scale probably wasn't going to be the best look. After that I went back to sanding out material form the rear, until just over a fifth of the fuselage's mass had been removed altogether. With that to help aim I squeezed in about 2.5g of lead, and then added some extra white glue more or less for good luck. The red marks where to show where the engine and panel would end up touching the other half so the lead slug could be put in a suitable position. The cockpit walls are perhaps rather coarse, but the canopy seems like it'll give us some "help" there. The even rougher rear parts will be hidden by the seat and extra fuel tank. Now it's time to get a bit unconventional, and... ...glue the fuselage together before painting up the cockpit. This is because the inside edges of the fuselage floor came quite heavily chamfered from the factory, meaning I have a huge ditch in the floor to fill up. Luckily the instrument panel is easily accessible, and the pilot's seat will also be easy to install afterwards. The extra fuel tank and control stick will have to be scratch built, maybe a rear cockpit wall as well. Otherwise this will be an OOB build, or at least with nothing added. Plenty has already been removed after all.4 points
-
Lost cause... I was only in the Slug on Wednesday...I'll let her know what you said!4 points
-
Today was mostly sanding filling and scribing... but I got her almost ready for primer Cheers Konrad4 points
-
don't really know if this was better posted here or in diorama section. Introduction Tank is Panther Ausf D 521 that fought in the battle of Kursk. I wanted to make a battle damaged tank, but i also did want to make a properly built panther, but i didn't want to build two of them. so the solution i came up with was to build this vignette, with the tank seen as pristine from one side and as disabled from the other, and two russian tankers posing for a picture with the tank they've killed to provide some contest. the damage is based on pictures of damaged panther i've found online. the kit the kit came togheter pretty well apart from the driver and codriver hatches plate that i had to cut and shorten cause it wasn't fitting by 3 good millimeters, that's kinda weird. all in all the kit provide nice detail. it has plastic single link tracks. No transparent parts and no photoetched part, is a basic kit. Decals are good quality. It's one of the cheapest panthers around, should be available around 20€ modifications no extra part used apart from the figurines ( Miniart 35027 ). Custom built the camera held by one of the figurines. Custom built the engine that is not part of the kit. Drilled the holes for penetrations, custom made some minor details like smoke grenade wires, hatches springs, skirts and mudguards. Redone Towing cable using electric wire. Custom made engine deck grills using a mosquito net. The base is just a painted piece of polistirene.4 points
-
I won't dwell on the kit too much, as I am sure it's been discussed on here by people more authoritative than me. But suffice to say it's a lovely, straightforward, nicely detailed kit. It's also TINY. So a great option for a short, wieldy build. All OOB except some wiring inside - which is even more totally invisible than usual... Kit painted with Tamiya rattle cans - then I played with some dry brushing on raised frameworks, various oil paints - sap green, yellow, burnt umber - to vary the tones. I painted some wood grain and silver on wing roots and used marmite as a mask (maskol dried out). All of that was sealed in with a quickly brushed coat of Vallejo satin varnish. I finally used a thin strip of self adhesive aluminium tape on the cowling, and used some dust pigments on the walk areas of the wings. Thanks for looking! Bruce4 points
-
Or you can cheat 😉 as I did here: Progress by Jon Gwinnett, on Flickr No hole, just gloss black paint, which when viewed through the curved astrodome looks just like a hole...4 points
-
Hello Anil... Here are some good period color photo’s of korea and post war. They should give you various panels to choose from. But the key one you really should do is the upper/lower wings. They're very distinctive. Korea ⬆️⬇️ Post war ⬇️ And some close-up’s of this aircraft ⬆️ next. Hope they help ? Dennis4 points


.thumb.jpg.158e2e086d45b8f96b7d93b8bee8dc21.jpg)


This leaderboard is set to London/GMT+01:00