
Leaderboard


Popular Content
Showing content with the highest reputation on 09/02/19 in all areas
-
Here is my recent build. The venerable Lancaster bomber, the famous “Dambuster” as flown by Guy Gibson. The aircraft and mission need no introduction. The kit itself is the Airfix new tool, and for the most part is excellent and a good fit. I think my fuselage was slightly warped so it needed clamping and filling. The wings, tail, fins, undercarriage and transparencies are an excellent fit. Some fettling is needed in parts. Build thread is here: WIP Build Can’t really find many faults but a few quibbles. The transparencies are a little thick, so one could invest in vacform replacements. Also the forward turret guns cannot be fitted on last unlike the rear guns – yep you’ve guessed it, I ended up busting them off! If I had my time again I would cut them off and add them at the end, but if you’re going to that much trouble you may as well invest in some aftermarket replacements. I drilled out the muzzles but reckon the brass replacements would look much better. This was OOB, but I did add quite a lot of detail inside, unfortunately much cannot be seen, but I’m resorting to the usual cliché in that “I know it’s there”. I also added quite a lot of detail to the internals of both turrets; you get some glimpses of it here and there. Not much else, little lights for the Aldis lamps, aerial wire from fishing line, drilled out and added the escape hatches, drilled out the odd duct and intake. Added navigation lights to the wing tips, and improved the formation and landing lights. The wing roundels were painted on. Paint was Airfix enamels as per the kit instructions. I used Tamiya NATO black on the fuselage and wings so it didn’t look too black, the turrets and other bits were normal Humbrol matt black. Alclad aluminium on the undercarriage. I painted the upkeep mine in red oxide as I understand some were delivered fresh from the factory still in red oxide primer. Not sure if that was the case with Guy’s aircraft but it is plausible and offers a splash of colour against the black. Weathering was done using oil washes and pastels. Thanks for looking. You can just about see the wireless headset I added (sorry about the fuzziness)37 points
-
It's been some time since I last posted on here, mainly because my work computer has blocked BM so I can't while away my lunch hours and spare time perusing Britain's finest and as my evenings are full of modelling and other activities I haven't had much time to chirp in. But anyhoo I have managed to complete the odd kit and here is my latest. Having spent most of my career surrounded by Seakings, its an aircraft I have a lot of affection for. I love all the different marks (apart from crab yellow! 😉) and styles but as a kit its not one that thrills me to build. When I started this Airfix MK3 version I did intend to have 3 kits on the go at the same time (Another Airfix and a Revell), but that soon dropped away very easily! These new kits go together very easily but I just start to find it tiresome a lot easier than other kits. Maybe because I know the aircraft inside out and feel the need to add a lot of needless fine detail that cant really be seen. Any how I got myself the Xtradecal set #2 for Seakings which set me on the path to build a Mk1, 2 and 5 to go with my Mk4 and Belgian Seaking. I managed to get hold of 3 kits, 2 Airfix MK3s and a Revell German kit. I banked on the Revell version being a MK1 as they included a 5 blade TR and the old radome. But the Airfix kit has an old radome and the MK4 had the 5 bladed rotor so I stuck with that one for the Mk1. I have also found old decals for a Canadian version so that may eventually bump out the Mk5 as that one is a dull grey. (I have a thing for Navy Helos with those great big numbers plastered on them!) I then set about turning the MK3 into a Mk1, not that much of a difficult job. Obviously you have the 5 bladed TR, old radome, the blade roots need to be squared off, the strake isn't fitted and the reinforcing around the tail cone/fuselage area needs to be removed, rear windows filled and various aerials removed. I also boxed in the sponson areas. The internals were quite basic but I did throw in a couple of extra bits in the cockpit including handles on the inside of the windscreen which cant be seen very well lol! I had a disaster fitting the canopy, trying to get it to fit well I ended up cracking it on a skylight, luckily it isn't a standout problem. All the cooling grills were cut out, thinned down and had fine mesh applied. This caused problems for the area at the front of the rotor head, but nothing a bit of superglue and patience couldn't sort (I was lacking a lot of the latter however!). The doppler antennae and rad alt were removed from the underside along with other aerials, it is missing another aerial type but I couldn't determine what that was so have left it off (I was a mechanical grubber so only ever broke aerials and not fixed them!) and the aerial on the spine is not correct as ive only just noticed. An old style doppler aerial was fitted and I also cut out the sonar well with the intention of adding detail in there.....but bottled it! I folded the blades to save space, but I don't like the angle airfix set them, so had to cut them either side of the cuff and reattach them, I also had to fit tip socks on the side blades to pull them in more and look more proper. Just for added interest I added a spreader board, these were used onboard to hold the blades if the head lost hydraulic pressure and I tied up the side rotors. So here she is XV653, Seaking Mk 1 of 706 NAS circa 1977. Painted in Model Master Acrylics and just out of the foam wash shop! Edit - Just looking through some old documents including my flying log and I carried out a Track and Vibro check test flight as a flying maintainer on this airframe back in 2001 when she was a Mk6 on 810 NAS, spooky eh! Thanks for looking! Bob37 points
-
I should have posted this last weekend at the end of the B-17 STGB, For your inspection and comments (yes I need a photo area to be sorted! ) The subject for my build was know by 3 names Patches / Flak Magnet / Trudies Terror - 43-37675 B-17G 381st BG 532nd BS based at RAF Ridgewell in Essex Kit : Airfix new tool B-17G - OOB except for home made decals Paints : Ultimate Primer - Gloss Black Vallejo Metal Colors : Dull Aluminium, Aluminium Tamiya : all other colours. Vallejo , Gloss Varnish , Satin Varnish Tamiya Weathering Powders36 points
-
I have just finished this, the new Wellington from Airfix and what a joy to build. 😀. It build OOB, i have only covered the side windows to march the ref. pictures that was found on the net. white is done by airbrush, green and grey with brush, all colors Humbrol. Clear and satin laquer from alclad by airbrush. Decals from the spare box. Polish Wellington Mk IC DV597 "T" during take-off in Dale, 2nd half of 1942. This a/c attacked U-boat on two occasions: piloted by F/O Figura on August9, 1942, and Sgt Golebiowski on October 9, 1942 Cheers Jes36 points
-
Calling this one done! One of those kits that has so many spikey bits sticking out of it you dare never touch it:) Trouble free build aside from decals which had a yellowed a bit but a few weeks in the sun seem to fix them. Got the kit of auction site and it looked like it had a hard life so this one feels like a save too Hasegawa 1/72 kubelwagen and BMW motorbike also just finished so added them to the photo28 points
-
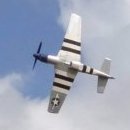
Here is another of my builds from 2018: a P-40 Warhawk from 45th Fighter Squadron in the Pacific, with the famous 'Geronimo' markings. The Hasegawa kit is difficult to find at reasonable prices, so I purchased an AMT kit on Ebay. I had read that the overall shapes are ok. I spend some efforts improving the cockpit with plastic strips etc and riveted the kit with a wheel from RB productions. The kit decals went directly to the trash can, fortunately I was able to get spare markings from the Hasegawa kit. The painting is done with Gunze Aqueous colors. I did a small base by making resin copies of photoetched PSP plates. I hope you will like it,23 points
-
#3/2018 My dad´s third and last Soviet WW2 subject for now. The excellent Zvezda kit, Eduard seatbelts added, EZ Line for the antenna wires. For the AMT-1, -4, -7 and -12 camo my dad used the new AK Interactive Real Color Air paints. Build thread here https://www.britmodeller.com/forums/index.php?/topic/235047253-soviet-pawn148-petlyakov-pe-2-peshka/&page=2 12th Guards Divebomber Regiment in 1944 DSC_0001 by Reinhard Spreitzhofer, auf Flickr DSC_0002 by Reinhard Spreitzhofer, auf Flickr DSC_0003 by Reinhard Spreitzhofer, auf Flickr DSC_0004 by Reinhard Spreitzhofer, auf Flickr DSC_0005 by Reinhard Spreitzhofer, auf Flickr DSC_0006 by Reinhard Spreitzhofer, auf Flickr DSC_0007 by Reinhard Spreitzhofer, auf Flickr DSC_0008 by Reinhard Spreitzhofer, auf Flickr DSC_0009 by Reinhard Spreitzhofer, auf Flickr DSC_0010 by Reinhard Spreitzhofer, auf Flickr DSC_0011 by Reinhard Spreitzhofer, auf Flickr DSC_0012 by Reinhard Spreitzhofer, auf Flickr DSC_0014 by Reinhard Spreitzhofer, auf Flickr DSC_0015 by Reinhard Spreitzhofer, auf Flickr DSC_0016 by Reinhard Spreitzhofer, auf Flickr DSC_0017 by Reinhard Spreitzhofer, auf Flickr DSC_0018 by Reinhard Spreitzhofer, auf Flickr DSC_0019 by Reinhard Spreitzhofer, auf Flickr DSC_0020 by Reinhard Spreitzhofer, auf Flickr DSC_0021 by Reinhard Spreitzhofer, auf Flickr DSC_0023 by Reinhard Spreitzhofer, auf Flickr DSC_0002 by Reinhard Spreitzhofer, auf Flickr DSC_0001 by Reinhard Spreitzhofer, auf Flickr DSC_0002 by Reinhard Spreitzhofer, auf Flickr DSC_0001 by Reinhard Spreitzhofer, auf Flickr DSC_0002 by Reinhard Spreitzhofer, auf Flickr DSC_0004 by Reinhard Spreitzhofer, auf Flickr DSC_0006 by Reinhard Spreitzhofer, auf Flickr DSC_0007 by Reinhard Spreitzhofer, auf Flickr22 points
-
Hello! Here is my 1:72 Hispano-Aviación HA-1112-K1L which I built back in 1999. It represents C4J-10/“94-28”, of Escuela de Caza de Morón, Ejercito del Aire, in Spain, in 1950. It's the Italeri Bf 109G-6 kit with the Dekno resin and white metal conversion set. I recall the Italeri kit had some build issues on the wing roots and the resin nose differed a bit in width when compared to the Italeri fuselage so there was extra work involved blending the parts. The kit was fully painted by brush and only varnished with airbrush. Decals were from the conversion set. This is my favourite of the Spanish-modified Bf 109s. I like the profile more than that of the famous later "Buchón" variant. This variant has been released as a full kit by Amodel relatively recently. Thanks for looking and all comments are welcome Miguel21 points
-
Taking one back to a more exciting time for plane spotters, particularly in East Anglia. Skylarks singing to the sunshine to break the silence over Honington after a couple of other Tornados did a touch and go; warm grass smell drifting over the fence, blue skies lighting up the apron. ZA407 sits between sorties as the RAF trains crews for its 10 operational Tornado squadrons.21 points
-
I've just finished two Spitfires! First off, I'm very pleased to have completed my Spitfire 21 in 1/72. It's an Airfix 22 kit with the spine and tail of the Airfix XIX grafted on. This is the second paint job on this model - the first attempt almost made it over the line back in 2016 but I made a mess of the varnishing and it went into some soapy water to get stripped. The unfortunate details are recorded in the wip: https://www.britmodeller.com/forums/index.php?/topic/234986779-spitfire-i-and-21-and-now-an-xviii/. Three years later it's finally done. Aside from the conversion its basically OOB with the exhausts drilled out and a set of Sword 4-spoke wheels. The sliding canopy is a Ventura vacform item and I'm slightly regretting not cutting open the door, but that would have given away that I haven't removed the Mark 22's canopy pulley system on the cockpit wall... On this second attempt I used Xtracrylix paints and opted for LA328 of 600 Squadron Auxiliary Air Force in about 1947, using the excellent Freightdog decals. Anyway, some pictures: Second, I've also completed a Spitfire 18 using the Sword XIV kit as the basis. This was more straightforward than the 21 though there was still a bit of work to do, e.g. redoing the outer wing panels and drilling the ventral camera windows, and I used a slightly reshaped Special Hobby rudder, with Z-type trim tab added. I used a spare Eduard bubble canopy as think it captures the shape better. It's in the 'Desert' scheme of 208 Squadron in 1949 Egypt, and I again used predominantly Xtracrylix paints, lightening the light slate grey even more with white. The dark Earth was Mr Hobby H72. Freightdog decals were again used, and here's what came out at the other end: And here they are together with my recently completed Sword XIV: The Sword XIVs are not the easiest of builds but they are the best we have so far in 1/72. I think I'll need to do a couple more... Hope you like these though - any comments welcome. Justin20 points
-
Hi all, I thought you might like to see my 15th 1:32 scale build - The German ‘Hansa-Brandenburg W.29’, a twin float, two seat naval patrol aircraft. This model represents the Hansa-Bradenburg W.29 (CM3G version), No.2512 as flown by Oberleutnant Friedrich Christian Christiansen of ’Seeflugstation 1’, Zeebrugge, Belgium during July 1918. The basic list of changes/additions to the model are: Engine: Exhaust pipes. Spark plugs. Cylinder fuel primers. Push rods. Valve springs. Rocker arms. Ignition lead support tubes. Ignition leads. Rear coolant pipe. Crankcase vents. Speed control gear. Fuel filter pipes. Modified or corrected: ‘GasPatch’ Spandau and Parabellum machine guns. Gun installations. Cockpit control cable pulleys. Cockpit control line routing. Cockpit flying control lines. Pilot’s control wheel. Throttle quadrant. Rigging points. Radiator top pipe. Tachometer drive cable. Animation of control surfaces Aftermarket additions: ‘Gaspatch’ 1:32 scale Parabellum 14/17 machine gun (15-32069). ‘Gaspatch’ 1:32 scale ‘Spandau’ 08/15 machine guns (15-320619). ‘Aviattic’ Bleached Clear Doped Linen (ATT32044). ‘Aviattic’ German Naval Hex (faded) (ATT32113). ‘HGW Models’ fabric seat belts (132562). ‘GasPatch’ Elite Accessories Turnbuckles. ‘Copper State Models’ 1:32 scale German Naval Crew (F32-034). ‘Copper State Models’ 1:32 scale German Naval Ground Crew (F32-037). ‘Coastal Kits’ 1:32 scale Abandoned Airfield Display Base (modified for 3D effect). As usual I've created a downloadable build log in Adobe PDF format, for those who might want to refer to it for reference or build details. It contains full step by step descriptions of the model build, its modifications/changes and is also supported with illustrations and photographs. If viewed in Adobe Reader, each build log has book marked chapters/headings for easier navigation through the log. My model website has the gallery page, so to view any model, go to the gallery and select it. If it has a PDF build log, it will be available to download using the 'PDF' icon on that models photo's page. For any photograph, just click the photo to enlarge or reduce the viewing size. http://igavh2.xara.hosting My next model will be the ‘Wingnut Wings’ Sopwith F1 Camel (modified version) of the Canadian ace William Barker. Mike16 points
-
I won't dwell on the kit too much, as I am sure it's been discussed on here by people more authoritative than me. But suffice to say it's a lovely, straightforward, nicely detailed kit. It's also TINY. So a great option for a short, wieldy build. All OOB except some wiring inside - which is even more totally invisible than usual... Kit painted with Tamiya rattle cans - then I played with some dry brushing on raised frameworks, various oil paints - sap green, yellow, burnt umber - to vary the tones. I painted some wood grain and silver on wing roots and used marmite as a mask (maskol dried out). All of that was sealed in with a quickly brushed coat of Vallejo satin varnish. I finally used a thin strip of self adhesive aluminium tape on the cowling, and used some dust pigments on the walk areas of the wings. Thanks for looking! Bruce15 points
-
Hi all, the finished Morris and gun Pictures before painting you can find here: WIP Cheers Macki12 points
-
- Special Hobby Flying Banana used by French army during Algerian war12 points
-
So here it is completed. For the WiP please tap here: A siesta due to too much Pernod:12 points
-
Another one bites the bench dust. This time the new Airfix Blenheim. Peach of a kit. Up to the usual standard of todays Airfix. One small gripe..... The rear turret is a work of art ...but ...why oh why did they not go the extra few feet and make a gun that looks like a gun. Decals are from Xtra decal. However I used the kits decals for the roundels...…….. they were fantastic, as good as after market ones. Well done Airfix. Anyway on to the pics. Please feel free to comment etc. Thanks for looking Dick12 points
-
Cheers Ced As the title now says AND THEN THERE WAS ONE! I am prepared to leave this here, nekkid as a jay bird Ish 'cept for the filler, paint and other folks input I present CH-53D of HMH362, the Ugly Angels Now then, where did I leave that pub... Oh yes, just down the road, catch ya laters12 points
-
My fellow modellers, good afternoon. I've starter this old Revell model (Note the price in Italian L'ira, so, bought before the Euro, and in my stash for a lot of time😁😁😁) in order to improve my skills in recreating a better seascape diorama. IMG_20190113_100952 by Franco Segato, su Flickr For this reason I've tryed a different approach from what I've used on my first attempt with the 1/700 Pearl Harbour Diorama. Instead of using the alluminium foil on a foam base, I modelled the foam using the wood stucco and creating the waves pattern. I've painted the whole base with black and blue, then I applied a coat of gel for the water transparency and finished with some cotton for the bow waves. The model was built OOB, I have just added some railrings remaining of my previous buildings. This the final result. Disclaimer: Be aware that the pictures were taken on my working bench on evening, with my phone camera. IMG_20190120_164240 by Franco Segato, su Flickr IMG_20190120_164320 by Franco Segato, su Flickr IMG_20190120_164251 by Franco Segato, su Flickr IMG_20190120_164307 by Franco Segato, su Flickr IMG_20190120_164320 by Franco Segato, su Flickr IMG_20190120_164430 by Franco Segato, su Flickr Thank you for watching, and any suggestion will be appreciated. Franco10 points
-
The V Beach landing alone would have fullfilled that by what I'm reading. It would have needed a very large drawing-board to go back to if it hadn't fitted! 😆 I too know too little of this event Giorgio - miltary history forms only a very small part of my reading diet as a rule. Gallipoli seems in many respects a violent reprise of the medieval Christendom vs. Islam crusades, here on the plains of Troy with modern weapons and on many levels. Britain, Russia and France all greedy to carve up the remains of the Ottoman empire between them. If only they knew that the easiest way to dispossess the native Turks was to buy time-share holiday apartments... Many years ago myself and an ex-girlfriend found ourselves alone in the amphitheatre at Ephesus (further up the coast) late one afternoon after most of the tour buses had left for the day. The architecture and silence with the sun setting over the plain made the hairs stand up on the back of your neck at how much the sheer 'ancient-ness' of the place seemed to emerge into the present once the tourists were gone. A lot of time then this morning spent rebuilding the navigation and radio stations inside the rear cockpit. I eventually decided that I wasn't happy with the visuals on the previous versions, both in terms of their alignment with the framework and wing spars, but also felt that more could be done with detailing the shelving and so forth. Not very exiciting to watch small pieces of brass being moved around so I just took some photos at the end: The internal angles for those parts now look a whole lot better: It's all grubby again and needs a wash to get rid of the excess flux and dust of course but am a lot happier now with how this all lines-up inside: Front cockpit to do first I think and then I'll work my way back. I have to make a decision about how much stuff to put in the nose; not that there'll be a whole lot visible in the darknes through the small windows for the bomb-aimer so I may just add a couple of panels on either side and the light in the nose. Buttoned-up tio keepthe brass safe until next time: Feels good to have got that done today - it always chafes at you when you've not done anything for a while doesn't it? Not sure when the next update will be but hopefully I can fit in a few minutes here and there over the week. TTFN! Tony10 points
-
Hello, I present another model of the Polish light bomber "Łoś", this time in version B. The model is painting Romanian Air Forces from before 1941. After 1941, when Romania began to fight together with the Germans, signs changed on planes for crosses. On black background. With brother PZL 37A9 points
-
A build from 6 years ago: Every country and every time has its pioneers, many times unrecognized for one reason or another. Argentina is not exception and the work of Mr. Virgilio Carlos Mira did not get perhaps all the support it deserved. Mira developed its own designs from the remains of an early Bleriot monoplane. These designs evolved into a series of successful machines of which we present here the third iteration, the Mira 3 “Golondrina” (swallow). This plane flew through the 20’s and incorporated some devices that were practical, affordable, functional and clever. Some information can be found mainly in “Historia de la Industria Aeronautica Argentina”, by Francisco Halbritter, also in “Los Registros R 1928-38” by Gabriel Pavlovcic and the A.A.H.S. Journal of summer 1968. It should be noted, though, that as it is common with obscure types, some data found in these sources is not totally correct, and that there is some mislabeling regarding the five or so versions that were built. The first reference contains a plan that is absolutely off the mark for the stated version, the third. When compared with actual photos of the Mira III the plan is almost useless. The deviations are so many that it would be impractical to detail them all here. I started after gathering references by correcting the plan to provide for a better base for scratchbuilding. A few items as you can see in the photos are from my ever-dwindling stash of Aeroclub white metal aftermarket details. The rest of the model follows more or less scratch techniques that I have presented already many times, the images anyway tell the story. The rigging is relatively simple and the colors are based on a model that used to be at Aeroparque airport in Buenos Aires, Argentina, of which fellow modeler Armando Gil took a photo.8 points
-
Hi New member here, this is my second model after a 20 year break. It is modeled after an aircraft from 332 (Norwegian) sq, flown by Alf Widerberg. Decals are from Vingtor, worked great. Built out of the box, added wine bottle foil seat-belts an IFF-aerials made of my wife's hair. Painted with Humbrol Enamels. I made a few errors, such as managing to get the wing walkway line over the upper wing roundels and the light mixed grey turned out almost as light as the medium sea grey, etc. Overall I'm still happy with it Constructive criticism is welcome. Isak8 points
-
Here's my GR-1A that I made from Revell's IDS kit. After market was Eduard PE, Seans wing seals and RAF pylons, Flightpath tanks and pods set and Xtradecal for both markings and stencils. My subject was ZA373 H from 2 squadron. Here's one or two of the shots I was using for reference... And after 9 months of grabbing whatever time I could at the weekends and evenings, here's the result... It's not perfect, but it's better than it would've been thanks to the contributions of some BMers who pointed out some noob mistakes on the WIP thread, so big thanks to all of them. Thanks for looking.8 points
-
Hello All, It's been a long time - Sweet's 1/144 P-51B/C modified to a RAF recon Mustang. Thanks for looking. Ian8 points
-
Looks great. Like it very much and I always was interested in that type as a kid, because of this dramatic box art of Revell's 70' one:8 points
-
WIP: https://www.britmodeller.com/forums/index.php?/topic/235016491-soviet-heavy-metal-172-tu-22-modelsvit/ Should have chosen different background8 points
-
New Year Resolution complied with - my Walrus finished at last, not quite before the Hunter arrived but not long after. I got stuck last year on a couple of issues. The first was the finish - I started to get debris in the paint. I finally tracked that down to poor brush hygiene with Xtracolor paint. There was a quantity of paint still in the brush which remobilised every time I used it, giving 'hairs' of paint. I've since given it a really good clean and it's much better now although still not perfect. The other was the rigging. In 55+ years of modelling I've never rigged a biplane before and I finally decided on 8 gauge guitar wire following a tip on this forum. It's not perfect but shouldn't go slack with time. Ditto the finish - it is what it is and doesn't look too bad under a coat or three of matt varnish. It's from the box apart from Eduard harnesses, the rudder mast (curiously omitted by Airfix), and the window spray deflectors, fashioned from the trailing edges of the unused flap parts, The paints are brushed Xtracolor and the decals from Xtradecal. I wanted a scheme with a clean demarcation between the upper and lower hull colours and as an FAA scheme, AA5R was the obvious choice. Thanks to ex-FAAWAFU for his hugely helpful WIP thread. The photo of AA5R shows light bomb carriers so I used the kit practice bombs and also fitted the other bomb racks. The photo also shows the bracing wires clearly but no antenna from the rudder to the top wing aerials so I left that off. It's a brilliant kit and the struts are more-or-less self aligning - congrats to the new Airfix. Thanks for looking!8 points
-
*This model was finished during January, but I made myself to take pictures of it only now... The mechanic took a week to make (Tamiya + Vallejo colours). After 5 years I declare this model FINISHED! The history of this build starts at the Heritage Aviation Models Ltd stand at the Scale Model World Telford in 2014. I bought the most expensive kit to that day (£40) there and I was so excited that I started building it at our autumn traditional model club weekend right after the show. There, I made the biggest mistake (due to really bad advice) and dipped the whole wing in to the Surfacer. I DO NOT know why I did that, bud it gave me a really hard time with sanding and mostly recreating the corrugated iron on the leading edges of the wings (more in the building thread). Due to this, the Supermarine was very often put back in to the stash for rest and, mostly, to forgot the mistake I had made on the most expensive model (I was 17 then...). Year after year I tried to continue and some minor progress was always made, but nothing serious. But, the last September, I found that poor box in my stash again and I pushed myself to finish it once and for all. And it was a successful attempt. I DO love Spitfire, I really do. And this is a part of it´s story, which was my motivation. I would also like to create the line of 1/48 Spitfires starting with S.6b, "224", K5054, K5054 (blue), first productional Spit, Speed Spitfire and so on... I really enjoyed the last term of modelling on this model. I tried many new things (NMF surface, HGW rivets - which can not be seen there , some scratched parts...) and mainly - this build kicked me into the serious modelling again after a long time. My friend Pavel helepd me with the masks (roundels and letters/numbers and Dunlop decal) and also with the figure of the mechanic (he painted the face ). I also added the base of the Southampton Supermarine factory together with the ladder and the airscrew cone. I used all the photos which I could found, from all over the internet, available books (The Spitfire Bible helped me the most) and the model portrays the K2890 before the RAF Pageant at Hendon at 30th June 1934. There are the most photos of the K2890 in this state and also I like the number "2" on the fuselage. You can see one error in the photos which is the hanging aerial, which changed its position due to the transport in cold weather. I hope it will not spoil your impression much. I hope you'll like the first Spitfire and do not worry to ask anything related to this kit/airplane/photos, I will gladly help with anything. Cheers, Andrew S. And now the model only:7 points
-
Hi guys; I finished this Zvezda 1/72 last December. I used Mig acrylics and Eduard PE set. I really liked this kit, but I had difficulties with Mig paints. Here some photos: Cheers;7 points
-
You've not entirely ruined this kit whilst I've been away then... Errant nonsense dear fellow - your patience and skill in getting that canopy sorted are of the highest order in the finish that you've acheieved there. That looks the bees knees - if not the entire leg.7 points
-
This is my completed Diorama 'Delivering Monty's Tank. It is the Merit M19 Diamond T Tank Transporter and the Tamiya M£ Grant tank. The Driver and camel are M&B figures. I Hope yo like it!7 points
-
I am also considering building the loading tractor/trailer unit for this build. As i noticed that the airfix ww2 u.s. airfield re-supply kit has the same 1:72 scale autocar tractor unit as the tempelhof inspiration photograph (- to my untrained eye) The trailer would need a whole bunch of scratch building but theres a good chassis base there to start from. I think the boxes could be sourced out there from a quick search around and it could be fun to recreate the scene. Downsides are: #1. I’ve never built a car/truck/armour or any vehicle except an aircraft before! 😳 And #2. I’ve only tried scratchbuilding something simple recently in another build thread without much finesse! So I’m pretty inexperienced all round and i might be biting off way more than i can chew. But hey there’s gotta be a first time - the worst that can happen is it fails. - and besides theres a forum of experts here to help advise so now might be the perfect time to try this? Maybe it’s best to see how i get on with the plane first? 🤔 Any advice is welcome! Thanks7 points
-
After this morning's rather plaintive missive I decided to shove things aside this evening. With Mrs. B working in her studio, our youngest out at a friend's party (I say youngest - he's taller than me now...) the eldest doing something unspeakable to aliens on the Xbox and not even a cat to distract you with demands for food/milk/petting, it occurred to me that there was actually nothing to hindera bit of quality time on the shop floor! The sense of liberty was overwhelming. Firstly then, this had been bothering me at the start of the week: Given that I'd been so particular in following the schematics for the framework in three-dimensions, I was baffled to find that after soldering the nose part of it on to the existing rear section, that there was a significant gap between it and the fuselage walls on either side, You know that feeling of vexation when you can't account for such an error creeping in? Annoying isn't the word. At least being too busy to do anything about it was a blessing in disguise so it wasn't until this evening that I had a chance to work out why and the penny dropped I'd missed the obvious in that there was nothing wrong with my measurements/scaling, but I had forgotten that along each side of the fuselage under the windows is a shelf/sill type thing that accounts for the gap. You get a nice view of it with the lads climbing in here: It runs all the way along from the rearmost window behind the radio station, all the way forward to disappear under the IP. A simple enough matter to replicate with some plastic strip: I'd anticipated tha there would be some argy-bargy, if not a downright howsyerfather in getting the final overall structure finessed and settled inside the fusealge snuggly enough. Sure enough there was. It's one of the penalties of using 0.3mm tubing - looks in scale but easily bent out of alignment during handling and I found that I had to rethink the build sequence. The nav station had a tendency to pull the forward section in too strongly so I realized I would have to take it out and add the front cockpit floor in order to keep everything aligned correctly up the front: This also required rebuilding some of the struts of the nose framework to mate with the floor more accurately. I'll redo the nav table mounting late but the important thing is that now works as an ensemble within the volume of the aircraft: Those solder blobs will get ground down to match the flat aspect of the frame junctions when all this bit is finalized. The intenral fit of the framework now though is dead on. Nice and snug! Doesn't seem like a whole lot of work when you look at the pictures does it? You know yourself though that getting structures to fit like that needs a lot of eyeballing and adjusting until 'just so'. A rather tense couple of hours getting that right, but I'm relieved it works and can go to bed now with a warm fuzzy Anson type feeling..... Currently reading Peter Harts': Only a couple of chapters in but just at that stage where you know it's all about to turn to a world of hurt. Polly Harvey's 'All and Everyone' is a fitting accompaniment in this respect. Tony7 points
-
A build from 5 years ago, posted as always with its original text. (At that time I didn't know a couple tricks to photograph the models in a convincing snowy environment, so these images will have to do for now): The somewhat strange lines of the Fairchild Super 71 bushplane seem to suggest an exercise on making a fuselage out of beer cans. The whole appearance is further enhanced by the shinny finish and the presence of a pair of floats/skis that any bush plane deserving its worth should be able to wear. The Execuform vacuformed kit is a simple approach to the matter, providing the basic shapes, a plan, resin parts that make for the stub wings where struts attach and a vacuformed clear canopy. As usual you will have to get the engine, prop, decals and detail bits by yourself. In the photos you can see the Aeroclub engine, the scratched interior and home-made decals. The Super 71 that has been restored and is exhibited at a museum shows servo tabs on the rudder. I wasn’t able to find anything like that on the photos I have of the original machine; but again, I was able to find about a dozen images, all not great in quality. In the museum the external sections of the wing are separated by a gap, in the original a metal strip fairing covered that gap. There was a time when the Super 71 was on skis. Since I have been posting here numerous articles dealing with the building of vacuformed models, all there is to be said has been already said, so I’ll keep this one short, but there are a few points to be considered nevertheless. The wings are molded as entire sections, upper and lower. The wing has an inverted gull dihedral which is portrayed in the kit parts. The wing halves, in order to have that dihedral, have been located in the backing sheet on a pedestal. It is advisable to mark and cut the wings from the “inside”, the other side of the backing sheet, not the side where you usually cut –see images- since the dividing line is more visible on that side. Be very careful with the slips of the cutter, since there is almost no guide line. Do not hurt yourself. Cut a tad further out from the actual dividing line; that will give you some slack to refine and sand later on. There are two front cowl parts, one depicts the more usual “cover-all” cowl, and the other represents one that looks more like a NACA cowl and accompanied in the original an engine shield. Study your reference material. The original stub wings were partially corrugated, so I decided to scratch them instead of using the resin ones provided. For that I made a pattern and joined part plain styrene sheet and part “corrugated” styrene sheet. The teardrop tips were made from long forgotten kit bombs, I am always happy finding other uses for them. The polished metal surfaces (fuselage) and the silver doped, fabric-covered flying surfaces should be painted accordingly to differentiate them. I went for the ski version (although it is not depicted or catered-for in the kit) for several reasons: a) Because I have a tendency to depart from the standards b) It requires a bit less struts (so they are limited to only 28 😉 c) It adds a color note (wood) to the otherwise overall metal finish d) It makes the display of the model easier (no water, no dolly) e) When I am pretending to fly the model in the house I no longer have to take off and land in the sink or bathtub, but can use the freezer instead. I would like to thank another vacuformed kit maker, Lars Opland of Khee-Kha Art Products, for his help with data about the original plane. While waiting for some parts to dry I worked on the decals and got them ready to be home-printed. A new stabilizer was made from scratch in order to be able to show the ribbing of the original. Same for the rudder. For the abundant struts on this model brass “Strutz” were used, and a very big “thank you” goes to Andrew Nickeas. of the lands of Nottingham, since -due to the shutdown of the Aeroclub Internet store- without his help no “Strutz” would be now among my scratchbuilding supplies. The Super 71 was used mostly as a cargo plane, so I depicted the interior with bulkheads, cockpit and floor. A few battens –gas tank area reinforcements- were added to the lower wing, as well as gas caps on the upper wing. Aileron cable leads and balances were fabricated too. There were two ducts that run parallel on the upper fuselage from behind the engine to the canopy; those were also represented on the model. Exhausts were made from styrene tube and solder. A little bit laborious but worth every hour of dedication. As the song goes, it never rains in Southern California -and much less snows- but we live in hope.6 points
-
First completion for 2019. This is the 1/48 Tamiya Jagdtiger built for the NSW Scale Model Shows "Panzer Tracks" Trophy. As usual a pretty fun straight forward build. More images and details at my blog6 points
-
A build from 9 years ago: Another carefully crafted vac kit from Khee Kha Art Products of Alaska, the WACO YKS is a welcome addition to the growing line of bush planes kitted by this talented manufacturer. This iconic biplane, of which still many cross the skies today is what we define as a classic. Many WACOs rode on floats, and many were modified to accomplish certain tasks; that aside the many models and marks that the factory itself delivered. For that reason it is a good idea before construction to select the actual plane you want to model and get some references, to be able to pint-point details, colors, markings and so forth. Research is an exciting part of the building process, and usually prevents the commission of mistakes regarding appearance, mistakes that are more difficult to correct after the model is built and somebody points them out to you. Construction started by separating the parts and sanding them according to the instructions. The molds have very good surface detail, be careful not to obliterate it. Some lines are a bit faint, so mark them to be able to score/cut/sand at the right place. By the way, those instructions are extensive, detailed and well written. Fuselage windows were open at this time too. I opted to represent a plane that had another engine (Continental), so I put aside the neat resin one that came with the kit (images depicts the well cast and detailed resin bits included in the kit (engine, two props of different style, instrument panel/dashboard, tail wheel, control column, transparent material for the side windows and the two –one spare-windshield) Advised by Khee-Kha’s owner I also modified a few details that slightly differed from the “6” variant in the landing gear area. This informs you about the adaptability of the kit, since with little tweaks you could expand the range of machines that can be represented. Being Khee-Kha’s owner a fan of bush planes, he of course offers aftermarket resin floats and decals for other versions that you can purchase separately. Wings and stab halves were joined, locking tabs glued to the fuselage halves and the interior parts cut from the backing sheet and built-up. I had a pair of suitable white metal wheels so I put aside the vac ones provided. The wheel pants were glued and refined to accept the wheels at this stage. I had to scratch the control wheel/pedestal, but that part is now included in the kit as a resin bit. Once the interior was finished and painted, I joined the fuselage halves, and had to do a little shaving on the cabin floor and instrument panel to have a comfortable fit. I was a bit enthusiastic while sanding the cowl opening, so had to glue a pre-curved flat styrene rim on the cowl mouth, to restore proper shape. Once the fuselage was set I started to locate spars for the wings and stabs, as seen on the photos. I departed a bit from the kit’s instructions since I feel comfortable with my own method, but the kit instructions give you a very good way to deal with the issue. The horizontal tail actually got the spar where it should be, and a connecting piece that united the halves at the front, lodged in the fuselage cutouts for the variable incidence as the original. Later on the elevators were separated from the stab and given a relaxing angle. The windshield transparency was carefully trimmed and set aside for the moment. The side windows were patterned as per their openings, cut and adjusted to fit; as you can see in the photos I added some thin rubber padding to a pair of tweezers after getting fed-up of marring transparencies. This allows the clear part to be held and proceed with minor sanding preserving the surface of the part. Other details as per photos were dealt with (exhaust pipes, carb intake, nav lights, rudder control horn, bottom wing linkage fairings, fuel gages under the upper wing, etc). As you make progress on the building start to think about your decals since they don’t come with the kit (as said, an option can be purchased from the manufacturer separately for one machine). In order to further expedite construction I replaced the kit landing gear and wing struts for Contrail (plastic) and Strutz (brass) material. I also added a lower fuselage fairing where some landing gear reinforcement struts go. The upper wings were glued to fuselage, via a metal tube spar previously inserted after its dihedral was given to it. The model needs a few struts, but fortunately no other rigging than tail bracings and control leads for the rudder horns. Home made decals were printed and a custom paint mix prepared for the model representing NC31663. I am truly grateful for the help received from the National WACO Club, which kindly provided information on WACO liveries.6 points
-
Howdy All, Just finished my second attempt at Special Hobby`s 1/48 scale Barracuda, so thought I`d bother you with some pic`s 🙂 Completed to represent an aircraft of 822, 1700 or 1709 Squadron depending on the time frame or what reference you use This is the standard boxing of the kit which doesn`t come with as much resin detail Made a slight improvement by opening the radiator cooling flap under the nose as most photo`s show it open Added some bomb racks and 250lb bombs left over from my recent Swordfish and the 500lb ones are Eduard Brassin items Added the small windows just below the windscreen and did open the fuselage at the forward wing root but you can barely see it All the decals came from the stash And thanks to Seahawk, EwenS and Tony O`Toole for there responses to my original questions on the subject Hope you enjoy, thanks for looking Cheers Russ6 points
-
I don't think he would approve of my leaving the maps for the mission on show in the plane with the doors open while I went and had a cup of tea You doth flatter me sir, but thanks. Thanks all for the comments and following the thread. It's been a long one but worth it and a well satisfying build. Here is the RFI Plus a little trailer:6 points
-
Another 1/72 Eduard Hellcat here, the Mk. I FN430 of 1844 squadron operating off HMS Indomitable in late 1944/early 1945. Flown by PO Hannay, took part in the attacks on Sumatra. Thread here:6 points
-
Partly because of that inconvenient 'real life' thing getting in the way and partly due to the anti-fun I had on Tuesday trying to get the Uschi Van whatsit riggy stuff through tiny holes, I wasn't in the mood, this is all that I managed to 'achieve' on Wednesday: I glued two bits together – pathetic isn't it. With the preparing the rigging and photo etch machine guns, I think this build has cost me about three years of life so far – not feeling the love for WWI builds yet. I'm a very organised person, so I don't know why chaos follows me around. This is a photo of my work area Thursday evening. It shamed me to tidying up, but for some reason it's just as bad today. It's a mystery. I can't believe I'm at the zipping the fuselage sage already! Normally it would take me about a month before I get here. At least it should give me a couple of months to do the rigging. This is me internals: The last photo has the major stuff I scratched – it may not be 100% accurate but…… don't care. Thanks for having a gander.6 points
-
Maybe the pilot is in there with his patriotic girlfriend having a bit of a proletariat canoodle?6 points
-
Oh, and one other detail I forgot to mention was the prototype's tail skid: I made it by cutting off slices of the actual tailwheel piece until it became wedge-shaped. I'm pretty pleased with the result of that approach!6 points
-
Here is my finished Boeing 767-200 in 1/200 made from the original Hasegawa American Airlines boxed variant that for those that can remember them, the series went on and fell off the back end of the original Hasegawa Love Liner200 Series. If my memory serves me as well as I hope it does, Hasegawa were quick off the mark to model their original 767 kit when Boeing first released the same. I've got some of the ANA, JAL and Delta original kits but their decals are now pretty much throw-aways as these old 1/200 kits seem to have only ever been stored in damp garages or attic's by their original owners on the basis that the kit looked good at the time of original release but the owner never got around to building it due to being a civil and less interesting subject perhaps...? So this really is the ROO McCoy, or should I say Real McCoy. Using some recently sourced very old Qantas Decals printed in the 90's by ROO-DECALS, lovingly printed in Australia. Shame Qantas retired their 767-200 Boeings as I think this simple livery looks good on a 767. Here's Kanger and Roo for you.... I hope you enjoy the finished article as much as I did so modelling it John6 points
-
Speaking of worms in a can, I tried and tried and I just can't seem to learn Japanese on the quick so I could read what Aki has to say about painting. I got about as far as ichi ban and gave up. (I was supposed to start at the beginning, right?) So I figured a great idea was to download the instructions for the new Airfix 1:48 Sea Fury kit and see what they have to say about detail painting. At least I now have some Humbrol numbers. In the Airfix kit, I notice a nice padded, quilted backrest on the pilot's seat - was this standard issue for the Sea Fury? I think so, but I want to make sure it isn't one of those warbird things that was mistakenly put into a kit. I hope it was, since I went ahead and made one out of sheet styrene and already put it on the seat...such cruel, wretched impulsiveness! And for those of you who are STILL waiting for me to show proof that I'm actually working on this model, and not just talking about it, here are a couple of photos of the engine. The designs of the castings are really quite clever, and the whole assembly pretty much snaps together. The entire engine is less than 2 cm diameter. Now that this is assembled, I will go back and add a smackeral of superfluous glue to the beginning of the exhausts, and then align each one to the respective port on the cylinder head. Although I am scratching my head as to why I would bother with this, as it won't really be able to be seen once that big honking prop and spinner are in place. (Gotta love that exhaust design - Bristol engineers really knew how to package five pounds of stuff into an aerodynamic three pounds of cowling.) Captured in the middle of the two banks of cylinders is one of those poly-cap thingies, free to rotate (assuming I didn't put glue in the wrong place). The propeller shaft slides into this bushing with a pretty really tight fit; I'm glad I tested this before the model was together. I think the first time I inserted the prop shaft, there may have been some flash or something similar that had to be pushed out of the way. After a lot of test fitting, followed by squinting with various combinations of Mk I and Mk II (mit bifocal) eyeballs, I think the only thing I will add between the engine and the cockpit firewall are two tubes of the engine mount framework (one each side). The only other stuff that would be visible in this scale are the brackets that hold the chain drive (dare I assume this is used to open/close these panels?). And those would be pretty small - as I've said before, I may be a Yank, but I'm not crazy. Cheers, Bill6 points
-
Ever since I've been modelling, there has been one unwritten rule – no WWI aircraft. When I was a nipper it was probably because WWI was obviously an inferior world war and not as good as the proper one – I did Top Trumps, I know these things. This time around it has been because of the joint horrors of rigging, and transmuting plastic into wood using only the power of paint. I've grown up now (mostly) and it's finally time to put those demons to rest. If I'm particularly concerned about one part of the build I like to tackle it as soon as possible. As I can't rig the thing before I've built it, my next major concern is making a reasonable stab at the prop. I don't know if you have seen the work of a modeller going by the name of 'Bughunter'. He's a proper modeller and does remarkable things like make laminated real wood props. Obviously, not being a proper modeller I don't expect to end up with anything like he makes. True to form, I only have one type of wood laminate available, so I did a few experiments - using Tamiya XF-64, XF-52 and a darkish brown oil wash to colour the alternate layers. I've got a shed full of carpentry tools, but when I do the wood worrying, it's usually on furnitury sized stuff, none of those tools were suitable. So I carved (with a scalpel), filed, sanded and scraped the prop, I then used mineral oil to darken the wood a little and then splashed on a mix of 50% of X-26 (clear orange) and 50% X-35 (semi-gloss clear) to give a varnished look. Not perfect but I'm quite please for a first attempt. I might have another go if I can be bothered. I'm feeling quite smug because I've managed not to make a total hash of something else: Watching those 'how to paint wood' vids paid off, but I made two changes. Before I painted I filed the plastic to give it more of a grainy texture (only filed it because my coarse sand paper is in the shed and that would mean I would have to get off me rear end and walk further than the kettle). I haven't got the yellow ochre oil paint that was suggested as a base, so I used XF-55. In the morning I put smears of my available brown oil paints on a piece of cardboard, as someone on another site suggested (so the paint dries faster). After three hours there was a linseed oil slick around each blob. It then had a none to perfect coat of the lightest brown, then four hours later (testing it every two minutes to see if it was dry) I used my most scraggy brush to apply the other two browns quite sparingly. After that, I scraped it lightly with a small wire brush in the direction of the grain. I'll probably put some thinned X-26 (clear orange) on it when it's completely dry. There's a couple of other much smaller woody things, but that's the big bits out of the way. Anyway, if any of you are still awake and can stand another instalment, I'll see you next time. Thanks for looking - comments welcome Gorby5 points
-
Hi everyone, This is my first completion of 2019, it's the Italeri's boxing of the Academy kit. Stunning moulding, full of interior detail and some excellent panel line and rivet detail on the external surfaces. On the down side the instructions were terrible, very vague requiring a certain amount of guesswork. Also the decals were unusable, they were very thick and did not conform so I replaced these with a Tecmod set. For this build I gave MRP acrylic paints a go and was pleasantly surprised, they sprayed excellently with a lovely smooth satin finish... I think these will be my paints of choice from now on. Any C&C welcome. Thanks for looking, gazza5 points
-
They were usually referred to as split brains. And a lot seemed to be just used for one trade when they eventually got to a real RAF station, as opposed to the fairy tale that was training. They needed retraining at this point and were usually given an SAC* to show them what to do. I was just a plain Rigger (SAC). I'd done about 4 1/2 years when I went on my Fitters course. Most of the rest of my course were from 18 Sqn Wessex in Germany. Between us we'd done a bit. The Civilian head of training welcomed us to the course, he explained that we would now be trained in various skills, and would learn to use power tools on Aircraft. He was puzzled & a little upset when we all burst out laughing. Been there, done that. *They were Junior technicians and the SAC (Senior Aircraftsman) was a lower rank but had experience of the Aircraft. Anyway. It occurred to me that us ex military types use terms and phrases that others may not understand. so, here is another little mystery explained; the Pip pin. The Pip pin is/was used as a quick release device in a number of places on Aircraft. Notably on Helicopter opening panels that might need frequent removal instead of a nut and bolt. Pull or push the ring at left and the ball bearings at right (one each side) loosen up and will retract, allowing removal of the Pip pin. Another version has a T piece in place of the ring, with a button to depress for fitting/removal. Various lengths and diameters were available depending on their point of use. And yes, this one is ex Wessex. Also ex Wessex are the screws seen in the picture above. These are typical mushroom headed screws in various sizes and were used throughout the Aircraft. Next week, how the Wessex broke the sound barrier.5 points
-
The correct wheels/tyres from Freightdog arrived and have been added. My worry there was freeing the incorrect resin resin wheels which I'd glued in place with Gorilla superglue, however my wife's Boots nail polish remover applied sparingly with a brush did the trick and interestingly to note is the stuff comes in varying strengths. Who knew? Fortunately for me hers is specifically for weak, dry nails, (she had no idea 😁) preventing collateral damage to surrounding plastic. Mid upper turret also added.5 points
-
Wham...! ... Bam! More in RFI shortly! Justin5 points


.thumb.jpg.d17ff607fc7e89ed057e63fcb6f2a888.jpg)


This leaderboard is set to London/GMT+01:00