
Leaderboard


Popular Content
Showing content with the highest reputation on 03/02/19 in all areas
-
Hello Dears Wow, This is another advantage of my Hip surgery !! Second RFI and we are the 2nd of February ! Now my friend @Christer A Will feel some pressure 😰 A Corsair, 2 Seafires and a Hurricane since December !! Not too bad Indeed !! So, let's go, I like when I choose a model and a paint scheme to know a bit about it ! The scheme of this Hurricane was Strange enough to be siren song for me …. Well we are in Malta for the 3rd time since December… but not in Hal Far this time and not at the same era… The bird is from the 69th Sqdn based at Luqa airfield I will thank our Friend Troy for his precious indications ! She surely has received the tail unit from another Hurricane Following battle damage. Now why an azure blue Hurricane ?? Kinda like the famous Malta blue Spitfires ??? No ! not at all it's simpler !! It's a Recce bird, they were frequently field modified with 2 or 3 ventral cameras especially on the MTO and CBI But this is a thing that Italeri did'nt tell in the kit instructions !! I used the camera plug from Barracuda cast on this one too ! Paints are once again Xtracrylics ones The armament has been recuced to 2 MG per wing for compensate the weight of the cameras Some are completely disarmed but it's not the case here For the purist, I've Added the intervalometer in the cockpit too What do you think about this CC Albeit, I forget to glue the sight in front of the windshield Blimey !! Well, Advices and comments are welcome !! Let's see now my MTO family Christmas is now 1 month old but still there are 3 Rudolfs here !! Unless the red nose are due to the blistering sun ??? Or any other Reason…. Ooookay Have a great modelling time Friends !! Sincerely. CC45 points
-
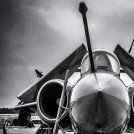
Good day all. It is very unusual for me to post two builds in less than a week. In fact, it never happens, until today. Prior to to my 3 year break, there'd be a good month between posts. The timing of the photography session with my little 'warm up' Vampire post the other day, then finishing and photographing this one means it's ready to post. 😎 History: The last two Phantoms I made were a vintage Hasegawa IDF RF4E, and the wonderfully dodgy Matchbox F4K/M, built back when both they, and me, were nice and new. I think I build better than I did back then so there is something to be said for old age. 😓 This one is the Fujimi Fire Birds offering from 1989. It has been sitting in my stash since the mid 1990s bought secondhand when I toyed with the idea of restarting my modelling hobby. I didn't though, because restarting my hobby had to wait till 2013! 😭 With the release of the Airfix kit and following my recent build warm up, it was decided to finally get this one done. Still a nice kit of course and I don't feel the need to replace the Fujimi FG.1 in my stash with a newer Airfix one. I threw in some Quickboost resin seats, QMT resin wheels and those Master pitot tube sets just for the fun of it. The scheme is from Xtradecal sheet X72295 and represents a 92 Sqn FGR.2 on detachment to RAF Akrotiri, Cyprus, 1989. I also had a set of Airdoc stencils as well. I'm not sure when I bought them, but WHAT WAS I THINKING!! @##%%@ Phantom stencils! Where did my life go? Didn't I have better things to do? Anyway, here you go, thank you for your time. I feel I was still warming up a little as my current build is definitely going better than this Phantom did. 🤕 Phantom-FGR2_02 by Jonathan Macauley, on Flickr Phantom-FGR2_01 by Jonathan Macauley, on Flickr Phantom-FGR2_03 by Jonathan Macauley, on Flickr Phantom-FGR2_05 by Jonathan Macauley, on Flickr Phantom-FGR2_06 by Jonathan Macauley, on Flickr Phantom-FGR2_07 by Jonathan Macauley, on Flickr Phantom-FGR2_08 by Jonathan Macauley, on Flickr Phantom-FGR2_09 by Jonathan Macauley, on Flickr35 points
-
I've just finished a long running (10 months) build of a FROG Beaufort. Well, the fuselage halves were from the kit and everything else was stolen from the new Airfix and Frog Beaufighters or scratchbuild. Long story, WIP here. Pictures, you say: It's about time somebody released a state of the art Beaufort. I take comfort in the fact that my three previous most complex fixings of kits resulted in new releases of high standards: old Airfix Swordfish (Airfix), Airfix IL-2 (Tamiya, Academy) and old Airfix He-111 (Airfix). So, fingers crossed! [EDIT the IL-2 isn't really that bright a green!] Thanks for looking, Adrian33 points
-
1/48 Short Tucano converted from hobbyboss EMB-312. The following parts are modified: 1\ the original three blade is converted into a four blade propeller 2\ jet pipes are moved to lower front fuselage 3\ the nose section is slightly modified to represent a smoother cross section on the Short Tucano rather than Embraer Tucano 4\ Added a frame and detonation cord to the original canopy 5\ Added the ventral airbrake, leaving it at closed position23 points
-
With Vector engine/cowl23 points
-
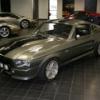
Hi all, Have wanted to do this scheme for a while, got the kit in December 2017 and finally started it late last year. I got the decals custom made but they got lost in the Christmas post so had to be re-sent, so I only got it finished a couple of days ago. It's a decent kit, but I had some fit issues, especially with the windows section, as the two strips for the windows are clear (both the windows themselves and the surrounding area) so it's hard to get them flush with the plastic fuselage sides. I also had some issues with the method I tried to use to do the camo, so all in all this isn't as 'smooth' a build as I would like! That said, it looks like the movie aircraft and I'm happy enough to have it done and on the shelf. If anyone wants the decals that came with the kit (Eduard 1:144 'Airliner') or even the spare sets of 'Where Eagles Dare' decals (there was enough room on the decal sheet when I ordered them to get a few sets made up) just let me know, they're yours. Thanks. Kit: Eduard Ju-52 'Airliner' Scale: 1:144 Paint & Weathering: Airbrushed with One Shot Mig Primer and Revell Aqua Colours, Weathered with Oils. Extras: Bedlam Creations Custome Decals for 'Where Eagles Dare' scheme.22 points
-
Hello all, This is my recently completed entry for the Boeing B-17 single Type Group Build. I have built the Revell 1/72 B-17G as 42-31636 OUTHOUSE MOUSE from the 323rd Bomb Squadron of the 91st Bombardment Group. The model was pretty much as out of the box with some minor additions to the flight deck and general interior not much of which can be seen. the decals are a mix of the kit set and the Kits World War Bird sheet for the subject aircraft and the colour scheme was as per the Kits World instructions. I have used oil paint and weathering powders to 'distress' the general appearance and to try and achieve a faded paint effect. The 'Frying Pan' display board is scratched and I have used the very nice Airfix USAAF Bomber re-supply set for the vehicles. The build thread is here: Apologies for the image quality, my DSLR decided not to play anymore so I had to use an ancient compact. Just noticed that one of the machine guns has gone AWOL! A couple of close ups of the vehicles: A really enjoyable STGB. Cheers, Mark.21 points
-
I did a build a while back that used up some spare new Airfix Beaufighter engines and an engineless Frog Beaufighter. Long story, WIP here. I finally got around to taking some better prictures today, and here they are: Thanks for looking, Adrian21 points
-
Viscount 'British Midland' 1:144 S&M Models, classic-airlines.com decals, and 26 decals detail sheet. This is the last of my three S&M Viscount kits, so now I'll have to get some more! I have made the same mods to the kit as on the other two, these are basically: 1) Reshape the too blunt nose, building it up with Milliput. 2) Reshape the cockpit 'dome' by sanding to a more rounded shape. 3) Thin all the trailing edges of wing, tailplanes, and rudder. 4) Shorten the noseleg to fix the 'nose high' sit of the model. 5) Thin all the prop blades and reshape them. (This is a real pain to do!) All these modes make a big improvement to what is basically a sound model. The 26 decals detail sheet provides all the wing & cowling panels and is essential to any build of this kit. The British Midland markings are from classic-airlines, lase printed on constant carrier film, so you have to cut each decal from the sheet by close trimming. They work very well. It pairs up nicely with my Welsh Models HP Herald. My three S&M Viscounts, a Conversion to a BEA 700 (shortened forward fuselage), a British Caledonian 800 ,and The British Midland 800. Thanks for looking, John20 points
-
Well, I’ll just stick the next bit on ... - whaaa?? ... and suddenly it was done: Torpedo has its detonator whiskers and the undercarriage has a fender for keeping the doors off (top tip: don’t add this right at the end; ask me how I know): Amazingly the cockpit is still visible: And, although some Beauforts were certainly well used, I went all restrained and classy with the bare metal chipping: There’s always a sense of anticlimax for me when I finish a build , so, with apologies to @Pete in Lincs: Thanks for all the support along the way. Proper pictures tomorrow! Thanks for looking, Adrian20 points
-
Quite some time ago I think I saw an article or a TV programme about Ken Wallis. Mr Autogiro and Dad to 007's little Nellie. I fancied building a Little Nellie, but back then they were not common and went for silly money. So, I had a Beetle engine in the spares box. Not dissimilar to a Lycoming. I had a spare propeller and other bits too. Oh, go on then. Scale is 1/24th. Basic frame is sprue. I can't remember how I made the blades though! Yes, the fin/rudder is from an Airfix Little Nellie but I can't remember ever building one as a lad! It's all wired up and has brakes too! Tie down points are cut down split pins. Decals are out of the spares box. L5-202 is probably something else! Since I built this I've learnt that the Airfix Little Nellie isn't that good, so I'm glad I made this effort. Thanks for looking. Pete18 points
-
Mel did this the other night. Curiously, she waited for the kids to be in bed first. We get a bit of that too -- the riverwalk in my photo had a skidsteer with a bulldozer blade on it chipping away at ice three inches thick in one section. Anyhow, tonight I glossed the Hurris and put their exhaust stubs in. One thing to watch out for -- there's a thick sprue gate connecting the front of one of the stacks to the sprue, and it will need careful separating or if you fail at that, equally careful cleaning up. Then, on went the first decals! I'm using Solvaset, which has worked well on Techmod decals before, so we'll see. I decided to press on with P3059/SD-N, which was a Gloster-built machine with the "bright" style of pre-war roundels. Also, I was on episode 5 of the first series of The Dectectorists, and I needed an excuse to keep watching. Coming along nicely.18 points
-
This is Airfix's very nice 1.72 Hurricane. Apart from the aerial everything is OOB. Paints xtracrylix for the top and Ammo for the undersides. Kit builds up really well.17 points
-
Hi all, I post some pictures of one of my builds from last year, that I finally decided photograph. It is a 109 G-14 from JG 53 found abandoned by US troops in Kassel. I used the Profipack boxing from Eduard and sourced the decals from my spares. I had decided to give a try to AK interactive acrylics but was not able to get correct results, so I went back to my trusty Gunze. The weathering is done with Mig Ammo washes, ink pens and pigments. I made a small base from styrene foam, with a cart from Tamiya, I hope you like it, best, Christian.15 points
-
I recently completed a build of the venerable Airfix Ford Tri-motor, made up for the fictional Miskatonic University Antarctic Expedition described in H.P. Lovecraft's horror novella, At the Mountains of Madness. The Cliff's Notes plot-line is that, in 1930, a university in New England sponsors a geologic and paleontologic expedition to the unknown Antarctic. Using aircraft to cover the vast distances, they discover a range of mysterious mountains and, beyond that, the cyclopean ruins of an ancient city. On landing to explore the city, the scientists encounter monstrous beings that proceed to kill the explorers, etc. etc. The WIP for my Tri-motor build can be found here: and here are a few pics of the finished model: With the Tri-motor done, I need to build a suitable diorama around it. This will be my first attempt at building such a large/complex diorama. My goal is to show the aircraft after it has landed at the edge of the mysterious city. For inspiration, I plan to draw heavily from this artwork: my list of needed "props" include: Sledge Cargo & oil drums Fuel pump & hose Ladder Skis Rifles Tent(s) Furniture for tents Booze bottles Booze crates Boot Giant Albino Penguins Sled Dogs Shoggoth Let's get started! My first step was to decide on the general layout of the diorama: The biggest challenge will be the city wall, so that's where I will begin. I drew out the general dimensions on paper and transferred that to a piece of foamboard: The wall's buttresses and other 3-D features were cut from various thickness of foam, which will be mounted to the foamboard backing after detailing is finished: The base will, of course, be covered with snow and ice. I will be using for the first time AK Interactive's products: A quick trial run looks promising: That's as far as I've gotten as of today. I'll be posting regularly over the next few weeks, and expect to be asking lots of questions along the way. -Bill14 points
-
This time the model with insignia of the Chinese Air Force, is my first model of a jet stationed in this country. The model is the Trumpeter Su-30MKK 1:32 scale, definitely the model is not the best model of this aircraft. This is Su-27UB with changed displays in the cabin. The model is easy to build and does not cause problems. Model made straight from the box.13 points
-
Meng's kit13 points
-
Photos: There you go. As you can probably see I had a few problems with the decals, particularly on the wings! I blame the ground crew for not cleaning the wings properly after trampling all over them with oily boots during painting. Enjoy!13 points
-
A build from 12 years ago: The Nemeth Umbrellaplane, as its name indicates, was created to minimize the weather impact while waiting on the tarmac on rainy airstrips. Or not. Thanks to one of the very good publications issued by Bill Hannan at Hannan’s Runway, this model could finally see the light of day (under the umbrella, that’s it). This beautiful machine was the brainchild of Mr. Nemeth, and was built by students of the University of Miami. The fuselage is from a stretched Alliance Argo, and was powered by a Warner Scarab. Later in its life the wing was altered to another, even stranger, split configuration. A bit more of information can be found at Aerofiles: http://www.aerofiles.com/_n.html The model, as you can tell by the “in progress” photos, is made basically, as usual, from styrene sheet and rod. Aeroclub engine prop and wheels completed the needed parts. The forest of struts was dealt with using brass “Strutz”. Once I got all the parts on the table I gently blew over them and pronounced the powerful word “Shazam!” And the model came to life. The truth is out there.11 points
-
A build from 10 years ago: What about another beautiful sailplane? First flight,1934!! Victor Nikolaevich Belyayev was part of a group of visionary designers that created innovative, ahead of their time planes. The BP-2, or TsAGI-2 was a high-efficiency, 20 meter span sailplane that used a variation of the “Babochka” –butterfly- wing. It was practically a flying wing, with “positive arrow”. As usual, not much exists around regarding this beautiful design, but I got enough from the Net to build the model. This plane seems to have been flown with and without a horizontal stabilizer mounted on top of the two fins. Some changes in the painting can be also detected. A year later another variant was created, the BP-3 or TsAGI-3, a two-place machine with changes mainly in the area of the “tail” and with the “centroplan” with a remarkable dihedral. Savvy modelers would have already noticed the resemblance with another plane from the same designer, the DB-LK twin-fuselage project of the WW-2 period. This is a relatively simple project, but you have to pay attention and aim for a sound engineering. I can’t tell you how much I enjoy scratching these designs. It takes me no more time than a normal kit (after a little practice, of course) and my potential subject horizon widens immensely. You can see the parts breakdown in the accompanying images. The “centroplan” actuated as the main “anchor” part to which all other sub-assemblies were attached. The pod, as said before, was provided with an interior and a minuscule vodka flask for the comfort of the Russian pilot in case cold weather has to be faced. Gliders/sailplanes are a growing segment of the modeling subject spectrum, which is a welcome alternative to what you usually see -again- in at the shelves in hobby stores and contests. This one in particular offers a daring design, a strong appeal and a relatively easy engineering. I am sure you can find many more.11 points
-
Thanks Bill I'm sure you're right that they were new builds, but I guess they used some trusted design parts. That's my story etc… Thanks Roger - very kind Thanks Johnny - gloss first, got it! 'Cut out' the tailplane from the diagram to a new file and printed it at 190%: on Flickr … and then cut out the tailplane, comparing it above and below the kit: After checking some reference shots of the MR1 I'm calling that good. Not so for an MR2 perhaps? Ready now to stick some more bits on, including the wingtip, er, thingies that I need to scratch.11 points
-
A build from 7 years ago: The MPM 1/72 scale kit was the base for the project. Several details have to be deleted and others added: 1) Deletion of all windows and door 2) Re-scribing of door in new position 3) Addition of faired tail wheel 4) Re-doing of the prop hub 5) New decals 6) Vacuformed canopy (just in case) 7) Modification of the fuselage areas where the two aft landing gear struts rest, which had four fairings (two on each side) instead of one as the kit subject. 8 ) Two short exhaust tubes replacing kit’s. 9) Venturi on the left hand-side of the fuselage The kit is nice; it is not a short-run kit but full injection with metal molds. The level of detail is good but there are no locating devices for the parts as in a short-run kit. This kit has been reviewed extensively on the Net. The fit is just good, with adjustments needed for the wing/fus joint and the engine support part and the fuselage (the former a tad smaller than the opening in the fuselage). The tail feathers’ to fuselage joint again need refining. In my sample I had to remove a little bit of material from the inside of the wheel pants for the wheels to fit comfortably. The canopy, wing and fuselage joint need also attention. The canopy must be glued first once all the dry trials have been performed to satisfaction. The kit's instructions will mislead you on gluing the LG oleo legs (A9-A10) to part A21. That's incorrect, as photos clearly show, the oleos should be glued to the wheel pants', into the recesses provided for that effect (small notch on top of are in relief on the inner side of pants). I am very happy to see a civil kit of a relevant plane, which was presented in many versions and has the potential to be converted in even more models of truly significant machines. Applause and well done, MPM. I printed my own decals based on a drawing sent to me by the late Jim Schubert (thanks, Jim, I know you are looking and having fun). My gratitude to the person that made that drawing too.10 points
-
Hi folks, After a 4 month hiatus from modelling due to work sending me all over the world, I’ve finally found some time at the bench. I wanted a fairly quick and easy build so I picked up the Italeri 1/48 Hawker Typhoon 1B, which I believe is a re-box of the Hasegawa kit. I know next to nothing about these aircraft so I pretty much went OOB, save for adding some padding and harnesses to the seat belts, the ignitor wiring for the rockets and the antenna on the rear fuselage. The fit of the fuselage insert and lower wings was not great and needed a decent amount of filler, sanding and some re-scribing. Otherwise the kit was very nice. I went with one of the kit schemes, ZY-Y from 247 SQN, France, June 1944 (I read that the Typhoon only carried the ‘full’ invasion stripes for a very short time during and after D-Day, so I weathered the stripes slightly less). I masked and painted the stripes, national markings and codes. Paint was mainly gunze acrylics, except for the Ocean Grey, which was my first go at using Lifecolour acrylics (which I had no dramas with whatsoever – they even brush paint very nicely). All up this one took me a bit under two weeks to build. The low parts count helped All comments, criticisms and feed back welcomed! Cheers BC10 points
-
A build from 9 years ago: After the Japanese Hansa with Rising Decals J-BIRDs decoration posted here: The limousine conversion (also inspired by the Arawasi magazine) was typical of the time when passenger carrying was starting to be taken more seriously. The pilot was exposed to the elements and the passengers usually sat face to face inside the enclosure, being an inheritance from the horse-driven road coach configuration. This arrangement pioneered the passenger transport before the now standard cabin started to dominate the field. The conversion was applied to pre-existing types that for one reason or another seemed suitable for the adaptation, being mostly military surplus or old types that were given a stretch on their life-span. There were many of such conversions, but I found only one photo on the Net depicting the plane with the registration J-BCAL. This time though the decals had to be home-made. The profile published in the same Arawasi magazine that featured the subject of the previous article is a good general guide, but compared to the photo shows a couple minor inaccuracies, like the exhaust arrangement and a slight difference in the windows of the passenger cabin. Again the Eastern Express re-issue of the Toko kit was used with the transformations already depicted in the previous article, plus the “limo” canopy. The kit prop was used this time, since J-BCAL had a two-blade prop. Different exhausts were fabricated too and of course besides removing the front fuselage, the aft position area had to be removed too. A wood plug was carved and used to vacuform the passengers’ canopy. Similar and yet different to the other Hansa, with the extra appeal of the lumpy proto-cabin10 points
-
My weekend project, MI-4 Hound (Air HQ Communication Squadron, Indian Air Force), HobbyBoss Kit 1/72. Hi Folks, I started this kit last week, however, couldn't progress much due to work. This Friday I started to work again and by today it is done. The hardest part initially was that there were no color photographs of the mi-4 vip scheme, so I need to do little of dig up and one I realized it is very much similar to Mi-8 Vip color tone. So, it was steel blue, white and navy for that I use Tamiya as my primary paint. The blue steel was mixed of blue, white, yellow and black. The kit was a pleasure to build, I have to say, it was really fun to build and instruction was quite simple to understand. Here it is the Mi-4 Hound (Air HQ Communication Squadron, Indian Air Force). Cheers10 points
-
Picked up the basic boxing at the Brampton model show last year and it was a real bargain as it was full of extra resin bits, not all was used in the kit as there were resin late and early wheels, 2 different types of seats etc. I used one of the seats with moulded on seatbelts, and the replacement wing guns (which invoice cutting the gun panel out of the leading edge of the upper and lower wing) not really worth the effort in the long run. Decided to buy the montex paint masks for the national insignias and codes (all except the Z which I had to make myself). I think that the painted on effect looks much better (getting the masks to like up on the fuselage roundels was a pain in the backside as the shape of the fuselage pulled the circle out of shape and getting the different colour circle masks to fit together was challenging. The fit of some parts (such as cockpit framework was exemplary, other parts (such as the wing halves) were not so good. The red and blue of the insignia was my own mix from different tamiya paints. Am pleased with the result. DSC_1500 by Richard Page, on Flickr _20190126_131927 by Richard Page, on Flickr _20190126_132035 by Richard Page, on Flickr _20190126_130201 by Richard Page, on Flickr _20190126_132211 by Richard Page, on Flickr _20190126_132402 by Richard Page, on Flickr _20190126_131632 by Richard Page, on Flickr _20190126_132300 by Richard Page, on Flickr _20190126_131605 by Richard Page, on Flickr _20190126_132520 by Richard Page, on Flickr _20190126_132432 by Richard Page, on Flickr _20190126_131758 by Richard Page, on Flickr10 points
-
A build from 9 years ago: It is not a common occurrence that decal makers will release options for civil machines of kits that are sold as warplanes. When I saw the (made in Czech Republic) Rising Decals “J-Birds” sheet and a related article in the ARAWASI magazine #7 on Japanese Hansa Brandenburg W.29, I was all for it. I wish Arawasi would include more civil golden era plane content. The acquisition of a W.29 kit proved difficult, though. The MPM, TOKO, and Eastern Express kits were not as easy to obtain as I thought. The available resin kits were not an option for my modeling budget. Finally Steve K. kindly sent me the Eastern Express release from his stash and Christos Psarras from the soon-to-be Atlantis (Florida) helped me to get another for a future “limousine” version (this one not included in the decal sheet). The Eastern Express (ex TOKO) kit has a reasonable level of detail. It offers two different stabilizers and two rudders. As a bonus you get a dolly and a couple of supports to prop the model “on land”. The wing-fuselage joint needs a certain amount of shaving and sanding to get it to fit, but I won’t go on describing the kit since it was already reviewed on the Net. Its nose is not applicable to the Japanese versions (which were powered by a geared Hispano Suiza) thence some nose cosmetic surgery was in order. A new radiator, firewal, support pieces and a metal cover were made .An engine was scratchbuilt too as per images. The interior was enhanced a tad adding bulkheads and some other detail parts. The kit two-blade prop was replaced by a touched-up four-blade prop from Aeroclub. All building and accessories made, the model was painted with a whitish aluminum acrylic and Future applied in preparation for the decals. The decals are wonderful, but bear in mind that they are thin, as good decals should be. Handle them with care and patience. I used Micro Sol and Set, but my impression is that they may not need setting solution if you apply them to a gloss surface and take care of eliminating water and bubbles. Their color is dense and not translucent at all, they are sharply defined. Two decals folded on themselves as I was trying to apply them (again, they are thin) but adding water and carefully prodding them with a toothpick straighten them out. Be aware of the direction of the Japanese lettering, you may not notice if you put them upside-down if you don’t speak Japanese. In this case (one of the four machines you can dress with the decals) you have a couple of options regarding some small lettering. Study the provided leaflet beforehand. After decaling assembly of the main parts ensued and details were added. There were a number of Japanese Hansas on the civil register (J-BASL, J-BAAI, J-BAFI, etc.) and if you are interested on the type a little research will be in order. The Hansa has indeed “character”, further enhanced by a civil registration and livery it really stands out. Stay tuned for the “limousine” version. (the other HB W29 is here): Scratched engine: Modified interior: Scratched radiator:10 points
-
A veritable blast from the past, since I built this one in the 90's: If you like rivets, weird birds and old molds, this is for you. I built this one many, many moons ago. This kit seems to prove that the proverbial "Rosie the Riveter" was well and alive by the time the aircraft was produced, and very enthusiastic too. I remember putting the fuselage molds to good use -before building the model- in filing wood, scraping wallpaper and sanding some bricolage projects. They are also good for peeling potatoes and other hard-skinned vegetables. All in all, the kit's stance is magnificent in its alternativeness, and building does not present any serious issues. I have no access to the model now -my son inherited it, whatever wanting it or not- so just these two images (that he took, by the way) are available. Since this is a well documented apparatus -many images on the Net- you won't have trouble finding references. It is a fair rendition filled with nostalgia -for lacking of anything else, since the interior is mostly empty. A basic cockpit is provided. The decals were good, but you have to match the "French blue" -a perfect color choice being this a British machine- for some details that you have to paint by yourself. Beware that it is a potential tail sitter. I found on Youtube movies showing it....Flying!!!! http://www.youtube.com/watch?v=y9633v6U0wo N of B: I must confess I bought another (and also a not very wise off-scale Revell one!), and look forward (one day) to build it again, perhaps improving a thing or two. Airfix fans (not really my case) always sleep with one under their pillows 😉10 points
-
Here are a few photos of my last finished model. It was built from Eduard's excellent 1/48 kit of the Bf 108 Taifun (Profipack edition). The model portrays a Taifun used by Norwegian regional airliner Widerøe's Flyveselskap for photographing and target tugging duties from the late 1940ies until the middle of the 50ies. I was in touch with Arctic Decals regarding custom decals, but they had troubles making the required cream colour. In the end, I got some APLS-printed decals in white, but ended up using the decals as templates for masks made from Tamiya masking tape. The exception is the logo on the motor cowling. Here, I over-sprayed the white decals with a mixture of transparent acrylics from Tamiya (mainly yellow) prior to application, in order to get the desired cream colour. The small text on each side of the fuselage behind the cabin window was taken from Lima November Decals' sheet of decals for Widerøe Beaver and Otter. Regards, Ragnar9 points
-
-Kit manufacture: Mikro Mir -Scale: 1/144 -Type: Vickers valiant B.1 -Extras used: None, built out of the box -Paints and colours used: Vallejo Model Colour Black Grey; Mr Hobby Aquaous H316 Insignia White, Mr Hobby Aqueous H332 Light Aircraft Grey; Mr Hobby GX100 Superclear III -Other info: Was built for a facebook group build on Bomber Command but was not completed in time. This kit put up quite a considerable fight, but being a limited run kit that was to be expected! I made the decision to pick and choose what I wanted from the PE fret as it was a challenge to sue PE in this scale. My recommendations if you want to build this kits to dry fit, dry fit and dry fit again before glueing anything. I do have a build video on my YouTube channel (see my signature strip). Anyway the model is far from perfect, but I’m happy enough with the result, it looks like a Valiant to me, any feedback is welcome. Mikro Mir Valiant by Neal, on Flickr Mikro Mir Valiant-3 by Neal, on Flickr Mikro Mir Valiant-5 by Neal, on Flickr Mikro Mir Valiant-4 by Neal, on Flickr Mikro Mir Valiant-6 by Neal, on Flickr Mikro Mir Valiant-7 by Neal, on Flickr Mikro Mir Valiant-8 by Neal, on Flickr Thanks for looking guys!9 points
-
Matchbox certainly chose some interesting and obscure subjects for their kits. Nowadays we have become used to seeing short-run unusual aircraft kits, but in the late 1970s this was a bit of a gamble to to try and avoid overlap with the established major UK kit manufacturers. This one came from last year's Telford Kit Swap and although its decals were a little tired, it has been a very satisfying build of something that I knew very little about. As you would expect from Matchbox, it assembles with no real issues although you have to take a little care with the separate nose sections and the split cowl. It also has a rather fragile undercarriage (cue the marvelous Matchbox stand). Replacement vacform canopies are readily available (and the previous owner included a set of these), but I'm not sure they are actually needed so I used the kit set instead. I built up the space behind the pilot's seat with plastic card to reflect the frame and head rest, plus added some paper seatbelts. Two nicely moulded aircrew figures joined the spares box. The tropical air filter is actually included on the sprue, but not listed on the instructions - I fitted it as an afterthought having seen it on reference pictures and as a result, it is a little lower than it should be. The wire aerial is stretched lycra thread. Hairy brush painted as always, using Humbrol enamels and top coated with Klear to apply the transfers, followed by a finishing coat of matt Windsor & Newton acrylic varnish. FredT9 points
-
I took a break from writing XML parsers for certificate handling and took some pictures, of which this is one: The RFI is here. Thanks for looking, Adrian9 points
-
Here she is the Academy 1:72 SB17 Rescue B17. Thank you to the Hosts and the Extension, a beautiful fleet of B17’s in this GB, I will definitely be building another!9 points
-
Morning Gals and Lads: Here comes the first one of this year (hopefully not the last). The good old Matchbox tooling of the Twin Otter depicting a Chilean machine operating from Antarctica circa 1985. I added the antennas, air scoop, wind screen wipers plus some safety ropes and struts for the skis. I leave you a few pictures: I hope you like it. Cheers Adrian8 points
-
Out of the box, including decals. Don't know why the Japan Ground Self-Defense Force chose to mimic the 1943 USN camo scheme, but they did.8 points
-
'Never fear, Hettie's here!' Didn't think I would make the Gallery, lack of modelling mojo at the moment. Academy's B-17E built as an early F to make a B-17 GRIIa FA699 of 251 (MET) Squadron, Reykjavik, Iceland, 44/45. Apart from the tailwheel collapsing during photography everything went OK!8 points
-
I'm glad they missed Laurie (as I'm sure you and a good deal of other folk are too). I totally agree Adrian, and if I'm being honest I'm not 100% satisfied with it now. Bill and I had a number of email exchanges to this effect. It is as per the kit instructions, but my old HU30 (it's full of bits anyway) will be consigned to Humbrol heaven to be replaced by the colourcotes offering. Roight up then. Not far to go now. I got the undercarriage assembled. I span the wheels in some grey pastel dust to dispel the uniform tyre look. Yes I likes it. However, in this game there is always a sting in the tail (quite literally – see below). And I noticed that when I inserted the rear turret (it was quite a tight fit), it opened up the seam. Proper pain in the rear (quite literally). Anyroad I filled the gap with a bit of cyano and Mr Surfacer. The finished off with some Nato black with a dab of grey. I will give it a dry brush of silver or white just to blend it in with the rest of the underside, although the harsh lighting brings out the contrast. I added some exhaust stains to the underside of the outer engine nacelles. The outer exhausts of Lancs were affected by the wing dihedral which resulted in exhaust stains underneath the wing, not above as per the other engines. Finally on its own wheels. Got the fins on. A few more bits and bobs to go, but almost, almost there.8 points
-
I am proud to add my 1/48 B-17 to such a great group of Flying Fortress builds in this Gallery. I would say stumbling onto this STGB changed model building for me, and I'm so glad to finally build a tribute to granddad, his crew and the 447th BG. - - -8 points
-
Well, I was determined to get her finished, and here she is. The Kitsworld decals went on really well, responded well with Micro Sol/Set. I fashioned a tailwheel strut but it collapsed during photography! Back to the drawing board 🙄 Overall a fair build, a lot of the tribulations were down to me and not the kit. It's a pity they have done the Dihedral way out but it is easily fixed. I ended up using the nose gazing from the Revell kit as I made a mess of the Pavla Vac-formed one! The glazing does not fit well but serves its purpose. Apologies to the B-17 'Buffs' for not improving/correcting the Carb'/Oil Cooler intakes, I'll do better next time 😉 Thanks for the words of encouragement and to the Host's for...….. well, hosting it! Well done to everyone on their excellent builds, hopefully 'Hettie' will fit in well 🙂 Davey.7 points
-
From the long stalled WIP "finished" out of the box - let's just not look too hard for stencils or for any pictures of details or the other side. No weathering or finishing touches as it was a crash project to get it in under the wire7 points
-
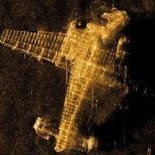
OK, this is where it stands today What you can just see in these pictures are the mine fixings in brass. These are part of my custom etching set drawn for this model and etched by 4D ltd in 0.020 brass. 4D can do relief etching meaning that they can etch half depth from and back, normally back for fold lines and from for relief such as rivet detail The plan picture shows the 3pdr platform etched and reinforced on the underside with 0.5mm ply Also in view is the inside of the wheel-house in need of finishing. The deck painting still needs further coats and cleaning up. The hull dazzle pattern (2nd attempt) is now looking OK and is waiting for the custom transfers before I can complete it and apply a matt cote As ever I'm in the middle of many jobs. I admire modellers who work in a straight line, I tend to break the process up, partly assembly of components, part testing painting etc meaning that at this stage it all looks a bit of a mess, as does the workshop. Both will clean-up in time I'm in two minds about finish on this model, but my thoughts are to attempt the sort of tired and slight distressed look that most pictures show. Weathering is not a strong suite of mine, but you only improve by trying. The wheelhouse is still removable but has now got most of its detail (wheel not mounted in this picture) Flag lockers mounted and paint in various testing stages, etched window frames installed7 points
-
Time for a Sunday morning update... As mentioned previously I've added tank numbers to the backs of the turrets - I've got plenty... Now I've cleaned all my mess off the turrets I'm actually pretty pleased with them... The tracks have been mucked up and need another gloss coat... I've finished cleaning one of the hulls... ...so one down - one to go... That's it for now - have a happy modelling Sunday - Steve7 points
-
Ever since I've been modelling, there has been one unwritten rule – no WWI aircraft. When I was a nipper it was probably because WWI was obviously an inferior world war and not as good as the proper one – I did Top Trumps, I know these things. This time around it has been because of the joint horrors of rigging, and transmuting plastic into wood using only the power of paint. I've grown up now (mostly) and it's finally time to put those demons to rest. If I'm particularly concerned about one part of the build I like to tackle it as soon as possible. As I can't rig the thing before I've built it, my next major concern is making a reasonable stab at the prop. I don't know if you have seen the work of a modeller going by the name of 'Bughunter'. He's a proper modeller and does remarkable things like make laminated real wood props. Obviously, not being a proper modeller I don't expect to end up with anything like he makes. True to form, I only have one type of wood laminate available, so I did a few experiments - using Tamiya XF-64, XF-52 and a darkish brown oil wash to colour the alternate layers. I've got a shed full of carpentry tools, but when I do the wood worrying, it's usually on furnitury sized stuff, none of those tools were suitable. So I carved (with a scalpel), filed, sanded and scraped the prop, I then used mineral oil to darken the wood a little and then splashed on a mix of 50% of X-26 (clear orange) and 50% X-35 (semi-gloss clear) to give a varnished look. Not perfect but I'm quite please for a first attempt. I might have another go if I can be bothered. I'm feeling quite smug because I've managed not to make a total hash of something else: Watching those 'how to paint wood' vids paid off, but I made two changes. Before I painted I filed the plastic to give it more of a grainy texture (only filed it because my coarse sand paper is in the shed and that would mean I would have to get off me rear end and walk further than the kettle). I haven't got the yellow ochre oil paint that was suggested as a base, so I used XF-55. In the morning I put smears of my available brown oil paints on a piece of cardboard, as someone on another site suggested (so the paint dries faster). After three hours there was a linseed oil slick around each blob. It then had a none to perfect coat of the lightest brown, then four hours later (testing it every two minutes to see if it was dry) I used my most scraggy brush to apply the other two browns quite sparingly. After that, I scraped it lightly with a small wire brush in the direction of the grain. I'll probably put some thinned X-26 (clear orange) on it when it's completely dry. There's a couple of other much smaller woody things, but that's the big bits out of the way. Anyway, if any of you are still awake and can stand another instalment, I'll see you next time. Thanks for looking - comments welcome Gorby6 points
-
After a week and two days of work, this model is finally finished. That's 3 Bf109s down, 5 to go..... And so many more to buy 🤣 In some of these pictures (especially of the underside) the matt coat shows up, it had only just been applied when I took the photos6 points
-
Finally get to post this! 1/72 Revell Tornado GR1 converted to GR4 using the freightdog parts and litening pod. This is built as ZA462 - "027" which was flown through the Mach loop by a friend as his last ever flight on the Tornado. As a thanks for letting me know the times etc, I built this, but have only recently gave it to him. Afterburners may just be for artistic purpose...🤫🤫🤫😉😉😉 lfa7 april 17-16 by matt wellington, on Flickr IMG_20181130_122531 by matt wellington, on Flickr IMG_20181130_122707 by matt wellington, on Flickr IMG_20181130_122846 by matt wellington, on Flickr IMG_20181130_122804 by matt wellington, on Flickr IMG_20181130_143453 by matt wellington, on Flickr IMG_20181130_143612 by matt wellington, on Flickr IMG_20181130_122744 by matt wellington, on Flickr6 points
-
Good old Academy kit, converted to Mk.5 version (because I love the 34 Squadron markings) - straight wing leading edge, fuselage vents configuration, reshaped tail cone, speedbrake etc. . Added some goodies - SBS detail set, Eduard flaps, Maestro canopy, Aeromaster and DACO decals. Thanks for looking Andrew6 points
-
Delighted to be able to join such esteemed completed builds. This was a scrap kit bought as part of a job lot on Evilbay sometime ago for pennies, decals kindly donated by Craig aka @modelling minion. The aircraft is a B-17C Flying Fortress Mk1 with RAF Coastal Command, servings in Nuts Corner, Northern Ireland 1942. Thank you for all the encouragement and to our hosts for a brilliant job. Finally good luck to anyone racing against the clock to finish, we are all behind you. cheers Pat6 points
-
With all the decals applied and sealed in with a coat of Quick shine gloss, today I turned my attention to weathering the aircraft. I started by mixing up some black and light grey to make a wash for the underside, this was thinned down and brushed over the underside. When it was almost dry I rubbed it down (in direction of airflow), and it has highlighted the panel lines as well as creating some shading varient's on the black. Then I created a dirt wash for the top /camo sections of the aircraft using black and brown. I then repeated the exercise brushing it over the top of the aircraft, and rubbing off when nearly dry. I also mixed a small amount of black and rust to highlight sections of the build. Once dry I added a little chipping, using Vallejo silver and a cocktail stick. Finally I turned my attention to smoke stains on the wings. Firstly blasting a little black from the airbrush, before adding some Curtiss grey. I'm really happy with how the stains have come out. I do have a question however, would there be smoke staining under the wings? I have looked online but can't find any photos, and would be greatful for a little help here. Now onto the stand.6 points
-
Well I'm on the home run with these now. Got the final coat of varnish on and am working on the canopies and fiddly bits. Here's the 18: The Cristal Clear camera windows are still drying. Meanwhile the 21 is also ready for its gunsight and canopy A few bits of tidying up around the lights and maybe a few paint chips here and there, and they should be finished in the next couple of days. The Mark I that also started this build morphed into a replica of the Batttle of Britain Flight's Mark II P7350, and I hope to finish that too before long. Justin6 points
-
Project Hub is not happy about the dying of the light: I had a bit of an experiment but I moved the mounds before it was all set so these haven’t worked. In another part of the forest, the torpedo is done, apart from the detonator whiskers on the nose: After watching the excellent video posted by Ced, it was tempting to start adding all the hatches and vanes of the real thing, but I resisted! I found a colour photo that supports the proposition that the aerial tail is unpainted plywood. It looks like it is towing a piece of 1960s furniture! Thanks for looking, Adrian6 points


.thumb.jpg.0bc57cb4bb3dec8e063e1951db6690c2.jpg)


.thumb.jpg.1b7e0b29f0d6300d78c7f03e6d716b61.jpg)


This leaderboard is set to London/GMT+01:00