
Leaderboard


Popular Content
Showing content with the highest reputation on 24/01/19 in all areas
-
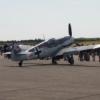
This aircraft was flown by Captain John England while he was with the 362nd FS, 357th FG. He survived WW2 with 17.5 victories and added another damaged to his tally in Korea. He as killed attempting to land in bad weather while low on fuel in November 1954. England Air Force Base was named after him. The kit is the older Hasegawa 1/72 offering. It has very shallow wheel wells, but otherwise the detail is nice and the fit very good. I chose to paint the invasion stripes and the checkered nose because I hate decals that have to wrap around or hit areas perfectly; they NEVER do.33 points
-
A Flock? Whatever the name for the plural is, lol Anyway, built for a GB elsewhere. As I live on RAF Scampton I had to do a Red Arrow. Unfortunately the one kit in 1/48 with the current tail is the Hobbyboss one. The only good thing I can say about it is that it fits together well.... I've also wanted a TWU and CFS red/white aircraft, so the scene was set. The TWU aircraft is the Italeri kit, and the CFS one is the older Airfix kit. Decals for these two came from an aftermarket set, and the seats on all three were replaced with resin ones of the appropriate headbox design for their age. DSC_0837 by Paul Carter, on Flickr DSC_0827 by Paul Carter, on Flickr DSC_0830 by Paul Carter, on Flickr DSC_0829 by Paul Carter, on Flickr DSC_0823 by Paul Carter, on Flickr DSC_0825 by Paul Carter, on Flickr DSC_0826 by Paul Carter, on Flickr DSC_0832 by Paul Carter, on Flickr DSC_0836 by Paul Carter, on Flickr DSC_0834 by Paul Carter, on Flickr25 points
-
Here we have my first model constructed as an adult. I just recently picked up a cheap knockoff airbrush and compressor combo (sub-$100 - I'm sure you know the ones), and so grabbed a couple of cheap kits from the local hobby stores to practice. The Achilles heel of this brush really seems to be fine lines - my first attempt at preshading was a bit of a struggle. Everything is OOB apart from some not-quite-to-scale masking tape seatbelts. Lessons already learned include that I should just fork out the $5 for a canopy mask, and that getting convincing 1/72 cables from the ol' sprue stretch technique is not easy! So, hit me with all your best criticisms, and don't be kind! I'm really trying to improve my technique here. Any feedback is greatly appreciated, and thanks for having a look.23 points
-
Probably my favorite Vietnam era jet. This was a simple easy build. Very enjoyable. This is my VF-162 Hunters F-8E Crusader.---John21 points
-
I built this International Orange U.S. Army Chickasaw based on a photograph of the real aircraft stationed in Thule, Greenland, sometime in the late 50s. Please enjoy! Decals came from my storage bin. (Italeri makes some of the best helicopter kits in the industry!)19 points
-
A run of not-great luck (or just ol' January fulfilling its normal role as the butthole of the calendar year) has culminated in Winston vomiting like it's his full-time job (don't have kids), and I had to leave work early this afternoon when Mrs P became overwhelmed and began sending single-word all-lowercase messages, never a good sign where she's concerned. All fine, I'm sure, I only have to get on an airliner for a five hour flight to Las Vegas for work very very very early on Friday, so it's not like the flu would be a serious inconvenience, who doesn't like uncontrollably vomiting while trapped in a steel tube five miles up? There's been a lot of handwashing and Lysol wiping of surfaces in the house today. I'm turning in shortly, but I masked and sprayed one Hurri with blu-tac, then sprayed the Dark Green, then decided this was all, honestly, way more work than I wanted to do, so I just sprayed the other two green and'll use the Arma paper masks in the fullness of time, because why go out of my way to make life even harder for myself. So at least we'll get to see those paper masks in action, though probably not before I leave (at 3AM on Friday) for Midway airport and thence to the City of Sin, where I'll be running around taking photos and hopefully getting word that the social media policy I wrote has been approved by our antediluvian board of governors. Maybe they'll give me more money? (No, they won't.) In any case, I'll have a smallish per diem for food, and if I'm not barfing my guts up nonstop this weekend, I'll at least eat well through Tuesday, when I fly home. Wish me luck, say a prayer for me, sacrifice a goat, whatever you have to do.18 points
-
Hi guys! Just finished off revell's tornado f3 1/48. Challenging little build with the usral flash and fit issues! Lots of dry fitting. but was impressed with the detail in the kit. Was built strait out the box, with just resin wheels and jet nozzles added. Had an issue with a decal on the tail, enjoyed the build so much I've orded another kit to fix that problem. Thank you for looking hope you enjoy! 😊 Beezwhat16 points
-
This is from 2018, I did this as my first Hobbycraft F-86 just before the Canadair Sabre 6 Golden Hawks. It's Korean War Ace Clifford D. Jolley's plane from the 335th FIS- 4th FIW. It's a little tricky getting the cockpit right but a veteran of several Hobbycraft Sabres clued me in. I ended up building 3 Hobbycraft Sabres in a row, the F-86E, Canadair Sabre 6 and a Canadair Sabre 5.---John15 points
-
I needed something to get my mojo going again. My airbrushing skills, etc., have be eroding. Something simple that didn't get dragged down with overdone scratchbuilding, which for me always takes the wind out of the sails at times. This kit was in the stash and looking very smart with the fine details. Building it was not a total pleasure, the fitting of the nose cowls and landing gear was not without frustration. But happy to have a kit completed. Good from a far, but far from good is what this reminds me but happy to share. My airbrushing techniques evolve and now I am finding thinning my paints more than the usual recommendation works well for my style. At times 50-80 % thinner to paint for Vallejo Model Air. It also keeps the paint from hiding the smallest details. The decals ended up breaking apart in spots, another frustration. Comments always welcome, and I will apologize for the photo took on a bit of a greyscale effect which I don't understand. Craig15 points
-
Hello everyone, Further to my "Three Spitfires against Japan" post from December I present another KP 1/72 Spitfire Vc Trop! This time the model depicts BS201 ZP-Q of 457 Squadron RAAF as based at Livingstone Strip south of Darwin in 1943. This particular aircaft had a long career with 457 from the end of 1942 until early 1944 when it was damaged in a landing accident and subsequently converted to components. Flight Sergeant John R. Jenkins was flying BS201 when he scored one of his two confirmed victories on the 28th of May 1943 over the advanced airstrip at Milingimbi 270 miles (440km) east of Darwin. Paints are Humbrol throughout, the markings were assembled from various DK Decals sheets with the stencils by Techmod with a few kit items substituted, cannon barrels are by Master and the DH prop came from an Airfix Spitfire Mk I kit. A group shot representing the three Squadron of No. 1 Fighter Wing RAAF: Comments welcome! Mike.13 points
-
The painter at 217 Squadron had a variety of styles for his “MW”s, with the middle “v”s being either full length or half height, pointed or cropped. Needless to say, although my Xtradecals code sheet contains quite a few variants of “M” and “W”, none of them match the ones on my chosen subject! So, out with the tape: I have blocked out the code letters. The dividers help me to check that heights and widths are equal and the end of the ruler provides a handy right angle so I don’t get italics. All the verticals: Diagonals: Get your “R”s in gear: And done: These are pretty close to the real thing, and closer than I could get using aftermarket decals, although the stroke width could have been a tad narrower in retrospect - less than a pencil line thickness so it’s beyond my modelling accuracy threshold! I’ve given them a light sanding to remove the masking ridges and I’m resisting the urge to do more corrections until I have got the roundels and serials on so I can see what needs fixing in context. Thanks for looking, Adrian13 points
-
It has been few days since I last posted any progress as there has been a flurry of MVS duties to attend to which have left me utterly exhausted. However I bit the bullet last night and decided to get as much of the remaining brasswork out of the way as possible. I don't really like working with etched brass any more than I have to; am I the only one? For the instrument panel I am using a set from a company called Hobby-Model which has much better detail than the Eduard set. I think this was anther of my bargain bin finds and although deigned for th Italerii kit, seems to fit the Airfix offering just as well. I began by gluing the back plate for the instrument panel to the front cockpit bulkhead and then knocking up a panel for the throttle quadrants to go below it. All the instrument panels were removed from their fret, cleaned up and have been given a black primer coat which s now curing. The film that forms the instruments themselves has had it's rear face painted white. A coaming for the instrument panel was cut out from .10'thou plastic strip, glued to the front bulkhead and faired in. A quick heads up here. I have been puzzling as to why the front fuselage parts are a bit reluctant to mate up properly and finally realized that the front of the fuselage where it meets the front bulkhead needs thinning down somewhat. This done, the two halves fall together very well. This is going to affect even those building out of the box in the same way that I am not. I keep forgetting to mention that I have decided to go with the blanked off extra fuselage windows on the starboard side. These have very prominent frames and these have been made from .10 x .30 'thou plastic strip. A shout out here for Mrs Martian's bear Beau who once again rides to rescue by holding the fuselage still while the picture of the windows was taken. Much better than me trying to hold the model still in one tentacle, while trying to take the picture with the other and generally making a mess of things. I still have the remains of those stringers to do, side gun mountings to knock out, rudder pedals and seat belts to fit but I think one more session should see the construction stage of the fuselage internals compete. We will have a bash at the engine nacelles next. I now have to have a think as to how I can make this bit more entertaining for you all as there was not a great deal of detail in this area on the original aircraft. Mostly just plain painted wood with a few strengthening strips. Still I have no doubt that some that are following this thread will find some way of enlivening that particular part of the build! Thanks for looking Martian 👽12 points
-
This is my Hobby Boss UH-1B Huey "Gunship". The Hobby Boss kit is an easy pleasant build that only took 10 days, start to finish. But it had a little help. In addition to the basic kit I used: A Bilek color interior. I had never heard of Bilek before and I don't know if they have a relationship to Eduard, but it looked just like and Eduard set. Eduard Mask Print Scale decals. I have used Print Scale decals in the past and been happy with them, but this set and the last one I used were problematic to the point of almost being unusable and I will probably stay clear of them in the future. They are very thin, which is good, but they have no body and stick instantly. This means that once you put them down you have no opportunity to adjust them. If you try they either tear apart of roll up into a ball. This is especially true on the lettering part with clear background, and I had to get the "United States Army" decals from another set because of this. Plus as an added bonus they were badly misregistered. see the tail serial number which should be all black. Mini World ammo belts. The kit gives you several options for armament and I used the M134 minigun. I couldn't see not having some ammo Italeri main rotor and mast. The Hobby Boss main rotor was just a little too simplified for my tastes. As it tuns out they are both 4 scale feet too short. So on to the pictures: Next up is the AZ Models' Douglas X-3 Stiletto. See Enjoy.11 points
-
This one is being posted over at Large Scale Planes. So you may have seen it there as well. This is my fourth build of this model. I first constructed it when I was a teenager and have had a kinky sort of love affair with it since. While only mediocre in terms of fit and finish, the designers went all out in providing fantastically accurate cockpit, interior and engine detail. (At least to the limits of what was common in the early 1980's.) The chances are good you know somebody with one of these in their collection: The model depicts the 1973 release of the airplane. But I'll be doing my best to replicate the interior of a later 1977 version. Later, 1977 interior: This one is being constructed for a friend and he has a specific request as to colors. The bright blues would not have been my first choice. He also wants the ship depicted in flight with doors and cowlings closed and a pilot figure at the yoke. Thus, I won't need to go crazy with engine detail. The desired scheme but with a US N-number: Not perfect, but close. Sticky clear sheet used for instrument "glass". More detail to follow. But I've got to start with setting up the pilot figure with a more realistic posture. Cheers, gents!11 points
-
This is my bombay build from scratch10 points
-
Even one is too many.9 points
-
My next project is serial PZL P.50a, unfortunately this series was not completed before the war. A few unfinished aircraft found Germans in one of the parks in Warsaw. There are only a few pictures of non-finished Hawks. My model presents a hypothetical airplane fighting against Soviet aggression (Soviets attack on Poland 17.9.1939), somewhere near Moscow in the summer of 1940. The story of PZL P.50a https://en.wikipedia.org/wiki/PZL.50_Jastrząb8 points
-
Hello, This is my completed 1/48 Hasegawa A6M5b Zero Type 52. The kit was built OOB with the exception of PE seat belts. I lost the small little pieces on the wings (don't know what there called) so I had to scratch build those using Tamiya epoxy putty. I also made the two wing lights using PVA glue as the kits lights protruded out too much and didn't fit properly. It was painted with Humbrol enamels and Tamiya enamels. Weathering was used to highlight details and give an overall clean aircraft look. Panels lines were highlighted using Tamiyas panel line Accent washes being Black and Dark brown and also by using a copic Multiliner Pen 0.02 Black and Grey. Other washes used include Vallejos Desert Dust on the cowling, landing bays, underside of the flaps and the wheels and also Vallejos dark grey and black on the inside of the cockpit. Presading was done with Tamiya XF-1 and post shading on both top and bottom by just adding some white to the original colour. Also finally I used Tamiya weathering master to create some dust effects overall on the aircraft. As always I am not interested in historical accuracy but the build and finish, so with that in mind am happy with the end result. I hope you all enjoy the photos and the video (which takes quite some time to do up) Photos8 points
-
4 years on the shelf of doom, I used more sheets of decal paper in a trial and error process of getting the shapes right... I never succeeded, I pulled this off the shelf of doom a few days ago, burned another 3 sheets of decal paper then said enough is enough, this is good as it is going to be.. at least it is finished. 1/72 Airfix modified. Pictured in model form is the Department of Civil Aviation HS125 flown by 2 examiners of airmen about to land wheels up at Avalon on 24JAN19678 points
-
Thanks Brock Close inspection shows lots of tiny micro-bubbles in the resin: on Flickr Worried that the wash would highlight them, I used Bill's tip and wiped PPP over the surface with a wet cotton bud. That done I started trimming and cutting the hangers. There's a step on the bottom of each one that makes them sit proud of the ledge on the main bay: Are they supposed to sit proud? Who knows… not me for sure and the reference photos don't show them that well. They're angled metal too rather than solid blocks. Ho hum, stick 'em in. Dry fitted to the bay, I then tried two washes, Citadel Seraphim Sepia and Nulm Oil: I'll see what they're like when they dry.8 points
-
This is the original (1958 mould) Airfix fuselage combined with the Mbox wings and tailplanes. Why? Well, the Airfix wings are horrible and the Mbox ones, which I had spare, have a wonderful representation of the fabric-covered geodetic structure. I adjusted the tailplanes, elevators and rudder to the shape fitted on later Wellingtons. She represents NC425 which I believe was from No7 Air Navigation School based at RAF Thorney Island c. November 1948. You can find a pic of the original at https://ww2images.com There's a few bits I am not too happy about - notably she's definitely too shiny, the bronze exhaust rings are too dark and the Mbox spinners are a bit too pointy - but on the whole I am happy with her and she looks so pretty in those colours compared to wartime camouflage. David7 points
-
So I spent the morning and part of the afternoon filling seams and sanding. I then attached the wings and vertical fin so I would have a frame of reference, and then attacked the intake problem. I first removed the pieces from the front of the intakes. Then I did some sanding on the top of the left intake to lower it and the bottom of the right intake to raise it. Luckily the plastic is thick enough that it can take a lot of sanding. I then repositioned the parts at the front of the intakes so they looked even. It will still need mor filling and sanding tomorrow when the glue dryis, but I think it looks a lot better. Tomorrow I will finish with the intakes, blend in the wings and rudder, and if I am lucky get the stabilizers and landing gear on, and maybe give it a coat of primer. 🤞7 points
-
Getting the cockpit frames on, one or two at a time: The canopy is still eerily clear for me. Thanks for looking, Adrian7 points
-
Time for some paint and decals. I started out with the yellow surfaces and then the RLM 70/71 on top. Theres a few areas i would normally redo. The rudder is a bit patchy and theres some yellow over spray. But in this case i decided to leave it. This was re-done in the field over the original Yugoslav scheme. And the Germans did not hang onto these for long as they were soon handed over to the new Croat air force, so i decided to leave it as it was. Paints are all Xtracolour and are rather shiny. hen it was time to add decals, fit the engines and sort the undercarrage. These Kora decals go down nice but are delicate. The sheet is one decal so you have to trim each one to remove the folm. But in handeling the sheet i nocited some of the black coming away from the decals under my fingers. So i had to be extra careful. The portion of decal over the lower side windows has been cut but i will remove that with the masks after the flat coat which will hopefully prevent damaging the rest of the crosses. Got the wheels and exhausts to finish off and fit, them some exhaust staining and light weathering.6 points
-
Brass in Pocket... In this post I'm 'gonna use my, my, my, imagination...' to do some new stuff - for me at least - with brass... Carpathia needs a rudder and I think that while the hull is split in half is the best time to add it. Mark up and cut out the relevant 'rudderish' bit, as shown below, and cut out the shape with a good strong pair of scissors or a nice precise set of tin-snips. Now chisel out a rebate for the brass piece to sit in. Here's the rebate, or 'pocket' cut out... and here is the 'brass in pocket'. Held in place very firmly with two-part araldite. Here's the effect when the two halves of the hull are dry-fitted together. And now to the bow. I was a bit concerned that the stem of the bow was not visibly sharp enough to be convincing but that if I carved it sharp enough the wood would be vulnerable to chipping and denting on the leading edge. So here I have essentially repeated the process at the stern except with the rebate cut at the very front of the ship and the brass sheet inserted so that a thin edge is exposed at the tip of the bow. In this case the stem will be made of brass embedded on the centreline of the ship. I'm hoping that the metal will be both stronger and able to hold a shaper edge than the wood. And now the two halves of the hull are ready to stick together. Just glue 'em up and stick 'em together. Simply using PVA for the wood and more araldite for the metal-to-wood contact. Let it sit in the clamps for 24 hours. Done! One hull. 👍 Note how the paper on the deck stuck on with spray-on photo adhesive has survived the whole process. That cheap spray-on adhesive is very impressive! So that's that - a bit of brass work completed. If you look closely at the bow you can just see the metal leading edge sticking forward of the wood. It still needs a bit of cleaning up but I think it worked well. Brass is a material that I have only discovered relatively recently and I am really enjoying finding out some of the great things that can be done with this strong, affordable, available and highly user-friendly modelling material. I enjoy using brass and now keep some 'in my (proverbial) pocket' at all times. I could tell you that I'm now an expert in the use of brass, but if I did I would be lying and I'm sure you would all see me as a Pretender. Best Regards, Bandsaw Steve6 points
-
Tried to plate it but even with this simple shape it became problematic, so I've filled in the bow & stern sections with filler. Filler of choice Isopon P38 Easy Sand. This is a car body filler which adheres well to plastic (I normally sand the the area of contact) metal etc. As it says on the tin it's easy to sand, so you're sanding away your model as you blend it. Dries in 15/20 mins. All the stanchions in place. Dividers used to assist in getting height right (they vary from bow to stern). Behind you can see the sections used to form the stanchions Hull skins on over filler Next shots should show every thing blended in. Tip don't apply to much filler at on time, lot easier to build it up in stages. Thanks for looking in Kev6 points
-
More careful glueing. The front of the bay is aligned and glued now with some thinned Humbrol filler in the small gap: I learned from the Humbrol site that you can thin the filler with Liquid poly and this is my first try. Looks good so far. By the way, I have been checking the wing root join and it looks OK so far (famous last words…)6 points
-
Thanks Martian - I think scratch is probably the way to go (sorry Alleycat) Keith you may have saved yourself - see how you feel when she's finished! Bay dirtied: I couldn't think of any reason not to glue the wings on, so I started with the bits where it touched from and back: You can probably see where the sides don't fit - I'll work my way down those, checking the wing roots. Carefully. Back here: @stever219 commented: "Also aircraft pre-wingtip ESM pod fit lacked the vortex generators on the outer wing panels so they can come off.i. In their place however you will need to install a long shallow fence just inboard of the outer end of the aileron, and running for most of the chord of the wing ahead of the aileron." Steve I can chop off the VGs but do you have any pictures/details of 'the fence' please? Ta.6 points
-
I was going to sacrifice a goat, but it jumped off the balcony. Same result though, does that count? Good luck! Ian6 points
-
Hiya Folks, Another superb pre war colour film,...... especially interesting for those building their Airfix Blenheim`s,..... check out the colours, especially the undercoat primer!! https://player.bfi.org.uk/free/film/watch-bristols-industries-1939-online?fbclid=IwAR0MPvujjz4qrcWkJTzfKRrC09UlxeLS9NzQ3BIFYgJPS58UNkjfXEgeQ_0 Probably only available for those in the UK,..... sorry,... not my doing. Cheers Tony5 points
-
I did this at the same time as the F-105F a few months back. It's OOB using decals from AOA for Devil 505 from the movie Flight Of The Intruder. The movie was so so, the book was GREAT!!!!! I only differed by painting it the real gray over white, the decals said it was two toned gray, they were basing colors on A-6Es they used in the movie, totally wrong colors.---John5 points
-
Did this one last year based very loosely on a black and white photo I found. It shows members of the Guards Armoured Division meeting up with the American 101st Airborne in Eindhoven during Operation Market Garden. I used a Tamiya Cromwell tank (I know the photo shows a Centaur!) along with figures from Tamiya, Masterbox, Paracel and various resin heads. Cobbled street base from Great North Roads.5 points
-
One of my modelling goals is to model every aircraft flown by BA in the Negus and Negus livery. So far I have completed 6 and have recently been working on 4 more. Here is the first of these 4 a Boeing 737-200. It is the Authentic Airliners kit with 26 decals, paints are Halfords Appliance White, Racking Grey and a custom mix of Tamiya X3 Royal Blue and X16 Purple. Windows, windscreen and landing lights are naturally from Authentic Airliners Decals. The natural metal on the engines is High Shine Metallic Decal also from AA Decals. There was a break in the rain today so I was able to dash out and take some pics. Thanks for looking, any comments or criticisms welcome! Cheers, Ian5 points
-
I named my cat after Macbeth in a roundabout way.... Let me introduce Spot Named so that when he is waking me up at 3am on a weekend I can misquote Shakespeare at him..... "Out dam Spot!" Gondor5 points
-
Thanks CC, Beau says he is most flattered. As to a convenience store, many a true word and all that. Apparently, when the first Italian bombers were shot down during the Battle of Britain, fresh bread, large cheeses and bottles of wine were found on board, earning them the nickname "The Chianti Raiders". Another interesting fact from your friendly neighbourhood Martian 👽5 points
-
This thread is a little slow at the moment as amongst other matters I've had an extra dog, a Beagle, (two brain cells and refuses to use either one.) to look after for the last two weeks, due to a family member in intensive care. What do you call someone standing, shouting, in the middle of a field.. A Beagle owner! My vet told me this one and she should know. In the meantime I'm drawing up the various propellers and differing details. John5 points
-
Morning folk's,my heart sank when I read Colin and Threadbear's info on the armour plating however with a bit of scraping,sanding and rescribing it look's OK.U/c is fitted and as you can see the panels with the window and door are fitted there are a few gap's to fill but they fit flush with the fuselage which is good news,after five week's of flu and general Mojo loss this kit has got my old enthusiasm back! And here taking a bow is my Monogram Skyraider built about five year's ago I must get round to a Vietnam "Sandy" in the future.5 points
-
Thanks Colin, I think I may have found a picture of the seats you mean. For the roof, I'll replicate Hendie's, which looks greaat. About the nose...it's a bit early now, I'm concentrating on theinterior, as I'm travelling back to the UK and any external detail (and on a Wessie there are loads of them!!!) could come off while travelling. I've got the 4+ book and it looks great! Now a small update. I haven't had much time, but I painted the landing gears' legs, using the same procedure: black first, then light grey, Future and Tamiya panel lines accent black. Resin wheels will be added once avaaliable. For now I'll keep those supplied with the kit. As I'm happy with th semi gloss finish, I decided to remove the masking tape from the windshield.I also dipped the canopy in the Future and let it dry under a glass. I also painted the front airbrakes' deflectors, the gear's and electronic bay's doors , but I didn't take any pictures. They cqn be seen at the base's front. Here I just dry fitted all small items to let her rest, waiting for my coming back. That's all for now. I'm flying back to Cambridge now and I brought with me the Wessie and.....another mate....let's see what I can do in the next few evenings. Ciao Massimo5 points
-
If something doesn't look too good on close inspection, then don't inspect it closely is what I say. I also say:- If in trouble or in doubt, run in circles scream and shout. Just saying.5 points
-
@dogsbody I did some screen grabs of the film, as there were some lovely scenes and I thought they were worth saving for posterity. In the factory. Note the primer colour. It seems to change appearance somewhat, depending on the lighting. ..and some painted examples. It's interesting to note that both A and B type fuselage roundels were being applied simultaneously. ..and just for interest, a few other types that (very) briefly appeared. I might go back and try to get a better grab which hopefully shows the Tiggie's wing registration better. Hope this helps, Mark.5 points
-
That's a good question (and remember there are people who've made more Spitfires than me), I suppose I just like making Spitfires.5 points
-
Progress report. Fuel tanks fitted. HSS in the form of Tamiya AS12 was sprayed overall. Wing tips masked and painted with a Revell red. It's had a few douses of Klear and ready to receive stickers. Stuart5 points
-
I don't usually do WIPs, but since this is a new kit and it has received some negative reviews: http://www.kitreviewsonline.de/douglas-x-3-stiletto-im-massstab-172-von-az-model-az-7597/#more-41416 I thought I would do one so that those are interested can see my trials and tribulations. First the sprues of which there are 2: Just ignore the Sidewinders, they are for a what-if boxing. There isn't a lot of flash but there is some and it is in awkward locations, like the slot for the wings Next the transparency, which is...transparent: Decals, which look really good: Finally the instructions, they are simple and some placement is vague but they are adequate Following the instructions I assembled the cockpit, main wheel well and engine exhausts. Then I tried a dry fit, and nothing fit inside the fuselage. Not the wheel well This is after I had already done some sanding. Not the cockpit And not the exhausts, which I didn't get a picture of. So out came the grinding tool and sanding sticks. In order to get the exhausts to fit I had to do major sanding to them and some grinding of the fuselage. They are mostly hidden so it isn't too bad. So after that I was able to button it all up; The wings are just stuck in place and not glued, They are going to need some more work before they fit correctly. The canopy fit is OK, but there are gaps that will need to be filled That's it for now. Next will be seam filling on the fuselage and then attaching the wings. That will be in a couple days since I have another project to finish first. Thanks for looking.4 points
-
UH-1N Twin Hueys of the 1st Special Ops Wing at Red Flag 81-1, Nellis AFB, November 1980. 69-6604 69-6642 69-6653 69-6654 Thanks for looking, Sven4 points
-
You see a Karmann Ghia park by the side of an Anglia and say the Anglia's gorgeous! Has the world gone mad (well yes I know it has, but I just said it for effect). The design of the Anglia is just wrong, and by the look on it's 'face', it knows it.4 points
-
Sorry, Dan, I didn't follow this hint (I didn't see why more faithful measures and color stripes would affect negatively my build): No offense... Cheers Olivier4 points
-
And the black! A few touch-ups needed.4 points
-
Greetings to all. This is my QANTAS L-749 Constellation, based on the Heller kit in 1/72 scale, completed around August 2018. Apologies for the somewhat sub-par photography - my wife would not be happy if I took on another hobby! I made the following modifications to the kit (which is very basic): Providing the engine cowls with the correct topside and chin vents, using scrap plastic and filler. Removing the engine cowl vents (which were based on the early multiple exhaust discharge configuration). Installing new scratch-built cowl vents and exhaust pipes (one on each side of engine) – fashioned from Evergreen styrene and rod. Altering the nose contours for a more accurate look. I feel that the kit nose slopes downward too steeply from the windscreen – it should be less of an angle and a little more bulbous. This was corrected cutting away the upper nose section and grafting in un-used nose parts from an Airfix F-27 Friendship (along with much filling and sanding). Main undercarriage wheels are resin replacements from Fisher Model & Pattern (with wheel hub covers from plastic sheet). The cuffed propellers and spinners are resin-cast items from Fisher Model & Pattern All the passenger windows were filled and the decal sheet provides the correct spacing and layout. Headlights in the nose cone (which is moulded on the clear plastic sprue) are enhanced from behind; with a sequin from my daughter’s formal dress (very successful) and a further piece of clear sprue (less successful). All aerial masts and pitot tubes are scratch-built from plastic and/or various types of wire. The QANTAS decals are aftermarket, Sheet CDS-049, from Hawkeye Models Although not a flawless build (far from it), I'm reasonably happy with it and hope some of you like it too.4 points
-
Before cutting off the trailing edge of the body, I attached the wheel well to the body with Milliput. The first application was done from the exterior to ensure correct positioning and alignment. The second application of Milliput was done from the inside. This adds considerable strength, rigidity, and weight. The third application was made from the outside, after the well was securely fastened in the correct position. With the body strengthened, rigid, and with the well positioned correctly, I cut off the tail. The surface of the rear deck should be flush with the outer edge of the well. The well will be shallower at the top and deeper at the bottom. I left extra material on the well and on the trailing edge of the body so I will have some latitude as I attempt to make everything fit correctly. It will be more work but I was not confident I could make more precise cuts. The new shape shape of the body - a wider and flatter top deck with sides that flow slightly inward down to the frame- is slowly coming into focus. The photograph below shows how much work will be required to cut the body back so that the panels will flow to the outer edge of the well.4 points
-
Cheers Keb. Sorry, shop closed. Cheers John. Forgot to post this earlier. A quick placement of the funnel to see how it looks. The 'funnel' deck still needs some extra stuff in the form of a ladder and davit in this view, a central mast and on the other side, another vent and a marine life raft. Stuart4 points


.thumb.jpg.eca0c14e328767d0864cd6db01ca9ccf.jpg)


.thumb.jpg.1cf6eaff267bfe9c24bacc49003b9a6c.jpg)


This leaderboard is set to London/GMT+01:00