
Leaderboard


Popular Content
Showing content with the highest reputation on 18/01/19 in all areas
-
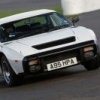
Hi guys. I stumbled upon this snippet of an article in Aviation Week and Space Technology of The Royal Norwegian Air Force's F-16 anti-ship capability and quite fancied replicating an F-16B equipped with some Penguin Mk.3s. Quite an interesting and unique capability among the four initial European Air Forces operating the F-16A/B models. After a lot of work I finished it these last few days. F-16B '691' in 1989 when the Penguin Mk.3 missile became operational on 334th Squadron at Bodø just before the end of the Cold War. This one has a filter from iPhoto that took my fancy, The pictures are a mix of indoor and outdoor, the cold evening's low light level gave this iridescent look to the canopy, not so appropriate for this early B (more MLU/D) but I liked the way it looked! Thanks for looking and any input! Cheers, David.48 points
-
This is my latest F-4EJ, using the 1/48 Hasegawa kit, it depicts an aircraft belonging to 306 squadron, 1982. Andrew32 points
-
New Year Resolution complied with - my Walrus finished at last, not quite before the Hunter arrived but not long after. I got stuck last year on a couple of issues. The first was the finish - I started to get debris in the paint. I finally tracked that down to poor brush hygiene with Xtracolor paint. There was a quantity of paint still in the brush which remobilised every time I used it, giving 'hairs' of paint. I've since given it a really good clean and it's much better now although still not perfect. The other was the rigging. In 55+ years of modelling I've never rigged a biplane before and I finally decided on 8 gauge guitar wire following a tip on this forum. It's not perfect but shouldn't go slack with time. Ditto the finish - it is what it is and doesn't look too bad under a coat or three of matt varnish. It's from the box apart from Eduard harnesses, the rudder mast (curiously omitted by Airfix), and the window spray deflectors, fashioned from the trailing edges of the unused flap parts, The paints are brushed Xtracolor and the decals from Xtradecal. I wanted a scheme with a clean demarcation between the upper and lower hull colours and as an FAA scheme, AA5R was the obvious choice. Thanks to ex-FAAWAFU for his hugely helpful WIP thread. The photo of AA5R shows light bomb carriers so I used the kit practice bombs and also fitted the other bomb racks. The photo also shows the bracing wires clearly but no antenna from the rudder to the top wing aerials so I left that off. It's a brilliant kit and the struts are more-or-less self aligning - congrats to the new Airfix. Thanks for looking!27 points
-
These 1/48 resin models gave me a lot of trouble and I nearly tossed em out several times, I have done as much as I am going to on them. I'll push it to back of display shelf. I might cleanup the antenna fairing on cockpit roof one day19 points
-
Hi folks, this is the Arma Hobby kit updated to one of the Finnish machines using SBS Decals. The kit is rather nice, but the fit leaves a lot to be desired for a modern kit, so lot dry-fitting, scraping, beveling etc. was the order of the day. Anyway, pretty good kit overall, but one is enough for me for the time being. Cheers, Libor17 points
-
Hi folk's,an armour build is becoming a tradition for my first finished kit of the new year,built for the Panzer iv GB I wanted to do a different finish to the usual paintwork on these mid to late war tank's,I poured over endless photo's and found one of a whitewashed Russian front machine with it's side armour still intact the only variation I made was showing the I.D. marking's showing through the wash.Been interesting after year's of trying for better paintwork on my model's to try and represent something badly painted as these machine's were in the field.Thank's for taking the time to look.15 points
-
My Mrs picked up this Zero when they were in Aldi for £4.99. I made my first one of these in the '60's when I got an Airfix Zero and Hunting Jet Provost for Christmas and not built either since. This modern version was a lovely kit that went together well (as well as I can manage anyway!) with a nice set of decals too. Built it up in a few hours over Christmas in between the turkey! Anyway here it is....14 points
-
Yes, we are Here we go: all the hanging out bits glued in with CA first and Tamiya Green Cap then to secure them in place On her legs Pitot and canopy in place Fitting the canopy was tricky - I had to shave off some more plastic from the back, as I already did prior to painting it. Anyway, here she is You can still see something of the interiors ... I'm calling this completed. A proper RFI will follow in a few days, meanwhile all comments are welcome Ciao13 points
-
Thanks Simon! The stars do seem to be aligning in that direction, don't they? 🌠🚋 and Scorpions, Michael Schenker Group, Judas Priest, AC/DC Blue Oyster Cult et al. ...followed by raves in the 90s. 🥁 Oh! How we used to laugh back then musing on how deaf we'd be one day on account of it all! All together now to the tune of Flashdance: 'What a feline! Doodoodoodoo-doodoooo....' 🎶 You are - as ever - too kind P. It's a tribute I guess to the original designers of the kit that well into the following century it still has ardent fans, despite more recent mouldings being available. You can't underestimate the role of nostalgia of course, in re-making something that your 10-year old self built. You....you're not a Timelord - are you? 😄 I do hope you get a chance to settle in to the sanctity of your worksbench again soon! I've two words for you. 'Nut Cups' Always knew those aircrew had cojones, but was unaware til now of cabin equipment to support this idea.... Thank-you Martian. Apparently people sending bottles of Plymouth Gin to you through the post is an old folk-cure. I read that somewhere.....probably. Большое спасибо Nikolay. When he sits on the window-sill at night and suddenly moves, it's like the darkness comes to life! Thank-you on both counts Roger! As a teenager I asked my grandad (from whom this as well as a dodgy back are genetic gifts) what it was like going deaf Bill. His answer (through the ever-present cloud of Benson & Hedges smoke)? 'Peace at last...' The BÄRÖNSÄ three-piece will be available at a metaball-hangar near you this Spring! (Nut Cups sold separately.) Help! I'm trapped in an episode of 'The Men from the Ministry'! Had the first pic already but that second one is a zinger Max - But what about when the catwalk supervisor shouts out: '...and turn and flounce. No darling, that's a mince not a flounce.....' So grim. Sorry to hear that. Loss of sight is beyond contemplation for me. I had to laugh at that revelation Simon. I similarly worked in theatre sound up to the mid-90s to pay the bills and on more than one occasion freaked out a director by saying - after the opening night of course - 'I'm sorry, that's not my good ear, let me just turn my head.' when being told of changes he wanted... 'You 'um it and I'll play the bongos along...' Blimey Ced. Can you pick up Air Traffic Control as well? 👂 I'd like something similarly discrete to tuck into the lugs but some of the prices (in this neck of the woods at least) are positively ruinous. I fear I shall have to go for the cheaper executive model: Most embarassing on the bus when it's 'Carmina Burana' playing.... 'Never read on a tightrope' is the moral here... Yes. You suddenly buying a shedload of brass and taking up soldering! 🔥🔥🔥🔥 I've acquired a not inconsiderable library of photos at this stage now Daddy M - give me a shout if you want same and happy to bung them upon on Dropbox for you to feast upon. Only had time to garnish bits here and there over the latter half of the week as work gets into full swing again, but pleased to say that positive progress had been made. The sky has proven incredibly distracting over the week however with the changing weather fronts over the isles. Much variety and definition in clouds, from these rolls last evening: - to what appearred to be the onset of the Apolcalypse at dusk on Wednesday: Whilst the Winter dieback of vegetation in the garden revealed The Lost Sunderland: This was the first thing I ever had the temerity to post on the forum back at the start of 2016 and is so staggeringly badly-made and painted (not having modelled since about 1981) that it quickly became a test-bed for natural weathering outside. Three winters later and I'm wondering whether it might at some stage be fun to strip and disassemble the thing for a rebuild and brass-fest. To topics of immediate interest then. I can't remember exactly at what point but late one night, after a not-insignificant struggle with angles and alignments, I menaged to get the nav's desk soldered into position: Like all such apparently simple tasks, only upon commencement does you realize it is going to take more patience than anticipated in order to avoid buckling the framework: Looks decent enough through the windows though: Latterly then, a similar struggle commenced with the radio-op's station. Queensbury rules and a cool iron: Seems to all tuck inside nicely: But not until both sides were on did the pulse settle: Proper busy now! With the extra info provided by Max I've still a rake of work to do on getting the seating sorted, plus the pilot's part of the cockpit to build, which should be fun. Also to be attended to up at the other end of the frame is to work out something to bung on top of the turrent ring: I've the Aeroclub transparencies to take care of the AW glazing, and have been researching details about the gun mounting and associated mounting inside. I've stripped the web of all available photos of the AW turret but still had problems trying to visually-integrate the internal structure until - as frequently happens - I realized there was probably something contemporary up on the Flight magazine archive. Sure enough, from January 23rd, 1936: https://www.flightglobal.com/pdfarchive/view/1936/1936 - 0205.html?search=Aw turret That's obviously the tail installation for an AW XXIII aircraft, but the actual gun/seat mounting details are the same for the Anson so this helps enormously with undertstanding what various photos of Annie's turret show. BTW. I love some of the more 'domestic' details that Flight sometimes has scattered across its pages, witness the lower right of the above: 'Mr. R. Lestrange Malone, Airwork's European sales manager, is to tour the Continent for about two months in a D.H. Hornet Moth, for contract and administration purposes.' I'm in the wrong job! Tony11 points
-
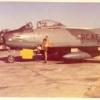
My first completion of 2019. The Wolfpack T-38A Talon completed as an aircraft of the 64 FWS, 57 FWW in 1975. In the early days of DACT, the 57 FWW used the Talon to simulate early Soviet jets like the Mig-17 and to a lesser extent Mig 21. The decals came from Caracel. As usual with me, a couple of mess ups. Caracel note this as an AT-38. In effect, the only real difference in this scale would be a Gunsight. I have a few decent pictures of the T-38A in this scheme, including one of this very aircraft. For some reason, in my head, I got them mixed up and referenced a different aircraft and believed that the one I was modelling was a standard T-38A. In fact it looks on closer inspection that Caracel were right. oh well - no gunsight on mine! The Wolfpack kit is not too bad but is another of those good in parts efforts - fit is generally OK but the surface detail is very fine and runs out to nothing in places. One tip if you want this kit is to go for the 'Holloman AFB" boxing which includes a few extra goodies in PE, resin seats and metal pitot which are all excellent. I did use part of an Eduard set which I was given for the cockpit. The Caracel decals worked with no problem but I do have a couple of issues - why provide decals for an aircraft that no kit exists (without conversion) - then I wouldn't have been so confused and I believe they based the decals on an early scheme which had no names on the canopy rail and no 57FWW badge on the intake - bothe of which appeared later. Anyway - it is what it is. I hope you like it. Cheers Malcolm10 points
-
Hi fellow modellers! This is the last model I completed. It´s Sword´s Spitfire Vc in 1/72. I have mixed feelings about this kit because it looks good but I ecountered several fit issues, mainly in the cockpit parts. Despite this it can be built into a nice model. I used Authentic Decals to represent a "presentation" aircraft, a plane donated to the RAF by a company from my country Uruguay. This very plane is restored and flying today in the same markings! I tried to follow the few historic photos I found because there are some differences with the restored one, like the wings. I hope you like it and all comments and critics are welcomed! Best regards. Ignacio10 points
-
Evening guys. Thanks for the lovely comments. I got a little done last night. I managed to get some Vallejo emerald for the super duper green in the cockpit from the LMS. If it’s not quite right it’s hard cheese I’m affraid as I’ve glossed now ready for weathering pass number one. 😃 Before that I added some more detail with plastic rods and plasticard. im making this up so accuracy has gone out of the window this time. Looks busy though. 😌 I added some dark pre shade. I’m happy with that. Next up is the light blue. Now in the pics it doesn’t look very blue but it is I promise. 😎 looks grey doesn’t it? I know but trust me here. ok I admit is grey Ish .... but looook. Soooo done with the gre.....light blue I move onto the juicy. word of warning, never mix Vallejo model colour with Tamiya thinners. The result is split colour and blotchy paint like the lower one. The upper one was ( after I found it lurking at the back ) mixed with Vallejo flow improver. I added a few details as well as the green/blue I’ll maybe add more after the first weather pass. I do like the colour though, I wish there were more of it. I have done the IP too but forgot to take a pic. These two shots were after a gloss coat. I’ll add the decals and do a weather pass next. Thanks for popping in chums. All the best and Happy Modelling. Johnny.10 points
-
Hello, This is my Hasegawa F-104. Nice kit to build OOB, although some of the decals were not that nice. I used Gunze Mr. Metal Color Aluminum and I was not pleased. I mean, the color is beautiful but it kept releasing pigments like forever and, at least for me, it is too fragile. Of course, the real problem could have been holding the AB, but I'll try something else next time, like AK polished aluminum. It's friendlier than Alclad, they say.... Cheers!9 points
-
Thanks Giorgio, Bill, Keith, Ben, Simon and Johnny Something smaller will be next, but I see a Wimpy in my future 🔮 Thanks Cookie and you're welcome I did some more yesterday and was hoping to finish this bit this morning but, after a lousy night's sleep, 'twas not to be. Mrs B has apparently developed a snore that sounds like someone banging on the front door - at three in the morning. It woke me up and by the time I realised what it was the adrenaline had me awake and it was 4:30 before I got back to sleep. Ho hum. It now joins her tummy rumble that sounds like a sash window opening Anyhoos, something quick to avoid the bay (which needs a good, quiet few hours) - the repositioned lights. Any excuse to get my punch set out and fiddle it: They go here: Anyone know why the chrome pen fizzes when applied? Wrong base I guess - this was over the Colourcoats grey I'd painted in the hole. Some more gentle sanding required in that area too, shown up by the 'disclosing' paint. Rats. Away for the weekend now - more next week9 points
-
Bonjour mes amis, Merci à Paul821 qui m'a très bien guidé dans l'art subtil de l'édition de photos, je peux vous proposer mon dernier modèle de navigation. C’est le Saint-Louis d’une de mes sociétés AIRFIX préférées. C'est un excellent modèle, très fin et superbement gravé. Un pur moment de bonheur. C'est la première fois que je reproduis la mer de manière si importante. J'ai utilisé toutes les techniques connues: mousse, papier toilette et colle blanche, support acrylique, coton synthétique pour filtre d'aquarium. le navire est peint avec des peintures Humbrol puis avec des peintures à l'huile. Je travaille maintenant sur "comment fabriquer des voiles crédibles à une échelle". Passez une bonne journée. Amitiés Marc7 points
-
On 16 February 1945 US Navy Task Force 58 launched a strike against Japanese airfields in Chiba Prefecture. It was the combat début for the Hellcats of VF-12 and VBF-12 aboard USS Randolph (CV-15). Over the Kantō Plain, Mitsubishi J2M3 of the Imperial Japanese Navy's 302nd Kōkūtai intercepted the formation and claimed eight Hellcats destroyed. 302 Kū, a veteran IJN unit, was based at Yokosuka to defend the industrial region south of Tokyo. Difficult to handle for a rookie Mitsubishi's 'Thunderbolt' was a formidable foe in the hands of an experienced pilot. Fast-climbing and heavily armed (with four to five 20 mm cannon) the J2M3 was one of the few Japanese fighters that could successfully intercept the B-29 at high altitude. Unfortunately, due to the tight casing of the engine, the 14-cylinder Mitsubishi Kasei was prone to overheating which hampered operational effectiveness. My Tamiya model is a veteran, too. I originally built it in 1977 and made an all-out restoration two years ago. It represents a squadron leader’s aircraft (yellow fuselage band) and was most likely assigned to Lt Junrō Teramura, leader of the 1st Buntai. This Raiden was lost on 19 April 1945 while flown by Lt(jg) Ei Fukuda. The victory was claimed by P-51 pilot Maj James Trapp, squadron commander of the 78th FS. Cockpit: Aires (#4538) and Eduard (#48201) Wheel covers: Quickboost (#48399) Exhausts: Quickboost (#48383) Decals: AeroMaster (#48-286) The colours are home-mixed following the excellent 'Mitsubishi J2M Raiden Colour Notes' by Nick Millman (Aviation of Japan) I hope you see why this is my favourite Japanese Navy fighter. ハッピーモデル構築 - Michael References Navy Interceptor “Raiden“, Famous Airplanes of the World No.61, Tokyo, 1996 Mitsubishi J2M Raiden, Mushroom Model Magazine Special No.6110, Sandomierz, 2004 Mitsubishi Navy Interceptor Fighter "Raiden", Mechanism of Military Aircraft No.4, Japan, 2011 Mitsubishi J2M Raiden, Model Art Profile No.11, Tokyo, 2011 J2M3 Imperial Japanese Navy Interceptor Raiden, Zoukai-mura SWS No.VI, Kyoto, 2013 J2M Raiden and N1K1/2 Shiden/Shiden-Kai Aces, Osprey Aircraft of the Aces 129, Botley, 20167 points
-
A brief update. The Morane now has undercarriage in. I shall have a little rant-ette about this in a minute. The black paint needs remedial work. Instead of overcoating in matt, I’m using a satin, but it’s going to need a couple more coats before I’m entirely happy. The Dewoitine is nearing completion. I’ve even painted the prop and spinner. The Curtiss now has its lallies in place, too. Another one to rant about. Finally, Monsieur Bloch's effort, with wheels in place. Oddly, this kit's undercarriage has been the easiest to install, which leads me to my rant. Throughout this build of four different kits, I’ve been encouraged by the relative ease of assembly and overall fit of the parts. Where things have been let down is unclear diagrams in the instructions, often bearing little resemblance to what is held in the tweezers and not at all helpful when trying to fit various tiny parts in place at specific angles. Where this problem is most acute, I find, is the main undercarriage. Aside from the RS Bloch and HB Dewoitine, locating main oleos and balancing wheels on tiny projections has been an orgy of cussing and tantrums. The Curtiss, for example, has that wonderfully complicated setup where the main wheels swivel as they are folded back into their wells, accompanied by numerous plates and covers doing a little dance. AZ reproduce this with a main oleo leg that doesn’t fit positively into its location hole, twin retraction struts that are much too long with no positive location, and a three-part cover system that sort of looks right unless you’ve seen the real thing. Moving to the Azur Morane, the main wheels are simple: leg, wheel, brace, fairings. There are even locating pins on the legs that match holes in the main fairing. However, these locating pins leave things fitted in the wrong places. Worse, if the prototype is considered, the mainwheels are purposely set at crazy angles to make it safer to land. The kit has the wheels set in line and neat and tidy. It’ll have to do, as correction would involve scratchbuilding. The locations for the various parts are woeful, I’m afraid, and it took me quite some time, propping the model carefully, to ensure the parts remained in alignment with the airframe and each other. All of the above, of course, would be of little import if the kits could be built with the wheels up. I think only the RS kit would work; as far as I can tell, the other kits have wheel wells that won’t accomodate the wheels and gear, which is a nuisance as all four have part of the undercarriage visible when retracted. Anyway, that’s my rant over. Just be aware that if you build these kits for shelf display, the undercarriage does need to be thought about carefully when you come to it. Right, back to the day job!7 points
-
Heading for 40C (104F) at home today so I touched up the undercoat and got the top coat on this morning before it got too hot. I used AS12 Tamiya Bare metal silver from the can. Nice and simple.7 points
-
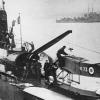
I've been working away scratch building the deck storage boxes and the Mark 8 smoke screen generator. Here's a photo showing the boxes & the generator as built & dry fit on the deck. On the foredeck, there are two very unique looking ammo lockers, & a storage locker including a ready use tray for Oerlikon gun magazines. There's another storage locker located midships on the starboard side. A Mark 8 smoke generator is located at the stern on the starboard side. I used the Revell kit part & modified it to better represent the actual smoke generator. This included filling a large cavity in the bottom of the part, modifying the generator cylinder cradles, & adding details at both ends of the cylinder. Next up, paint these assemblies and then start thinking about making the 37mm & 40mm guns. Thanks for looking. John7 points
-
I've spent yesterday and today getting my control cable rigging sorted out. It's mostly done, as you will see. There's still some tidying up to do, a couple of items to add, etc. First off, here's what I'm using for the rigging (Thanks, Limeypilot!) : It's very fine (small enough to fit through the #80 holes in my control horns), and stretches (so it's easy to get the lines taut). Here are the pics! The Ford Tri-motor has fairleads on the rear fuselage side for the control cables running to the rear: I haven't yet decided exactly how to build those, but in anticipation of that, I added short sections of thin tubing on the rear control cables: There's also an additional fairlead for each rudder cable mounted further aft. No mount needed for these, they attach directly to the fuselage: Tomorrow I plan to carefully trim the bitter ends and see if I can create a suitable mount for the fairlead tubes. I'm pushing hard to get this build finished by the weekend, as I have a back-to-back business trips scheduled over the next two weeks. I also still need to rig the aileron control cables, and add the strengthening cables that attach to the vertical and horizontal stabs.6 points
-
The decals are extremely thin (which is good), but need super careful handling and plenty of water, and be moved around only with a brush. I folded one and broke a little piece off as I was trying to unfold it, and finally managed with patience to fix it. The glue leaves a very noticeable residue once it dries, so again very carefully with a wet cotton bud you will need to clean after all is pretty set (next day perhaps better). Their color is nice, but the small British flash that goes on the fin is completely out of register in my sheet, even with the multiple spares provided. A let down on an otherwise nice sheet. I put it on, but will replace it when I get good ones. The carrier is very generous and will benefit from trimming if you feel confident; I cut the letters individually to reduce it even more:6 points
-
You are right... friendships Marc6 points
-
Hello, Here is my last model, an Imperial Iranian Air Force P-47D from Tamiya at 1/48 scale. I used Vallejo Metal Color for the aluminium finish. For the roundels, I used Montex masks and Persan numbers are home made masks. Weathering is done with oil paints and powders for the wings. It was interesting to build such an exotic livery. I hope you like my Thunderbolt and thank you to Reini78 who built the same, two years ago. Lolo5 points
-
Hi Guys, I will make a conversion of the Tamiya 1/48 Gloster meteor F3 into a F4 with the Heritage aviation conversion set. It will get decals from Dutch decals for a Dutch Meteor from 323 squadron that was based at Leeuwarden afb in 1952/53. Here are some pictures. the box the content the conversion some extras I might be using?! And the scheme I use for it. That is it for now. Cheers,5 points
-
Here’s a Spin Bristol I finished a couple of years ago. Finished in my interruption of PC12 and light blue used in the Near East.5 points
-
Very challenging and fun build on the Kitty Hawk F-35B STOVL Marine Corps Lightning. I started about eight months ago did a ton of research to find the most detailed photos. The aircraft has allot of openings so it only seems right to pay attention to the detail in each area. To give detail but not over do it. Also allot of research and test swatches on the paint. RAM panels overall paint scheme has to be very sharp it’s a challenge for the most seasoned modeller as the aircraft has not been in service that long and even carrier Ops show minimal weathering. The engine and aft underside seems to take the brunt of the weathering. I bashed the hell out of this kit replacing or reworking the engine, rear rudders, leading edge spoilers, wing flaps, vertical stabilizers, landing gear, wheels, cockpit and decals. Lots of wiring and hydraulics added to the landing gear, weapons and landing gear bay. The kit is fair at best the surface detail on the main body upper and lower portion is there but that’s about it. Biggest challenge was the lack of any detail on that gorgeous rotating exaust nozzel Lockheed Martin designed found great photos to work from. If you have any questions on the build paint colours, PE add on kits please feel free to contact me.5 points
-
5 points
-
Panzer IV H in Spain Tamiya 1/48 RB barrels FCmodeltips decals from Spain wip second AFV terminated! thanks everybody for your support and to the hosts for the great GB! up to the next very soon as I see5 points
-
5 points
-
Resurrection complete. The undercarriage and canopy are awful but I’m fairly happy with the rest. Remarkably my plan seems to be working so next up will be the Swiss Mustang that came to grief in the Dedicated Kit GB5 points
-
Hi Folk's,Tamiya's venerable Stug iv, modelled on a whitewashed Russian front Machine I found a photo of online.5 points
-
Not sure if this helps but I've taken a couple of quick pics. This is a part-built Academy Hunter (an FR.10 conversion that I couldn't be bothered to finish!) with the Airfix canopy sitting on it. It fits surprising well with no real gaps at all. The only problem is the oversized spine of the Academy kit. If that can be slimmed down to suit the Airfix canopy then it'll fit fine and will be a huge improvement on the Academy version. Bear in mind that the canopy is sitting about 3mm too far forward in these photos as the rear of the canopy should normally overlap the spine.5 points
-
Thank you Cookie for your (too!) kind words again, always happy if you like the models! I finished the B here: Thank you to those who commented/liked the thread and I hope you like the F-16B. I'm going to take a break for a bit before finishing the other F-16s, I think I need to do something different tbh as the motivation has temporarily worn off a tad for these. Cheers, David.5 points
-
Hello Everybody and Happy New Year again to all !! Been working as much as time allows on the back of the car. Looking at all the reference pictures of the car in 67 and 68, the back of the car is very complex. However different wirings and configurations of pumps and oil tank coolers etc. changed in almost each race version of the car. So it is a feast for those who want to superdetail. This is not the intention in this build. However, Paul was a neat and very meticulous builder and so the task needs extra attention. Here are the principal periphery parts being finalised before assembly. Most are already weathered with artist oils of high quality and very fine pigment mixed with lighter fluid. these are the main oil filters: here is the wiring for the disc brakes. I apologize for the quality of the pictures, when mounted i will take proper pictures using a tripod and white light. This below is how the car looks now before assembling the parts above, which i intend to start this week end. you can see i added the pipes to the brake calipers and the pins connected to the adjustable antiroll bar. The little oil tank connected to the gear box appears in different colours in many versions of the car: grey, black, dark grey, metallic etc. Here it is in the metallic version. I promise to take better photos tomorrow !! here below is my attempt at slightly improving the throttle connectors and add the cables between the front of the car to the back and to the fuel injection metering unit, on which i have added a few details you will see this week end. The work is tiny and this is the dawning of a possibly acceptable result after many many failed attempts, it is still work in progress. If i am not able to scratch a neat piece i will revert to the MFH version. That's it ! Thank you very much for watching. I expect to be able to finalise 80 % of the back's assembly this week end and post thereafter. Sam5 points
-
*** Slightly better photos added Feb 2021 *** Still struggling to get really good snaps of this big bird but at least the lighting is a better in the photobox. Enjoy! Hi all, photos of my finished Academy 1/72 B-29, sorry for the distinctly mediocre picture quality, haven't really figured out how to photograph big models like this... The scheme is "Celestial Queen" with decals from warbirds and I also added the Eduard etch set. She's painted with various shades of Alclad - it was a bit of a battle at times as I was pretty much learning how to airbrush and how to do NMF as I went along. I enjoyed detailing the cockpit and scratch built a few bits and pieces like a lamp, map and headphones for the radio operator. The front of the fuselage is held on with little magnets so you can take it off to see the detail inside (looks better in real life than in the photos!). This works quite well but if I was doing it again I'd make the whole upper half come off so the joins appear along panel lines rather than on top. I also put quite a lot of effort into the bomb bay with doors open and all those bombs to decal! It took me most of 2018 to get done but in the end I'm really happy with it and it looks pretty cool alongside the B-17 with matching red wing tips! I learned absolutely loads along the way, thanks to those who provided help and encouragement, the WIP is here: Enjoy!4 points
-
Well, we are here already! How time does fly! For my first build I will be using Heller's classic kit of the F84-G Thunderjet in 1/72nd scale. I notice that there are a few F84 builds in the GB already so this should be fun. I am not sure if it will be French or Norwegian at the moment, but I am leaning towards the Scandinavian side of things. Here's the box-top... The decals look good and are not yellowed. No stencils. The two profiles to choose from... And the sprue. Not too bad for basic detail, no flash to speak of. I'll be building OOB. I might add some cockpit detail if I am able. I'll jump in tomorrow morning! --John4 points
-
Really, REALLY glad to get this finished after hanging around on the bench like a bad smell since before Christmas. The fit isn't that bad & surface detail is good as are the u/c bays & legs but the cockpit & seat are woeful, comprising little detail with what there is provided by etched placards & decals which IMHO is simply unacceptable with a kit of this price. All kinds of issues surrounding the "instructions" that for instance show where one end of an actuation strut fits but not the other & strange colour call-outs with contradictions on the colour illustrations, for instance the u/c bays are called out in interior green (correct) but shown in red (correct for the flap & airbrake interior). The decals were strange in that the large decals such as the walkways & national insignia seemed to be very thick but the smaller ones are commendably thin. Anyway apart from the walkways they settled down eventually. However I wasn't entirely innocent as I lost some parts such as one of the landing lights on the nose gear & the clear cover for an aperture under the nose & THEN, when all was just about done, I decided that the canopy wasn't sitting right so tried to remove it for refitting only for it to CRACK right down the centre! By this time I was just about on the point of junking it but thought of the cost of the damn thing. Rather than attempt to glue the canopy back together, I attached the two halves to the opening independently, lining up the edges of the break as best I could & to be honest, from most angles it's almost impossible to see the join! Main paint is AK polished aluminium with Alclad jet exhaust for the burner cans & rear fuselage, dry brushed with some black, silver & bronze to try replicate the finish in these areas. It's a big kit that takes up a lot of space on the shelf. Kittyhawk produce other 101 versions & I was thinking of the their F101C but frankly I think I'll look for one of the old Monogram kits - can't go through all this again!!4 points
-
Back in 1924, I believe, the U.S. Army Air Corps decided to fly around the world as a demonstration of air power. This was NOT non-stop, but went from point-to-point, often laying over for days to weeks at each stop. Nevertheless, it was exciting stuff for that era. The Army Douglas World Cruisers (there were 4), were modified versions of the Douglas Torpedo Bomber (DT). One of them, named the Seattle, crashed in Alaska, but the other three, named Chicago, Boston, and New Orleans made it all the way 'round. My model represents the New Orleans. It is a 1/72 scale Williams Bros kit, built strictly Out-Of_The-Box, for entry into a model contest. Only rigging and paint was added. The rigging was done using "invisible" thread, which is actually like a very thin mono filament thread. I drilled holes in the wings (top of top wing and bottom of bottom wing were left unpainted), anchored the thread, then pulled it tight through the holes in the top and bottom of the wing. Then I secured them with a drop of CA cement on each. When dry, they were trimmed flush then sanded down smooth, after which the appropriate remaining wing surfaces were painted and decals applied. Paints were mostly Humbrol, and of course, the kit decals were used. She finished "Honorable Mention" --- it was a tough competition. Without further ado, the pictures: If I were to do it over today, I would only change two things: I would use a better brass paint for the radiator, and I would change the white "4"'s to black ones, as the more readily available internet shows that's what they should have been. But, in the early 80's and with the old OOB rules, here she sits. Comments, criticisms, and general input are welcomed! Hope you enjoy this trip in the Wayback Machine. Ed4 points
-
Finished out of the box. The only thing that I disliked about it was the lack of instructions for decal placement. There were two small pictures on the side of the box. One partly hidden by a sticker. I have a couple of other submarines going on right now. I'll be back when they are finished.4 points
-
Hello all, Here is my recently completed 1/48 Tamiya F-14D Tomcat in the markings of VF-213 'Black Lions' during their last cruise with the jet in 2005 - 2006. The build thread is here BuNo 164602 was delivered new to VF-124 in 1992, before being transferred to VF-2 in late 1994 and eventually to VF-213 in 1997. The jet saw combat in Operation 'Desert Fox' in 1998, 'Enduring Freedom' in 2001 and 'Iraqi Freedom' in 2003, when it expended the squadrons' highest volume of ordnance - a mixture of 31 JDAMs and LGBs. The jet was retired in 2006 and I believe remains in storage at AMARG. Extras used included a set of Quickboost seats, a Master pitot & AoA probe and a GBU-38 from the spares. The ROVER antenna was made from a styrene sheet. With my other Tamiya F-14D: Thanks for looking. Dave4 points
-
I'll book me ticket now if you don't mind! My second build on BM was an ebay acquired bit of lost childhood. Bits missing, bits broken, more glue on it than holding it together. (apologies for non-flying-thing interruption to these pages) it can be enormous fun turning it from that ^^^ into this ('scuse the passenger getting a bit enamored with James - I warned him about that several times) I picked up a few new skills along that journey. just as well. I've got nowt planned for some time This brass work is captivating. I have to admit to being slightly okay, enormously envious that you have such an interesting and challenging subject matter. The more I look at it, the more I find myself thinking of future builds - similar to my Lysander attempt.... what can I build that's provided in basic kit form, thereby leaving me lots of brass-work and scratchbuilding challenges? more power to your anvil my friend I found myself looking at the "irresistible appeal to boys of all ages up to 80" statement. So nothing much has changed in the intervening 83 years then?4 points
-
A few more notes on the Airfix kit. In no particular order. The port aileron needs the trim tab scribing, and both need a couple of 'panel' lines adding. Both need the trailing edge tip "flair" added I've converted my wings to dog-toothless, and I have to admit I have a few reservations about the wingtip shape - though until I make one without the finessed modelling skill butchery, I will reserve from further conversation - though id be interested to hear anyone else's thoughts. I had a bit of warping on the top wing trailing edge - the area above the flap bays. It's a sod to fix. if I encounter it on kit No2 I'll be tempted to glue the flaps into the top wing first - so they help straight then warp. The top wing part fits really well - though I found that the internal forward edge of the fuselage section benefits from a plastic card shim to raise it "ever so" slightly ( and I mean "ever so", ever so. Gnats whisker style) - this gives an almost spot on flush fit with the fuselage I also found that if you push fit the top wing - then apply the landing gear bay edging- gluing only to the top wing underside rather than the fuselage, you can then apply the lower wing pieces, and if you glue and tape or clamp of hold or train a crab to grab the leading edge join right by the intakes to pull it together - you will pull the top wing intake sections perfectly into alignment on the fuselage - requiring only a wee brushette of liquid adhesive to glue. The rear join of the top wing section can be capillaried with liquid glue after wards. Shellcase ejection ports - drill out before fitting- it looks great. Sabrinas - I drilled the holes exactly as per the instructions - but then found that the sabrinas would foul the case ejection ports - so i remove the location lugs, filled the holes and positioned them so they didn't- and please note on the actual sabrinas there was a small cut out for the foremost case shute - so they should be very snug to the them- but there's snug, and there's restraining order / #MeToo snug! Airbrake - the front fairing insert fits really well. The airbrake edges need a clean up and the hinge arms need a bit of a sand to get them to locate- and even then they need some "Glaswegian" persuasion. The clear sprue runner in the kit is the perfect diameter to make a conical bulb fairing for the rear of the fin bullet. Airfix didnt provide this part because they want you to not neglect your modelling skills: See they think of everything. Finally - though its all painted now - here's what I did with the cockpit (p.s. I made some of it up - because I could) - because lets face it under all that black you can really see it! cheers Jonners4 points
-
Thanks John, thats what I was shooting for so pleased you think so Cheers noeyedears! Thanks Pete, its good being back (properly this time!) Thanks Will Appreciate it, and I agree about the gloss, think once I start adding slime and goo I'll gloss the whole thing for that "moist look" (copyright @Carts ) And just a quick update, I got the tentacle filling sanded down and painted over IMG_20190118_134552 by Nick Frost, on Flickr IMG_20190118_134924 by Nick Frost, on Flickr So thats all covered over and forgotten about! Panic over And I got my tentacles for the flower glued in place IMG_20190118_134220 by Nick Frost, on Flickr I actually really like the green contrast, so much I was tempted to paint them green, but I think ill stick with purple for them, which is what I'll do next. Thanks for looking, more soon4 points
-
Airfix workbench has the development details up, breakdown looks interesting. https://www.airfix.com/uk-en/news/workbench/strike-fast-and-low-in-20194 points
-
To the whole of the outstanding Eagle T1G team There are times when there is a confluence of modelling, engineering and art and some of the latest work for me definitely inhabits that exaulted territory. It is a fabulous effort and great example (and we need these at this time) of the best of humankind. Wonderful work by everyone. Best wishes Quentin4 points
-
Worryingly, I find myself saving more and more detail pictures of Ansons. We all know where that is heading don't we? Martian 👽4 points
-
Hello Spad !! Spot on ! your "Green" look really good !! Nice blending !! Now, I also use that very fine copper wire from electrical chord ! thin like hairs then you take 3 to 4 ones and twist them. Realism is also surprising and it's an easy to find material…. Aaaand cheap if not free ! Look from the black box on the front of the falf fuse just over here ! Sincerely. CC4 points
-
Until you start singing along 🎼🎤 AW4 points
-
Good evening, a small update about the detailling of the port fuselage half. Time to sleep now. Good night!!!4 points
-
Tonight I have airbrushed a little dark earth detailing into the cockpit, really to dirty it up a little, before the build starts. once this was dry, I secured the fuselage halves together (these fitted perfectly, I did dry fit first though), and placed the cockpit floor and interior onto the wings. These are now pegged together and drying, so far the kit has gone together well........so far!!4 points


Wedge-TailedEaglePortraitRaptorDomains.thumb.jpg.41a306d3445a68f0f2df773e01776ea6.jpg)


This leaderboard is set to London/GMT+01:00