
Leaderboard


Popular Content
Showing content with the highest reputation on 01/01/19 in all areas
-
The subjects for my models are often the result of coming across a story which catches my interest. This is one of those. In late 1941 / early 1942 there was a need for something (anything) to lift morale. The victories in North Africa that marked a turning point were still months away and Europe was shrouded in gloom. An SOE specialist undercover in Paris had noted in September 1941 that the German army paraded daily at midday along the Champs-Élysées. He suggested that the RAF could mount an attack on the parade as a morale boost for both Britain and occupied France. After a rather daft idea from Fighter Command involving three Spitfires and coloured smoke, the mission was assigned to Coastal Command to use a Bristol Beaufighter Mk Ic which had both the range and a navigator as a second crew member. Several crews volunteered with pilot Flt Lt Ken Gatward and navigator Sgt George Fern of 236 Sqn being selected. The mission needed complete cloud cover so was delayed many times but finally on 12th June 1942 they took off from RAF Thorney Island in T4800 at 11.15am. The flight would have been roughly 200 miles (320 km) to Paris most of which was over German occupied France so they flew at less than 100 feet, often as low as 30 feet. The pictures taken by George Fern are a vivid testament to this. See this image of Le Grand Palais - apparently 'La Vie Nouvelle' was to be that night's show. They arrived at midday but the Champs-Élysées was empty. Their secondary target was the Gestapo HQ in the Kriegsmarine (navy) building so this was attacked with the four 20mm cannon in the nose. They also dropped two French tricolour flags, one over the Arc de Triomphe and one as they passed the Gestapo HQ. The return trip was as uneventful as the outward - without being fired at by AA guns or by Luftwaffe fighters. They landed at RAF Northolt in west London two hours after departing Thorney Island and were debriefed and instructed not to discuss the details. Rather nicely George's parents heard about the mission from the BBC whilst he was on leave with them. It seems that they missed the opportunity to attack the parade due to the Germans having synchronised French time with Germany. Time in northern occupied France was moved an hour forward to match German time (the unoccupied south remained unchanged). And they didn't tell the British. How mean. On to the model and my attempt at T4800 ND-C. I have used Tamiya's 1:48 Mk VI backdated to a Mk Ic. To do that I used a conversion set from Resinair with zero dihedral horizontal tails and short exhaust manifolds (that shows quite clearly in the first pic). I also filled in the wing .303 machine gun holes and cartridge ejection slots as I believe the wing guns were replaced by extra fuel tanks in the Mk Ic. Other extras were Eduard steel seatbelts and canopy masks plus a Yahu instrument panel. Paints were Ultimate acrylic primer and Xtracrylix acrylics. Decals were largely from various Xtradecal sets with the stencils from the excellent Aviaeology set. Weathering was done with Winsor and Newton oils with pastels for the exhaust stain and darkening the collector ring / exhausts. The historical info mostly came from an article in 'Aeroplane' magazine of March 2010 which was based on an interview with George Fern and was my inspiration for this build. I also used the Modeller's Data File on the Beaufighter which has a profile of T4800. I've made a couple of mistakes. One I'll own up to – I forgot to install the gunsight. The other might be spotted by those that know the Beaufighter. I'll probably live with it as it is. As usual - comments appreciated. All the best Mark38 points
-
This is HB981, a Republic P-47D-22-RE Thunderbolt attached to 135 Sq. RAF in Burma during 1945. At 04:45 on 2nd May 1945 it was taking off from Akyab Main to provide "cab rank" support for the Operation Dracula landings at Rangoon, when it lost power and ground-looped off the end of the runway, tearing off both wings in the process. Its relevance to me is that the aircraft contained my father at the time it performed this unplanned evolution. After the aircraft had come to rest, he popped out of the cockpit unharmed, then popped back in again to retrieve his parachute, since it was a chargeable offence to lose a parachute. Then he jogged back to the end of the runway, sat on the parachute, and waited for a vehicle to come and get him. At which point he cadged a cigarette off the driver. Shortly after that, he had his photograph taken, posing on the wreckage. (The photograph, you'll see, also had a fairly hectic later life.) The story is retold amusingly in Roger Freeman's Thunderbolt: A Documentary History Of The Republic P-47. (The squadron number is wrong - 135 Sq. didn't renumber to 615 until slightly later in the war.) Paints are Tamiya, LifeColor and Alclad. The 150-gallon (US) drop tanks are filched from a Tamiya P-47M kit, but the Hamilton prop (and its decals) came with the Razorback kit, although it's not required for either of the aircraft detailed in that kit. SEAC roundels, flashes and the tail number come from an Xtradecal "Yanks with Roundels" sheet. Eduard photoetch detail and placards, Squadron wheels, and an HGW Sutton harness which I found almost unusable. Finally, a comparison of the Thunderbolt and Hurricane, showing what a brute the Jug was in comparison. (My father used to take great delight in relaying the old RAF joke about how the easiest way to avoid enemy fire in a Thunderbolt was to release your harness and run around in the cockpit.) Possibly the drabbest Jug ever modelled. Sorry about that.36 points
-
Hi all, My last build for 2018 is a Revell 1/72 Boeing B-17F which I have finished as an RAF Fortress Mk.II operated by 206 Squadron in June 1943, in fact on 11th June whilst flown by Wing Commander R.B. Thomson she attacked and sank U-417 South East of Iceland but was herself brought down by return fire from the U-boat. All the crrew of the B-17 were rescued 3 days later by an RAF Catalina after a US Catalina crashed trying to rescue them, the US crew were rescued a few days later. The Revell kit is excellent and has great interior detail from the box but I have had to scratch build the ASV aerials for the nose and under the wings from brass rod, they are not perfect but they look okay to me. I used decals by DK Decals which are excellent and went on with no issues at all, I just wish their instruction sheets were bigger! Anyway enough waffle here are the pics; I've built this as part of the ongoing (and excellent) B-17 STGB which you need to check out as there are some great builds going on there. For those of you interested here is a link to my build; Thanks for looking in and as usual all comments and criticisms are gratefully received. A Happy New Year to you all. Craig.34 points
-
Hi Guys first off a happy new year to you all, hope there are not too many soar heads!! let me introduce you to the 1/32 Revell GR4 Tornado, I used Aires ejector seats and cockpit, and pilots from PJ Productions, with the decals from fantasy workshop, the rest is OTB. The kit goes together ok, but you need to be patient with it , I used HATAKA acrylics which are turning out to be my favoured brand, enjoy.24 points
-
I got some shots of my Pup taken this afternoon. Here are some to show the completed model. Here you can see the split axle method of adding to some 'suspension' to the undercarriage. There would normally be some bungee cord over the top of the axle and under the faired strut below, pulling the wheel down. I stupidly forgot to add these parts and it proved impossible to rectify. Happy New Year everyone!23 points
-
Just about managed to get this one finished and photographed before 2018 is done. The scheme is taken from the Xtradecal BoB decal sheet and represents "Black 8" flown by Ofw Bernhard Lempskemper. The airfix kit went together very well along with some Eduard etch for the cockpit, wheel wells and air intakes. I tried to replace the slightly sorry looking moulded guns on top of the nose by scratch building some out of thin stainless tube - not sure there's much improvement though in the end... The aerial wire is from stretched sprue with little coiled bits of wire to add interest. I airbrushed on Mr Color RLM04, 65, 02 and 71, thinned with X-20 and they went down a treat, especially the yellow! Weathering was mostly done with brown, black and white oil paints and I added a few random chips with a fine brush and silver paint. The paint job was then protected with a coat of Vallejo flat varnish. This was my first go at riveting and mottling a Luftwaffe aircraft and overall I'm pretty pleased with the result - she looks good alongside the Mk1 Spitfire. WIP is here if you'd like more details: Thanks to those who helped along the way and Happy New Year!23 points
-
Hi all, This is the Heller Mirage 2000N modified to get a D version. As usual with Heller, lot of work to get a decent model. Happy new year17 points
-
This started off as a hairspray chipping experiment, but I decided to push on and finish the model before the end of the year. I don't "do" New Year so have used the time today finishing this off. There's a replacement bomb on the way for it and I will improve the bomb cradle and add them both later - but this is it for now. I hope you like it. I gathered a lot of photos of beaten up USMC operated F4U-1s and 1As in the Pacific and have tried to take inspiration from a number of them. The 100 mission markings on the particular aircraft here indicates that it was quite a well-used machine and indeed the photo I found of it online indicates likewise. I've been asked via a social media page post already what I used for this colour-wise so here are the main ones shown. The dark blue wasn't used as-is but instead was blended with ACUS08 - ANA608 Intermediate Blue to fade it towards a blue-grey.16 points
-
Hi Guys! Here is my finished Matchbox Victor, XM715 - Teasin' Tina displayed in her "final flight" during Bruntingthorpe's cold war jets day in 2009. The kit was built straight out of the box, then finished in Humbrol paints and flightpath decals. Slight mistake as at the time of the flight, the Meldrew nose art had been removed for its re paint, so its a mix of then and what was on there last Saturday ( im lucky enough to volunteer at Brunty) For future reference if anyone wants to build hernas she is now- she no longer has any stencilling, just the nose art, ejection triangles, serial number and some of the underwing stripes. Easy build, really enjoyed it IMG_20190101_104939 by matt wellington, on Flickr IMG_20190101_120652 by matt wellington, on Flickr IMG_20190101_120928 by matt wellington, on Flickr IMG_20190101_120600 by matt wellington, on Flickr IMG_20190101_120544 by matt wellington, on Flickr IMG_20190101_120514 by matt wellington, on Flickr IMG_20190101_120442 by matt wellington, on Flickr 2019-01-01_12-53-18 by matt wellington, on Flickr15 points
-
My dear modeller friends, a lot of time passed before I could finish this work. But I've just finished!! It was my intention to finish the diorama for the anniversary of the Pearl Harbour attack, but personal problem took me out of my intentions. Anyway, let me present you my last work, my first 1/700 model and, last but not least, my first maritime diorama. I never tried to work on a so little model, as I was afraid for the very little pieces and difficulty on working with them, but after seeing a lot of your works, I tried. I bought the 1/700 Dragon USS Arizona winning an auction on the "bay", then during one of my trip, I found on sale the 1/700 Flyhawk USS Ward and the idea of a diorama come up. My intention was to replicate the day before the Japanese attack on Pearl Harbour, when the battleship USS Arizona was lying down on the harbour mooring quays, and USS Ward destroyer was starting her duty on patrolling the bay. The USS Ward was the first US Navy unit to fire to a Japanese unit that was trying to enter on Pearl Harbour for a torpedo attack The 7th December 1941, during her patrolling duty she discovered a Japanese mini submarine, she attacked firing and sinking it, she also gave the alarm to the US command but her Captain's alarm was ignored. Then the disaster arrived! On reality the USS Arizona was sided with a working ship, the USS Vestal on her renoval duty, but I couldn't find any model of this scale, and so I decided to replicate a "near reality" diorama! Anyway this is my interpretation and realization.... IMG_20181231_155851 by Franco Segato, su Flickr IMG_20181231_160140 by Franco Segato, su Flickr IMG_20181231_155949 by Franco Segato, su Flickr IMG_20181231_155256 by Franco Segato, su Flickr IMG_20181231_155222 by Franco Segato, su Flickr IMG_20181231_155112 by Franco Segato, su Flickr IMG_20181231_155104 by Franco Segato, su Flickr IMG_20181231_155019 by Franco Segato, su Flickr Hope you like it. I also wish you a very very pleasant and happy new year to all of you. Franco14 points
-
Keep building. Mark DSCN3017 (2) by mwsfly9, on Flickr DSCN3032 (3) by mwsfly9, on Flickr DSCN3046 (2) by mwsfly9, on Flickr DSCN3060 (2) by mwsfly9, on Flickr DSCN3095 (2) by mwsfly9, on Flickr DSCN3122 (2) by mwsfly9, on Flickr DSCN3146 (2) by mwsfly9, on Flickr DSCN3185 (2) by mwsfly9, on Flickr DSCN3212 (3) by mwsfly9, on Flickr DSCN3236 (2) by mwsfly9, on Flickr DSCN3288 (2) by mwsfly9, on Flickr DSCN3306 (2) by mwsfly9, on Flickr DSCN3326 (2) by mwsfly9, on Flickr13 points
-
Happy new year to the modelling world and builders!! This is my 1/32 Trumpeter P-47D Razorback with the Kits-world War Birds decals used. This kit went together well, even though there a few minor instruction issues, but nothing major to overcome. Painted with MRP paints...……….which are highly recommended! Built out of the box other than the decals. A bit about the man:- 2Lt Paul Ellison who was shot down by flak on 17th July 1944 while flying "Tipsy". After taking off from Picauville he was hit by flak just after bombing the bridge at Conde-sur-Vire. Bits of the wing started to fall away and Ellison bailed out at about 1000ft. He evaded capture and returned to military control on 2nd August. Now the machine......well, my version of it 🙂 Hope you like it, id like some feedback on the prop as I tried for the first time, the salt weathering technique it simulate some weathering on the prop. Thanks for looking, all comment are welcome13 points
-
About 20 years a go I build a DHC 3 Otter in green Vietnam colors, six years a go I refurbished it in ''Artic Red'' and placed decals from ''MAX Decal'' of the British Artic Survey from end '50. It is a nice set with different Artic Otters such as Argentinian, belgian, US and British examples. I have still a few in the stash, for some arctic examples. Gerhard13 points
-
More "building up" was done today.... Thanks Massimo! As mentioned above, I spent a couple of hours mulling further the problem of the bomb bays. Namely how to get the framework in the right place (along the spars, nit at the edges of the cutouts) and how do I thin the remaining panels to be realistic. The answer, it may not surprise you, was to remove more plastic. You can see here the thickness of the plastic which needed thinning, and the locating peg which hinders the task. More drilling and joining of dots followed, and the panels were removed back to the flap at the rear, and the leading edge panel line at the front. That left me with an open box to fill. Much easier! The panels I removed will be replaced with 10thou sheet so no need to thin. After adding a 10thou false floor to the underside of the upper wing I made a start on boxing in the area at the outer and rear edges. The outer edge has been fitted under the wing part so it's flush, and the rear part will provide an attachment point for the panels. These were blanked off on the actual aircraft so it's accurate. The forward edge and between the bays will be framework, again leaving it slightly short to provide attachment point for the panels to be refitted. Needless to say I decided not to faff about adding the ribbing on the inside of the wing skin. That's all for now, thanks for looking in! Ian11 points
-
Hello Please allow me to show my Airfix Ariel Arrow to 1/16 scale. Once again, built to support the Car and Motorcycle SIG at Telford and just slipping in for 2018 due to lack of pics. As finished for the SIG stand it was lacking the screen - I've managed to get that on now so more or less done. Another model that's been in the stash for far too long. Bought by housemates as a birthday present back in 1982 and part assembled. I tried to "chrome" the exhausts using cigarette packet foils which worked quite well - then I realised I stood not a cat's chance of doing the wheels in that, so it got shelved while I thought about it. As with the Zodiac, things have changed a bit over the years, skills have improved and products are available that just weren't around then or, at least, I knew nothing of. So, the kit is fun and remarkably detailed when compared with the real thing. For the paint job I used AK Xtreme Metal Gold and Zero Paints white with Zero prethinned lacquer. An assortment of silvers were used including Alclad Chrome and Molotow pens. Kit markings were used and behaved remarkably well after they had been stuck to a sunny window in the summer. A bit of wiring was added and a garment tag gave itself up for the fuel line down the left side. Anyway, enough chat from me - here's the bike, hope you like. C+C welcome! Thanks for looking - see you all next year! ATB Rick10 points
-
Good afternoon to you all, hope you've all had a good Christmas! I thought I would share my latest builds that were finished yesterday. Earlier in the year I picked up this for a good price and felt the need to build them straight away: Both went together without any effort. They were both OOB builds and the only deviation I made was to leave the nose caps off the fuselage until after painting was finished in order that I could pop the exhausts in at the end rather than having to do a lot of masking. Mr Paint was used for the RLM 78 and 79 with all other colours being Tamiya. A Mig blue grey wash was used over the 78 and Tamiya brown panel line wash over the 79. Here is the first one; Bf 109F-4/Trop 4./JG27 El Gazala, Libya 1941 And if your eyes aren't bleeding, here's the other one: Bf 109G-2/Trop 1./JG 77 Bir-el-Abd, Egypt 1942 Look forward to your comments as always and here's wishing you all a wonderful New Year! Howard10 points
-
Latest Build. Added aftermarket interior and decals. Painted with craft paint. Mark DSCN3326 (2) by mwsfly9, on Flickr DSCN3324 (2) by mwsfly9, on Flickr DSCN3325 (2) by mwsfly9, on Flickr DSCN3327 (2) by mwsfly9, on Flickr DSCN3328 (2) by mwsfly9, on Flickr DSCN3DSCN3330 (2) by mwsfly9, on Flickr329 (2) by mwsfly9, on Flickr DSCN3331 (2) by mwsfly9, on Flickr DSCN3332 (2) by mwsfly9, on Flickr DSCN3333 (2) by mwsfly9, on Flickr DSCN3336 (2) by mwsfly9, on FlickrDSCN3337 (2) by mwsfly9, on Flickr DSCN3339 (2) by mwsfly9, on Flickr DSCN3340 (2) by mwsfly9, on Flickr DSCN3341 (2) by mwsfly9, on Flickr DSCN3323 (2) by mwsfly9, on Flickr Thanks for looking. Mark9 points
-
No messing about... I'm going to try to make this build fairly prompt as I'm aiming for a May deadline. I reckon today has been a productive day and I'm hoping for another update tomorrow evening. Not much to say really, most of today's efforts have been very simple. Just cutting out various geometrical shapes of different sizes and shapes. I've been using the bandsaw... a jeweller's saw... and the disk sander quite a bit today. In addition I've had to cut out a couple of thin sheets of plastic to form the boat deck and bridge deck using the usual combination of scalpel and scissors. Here's where I'm up to so far. Please note that the reason the ship is sitting so proud above the 'water' is that I've intentionally cut the hull to a line about a centimeter below the true waterline. This is to help me embed the model into the sea that I will be making for her to sit in. Here's the view from astern. So far I reckon I'm making good progress and am feeling confident about May. But we shall see... 😉 Steve9 points
-
Happy New Year everyone. Have managed to get some stuff done, including painting, over the festive period in between food and drink consumption. What seemed like an eternity, I finished off the masking. This is a “one I did earlier” midway through shot where I’m just beginning to mask the side windows. I then got the front turret settled in after giving it a coat of black. The cowl did not fit right and was a proper faff requiring me to add a slim piece of strip below to close the gap. It took a lot of persuasion to hold it in place while the glue set. Finished article. One casualty I busted off the front guns, stuck em back together then busted em off again sigh! They will remain off until completed. I should’ve known better really. My advice would be to go for the brass aftermarket jobs. They look much better and as you most likely glue them on at the end, won’t get busted off. Another obvious addition is that I gave the canopy a coat of cockpit green. This is Colourcoats RAF interior green and the stuff went on like a dream, so step by step I will be replacing my Humbrol enamels with Colourcoats enamels. The new formula HU 78 is in the bin with all the other festive detritus awaiting collection and deposit to the local incinerator, Birmingham bin strike permitting. With that done it got a coat of primer – Tamiya Fine out the rattle can: Well pleased with the outcome thus far. I had to do a little more sanding on the fuselage spine which I re-primed with Alclad grey primer. Dark Earth and Dark Green at the ready. The Dark Green is Humbrol old school so no grief anticipated. Anyroad just about to have a big greasy full English fry up then it’s off up the pub for my customary New Year lunch time brandy…9 points
-
Although she never bothers with my modelling, Merry can't resist my wife's jigsaws Happy New Year to cat lovers everywhere. Dave G9 points
-
Just an old fashioned Stirling With old fashioned ways A fuselage tattered and torn. Four Hercules engines keep chugging away She's flying from midnight to dawn. Though she don't go so fast, No great height does she claim, Sure there's something that makes her divine When she flies there on high She's the Queen of the sky She's that old fashioned Stirling of mine Taken from Stirling Wings by Jonathan Falconer - song often sung in the sergeants mess at Lakenheath where 149 Sqn were based in 1943 After 10 months of slogging away the Stirling is finally done. By far, this has been my most challenging build to date, the first vac formed kit I've ever completed (first attempt ended up in the bin!), the first time I've vac formed my own canopies if crash moulding doesn't count and first time soldering parts! The overall shape of the Sanger kit is pretty good, however there are a few noticeable errors, the first being the wings formed upside down and the second being the squared off rear fuselage when it should match the profile of the FN20 turret. It's built as a dedication to Ron Middleton who was posthumously awarded a VC for his bravery on the night of 29th November 1942 when he sadly didn't return from his 29th mission to Turin. Hit by flak over the target, he lost his right eye but maintained control of the aircraft and managed to get it back to the coast of England. 5 members of the crew bailed out, two others remaining to help him fly the aircraft but it lost control and crashed in to the sea taking the three crew members with it. There are two build threads to this because it was started by @Mike way back in 2008. After several years of me pestering him to finish it, he sold it to me and I picked up the gauntlet to get it to Telford as part of the 1/48th Bomber Command SIG VC display this year. The build continued here. There's lots of people to thanks for their help in this build, John @12jaguar for his wealth of knowledge and reference photo's, Nick @SleeperService for sending me a Wellington nose turret of which was used for the basis on the front turret in the Stirling, Alain @corsaircorp for sending me some resin parts that got used in the cockpit including the instrument panel and Chris @stringbag for his 1-2-1 soldering lesson and incredible drawings that were critical to get the complicated wing and undercarriage structure aligned. I'd also like to thank Megas Tsonas for his truly amazing 1/48 Stirling build that you may of seen in air Modeller, however this also proved to be a demotivator because I could in no way achieve the results he did! My goal was to get it finished in 2018 (well actually it was to have it ready for Telford but didn't quite make that!!) and I've just about squeezed it in! It's by no means perfect Anyway, enough blurb, here's the piccies. Hope you like her. Thanks for looking Neil8 points
-
Hi, The last my build from 2018 (Nos 27&28!): Curtiss SO3C-1 Seamew by Sword and Curtiss SC-1 Seahawk by Antares (known also from many reboxes) 1. The SOC-3 (photos with flash, it was too dark to do photo without flash at 3 PM today in Krakow...) - from USS Santa Fe, summer 1943, I think somwhere close to Aleutian Archipelago. Decals by Techmod, number self printed 2. Curtiss SC 1 Seahawk, USS Alaska, Iwo Jima battle, 1945: Comments welcome Regards Jerzy-Wojtek P.S. Welcome to my Yearbook, 2018.8 points
-
My first for 2019 🙂 Farman F.70 ”Aero” Komunikacja Powietrzna S.A. (Polish Airlines) 1925-28. Sorry for the quality but I used my smartphone.8 points
-
Made a few years a go a new tool Harrier Gr.1 in a ''Belize'' Harrier GR3, XV787 ''Hot to trot''. This one is without the ''Sharkmouth'', that was only for three days. It was to aggressive according a high officer with a lack of humor. Scheme was the new '' wrap a round camouflage'' the gun pods are light grey, and the fuel tanks where also in the old colour Not my best effort, had some problems with the masking so I had to paint the green camo. Also problems with the dull cote, so next time a better Harrier..... Gerhard8 points
-
I've got the first painting job done, the light grey wingtips which are made of glass fiber on the real aircraft, this serves a double purpose, it makes for a cheap replacement should the wing tip get damaged on landing and it is also the position for a large radar antenna which was part of the Pee Wee III ELINT suite. I've also re-scribed the few remaining panel lines lost during filling. John8 points
-
Kind of you as ever Roger, and the very best to you and yours for a peaceful year also! And the same to yourself and family Benedikt: Prosit Neujahr! Just as well I suppose given what follows.... Most kind hendie. May all your greetings cards be in German and may all your pigs smoke cigars.... Thanks for thoise kind words - and the very same best wishes to yourself and famille! Holy gnashers BatGiorgio! And to thou Brother Ian of the Desert Sands! Or rivets..... 'All is quiet on New Year's Day', sang the Bono Dog Doo Dah Band once upon a time. It is indeed a quiet day here; not a breath of wind and socked in by a thick layer of featureless stratus so that outside has resembled a still photograph since breakfast. We're having one of those reclusive days where time only passes in reference to the coming and going of the cats and ducks in the garden, spiced by the occcasional sizzle and whiff of flux upon the air. Mountings have been added to the starboard engine-bearer to hold the oleos now: A simple expedient of 1.0mm tubing attached to a baseplate for strength (as this part will have to take the weight of the aircraft on that side): The oleos won't get permanently attached until after that structure has been finally mounted inside the nacelle of course. I'll get round to using hendies idea of a plastic mounting block for the port oleo later. The radius ams also had some overdue attention in terms of how they will be secured at the rear of the nacelles. To allow the brass to pass in under the kits moulding (which is quite thick) I used a drill in the flexible shaft of the Dremel to grind out any plastic that was in the way, and then added a bed of Milliput to the resulting space in each nacelle into which the radii arms were pressed at the correct angle to create a moulding to hold them in place later: Like so: Between the radii arms and oleos, this should ensure now that ther replacement undercarriage will be plenty stable for the modest weight of the aircraft overall: I just posed these for the camera so that you could see the reasoning behind this as the arms needed to come back out of the Milliput before it began to harden. Just as well anyway because I note in the above shot that I've still got to sand down the innner arc of the radius arms a bit more to make them flush with the 'horseshoe' bit down by the axle. The oil-coollers also had some bits sawn of them. If you recall I found out that that PE for these is too wide and had two too many 'gills' included, thus making them 'chunky danglers' (in hendie's immortal phrase). I sawed two of the outer gills of without any real drama and then decided to solder the starboard one into place on the underside of the nacelle: I simply don't trust to glue to bond such metal parts together strongly enough in a way to survive all the subsequent handling that will still be involved and they certainly can't be soldered on after painting - so this seemed the right things to do. As this side of the nacelle is open, I have to also add some 'stubs' on the other side of the oil cooler inside the nacelle in order to represent the ends of it into which the return oil-line from the engine is plumbed. The port cooler has to be mounted on the kit plastic of course, but I'll can cut some small recesses to give a better grip for that and that can be added after paint. Those coolers definitely look more accurate cut down now anyway so I'm happy to move on from them. Next task I reckon is to finish the oleo mounting for the port side, sand down the radius arms as mentioned above, and then step away from the nacelles for a bit and do some other part of Annie for variety and sanity. Oh. Propellors. Anyone any idea about something thinner and more accurate than the kits parts? How hard could it be to do these in brass? Tony8 points
-
Hi all and forgot about posting this one here from earlier in the year. Built for the Carriers GB here on Britmodeller. Mostly OOB but with some corrections to make accurate for the type - full build thread if you're interested is here ! Cyber Hobby SH-3D Helo 66 (1) by Dermot Moriarty, on Flickr Cyber Hobby SH-3D Helo 66 (2) by Dermot Moriarty, on Flickr Cyber Hobby SH-3D Helo 66 (4) by Dermot Moriarty, on Flickr Cyber Hobby SH-3D Helo 66 (7) by Dermot Moriarty, on Flickr Cyber Hobby SH-3D Helo 66 (14) by Dermot Moriarty, on Flickr Thanks for looking and Happy New Year to you and yours. Cheers, Dermot8 points
-
Fortified by Anil's sage advice, a glass of champagne, and a half-litre of Dr Pepper (my first caffeinated soda in almost two years, more on the reason why in a jiff), I tried again for my first modelling of 2019. Greetings to all of you already firmly ensconced in the far-future year of 2019. Can it be worse than 2018? One would hope not, but the last few years have certainly seemed to indicate that the arc of human history bends downwards on a pretty much permanent basis these days. Sometimes, of course, things must get worse that they might grow better, but cold comfort to those living through the tumult. We spent the last week or so in Michigan, a part of the United States so not unlike Finland that large numbers of Finns left their homeland to experience the same extremes of temperature in a country where vowels were in rather shorter supply. (Mrs P's family, however, are of Quebecois and Romanian extraction. Incidentally, I've often thought a fascinating book could be written on Romania's consistent failure to pick a geopolitical winner to throw its weight alongside throughout the twentieth century.) It was cold, I'm heavily implying, and I should know, as I walked 51 miles over the course of the week, mostly in 8-mile circuits around my in-laws' house, listening to an audiobook of Leo McKinistry's Lancaster; I had initially started with Big Week, by James Holland, but the narrator had one of those weird raspy American accents that're supposed to sound manly but sound instead like a chap manfully struggling to talk through some gas which may prove to be horrifyingly more without making a mess of himself, and it make it hard to keep moving, or indeed to want to do anything but curl up and die in the snow. We were supposed to head home yesterday, that is, the 30th of the previous year, but Mrs P's heart is closed to joy and she retires for bed at 9 PM on NYE, so sees little reason to be home in a rested condition for it, and she also wanted to stretch out the amount of time she could fob the children off on her parents before spending a long week of Quality Time home with them when I returned to work. (She also said she feared that I'd just sit on the computer all day and ignore them; I had been unaware this was an option, but I confess I was intrigued by the notion.) So on the morning of the 31st at 5 AM local time (Michigan is an hour ahead of Chicago), we packed up our children into the Subaru and began our 360-mile trek home, arriving at 10:30 AM Chicago time almost on the nose. Through a comedy of errors I then totally failed to get a chance to take the nap I was promised for acceding to this request, so I took the opportunity to catch 90 minutes of shut-eye when I put Winston to bed. ("May I have the pillow too?", he meekly asked me.) Then it was off to my parents' house to find that they'd totally forgotten about me (which shouldn't have been a surprise going on the last thirty-five years of my acquaintance with them) and waiting in the rain on the stoop for about an hour. Splendid. Anyway, that all sorted, we rang in the New Year with the aforementioned champagne (sparkling wine, technically, since it was made in Britain*) and I returned home at 12:15 AM in the grim future year of 2019. Naturally, now was as good a time as any to try and do stupid things with models, so using much, much much thinned Colourcoats, I -- well, fixed might be too strong a word, so -- confused the mottling on the flanks enough that I think it's passable. Far from perfect, but I trust you will agree, enough of an improvement that we can all get on with our lives. I also did the wheel hubs: Just need to do the gear legs and gun barrels. And for the spinner, all that remains is to mask the prop blades and spray the metal of the prop hub, then assemble the whole kit and kaboodle. So here we are. Hope you have a great year, I'm certainly hoping against evidence for one. *8 points
-
well, this is klasic short rur . And very nice fighter. I feel the smelth of Corcair ,-)7 points
-
I like this fighter. Generally, fighters from 20-30 May something.7 points
-
Happy New Year all! I hope you had a good evening and here's to a happy and prosperous 2019! We walked to a nearby pub/restaurant and were treated to one of our local characters playing 'Scotland the Brave' on his bagpipes while everyone sang 'Auld Lang Syne'. He's English. Very eccentric, but he's part of the character of the area. Castleated house and all. Yes, he'd been fuelled up. 10 pints apparently. No I didn't match him. More Nimrod to come but I'll bet it won't be later in the morning...7 points
-
Almost 20 years ago I build a Bandai Thunderbird 1, scale unknown but smaller than 1/72. I think around 1/82. I have scratch build the landing gear from copper wire and plastic rod. I airbrushed it with different metallic airbrush paint from Testors, It was my first TB I have build. Gerhard And refurbished a Matchbox (I think, scale about 1/72)) toy thunderbird to something you can look at. it was a good case to test the metallic paints( Testors), the letters are from ''dry transfers'' (lot of work to do it straight in one good line) Also make a old Airfix Saab Draken in to a Red Arrow from the episode ''Edge of Impact''. And a old Monogram VooDoo F-101 (scale unknown) as a UN Fighter from the episode ''The Imposters''6 points
-
My DWI Wellington now completed, great feeling finishing a model for a change. Conversion made by myself available at Aerocraft Models. http://www.aerocraftmodels.com Decals are from DK decals, excellent decals. see http://www.dkdecals.cz the ones used here are on sheet 72069, another DWI is on sheet 72063, however tail turret cover is slightly different, but the rest of the conversion is the same. I issue a warning though if you purchase one of these or both as I did of these decal sheets I know like me, you will be tempted to purchase more kits as there are some great options to be built. Pictures not the best as the daylight is not that great in Scotland at this time of year so had to resort to some 'lights' hope to get some better ones in a day or two.6 points
-
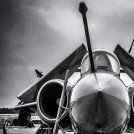
I loved building this as part of my model clubs group build: T101 (101 years of Tangmere Airfield). XV408 is currently resident at Tangmere Military Aircraft Museum, which is home to my club: Tangmere Sector Modellers IPMS. It is being lovingly restored to its most famous 'blue' scheme that 92Sqn had done in homage to the blue Hunters that the Squadron used for their display team. This is the Hasegawa 'blue special' kit with Aires resin cockpit, Radar, electronics bay, allycat seamless intakes, scratch built parachute compartment (and other bits). Painted with Vallejo Model Air insignia blue.486 points
-
Last one for 2018. The depended all Hasegawa Phantom FGR2 in 74Sqn scheme. Built for the backseat of this particular aircraft. Extras included eduard photo etch and armament. Paint is Vallejo Air. Happy New Year and look forward to seeing more outstanding builds in '19.6 points
-
.HAPPY NEW YEAR ALL. I still have a couple of rail related builds left to post so will start off the year with wat is left. a ,1 72 scale destroyed bridge and scout car now calling it over the edge you can see why. , as you can see its a german armoured scout car (train ) and not noticed the bridge is out is just about to go over the edge / tottering on edge, and that crew member wants to get off in a hurry. Rocks were a first for me and dont look to bad they were made by pressing a crumpled then straitened piece of cooking foil, then pressed on to soft plaster and left to dry. The bridge was built from balsa wood.6 points
-
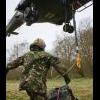
Hi All, Here is my build of Takom's 1/35 Panhard AML-90 in a simple diorama with some Blackdog figures, showing a scene outside Port Stanley in 1982. The base is from an off the shelf mat cut and shaped to give some contour and a few grasses and flowers added. I used Crossdelta DPM decals for the Marines - painstaking but with my painting skills they were essential! I'm only just getting in to figure painting so I'm really pleased with these. I'm aware my AFV weathering skills leave room for improvement as well, but I really enjoyed doing this one. (And I have spotted the way too clean wheel arches this afternoon, plus the fact that the mirrors need some 'spatter' adding.) Thanks for looking, Gareth6 points
-
And let's kick off the new year with some masking for my two tone hotrod, laid down a very iridescent Tamiya light metallic blue first, And then the Mica blue, ooh fifties baby! (Silver rectangle is for the Rolls Royce logo). Finally, primed the prop with a 50/50 mix of Mr Surfacer black and GX112 super gloss, I'm going for a see-your-own-reflection vibe when I hit it with the Alclad chrome, Some last minute touch ups done, gloss coating and wacky WHIF fifties race decals tomorrow, it looks like the first finish of 2019 is imminent! Happy New Year to All Anil6 points
-
I've said it before and will say it again. Weathering always causes me the shivers. When a build has lasted so long there's that awful feeling of mucking it up in the final furlong So no better time to try out the Mig Ammo "Oilbrusher " in Starship filth. I use very small amounts and effectively dry brush it on building up in small areas at a time. I also try to "embed" all the deck furniture by dry-brushing around the bases which leaves them "sitting" more realistically ( To my mind anyway). The whole deck took about 3 hours!! Original pics show these boats were often quite grimey and whilst I accept it's easy to overdue the weathering I do like my models looking like used working boats. Next up was to apply a flat varnish on the deck and for this I thought I'd try the AK Ultra-matte offering which gets good reviews. I like differential varnishes on a model which adds to the weathering - flat for wood and often leaving "metal" objects with their coat of "Klear" to give that slightly sheeny metallic look The flat varnish actually tones down the oil weathering. I'm pleased with how matt it is, all be it needing 3 separate coats And with that all done it was time to go to the next step which I've been dreading - "raising" the radar gantry. And by raising I mean cutting off the base cross members before gluing it down to the bridge section It didn't collapse ...and you also see those nice Brodie helmets painted up above the flag locker It's actually starting to look the part Happy New Year to you all! Rob6 points
-
That's quite right Ian - on the actual aircraft that cross brace marks the point where there's a kind of extended vertical triangular bracket directly above and inline with it on either side, into the apex of which the locking gear for the oleos are mounted. As even I'm not daft enough to try building a double-hinged locking-gear at this scale I've snipped the cross brace out now as although it is there on the design of bearer frame, there's no safe way of cutting it down and fixing it directly between the two bits of brass tubing that the oleos are going to be mounted in on that side. I can leave it out without spoiling the visuals of the aircraft, and as long as you keep schtummm, the others mightn't notice my indiscretion... 🤫 I've a secret to share lads in that - as may have become vaguely apparent from time-to-time - I'm partially using this build as a sandbox to see how far I can push my metalworking abilities to a higher level in anticipation of more advanced metal-based projects in the future. In this respect material-reasoning frequently takes a back seat, and in relation to which, I earnestly apologize for giving any false impression of rationality behind my conduct! Gosh. I'd be afraid to get into the aircraft on that evidence Bill! 😨 This shot from the Nhill restoration looks a tad beefier in comparison and nicely shows where the radius arm is hinged to the rear spar: (Apologies to the guys there, I wan't able to find the url I downloaded this from again to give an exact credit.) The do indeed Bill and would seem to match the PE more closely, however, they don't match the more svelte version that can be seen in the maintenance manual or reference shots of wartime Mk.1s, eg. ...so I guess it's possible that chunkier version is a later variant/modification? Gosh no! I likes 'em! 😁 Speaking of Anson pictures, I found this in the IWM archives a while back: I'd seen those well-known shots of two Ansons getting intimate but not this of one nibbling the ear of a Whitley! Duly noted.6 points
-
Happy New Year ladies & gentlemen! And thanks guys for your kind words, always much appreciated... Today, around the radiator. Of course, nobody will see them in a few... month (!), but it's there and I know that! First steps... What a puzzle! Dan.6 points
-
Here's how that deck malarkey turned out. It turns out that W&N acrylic gloss clear is no barrier at all to enamel thinners so I managed to damage the surface just ahead of the turret barbette. That's getting remedial work now. I had intended to ask if the BM populace considers this deck painting to be ok or if it needs redone, but these images are not scaling well at all and the automatic resizing keeps applying its own patterns to the deck that are not present in real life. I guess I'll just need to go with my own opinion on the matter here. I have turned my attention to the hull for now. This has four large gates on the keel but they are easy enough to remove with a flat chisel. On mine a dab of filler is needed on each as some material has come away when the moulding has been broken off whatever runner/sprue arrangement the injection moulders used. There are a couple of "bridges" on each side to aid moulding the surrounding structure around the midships torpedo tube openings. This isn't beyond the realms of reasonable modelling skills but I can foresee heavy-handed modellers breaking the bits they're supposed to keep. Mine was already broken in the box on one side - no big deal. I removed the surplus plastic using a good sharp pair of nippers that every modeller ought to have... I need to retract my earlier statement about the deck being a bit springy. On closer inspection there was a very easy answer: There are a few of these on the undersides of both deck sections and they are easily removed with a chisel blade. Once done, the deck fits very well as shown here dry fitted:6 points
-
OK to follow on in the vein of wall lining I have been doing a bit to this (And no I aint forgetting the Sea Beastie, that is in hand too) Here is ALL that is going to happen inside the Merlin My Tamiya tape layers will hide the oddball interior that results from the way Italeri made the front fuselage, no doubt, though I havent seen the HC1 so that the different window arrangements could be accommodated The transparencies must be used for all versions because they gave me more windows than the MH1 has but as many as the HC3 Which was useful because they don't give you as many windows as the MH1 has in service Prototype side walls need a smaller front side window by the crew door Like this So I added it from one of the left-over big ones and added a rubber seal that needs reducing like the others on the model And underneath working from some of the pictures (rare ones I kid you not) that allow light to flood under her I managed to work out where the various load items lower or drop Et viola I'm looking forwards to finishing inside so I can begin adding the stuff outside that needs attention, so many carbuncles seeking attention HRH the POW would be proud, I wonder if he has kept up his currency in RN helicoptership... Attention seeking carbuncles, looks like accelerated H&S doesnt it Hand rails for the steps, blobs covering stuff and assorted vents and plug 'oles, a carbuncler's dreamboat Can't wait6 points
-
So the last model of the year. Just finished this one build oob. It was kind of an experiment as i tried for the first time the Hataka acrylic paint Orange serie for brush painting. It turned out quite good. Morlot was killed on the 15/5/40 by either Lt Bock or Uffz. Vollmer from 3./JG 3. Cheers Jes6 points
-
Don't worry Ben - with current politics in Britain even the geology is confused now.... So. Last post of 2018! Did that seem like an exceptionally quick year for you lot as well? I spent a large chunk of today unexpectedly having to help my youngest with installing a new gfx card in his PC - he's an able lad at such things but the damn thing refuses to act as the primary display despite the OS recognizing it and all drivers and BIOS assignments being sorted according to manufacturer's instructions. We'll have anbother roll of the dice tomorrow, otherwise it's heading back for a refund. As therapy then I became increasingly obsessed throughout the day with getting the nacelle in a finished state - at least as far as adding any more bits of metal to it is concerned. You're probably getting a bit sick of seeing it at this stage but thankfully this phase is nearly done now. If you have a look at the opening in the nacelle in this shot: ...you can see that inset strip and screw points running around the edge of the opening that the removed panel fixes onto. Do you see that guy lurking underneath the aircraft behind the oleo? I swear he wasn't there the first time I posted this photo back in August! It's a prominent enough detail in such views that I felt obliged to have a go at creating something like that 'lip' out of some scrap runner from the PE set, seen here tinned and ready for use: I started with the engine bearers first, a strip of the PE added around the firewall and then the fixing points tacked on each side: Tucked back into the nacelle briefly to check positioning: Next up was to add the inlay to the nacelle itself, using the same ingredients: These sections were a lot harder to do due to having to solder inside the tunnel with the iron turned right down to the lowest setting, but the results are worth the effort I think in terms of building up the visual 'busy-ness' of this region of the aircraft: The rear fixings then got some attention. Some 0.8mm tubing was soldered on to the rear of the bearer for strength and then some holes drilled into the brass disk that will act as the spar mounting squirelled away inside the nacelle: It made more sense to drill and mount like this so that the exact position of the bearers could be jiggled about before being permanently attached to it. Just as well because on test-fitting into the nacelle, I had to snip of a section at the top of the disk to get the bearer to run parallel inside the nacelle: The forward firewall is however meant to be at an angle like that - just in case you think it looks odd! That looks and feels now like a good solid method of keeping those innards fixed in place, though of course they'll all need painting-up before being inserted finally and soldered into permanent position. Fixing the oleo inside there can wait until next year now.... It only remains for me to wish all my friends on here a: Catch you in 2019! Tony6 points
-
Whilst preparing to put the turret side hatches on I nearly 'cleaned off' these... However it turns out they are for locating the fixings for the turret skirt. Another 'phew' moment - but on with the hatches... Next up was the side fitting air filters that had me somewhat confused on the PSC build... ...luckily the Revell instructions precisely show where it should go... ...but I didn't understand at first that the holes needed to be drilled... So I got there in the end and I think it is quite a nice feature & adds a bit of 'interest'.5 points
-
OK so starting to get back to normal (if you can call this hobby normal) after the Christmas/wife's birthday/sons birthday and New year celebrations Slowly building up the water on the base not happy with the beach effect so will be adding some mig pigments as my fine sand looks like boulders in this scale trying to get the right color for the pacific Islands water needs to be lighter I think HAPPY NEW YEAR TO ALL 🎆 beefy5 points
-
hello again Rudder is now complete... ..first step is to cover it in solartex which is what RC folks use for their flying models - it has a nice scale fabric effect - this is my seventh try to get a nice clean straight bond - it is heat activated with an iron which causes the adhesive to bond and the material to shrink - pretty tricky on a part this small (by comparison..)... ..there is also a metal fairing at the bottom of the rudder which I assume protects it from crap thrown up from the tailwheel - I pressed the part into plasticine to make a female mould and then cast a buck in resin to vacform the piece over.. here I am marking it for cutting, with the part taped to the buck.. ..and the covered rudder - started marking out all the rib positions for the rib tape... ..you can see on a real P51 the rib tapes go over what look like small circular depressions (rather than a Spit which has raised bumps where the knots are) - look along the line of the top rib tape and you can see the effect we need to get.. ..to get the effect, I used a rivet awl to punch small holes in tamiya tape and laid these down first along the rib lines.. ..then for the rib tape itself, I use plumbers aluminium tape - this was made to scale width from the plans and the 'pinked' edges (fine zigzag cutting to avoid fraying) I ran a rivet wheel along the line and tried to cut through the punched holes to make the pinking.. these were then laid out according to the NA covering diagram.. ..all done - hopefully you can see the dimples along the rib tapes - this was the effect I was after.. also made up a trim tab from the part broken out of the main rudder & skinned it in litho... the rivets on it are perpendicular to the leading edge, not in line with the ribs as you would expect.. ..also added the trim tab hinges to match the cut-outs in the tab... ..to finish off I added the trim tab control horn & arm, and at the top leading edge the balance weight - this was actually quite complex as it it shaped in many directions to match both the aerofoil and the tapering tip of the rudder post.. ..coat of primer to settle the details & textures.. ..the rib tapes look good to me so job done.. back with something else soon TTFN Peter5 points
-
A little further along the row. Decals on and they're not the best. I wasn't happy with decal that presented the windows, looked very odd and so were 'blacked-out' (as best as one can being only about 2mm high). The decal also started to break up for some reason (specks of K22), so thi's will be fixed in due course. ....and so onto the base, a piece of insulation foam board, wooden trim, primed and painted satin black. The sea will obviously be painted before the 'water' is added. ...and a sneak preview of where this going. Stuart5 points
-
Thanks Simon Hopefully things will progress faster now, with fewer sausages. Well, that didn't last long… having a go at the bomb bay? Well within your talents Thanks Ben. Christmas with the family - what could be better? Answers on a postcard… It is Giorgio, work will be resumed below I hope so Kirk, but I doubt it… Weapons bay, of course. Thanks John Thanks Chris - more views of the windscreen below Oh well, I tried. No chance of going sausage free with these German residents around… I was a bit worried about removing the windscreen from the block but it's well connected and after the first saw cut snicked away so the rest was cut with a blade: Here it is compared to the kit part: The instructions say to insert a 0.020" shim in the fuselage top to correct the width: … but the shape looks great. Next step is to insert the windows. Initially I started sawing off the parts to maintain the angle on the lip: … but then realised they don't effect the fit: … so I clipped the rest off with the sharp sprue cutters and stuck them in with some Araldite Crystal: The protruding windows (part #13F) only fitted when the ports were opened up a bit with a scalpel but the others clicked beautifully into place and they're nice and flush on the outside: That's it for today. Thanks for looking5 points


.thumb.jpg.158e2e086d45b8f96b7d93b8bee8dc21.jpg)


.thumb.png.6e11fc11af5645499ae76cb59fcfb788.png)

.thumb.jpg.b4a5069fd2c2dd5708ce1694345c5b11.jpg)


This leaderboard is set to London/GMT+01:00