
Leaderboard


Popular Content
Showing content with the highest reputation on 09/12/18 in all areas
-
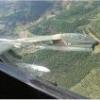
1/72 HobbyBoss A-7E Corsair II, VA-27, USS Enterprise 1973. Yankee Station. I know that there are shape issues with this kit but it's something that I can live with. The kit has loads of detail and is very easy to build. Decals were from Print Scale. Little bit of etch used. The Starboard TER is loaded as to not interfere with the Shrike. Shown here with an asymmetric load for an Iron Hand mission. The Combat Workshop blog planted the 'SEAD' for this build and loadout. Check out the site, some great info on there: http://thecombatworkshop.blogspot.com/2018/11/making-sure-your-7-is-dead-on.html Cheers all, Phil25 points
-
Here's my Airfix 1:72 Hannover CL.IIIa 3879, operated by an unknown Schlachtstaffeln (Battle Squadron) of the German army aviation, in the Western Front, 1918 which I built in 2001. This was a 1970s/1980s issue of the kit and I built it OOB. I believe this kit was re-issued a few years ago. The kit was completely painted by brush with only the varnish being airbrushed. Fortunately, the wing lozenge patterns were to scale in the paint guide of the back of the box so I could trace it on to the kit itself. I'm well aware the colours used may not be accurate since I went with the colours indicated in the kit's instructions (actually, their Humbrol equivalents). Nevertheless, I was (and am) very pleased with the end result. The kit isn't rigged as I only had the courage to start rigging a few years later! Thank you for looking Miguel23 points
-
I present you my favorite combat jet the Su-27. The model shows the Su-27 with the side number 23 RED. As always, the model built straight from the box. Set: Trumpeter 1:32 Painted: Sikkens Auto Wave II Decals: Trumpeter22 points
-
Here’s the Amodel Shavrov Sh-2 built for a forthcoming club display (and because I like VVS planes, even though, strictly speaking, this isn’t one!). This kit is one of Amodel’s earlier efforts and is believed to be from the early 1990’s. It looks pretty crude in the box. However once cleaned up the parts go together okay but nothing fits with precision. There are decent review and build articles here http://modelingmadness.com/review/preww2/russia/bakersh2.htm http://www.swannysmodels.com/Sh2.html and a search on Britmodeller will find more builds from @JWM and @Colin1967. There are several boxings of it, which may differ in contents. Most builds seem to be the Soviet ambulance or captured Finnish options but I was intrigued by X-104. Translating the inscription on the nose ("Главрыба" - GLAVRIBA - fishing) indicates it was operated by the Commissariat for Fisheries Protection around 1940. From the early boxing I had, it’s not actually possible to build X-104 out of the box as the propeller and wheels are different to those supplied. I believe the green/blue colour scheme is correct for Soviet government non-military aircraft of this period. Later boxings have incorrect black decals for X-104 and specify a grey or silver overall colour. They seem to have gone backwards here. The wheels and propeller were replaced from the spares box – white metal unknown prop and cereal box car wheels. The interior was detailed with improved seats, seat belts and hammer-finish instrument panel with undercarriage winding handle – all wasted effort as it’s invisible under the parasol wing. ] The builds quoted above were followed and the struts were replaced, the engine was detailed with pushrods and exhausts, control cables and the circular inspection panels were added. Contrary to other builders experiences the decals were awful. They were continuously printed which isn’t helpful when many were white decals on white paper. They stretched alarmingly and a couple disintegrated despite being coated with decal bonder. Replacements were made on the Alps printer. Even though the result is acceptable it wasn’t a really pleasant build. Many parts needed replacement or modification and many were fragile - the wheel retraction tracks on the kit are pretty crude and were replaced with fine strips of plasticard. The ends, which protrude above the hull, must have been knocked off half a dozen times. Similarly, the prominent exhausts, absent in the kit, were made from fine-core solder and were equally fragile. Amodel have upped their game since this one came out and it’s not representative of their current output. It wasn’t an easy build but it’s very cute!18 points
-
Hi, everybody! It's my next model.17 points
-
Hallo again The EF-111 is the 1/48 kit from HB. I used the etched parts from Eduard and I think this was all. The a/c is for me interesting in the navigation aids, as terrain following and stellar navigation. The kit is not so difficult; the aerodynamic of the open wing was for me the most exiting feature. Happy modelling16 points
-
Eduard's great MIG-21 kit all build OOB. Thanks Jason Brewer for the pictures! Thank you for checking out my build. Thanks!16 points
-
This has not been a good year for me in any respect with the death of my mum, followed quickly by a major leg injury that needed two significant operations to fix. However, once again, modelling has proved to be a therapeutic hobby. Although builds from the early and middle part of the year were mostly built whilst lying on a sofa, or sitting on the floor (getting back up on the sofa required external assistance), I'm relatively pleased with my output and it definitely helped me to get back on my feet.... literally. As always, all kits were 1/72, hand brushed using Humbrol and Revell enamels. January started with two early Harriers to add to my collection - both ESCI 1/72 kits. The USMC one came in a bag with a warped fuselage and broken wing (I suspect the box had been squashed), but after some remedial work you can't tell. February saw two late WW2 kits of Axis aircraft intended to counter high flying bombers, an ancient FROG He162 and a slightly more modern Hasegawa Ki-44 Tojo: March was the month of disasters, but at the start of the month I finished a rather nice DeHavilland Sea Devon. April was more difficult - I had started and almost completed one of the new Airfix Hawks in Red Arrows colours before my fall. Overall red isn't too difficult to paint lying on your back and once it was complete, I threw together an ancient Airfix Gnat to join it (on the basis of "if I mess it up I don't care"). Both came out pretty well, although I was still a little shaky and struggled with hand painting the frames on the canopies: May saw the second operation and a bit of a setback. Rather than start anything new, I decided to fix an old model that was bugging me - after all, because I couldn't get upstairs, I was sleeping downstairs on a sofabed in my modelling room, so all was laid out in front of me for scrutiny. An Airfix Lynx HAS.3 ICE built in 2009 had some rather crude handling bars for its folded blades, so an easy replacement was overdue: And then, because AFV models are they are easier to handle and generally don't need any heavy duty sanding, I completed a Revell 1/72 MAN Truck. This was a surprisingly complex and satisfying little kit that turned out well. The brown is wrong, but was all I could get hold of at this point. At this point I shuffled down onto the floor to paint at a coffee table, which worked relatively well, although I couldn't actually get back up again and had to stay there most of the day until Mrs T came back home to help me back up By June I was feeling a little more adventurous (and a little impatient/frustrated) so took on a conversion of a 1/72 Airfix Spitfire 22 into a Seafire 46, using some Model Alliance decals. This was a real morale booster as it worked out very well. They say pride comes before a fall though and bouyed by my Seafire 46, I decided to try a resin CMR Seafire 45. For some reason I could not get the CA glue to stick anything together. I washed the parts thoroughly, then sent Mrs T into town to buy new CA (twice) to no avail and finally ended up using Araldite (truly horrible stuff). I got there in the end, but the result wasn't as good as I had hoped. I still cant reach the "Late Seafires" box in the garage, so no pictures yet with my Seafire 17 and 47. The heat of August wasn't good for modelling and I felt a little downhearted following the resin issues, so I played around with an old Airfix blister pack Spitfire Mk.9 hacking it into a passable Seafire L.III. Definitely "looks like a Seafire" and a satisfying build, although it would undoubtedly have the Seafire experts squirming. September saw a FROG Hunter FGA.9 as an easy and fast build. The pictures seem to overemphasise the apparent hook up of the forward fuselage - it doesn't look that bad in reality. October saw a little bit of serious bravado, as I started a Mach 2 Hu-25 Guardian kit. This is definitely old-fashioned modelling, which was a lot of fun. I made a few scratch additions to turn it into an Hu-25D with gps, satnav and optical sensors. Although the end result has its blemishes, it makes a striking impact hanging from my modelling shelf ! November was Canberra month, starting with a Cold War FROG B(I).8 kit and ending with a Vietnam Italeri B-57B. Same role, different approach, for different wars: And then December. Having returned fully to work in June (after working from home for a while), F-35Bs and QE First of Class Flying Trials have been a major feature. And now they are complete, QNLZ is back in Portsmouth and PWLS is progressing in Rosyth. So in a fit of excitement and pride, I had to build another F-35B, and it had to be in RN colours (don't scoff, it's not impossible, by a long way). I briefly contemplated doing one of the two trials aircraft, preferably the one with the coloured markings, but some of the prominent light grey lettering defeated me. So instead I built a new one in slightly toned down 809 Sqn markings and updated last year's build to add the badge of the F-35 Integrated Test Force to the inner tails: And that. I think, was a good way to end a bad year. Roll on 2019 - the coming year's objective is to find a model show I can display at and get some of them out of their boxes again! FredT14 points
-
this is the old tool hasegawa A6M5c with the metal cowl and undercarriage .....it's an old kit but still builds up well...the markings are for a plane flown by Saburo Sakai in 1945. the kit is out of box other that a set of stunning Eduard wheels...and it's my first serious attempt at weathering....pretty happy with the results. 48189145_891007654427941_8537467885692387328_o by paul sabin, on Flickr 48237114_891007591094614_2427286469388271616_o by paul sabin, on Flickr 47680111_891007794427927_1391688894189142016_o by paul sabin, on Flickr 47681468_891007687761271_8704623490252144640_o by paul sabin, on Flickr 47580615_891007624427944_3525011382179201024_o by paul sabin, on Flickr 47578347_891007847761255_4762451636943585280_o by paul sabin, on Flickr and with an older 21st century early A6M5 that i built 48408314_891007887761251_2994181298731352064_o by paul sabin, on Flickr it's been an enjoyable learning experience...i'll be playing with weathering in the future14 points
-
Hello Everybody, one day I saw a picture of probably the most beautiful plane in the history of aviation - XB-70 Valkyrie. It was "in flight" with wings folded: That moment I decide I must build one in exactly same position - in flight with wings-fold. So here it is: At the beginnig I planned clean plane as for experimental one then I saw picutres that showed it used to be really tired at a time: So this is my final build. The kit is infamous 1/72 Italeri kit (ERTL one before). This is truly a horrible kit, with few really huge parts extremely difficult to snap together, lots of sanding etc... So it was like 2 months battle, few times I nearly gave up but finally we have a draw: The kit is reallllllly big - here with 48 Spit: Here with other 72ers (Revells Transal and Blohm&Voss): And here with my 48ers - it is really dominating the whole pack:13 points
-
My latest project is this Special Hobby Vildebeest. I was initially drawn to the model by the excellent box art on the new release but after researching the somewhat controversial thoughts on the camouflage scheme (ie, whether it should be Brown and Green or Blue and Green and black underneath or sky etc, etc) I opted for a basic silver and grey one. Built pretty much straight from the box except for the modified rear gunners compartment to replace the (again, apparently?) incorrect scarf ring arrangement with the Fairey High Speed version. Too late now as I'm not changing it back! The rigging is rolled wire and the aerials on the top wing are Uschi thread. Although its a nice kit to build I found I had to shorten the cabane struts a little and I was disappointed to find the wheels and spats as one piece..(or rather two but with the wheels moulded on to them) There's also a very nasty sink mark on the tail wheel assembly. Also when I can get my steady hand back I'll edge the red on the spats with black..... Thanks for looking. IMG_0103 IMG_0105 IMG_0101 IMG_0102 IMG_010412 points
-
Hi, Within the STGB devoted to B-17, after pernission from other colluegues I constructed a passanger modification of B-17, the Boeing 307 in his appareance as C-75, after beeing impossed to Army. The construction thread is here You may found there some challenges and problems which one can meet on construcing this model. BYT - this is a kit made by Russian Maquette company in which a late war or post war variant of Model 307/C-75 is presented. In fact this is a ex-Frog B-17E with new fuselage and few more new parts. The Boeing Model 307 was produced in short series of 10 machines for PAN-Am and TWA companies. One machine was bought by Howard Hughes. The five TWA machines were impssed to army keeping their individual names from times of being in TWA, they werenames of Indian tribes: Apache, Cheeroke, Comanche, Navajo and Zuni . The machines were few times strongly modified, so I did it in configuration of 1941-43 (markings for 1942). She has different tailplane than in box and oil coolers as well as air intaked above engines comparing to late war variant from box. The "307"s as C-75 played the role of VIP transport mainly. I did "Navajo" (c/n 2001, 42-88627). From Feb 1942 she was ued on route: Washington DC to Cairo via Natal (Brasil). Later the Noth Atlantic route to Englan. The VIPs transported were people like Eisenhower, Clark, Vandenberg, Towers.... Machine was returned to TWA in July 1944 The names of Indian tribes were inharited from TWA. Here she is: Comments welcome Regards J-W ,11 points
-
Morning Chaps and Chapesess Well, there it was, gone! It wasn't until I started getting all the pictures together that I realised how much I had actually built this year.... 22! So, Are you all sitting comfortably? Then I shall begin. Tamiya Kawasaki H2R The best Tamiya bike I have ever built. The detail is incredible, the fit is fantastic, just a pity that there is no fork set for it really. If you've built the 1199 Panigale, this is better Took me 18 months to finally build it, but fantastic! Added the Studio 27 carbon decals, which is why it took me so long to finish it and I didnt want to do the usual chrome black finish.... It just had to be green, TS Candy Lime Green Tamiya Kawasaki GPZ400 This was purchased on a holiday in Thailand a couple years ago, very nice kit indeed. Finished in Tamiya TS22 Lime Green Tamiya Suzuki RM250 One of the ones off my seriously want list. Finished in Zero Champions Yellow Tamiya BMW K100 I actually started this a couple of years ago and eventually got round to finishing it this year because I thought I had lost the front fairing - duh! - Tamiya TS18 Metallic Red Aoshima Ape 50 Monkey Bike. This kit was given to me as part of a challenge at our Nationals last year. The Instructions for the challenge were 'Go Ape' . From the get go I wanted to do a Speeder Bike and It took a good few months of planning and thumb sucking to get it right, building and rebuilding. Only the seat, tank and handlebars are from the kit. Italeri Volvo FH16 XL - Love trucks and happily carrying on building them. Finished in TS 41 Coral Blue Italeri Technocar 20 Foot Container Trailer This was such a cool one to build that I want to do a few more. The trailer has excellent detail but I did have a few issues with the container trying to get it to fit together, but if you ignore the instructions and build it logically it goes together perfectly. Container finished in Tamiya X7, Trailer in TS 29 Semi Gloss Black Revell Krupp Titan An absolute gem of a kit. I love the classic trucks and this one was a corker. (and its massive ) Cab finished a mix of XF3 Flat Yellow & X8 lemon Yellow and Chassis XF7 Red Italeri Mercedes Benz 2238S Another of the kits that I built years ago that I wanted to do again. This one had a wicked warp in the chassis that probably took more time to get right than it did to build the kit. Chassis finished a mix of XF7 red & XF9 Dull red and the Cab TS 93 Pure Blue IBG - Scammell Pioneer R100 This is a kit that I have been praying for from the first time I stuck the old Airfix Tank Transporter together Its a fantastically detailed kit, but its not an easy one to build and to me, the instructions are a little back to front. I wanted to do a civilian one and finished it in X8 Lemon Yellow & Flat Clear. Revell Jeep Honcho Another I have been after for a while and was very happy when it was re released again. Finished in TS 18 Metallic Red Revell Chevy Suburban Its been a long time coming for this to get into an Injection moulded kit, and it really is a fantastic kit. Finished in TS98 Pure Blue & TS76 Pure White Italeri Restored Willys Jeep (24th Scale) I actually built one Military Vehicle this year, woohoo , Well sort of. This is an excellent kit, goes together like a dream, fits perfectly and looks just right. Finished as a restored Jeep, In Tamiya XF 62 Olive Drab. Airfix Maserati Merak SS Another of the youth rebuilds. These kits really aren't that good so it fought all the way (so much easier when you just stuck them together on a saturday morning ) Finished in Tamiya TS 47 Chrome Yellow . This was actually a turning point in my modelling career where I stopped using Bare Metal Foil for window surrounds and started using AK Extreme Metal Aluminium instead. Airfix Jaguar XKR GT3 - 32nd Scale I love these 32nd scale kits from Airfix. They have a lot of detail but man do the tyre's suck! The decals are quite intense in this one and I eventually resorted to cutting them up to get them to fit better. Finished in Tamiya TS 29 Semi Gloss Black . I also added a bit of CF decaling on the front and rear. Airfix Mini Countryman WRC 32nd Scale I think this is the best of Airix's 32nd scale car kits, but I did have issues trying to get the decals to fit, they seemed to be too small? I purchased a second kit and lovely jubbly it had 2 sets of decals in it but they all did seem to be the same. The black outlines around the windows are not very funny to get right, and those tyre's again... One plus tho, the way that the front suspension is built, you can cut it apart and turn the wheels and I added seatbelts too. Finished in X7 gloss red. Tamiya Nissan Skyline GT R 2000 This is a fantastic kit. packed with detail and comes with a Photo Etchset and Seatbelts. Finished in Tamiya TS26 Pure White Monogram Triumph TR7 Well firstly, its a TR7, and its been sitting in my cupboard for years looking all forlorn and dejected. It really is a very simple kit and only had like 25 parts so I thought why not give it a go and see what we can make of it. Finished in Tamiya TS34 Camel Yellow Esci Audi Quattro I actually started this one about three years ago and its been through a couple of colour changes, first red, then yellow, before I decided that its looks better in TS 17 gloss aluminium. I know they aren't that well detailed and they are a bit outdated now, but I love the old Esci kits and the decals still work 30 odd years on Polar Lights - Batmobile 1968 TV series. This was fun, and another of our friendly challenges at our Nationals. It has a pre painted body which isn't too bad but it was a fun build. Tamiya Porsche 934 Vaillant Another one that's taken a long time to get right, mainly because of the masking of all the black areas is quite a mission. After a couple of attempts I eventually stopped using tape and used Bare Metal Foil instead and that worked, but it took ages to get the residue from the BMF off (first time that's happened). Finished in Tamiya TS Cobald Green this was actually a fun build. and finally Aoshima Mazdaspeed AZ1 Yep, you are right, never heard of it, but if you were a frequent visitor to GT4 on PS2, you will recognise these tiny little cars from a few of the challenges. A friend of mine had one up for grabs and it went into my grubby little paws at near light speed. Its a very simple kit, not really much too it, but it comes with coloured lenses, windscreen masks and 2 sets of wheels so a nice one. The longest job was actually the whole glazing effort which needs to be masked inside then painted, then masked outside as well and painted. Excellent little kit, absolutely loved it. Finished in TS17 Gloss Aluminium Well, That's it then.... I'm actually sorry that I didn't take part in any of the Group Builds this year... I was looking through some of them yesterday and they looked fantastic, especially the Classic Airfix one, I should really have joined in on that one. I also haven't built any Military stuff this year which is quite a surprise really, but I do have a couple that are in the starting blocks, and I'm currently busy with an RNLI Lifeboat and a BE2c, both from Airfix, as well as a couple of cars & trucks still on the go. Thank you to everyone on Britmodeller for being such a great bunch of guys and girls and a big thank you to the Mods for sitting around and drinking tea all day Hope you all have a Merry Christmas Mad Steve11 points
-
My first helicopter, I did a lot of mistakes, but at the end i’m satisfied also because the kit is not the easiest on the market (thank to S&M for giving us a kit of this interesting subject) I used some etched, built new landing gear with Albion alloy tubes, open 2 doors and folded rotor blades Colours are from Gunze Sorry for the low quality of the photos11 points
-
Airfix P51D new tool kit built OOB to go with my previous P51 build - Drop tanks in this kit do not have the characteristic seam line so the were made from 0.3mm Plastruct square rod. - One tank corrected so both have the filling point on the left. - 0.3mm round rod used as the actuator in the radiator cooling duct. - Tamiya tape harness. - Arial in the kit was so badly moulded it was replace with one made with plastic strip. - Upper engine access panel centre line was scribed with its screws marked in. - Painted in Humbrol enamel with the paint numbers given by the kit except Alclad 106 White aluminium used for the NMF with the shade altered on some panels by mixing it with gloss black enamel. - Flap retraction areas were finished using chrome baremetal foil. - Underwing lights made by adding a little CA into the recess allowing it to set in a concave shape. aluminium foil was then glued into the recess and finished with blob of appropriate Tamiya clear colour. - Decals applied with MicroSol & MicroSet. - Flory Black & grime Washes. - Model was given a coat of Humbrol Gloss Cote prior to decals, washes and oil dot weathering then matted with Humbrol Matt Cote. - Jeep is from the Academy P51 kit enjoy Thanks for looking.11 points
-
I find that sometimes some modellers are so fixated on the minutiae of minor detail on a kit that hasn't reached the shops yet, that they fail to see the bigger picture, or indeed the massive effort involved to bring you this new kit. The team at Airfix are a dedicated and first class bunch who have, like the rest of us to fit in with budgetary restraints, deadlines and resources. Also they want to do their best but they can't be experts on every aircraft or other vehicle, they want to produce, or indeed have unlimited research time. So they also talk to other people who by virtue of their knowledge, or have, or know of resources, and who might be in a position to help. Many well known foreign companies don't. to their cost Airfix in my opinion are doing their very best to meet the criteria. They are not only using the best design technology but where possible they use cutting edge stuff like LIDAR. Technically the whole modelling game has changed out of all proportion with CAD, 3.D printing and LIDAR etc. Take the last of these, it's incredible to see the results but the most boring thing in the world to see in action. It's detail is such, it will get confused over the thickness of paint on a serial number and it will record any tiny dent or even bullet holes in an aeroplanes tail. It records precisely what it sees. However it doesn't have the function to notice that the target aeroplane's oleo legs haven't been charged with Nitrogen for a long time so the sit is wrong as the legs are compressed. The first time that this might be noticed is on the 3 D renders, when someone external to the design team is asked to "have a look these and tell us what you think". Even then tiny details might still be missed, but the important ones are usually picked up. A more precise question of another type, might be "what's the gen on the two different aileron trim tabs we've noticed on photos" The answer was actually three types! So why not wait until the kit is in your hands, so you can see that there are perhaps parts there, which aren't needed in your kit, but give a clue to another version. Remember humans aren't infallible either. John11 points
-
Well it's been a busy modelling 2018 but I seem to have produced fewer models than in recent years. I have to say though, that these have been some of my favourite builds so far. All the builds have been made in GBs which I find excellent for encouraging me to try different things. First project of the year was built as part of the M3/M4 Sherman STGB. The kit was from Eduard who had re-used Asuka's rather lovely M4A1 kit. The result was a vignette called "Report back........not bring it back!" The WIP can be found here. More photos of the scene can be found here. Then in the Britmodeller 10th Anniversary GB I had my first go at building a modern AFV. I built Tamiya's 1/48 JGSDF TYPE 10 TANK. The WIP can be found here. The RFI can be found here. Next up was a build in the MTO II GB. This time I built Tiger 131 using the specific 131 kit from Dragon. The WIP can be found here. More photos of the scene can be found here. I have done three aircraft builds this year including Airfix's 1/48 Hurricane which I built as a restored Hurricane I had seen at the Victory Show a couple of years before. It was built in the Hawker Siddeley GB and I used a small motor to make the prop spin. The WIP can be found here. The RFI can be found here. Another aircraft build this year was in the P-47 Thunderbolt STGB where I made Tamiya's 1/48 Razorback P-47D. The WIP can be found here. The RFI can be found here. Last but one of the GBs this year for me was the Eleventh Hour GB when I had my first go at making WW1 tanks. Two in fact. First up is Takom's 1/35 Mark A Whippet. The WIP can be found here. The RFI can be found here. My other build in the Eleventh Hour GB was Meng's 1/35 FT-17. The WIP can be found here. The RFI can be found here. For the two WW1 tanks I decided to make a bit of a vignette which I called "....so the top rotates?" "Mais bien sûr" The Vignette photos can be found here. My final project of the year was made for the Grumman GB and is Airfix's 1/72 Wildcat which I decided to display in flight - I used PE PropBlurs and the base is made from MDF with a filler sea. The RFI photos can be found here. The WIP can be found here. Thank you to everyone who has taken the time to comment or make suggestions in any of my threads this past year and to all the hosts of the GBs I have taken part in. Kind regards, Stix10 points
-
Hi again all, Back in August I was asked to build the all-new 1/48th Airfix Hunter F6 to feature in the December issue of Airfix Model World and the Key Publishing Combat Machines special on the Hunter, released in time for the Telford show. It's a very straightforward kit, easy to assemble with no fit problems or issues worth mentioning, (although I did have a problem with the nose cone being slightly too large and needing sanding to shape, however after having a word with the Airfix guys at SMW they assured me that the production kits part fit perfectly, so I'd put this down to the pre-production nature of the kit. On offer are two tail cones, one plain one with parachute fairing, so an F6A can be modelled following references and a couple of Matra rocket packs, along with the smaller 100gal wing tanks used on this variant. I'm sure other versions will follow, including both straight wing and dog-tooth variants, though no trainers are to be expected. As usual, there were no decals included with the test-shot so an after-market sheet was provided instead. The editor decided he liked the look of the yellow marked Day Fighter Combat School aircraft based at West Raynham circa 1962 and so Xtradecals X48189 Hawker Hunter F.6 Pt1 was used in the build as these included them. Interestingly many colour palettes and model companies like Revell have the scheme depicting yellow tailplanes to go with the striking yellow spine and fin but noticed that Xtradecals portrayed them as being camouflaged. This piqued my interest and so I decided to research the scheme further and found very few colour images of XG204 online and these proved inconclusive. Luckily Martin Derry's excellent tome ‘Britain’s Military Aircraft In Colour, 1960-1970’ included two high-definition images and an excellent 4-view profile showing the aircraft taking part in an airshow at Finningley in 1962 and Lo and behold the tailplanes were indeed camouflaged. Although rocket rails and Aden gun muzzle deflectors were fitted by this time the editor wanted the model to be as out of the box as possible so these weren't added, (although I did add the two yellow DME Rebecca 8 aerial rods beneath the fuselage along with upper wing whip aerials, (apparently the aircraft didn't have the two spine-mounted or single under-fuselage whips often seen on F6s). The model was painted using MRP acrylic lacquers and due to the heavy usage by the DFCS at the time, weathering was applied using a mixture of Abteilung oils, MIG Oilbrushers and pastels and AK oil and kerosene stains. Once again thanks for looking, hope you like it and decide to buy a few...for those of you tempted, you won't be disappointed... Cheers Melchie10 points
-
For a long time i have avoided Airfix kits, only building the odd one of there older ones. But i have ben gathering a collection of their new tooled kits ove rthe last couple of years and finally got round to building one. The Phantom was a really nice kit, there were a couple of fit issues which i think were self inflicted. The only really down side with the kit was the decals, mainly the stencils. The 250+ took me 6 days to apply. I added an Eduard Big Ed set, resin wheels and metal pitot tube. The tractor is from F4 models and the base from Coastal kits. Its not completly finished as i am awating the release of some RN deck figures including a tractor driver, from Air Graphics.10 points
-
My favorite MiG 29 SMT version is often called "humpbacked". This is quite interesting versions especially in terms of painting. First, camouflage cut sharply The second is quite interesting colors made with not the best quality paints. This causes quick changes on the surface. Model as always straight from the box. Set: MiG-29SMT G.W.H 1:48 Painted: Sikkens Auto Wave II Decals: GWH set.10 points
-
I seem to be on a theme of RAF jets lately and I've had this one in the stash for a couple of years so finally got round to building it. To be honest, it isn't one og my best builds - I think I've got the dark grey too dark. Its also a very old kit and it shows in the fit. I used the Eduard PE set for the GR1 and replaced the ejector seat with a resin Martin Baker Mk 9 from PJ Productions. The decals were from the Model Alliance Jaguar GR3 RAF Special Schemes 2005 Part 1.10 points
-
The first aircraft is an Italeri re-box of the Hasegawa kit and the second is the Hasegawa in 1:48. The first aircraft is also my first attempt at mottling. I would love to say the second aircraft was my first attempt at smoke rings but Italeri provided these as decals and if you look closely you can see the spray pattern. Well done Italeri.10 points
-
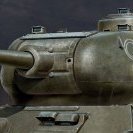
I have been harbouring a guilty secret. My turret vacform wasn’t fully formed. Because of webbing I had cut away a big piece at the back. So today I tried vacforming it on a little balsa platform. The idea is that the plastic folds in on itself to make the webbing at the bottom of the platform and then snuggles up nicely to the turret shape. It worked. Twice: With vacforming into a cavity like the Falcon canopies you don’t get this problem because the plastic is always stretching. Anyhow, here’s the new one against the old one, showing how the old one was missing a lot of its back: And here’s the new one sitting on the turret ring with the sliding portion of he glazing marked out: That’s my fun for the day. Time to get the Christmas decorations down from the attic and put up the tree... Thanks for looking, Adrian10 points
-
Pretty sure I`m not going to have to explain the inspiration for my latest in-flight diorama......! (Prop blur courtesy of Flickr photo editing) Thanks for looking.9 points
-
Hallo again This is the Trumpeter 1/48 kit. I used etched parts from Eduard and stencils from Bregnun. The Su-24 was for me a challenge. I never saw this a/c in real. Yes, most a/c I know in reality, also the old birds. This one not at all. So I had to use just the web and my own feeling. A new and in this case the very first experience to me. No literature I could rely on. Yes, sometimes it is fun, just to guess. Well, finally you may find out if my guess was good or false. Happy modelling9 points
-
I recently finished my first Amusing Hobby kit, the Pz VII Löwe and what a great kit it was. I did add some extras, resin exhausts, metal barrel and some parts from the spares box. But most of this was to bring it to 1945 standard rather than 1943 as originally designed. Crew figures are Mini Art, Infantry Dragon.9 points
-
My eighth Meteor build since I restarted modelling in January is a conversion: the MPM F.8 combined with the Alley Cat resin conversion for a U.16 or U.21. This has been my first resin conversion and was most impressed with the quality of Alley Cat's product. When it came to the decals, they were superb, very detailed, thin but not fragile and adhered well. This is a comparatively simple conversion, requiring replacement of the nose and wingtips, neither a 'biggie'. I went for a model of WK800, now in the Old Sarum collection and famously long-lived as the last U.16 to fly. I could';t resist adding the lumps and bumps applied to the airframe in 1988 for the Radar Vector Miss Distance Indicator Trials. I think the domes are slightly overscale but I wasn't going to argue. The paint job was pretty straightforward except for the demarcation between the two colours ahead of the cockpit. I think the yellow goes too low and the shape of the taper there won't clinch me the IPMS Nationals. One thing I have omitted (yet) are a set of metal tubes to form the jet pipes. Here we go: Kind regards, Neil9 points
-
This was my build for the Gumman GB and I used Airfix's relatively new tool 1/72 kit. It was a nice kit to build and I made it as the aircraft of Capt. Marion E. Carl, VMF-223, United States Marine Corps, Henderson Field, Guadalcanal, September 1942. I had originally thought of doing the model with it's wings folded but decided I'd prefer to display it in flight over water. I haven't modelled water before and I have an idea for a project next year which may include scenic water - so I took the opportunity to try out some ideas. I think it worked okay. I didn't have time to motorise this aircraft like I have done with some others so instead I used PE PropBlurs. Kit: 1/72 Airfix - A02070 Extras: PropBlurs Paints: Revell and Humbrol Acrylics all applied by brush Base: MDF and filler. Clear perspex rod. The WIP can be found here. Now some photos which include the base: Thank you to everyone who commented and offered support or advice in my build thread and thank you to @TEMPESTMK5 for hosting the GB. Kind regards, Stix8 points
-
Hallo again The Mitsubishi F-1 in 1/48 from Hasegawa was the basic for this model. The model is equipped with training weapons. The colorful air-ship rocket is the eye catcher. Since much of the F-1 fleet is stationed in the very north at Hokkaido, the surrounding is very different from central Japan. Here we are at the same northern position as Vladivostok i.e. Sapporo. The northern part is very close to Sakhalin and the eastern part faces the Kuril Islands. This F-1 are always in close contact with the Russian air force. Happy modelling8 points
-
Here is one of the kits I have completed this year. It's Mark I's 1:144 Arado Ar 96B-1 White 16 (KK+CW), W.Nr. 0122, of JFS 3, Luftwaffe, at Stolp-Reitz airfield, Germany, in autumn 1940. I added belts from tape and sticks from stretched sprue in the cockpit. There were issues with the wing/fuselage join which needed some work to get a decent join, and the exhausts which are unclear in their positioning and stick out too much if glued as suggested. I solved the latter by opening holes in the dimples on the engine cover where you are supposed to glue them, to insert them into and thus get them in a better position. I also added the underwing pitot tube. The big flaw of this kit is the propeller spinner which lacks the "orange-squeezer" tip. Retrokit have made a resin replacement propeller that is a big improvement and I have used it in this kit. The other thing to watch out for is getting the angle of the main undercarriage legs right as the instructions are unclear here too and they are supposed to be raked forward in a fashion similar to the Fw 190. Otherwise it was an enjoyable little kit and I have built another (to be posted later) and have several in my stash. The kit was completely painted by brush. Weathering was minimal as these were trainers and not combat machines and were better kept. Thanks for looking Miguel7 points
-
Hello I am Chinese. I live in BeiJing. I like build models, that is fun.7 points
-
Done! My 3rd 109G and definitely not my last one! I really enjoy these kits. And I really enjoy SBS decals, they work great. This is Eduard's 1/48 109G-6 Late boxing built OOB with SBS decals. Paint are Vallejo Model air for the camo and a variety of Tamiya and Vallejo paints for all the rest. MT505 of PLeLv 41 Based out of Luonetjärvi around summer 1950 Photo cred goes to Jason Brewer of Brewer Models! Thanks! Thanks for looking!7 points
-
I'll start the thread off, then, as I'm still a relative newcomer round here! Everything is 1/72nd scale, apart from the road and rail stuff which is 1/76th. We had a lot of fun in the summer with the "Airfix - the Golden Years" Group Build. My first group build with this forum, and I enjoyed it immensely. The Rotodyne was supposed to be my only entry, but the bug got me! A couple of Battle of Britain kits fell off my stash for the Group Build, too. In fact, most of my 2018 builds occurred during the GB, which tells you a lot. Here's another Airfix GB model. And four more! Another set of wagons was planned, but unfortunately the extra detailing sets I ordered failed to arrive in time. Fancying something a little different, this RS Models Avro C30 Rota MkI arrived on the bench. Back with Airfix, a modern kit but still in my 1940 interest bubble was this Blenheim MkIF. Special Hobby produced this Blackburn Roc, again for my 1940 thing. Finally, this venerable Matchbox Lysander was a reasonably short and entertaining build. So, that was my 2018.7 points
-
Evening folks, Built this 1:32 scale Revell Spitfire as a commission build for a mate who wanted a mk 1 or mk II Spitfire for his WW2 memorabilia collection. He wanted it to resemble "XTD" which is the fibreglass gate gaurd now on display at Edinburgh Airport. The replica its has " Blue Peter " written on the side and has a four blade prop and a bright red nose cone. The kit itself went together with no real issues and was build OOB with the only addition being harness straps made from tape placed into the cockpit. I just used the cockpit decals provided with the kit. As usual, I weathered the kit using the preshading method and masking tape to seperate the camouflage colours. For the first time I tried using the " maskol" method of replicating the paint as having been worn through on heavy traffic areas, around the cockpit and a couple of the acess panels. An easy method of spraying silver then applying the maskol and rubbing off after the top coat has been applied. Very easy and effective... Used Hannants "Xtracrylix" thinners on this build, so much better than my usual Tamiya thinners and would highly recommend. Unable to source the "XTD" decals or correct serial numbers " L1067" etc, but it looks like a Spitfire and the new owner is very pleased, as for payment ... a couple of nice bottles of red wine 🤩 Always wanted to build a spitfire again and this way I don't have the headache of where to display it ... just the headache from consuming the wine !! A few pictures of the finished result .. Thanks for looking and all comments welcome. Best wishes 👋7 points
-
Hi, This is my work this year. I builded without big accessories, only clean box with small accessories. I only used HGW safety belts and a back seat from the old jeans. Bleached car spray - acrylic paint and at the end 4 layers of Polish lacquer with UV filter.7 points
-
Here is my Matchbox 1:72 Bristol Beaufighter TF.X which I built back in 2008. It represents RD147/PL-U of No. 144 Sqn RAF based at Dallachy, Scotland in spring 1945. I added the Aires cockpit set and some parts from an Airwaves etched set. The thimble nose and the tail fin extension were both from Quickboost. The rear canopy came from an old Airfix kit and I added a machine gun. I added the strike camera, various aerials and probes, wingtip lights. Improvements were made to the engines and various intakes as well as the rockets and their pylons. And more... but I can't list it all here! The main scheme was painted with airbrush. Thank you for looking and all comments are welcome Miguel7 points
-
Some more progress. I made some 5-spoke wheel hubs with Milliput using an Oyumaru mould from the old Airfix Blenheim hubs. Looks a bit rough close to but a lick of paint should help: And some Vickers K guns from card, rod and stretched sprue/runner. I need two. Given that I have to add the turret before closing the fuselage, cleaning up, and re-doing the wing fillet, I’m not betting against some fine language later in the build! Thanks for looking, Adrian7 points
-
Hello Everyone This project took a little more time than i expected. A very known model from 70's, model I am extremely fond of, because it was the first model which my father made for me and introduced me to this hobby. I decided that I will do the same version, without any additional details in same colors and markings, just for him. I decided and ..... after almost 40 years I finished it...but in different way: Engraved, a complete cabin with instruments made (known only to me and impossible to see), completed made landing gear bay, replaced propeller with one from hobby boss, used Italery colors, for wash and shades used artistic oli paints, markings skymodel ... if I remember well ... and that's it, almost from the box Not to bother you more, another model old almost as me is done. I hope you like it Best regards and pictures at the end:7 points
-
Here is what became the first of a run of 1:144 MiG-21s, mostly from Eduard, that I built back in 2011-2012. This is Mikoyan-Gurevich MiG-21MF "Fishbed J" 5121, flown by Pham Tuan, of the 921st Fighter Regiment 'Sao Do', Vietnam People's Air Force, during the Vietnam War in the early 1970s. This is the Eduard kit built straight out of the box. It was completely painted by brush. Thanks for looking. Miguel7 points
-
I concur with John’s comments whole heartedly. I get very upset when I see on here some so called subject experts spouting off on here about certain aspects of a model not even released yet. Most have never even worked on these lovely subjects but are able pontificate to the Enith degree about this rivet or that panel line. Most of the time they don’t get the right picture. I take a case to show you what I mean. Sea Fury 1/48 someone was saying that the rivets on an oval panel on the side of the tail was wrong in some way. Well although I have never worked on such an interesting subject being to young(57) and working for the RAF and not the RN. Going back to that oval panel it is not riveted at all but was removable for servicing purposes with countersunk screws. Secondly and to get another thing of my chest- Rivets it took years for me to perfect the art of fitting these bloody things. Literally thousands of them. I spent a lot of time reducing some to within 5 Thou of the skin. I would have a normal rejection rate of about 5% that I needed to sort in some way. There are many types of rivet used as well ranging from hitalumium these are nice mauve coloured ones, tucker pops which most people know and the Joy of Joy to use a Jo bolt. The point I am try in make here is that we aircraft maintainers are in the main trying to get rid of a rough surface to provide as smooth a surface as possible. Where as the modern trend in modelling for some people is get the riveting tool out we must put all of the rivets back in NO look at your subject in detail first see which rivet lines are prominent some may be domed rivets or Dzus fasteners or some other fixing. This is just a rant as it gets me unset the vast majority are not looking hard enough at your subject yes Airfix may get it wrong but so do other manufactures. Look how wrong the New 1/72 B-52 is? Can you imagine Airfix getting that wrong OMG. Simon7 points
-
Some bits of photoetch this afternoon - the rocket pylons and pitot probe thingies for the nose. The forward probe under the nose always looks odd to me, but the probe tube itself has to be in line with the airflow I guess. You can see it (and the rocket pylons) in this photo of may gal's sister ship: AZ provided injected parts for these nose probes, but they seemed to be too big in diameter and rather clunky. The Airwaves photoetch, on the other hand, is too thin, being two-dimensional. But I decided to use it since most folks won't be looking straight down the axis of the beast. In order to get these photoetch parts to stand up and stay attached to the fuselage, I drilled some tiny holes, 0.015" diameter, as if the parts had an alignment peg. Then, on the PE fret, I left a bit of the fret attachment point at the appropriate spots, and used that as the alignment pegs which I superglued into the holes. I think this makes a much better joint, and they all seem pretty solid. I borrowed some rockets from the Airfix Typhoon Mk.IB kit, and the paint is drying as I type this. I'm also building an arresting hook and putting some Alclad on the exhaust. I think there may be some more whip antennae, but the location seems to vary a lot. I'll probably use my Nitinol wire for that if I can figure out where to put it. What else is left? Control column in the pit, sliding canopy, wing tips...that's about it I think. And, of course, the nit-picky things that gnaw at me when I step back and look at what I've wrought. There are already a few things in that basket... Cheers, Bill7 points
-
now, if only I knew how to use it properly! you won't regret it. I don't use mine that often, but when I need to - it's invaluable and as it is sayeth, so it is done... sort of... I hadn't planned on making a posting so soon as I wanted to get more accomplished but since I am heading orff on my travels again this week, I thought I would throw something out there to keep this thread moving. However, before we continue, I'd like to express my sincere thanks for keeping this thread (at least up until now. Lord only knows what Ced'll get up to in here while I'm gone) Oleo's. Oleo, oleo, wherefore art thou oleo? Coming right up. But first it was back to the lathe to knock out a couple of these... can't tell what it is? It's the top of the oleo which will eventually fit to the fuselage. The oleo is slipped on the end to check for fit and here's what it looks like out of the lathe... exciting huh? well, maybe not. but necessary nonetheless. It still has to have some fettling done before it's finished though. The other end was similarly knocked up in the spipnning turny thing, then a hole was drilled and a small length of wire glued into place which will locate the oleo in the appropriate part on the main wheel A quick comparison of the kit part versus the new oleo. The additional girth (careful Ced!) does add to the appearance and thanks again to Ced & Roger for getting the appropriate dimensions for me! The kit oleo isn't too far off, but far enough to annoy the heck out of me. I then spent ages trying to solder a small bracket onto the axle stub... unsuccessfully I might add. Then I had a 'doh! moment -simply make the bracket much larger for the soldering operation Then once it's actually soldered in place, I can trim, file, shape the part to my hearts content. If you haven't guessed, the bracket was for the tie down ring that hangs underneath the axle A quick dry fit to cheer myself up more from the front... and lastly a close up of the assembly (dry fitted) Personally I think the oleo is too close to the main wheel, but repositioning it will involve a lot more work - on which I am still undecided Sorry it ain't more exciting but I'm in a bit of a rush to try and get things ready for heading off tomorrow6 points
-
OK...finito...Time to get cracking on something else, namely the Duck over in the Maritime Patrol GB. I might also start another Bf-109 and/or Spitfire. Although, now that I have begun work in the darkroom with my winter group (23 of them)...no, I will build as much as I can, when I can. This was a fun kit, if a little nerve-wracking at times and it is good to see it done and out of the stash. Some of the plastic is so thinly moulded that it threatens to break; some of the exhaust pipes needed are not supplied; some of the plastic parts are as small as photo-etch...But it built into a nice representation of this very famous aircraft. I'll get around tp fashioning some more exhausts later...Trust me, there were no leftover parts save for the skis. Thanks for all the support! -John6 points
-
After a long build which took most of this year, my 1/48 scale Do 217E-1 is complete. The plane I have chosen is F8-DM. This was a late 1940 KG40 plane so would have been quite new at the time, as a result I haven’t heavily weathered it. I have not used drop tanks as this would have been used against England during the Blitz period on night bombing raids. The build was straight forward except for the Canopy which isn’t the best of fits. It is a fraction too narrow and needs some putty work to get it to look right. The model was built out of the box with handmade masks. I have used aftermarket decals by Eagle Strike. These were good decals although the separate white outline gave me trouble. I ended up using three decal sets before it was completed. The tail marking are separate to the swastika which I had trouble getting in the right place as you will see. Thanks to Dave (Rabbit Leader) who came to my rescue twice with the white outline “D” and when the right side decals were damaged by a mask dropping on to them. I did have problems with the canopy as mentioned. To start with I dipped it in future which would have been fine if it had gone on easily. After removing it and the resetting it the inside surface showed fogging when the mask was removed. This would have been a major problem if I hadn’t cut the access hatch open earlier. This allowed me to get some future on the inside window surface and clean out some dust that had got inside. Still in the end it was a lot better, but not what I would call great. Once again it was Dave’s suggestion that got me through it. I have also just noticed the spinners should have had white tips. Something for another day. I cut out the crew access hatch and added a scratch built ladder. This makes the plane much more interesting. After lots of minor accidents when I would knock off bits in the last day the plane was finished at long last. I took it to a friend of mine to get some images. On the way the wing Pitot tube was knocked off and I didn’t notice it until the photo shoot was finished. As a result I have used Photoshop to show it. It will be back on the plane tomorrow. I also used Photoshop to add the aerial wire that goes from the fuselage to the main aerial wire. It was on the plane, but got knocked off last night I will get it back on later. These are the only parts added in Photoshop. The rest of the image work was removing the join line in the back drop sheets in some of the photos. Well that’s it after a very interesting journey I present my Do 217E-1.5 points
-
It's been a quiet year's modelling for me. First kit finished was a 1/700 SMS Derfflinger (Flyhawk), with deck, brass guns and etch also by Flyhawk. It's is displayed here on a flat printed base, which isn't nearly as amazing as the handmade waterscapes that many modellers make, but it saved me time and space; you can get them at Starling Models. It's too bad one of the rigging cables broke during transport and I didn't notice till uploading the photographs. 1/700 HMS Hood 1931 (Trumpeter, with Flyhawk etch detail). I can't remember off the top of my head who manufactured the wooden deck for this one, but I think It was Hunter. The Flyhawk set was ridiculously extensive for such a small scale and I still have quite a lot left on the frets. That's it for my 2018 - thank you for having a look and I hope that everyone has a great Christmas and a fantastic 2019. Thanks, Ross.5 points
-
A build from 6 years ago, another classic of the Golden Age. Continuing with the record plane saga, here we have the Stinson SM-1 Detroiter “City of Chicago” that conquered the endurance record after flying 553 hours 41 minutes with in-flight refueling. The four Hunter Bros. manned both, the record and the refueling plane (Big-Ben, another Detroiter). I guess that by the time they got down, the diameter of the pistons of the venerable Wright J-6 was reduced to that of a pin. As in other similar record planes, maintenance of the engine was done by the dubious procedure of exiting the plane while flying and stepping on a catwalk that surrounded the plane’s nose. Brave men, those record-seeking people. Once again, as no kit of the Stinson SM-1 is around, scratchbuilding was the solution. Fair is to say that Khee-Kha Art Products of Alaska sells a beautiful resin J-6, with prop and exhausts included, and that helped quite a bit. Wheels where white metal aftermarket parts form Aeroclub and the rest created with the Enterprise replicator Of a slightly bigger size than the previously posted Curtiss Robin record plane, they share nevertheless a similar concept shape-wise, so more or less the same building techniques were used, the only variation being the upper and lower fuselage which had a slight curve, and therefore required particular parts.5 points
-
Thanks to @Enzo Matrix the Pz.IV STGB area is now open for business! No starting your builds yet though - that will have to wait until next Saturday (15th December) but you can start your build thread and let us all know your plans for this GB. I'll try and get my thread started soon. I'm looking forward to seeing all the different Pz.IV variants that are going to be made! Kind regards, Stix5 points
-
Yes indeed, and if I had bothered to look at the cutaway drawing that I have of the Attacker, they are clearly designated as such. They are also one of those nit-picky things I mentioned in the last post. I just plain don't like what I've done with these. If we look closely at one of the photos from the Attacker walkaround here on Britmodeller, we can see that there are two posts, not one, and that they are black. In some period photos, they look like they might even be unpainted. I have to say that I don't know - although many aerials that I've seen have stenciling nearby stating "do not paint." So I shouldn't have painted them Sky! I went back to my Magic Box of Misfit Photoetch Frets, and found some goodies that look to be dead-ringers for these babies. They look to be the correct size as well. These are a bit thicker since it's actually two pieces folded on top of each other. I've popped off the other ones and will replace with these. I've also made a new arresting hook which is perhaps not completely authentic but it seems to match the size and shape of the bay I built for the hook to retract into. Looking at my photos, it seems the hook doesn't retract completely and a good portion of the hook itself remains in the air stream. Airwaves provide a PE piece for the deck landing alignment sight, which is the tall post on top of the nose. Due to its precarious perch, it's best to leave this for the end of the build. Maybe I'll get those wing tips on yet today... Cheers, Bill5 points
-
A flame war (of which I would not be a participant) would be pointless and I think this is not intended by anyone. As ever, thank you for the supportive remarks. What was intended by my own opinions and comments in my post was to point out that all of us are fallible and also the lengths which Airfix (to my knowledge) will go to achieve the best result within the constraints of business. I was/am not speaking for Airfix in any way and any comments I make are from occasional personal experiences, when my help was freely given. As it is to some other companies and each is confidential unless the other party chooses to reveal association before the kit is released. Each additional cavity for a further part in a kit costs a great deal of money so each company has to choose carefully which versions will give the necessary returns. I'm talking personally again here. Every colour variation on a decal sheet also costs a great deal of money. So I would always try to find the schemes that can be encompassed by the standard colour palette of Red, White, Blue, Black and Yellow with perhaps one or occasionally two others. Squadron badges are a pain as they added Gold, and light Blue for starters. I made my first model aeroplane from wood and paper at the age of about 8 using no more references than a picture of a Breguet airliner on a Players cigarette card, and I've never stopped learning since. John5 points
-
Good evening gents. I finally managed to finish this ''girl'' and I give you some pics of her(taking photos is not my strong point!!) I would like to thank you for your company and especially Christian for the info he provided to me!!! Mery holly days and health and happiness to all!! John5 points


.thumb.JPG.2ce06c4ff2300a5faba93aaeacbdab25.JPG)


This leaderboard is set to London/GMT+01:00