
Leaderboard


Popular Content
Showing content with the highest reputation on 06/12/18 in all areas
-
Hello, dear friends and colleagues! Let me present my yet another model Blackburn Shark Mk.II by Eastern Express. This kit is the repack of the "old school" Frog model. The kit offers wide choice of varieties – with floats, on wheeled chassis, with folded wing or in-flight configuration – and leaves you rather pleasantly impressed. For its time the model seems quite respectable and can be transformed into a perfect replica if you give it a certain effort. As far as I know, this model of Shark aircraft hasn’t got any alternatives nowadays. The main drawbacks are the following: horrible engine which you must change undoubtedly, empty cockpit (though this feature is characteristic for all models of that time) and wrong number of ribs on the wings which can be seen while imitating the sagging of canvas. I managed to deal with the first two problems but the last one was resolved only partially – I didn’t have neither energy nor desire to remake the whole wing. The model has been made out of the box and materials at hand such as plastic sheets, wire of different gauge, fishing line, cotton buds tubes, hand-made sprues. From aftermarket I used only the Вrengun sight for the tail gun. The model was totally rejointed, riveted, remade the engine, added a cockpit interior, detailed the wings and fuselage. Cross-bracings and aerials are made of fishing line, guns – of wire and a drawn cotton buds tube, navigation lights – of drawn colourful party picks. All in all, the building produced positive impression and turned out to be useful experience for me. Colouring – enamel and acrylic paints Revell, Humbrol and Tamiya, lacquers Tamiya. I tried to highlight the sagging of canvas with paints and some graphite chips, so part of ribs and primary wing structures are merely hand-drawn. Accentuation of jointing – Tamiya panel line wash, oil paints. Toning – oil and water-color pencils. So, nothing out of the ordinary. Decals from the kit turned out to be of very high quality in spite of their age. I liked working with them, they are thin, very good to attach and don’t flake while masking. The result is the torpedo bomber 820 Naval Squadron K8471/652 from HMS Courageous air group as in 1937. Pleasant viewing! Thanks for watching!54 points
-
Hi again all, Back in August I was asked to build the all-new 1/48th Airfix Hunter F6 to feature in the December issue of Airfix Model World and the Key Publishing Combat Machines special on the Hunter, released in time for the Telford show. It's a very straightforward kit, easy to assemble with no fit problems or issues worth mentioning, (although I did have a problem with the nose cone being slightly too large and needing sanding to shape, however after having a word with the Airfix guys at SMW they assured me that the production kits part fit perfectly, so I'd put this down to the pre-production nature of the kit. On offer are two tail cones, one plain one with parachute fairing, so an F6A can be modelled following references and a couple of Matra rocket packs, along with the smaller 100gal wing tanks used on this variant. I'm sure other versions will follow, including both straight wing and dog-tooth variants, though no trainers are to be expected. As usual, there were no decals included with the test-shot so an after-market sheet was provided instead. The editor decided he liked the look of the yellow marked Day Fighter Combat School aircraft based at West Raynham circa 1962 and so Xtradecals X48189 Hawker Hunter F.6 Pt1 was used in the build as these included them. Interestingly many colour palettes and model companies like Revell have the scheme depicting yellow tailplanes to go with the striking yellow spine and fin but noticed that Xtradecals portrayed them as being camouflaged. This piqued my interest and so I decided to research the scheme further and found very few colour images of XG204 online and these proved inconclusive. Luckily Martin Derry's excellent tome ‘Britain’s Military Aircraft In Colour, 1960-1970’ included two high-definition images and an excellent 4-view profile showing the aircraft taking part in an airshow at Finningley in 1962 and Lo and behold the tailplanes were indeed camouflaged. Although rocket rails and Aden gun muzzle deflectors were fitted by this time the editor wanted the model to be as out of the box as possible so these weren't added, (although I did add the two yellow DME Rebecca 8 aerial rods beneath the fuselage along with upper wing whip aerials, (apparently the aircraft didn't have the two spine-mounted or single under-fuselage whips often seen on F6s). The model was painted using MRP acrylic lacquers and due to the heavy usage by the DFCS at the time, weathering was applied using a mixture of Abteilung oils, MIG Oilbrushers and pastels and AK oil and kerosene stains. Once again thanks for looking, hope you like it and decide to buy a few...for those of you tempted, you won't be disappointed... Cheers Melchie42 points
-
WnW set with Parabellum gun maschine from Master Model, Proper Plane wooden propeller and Ushi van Rosten plywood decals.22 points
-
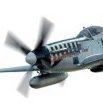
This is a 1/32 Trumpeter Razorback built for a friend who wanted a weather-worn workhorse. Insignia airbrushed with Montex masks before top coat in an effort to prevent markings standing proud. A few scratch-built additions here and there but generally OOB. The kit built quite well although you do need to be precise bringing together the interior in order to get the fuselage fitted neatly. Love these planes and want to build another.20 points
-
Good day. I present my finished model from the company Airfix A05126 Supermarine Spitfire Mk.I 1/48. Prototype aircraft of the outstanding aces of the Battle of Britain P/O Eric Lock Spitfire N3162/EB-G, 05.09.1940 Airbrush: Harder & Steenbeck Evolution 0.2 Paint: Gunze Sangyo H12 Flat Black / Primary - Screw / Blackout Effect Gunze Sangyo H58 Interior Green / U.S. Army & Navy Aircraft WWII - Lightening Effect Gunze Sangyo H72 Dark Earth Semi-Gloss / Great Britain Aircraft WW II - Camouflage Gunze Sangyo H73 Dark Geer Semi-Gloss / Great Britain Aircraft WW II - Camouflage Gunze Sangyo H74 SKY Semi-Gloss / Great Britain Aircraft WW II - Camouflage Gunze Sangyo H 327 Red FS11136 Gloss - Signs Gunze Sangyo H 328 Blue FS15050 Gloss - Signs Gunze Sangyo H 329 Yellow FS13538 Gloss - Signs of Designation Tamiya XF-2 Flat White - Lightening Effect Tamiya XF-54 Dark Sea Gray - Color alphabetic code Tamiya XF-57 Buff - Brightening Effect Tamiya XF-64 Dark Brown - Blackout Effect Tamiya XF-71 Cocpit Green (IJN) - Cab Color Tamiya XF-76 Gray Green (INJ) - Blackout Effect Photoetched: Eduard 49006 Seatbelts RAF WWII Masks: Pmask Po48001 Supermarine Spitfire RAF 1/48. Very high quality manufactured kit, has both early types of characters and late ones. The letter code was made to order by a colleague UpRise, for which I express many thanks to him. I recommend as a very high-quality manufacturer of masks and decals. Top camouflage applied by hand without masks. I hope you will like it. \18 points
-
Just finished this kit. I found it a bit hard going, lots of filler. The decals are good but tend to curl up instantly. Still it is done, so as usual all comments welcome. I finished her clean with a bit of weathering because she flew at air shows so was kept clean. DSCF9486 by john dann, on Flickr DSCF9487 by john dann, on Flickr DSCF9489 by john dann, on Flickr DSCF9500 by john dann, on Flickr15 points
-
Model and pilot from ICM. Pilot was painted by the author - sculptor Anatoly Gagarin.14 points
-
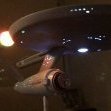
Hello Britmodellers, Three of a kind. Now: Number 3, the first prototype, kit bash of 3 kits, Heller, Academy, KP 1:72, some left parts of the 4th, one of the 2 Tamiya kit,s and a lot of scratch with self printed decals.. Different keel, fuselage, cockpit, glass is milled and sanded for right curvature, older MLG cutout, wheels, front strut, navigation lights etc. I hope you like it! Cheers, Tom13 points
-
Polish Air Force 305 "Black Boar" Aftermarket used; MasterModels pitots Eduard PE cockpit set Aires seats HAD Models resin FOD covers set ModelMaker decal set Ian G-3259 by ian gaskell, on Flickr Ian G-3262 by ian gaskell, on Flickr Ian G-3263 by ian gaskell, on Flickr Ian G-3264 by ian gaskell, on Flickr Ian G-3266 by ian gaskell, on Flickr Ian G-3267 by ian gaskell, on Flickr Ian G-3268 by ian gaskell, on Flickr Ian G-3269 by ian gaskell, on Flickr Ian G-3270 by ian gaskell, on Flickr Ian G-3271 by ian gaskell, on Flickr Ian G-3272 by ian gaskell, on Flickr Ian G-3274 by ian gaskell, on Flickr12 points
-
Hello! Here's my HobbyBoss 1:72 Messerschmitt Bf 109E-7 Trop which I built back in 2008. It represents "Black 8", of 8./JG27, flown by Lt Werner Schroer, at Ain El Gazala, Libya, in April 1941. Despite being an "easy-build" kit, I had alot of work dealing with poor joints, especially along the fuselage sides. I added belts in the cockpit from an Eduard Luftwaffe WWII etched set. Although the boxtop displayed this option, it wasn't included in the decals so I used some from an old Airfix kit (from around 1980) which I had left over and were still in good condition. The main markings came from the HobbyBoss kit. The kit was mostly painted by brush except for the RLM80 mottling which was done with airbrush. The matt varnish was also airbrushed. Photos of this machine show it in reasonably good conditions so I kept weathering restrained. Thanks for looking and all comments are welcome Miguel12 points
-
Grrrnnnggghhhh.... Sorry chaps, the neighbours dinner was 'a good night'. There was wine. Yesterday was a write off Today we're going to an 'Escape Room' in Bristol. All being well I'll be back after lunch. If not, please send a rescue party. In the meantime, hold on to your sausages (fnaar!)12 points
-
Hello friends. Here is my latest work, the FW-190 D-9 from Eduard. In general good kit but quite far from their latest kits like the new forms of Bf-109's and FW-190's, which are amazing. Flush of parts, bad fit and engineering, etc. But never mind all of this - it was a pleasure to build and paint it. Hope you like it11 points
-
Another heavily exploited jet. After reviewing many photos from the location of Mirage IIIC (Djibouti), I decided to make a model using the photo below. The model straight from the box is basically the biggest challenge is painting the model to bring it to this look. I'm not sure if you'll like the model so tired. Mirage IIIC10 points
-
Hello Here is my last build with this 1/72 Airfix North American B-25C from 83rd Bomb Squadron / 12th Bomber Group U.S. Army Air Force in 1942 somewhere in the North African desert area. Decals came from Xtradecal. Soon to be published in Tamiya Magazine French Edition. Patrick9 points
-
Today's lunch The sausage is of the Toulouse variety John9 points
-
The dioaram I have been building, and described in this thread is done. Here are a some pictures. The cab is empty. Where has the driver gone? Here he is. Tending to urgent needs! Is the driver drunk? Starring eyes and the helmet askew 🙂8 points
-
[grunt] HUT! GRNRGGHH! HNRGH! Tada! I do it all for all of you. I've sanded down the turtledecking and repainted it as well.7 points
-
I think he was last seen spitting out some andouillette. AW7 points
-
Few more 72nd's and two 1/144th's. To @giemme and @TheBaron, thanks for asking me to post some pics, most of these were built so long ago that I'd forgotten about them! Amodel Yak 25 I'd loved this jet since seeing a grainy 'spy' shot in an ancient 'Observers Book of Aicraft when I was a kid, so built this for a Soviet aircraft group build on BM. Thoroughly enjoyed it too! Airfix 'new mould' Zero Revell Hunter F6 4FTS Fujimi Phantom FG1 Eduard L-39 Albatros And the couple of 1/144 builds I could find; Final Countdown diorama Trying to recreate a scene from one of my all time favourite films, where Kirk Douglas has given the alert flight Tomcats the order to shoot down the time travelling Zeroes! F-14 from LS with crew from Dragon's flight deck figures, 'Zero' converted from a revell Spitfire Mk1...!! Revell Super Constellation Built for, IIRC, the first BM airliner group build Went a bit daft with that one and made a crew for it! And as they say in all the best cartoons - That's All Folks!! Thanks for looking and enduring my trip down memory lane! Keith6 points
-
#32/2018 Dec. 5th in Austria.....celebrating Krampus Day typical Krampus Run https://www.youtube.com/watch?v=UCwzqkeR2_o 640 by Reinhard Spreitzhofer, auf Flickr And now for the model... Before the WNF G-10 Profi Pack, Eduard already released a limited Czech edition. My dad built it mostly oob, EZ Line for the antenna , brake lines added, painted with Gunze and Tamiya acrylics. The model displays Avia C-10.21, OK-BYU, Police Air Patrol Unit, Czechoslovak Police Air Force, Prague – Ruzyne, 1947. Build thread here https://www.britmodeller.com/forums/index.php?/topic/235044971-bohemian-schmitt148-avia-s-99-wnfdiana-g-10-czechoslovak-police-airforce/ DSC_0001 by Reinhard Spreitzhofer, auf Flickr DSC_0002 by Reinhard Spreitzhofer, auf Flickr DSC_0003 by Reinhard Spreitzhofer, auf Flickr DSC_0004 by Reinhard Spreitzhofer, auf Flickr DSC_0005 by Reinhard Spreitzhofer, auf Flickr DSC_0006 by Reinhard Spreitzhofer, auf Flickr DSC_0007 by Reinhard Spreitzhofer, auf Flickr DSC_0008 by Reinhard Spreitzhofer, auf Flickr DSC_0009 by Reinhard Spreitzhofer, auf Flickr DSC_0010 by Reinhard Spreitzhofer, auf Flickr DSC_0011 by Reinhard Spreitzhofer, auf Flickr DSC_0012 by Reinhard Spreitzhofer, auf Flickr DSC_0013 by Reinhard Spreitzhofer, auf Flickr DSC_0014 by Reinhard Spreitzhofer, auf Flickr DSC_0015 by Reinhard Spreitzhofer, auf Flickr DSC_0016 by Reinhard Spreitzhofer, auf Flickr DSC_0017 by Reinhard Spreitzhofer, auf Flickr DSC_0018 by Reinhard Spreitzhofer, auf Flickr DSC_0002 by Reinhard Spreitzhofer, auf Flickr DSC_0003 by Reinhard Spreitzhofer, auf Flickr DSC_0004 by Reinhard Spreitzhofer, auf Flickr Greetings from Krampus krampus1 by Reinhard Spreitzhofer, auf Flickr6 points
-
By under control he means that in a non-modelling food fashion, this thread is available for viewing by anyone on this space borne rock with tinternet access. (Therapy and calorie reduction advice available at additional cost + postage) BTW, the large white space in the Martians post is available for rent. Also at additional cost.6 points
-
I posted my earlier attempt at this kit earlier, but as there are two in the box it would be rude not to build both. So this one is a machine of the Squadron commanders bird from the 87th FIS. Both together Thanks for looking.6 points
-
I'm starting to worry that this thread may be beginning to affect my life outside scale modelling. I think I'm becoming obsessed.6 points
-
Bench time has been extremely limited since Telford as I am responsible for organising a refit on one of our MVS launches. Despite my attempts to ensure the tail planes were secure, I managed to dislodge them, how I know not. This was not all bad as I took the opportunity to reset them at the correct dihedral. I have begun to clean up the mess that this left. I am slowly getting there in my attempts to get the areas around the inner intakes cleaned up and polished. This is taking some time as I have no desire to have to replace them yet again. I plan to turn my phone off and lock myself in the Marian cave over Christmas and the new year and get some Martian time in for a change, no MVS, no nothing, just some good old fashioned modelling. Martian 👽6 points
-
The engines, which will be lit with flickering blue 1.3mm LEDs. I need one more light to finish the cockpit and then I can start putting this all together. I'm still unsure how I'm going to get the wiring into the base. I'd like it to be invisible but I'm not sure how I'm going to manage it. I'm thinking I may put in a fake fuel hose or something. Here's the front landing strut. These things were kind of a pain to get out the seam lines and paint in a way that they look kind of interesting. The engines. The side control rods were also rather difficult to attach. I gave them a dry brushing of copper to give these a slightly more interesting color variation. Finished Viper. I kept the weathering fairly minimal. It's easy to go overboard and I didn't want to make this one too banged up. Some weathering close ups. So much putty along the body seams to get the stupid cockpit to fit. Thank god for weathering to cover up the larger mistakes. You won't see much of the underside once it's mounted. I added a scratch-built throttle since the kit only has one mounted in the pilot's hand, and I'm not using the pilot. Engine lights flicker.6 points
-
Inspired by @Andre B, I thought I'd post a short resume on the 1956 edition of the USAF/USAFE Skyblazers aerobatic team, which flew F-86Fs until converting onto the F-100 Super Sabre in October of that year. As with the 1955 team (which I may cover at some point), the team had five aircraft painted in the team colour scheme, which was all-new for 1956 compared to the 1955 colour scheme. Each aircraft was painted slightly differently, especially with respect to the positioning of the white stars on wings, fin and tailplanes. Most, if not all, of the kit and aftermarket decal manufacturers have represented the pilot names incorrectly on the canopy rails: though their full names were James, Harold etc, it was their nickname or shortened first name that was actually painted on the aircraft. Thus, James Foster was painted 'Jim Foster' and Harold Homan's name was painted 'Bud Homan' etc. SO, the aircraft s/n for 1956 and their respective canopy names (pilot name on LH canopy rail; crew chief on RH rail) were: 53-1162 CAPT. JIM REYNOLDS/C-C TL ANDERSEN 53-1186 LT. WARREN EFTING/C-C* 53-1192 CAPT. JIM REYNOLDS/C-C G BUELER 53-1201 LT. JIM FOSTER/C-C* 53-1219 LT. BUD HOMAN/C-C* *Crew chief names of the aircraft shown '*' are not known: C-C W HAMMACK was crew chief on one of these. Crew chief for 53-1192 possibly painted ‘S/SGT GARY BUELER’ rather than as shown above. Rarely-mentioned, the Spare pilot for 1956 was Lt Harold L “Harry” Brewer; Second Spare pilot and Narrator was Capt William R Gilmore. These are, as far as I'm able, the four-views for each of the aircraft as a guide to accurate decal placement. Note the very different star arrangements from aircraft to aircraft (all photos USAF official except first colour shot which is credit Dave Menard): 53-1162: 53-1186: 53-1192: 53-1201: 53-1219: Skyblazers Sabres were often seen with decorated drop tanks, but again one key element of this scheme seems to have been missed by the kit manufacturers and aftermarket: as shown in this view, where the 'no step' markings are shown: Finally, on On 30 September 1956 the team flew its last F-86F show, at the Stuttgart-Echterdingen “Grossflugtag”. At least two of the aircraft wore a nine-flag panel beneath the cockpit on the LH side, reflecting the countries visited in 1956. Photos below by Peter Sickinger show -1162 and -1201 at that display with the flag panel, but 1219 (possibly the spare by that time) did not have it. I don't think this element of the scheme has been modelled before. And my rendition of the flag panel: I also had a look at the available kits and decal sheets and this is my resume (I'm sure this list is not exhaustive, so feel free to add or correct): 1/72 Kit: Fujimi 72141 - markings for 53-1162, 186, 192 & 201 (– 219 missing) - Star locations are generic - Partial canopy names 1/48 Kits: Hasegawa 09969 - markings for 53-1186, 192, 201 & 219 (– 162 missing) - (early version?) star locations generic: later rectified - Canopy first names incorrect for (‘James’) Foster and (‘Harold’) Homan - Pilot’s names incorrectly duplicated on RH side Italeri 2684 - markings for 53-1192 & 201 (– 162, 186 and 219 missing) - Canopy first name incorrect for (‘James’) Foster 1/32 Kit: Italeri 2503 - Blue looks too pale. - Pilot’s first name incorrect (‘James’) Foster - Only includes marks for 53-1201 1/48 Decals: Cutting Edge CED48022 - markings for 53-1162, 186, 192 & 201 (– 219 missing) - suspect canopy names Microscale 48-0028 - Only includes markings for 53-1162 - Incorrect canopy name?5 points
-
Hi gentlemen and thanks! Temporarily stuck with trouble on my mill, I stopped the mechanic job... Lets go to the coachbuilder job! And of course, some wood is required, remember, we are in 1927. The beginning... An a very curious belt! Dan.5 points
-
Very cool @krow113 - will have to have a go at something other than straightforward ply In the meantime my cast concrete base has set sufficiently that I could assemble the rocket lamp. Laser cut ply rocket, frosted acrylic with LED lights for the plume and a cast concrete base to hold all of the gubbins. About 70cm tall all told5 points
-
Hi. I've now done the PE for the cockpit. And Wow!, what a difference it made. 025 by Bosse Persson, on Flickr 026 by Bosse Persson, on Flickr 027 by Bosse Persson, on Flickr To be continued..... /Bosse5 points
-
Lower wings, and horizontal stabilizers scribed, trimmed, roots shaped and drilled. Cowling actually glued in place,, but will need some filling at the joint. Still a lot of progress. Might even get as far as some assembly and painting at the weekend.5 points
-
Hi gents, I wrote this up about 20 years ago, but I've not yet found anything to contradict or confirm what I understood back then. It seems to fit this discussion: Here's the rather limited paper trail I've been able to find on engine colors. It offers more questions than answers, but perhaps it will help. In 1930, the Army and Navy used separate color cards (of course!). The Army seems to have used Spec 3-1 color #12 Blue Gray (glossy, and a bit darker and yellower than 36307) while the Navy may have had its own Engine Gray. (A chip with that name was certainly issued by the Philadelphia Navy Yard in 1932, and is reproduced in Jack Elliott's Monogram Volume 1). In 1932 the Army created a set of porcelain color plates including a new Blue Gray (reportedly from "Cobalt-Chromium-Iron Black" and Tin Oxide White). This new Blue Gray is the only chip missing from my set, so I can't comment on the value of the color. In 1933 the Navy issued a new Engine Gray chip based on Windsor Newton Mars Black, Windsor Newton Paynes Gray, and Liquitix Titanium White. My chip seems a little lighter than the earlier sample in the Elliott book. This Navy chip was officially accepted by the Army as the basis for the ANA standard color Engine Gray, even though the Army would delay implementation of the ANA system for six more years. The ANA chips were released in July 1936, and the Engine Grey seems a good match for the Navy 1933 chip. Pratt & Whitney reported switching to this ANA color shortly after its release. In 1938 Sherwin-Williams commented that the ANA Engine Gray was much lighter and cleaner than the old Blue Gray (supposedly compared to the Army porcelain color chip). In January 1939 the Navy requested an unspecified radical change to the engine gray color. Pratt and Whitney requested clarification, and though I've never found the Air Corps' reply, P&W agreed they would switch to this color on all parts shipped after June 1, 1939. Whatever the case, the 1945 ANA chip for Engine Gray doesn't differ all that much from the 1933 Navy chip - I've never found any evidence of the type of gray the Navy was requesting. The 1945 ANA chip is a good match for 16081. In August 1942 the AAF reported that 3-1 color #13 (Dark Gray) was considered a satisfactory match for engine gray. Dark Gray was glossy and a bit stronger and browner than 36081 - not a bad match for the ANA color. There are bound to be many other pieces to this puzzle, but I haven't yet been able to find them. Hope this helps! Cheers, Dana5 points
-
Just give me five minutes ma'am and it'll be ready again... Arrived back on this thread to find it in the gutter and Ced filling an opening. Disgusting. You should all be thoroughly ashamed of myself.5 points
-
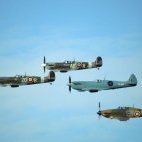
At first light HMS Emperor turned into the wind in the North Atlantic 120 miles off the coast of Norway. Emperor was an escort carrier with 20 Hellcats on board from 800 and 804 Naval Air Squadrons and was part of a large force planning to put a few dents in the German battleship Tirpitz. It was 3rd April 1944 and this was Operation Tungsten. Tirpitz was sheltering in a Norwegian fjord and was about to start sea trials having just finished repairs from damage caused by an earlier attack by midget submarines (Operation Source). The 800 squadron Hellcats took off from Emperor as part of the first of two strikes. Each strike comprised 21 Barracudas fitted with a variety of bombs to maximise damage plus 40 escort fighters. Hellcats and Wildcats to suppress the shore and ship anti-aircraft guns and Corsairs and Seafires to provide top cover. Here we have FAA pilots planning the Tirpitz mission on the deck of Emperor. Possibly posed methinks. The image below shows Hellcats on the deck of Emperor getting ready to introduce themselves to Tirpitz. The first strike achieved complete surprise with the alarm only sounding as the Hellcats and Wildcats were beginning their attacks. As a result the anti-aircraft guns were rendered largely ineffectual. The Barracudas achieved 10 direct hits and although none fully penetrated the deck armour there was significant damage. This image shows the attack underway and a direct hit. The twin wake is someone making a speedy departure in a launch. The second strike followed and had similar success hitting Tirpitz another five times. Most of the damage was to the superstructure and between the armoured decks. Bombs also exploded in the water opening holes in the hull and causing flooding. The Fleet Air Arm had just managed to undo six months of repair work. No defending fighters were encountered but two Barracudas and their crews were lost. Tirpitz never again left the shelter of the fjords surviving another seven months, and a number of further attacks, until a final visit from RAF Lancasters with their 12,000 pound tallboy bombs. A slightly interesting point is that the cruiser HMS Belfast was part of the covering force and (for those that may not know) is now a museum moored on the Thames in London between London Bridge and Tower Bridge. Emperor was in action throughout the remainder of the war. First with anti-shiping operations off Norway then providing cover for the landings on D-Day and later in the south of France. After a re-fit she saw extensive action in the Indian Ocean against Japanese forces. In the era of Lend Lease the end of war meant time was up for Emperor and her Hellcats. The Hellcats probably all met a watery end and Emperor was returned to the US Navy at Norfolk, Va. She was sold for scrap. On to the kit and my attempt at an 800 Squadron Hellcat Mk I in Operation Tungsten. This is the Eduard 1/48 Dual Combo Hellcat Mk I / Mk II boxing. A straight out of the box build which had plenty of Eduard p.e. (I'll own up to not using all of it) and their canopy masks. There are two options for Mk Is on Emperor and as usual with Eduard there is plenty of historical info but surprisingly (at least for me) there is no mention of the Tirpitz operation. I drilled out the holes in the tail wheel strut, the exhausts and the .50 cals. I also strengthened the wing to fuselage join with a spar from sprue and the horizontal tail to fuselage join with a cocktail stick/toothpick. Grumman provided the Hellcats in Royal Navy colours so the scheme is Extra Dark Sea Grey and Dark Slate Grey over Sky undersides. I've used Ultimate acrylic primer and Xtracrylics plus Winsor and Newton oils and pastels for the weathering. And for the first time I added a couple of drops of Liquitex Flow-Aid to the paint. Worked perfectly. One of those – why haven't I done this before - moments. I had a few problems with the decals but that was entirely down to me. One or two look a bit iffy in the pics. And I've still got a Hellcat MkII in the box for the future. Comments appreciated. Maybe the sunrise in the North Atlantic doesn't quite look like the final pic. Artistic licence perhaps. all the best Mark5 points
-
Well after what seems like a lifetime of masking/remasking I now have the invasion stripes in place, pretty sure theres a few issues with how i've presented some things (like the positioning/gaps in the stripes around the codes/roundels etc) however I am reasonably happy so far, as you may notice i've also knocked the chipping on the walkways back a bit. Next big step is a final clear coat (satin, not matt to keep an element of the smooth finish of the original) and then just a few more weathering steps before its time to put all the seperate parts together , now lets think whats needed? oil stains dust around walkways/wingroots some silver pencil chips around some panel lines exhaust stains Ive had a lot of fun with this so far and I am already planning another!5 points
-
Hello everyone I will welcome you with the b-2 bomber model. A gluing, or rather a sculpturing, took me half a year. At the time when I stuck it, it was the only 1/72 scale model on the market. Tests are not impressive with quality, it is a model from the "gniot" series. The patches date 1991, convex lines, wyppaczane items, there are many shrinkage pits, you need to improve a lot and even more earn. I collected probably the majority of photos, videos and reports from the model building available on the Internet. Unfortunately, very few photos of B-2 details are still available today. For the construction I used Eduard's plaques and airesa armchairs, the only elements available on the market for this model, and still are not perfect. Cockpit, bomb chamber, chassis recesses, engines, leaning rudders and many other things done from scratch, engraved lines. I have not used so much putty in my life, even on Mach 2 models. Model painted mr. Color C (FS36118), H. The presentation of this copy (21066) took place on November 22, 1988 at the Palmdale Air Force Base, California. The first flight took place on July 17, 1989 from the Palmdale base to the Edwards base. greetings ,,,,,4 points
-
Hi all, after the L-39 I built another Czech AF jet: The MiG-23MF! Used the new nice "Bedna" Kit by Eduard (ex Trumpeter) and add Brassin intakes, nozzle, wheel bays and tyres, the Eduard PE update set and a Master pitot. Hope you like this MiG!4 points
-
It's time for a model that I finished two years ago. The F-4J model comes from the Tamiya set is very easy to fold, This jet is one of the most beautiful combat aircraft so in my opinion, there are never too many Phantoms on the shelf. Model made straight from the box. The interior of the cabin from Eduard4 points
-
I recently posted some pics of my car models in the vehicles section and @giemme and @TheBaron asked if I could post some of my aircraft builds - so you can blame Giorgio and Tony for this nonsense! Like my car model pics, these were all probably posted on here in the past, but following photobucket's attempt to take them hostage, if any of the threads still exist, they'll be devoid of pics as I deleted all my stuff off that heinious organisation's site. Rightio, here we go... Eduard 1/48 Sopwith Camel This was built as a retirement gift for my wife's then boss. Which I regretted as when it was finished it became one of my favourites and I didn't want to give it away! Apols for so many pics of this one! Smer 1/48 Tiger Moth This was built for a friend of the recipient of the Camel who was an RAF veteran who was groundcrew on Moths during the war. He was rather poorly and housebound, so my wife's boss thought it might cheer him up - I hope it did! Hasegawa 1/48 P-40 Aeroclub 1/48 Jet Provost That's all the pics I could find of any of my fumble thumbs scale builds, so I'll start another thread for the One True Scale models.... Keith4 points
-
It really wasn't that hard, in the end. I used white glue on the canopy and I'm up to the challenge of pulling a glued-by-white-glue part off, and then my little microchisel turned out to be the perfect tool for the job; the PE went through the hole it made without difficulty. And I'm not even mad at you about it! It's pure coincidence I've been throwing hobby knife blades at a picture of a baboon for the past few days, really!4 points
-
Evening all, I have just applied some finishing touches to the Duck, I managed to massage the rather flimsy undercarriage into place, how long it'll last I don't know, the wheel hubs are I'm afraid not representative of the real example and nothing in the spare box would suit so they'll have to do. A suitable base on which to set the model and quality pictures will have to wait until the weekend: Anyway calling it finished, many thanks to @TEMPESTMK5 for organising. Enjoyed the GB especially building two Grumman products that literally are worlds apart. Cheers, Mark.4 points
-
I continue with the Italian Aviation jets. The Macchi C.200 Saetta, the old Revel's model, was completed. It suited me for work. It's all out of the box. except the decal and the elise. The model is a plane that was stationed in Crete. Here's the picture.4 points
-
Thanks for that Duncan, the photo that you provided above proved useful, I have added the missing details now, scribing in the panel and using stretched sprue for the ridge detail. by John L, on Flickr4 points
-
Colleagues, thank you so much for your comments and kind words! Hacker, here are some pictures, that I used:4 points
-
Hi Panzer People As far as I can tell the Tamiya kit is a fourth series vehicle with a slightly lower and shorter superstructure and commander's cupola. Between June 1944 and March 1945 162 vehicles were built in Duisberg, In September 1944 Zimmerit was discontinued and replaced by a factory applied 3 colour camouflage scheme. With 86 vehicles completed by end-August and 19 in September the change happened between vehicles 86 and 105. The rubber tyre issue was causing problems as early as 13 July 1944 which was no surprise as the steel road wheels were specified on all 8 positions. As stated above the number of steel wheels per side varied between 0, 2, 4 or 8. Duisberg seems to have gone for four each side at the front with four rubber at the rear. I believe they made every attempt to stick to this as the Army Acceptance people weren't happy with rubber tyres at the front. Where ever possible 8 steel wheels were used. The chassis used were all new-build from Nibelungenwerke which was supplying several factories so some chassis built to other specs may have ended up in Duisberg. I think it likely that faced with an all-rubber Panzer IV wheel set and an 8 steel Sturmpanzer the rear 4 were swapped on each side. The reason for the change was to reduce the consumption of rubber which was becoming very hard to maintain. The new wheels used far less and it lasted a lot longer. On a related matter the idler wheel is usually the tubular type and vehicles from December 1944-on could have only 3 return rollers and/or the towing hooks front and rear replaced by extensions to the hull sides. Finally the lighter track also used on the JagdPanzer IV L/70 was meant to be used but the standard track is at least as common. HTH. I am a bit of an anorak on the Panzer IV so will help if asked.4 points
-
Cheers mate. My advise is to test fit and be ready with sharp blades n sanding sticks....loads of flesh n misallinged stuff, but with some care, they can be built. Hope to see your progress soon. Yes been years I have been waiting for a 1/48 provost to build to complete the trainers which my dad flew in service. Hope they finish off ok Cheers. Yes 2 of them will follow the czechmaster kit (checkers). One will be the delivery scheme. This was just decided today as I wanted some variety. I would be obliged if you could share your research material. Love the provost and be nice to see. If you can. I will anyways pm you. the current state of affairs, 1 is unmasked, 1 is a dull silver and 1 is in black primer. Looking to complete all painting by this weekend if all goes well. Best regards brian4 points
-
You forgot to add "iconic", "no line up would be complete without" and, "why do this when modellers are screaming for (insert)". To name but a few popular clichés! Allan4 points
-
Sabrejet, not sure about the decals available, but, my father lead the Skyblazers from 52-55 (Dillard, Bennett, Gilmore, Reynolds). I have all of his memorabilia and photos. Let me know if you would like to see any reference. (assuming I can figure out how to post photos on this site04 points
-
I think the lad b*ggered off with your skyhooks, they were the skyblue pink ones weren't they It won't matter he's in the line at the stores for the long waits, we can pick him off at leisure Black Anson, yup A chap could aspire to a monniker like that one, awfully aspirational...4 points
-
Great point and ideas @Aardvark - it’ll do spring steel so could easily do small etch-type parts I’ve not really been looking for commercial opportunities while I’ve been learning but you’re right this has a lot of model accessory options Just finishing up a couple of personalised clocks... ... and working on a prototype lamp4 points
-
What's the long German word for when your Britmodeller thread goes wrong? NimrodBauenWurstÜbernahmen?4 points


(250x229).thumb.jpg.48a57772b41ed148fdc8d15e3c202763.jpg)

Wedge-TailedEaglePortraitRaptorDomains.thumb.jpg.41a306d3445a68f0f2df773e01776ea6.jpg)
.thumb.jpg.76f12b87ce9ca9929c9aabdcf8f9d2dd.jpg)


.thumb.jpg.cfc129272ffec824439b15e6013d5952.jpg)


This leaderboard is set to London/GMT+01:00