
Leaderboard
.thumb.jpg.76f12b87ce9ca9929c9aabdcf8f9d2dd.jpg)


Popular Content
Showing content with the highest reputation on 05/12/18 in all areas
-
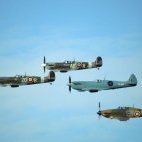
At first light HMS Emperor turned into the wind in the North Atlantic 120 miles off the coast of Norway. Emperor was an escort carrier with 20 Hellcats on board from 800 and 804 Naval Air Squadrons and was part of a large force planning to put a few dents in the German battleship Tirpitz. It was 3rd April 1944 and this was Operation Tungsten. Tirpitz was sheltering in a Norwegian fjord and was about to start sea trials having just finished repairs from damage caused by an earlier attack by midget submarines (Operation Source). The 800 squadron Hellcats took off from Emperor as part of the first of two strikes. Each strike comprised 21 Barracudas fitted with a variety of bombs to maximise damage plus 40 escort fighters. Hellcats and Wildcats to suppress the shore and ship anti-aircraft guns and Corsairs and Seafires to provide top cover. Here we have FAA pilots planning the Tirpitz mission on the deck of Emperor. Possibly posed methinks. The image below shows Hellcats on the deck of Emperor getting ready to introduce themselves to Tirpitz. The first strike achieved complete surprise with the alarm only sounding as the Hellcats and Wildcats were beginning their attacks. As a result the anti-aircraft guns were rendered largely ineffectual. The Barracudas achieved 10 direct hits and although none fully penetrated the deck armour there was significant damage. This image shows the attack underway and a direct hit. The twin wake is someone making a speedy departure in a launch. The second strike followed and had similar success hitting Tirpitz another five times. Most of the damage was to the superstructure and between the armoured decks. Bombs also exploded in the water opening holes in the hull and causing flooding. The Fleet Air Arm had just managed to undo six months of repair work. No defending fighters were encountered but two Barracudas and their crews were lost. Tirpitz never again left the shelter of the fjords surviving another seven months, and a number of further attacks, until a final visit from RAF Lancasters with their 12,000 pound tallboy bombs. A slightly interesting point is that the cruiser HMS Belfast was part of the covering force and (for those that may not know) is now a museum moored on the Thames in London between London Bridge and Tower Bridge. Emperor was in action throughout the remainder of the war. First with anti-shiping operations off Norway then providing cover for the landings on D-Day and later in the south of France. After a re-fit she saw extensive action in the Indian Ocean against Japanese forces. In the era of Lend Lease the end of war meant time was up for Emperor and her Hellcats. The Hellcats probably all met a watery end and Emperor was returned to the US Navy at Norfolk, Va. She was sold for scrap. On to the kit and my attempt at an 800 Squadron Hellcat Mk I in Operation Tungsten. This is the Eduard 1/48 Dual Combo Hellcat Mk I / Mk II boxing. A straight out of the box build which had plenty of Eduard p.e. (I'll own up to not using all of it) and their canopy masks. There are two options for Mk Is on Emperor and as usual with Eduard there is plenty of historical info but surprisingly (at least for me) there is no mention of the Tirpitz operation. I drilled out the holes in the tail wheel strut, the exhausts and the .50 cals. I also strengthened the wing to fuselage join with a spar from sprue and the horizontal tail to fuselage join with a cocktail stick/toothpick. Grumman provided the Hellcats in Royal Navy colours so the scheme is Extra Dark Sea Grey and Dark Slate Grey over Sky undersides. I've used Ultimate acrylic primer and Xtracrylics plus Winsor and Newton oils and pastels for the weathering. And for the first time I added a couple of drops of Liquitex Flow-Aid to the paint. Worked perfectly. One of those – why haven't I done this before - moments. I had a few problems with the decals but that was entirely down to me. One or two look a bit iffy in the pics. And I've still got a Hellcat MkII in the box for the future. Comments appreciated. Maybe the sunrise in the North Atlantic doesn't quite look like the final pic. Artistic licence perhaps. all the best Mark29 points
-
Hi again all, Back in August I was asked to build the all-new 1/48th Airfix Hunter F6 to feature in the December issue of Airfix Model World and the Key Publishing Combat Machines special on the Hunter, released in time for the Telford show. It's a very straightforward kit, easy to assemble with no fit problems or issues worth mentioning, (although I did have a problem with the nose cone being slightly too large and needing sanding to shape, however after having a word with the Airfix guys at SMW they assured me that the production kits part fit perfectly, so I'd put this down to the pre-production nature of the kit. On offer are two tail cones, one plain one with parachute fairing, so an F6A can be modelled following references and a couple of Matra rocket packs, along with the smaller 100gal wing tanks used on this variant. I'm sure other versions will follow, including both straight wing and dog-tooth variants, though no trainers are to be expected. As usual, there were no decals included with the test-shot so an after-market sheet was provided instead. The editor decided he liked the look of the yellow marked Day Fighter Combat School aircraft based at West Raynham circa 1962 and so Xtradecals X48189 Hawker Hunter F.6 Pt1 was used in the build as these included them. Interestingly many colour palettes and model companies like Revell have the scheme depicting yellow tailplanes to go with the striking yellow spine and fin but noticed that Xtradecals portrayed them as being camouflaged. This piqued my interest and so I decided to research the scheme further and found very few colour images of XG204 online and these proved inconclusive. Luckily Martin Derry's excellent tome ‘Britain’s Military Aircraft In Colour, 1960-1970’ included two high-definition images and an excellent 4-view profile showing the aircraft taking part in an airshow at Finningley in 1962 and Lo and behold the tailplanes were indeed camouflaged. Although rocket rails and Aden gun muzzle deflectors were fitted by this time the editor wanted the model to be as out of the box as possible so these weren't added, (although I did add the two yellow DME Rebecca 8 aerial rods beneath the fuselage along with upper wing whip aerials, (apparently the aircraft didn't have the two spine-mounted or single under-fuselage whips often seen on F6s). The model was painted using MRP acrylic lacquers and due to the heavy usage by the DFCS at the time, weathering was applied using a mixture of Abteilung oils, MIG Oilbrushers and pastels and AK oil and kerosene stains. Once again thanks for looking, hope you like it and decide to buy a few...for those of you tempted, you won't be disappointed... Cheers Melchie24 points
-
I recently posted some pics of my car models in the vehicles section and @giemme and @TheBaron asked if I could post some of my aircraft builds - so you can blame Giorgio and Tony for this nonsense! Like my car model pics, these were all probably posted on here in the past, but following photobucket's attempt to take them hostage, if any of the threads still exist, they'll be devoid of pics as I deleted all my stuff off that heinious organisation's site. Rightio, here we go... Eduard 1/48 Sopwith Camel This was built as a retirement gift for my wife's then boss. Which I regretted as when it was finished it became one of my favourites and I didn't want to give it away! Apols for so many pics of this one! Smer 1/48 Tiger Moth This was built for a friend of the recipient of the Camel who was an RAF veteran who was groundcrew on Moths during the war. He was rather poorly and housebound, so my wife's boss thought it might cheer him up - I hope it did! Hasegawa 1/48 P-40 Aeroclub 1/48 Jet Provost That's all the pics I could find of any of my fumble thumbs scale builds, so I'll start another thread for the One True Scale models.... Keith23 points
-
Few more 72nd's and two 1/144th's. To @giemme and @TheBaron, thanks for asking me to post some pics, most of these were built so long ago that I'd forgotten about them! Amodel Yak 25 I'd loved this jet since seeing a grainy 'spy' shot in an ancient 'Observers Book of Aicraft when I was a kid, so built this for a Soviet aircraft group build on BM. Thoroughly enjoyed it too! Airfix 'new mould' Zero Revell Hunter F6 4FTS Fujimi Phantom FG1 Eduard L-39 Albatros And the couple of 1/144 builds I could find; Final Countdown diorama Trying to recreate a scene from one of my all time favourite films, where Kirk Douglas has given the alert flight Tomcats the order to shoot down the time travelling Zeroes! F-14 from LS with crew from Dragon's flight deck figures, 'Zero' converted from a revell Spitfire Mk1...!! Revell Super Constellation Built for, IIRC, the first BM airliner group build Went a bit daft with that one and made a crew for it! And as they say in all the best cartoons - That's All Folks!! Thanks for looking and enduring my trip down memory lane! Keith18 points
-
Good day. I present my finished model from the company Airfix A05126 Supermarine Spitfire Mk.I 1/48. Prototype aircraft of the outstanding aces of the Battle of Britain P/O Eric Lock Spitfire N3162/EB-G, 05.09.1940 Airbrush: Harder & Steenbeck Evolution 0.2 Paint: Gunze Sangyo H12 Flat Black / Primary - Screw / Blackout Effect Gunze Sangyo H58 Interior Green / U.S. Army & Navy Aircraft WWII - Lightening Effect Gunze Sangyo H72 Dark Earth Semi-Gloss / Great Britain Aircraft WW II - Camouflage Gunze Sangyo H73 Dark Geer Semi-Gloss / Great Britain Aircraft WW II - Camouflage Gunze Sangyo H74 SKY Semi-Gloss / Great Britain Aircraft WW II - Camouflage Gunze Sangyo H 327 Red FS11136 Gloss - Signs Gunze Sangyo H 328 Blue FS15050 Gloss - Signs Gunze Sangyo H 329 Yellow FS13538 Gloss - Signs of Designation Tamiya XF-2 Flat White - Lightening Effect Tamiya XF-54 Dark Sea Gray - Color alphabetic code Tamiya XF-57 Buff - Brightening Effect Tamiya XF-64 Dark Brown - Blackout Effect Tamiya XF-71 Cocpit Green (IJN) - Cab Color Tamiya XF-76 Gray Green (INJ) - Blackout Effect Photoetched: Eduard 49006 Seatbelts RAF WWII Masks: Pmask Po48001 Supermarine Spitfire RAF 1/48. Very high quality manufactured kit, has both early types of characters and late ones. The letter code was made to order by a colleague UpRise, for which I express many thanks to him. I recommend as a very high-quality manufacturer of masks and decals. Top camouflage applied by hand without masks. I hope you will like it. \17 points
-
#32/2018 Dec. 5th in Austria.....celebrating Krampus Day typical Krampus Run https://www.youtube.com/watch?v=UCwzqkeR2_o 640 by Reinhard Spreitzhofer, auf Flickr And now for the model... Before the WNF G-10 Profi Pack, Eduard already released a limited Czech edition. My dad built it mostly oob, EZ Line for the antenna , brake lines added, painted with Gunze and Tamiya acrylics. The model displays Avia C-10.21, OK-BYU, Police Air Patrol Unit, Czechoslovak Police Air Force, Prague – Ruzyne, 1947. Build thread here https://www.britmodeller.com/forums/index.php?/topic/235044971-bohemian-schmitt148-avia-s-99-wnfdiana-g-10-czechoslovak-police-airforce/ DSC_0001 by Reinhard Spreitzhofer, auf Flickr DSC_0002 by Reinhard Spreitzhofer, auf Flickr DSC_0003 by Reinhard Spreitzhofer, auf Flickr DSC_0004 by Reinhard Spreitzhofer, auf Flickr DSC_0005 by Reinhard Spreitzhofer, auf Flickr DSC_0006 by Reinhard Spreitzhofer, auf Flickr DSC_0007 by Reinhard Spreitzhofer, auf Flickr DSC_0008 by Reinhard Spreitzhofer, auf Flickr DSC_0009 by Reinhard Spreitzhofer, auf Flickr DSC_0010 by Reinhard Spreitzhofer, auf Flickr DSC_0011 by Reinhard Spreitzhofer, auf Flickr DSC_0012 by Reinhard Spreitzhofer, auf Flickr DSC_0013 by Reinhard Spreitzhofer, auf Flickr DSC_0014 by Reinhard Spreitzhofer, auf Flickr DSC_0015 by Reinhard Spreitzhofer, auf Flickr DSC_0016 by Reinhard Spreitzhofer, auf Flickr DSC_0017 by Reinhard Spreitzhofer, auf Flickr DSC_0018 by Reinhard Spreitzhofer, auf Flickr DSC_0002 by Reinhard Spreitzhofer, auf Flickr DSC_0003 by Reinhard Spreitzhofer, auf Flickr DSC_0004 by Reinhard Spreitzhofer, auf Flickr Greetings from Krampus krampus1 by Reinhard Spreitzhofer, auf Flickr15 points
-
I finished this one up not so long ago. I bought it for myself as a Fathers Day present (after my wife forgot Fathers Day, haha). She sent me off to the hobby store in Sapporo where we were visiting and this was one of the things I came back with. Really neat kit and easy to get it to look nice, as it's moulded in white and therefore takes Tamiya white spray pretty nicely.12 points
-
These are pics of some of my 72nd scale builds, all down to a request from @giemme and @TheBaron Hasegawa 1/72nd T-33 Built for a 'one type' competition at my model club, rescribed and minor details added to the 'pit... Xtrakit Hunter T7 Real dog of a kit, but quite pleased with the end result. Xtrakit Sea Vixen D3 Another right woofer of a kit, not that accurate as it comes out of the box. I didn't do anything to address that other than trying to get the radome looking better, as the o.o.b. effort is woeful. Pavla Westland Whirlwind Pavla Supermarine Walrus Think that'll do for this thread, I've a couple more 72nd's and two 1/144's that I'll finish off in another thread Keith11 points
-
Apologies for the quality of the images. The original prints are quite small and taken nearly sixty years ago - time has not been kind to them :- I understand that the device on the nose was in Gold and Black but am quite willing to be corrected ! Red spine and fin with Red 'T' Bands on the wings (Possibly Day-glo Red ?) HTH Dennis11 points
-
It's time for a model that I finished two years ago. The F-4J model comes from the Tamiya set is very easy to fold, This jet is one of the most beautiful combat aircraft so in my opinion, there are never too many Phantoms on the shelf. Model made straight from the box. The interior of the cabin from Eduard9 points
-
Hello Dears, It's a long time now that I think about this thread ! A way to share some bits of history with you and a way to bring some unknown spot into your home by the magic of this forum ! I just hope that it would be interesting for anyone. Do not hesitate to comment or ask for more ! I will feed the thread as frequently as I can ! In between my (Too numerous) builds !! First one ! It's situated on the bank of the river Meuse, between Hastière (Belgium) and Givet (France) The place is very a very scenic one. Originally, The tank was a Sherman Jumbo, but there has been an exchange... The Jumbo is now in Bastogne's museum, and it has been replaced by this one in the '70. The tank has been repainted and a bit restored 2 years ago ! Sorry, the CC van is visible... The plynth is in pink marble, usual in our region... And it read.. A tribute To the GI's from 2nd and 3rd Batalion of the 60th Infantry Regiment of the 9th Infantry Division Of the 1st US Army Under the orders of Maj Gen J. Lawton Collins Here at the dawn of the 5th of September 1944 They crossed the river Meuse Under ennemy fire, helped by a handfull volunteers from Hastière After 2 days of fierce combat facing the 2nd SS Panzer Division "Das Reich" Their courage and abnegation give us back our liberty May their sacrifice will never be done in vain ! Location; On RN96 at the entry of Heer Agimont ! I'll try to put the right location, that way, if you ever paid us a visit, you can easily spot it !! Of interest, Elements of that same "Das Reich" has slowed american advance in the village where I'm currently living The fight in Neuville lasted for one full day. Here we are, the next one is almost ready Thank for watching Corsaircorp8 points
-
Polish Air Force 305 "Black Boar" Aftermarket used; MasterModels pitots Eduard PE cockpit set Aires seats HAD Models resin FOD covers set ModelMaker decal set Ian G-3259 by ian gaskell, on Flickr Ian G-3262 by ian gaskell, on Flickr Ian G-3263 by ian gaskell, on Flickr Ian G-3264 by ian gaskell, on Flickr Ian G-3266 by ian gaskell, on Flickr Ian G-3267 by ian gaskell, on Flickr Ian G-3268 by ian gaskell, on Flickr Ian G-3269 by ian gaskell, on Flickr Ian G-3270 by ian gaskell, on Flickr Ian G-3271 by ian gaskell, on Flickr Ian G-3272 by ian gaskell, on Flickr Ian G-3274 by ian gaskell, on Flickr8 points
-
The dioaram I have been building, and described in this thread is done. Here are a some pictures. The cab is empty. Where has the driver gone? Here he is. Tending to urgent needs! Is the driver drunk? Starring eyes and the helmet askew 🙂8 points
-
This time I present you a F-35. I made this model in three different scales 1:72, 1:48 and 1:32. In general, the appearance of larger models depends on what I managed to do in a 1:72 scale. I wanted the models to look the same in three diferente scales. Model in a 1:32 scale is a set of italieri, generally it is a simple model to build. the biggest problem is with applying a mask for painting.8 points
-
And we are back! Here's my just finished model of the Uss Missouri. As she was on her last tour in the Persian gulf participating in the Desert Storm in 1991. The base was the old Tamiya kit brought back to life with the Pontos advanced set. Also some Infinis detail sets were used. After that thousands of scratch build details added. Painted with Tamiya acrylics and weathered using AK , Ammo and W&N products. For more detailed build log you can visit here: http://www.shipmodels.info/mws_forum/viewtopic.php?f=59&t=167436 And for more pictures here: https://imgur.com/a/EfkWVOw Enjoy!7 points
-
Hi all, after the L-39 I built another Czech AF jet: The MiG-23MF! Used the new nice "Bedna" Kit by Eduard (ex Trumpeter) and add Brassin intakes, nozzle, wheel bays and tyres, the Eduard PE update set and a Master pitot. Hope you like this MiG!7 points
-
A while back I did a little cross kitting to produce a more accurate looking 1/76 Bedford QL bowser - https://www.britmodeller.com/forums/index.php?/topic/235010404-bedford-ql-aircraft-refueller/&tab=comments#comment-2510934 Since then, the remnants of the Airfix QLD/QLT and Refuelling sets have been looking at me asking to be built. I did consider doing more conversions but in the end decided on some nice, relaxing from-the-box builds. So here we have the QLT, 100% straight from the box and the AEC 0854 again pretty much from the box, with the addition of a set of Wee Friends wheels, acetate windows and a raised fire shield behind the cab. Both have been finished in 'Mickey Mouse' style camouflage, the Bedford using the box top scheme and the AEC using my own artistic license as the colours of these things are ambiguous to say the least! Hope you like them.7 points
-
After seeing the picture below I was inspired to recreate the scene: I bought Revell's 1/48 IDS and then went searching for a 1/48 VW T3 kit. Unfortunately there was not such kit. After waiting a year or so with no kit in sight I decided to scratch build a roof. I used some thin lead sheet for the roof, some plastic card for the door and EZ line for the rubber strips. I replicated the broken glass with Deluxe Materials Icy Sprinkles and printed the tiger stripe drop tank decals by scaling up some 1/144 decals. Aircraft stencil decals care of Muzz - thanks mate, they went on a treat except for the walkway lines which were a pain. Cheers Mick7 points
-
Hello, This is a Brazilian Air Force Mirage IIIE, in the air defense color scheme used back in the 90’s. These machines were replaced by the Mirage 2000 which, in turn, will be replaced by swedish and locally built Grippens. The kit is a nightmare regarding fitting, specially in the air intakes and aft lower fuselage. Almost ran out of sanders and superglue. Instructions sheet is also very poor. I was told they corrected some of these errors in the dual seat version. But it is not as cool as this one…. I’ve made a few mistakes during painting, hopefully you won’t notice. That is my first black basing project. Cheers Cheers7 points
-
I'm glad this thread has generated discussion. To answer the original question - I do througj-holes on both ends. Cleanup can be a chore, but better than the mess I would inebitably create otherwise. Ask me how I know. Anyhow, main rigging is done. And here's where the cleaning will happen. And the next time one of you sees me talking about building a biplane in 1/72, grab a stick and use it to beat the stupid right out of me.7 points
-
I've been watching Britmodeller from the sides for quite some time now, and finally decided to take the plunge and get a log in. The new Italeri Stirling is one model I've been really looking forward to building. Upon opening the box I did what everyone else did, and gasped at the panel lines. However rather than putting it back on the stash, I decided that I wanted a Stirling in the cabinet and started to build. There aren't many bad things to say about the kit, and believe it or not, once paint is on, the panel lines are actually quite bearable. The kit fits together very well, with the exceptions I found to be, the nacelles to engine assembly- However there's a good chance that was me rather than the kit, and the rear gun turret glass to floor join- once again there's a chance it could well be me. The only other problem I had was the join line down the fuselage sunk on me after I'd sanded it, which was very frustrating, nothing like a bit of Milliput to fix sink problems though, thank goodness. The model is totally out of box. The photoetch once annealed was really nice to use, and the decals conformed really nicely. The topsides are painted using Xtracolour, as I really like the RAF colours they do, and the undersides are painted using several tones of dark blues, browns and dark greys. The flat top coat is very thinned down Wattyl estapol, which is a timber varnish purchased from hardware stores. One product I've really enjoyed using is the Mig 'Fresh oil' weathering paint. I've used it for the oil streaks going across the wings, I've also put it on the tops of the tyres and landing gear legs, then streaked it using air from the airbrush to 'push' the paint around. Final weathering was completed using chalk pastels, followed by paint chipping with a bit of grey and silver, which I've found in 1/72 takes away the starkness of chipping done in silver only- thanks John Darlington for this top tip. Overall a really enjoyable build, and it's so nice to see the great British heavies being re tooled. I look forward to Airfix's Whitley and Shackleton later on this year, which I'm sure won't sit in my stash too long once I have them. Regards, Alan6 points
-
Hi, another rail related model dio, this is three resin kits a panzertriebwagen with two panzerjagerwagon both ends ariving at a fueling point somewhere in Russia. kits are by ARMO and are good quality. This was a armoured version of the wr 550d14 diesel loco ( and it was huge)6 points
-
My two latest builds, built simultaneously. This is the newish Revell 1/48 version. Interesting kit, very overengineered in places but very detailed. The 56Sqn aircraft was fitted with the flaps and slats deployed. This means fixing the wings in place. The black one is supposed have the wings (and pylons) moveable but the paint finish has stopped all that. Some aspects weren't so good. The intake fit and taliplane fit wasn't good and some instructions were a bit vague. Some parts were so small I struggled to pick them up, that's if the carpet monster didn't claim them first. Both using Xtradecal decal sheets. Firstly ZG757 finished in black in the 43Sqn anniversary markings from 2006. 1. 2. 3. 4. Secondly this one finished as one of the 56sqn display jets in 2005. 1. 2. 3. 4.6 points
-
Last finished model (s).6 points
-
Update #5 - Decals and a little back story Trying hard to wrap this one up, however it's been a bit of a slow grind to be honest. Not really sure why but I just seem to always get bogged down in these latter stages of each of my builds. Perhaps it's just not knowing when to stop or looking at the model far too long and finding too many flaws that still need correcting? Anyway a few coats of clear, a session or two of decals (one in between a power outage!) and some not very convincing pin wash treatment sees this P-40 as shown in the photos below. The fine panel lines did not really accept my usual oil paint / turpentine mix, so I resorted to a Tamiya paint / water / isopropyl alcohol mix. This seemed to be thin enough and I was happy that it found what fine panel lines were left, however it also dried in next to no time so now I have a few areas that I'm not entirely happy with that still need some form of correction. Now a little history lesson. There's not a lot of photographic material that survived this period of the Pacific War, which is hardly surprising once you read the book and understand what these lads were going through. I've chosen one of the earliest RAAF P-40's here with A29-6, a P-40E (not E-1) still finished in the US colours of Dark Olive Drab over Neutral Gray. The E-1's built to a British order were camouflaged, however (from what I've read) a surprisngly large number of early Aussie Kittyhawks were coloured as per the standard US orders of the time. A29-6 had a brief but rather spectacular service career with the RAAF. It was allotted to No. 75 Squadron on 8 March 1942 and coded 'F', eventually arriving at Port Moresby's 7 Mile strip on 21 March. That same day, piloted by F/O Wilbur Wackett (the son of Lawrence Wackett - head and driving force behind CAC (Commonwealth Aircraft Corporation), it was involved in the very first air-air Japanese kill over Port Moresby, delivering the final blow to a lone Betty bomber sending it crashing into the sea to the many cheers of the Army personal watching below. At a stroke, the 'Tomorrow-hawk, Never-hawk tag was never mentioned again. The next day, Sqn. Leader John Jackson made plans to launch a surprise and daring early morning raid on the Japanese held base in Lae. Reports indicate that of the 20 enemy aircraft parked on the Lae strip, nine were considered destroyed or significantly damaged, however two RAAF P-40's also did not return - one being Wackett and his A29-6. Post strike, a standing patrol of Zero's engaged 75's Kittyhawks, with Wackett being hit from behind whilst attacking another Zero. The damage sustained was enough to force Wackett to ditch approx eight miles off shore in shark infested waters. Having negotiated this episode, Wackett swam to shore and eventually found help from two locals who helped him trek his way back to safety, however not before a torturous two week jungle trek with badly blistered feet and blood sucking leaches! So here she is so far. Hoping to finish her off before we take a family holiday this Saturday? I've also attached the only known photograph of A29-6 and an image of A29-28 in similar colours taken in Townsville (I think?) just before it was sent to join Port Moresby as an attrition replacement aircraft. Cheers and sorry for the long winded post.. Dave6 points
-
So here is where she sets at the moment: I've done some subtle post shading on the fuselage using my favourite Gunze H95 Smoke Grey. I didn't want to do a lot since photos show these birds fairly clean. The tape has come off the windscreen so now at least the pilot can taxi over to the Officer's Club and find a nice parking spot. The sliding portion of the canopy is not yet attached, I just posed it for the photos. The gear doors have gone on, along with a couple of short pieces of thin wire on the front gear legs. You can see these in photos - I'm not sure what they're for, but I'm guessing perhaps some kind of stiffener/anti-twist linkage of some kind. Which reminds me, I forgot to take a shot of the underside...next time! The Airwaves PE fret includes some pieces to represent the pylons used to carry the rockets. I think I'll add these to give the model some more interest. I have a bunch of leftover rockets from the CMR Scimitar kit, and I wonder if these would be appropriate for the Attacker? CMR describes them as Mk.5 rocket projectiles, both 12 lb. and 25 lb. What do you guys think? The folded wings are also ready to go on, but I'm going to leave that and the delicate antennae and pitot sensors on the nose until last. Cheers, Bill6 points
-
Westland Sea King Mk.43 330 Squadron Royal Norwegian Air Force 1996 Airfix 1:72 Every now and then I like to build something outside of my usual interest and scale, for a complete change. The New tool Airfix sea King fits the bill perfectly! It is a fabulous kit that fits very well. The paint scheme was a bit complex though, I must have used yards of Tamiya tape with all the masking it required. A thoroughly good kit, light years away from the 'old 66' Airfix Seaking I built as a kid, with its box art showing an Apollo capsule recovery. Thanks for looking, John5 points
-
Latest build. Mark DSCN3305 (2) by mwsfly9, on Flickr DSCN3306 (2) by mwsfly9, on Flickr DSCN3307 (2) by mwsfly9, on Flickr DSCN3308 (2) by mwsfly9, on Flickr DSCN3309 (2) by mwsfly9, on Flickr DSCN3310 (2) by mwsfly9, on Flickr DSCN3312 (2) by mwsfly9, on Flickrp/2dhEgYc]DSCN3311 (2)[/url] by mwsfly9, on Flickr DSCN3313 (2) by mwsfly9, on Flickr DSCN3314 (2) by mwsfly9, on Flickr DSCN3315 (2) by mwsfly9, on Flickr DSCN3316 (2) by mwsfly9, on Flickr DSCN3317 (2) by mwsfly9, on Flickr DSCN3319 (2) by mwsfly9, on Flickr DSCN3320 (2) by mwsfly9, on Flickr DSCN3304 (2) by mwsfly9, on Flickr Thanks for looking.5 points
-
This is a 1/32 Trumpeter Razorback built for a friend who wanted a weather-worn workhorse. Insignia airbrushed with Montex masks before top coat in an effort to prevent markings standing proud. A few scratch-built additions here and there but generally OOB. The kit built quite well although you do need to be precise bringing together the interior in order to get the fuselage fitted neatly. Love these planes and want to build another.5 points
-
I prefer to start from the shadows and work my way into the light Pete. Worked in Vienna anyway... Yes you will Chris! Gracious of you to say so Giorgio. ☺️ Beautifully typed and spelt hendie. The committee was unanimous in deciding to award you the book token as 1st prize. You neglected to mention where it fell out of Johnny.... From Liberace! https://en.m.wikipedia.org/wiki/Snader_Telescriptions I find such work tends to kill a relationship Benedikt. If we were really wicked Bill we'd start inventing tools in our posts the way old sweats do to the new apprentice in the job. Anyone seen my skyhooks?5 points
-
Just give me five minutes ma'am and it'll be ready again... Arrived back on this thread to find it in the gutter and Ced filling an opening. Disgusting. You should all be thoroughly ashamed of myself.5 points
-
What's the long German word for when your Britmodeller thread goes wrong? NimrodBauenWurstÜbernahmen?5 points
-
Oooh, very nice indeed! Started off all brassy and now it's turned black and sultry......Reminds me of a lady I once knew. Ian5 points
-
The decals are being re-scaled and will include all registrations5 points
-
Ask yourself - will it really be a problem if I buy & build the kit? Where will you display it? Will anyone else who sees the model laugh and point out the errors or, more commonly, say "mmmh, nice plane, what is it?". Can you live with the errors? A few months after its completion, will you really care about the errors or even remember what they are? Jeff5 points
-
I've got new book about Polish MTBs S1-S4 yesterday! Polish S2 and S3 were MGB 44 and MGB 45, initially with double turrets each with double 7,7 Lewis (book cover photo), then (autumn 1941) modified into single-turret version armed with double 12,7 gun (like your model) and additional depth-charges. Before modification: After modification: S4 is tempting too, but it was MGB 113 of 71' 6" type, the kit is much more expensive. S1 was custom built for Polish Navy already before the war in White shipyard (Cowes) - White 75 type. It is possible that it was the first modern motor gun boat ever. Initial armament was designed as two torpedo tubes, 40 mm Bofors automatic gun and double maxim machine-gun, but it never got the Bofors and torpedos. S2 had stunning commander Lt. Eugeniusz Wciślicki (called "Whisky" by British friends) - 21st June 1942 alone(!) fought against 6(!) German E-Boats and won the battle, forcing Germans to retreat and damaging two of them. He was decorated with Polish Virtuti Militari Cross and British DSC for that.5 points
-
Model and pilot from ICM. Pilot was painted by the author - sculptor Anatoly Gagarin.4 points
-
Almost forgot these shots with the ship! Can't decide which angle I like best, so you get both.4 points
-
Damn, turns out it's not easy to find the kit these days! Did Airfix discontinued it??? BTW, I've found online photo of very fine model of S3, of course converted from Airfix Rescue Launch: On the FineScale Modeler site, model built by Mirosław Golik from Biała Podlaska, Poland.4 points
-
This time the model with a hint of SF. MiG-29M but in the demonstration camouflage M2. I love the sharp cut camouflage, which is why I made this model. The model itself is made straight from the box. About the quality of this model, you can write that it is not good. SET: Trumpeter AINTING: Sikkens Autowave II Cockpit: Eduard photo etch.4 points
-
Su-27 from the airshow. Su-27 Model of the Ukrainian Air Force. The aircraft with this side number was often presented at air shows. As always with the Su-27, the effect depends a lot on how the engines are painted. Set: Trumpeter 1:32 Painted: PPG Envirobase4 points
-
It has been in the works long enough. Resin, vacu canopy and decals from Miniwing. Cannon fairings courtesy of Master. Brass by Shelf Oddity, which means it is the test article for the brass parts - an awkward way to promote our product and equally awkward way to excuse imperfections. First two photos with my trusty companion, who did the part chopping: and lent a helping brush: Now, the Attacker himself: "We there yet?" Thanks for watching!4 points
-
Really enjoyable fun build, nice well detailed kit that went together without to much fuss, eduard masks and squadron decals. Not 100% accurate for the chosen scheme, waist guns should be back to back I think and the 'patches' are oversize but hey ho! Paints are Tamiya acrylics. Untitled by peter crossman, on FlickrUntitled by peter crossman, on FlickrUntitled by peter crossman, on FlickrUntitled by peter crossman, on FlickrUntitled by peter crossman, on FlickrUntitled by peter crossman, on FlickrUntitled by peter crossman, on FlickrUntitled by peter crossman, on FlickrUntitled by peter crossman, on FlickrUntitled by peter crossman, on Flickrv4 points
-
Little bit further along. Would be further but there was an incident involving a wasp that was particularly time costly4 points
-
Here's a pic I took with a Kodak Instamatic (remember those!?!) of what I believe to be the old girl - though it could be G-ANTD which was also present that day. The presence of those wheel doors makes me think it's 'MPZ though. Anybody? I made sure I was sat on the left, one or two seats in front of the door so that I was behind the wing and, so, was able to snap this as we flew over Marham. 57 Sqn pan with a Victor Mk.1a (don't believe 57 had any Mk.1 tankers!) - note the lovely yellow fuel bowser and the shadow of the Dak! Our house was about 100 yards off the top of the shot. Happy days! ATB Rick4 points
-
Morning folk's, I need to grab another pot of yellow to finish off the Panther and can't get to the shop so I made a start on the Intruder.I didn't want to get too bogged down with detailing so just followed Revells colour callout's and used mostly decal's rather than paint the quite nice raised detailing,The pilot's are quite well molded so I'm painting them to see how it goes once I was happy with it I joined up the fuselage side's which went without a hitch.4 points
-
Ha Ha! I had quite the time getting that little sub-scene together. The hardest part was finding a suitable figure. In the end I used the one below. The angles of the arms are not 100% correct for what he is supposed to be up to. But it is close enough, when seen from behind. 😉 Apart from that, I filed away at his parka to make it more like a shorter jacket and loosing the hood. The hard hat is from the original (sitting) driver that came included with the Hasegawa excavator kit. The reflective striping is plain household aluminum foil.3 points
-
I took advantage of having the filler out for my Eurofighter build yesterday and added a couple of smears to the top panel of the nose and around the undercarriage join. I am still trying to confirm if there should be a join running down the centreline of the fuselage underside before I scribe that in and then I will have a look at the fuse/wing struts before I start painting. by John L, on Flickr by John L, on Flickr And here are a final couple of shots of my visit to the MAM in Coventry with a spotter pal from days of yore. The first shows yours truly about to clamber aboard XL360, and the second is of both of us in situ in the crew area. by John L, on Flickr by John L, on Flickr3 points
-
Hello Dears, Look, the Bang seat is quite good for an injected part ! But now, I need Something looking like that Well well well !! Sincerely. CC3 points
-
Ok...now I'm in as deep as a KH/HB kit..... I just went back to the eBay store where I got the one Su-17M3...and snagged a second along with a Su-7BKL, and a Su-25UB. Waiting on the total as I'll be able to save by combining on shipping. 🤫3 points


(250x229).thumb.jpg.48a57772b41ed148fdc8d15e3c202763.jpg)


.thumb.jpg.2c282efcc138b7cf7f1e1586a9c534d2.jpg)


This leaderboard is set to London/GMT+01:00