
Leaderboard


Popular Content
Showing content with the highest reputation on 16/11/18 in all areas
-
Hi folk's second build for the Grumman GB is Eduard's 1/48 Hellcat as a FAA machine based at Tricomalee,nice kit not without a couple of little build issues I found the kit's USN marking's a bit brittle and poor in density so ordered xtradecal's AM set Yank's with roundel's.Thank's for looking in.38 points
-
Hallo again Here is my Tornado. The kit was Revell. Moreover, from my friend I got a very old kit with Zeppelin tanks. I did the desert pink, because here you can show weathering! I wanted to show a real a/c. It is not 100% accurate, but I was at this time satisfied with it. B.T.W. the engine of the Tornado was at this time the most sophisticated and reliable jet engine of the world. Happy modelling20 points
-
Hi This is the test bed Trent engine Meteor. The kit is the MPM at 1/72. MPM has a several kit of the Metor version. Basicaly this kit is a MkI with additionnal part for the tail and the landing gear. There are no major flues on this kit. But my advice is to not use the tail part that needs to cut it but just add a part at the end of the tail. Only the engine need a little putty. A good kit for the Short run beginner. A general view A little galery: Gloster Meteor Trent19 points
-
This time from my side a model in which I put a lot of work. Su-25M1 DIGI Camo Model as always made straight from the box, painting is a typical hand made, without the decals. The Su-25 Trumpeter model itself is quite difficult to make. It requires a lot of work when playing the line of ties and rivets. I hope you will like it After many hours17 points
-
This one is older vacuform builds for you approval. I ordered this kit from an add in Fine Scale Magazine in the early nineties. I have no idea who manufactured the kit but do remember they were in Canada. Any and all comments are welcomed and appreciated.15 points
-
Evening all, Here is my Airfix GR9a starter kit that my daughter got me for fathers day. Its a starter kit and I still managed to get something wrong. Seems like I've got the vent pieces for the intake area the wrong way round but didn't click until it was too late. Also a few other things that aren't right but had to get it done to show the little boss. I also got the CMK resin cockpit set but only ended up using the tub,seat and main panel, didnt want to start cutting pieces off the model for the other bits and the stick wasnt as good as the one that came with the kit. Well anyway here it is and lets hope it dont offend your eyes too much lol.14 points
-
I have just finished this badge of 109's, which is no. 211-215. It is the Az model of the F and G. Build out of the box, with aftermarked decals. Cheers Jes14 points
-
That would be great Massimo, hopefully I'll be able to bring some of my models, including this one! Cheers Chris! Thanks Keith. There would be more frequent postings but my network keeps crashing. I have now figured out how to access the site again - I have to reboot my router every time which is a right royal pain. Time to call the internet company! I thought that might appeal Ced! I have a set of clay modelers spatulae (is that correct?) which are great for smoothing and forming miliput and PPP. That may well be the plan to go with Adrian, thanks! The what??? Oh, FRANKEN! Must take more time to read words properly! It's good to be back on it Terry! Thanks Stuart. It certainly seems to have done so, but as we all know, the priming will tell the truth! Thanks Benedikt! Isn't that what every model is? 😉 Sorry for the delay in responding folks, but as noted above, I have been unable to access the forum from home and have only just figured out the problem. Needless to say there has been a little more progress. I moved onto the cockpit area, which should have been finished ages ago but I got it wrong and have now to correct it! The longerons in the rear cockpit were too low so I had to add a piece of .020" to bring it up to the correct level. The top surface of the existing piece was cleaned of paint so it would stick properly and the sheet was marked using that as a reference. Said piece of plastic after cutting it out and shaping with a piece of sandpaper wrapped around a pencil. Don't say I never give you guys any excitement! It was then glued in place and given a light PPP coat to blend it in. Of course if I'd paid attention at the beginning I would have been able to simply shape the existing kit plastic instead of removing it all and then replacing it! You'll also notice that I have added strips of .020" square rod to the pilot's cockpit sides to bring them to the correct height. That would not be necessary if you want to model it with the canopy closed as the side frames would hide these, but with it open, they need to be there. They have also been filled and sanded. Again, it would have been much easier to have done this before adding the interior. I have no idea why I didn't as I knew about it from the start! A pic with the gun mount added, showing that it is now central - another small shim of .010" strip was added to the left (right as you look here) side to centre it properly. I will also add a couple of small pieces to the mount itself to bring it to meet the fuselage sides properly. I now have to work out how to add the very slight upwards curve of the fuselage top where it fairs into the gun mount. Maybe a little more PPP? Finally, a test fit of the canopies. First the centre and rear parts and then the windscreen and pilot's canopy This of course won't fit properly now until I separate the windscreen, as the new side strips prevent that. I mounted it so that one side fitted, to make sure that the new additions ended in the right place, ie snug up against the lower rear of the windscreen. That's everything up to date for now. I still need to do the hinges on the elevators and rudder, and mark out a new tail wheel position as the kit one is too far forward. Then I think a coat of primer will be in order before I make a start on the scribing. I'll do that before I fit the undercarriage fairings as there is a long panel line running under them and it will be easier to do it in one go. Thanks for tuning in! Ian13 points
-
Another build for the Classic British Kits SIG at SMW that's finally made it to the photo booth. The slightly creaky Airfix kit with a bit of help from a Heritage nose and tailplane, and some scratch-built intake interiors (though you're hard-pressed to see much inside them in these pics! Many thanks to Tim, @theplasticsurgeon, who came up with some surplus Xtradecals for and aircraft from 12 Sqn in 1985, with the cheery fox heads. I see now I post the pics that the blinkin' "Fire Panel" decal on the starboard intake has gone AWOL again: it was already sporting one in Afrikaans thanks to the first one wandering off somewhere... best, M.12 points
-
Hallo again Here is my Spitfire Mk. XIc in 1/32 from Tamiya. This kit is wonderful to build. Like all Tamiya kits. The painting and markings are done without decals, as you may read on the forum. I build the aircraft flown by George (Buzz) Frederick Beurling. He was one of the really great RAF fighter pilots. His flying is history. He was not an easy person. He took part on the establishing the Israeli Air Force. After an accident after take-off in Rome, he was killed. His remains are buried today in Haifa, Israel. I did not find his grave, but my friend found it few days after my departure and sent me the shots. He is one of my idols in just flying! Happy modelling12 points
-
Hi chaps, this is my first post on this forum; I used to make paper models but have switched to the plastic stuff recently. At the moment I'm building planes of the Operation Firedog, AKA Malayan Emergency, and here is what I've built so far. All 1/72. Hope you'll enjoy it. Auster AOP.9 used mainly for spotting, target marking and as light cargo transport. This is a slightly modified venerable Airfix Auster AOP VI kit , not too detailed but I actually like these old ones in a away. One can give them a good bash and only make them better. I added tail fins, cockpit truss and bespoke markings. Bristol Sycamore HR14 cargo transport, medevac and SAR chopper. Slightly modified S&M models kit; quite fragile and hence a bit difficult to work with. Bristol Beaufighter TF.X ground attacker. Very good Airfix kit built straight from the box. Supermarine Spitfire PR.XIX recon. Airfix kit built straight from the box with added nose art marking the last operational sortie of the type from RAF Seletar in 1st April 1954.11 points
-
One I finished a while back but never bothered posting, the Hobbycraft Bearcat in 1/48. I modified the cowling profile a little, added some detail to the wheel bay and used Microscale decals. Fun kit, so good I went and bought two more afterwards! 😀😀 Thanks for looking! Chris11 points
-
A visit to Bunnings Last week I went to the local Bunnings outlet. Bunnings is Australia's largest hardware chain and despite their reputation for - shall we say prioritising cost over quality - I find them quite useful. I was in search of some cylinders for a 1/32 LeRhone 9Ja rotary engine and when I asked the young man at the counter if he knew where they were stored, he pretended to not know what I was talking about. He suggested that I have a look in aisle 36 where the petrol engine lawnmowers were kept, which was very helpful because two and half hours later in aisle 14, I found these... Suddenly, what had transpired became very clear to me. Following the public announcement that I - Bandsaw Steve - was setting out to build a 1/32 scale Avro 504K, Bunnings had obviously suffered an unsustainable run of high demand for 1/32 scale Clerget 9, Le Rhone 9J and Gnome Monosupape engine parts. In order to protect their rapidly dwindling stocks, all remaining engine cylinders had been carefully camouflaged as 'grub screws' as per the package above. The young man at the counter had obviously been instructed to deliberately misdirect anyone trying to find this treasure. Nice try Bunnings, but it was all to no avail! I bought two packets of 5 - which gave me the nine I needed plus one spare with which I shall return one day and use to bargain for a pair of 1/18 scale Aston Martin DBR1 tail-lights. Upon my return home I showed my purchase to my wife - who was overcome with joy. For months she had been worrying that I would not be able to find engine parts for my Avro A380... So then it was out the factory to try out this little wonderful thing - it's technical name is a 'wotcher-notcher' - that must be true because I made it up just now. Basically a 'wotcher notcher' is a small hand-held mitre box that allows you to cut several lengths of wire or pipe or plastic (or whatever) at a standard measured length, and guides your saw or razor blade to cut at exactly 90 degrees or 45 degrees as required. G.W. - the guy whose battleship beat my submarine for gold at the last WASMEx - swears by this tool. He's less 'tool orientated' than I am but when he's working on his ships he always has this one within reach. Here I am cutting the first of nine bits of plastic pipe all to a standard length. That Razor saw looks appallingly rusted - but it's actually quite sharp. Here's 8 of the 9 little plastic pipe things that I need... and below we can see the ninth... Each of the so-called 'grub-screws' has a hole in the centre of it into which that bit of plastic piping fits nice and tightly. So, simply line up the pipe with the bung-hole and stick the assembly in a vice and... squeeze until the pipe sinks right into the centre of the screw. It's a beautifully tight fit so absolutely no glue is required. Repeat the step above eight more times - then do some maths and work out at what length to cut off the brass 'sticky-outey' bits exending from the engine's crank-shaft. Cut them with that invaluable pair of heat-tempered steel scissors. When I bought them I asked the shopkeeper if they - the scissors not the shop staff - would stand severe abuse. She assured me that they would, and have they ever! These scissors have been a great buy. So now after snap-fitting all of the bits above together I have the basic outline of a Le Rhone 9j rotary engine. Clearly there's a lot more to do on this engine, and it's definitely never going to be 'laser accurate', but I am happy with it. It meets my low standards for accuracy and finish and, at this early stage, looks about right when dropped into place under the cowling. That's about it for now... Next time - I dunno - I might get back to that cockpit...? Best Regards and thanks for all the banter and interest, Bandsaw Steve 👍11 points
-
The venerable Matchbox Phantom, built for the CBK SIG display at SMW, and now ready for its photocall! Thanks to the much-appreciated support of @rs2man who kindly provided a Fujimi canopy and resin copy of an Esci F-4J radome, it looks a lot more like a real Phantom than the Matchbox does OOB, in either earlier or re-tooled version. To get them to fit requires some judicious shimming and sanding top and bottom, but it's worth it, IMHO. Decals for a 92 Sqn aircraft from Wildenrath celebrating the Silver Jubilee at Wittering in 1977. What a lot of stencils Mr Ward kindly provided. Anyway, glad I got this done just before this whole palaver becomes unnecessary with the arrival of the new Airfix FGR2... This is where you can really see the difference the new canopy and radome make... best, M.10 points
-
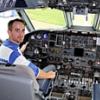
Morning all, This is my first attempt at an airliner, its the Revell Boeing 787-8 Dreamliner, done as JA842J using 26Decals set, as that was the one i flew on to Tokyo in February. The actual kit went together really well and the fit was good. I decided to use putty through the windows and sand down.Wish id sanded down the cockpit glass more, it looked ok until the final varnish then looked a bit "sticky outy"!!! I broke one fan blade on each engine before trying to get them off the sprue, wish id realised how flimsy they were! I had issues with the decals(probably more user error to be fair) as a few bent over on themselves, which was a pain, as the rest went on really nicely. It doesn't have the bumps and aerials, so maybe ill look at getting some aftermarket ones....Its a damn sight bigger than my usual fast jets, but was nice to do something different My muse waiting at Heathrow B787 JA842J London Heathrow 24.02.18-1 by Jonathan Francis, on Flickr Revell 1.144 Boeing 787 JA842J-1 by Jonathan Francis, on Flickr Revell 1.144 Boeing 787 JA842J-2 by Jonathan Francis, on Flickr Revell 1.144 Boeing 787 JA842J by Jonathan Francis, on Flickr Revell 1.144 Boeing 787 JA842J-3 by Jonathan Francis, on Flickr Revell 1.144 Boeing 787 JA842J-4 by Jonathan Francis, on Flickr Was fun trying to get the whirly decal on...... :mad: Revell 1.144 Boeing 787 JA842J-8 by Jonathan Francis, on Flickr Thanks for looking Jon10 points
-
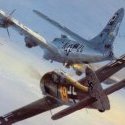
As mentioned in the build thread, here are a few pictures my model of the F-100D flown by Colonel George E "Raven" Laven, Jr, on the ill-fated first mission into Laos on 9 June '64 out of DaNang. The model is a modified Trumpeter 1/72 scale F-100D as described here: F-100D Build Only one photo is known to exist of this aircraft, and this is my interpretation: Thanks for looking, Ed10 points
-
Bud Anderson is part of that rare breed of fighter pilots who first saw combat in piston engines fighters in World War Two and whose last combat mission was over the skies of North Vietnam. He claimed 16 and a half aerial victories (no strafing victories in there) making him a Triple Ace. There will probably never again be another pilot to equal this. Anderson flew with the 357th from Leiston and was its top scoring ace. He has remained lifelong friends with Chuck Yeager who also served in the 357th and once said of Anderson ‘he’s the best fighter pilot I ever saw’. Anderson named all his aircraft 'Old Crow' after a brand of Kentucky Bourbon. I imagine there was a good backstory and probably a wild party behind that, though Anderson claimed to be teetotal...! Anderson’s first aircraft was not his recognisable Old Crow Mustangs but a P-39Q Aircobra while on a training squadron in New Mexico. Although the aircraft was much maligned by US pilots, Anderson liked the nimble little Aircobra: “Actually I enjoyed the ’39—it was fast and looked good. I just wouldn’t want to take it into combat.” This is the F-Toys P-39Q which I repainted. I replaced the pitot with something less cannon-like, but otherwise OOB. Different sources give different views on whether this had a red tail or not. I went for a red tail, because it was more fun (and the squadron aircraft were repainted with red tails for war game exercises, though there is nothing suggesting this was done on Bud Anderson's P-39). A good, clean build with few fit issues. I had to strip off the canopy pre-painting which was tricky (and it's still a little too thick but I can't do anything further on that). The Revell MicroWings P-39 is a useless old mould, replete with acres of flash. But it does come with some nice decals for Anderson's P-39, which I could repurpose for this build. No issues with these - they worked well. In March 1943 Anderson was posted to the 363rd FS of the 357th FG, flying the Merlin-powered P-51B. The 357th was the second P-51 Fighter Group formed (after the 354th 'Pioneer' Group that Sweet caters for in this scale), but the first assigned to the 8th Air Force on long-range bomber escort duty. On 27 May 1944 Anderson (who by now had scored several kills) was caught in a dogfight with a veteran Luftwaffe 109 pilot. In a series of 'boom and zoom' vertical maneuvers, which pushed the aircraft to the very limits of what they were capable of, Anderson managed to get some shots into the 109 which crashed. Subsequently some historians have offered to try to identify the Luftwaffe pilot (who was obviously very experienced). Bud Anderson's response was typically modest and quite moving: he didn't want to know, there was no prestige in it; the German 'was just some guy trying to kill me, that's all.' In his second tour in late-1944, Anderson flew the P-51D, which I've made here. This was initially olive drab, but returning from one mission over the frozen wastes of northern Germany, Anderson remarked offhand to his crew chief that he felt conspicous flying a dark-colored P-51 against the white landscape. To his great surprise next morning his Olive Drab/Neutral Grey aircraft was gleaming polished aluminium. “Otto Heino, Mel Schuenemann, and Leon Zimmermann had stayed up the whole night through, hand-rubbing the paint off with rags soaked in gasoline. In the process, they had rubbed most of the skin off their hands. No one asked them to do that. No one expected it." I've modeled Anderson's P-51 after perhaps a couple of missions. I've left things quite clean and polished, bar some mud and exhaust staining (it was a cold, wet winter after all). This is obviously the Platz P-51. The Platz 'Aces of the 8th Air Force' box offers decals for this version of Old Crow and the olive drab version too (Cartograf and very nice) but I went for a mixture of those and MYK decals' offering. The MYK decals are superb at conforming to complex curves and were better for things like invasion and ID stripes, but some of the Cartograf decals were a bit sharper in terms of details - like the kill markings. I love the whitewall tyres - so cool and come as decals which makes life easier... Overall AK Interactive Aluminium, but I varied some of the panel colours with a variety of other shades. A fun build - I can't get enough of these Platz P-51s (which is fortunate as several boxes of the new issue just landed on my doorstep!). I suspect I will try and build several other of Bud Anderson's mounts, including his F-105. What an amazing man. Thanks very much for looking - as ever! Angus9 points
-
My daughter's B-17 is done! It was started October 2017 and finished today after school. A couple of days ago, at her request, I fitted some brass rod for all the guns rather than the over thick and fragile plastic barrels. Today she got the landing gear attached, then the props and the astrodome fitted. The only other thing I might do for her is to paint the cockpit roof windows. She's done pretty much everything herself. I did a little sanding on the bottom wing tip joint when she got bogged down by the boredom of filling and sanding to correct the poor fit of the wing halves. I also masked the glare panels for her to paint, made the props, fitted the guns and painted the non-glazed windows. The rest of my input was advice and holding things for her when needed. She's very pleased with the finished result and we hope to take some better and possibly flying pose pictures on Friday after school or Saturday when we have some decent daylight and hopefully a blue sky. Here's a few build pictures.8 points
-
This one was a bit of a struggle, owing to a combination of my native impatience and the short run nature of the kit. Avis does indeed supply the cockpit/passenger window masks, but they are provided in a medium that is basically a die-cut press-on label. Not only are they difficult to get to lay down on the curved fuselage (slitting the label judiciously and pressing it in is the key here) but they are tough to get off the model once painting is complete. I usually use WD40 (silicon degreaser) to get the gunk off the plastic and add a nice little shine to the clear parts as well. But this required, shall we say, vigorous scrubbing to get it all off. Not the greatest of result, but it's another one in the display case. Even the photos had issues - the Alclad copper paint job acts as a light sink and makes the result darker than the original is. This is completed aircraft #499 (16 aircraft, 1 ordnance, 5 vehicles for the year 2018), finished in November of 2018. You’ll note that there is only one more model to go (which is already pretty much done) to hit a historic milestone in terms of my model production. Stay tuned to see which type it ends up being.8 points
-
7 points
-
Not one for the faint hearted but if you want one and it's the only one available... It seems to be one of those kits that you need to build one so that you can find out how to do it properly. Main problem area was the layout of the cockpits. There seems to be no information available and I could not get the resin u/c bay and cockpit into the nose together. Maybe a Sea Vixen replacement set would be the answer. I don't think that the ejector seats are the right type either. I ended up sawing off the top halves. The glazed areas for the observer were made by replacing parts of the fuselage moulding by some chunks of clear polystyrene from an old stand and sanding to match the fuselage shape. They were then polished and masked off before painting. Fitting the fins to the booms was not easy as the bits that join together were different sizes. It was bodged with bits of sheet and then strengthend by pouring in a mixture of Ca and talc to act as filler/glue. Milliput was used to get the forward and aft portions to match. I thought that the fin chord was too short so the leading edges were extended. Apart from that the dimensions and shape seem to be about right. I wasn't happy with the decals. Most had some white showing around the edges and after finishing the job I found a picture of the 110 showing the ones on the fuselage to be in different positons to those specified and the WG240 on the undersides looked a lot smaller on the real thing. The finish was interesting. Originally I was going to use gloss black enamel but after putting on black Alclad primer I noticed that it had a slight sheen so I polished it with T-Cut and got a most satisfactory result. Hope you like it and find this of interest Together with prototype Vampire and Venom7 points
-
Coincidentally the first model I have made in 36 years for pleasure is a Gipsy Moth. It's one of my 1:48 DH 60 M's which I have modified by flattening the fuselage sides to make a 60 X. The figures with the exception of the one on the left are my own resin castings. The vehicles are part of my collection of 1:48 diecasts. It's not widely known that quite a number of the Dinky range from the forties and fifties are actually 1:48 ( not 1;43). The Ford T is a Lledo model with the original paint work but with my cast metal wheels. The Bug is an early Matchbox car. All of the Dinky Super toys lorries were again to 1:48. A few of the Yesteryear's are 1:47 to 1:50 scale The scenario.. The lady pilot is the Hon Leticia (aka Titti) Longshaw, (daughter of a a cotton magnate) who has just flown her new Moth through a flock of small birds and has her engineer, Pop Rimmer, from Hooton and mechanic Eddie check out her Moth for damage. Looking on is the club chief flying instructor I.A.M. Hardley Keen (late Capt R.F.C.) who has brought Leticia's race trim Bugatti over. The boys brought the Ford T pickup. Well I needed something to take my mind of my woes during the dark days. John By the way the diminutive for Leticia is quite correct as used in the original Swallows and Amazons, by Arthur Ransome. Also should anyone doubts a race trim Bugatti would be seen on the road, when I was leaving the last Woburn Abbey, Moth rally, I was overtaken on a quite narrow road by a scruffy racing Type 35, driven by a bare armed hat less individual, which then bellowed off down the M.1. Lancelot aka 'Pop' Rimmer and Eddie (a hero of mine) were real people.7 points
-
I brought some of my older Spitfire builds out of storage recently to find that the had suffered quite a bit of hangar rash! I therefore decided to give them new paint schemes and decals. First up is the Special Hobby Vc, formerly in malta markings now in 54 Squadron RAF colours based in Australia during 1943. Next is the Hasegawa IXe using the Aeroclub fuselage, repainted in a different iteration of its previous Czech AF scheme. Last up is the Airfix/Aeroclub Mk.21, previously overall Silver CAACU and now in 41 Squadron markings at Lubeck, 1946. Hope you enjoyed my efforts and model recyling and thanks for looking! Chris7 points
-
Hi Folk's,first in a few build's for the Grumman GB is Tamiya's venerable 1/48 Wildcat,nice stress free build there's some lovely detail on this kit despite it's age as the title say's an aircraft of VF-22 on board the U.S.S. Independence,many thank's for looking.7 points
-
Evening All, Mig88 has recently posted his Airfix Albatros D V representing von Richtofen's machine. It reminded me of one which I built some years ago for a group build on Airfix Tribute Forum. When I was a teenager I did not have the skills to carry out conversions or elaborate painting schemes and was a bit frustrated as a result. Then I saw in a boys comic an article about a German WW1 pilot who flew an Albatros DV with zebra stripe markings and I decided to paint a model in this scheme. I do not remember who the pilot was and as there were several aircraft marked in different variants of zebra striping I cannot now be sure who the subject of the article was. However a little research on the internet led me to the riseofflight.com website and an image of an aircraft flown by Ltn. Rudolf Windisch of Jasta 32 in the summer of 1917 and I chose this to be the subject of my model. I had an Albatros from a much earlier era - remember this being released? If you do it means that you are getting old!! Actually I had an Albatros kit in a poly bag too - and the one I made as a teenage predates this issue, so I AM old! The original kit was released in the late 1950's and was one of Airfix's earliest offerings. When I extracted the sprue (there was only 1) from the box I found that the engine was missing, but as the original was pretty poor it did not matter too much and I scratch built one. I also decided that I coud not just build a kit from the box so I added some internal details as well and then cut off the engine covers and replaced them with thin card. I also replaced the machine guns with white metal parts as the kit parts were worse than even I could scratch build. The markings on the fuselage were hand painted: the wing markings were made from Letraline. Stevehead kindly sent me some transfers from a more recent issue as those in my kit were unuseable. Here is the result: This is what I scratched for the interior and engine: Lt Rudolph Windisch started flying bombers and reconnaissance sorties on the Eastern Front in 1916, but transferred to fighters in early 1917 and was posted to Jasta 32 where he adopted the scheme illustrated here. According to the rise of flight website two versions of his personal scheme are recorded in photos with wider borders to the national crosses and wider lines for the stars. Windisch was credited with 8 victories with Jasta 32 and transferred to become commander of Jasta 66 in February 1918, where he was credited with another 14 victories before he was forced down and disappeared on 27 May 1918. His fate is not known. Thanks for looking. P6 points
-
Figures are various from Tamiya from my spares box. The chaplain was built using various parts from my spares. The wall is scratch built using a form u lay mould to cast the wall. Various scenic materials used and the tree scratch built, boxes, crates, pamphlets etc. along with the animals are all from my spares box Inspired from the book with the same title by Rev Tom Wilson I have tried to represent a scene showing a short service by the padre, just behind the front line 1/35 scale I I6 points
-
Some pigment accents left but finished the Hawg. Another overlooked REV/MON gem on my bucket list completed. Wing King's aircraft 1986 time frame, QuickBoost ACES II seat, Master GAU-8 gun tip, Xtradecal's X48-006, stencils from kit & war weary hog sheet. John6 points
-
WWF are not entirely happy with it, but it is what it is I have begun experimenting with the window replacements method Plasticenealike inside the nose moulding and then pushed back to clear the recess Let that settle although it will never harden very much which is why I like to reuse old plasticene, it's a bit less compliant Quite an asset when I want it to stay put when the PPP is on The PPP IS on, lets see how it hardens I am not expecting to replace the entire nose, just the window glazing Little moves, a bit at a time6 points
-
Well folks another update. Wings on. Not too bad a fit, a little filler here and there. Flaps on. Canopy dry fit, quite well.. All comments welcome. Simon.6 points
-
Instructions: https://www.facebook.com/Clearpropmodels/videos/2276268145938193/ V.P.6 points
-
Boxart & decals - ref. DW 72012 - Bellanca J-300 Sources: https://www.facebook.com/DoraWings-1929101897320378/ https://www.facebook.com/1929101897320378/photos/a.2014888442075056/2304641373099760/?type=3&theater Artwork by Seweryn Fleischer. V.P.6 points
-
Ha, interesting stuff Serge. I wasn't aware that the boys in the VF-31 paint shop had added gonads to Felix for the last cruise. But I'm not surprised. But I was thinking about the last flight, not the last cruise. I was remembering that there was an old-fashioned Light Gull Gray over White scheme with high visibility markings on a D model Cat just for the ceremony. A bit of Binging and here it is: This should work. It's a D and it ain't dirty. Plus, and I like this part of stash hoarding, I actually have these markings! OK, back on topic - none of that populist Top Gun stuff around here. We've got an Attacker to build! Or, build twice as the case may be - ha! I'm such a schmuck. I mean, come on, breaking off the wing? How old am I? How many models have I built? How many wings have I broken off? I'm not going to answer any of these questions. I plead the fifth. The wing has been reattached. The putty has dried and the sandpaper is ready. I'll be back in a bit. Cheers, Bill PS. Ah, the wing tips came off nice and clean. The photoetch set from Airwaves have parts that represent the internal framework and details that are exposed both on the wing proper and the tip when the wing is folded. Interestingly, they are attached to each other, so you just need to do a quick ninety degree bend. This will be one of the last stages of the build, so for most of what's to come the Attacker is going to look pretty stubby. You'll get used to it.6 points
-
... and after phase III, time po paint the black stuff. Thanks for watchin and commenting. Why all my builds have to be soooo damn looong ???6 points
-
First set of decals on. The 'Sol' is next but I'm calling it a night for now 💤6 points
-
My third full airliner build so far, and probably the first one that I'd be able to say went together as planned (more or less). The subject depicted is one of Cathay Pacific's B777-300ERs, registration B-KQY, an aircraft which I was on last July, which I snapped a few photos of and later used as references for this build. Anyways, on to the build itself - It was painted with just Tamiya acrylics and Mr. Base White. I used a ratio of 1 part XF-23 to 10 parts X-2 for the underside and engines, 1 part XF-23 to 8 parts X-2 for the stripe (though this turned out to be too dark so I overcoated it with X-2 later on) and 1 part XF-19 to 4 parts X-2 for the wings and engine pylons. For the decals, I printed my own and they were relatively easy to make as I had made them before for a 1/144 build and just had to resize them, change the registration and fix some of the previous issues of the decals (from experience), with some of the decals being used from the Hasegawa kit's ANA decals (which were plentiful and useful). The kit itself is very easy to build and simple as with all Hasegawa airliners; I find that the fit is better than on their B767 and the build went relatively well assembly-wise. Watch out for the fuselage seam and the connection from the wings to the fuselage though - The fuselage seam is difficult to deal with especially because it extends for the length of the entire fuselage, and the plastic slab on the wing that connects with the fuselage isn't enough to guarantee a good dihedral angle and is also weak as a connection point. Take your time to test fit that area, and use strong adhesives so that you can minimize the gap, or fit the wings on early into the build so you can fill in the seams left behind. It's a very easy build, though; I'd recommend it to anyone looking for a quick build or those who want to get into airliners and practice first before moving on to the bigger 1/144 kits. I'd also advise getting some aftermarket decals for the cockpit window or printing your own; The geometry on the Hasegawa clear part is off and so is the window decal provided with the kit. I decided to print my own and size it similarly to the Hasegawa decal which I think looks somewhat better than the kit decal. Now for the image spam: (My lightbox is pretty small, so a lot of the shots had to be highly cropped or have borders visible. Sorry about that) And as a bonus, a few pics I took of the real thing back in June: I definitely don't consider the build perfect (If anything, really, a close look at it reveals a plethora of flaws) - The nose decals distorted weirdly on me and some of the thick decal borders are visible, some of the X-22 used as a gloss coat left an orange peel finish and some of the door decals are off (To recreate the white door borders on Cathay Pacific's planes I adapted the decals that came with the Hasegawa ANA B777-300ER kit I was using and trimmed some of the door decals with white to fit; On others I had to make do with cutting tiny strips of white decals and lining them up on the door). This build was more of a test to see how well I can build a relatively simple airliners and test my abilities before moving on to bigger projects. It's also something nice to look at in the display case of die-casts and snap-fit models. Despite the flaws, I think it worked pretty well somehow..5 points
-
Slated for a 2019 Q1 release: Apollo 11 “Columbia & Eagle” 1/96 Apollo 11 Astronaut on the Moon 1/8 Apollo 11 Lunar Module “Eagle” 1/48 Apollo 11 Saturn V Rocket 1/96 Apollo 11 Spacecraft with Interior 1/32 I assume these will be straight re-issues with no enhancements. Tommo.5 points
-
As promised, here are my gaggle of Typhoon's, all from Hasegawa kits. Don't ask me anything about them as they were built some years ago and I can't remember . Stuart5 points
-
This is posted just more for interest sake than anything else, it’s not a great model and I still have issues with it, but it’s not what you normally see posted here. But those who know me know I can’t resist build resin stuff no matter the issues/grief it gives me. It’s a Collect-Aire 1/48thF-86K which means she resin………and not one of their best. It looked initially to be a simple build (for the 60’s NATO vs WP GB), but it turned out to be one of their more difficult models to build. New bits had to be made and other bits replaced and to top it all off the resin was full of bubbles. It probably would have been much easier to build the old Revell/Monogram model, but I really did want to build a Luftwaffe K model and I managed to get the Collect-Aire beast VERY cheaply. So I really can’t complain too much and she looks ok….from a distance! Now if Tamiya could release a 1/48thF-86D/K/L!!! cheers Model: Collect-Aire 1/48thNorth American F-86D/K/L Sabre Dog Paint: main Mr Paint, Mission Paints, plus Mr Hobby and Tamiya Acrylics & Model Master Metalizer Lacquer Extras: Eduard F-86D Interior set Eduard F-86F Wheel Set HaHen F-86K Luftwaffe Decal set SAC Landing Gear set Squadron F-86D Ejection Seat Custom parts ...and with her "Hot Rod" sister FJ-4 Fury (1/48th Grand Phoenix, a truly awful model!!)5 points
-
yahoo the weekend beckons! Managed to get the major assembly work complete, it all went reasonably smoothly, theres a few areas that need a touch of filler (the gun insert and cockpit coaming areas i think are my issue not Eduards, pretty sure a bit more fettling would have sorted these without the need for filler) the joints on the flap mean i've lost a bit of surface detail so plan is to spend what spare time I have at the weekend to tidy up all joints/surface detail and hope to be in a position to start painting by Monday.5 points
-
Hi to all. This is what I got in my shop yesterday! a 1965 Mustang, V-8, automatic transmission. This is what I got today!!! Is the "Nevado de Toluca", first snow it gets for this comming winter, most of the year does not have snow and it is gorgeous! has an altitude of 4600 metes, my town is now at 0°C and we had reain the past two days. Have a great day!5 points
-
Fairly certain this is what I'm going to build for this STGB: I got it a while back and I know there's some issues with it, primarily relating to the overdone cast textures in places. I'll see what I can do about those! Kind regards, Stix5 points
-
Good morning chaps. A bit of an update is in order, methinks. Hartford shock absorbers...Contrary to the blueprint, which shows a 3-blade/2 spacer arrangement, all our photos show 3 spacers, which means 4 blades. I'd been putting it off since I did the rears, due to the sheer volume of file-work needed. So, we have 12 aluminium discs at 0,75mm thick. The only ali I had left was 1,5mm. My tip of the day: before you start to file metal ( especially softer metals like ali white-metal and solder), rub talc onto the blade. This will prevent the blade from getting clogged, thus saving you an hour of grumbling whilst scraping out the file blade with a sharp implement. Funny thing is, though, most of the time I only seem to remember about it when I'm sat there grumbling... We have 16 blades from 0,3mm brass. I must say that the use of pin-vices was invaluable for this operation...modellers' best friend! Flanges added... … and with the addition of 3 brass plates, nickel star-spring and M1 hardware each, we get these: To finish off, a couple of no-expense-spared arty shots Whilst these are going through the painting process, I will make the adjustment levers, including the 2 for the rear, which I had forgotten about. I hope you enjoy and thanks for watching. Cheers, H5 points
-
I got the mud down on the tank. But now the light dust on the top looks too white. I'm thinking on putting some darkish wash on the light dust to blend it in. Would that work? On the rear part I added a second colour of dust. I think it looks better than the first picture but still needs blending. More muddy pictures:5 points
-
The odd box under the fuselage is a Target towing container. John5 points
-
Given the loud voices proclaiming Airfix's foolishness in missing this absolute goldmine of an opportunity (their opinion) I think that we would all like to see your sales! However I suspect that it will sell well enough for you anyway.5 points
-
Release date is now December 1st, 2018 https://modelsua.com/buran-soviet-space-shuttle-1-144-ark-model-14402.html Source: https://www.facebook.com/arkmodel/posts/938513249692498 V.P.5 points
-
Recently finished this very nice kit. There was a bit of an issue where the upper fuselage inserts which allow for different door / canopy versions come in. I failed to get one side flush, and as a result had to do some filling on the centreline of the kit. Wheel attachments to the legs are rather odd too, in my opinion, short rounded inserts which dont automatically set the wheel straight on the gear. Don't think I have seen it before on a kit and feel like there must be some logic behind it... God knows what. Anyway... Outside those rather minor bumps, which are easily navigated if you are less cack-handed than me, it's a lovely thing to make. I tried adding some rivets, but it's early days for me on that, so it was basic and tentative. I painted mine up with Tamiya rattle cans, then weathered panels with oils. Once the 'bleaching' had set a bit - a few days - I did a dark pin-wash. Finally I added some chipping with thinned Vallejo greens and greys sponged or brushed on, and lastly a little heavier chipping with Vallejo aluminium. After that a little dust and oil paint exhaust stains. Thanks for looking! Bruce5 points
-
Hi folk's,second buildis Eduard's 1/48 Hellcat,a decal issue meant AM decal's for a FAA machine.5 points
-
Thanks folks! The Tamiya kit fits beautifully so far, with nice positive location for things. And the detail is great as the black wash in the cockpit hopefully demonstrates: Need to get the IP finished next. Cheers, Will5 points
-
https://www.facebook.com/pg/Clearpropmodels/photos/?tab=album&album_id=23109381758553355 points


This leaderboard is set to London/GMT+01:00