
Leaderboard


Popular Content
Showing content with the highest reputation on 09/11/18 in all areas
-
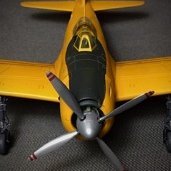
Hi Guys, This was a quick build as my parent was coming and need to finish it before they arrived as I need to close my bench for few days, May I present you an awesome wee kit from Tamiya F-84G i highly recommend this kit if you have not built it, Hope it has turned out ok, Cheers Regards19 points
-
A build from 8 years ago, related to the thread of my model of the Tupolev ANT-25. Classic planes from the Golden Age of aviation have a charm that increases with time, as it should be with classics. After finishing the Clark GA-43, it seemed natural that the Vultee V-1 would follow, as they share some characteristics, not being the least important their remarkable aesthetics. They had the same weight, were single-engine cantilever low wing monoplanes and featured modern metal monocoque fuselages. The Clark could carry ten passengers and the Vultee 8. Although aware of the Special Hobby release, I choose to exhume from my stash the Execuform vac. As described in the Clark GA-43 article, these are simple molds that should be regarded as a white canvas to express yourself. Once the research stage started, one machine immediately caught my attention: the V-1AS variant that Russian pilot Levanevsky and navigator Levchenko flew to Moscow from California -where I live- via Alaska and Siberia in 1939 (CCCP-H208 in Cyrillic). For this version a new vertical stabilizer, front cowl and floats were needed. Fortunately adequate vac floats were found in the spare parts’ bank from the same manufacturer’s Clark GA-43. The kit I had was purchased some time ago from an online vendor specialized in rare kits, since at the time I wasn’t aware that Execuform kits are now available from the manufacturer. Nevertheless, mine included an epoxy engine and prop that used to come with the kit before. Since the plane I was modeling had a “winter” front cowl, which almost completely blocked the view of the engine, I included the one that came with the kit. The prop after some refinement was deemed usable, but I replaced it anyway for a metal one. In some photos the plane sports a chubby spinner. Plenty of images of the V-1AS can be found on the Net, and some color clues that in some cases are not entirely accurate. After some study the choice was a blue general color with red flying surfaces and trim, plus black rubber boots on all leading edges. Many attractive liveries can be chosen for the Vultee V-1, I counted at least twelve when browsing the Net. The American Airlines and the iconic Lady Peace come to mind. All these versions require some tweaking because they diverged in minor details. Strangely enough, the markings used for the plane modeled here are the western version of the original Russian Cyrillic CCCP (actually SSSR in western language); but the code H208 wasn’t translated as N208 as it should have been, being “H” Cyrillic for “N”. Construction started by marking, scoring and separating the parts from the backing sheet, then sanding and adjusting carefully. Locating and opening windows followed, and then the interior structure was scratched from leftovers of the same kit, all of that depicted on the customary in-process photos. It is worth of note that in the Russian Vultee, although it flew 10,000 miles, the supplementary fuel tanks were in the wings, not in the fuselage as in Lady Peace. N-208 had the full eight cabin seats compliment. The bathroom was also scratched and even provided with a toilet roll for the long trip. All the cockpit and cabin detail, as it happens frequently, would be almost hidden once the fuselage halves are glued together. A vertical stabilizer was as said fabricated, considering that modifying the kit’s one would have taken more time than making a new one. Departing from the Execuform arrangement I separated the stab parts in order to be able to deal first with the aft cone of the fuselage and then add the stab halves via a spar inserted through the fuselage. The wing halves were glued, and here Execuform devised a way to “embrace” the fuselage by gluing the wing halves and later cut the upper central section in order to lodge the fuselage. The joint will need attention. Styrene “Contrail” and brass “Struz” airfoiled struts were used to prepare the attaching structure for the floats; the later were trued and detailed as per photos. Bear in mind that although wearing floats this machine had the landing gear retracted, not deleted, since after reaching Russia it left the floats and reverted to wheels. After arriving to Moscow (where Nikita Khrushchev was present!) the plane was carefully examined by the Russian aviation industry, finding it remarkably modern and intelligently built and suggested that many of its features should be incorporated in Russian design and production. Once the interior was finished windows were inserted before closing the fuselage as described in the accompanying images. One by one they were cut and adjusted, because unlike men they were not created equal. You could super-glue very thin rubber pads to your broad tweezers in order to hold the window panes as you sand their edges to make them fit. I didn’t, and scratches were the result. Sometimes in these articles what it looks like a straight line from zero to model is actually a winding, meandering, puzzling scribble that involves a good number of boo-boos and their correction (or not). I had to do a few parts more than twice, blotched, marred, patched and so forth a number of times, so if it happens to you too, don’t feel alone. While the fuselage was drying, it was time for engraving the flying surfaces’ panel lines. I had a lot of fun filling and sanding the results of the over-exuberance of my scriber. A few exterior details were fabricated like the DF loop, carb air intake, “winter” front panel for the cowl, hatches, Pitot, Venturis, exhausts, nav lights and so forth. Especially tricky were the cockpit transparencies, due to the strange angles of the panes at the front and the lack of positive locking points. Four individual panes and some tweaking did the trick. The floats were primed with their struts and inspection covers already in place; the rudders, rudder posts, horns and “pulleys” were glued and then the floats were set aside. Same for the engine, cowl, prop and associated bits. The wing was fitted to the fuselage, then the stab halves, and then the vertical surfaces were removed and replaced by the scratched, bigger ones. Then it was the somewhat dull job of puttying, sanding, re-scribing, but all in good mood listening to the music of Fito Paez, Charlie Garcia and Spinetta. After a rather complicated masking/painting session to do the stripes and separate the colors the horizon looked better. A few minor decals were applied at this time on the prop and the vertical stabilizer. All the bits started to come together and flat black-sprayed decals were used for the de-icing boots. The floats’ rigging was done and tiny cleats that came with one of Khee-Kha’s sets of EDO floats were added (I ordered those detailed and impeccably cast floats for the next model, the Wiley Post’s Orion/Explorer hybrid –more on that matter later, stay tuned). A well-hearted fellow modeler and friend, Christos Psarras, sent me the white registrations decals. Thanks to him the model could be finally finished. Now the Vultee with its conspicuous shape is part of the ever-growing collection of hidden beauties of the Golden Age. (The model as said is 8 years old, the photos are not the best, I see that I dodged building a beaching trolley as I do now for such models, and I photographed the model on grass. Hope all these sins are forgiven)14 points
-
Thanks for watch, every one !!!13 points
-
11 points
-
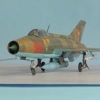
Hello! This is my new kit! In assembeling it's very good set. As additional sets I used resin wheels, hood, bronze landing gear from Eduard, metal gun barrels from Master and copper exhaust pipes from REXx. Painting-Hataka. Weathering sold and oil dots, washes and pigments.10 points
-
two planes are to inspected here today ,both built by me [who else?], both painyed with hataka lacquers ,orange line . the first one is my 1/72 martin m-187 maryland .kit is from ark models and really very affordable!! there is not much to say about it besides that from a distant it looks best,it is not perfect ,but the gay colours can cheer up someone who is wrestling with a sad or depressing day /time/mood/whatever . I used the french hataka orange line lacquers colours set for my contraption.I must say that I like working with those lacquers very much . I am a beginner with the airbrush so I guess this means something ,exactly what I do not know [hopefully] yet. my second plane, here to be seen, is a 1/72 italeri cant z-501. also painted with the hataka orange line lacquers .for this one the sets with french colours and the set with raf desert colours were used. I am quite happy with the result. ps ,only now I notice some details on the martin that need attention ,guns[?] in the wings+pitot [I remembrt having seen the "fork".. and an ugly piece of cockpit frame is ennoying me loudly! all things have been taking care of by the time you read these words and and and and and and maybe some photo are uploaded twice ,I lost my panoramic view over all my creations that I uploaded at imgur mea culpa.....time for the cant-z.501 now and and and and and .10 points
-
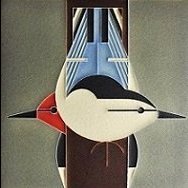
Final pics from my archives of glider models. All these 48th builds have been sold and all were built as reviews for SAMI some many years ago now. Bocian. Ardpol kit Another Ardpol resin kit. Sorry forgotten type? Mucha ( Fly) Ardpol. SP-2749 a later type of Bocian also By Ardpol kits. Planet Models kit. Type unknown...? Habicht with long wings Another Planet models kits. By the way, all those blue sun burst markings were masked and airbrushed. If I find more pics of my glider builds in the two scales shown here recently I will post as and when. Meanwhile I hope you all enjoyed this little series of my silent flight builds. Cheers for now.9 points
-
I've just learned from my sources that it's a Comet 4C in RAF and DanAir markings, which is from @bentwaters81tfw , who spoke to Didier today at Telford. There you go! Speculation ended9 points
-
At the end it was a dash to finish it for our club's exhibition which was open yesterday in Belgrade, so I will have to put pictures taken with smartphone. Build article is here It was my first vehicle build, and I did enjoy building it.9 points
-
Another model from 8 years ago, to further illustrate vac construction. I never built a model with so many names and such complicated history. Suffice to say that it is known as Faichild 150, General Aviation GA-43, Clark GA-43, and North American GA-43. The “Clark” there is the same one as in the Clark “Y” airfoil fame, for you aerodynamicists. The plane also has some Fokker strings attached. To explain here all the mergers, acquisitions, take-overs and other financial mysteries would take too much space, so let just say that it was an all-metal ten-passenger plane with –after the prototype was converted- retractable landing gear. It was used by Swissair (two machines), SCADTA in Colombia, Western Air Express in the USA, one ended up in Japan as J-BAEP and yet another somehow managed to fly in Spain on the (fortunately) anti-Franco side. A pretty good story for only five machines built in total. There is a very good article on the subject on Skyways magazine issue of January 1998. I opted to represent the prototype, since its spats and short one-seat canopy had a chubbier look that was very appealing to me. Parts were separated from the backing sheet using the well-known tachyon pulse method, and flat-sanded cautiously while testing. References were consulted in order to establish which parts were needed so they could be made with the replicator. Some goodies were beamed-up from an obscure British manufacturer with Klingon ties. Do not get rid of the leftovers of the backing sheet, many extra parts (like bulkheads, spars, seats) can be cut from them. The next thing to do was to establish the position of the windows, door and luggage hatch on the fuselage and cut them open. Five bulkheads and the cabin floor were cut from the leftovers (see, I told you!). At this point I decided, after much pondering, to diverge from the Execuform path and separate the stabilizer halves, work out the tail cone integrity, and add the stab halves later. Execuform planned the parts to provide some sort of easy keying for alignment, but I rather sand the fuselage smooth and add the stab than meander between the parts later with the sanding stick and the putty. The ten passengers chairs came next, each one made of six parts (back, seat, head cushion, two armrests and magazine pouch in the back). As per photos a few metal parts were found in my spares box too. The cavity showing the wing root from inside was closed using sheet styrene. The wing roots in the model are slightly asymmetrical, being one a bit higher than the other. Be careful to compensate for that. The wing halves were glued and their panel lines engraved. Beware that the prototype had longer span ailerons and no flaps. Also some anti-stall small sections were located at the leading edge. Those were replicated carving the styrene and adding a few small ribs. No landing lights were present at the leading edge at the time that this first machine was flown. No nav lights can be seen on the wingtips either, but two were present on the fin and on the tip of the tail cone. The whole interior, as a single unit –see images- was detailed and prepped for its later insertion between the fuselage halves. A roof was glued to one side and some detail added on those halves too. All these may sound boring or difficult, but it wasn’t at all. Is like solving a puzzle for which you create the pieces as you go. Very Zen. Once the fuselage was closed the stab halves were refined and a few parts created to better engineer its addition to the fuselage. To the wheel pants a strip was added and blended to represent the shock absorbing mechanism arrangement. Once all the painting was done and set, home-made decals and a few external details were added, and the gleaming retro beauty of the GA-43 shone away in all its glamor. And as Master Po used to say, a Shaolin monk is not ready until he builds his scratchbuilt, resin and vacuformed models.8 points
-
This is another Strike Eagle built for the F-15 Program Office director upon his retirement. The aircraft itself is built out of the box, the cockpit bits left out and the canopy painted over to match similar desk models. There is a block of wood epoxied inside the keel to accept the brass pins of the acrylic stand and the fuselage filled with expanding foam to add some rigidity. Most of the stores come from Hasegawa weapon sets. I think all the markings are from the Revell kit, with the exception of the crew names below the windscreen. As was my practice, the pilot name was always the person receiving the model. The remaining names were usually co-workers. The acrylic stand is covered with cling film to avoid fingerprints until the model was presented. Panel lines were accented with a Paine's Grey oil wash applied over the ModelMaster enamels finish. We (the F-15 office) had just recently certified the Sniper targeting pod for carriage and. operation on the F-15E, so I had to put one on this model. The pod is my own resin casting, and it is slightly over-scale (didn't have time to try to make another master and mold). We had also just cleared a modification to add a satcom radio to the Strike, so I had to add that as well. I didn't add the radio components😄, but you'll notice there is a slightly raised square frame around the antenna location ahead of the windscreen. This is where we put the satcom antenna, replacing the ADF antenna. Only problem was the antenna aperture covering would start to delaminate at high speed. The quick fix, to get the mod out to the deployed OIF/OEF units, was to add a metal frame covering the edges and protecting them from the air flow. Simple but effective, and still out there today. The feedback from the crews was that it gave the Strike a little more character. I liked this kit enough that I bought one for myself, even though I normally only build 1/72 for my collection. I did keep a small stock on hand just in case I was asked for a model on short notice. Luckily, one of the local craft stores usually stocked this kit and often used to issue coupons for either 40 or 50 percent off one item, so the price was never too dear. Now that I've retired, I'll have to dispose of a couple of kits eventually - the calls asking me to provide a going away model have finally stopped. Thanks for looking, Sven8 points
-
The Kugisho D4Y (or Carrier Dive Bomber 'Suisei'), developed by the Naval Air Arsenal at Yokosuka, was the last scout bomber of the crumbling Imperial Japanese Navy. The design is amazingly compact when compared to its precursor, the Aichi D3A. There is a strong contrast in philosophy to US Navy dive bomber development which advanced from the fragile Vought SB2U to the monstrous SB2C Helldiver. Even with an internal bomb bay the Suisei is no larger than the SB2U! Folding wings were not needed for handling this little aircraft on carrier elevators. My model represents the D4Y3 variant with a Mitsubishi Kinsei 14-cylinder radial in place of the earlier Daimler-Benz in-line derivative. リ-266 belonged to the Hyakuri Kokutai, an operational training unit. It was involved in at least one combat mission in November 1944 flown by Lt(jg) Kiyoshi Arasu. I bought the FineMolds box in the mid-nineties and found the price unreasonable. All the more so as the kit proved less satisfactory than I had expected. A number of adjustments were necessary and I used available after-market parts to upgrade the model. I hope you enjoy this unconventional subject. A Japanese airplane enthusiast for many years I admire the elegant lines of their designs, and it's a pleasure to share the pictures. ハッピーモデル構築 - Michael References Japanese Navy Air Force Camouflage and Markings WWII, Donald W. Thorpe, Fallbrook, 1977 Navy Carrier Dive Bomber "Suisei", Famous Airplanes of the World No.69, Tokyo, 1998 Kugisho Carrier Dive Bomber "Suisei", Mechanism of Military Aircraft No.11, Japan, 2011 The IJN Carrier Bomber Suisei - D4Y Series Photo & Illustrated, Model Graphix 23079, Tokyo, 2012 Imperial Japanese Army & Navy Airplanes Illustrated - Book 2, Model Art, Tokyo, 2016 The Dark Green Paints of the Imperial Japanese Navy Air Force, Nicholas Millman, 2016 The Imperial Japanese Army Air Force had fine airplanes, too. Click here8 points
-
By 'eck that's smart marketing. Buy the kit, travel down to Hornby Hobbies dockyard, build it up and sail it home. Should be able to get pretty close as it'll fit narrow gauge canals....... By the time you get home you may find it being your sole possession post-divorce though.8 points
-
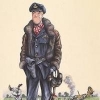
Hi all.....I'd like to show you my latest finished kit. It's the Scratchaeronautics' 1/48 resin kit of the nimble spanish jet. An original design from Willy Messerschmitt while working for the spanish company La Hispano Aviación de Sevilla, S.A., rhe original two seater, trainer design led way to an improved, co-in single seater, called "Super Saeta". The rear seat was removed and an auxiliary fuel tank was added, improving the range of the plane. Other modifications were the adition of two undernose gun pods, containing 20mm Hispano guns, and up to four underwing pods, able to carry a varied load of rockets or jettisonable napalm tanks. Their swan song was during the early to mid seventies, carrying out armed patrol missions over the Western Spanish Sahara against moroccan supported insurgents and moroccan army alike. From 1975 onwards, after the Spanish withdrawal from those territories, the spanish Ejército del Aire carried on armed patrols and escort missions over the Canary Islands' territorial waters, protecting spanish fishing and merchant vessels from the moroccan and Frente Polisario insurgents attacks. The kit was built OOB, with the only exception of some belts made from lead foil. It was painted with Humbrol enamels and slightly weathered with pastel chalks. I hope you'll like it. As usual, any comment will be welcome. Best wishes.... IMGP0008 by Arturo Navarro, en Flickr IMGP0010 by Arturo Navarro, en Flickr IMGP0012 by Arturo Navarro, en Flickr IMGP0011 by Arturo Navarro, en Flickr IMGP0014 by Arturo Navarro, en Flickr7 points
-
Hello, This is Hobbycraft's 1/28 Fokker F.1 (also repackaged now by Revell), which my father made a couple decades ago in the famous Red Baron all-red scheme. I decided to restore it for the "WORLD WAR ONE IN MINIATURE" Belgrade exhibition, but in a rather interesting F.I pre-production version (only three produced, of which two reached the front) I made some modifications to the kit, such as "rounding-up" the tailplane a bit, correcting the cowling, prop and the ailerons; as well as adding some some standard WWI aircraft features, such as seat-belts, lower stitching, windscreen and gun sights. Most of the thinner struts were also scratch-built. You can see some WIP pics, by clicking this link And today, it found its place in the gallery of Serbian Academy of Sciences and Arts (SANU) display case 😎 Fellow modellers visiting Belgrade in November will be able to see this one, as well as over 80 other WWI-themed models of various scales and themes from this Thursday, November 08th, to the end of that month. Each Friday afternoon, our scale club members will be at the exhibition room, for curating and discussion purposes. Thanks for looking, and all comments are welcome! Aleksandar7 points
-
Enjoyable basic cheap £6.99 kit. Bad points: The landing gear struts needed trimming back, as far too long. The decals are very thick, but apply with no chance of falling apart.. The interior detailing is non existent not even a joy stick. The thickness of the wings is a little off. The wheel wells have no detail. Good points :. The plastic is lovely to work with, almost no flash, fit is very good... Conlusion:. Well worth the money. Great basis for practice. -. Something I need greatly. Norma was the name Lt Brad Muhl added to his jug to impress a nurse he met at a dance in Italy. She took it as a sign he was serious about her and they married. A 1996 feature in the Hartford Courant reported it was in the 52nd year...7 points
-
Nose looks wrong whatever it is!7 points
-
In which case it won't matter how many they have, there still won't be any Zeros! Or indeed if you add them😁 It could be worse. It could be something involving irrational numbers. Because nobody here is ever irrational. Not. Ever....7 points
-
Trumpeter kit, Aires cockpit, Eduard Falcon missiles, Caracal markings, fündekals:) stencils - highly recommended! The stencil set really brings it to life Cheers from Czech rep. Andrew6 points
-
I have removed the masking from the tail and masked the wings ready for the yellow to be airbrushed onto the leading edge of the wings. I have also sanded down the wooden jar lid, for my stand and given it a blast of white.6 points
-
As promised photos of Dougal in all his greyness (not brilliant photos), complete with black nose.6 points
-
I have started the green mottling and am having some self doubt. My Maru Mechanic book has an excellent close up of the nose of a Nick showing a fairly (actually very) sloppy application of the green. Im sort of trying to replicate that here. I am doinv the Green freehand. Have a look comments questions threats proposals and haikus all welcome! I think I may “flesh in” some of the green and connect some of the smaller sections.6 points
-
Cheers Fella`s,.... yep I`ve got a bit of a Beaufighter fix going on at the moment,.... and ..... fancy getting hooked on helicopters by the Crab`s Colin and then going off to wear bell bottoms,...... but then you like your airfield to be on the roof son`t you mate! I`ve got the decals on the models today,...... the red codes for the Coastal aircraft had to be chopped up a bit and altered from the Modeldecal sheet to match the codes on the real aircraft a little better; And for those who saw my 1/48th scale Beau`s,.... I`m still tootling along with the refurbishment of an old Tamiya 1/48th scale Beau which I built many moons ago,..... I`ve given it early style horizontal tailplanes and repainted it as the famous `Young Hunter III' of 89 Sqn which was used on detachment in Malta from the units Egyptian base. Although delivered in overall black,.... they were soon given a desert finish on top to make them less visible on the ground during daylight hours; Cheers Tony6 points
-
It's not going to happen but I wish it would be a completely new tool 1/48 DH.88 Comet and with decals for Grosvenor House, Black Magic and the BRG one too. A Hawker Hart family of kits wouldn't go amiss either and I'm not fussy, 1/72 or 1/48 will do nicely. Oh and I'd also like to win the lottery and for Catherine Zeta-Jones to ring me up and say she's had enough of that Douglas bloke and would I mind taking her out for a spot of dinner too. The last one might rub the missus up the wrong way but we'll cross that bridge when we come to it!6 points
-
Right - after a year 'off' modelling and a move back to the UK, I'm getting back into the modelling game again- for my 2nd military plane, I'm building this large scale kit for a friend. Pretty sure this was bought as part of a group buy via good 'ol Blatchat (7 Club) I've not finished the Mossie yet, but need something new to get me back into it all.... From what I have read, these old big Airfix kits can be a bit hit and miss in terms of fit etc - certainly not quite the same as the new Tamiya stuff, that is for sure! But a lovely subject. The kit had been very slightly started, with a few parts of the cockpit assembled and painted. I've undone this work, so I can paint again with new paint and so keep colour consistency. It also means I can add a bit more detail - despite my plan to build totally OOB, I can't help myself. I've ordered the Eduard seatbelts, Master 20mm cannons and some masks for spraying the cockpit I'm going to scratch build some cockpit internals - but not go mad - hopefully. Researching forums on this subject, there are a huge number of opinions, variations etc etc - I'm going for a nice kit - if the radio headset is not correct for a particular month in the 40's, I'm ok with that That said, I do want to get the big stuff accurate.... So the first job was to dismantle the very small amount of assembly, just to make it easier to tweak. I didn't take many pictures at this point, but it was only really a little bit of cockpit area stuff. I primed over the green paint, just to make it easier to see what was going on... At this point I was going to work on the engine, so I had stripped this to work on as well - I was just going to show one side panel open - the panel fit is so bad, I was going to glue the other side shut! Now the plane is 'in flight' I can miss this step out... I took the very small amount of 'detail' in the kit and improved it a little - as now much of it would be properly hidden I did not do too much of this - at this point! ....I cut the end off and replaced with wire - if this had been visible (it wont be) I would have rebuilt in its entirety - but I want to actually finish this model! I had bought a few detail parts...cannons (nice) seatbelts (now not needed, or at least not all of the parts) and cockpit canopy masks... I started to assemble the 'big' bits, knowing that the real work was going to be the filling, sanding and finishing - this is not a complicated kit to assemble in terms of part numbers of complexity... Nothing glued here obviously... The wings have lots of panels to fit - used to show the guns inside the wing if required...they went in ok - with some fettling obviously... In order to get the panels to fit over the engine, I had to cut away the back to thin them... Could be fairly crude as unseen... I glued a crossmember in the wing root to fix the oft-mentioned drooping wing, after joining the wing parts.... I had fixed the undercarrige in place - I'll fit the cover panels later.... That really was it for the big stuff - could now turn my attention to the cockpit area...5 points
-
Hi folk's,a good old run of the mill Tamiya 109 in 1/48 scale kick's of a pair I've been plodding along with in WIP,I'd been reading Wellum's excellent book and was inspired to build this as well as Tamiya's Spitfire in the same scale as I'd built neither before.This was a delight to build as you would expect from Tamiya all colour's mixed by me from Tamiya paint's (so If it look's wrong no one else to blame} and first kit weathered and post shaded with my new airbrush.Thank's for looking in.5 points
-
... and the big announcement will be .... somebody's left their car lights on in the car park.5 points
-
I got the cowl panels partially scribed today, but it wasn't an easy job due to the mix of filler and model board used in its construction. For that reason, I've decided not to panel the fuselage, but to mould it first, take a pure resin version which can then be scribed and a second mould made. Having a fuselage made from the one material will make the scribing much easier and means I won't risk damaging the master pattern if the panelling goes wrong. I'm not looking forwards to scribing around the fuselage. I finished the windows on the fuselage too, adding the small frames on the front windows and the join in the sliding window where the gun sticks out. Here's the tiny tail wheel. Turning the 4mm diameter was fun!5 points
-
Gentlemen, the Battle is back on the bench! I tried to post a small update a couple of hours ago but the site wasn't co-operating. I have repaired most of the damage done to other models during the move, and, needing to do something a little more productive than repairs to already completed models, have dug this out again. Today was mostly spent trying to remember where I was and what I was going to do (not an uncommon problem!) but I did tidy up a few things: straightened the left horizontal stabilizer and reinforced it with CA gel, and added a skim of PPP under the wing centre section which had rippled slightly due to the glue acting on the thin card skin. I hope PPP can be scribed...... I will post pics when there is something pic-worthy! Ian5 points
-
Thanks Pete! Got a bit more done on the base, I started by painting the inside of the shot flower red as thats supposed to be the insides you can see 20181029_134122 by Nick Frost, on Flickr Then it was time to glue the big flower in place, but before I did this I wanted to make sure it had good contact giving a strong bond. So I wanted to use greenstuff to mold into the base so it would create a solid base. Greenstuff is very sticky of course so I laid down a polythene sandwhich bag first then squidged some greenstuff on the bottom 20181101_133305 by Nick Frost, on Flickr 20181101_133400 by Nick Frost, on Flickr Then pushed it down onto the base to get a mould of its position pressed into it 20181101_133831 by Nick Frost, on Flickr Then when it dried I painted it blue and then used some ca glue to get it in place 20181101_133945 by Nick Frost, on Flickr 20181102_130913 by Nick Frost, on Flickr 20181105_134955 by Nick Frost, on Flickr Feel glad now thats in place, at least its in one piece now! I also made a start on using some pigments on the growths and roots in a small area to get a feel for it 20181106_134333 by Nick Frost, on Flickr So next up I'll continue with the pigments and make some tentacles for the inner part of the open flower. Thanks for looking, more soon5 points
-
Put the final bits on the tiffy tonight - is it finished? Not sure to be honest but probably 98% there. Too tired to continue but here she is for better or worse - some adhoc shots from the kitchen table. Will do some better shots for the RFI but you can take a gander as a preview. Big big thanks to the poor souls who followed this build - and who offered encouragement and advice along the way. I really appreciated it. I learned a huge amount on this and took many lessons on board. Hopefully some of them will stick! There were many firsts and some actually came off okay which was a great confidence booster. I still feel I’m at the bottom of a very big mountain in terms of my skill set - but I’m enjoying myself which is the whole point I suppose. I’ve mixed feelings about this model. Parts of it are great but other parts not so much - overall it’s okay. Loads of room for improvement basically:) I’ll stop talking now - pictures:5 points
-
Last few photos before Telford - almost there!!! Decals and dirt applied, undercarriage attached You can see in the second pic the exhausts that have been painted with Alclad and overpainted with burnt metal. Finally the wings So thats it for now, I'm off to Telford in a couple of hours and won't be back until Monday so hopefully I'll have enough time on Monday to complete the final assembly and put a matt varnish coat over before our club meeting on Monday night! See you at Telford... if you are on a table in Hall 1, I will be coming to take your photo at some point during the weekend for the IPMS magazine5 points
-
Massimo. i’m sure you know this, but that ILS antenna on the side of the tail needs to come off; RN Tooms didn’t have it. I’m sure correcting Airfix’s minor errors still counts as OOB!5 points
-
Hi The nationality marks are painted except for the tail I accent the pannel line with Tamiya panel accent I set the few decals My blue for nationality marks is too clear5 points
-
Well amongst a lot of admin stuff I managed to get my models packed ready for the stand building session tomorrow I do need to make 4 intake blanks but that apart this will do for now And If you need to see any more we're in Hall 3, see you there This isn't a Buccaneer honest Obviously it's a palouste diorama... Phew time for a rest5 points
-
The week started ok with panelling the centre wing and starting on the prop, then daughter caught a cold and was off school, so I ended up on childminding duty and haven't got anything else done all week. She felt a bit brighter today and while still off school, managed to do a little modelling of her own - a 1/144 scale B-17 which is nearing completion.......5 points
-
Hi All, So thought I should have a practice at doing a WIP before the December Panzer IV group build. So since I was in Hobbycraft picking up some black paper for my photo backdrop (See my Flickr album for my just finished king Tiger here https://www.flickr.com/gp/138803726@N04/57D559 ) and spotted one lonely little Pz II sat on the shelf. So here we go, will be OOB as usual and is really a test bed for some paint techniques before the GB. I won't be doing the figures (still can't get them right) the ones in the kit are quite crudely moulded. First job is to check everything is present, all good except for one "bendy" track which hopefully will be ok when fitted. Super simple kit with one page instructions 😀 I'm going for a DAK colour scheme and will be using brushes only on this build. Sorry no photo etch or massive scratch building but just an exercise to try and get the hang of how best to do one of these, getting the photos right and so on. Any tips, comments and advice most welcome.4 points
-
NOTE FROM FUTURE PROCOPIUS: This post is six years old. A lot has changed in six years. So ever since I meandered over here a little under a year ago, I've realized more and more that I was not making models that looked terribly good, and that many if not all of the posters here were. My new year's resolutions included the ordinary inconsequential things (be a good husband, be a better runner, work harder, etc.) but also my top priority resolution: work on being a better modeller. I decided to knuckle down and really make the effort on a new Sword Spitfire Vc I'd gotten, since I was really beginning to feel I couldn't justify the expense of a nice model unless I really worked on it a lot more than I had been. So, I started on the 20th, and finally finished today. Normally it took me two days or three days to build a model, but I'm much happier with how this guy turned out. HOWEVER - I still have a long way to go. I'm terrified of trying weathering, and I couldn't make a mask for the canopy to save my life. Here is the short list of mistakes I made that I know of. There are likely others I don't even see. - Reversed the colors of the camo scheme by spraying Dark Earth as the base instead of Dark Green. - Skewed the seat in the cockpit during assembly so it swings to one side - Badly scuffed the canopy attempting to cut a mask while the tape was on it. - Poor canopy framing paintwork. - Used RAAF Sky Blue for the underbelly, as the instructions said "Sky Blue". I now believe this to more properly have been Sky Type "S". - One landing gear slightly canted in because I forgot to remove some flash. - The spinner looks like crap. I couldn't figure out a good way to put it together and paint it without messing up the paint or the assembly process. Anyhoo, with that introduction, here goes: Please excuse the fact that this was photographed on the bathroom floor (but look how clean I keep it!), there's not a lot of natural light in late-winter Illinois.4 points
-
I couldn’t resist! I split the difference fleshed out the green and took the tape off as soon as the paint was dry to the touch....4 points
-
I hate looking at this thread! I have three frikkin' cats now and Antoines pix makes me want a kitten! Thanks so very much! Take this!4 points
-
4 points
-
2 x Zero = Zero4 points
-
The A6M2 was manufactured by both the parent company Mitsubishi, and under license by Nakajima. They painted the wheel wells differently. According to Nick Millman’s excellent PDF publication “Painting the Early Zero-Sen” (available through his “Aviation of Japan” blog): Mitsubishi Entire wheel well, and inner faces of all four gear doors, the same gray as the airframe. Main gear struts and inner door retraction yokes black. Torque links and wheel hubs silver (painted). Tailwheel assembly airframe gray with black or green leather cover over the opening. Tailhook and its front attachment black, with shaft aotake or airframe gray Nakajima Wheel well, and inner faces of small inboard gear doors, aotake. Inner faces of main gear doors airframe gray. Other details similar to Mitsubishi.4 points
-
Small progress report and actually 95% done I'd say. Panel lines have received a sludge wash, undercarriage, prop and pitot tube attached and matt varnish applied. Generally I'm happy, there's some very small amounts of silvering which I'll rectify with some brushed colours. The metal end of the pitot tube needs painting and pastels and silver chipping still to do as well. And last but not least the IFF antennae which I'll make from smoke coloured invisible thread. Sorry the photos are a bit rubbish quality-wise but I was rushing a bit and the light here is fading fast (joys of living inside the Arctic Circle). Should have the old girl all sewn up over the weekend though.4 points
-
Morning folk's,the change of scheme meant out came the masking tape for the white ID marking's this aircraft carried,need to tone and weather them in a little then get those decal's on.4 points
-
Hi Everyone, This is the first time I have posted a model in the RFI section. As the title suggests this is the recent 1/72 tool Hawk from Revell (04921). The kit is good despite surprising amounts of flash for its age and bright red plastic (well it is a Red Arrows kit after all). As the kit only includes the very early short fin fillet and curved rear of the fuselage, I decided to complete it as XX164 of the Central Flying School, RAF Valley 1979. This meant I had to modify the kit seats to add the wider headbox. These were completed with homemade masking tape belts. I also lengthened the intake scoops behind the canopy, as these are too short in the kit. Various other details were scratch built like the pitot tube (albion alloys brass tube) and underside antennas (plasticard). The kit features no intake trunking, so these were blocked off with covers scratch built also from plasticard, referencing photos online. The moulded in beacons on the spine and ahead of the airbrake were replaced with offcuts of the clear sprue, sanded to shape. Photos online suggested that this aircraft lacked the blade antenna on the spine in its early days, so I left it off. The main decals are from Xtradecal's X72-166 set and the stencils are from the X72-168 set from the same company. The model was primed with UMP white followed by Mr Hobby's White and Light Aircraft Grey. The red was Revell Aqua Gloss Fiery Red. After some light weathering in was coated with Ammo by Mig Lucky Varnish Satin. The canopy detonation cord was hand painted as the detail is raised on the inside. I have plenty more Hawk decals left from the Xtradecal sets so I will have to build some more In the future. I hope you enjoy. Mark.4 points
-
Good morning all, I finally bit the bullet, purchased some EZ Line and retrofitted it to the Spitfire. Even without paint she looks so much cleaner. Thanks for the great advice everyone, now I feel comfortable cracking on with the Airfix F8 Meteor.4 points
-
Hi Guys, Tonight I couldn't go to sleep without attempting some more glueing! So here's what I did: Cockpit and seats first...they look not bad at all!!! On this one the wing-fold won't take me that longas on the Gannet!!! Tail glued to one fuselage half. Nose air intakes. They'll have to be sanded a bit, but thats work for Tomorrow! And finally a dry-test. I don't think she'll need much filling and sanding!!! I can call the day now. Good night!!! Massimo4 points
-
Finally started to put the inside of the fuselage together. Last night I put in the bomb bay/wing spar assembly, and tonight after test fitting a few times added the rear assembly. The rear part is a bit reluctant to fit towards the rear of the fuselage, so I bent it down slightly just after where the ball turret would go which did make it better so when I added glue I also added a peg to hold it in place. I have also almost completed the cockpit part, but after seeing that most people adding some sort of cushion affair, I broke and I have added a few bits of plasti-card to act as said cushion which I am now painting before adding some tape to act as seat belts. You will also note that I have added the glass parts to the front of the fuselage and the turret to the rear. I must remember to add that part that fits inside the turret to the side of the fuselage.4 points
-
This is the Airfix Magazine conversion of the Avro 504K to the Bristol Scout as described by Chris Ellis. As the author explains it is not 100% accurate but it does end up looking like a Bristol Scout. It's no particular aircraft simply a generic example of the fighter that was used by 19 squadrons on the Western Front, 3 in Palestine, 2 in Mesopotamia, one in Macedonia and one HD squadron. It was issued in small numbers to these units and operated as an escort fighter. Later they became popular as training aircraft particularly with the instructors. Albert Ball VC began his fighting career flying a Bristol Scout and claimed four victories if the grey cells are working correctly. Regards, Steve4 points


.thumb.JPG.3498f40362ff13ebfc4b2e45abbd545e.JPG)


This leaderboard is set to London/GMT+01:00