
Leaderboard


Popular Content
Showing content with the highest reputation on 12/10/18 in all areas
-
Siemens-Schuckert D.III With the pictures of the finished biplane a project ends, which I started in Jan 2016. So this is model number 5 of the actual year. The biplane is a Siemens-Schuckert D.III, as flown by Ltn. Heinrich Dembowsky 1918, with a rotary engine Siemens-Halske Sh.III. The kit was Eduard Profipack in 1/48, also the engine is a Brassin-kit of Eduard. The Spandau-MGs are Master, Aviattic decals are used for lozenge and the turnbuckles are Gaspatch. The 4-blade air screw is hand crafted. As usual I have used paints of Alclad, Gunze and oils. The build was fun, because is is really a great kit with good fit. Enough text, I assume you want to see pics: It was not that easy, to take good pictures of that "Black beauty" And again a nice piece of history for my collection! Cheers, Frank21 points
-
I started this kit two years ago and for the best part of last year it was just sitting collecting dust,I just didn't feel like doing any work on it.I finally decided to get it done this month and here it is.No it didn't turn out as good as I hoped it would (I still got a lot of learining and improving ahead of me) but it could have been worse. Took these pics real quick with my phone hence the bad quality.19 points
-
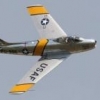
Hi all - like many here, I’m recently returned to the hobby after about 30 years away - bought a model for my kids and rediscovered how much I enjoy fiddling and painting plastic. This is my 7th build all up and the first one I’m reasonably happy with. First one painted with my new airbrush which I’m very happy with. Airfix kit - quite recent I think, painted with Tamiya acrylics. Used oils for the weathering. Nothing on the work that’s posted here but a step in the right direction for me I hope! Thanks for any feedback and apologies for the smart phone photography.18 points
-
Hi Folks A quick build not from the shelf of doom. The Hobbycraft kit is quite simple to build and reminds me of Matchbox kits, nice fairly thick plastic to work with and with no warping. Otter's were frequent visitors to Prestwick Airport in the mid sixties in the main US Army ones but a few Canadian ones wrapped up in UN markings also appeared. Painted with Tamiya acrylics and Xtracolor paints, decals from the spares box. Cheers Ian17 points
-
A big worry for me is that my 2019 Telford trip (god willing, at this point, that no more fiscal emergencies pop up between now and then, but I'm gambling that flights to England, the garden of the world, will be cheaper in November) will in no way be able to encompass all of the things I want to do while I'm back Lowestoft is on the other side of the country, as is Lincoln, and of course a million other places. There's more to England than you think. Whoever's in charge of tourism for the UK's largest constituent country can have that one for free. Lower and upper cowls protrude about 0.5-1mm further out than the fuselage at the nose unless some fettling and test-fitting is done. Be sure to keep the mating surfaces for the cockpit parts free of paint. Test-fit the underwing radiators a few times, they're tricky. Anyhow, a weird couple of days here at Hedgehog Manor. Last night, shortly after I clambered into bed around 1 AM after playing Rule the Waves for far too long, I could hear some crashing about in Winston's bedroom, and then him softly reassuring himself "I am a big boy". I thought nothing of it beyond a fervent wish he would immediately go back to sleep. Time passed. The door to our bedroom opened, and Winston, accompanied by the unmistakable smell of poop, drifted in wordlessly and tried to clamber into our bed. Now, we have a king-sized bed because Mrs P is an aggressive sleep kicker, but the bed could be a thousand miles wide and it would still be too small to fit our children, as far as I'm concerned. Mrs P, who they like and wouldn't dare try and kick repeatedly (an inherited trait, apparently, passed on down through the generations, in the absence of the more rugged forms of natural selection against such things) has a different view on the matter. But Winston is not allowed in the bed. So I wordlessly picked him up, and to my surprise, he was very clingy, unusual for him as he's generally not keen on either me or being taken away from his mom. But the smell was quite intense. It was clear he'd had an accident. So I took him back to his room to change his diaper, only to discover...the diaper was clean. Winston's legs and arms, and his butt, however, were not. "Where's the diaper, Winston," I asked, with roughly the same tone and urgency an interrogator might use to demand the location where the bomb was hidden. "In my bed," he replied, and indeed, there it was, along with...well, I won't dwell on the gory details, but you know how in horror movies you can tell something bad happened sometimes because there's a splatter pattern that looks like someone poked a hole in a garbage bag full of blood, dragged it a ways, and then blew it open with a controlled detonation? Sort of like that, but not blood. It soon became apparent that Winston would need a bath, and I sprang into action, while Mrs P (with a now-roused and alarmingly chipper Grant) took on decon duties for the horrific path of destruction Winston had left in his odoriferous wake. Poor Winnie was so clearly expecting to be in trouble, and had so obviously just been trying to be a "big boy" and change himself, that it was hard to be mad at him and I didn't try. We got him cleaned up and his room disinfected (I suggested burning the house down, with me in it, as a possible cleaning solution early on in the process), and got him and Grant back to bed no later than 2:30 in the morning. Consequently, I overslept badly today and missed not only my normal train but also my backup train that leaves thirty minutes later. Fortunately, I'm able to work from home once a week (in theory I could do it every day and never need to come in to the office, but my boss likes to roll deep to meetings, even when the meetings are, strictly speaking, irrelevant to what I do), and so I indulged, and had a lovely quiet day alone, with no other human beings around; I even went for a little walk at lunch. My office has been incredibly hectic with lots of stressed people yelling at each other lately about a project I'm not a part of and I'm just worn out in general. I'm in general a big civilisation guy, because hot dogs stands and pizza places* and Thai food and curry all tend to be better where the population density is higher, but intermittently I feel a deep need to be in a cabin by a lake with a stack of books and I am feeling it intensely these days. I almost always feel alone, even with other people, but so rarely get to be alone with my thoughts,. I feel sure some of them were good ones; I wish to become reacquainted with them. Anyway. The Spitfires! Amazingly, the cheapo masking tape I ordered from Amazon has worked a treat, and the XII's D-Day stripes are on: I used Gunze lacquer white and black for the stripes. As you can see, I cut out a little of the masking covering the Sky recognition band around the tail to enable me to replicate the staggered arrangement seen in the photo. I then went over it again after masking off around it, which was a mistake as it created a big ol' step in the paint. I tried to smooth it out as best I could using a brush dipped in Gunze self-levelling thinner. We'll see if that helps. I'm trying to wait a long time in between coats of paint, because I'm worried about negative chemical interactions. Once I feel like these have all dried sufficiently, I'll mask them off fully and it's out with the Colourcoats to start on the camo. * Not always, though, New York is a very densely populated city, and their pizza is only fit to be dried out and used as a plate for other, better pizzas.16 points
-
British Airways Vickers Vanguard. Finally I have come to the end of my builds and here is my final entry I am a bit disappointed with the cockpit window as I pushed it in a tad far so I couldn't get a good paint job on it. But I am pleased with the final result.13 points
-
Here's my finished Martin Marauder, with almost no detail additions! Build thread is here if you are interested: A huge thank you for the organisers and everyone who took part in the Airfix Golden Years GB. This GB has been a wonderful experience and a lot of fun. Thanks for looking, Adrian13 points
-
Well, the restoration of my damaged and incomplete Ferguson Tractor, from 1948 is as done as I can get it for now. It’s finished enough to display, and that’s a major leap forward for me. The model would quite likely have sat in its storage box for a few more years had the Group Build not come along to rescue it. It’s been restored as an Airfix Ferguson rather than built as a model of the original tractor, hence the lack of extra detailing over that provided by Airfix in 1948 or so. The original paint on the model would not respond to stripper or bleach, so it got flatted off with wet and dry paper and redone in Humbrol Maroon No20 and Xtracolour Mobility Command Grey. The Grey on its own looked far too drab to me, hence the addition of the Maroon Hood and Wings. The model was missing its front near side suspension leg, the steering wheel and column and the seat and spring. I’ve scratch built that lot using brass tube and various bits and pieces of plastic rod and tube. The seat was shaped in milliput, then carved and sanded to final finish. The finished pieces pass reasonably close inspection but a full on Airfix buff would probably spot the additions. I’ve not added any draw bars to the tractor as mine were completely missing and I didn’t think I could make up a set with the references to hand. A set might turn up at some point or maybe a piece or two to copy. The Tractor displays just fine without them for now. Here’s the Origin of the Species as it sits at the moment, somehow half the gearstick has gone missing, it could be anywhere between my bench and my garden, where a couple of pictures were taken. I’m suffering Ferguson Overload at the moment, I’ll make a new gearstick later. A thoroughly enjoyable bit of kit rescue and a fitting one for me to close my Group Build contributions with. Thanks are due to the organisers for a rolling couple of months of nostalgia overload, I’ve had an absolute blast!13 points
-
'The Eagle has landed' - that's the second time I have used this line, the first was when this lovely kit arrived in the post, generously sent over by 'our Heather' - the story is in the build thread. The kit went together very well and a couple of additions in the way of 'moondust' and 'gold heat resistant film' (delicious Ferrero Rocher) really added a bit extra. Very enjoyable and great fun - the build thread is here: Many thanks again to Heather and all you other excellent modellers who pitched in with help and support as is the norm for BM and this Airfix 'The Golden Years' GB in particular.13 points
-
Here is the Honda CB450 - a finely molded kit with a lot of the details that a true biker (not me) will recognise. There was still room, though, to add in brake cables from handle bars and wheel hub actuators....and I did the frame in Oxford Blue rather than black. I've never built a model of a motorbike before but took this on to make sure this GB covered all the bases in terms of kit subjects - there were plenty of 4-wheeled subjects but no 2-wheelers. Build thread is here. Thanks again to all you Modellers out there who really 'come along' with the builds and make the amateurs like me feel brave enough to push the boundaries of knowledge and skill.13 points
-
May I present my 1/48 Academy MiG-29AS. Built OOb no extras, as usual all comments welcome. DSCF9339 by john dann, on Flickr DSCF9340 by john dann, on Flickr DSCF9351 by john dann, on Flickr DSCF9342 by john dann, on Flickr DSCF9343 by john dann, on Flickr12 points
-
Maybe a good soup for dinner tonight will help!12 points
-
Thanks John - yes do, you won't regret it! Thanks Washy Keith Thanks Giorgio While I'm waiting for the tailplanes to dry I thought I'd start the engine. A Pegasus XXII. Right, we all know our Bristols: Flickr Oooh look, PE for the metal bits! Nine (count 'em) MP12s. Oh dear. There's also some flash around the cylinders: I trimmed that off, splashed on my favourite Mr Hobby Iron, burnished me rockers (oi oi!), painted the casing and applied some AK paste aluminium to the PE: All I have to do now is apply nine tiny bits of PE: They're a bit short IMHO but hey, every detail's worth it eh? Before you stick the cowling on…11 points
-
Oh no it isn't... no wait, we've done that already Yesterday I splodged some Mr Surfacer into the remaining seam gaps: Flickr Applying multiple coats until there were no gaps. Sanded it off and now happy. This morning I've jigged up for the tailplanes: … which are not quite butt joins: … and would seem to stop the rudder moving: … until I sanded the angle of the dangle: Now drying after flooding with TET:11 points
-
A quick build (1 hour 48 minutes) this afternoon to put something new on the table for a club meeting tomorrow night. The model is an Aerobase kit I picked up whilst in Singapore recently.10 points
-
Something that I was dabbling with during a bit of down time. MAC Distribution kit( very Kindly supplied by John D.C. Masters (Many thanks John!)Aviattic lozenge decals and other decals from JBOT. A rare attempt by me in building a WW1 subject and a tentative go at applying the lovely lozenge decals by the aforementioned. I am reasonably content with it but feel I should have done better. Never mind. By the way, the kit was much nicer and easier to build than the Rodent one I tried and was put off by a few years ago. Will have to hunt down another of these or the Revell one which I think is not too bad too having built a couple hundreds of years ago9 points
-
Just about done here now. The Milliput seat got carved into something resembling the original. I hope my missing original one turns up at some point, but this one will do the job until that happens. The steering wheel went together well. A couple of heavy coats of grey smoothed it all out and made it look one piece. The first attempt at a steering column got scrapped and another made in its place out of plastic tubing. The tube fitted the cutout in the dashboard and slotted into the hole left my the missing original at the transmission end, so it can't be far out from the original one. A couple of plastic collars around the tube busied it up enough to look about right and a throttle lever was added to finish the column off. The lever is a short length of brass, dipped in glue at the tip to make the rounded end. Tonight should see this one finished as far as I can take it for now.9 points
-
Here I present my latest build, an OOB build of a Vanguard Class SSBN using the Bronco kit. The only bit of work needed was the mating of the hull halves. Primed using Halford's grey primer, German tank grey for lower hull and Halford's satin black was used overall. The sub was 'Kleared', decaled and coated with Tamiya satin varnish. Das Boot was masked to leave the deck exposed, with VERY low tac masking over the two decals and painted with Humbrol matt black and the sonar array was glossed with Klear. Five masts were fitted into fin and a couple of Tamiya figures were added to complete build. WIP here: Stuart8 points
-
Hi everyone, When the model of the AMK kfir came out, I did not resist to start it. The decoration is a mixture of AMK decals and Isradecal. I paint it with the IAF colors of Mrpaint at free hand, exept for the identification mark of course. It's a very nice kit, for me the best Kfir in 72° scale. See you soon for the C7 Cheers Joel8 points
-
Finally got around to taking some gallery shots. Since I've only got a quota of five in the gallery, here are the other four: We had a big tidy up in the house this week and so I could take the shots indoors with my wife's craft lamps. A combination of that and me trying out some colour balance buttons on the camera seems to have resulted in slightly better photos than my average! I thoroughly recommend this kit! (with the usual trade off between sharper plastic from earlier pressings and better decals from the current release) [Edit: I would add that this is a tail sitter unless you cram nose weight in everywhere. The undercarriage is fairly thin too, so it almost feels more secure resting upside-down on prop blades and tail fin!] Thanks for looking and the interest along the way, Adrian8 points
-
Finished the detail painting on the 'take-off' section of the Lunar Module, the Astronauts and the experiment stations and it is finished. All done with a very small brush without masking, which my great friend 'the camera' takes delight in pointing out. The flag was cut out from the transfer sheet as per the Instructions but the other two decals were stubbornly stuck fast - I maybe went too heavy on the 'decal film' coated over for insurance. The plaque for the Moon's surface was just glued on complete with backing paper but thank goodness the one for the Eagle base section came off the backing eventually. This kit was indeed great fun to build so thanks again to Heather for 'donating' this classic kit for this build and thanks to all you classic modellers for supporting along the way. Armstrong and Aldrin are out planting the flag... And then they were gone! (and forgot to leave the flag, apparently!)8 points
-
The upper surface colours are on now. I used gloss colours for the first time, to help with the decaling apparently. I went ahead and applied the decals, using some Microset/sol and it seems to have worked out ok. No silvering. The thing is rather shiny though, so the next task will be a matt clear coat and some light weathering.8 points
-
I've built 3 so far, with another 3 in the stash. That must make me insane then..... DSC_0043 by Paul Carter, on Flickr DSC_0039 by Paul Carter, on Flickr8 points
-
My guess is a 1/24 Bristol Brexit. A relatively unknown type, it was ordered in a surprise move but then repeatedly delayed as they fiddled with the design. The finished product eventually lumbered into the air, but so big were the changes that it failed to live up to expectations and was quietly scrapped. Maybe...8 points
-
Hi all, here some photos of my latest model: Edurad`s P-39 "Bella" wich was released some weeks ago. It is a nice "Profipack", so I built it OOB7 points
-
Howdy All, Just finished my RAAF Boston Strafer that I was building alongside my recent RNZAF Dauntless you may remember Built from Italeri`s re-issue of AMT`s 1/48 Boston kit Finished to try and represent one of the few A-20C`s used by 22 Squadron RAAF I was originally going to do it as an earlier one with the RAF style camouflage and four .303 guns in the nose, but when I came across a photo of a `C`.................... ....with the less well known 5 X 0.5 guns, I had to give it a try I couldn`t find much info` or photo`s on Google ( I did find an old thread here on BM, but most of the photo`s are gone ) So it`s mostly my best shot at doing one ( I did find that they were from U.S. stocks and appear to be Olive Drab over Neutral Grey with the stars and bars painted out ) from one grainy in-flight photo of DU*W Hope you enjoy the pic`s, thanks for looking. Cheers Russ7 points
-
Cowling is on the Fiat G.50 bis and the pilot is in. I've put the tiny canopy on - masking is impossible at that size - and I'll have a go at touching some paint on the framing as we go. Gloss cote on and all but the serial and squadron numbers transfers on - I thought the camouflage pattern would show through the white backing on the fasces etc, so decided to put them on top of the base colour for consistency. The fuselage band eventually broke up while being adjusted so I'll need to paint that in next. I've had what I think is a brainwave for painting on the green and brown of the camouflage, hence the two foam shapes stuck to the ends of the paintbrushes. Fingers crossed.7 points
-
Hi Michael, Your post reminded me of a set of photos I completely forgot that I had on my computer. Maggie / The Sooner - 1st FG, 71st FS, serial number 44-23158, P-38J-15-LO. The pilot was 1 LT James T. Hulslander. Squadron number 37. I thought these pictures were interesting because they are of an OD/NG J-model in Italy. Most of the picture I've seen of J-s in Italy are all natural metal. I found these pictures on Flickr and emailed the owner. They are pictures of his fathers plane. I can't for the life of me find our original correspondence but this is what I found, cut-n-pasted, from a different email with a friend. "Yes, my father's plane is a J model. He flew with the 71st Sq of the 1st Group from the end of 1944 through 1945 while the unit was in Foggia, Italy. At the time he arrived in Italy he was the youngest combat fighter pilot in the European Theater. He was 19 years old. He would turn 20 in April 1945. Some notes about his plane. While it was a J model, it had L model engines. The story that he tells is that the Tech Rep from Allison Engines was in Foggia. My father somehow convinced him to install the L model engines in his plane giving him, I believe, a boost in power and speed. Also, he and his crew chief used an army blanket and actually waxed the wings on his plane (a note for modelers, maybe a little glossiness but not much) giving him a few knots more of speed. He had the fastest P-38 in the squadron. Markings: The nose and spinners are Oriental Red. He is very specific on this shade of red. On the left side of the gondala is the name, The Sooner, in white. His crew chief was from Oklahoma. On the right side is my mother's nickname, MAGGIE, in Oriental Red. You can just barely see that but it is there. The lightning bolts are white, the number 37 is white, the tail booms are white, the A/C number on the tail is yellow. The wing tips are white. That about covers the markings of the plane. I believe the natural metal planes of the 71st had black tail booms and wing tips. Not sure about this.[This is correct.]" Enjoy! Cheers!7 points
-
Nearly 4 years ago I started an attempt at scratch building a Short Sperrin (scale 1/72) using CAD modelling, my CNC-machine, 3D printing and Vacuum forming. I got as far as a nearly finished CAD model and a few moulds made in the CNC-machine, but life got in the way, so the project ground to a halt. I recently felt the urge to take it up again but I quickly realised what a big project the Sperrin is regarding the number of moulds required (at least 18), so I decided to pause it again. Instead, I am doing something much smaller and more simple but using the same techniques. I have always had the ambition to model the most important planes of my real world aviation career, so I thought why not start at the beginning. I started to fly gliders when I was 14, and much of my training and my first solo was in a Grob 103 Twin Astir registered SE-TZL. Thus, SE-TZL will be the subject of this build. Here is my plan, process and progress so far: I started off by collecting as many images and references of the Twin Astir as I could. These were used in trying to create accurate drawings/profiles. The profiles were then imported into the 3D modelling program Blender where I created an accurate (hopefully) 3D model of the Twin Astir. Here is a simple render of the 3D model: The 3D model was then chopped up and turned into moulds (still just on the computer) and scaled to 1/72. I decided to create female moulds in order to get the dimensions accurate when vacuum-forming. The 3D moulds are then sent to my kit-CNC machine which will mill the moulds for me. And here it is milling the left-hand side fuselage mould. I have managed to mill the moulds for the stabiliser and the two fuselage halves, so that leaves the wings and canopy moulds to be milled. I will hopefully get that done over the weekend. Here is a picture of the right-hand side fuselage mould and the stabiliser mould. I have also vacuum-formed the right side of the fuselage and the stab. It really is a small model, and I think it is going to be a little tricky to build, especially since this is my first vacuum formed model! This is my very simple homemade vacuum-forming machine: And here is the right-hand side of the fuselage vacuum formed together with the stabiliser:6 points
-
This Boeing P-26 of the 17th Pursuit Group's headquarter section was my first exhibit for Britmodeller. It is possibly the personal mount of the Deputy Group Commander, based at March Field, CA in the spring of 1935, shortly before the Peashooters were handed over to the 20th PG and the group became the 17th Attack Group. I decided to do a little upgrading on this fairly good Hobbycraft kit. Besides installing a Vector R-1340 engine and cockpit detail from Eduard (48 265) I replaced the prop blades (too short), the wheels (too narrow), the windscreen (too thick) and added hollow blast tubes, new carburettor intakes and a few more things. The following pictures show two other modifications: the additional covers around the rear of the cylinders and the gap between elevator and stabilizer (I removed, sanded and re-attached the elevators). To fix the rigging wires to the undercarriage I drilled through the fairings, rebuilt the tips with paper jackets and, after assembly, pulled Griffin Jewelry Wire through the wheel spats. (Two different grades of wire were used on the Peashooter). This method required an unusual approach of installing the wheels later. There is a couple of bugs that I spotted too late and didn't correct. The engine face plate appears a trifle too small, but it's a very nice piece and I wouldn't know how to change it apart from vacu-forming a completely new one. In hindsight it would have been easy to adjust the second small error, which is the position of the upper cable fairings on the inside of the wheel spats. They should be higher up towards the wing than shown in the instructions to have the wires go across more symmetrically. All 17th PG markings are home-made since they are not represented well on any decal sheet. Likewise, the available underwing 'ARMY' inscription (Starfighter Decals 4001), which is too wide across the span, needed to be applied letter by letter with less space in-between. Unfortunately my printer's color cartridge failed when I printed the group crest and I didn't get the texture as clear as I wanted. I thought the Matchbox 1930 Packard Victoria in 1/43 is an amusing complement to give a feeling for the era. You will notice the modified front. When I was 13 years old my father accidentally stepped on the car and broke the headlights - big drama! I hope you enjoy the pictures and my experience with the Hobbycraft kit is useful. Happy modelling! Michael References Boeing P-26A, Profile Publications No.14, Peter M. Bowers, Leatherhead Air Corps, J. V. Mizrahi, Northridge, 1970 Boeing P-26 "Peashooter", Aero Series No.22, Edward T. Maloney, Fallbrook, 1973 Boeing P-26 Variants, Aerofax Minigraph 8, Peter Bowers, Arlington, 1984 P-26, Mini in Action No.2, Larry Davis, Squadron Signal Publications, Carrollton, 1994 The Official Monogram US Army Air Service & Air Corps Aircraft Color Guide Vol.1, Robert D. Archer, Sturbridge, 1995 The P-26 has now been joined by the contemporary Kawasaki Ki-10 which I built as my contribution to the 'High Wing' groupbuild here. Both were active in China in the fall of 1937. While the Peashooter appears more advanced it was perhaps not as efficient and successful as the 'Perry'. With comparable performance ratios the Ki-10 was faster and climbed better. This juxtaposition is a fine illustration of the technology transition that occurred in the thirties.6 points
-
I finished my Bf109e. I had a few issues mainly with painting, or rather the mottling and weathering. The kit itself was great, it's only problem was vague wing fit so I ended up resetting them to get better dihedral. I like this view from no.8's wingman or a lucky Tomahawk about to get a bead in? The markings are the second option from the kit and went on really nicely. It's been fun building this kit and seeing the variety others have worked on for the GB. I'll aim to replace these photos when I can get decent lighting on Sunday. Well the sun was out this afternoon, and I didn't go to London as expected, so had time to take the 109 out in the sun (the first time as all build and paint has been in the evenings). The colours look a lot more desert appropriate in natural light. I'm still slightly thinking I actually prefer my models in the glossy modern warbird finish after Klear over transfers! Cheers Will6 points
-
Finally I can post this build. The Eduard Ltd Edition Harrier GR 7 using the Hasegawa moulds and a spot of Eduard magic makes this kit one of my all time favourites: and I am honoured the build made it into November's issue of Airfix Model World. Here are a few more pics that didn't make it into the publication..6 points
-
An excellent idea! I can provide ten GB slots for 2019, if that is acceptable. This would mean that at some points during the year (early March; April and early May; a single week in each of August and September) there would be eight GBs and STGBs running concurrently. If we go down this route, it means that we dispense with a poll for next year. The current nine with a +++ designator would go through. I would also add the Small Wars GB, which would incorporate such subjects as the Spanish Civil war proposal and the Continuation War proposal, One minor issue is that the Small Wars GB would need to have a clear set of criteria for eligibility. This proposal would clear the decks for 2020. There would be no GBs running through with a bye. It would also mean that the bunfight for dates could start a month earlier. That means an extra month's notice and prep time for those GB's that start in January and February. Comments? Bouquets or brickbats?6 points
-
Unexpected Revelation Number 3: The central portion of the port fuselage is 1.0 mm taller than the same portion on the starboard fuselage. Ha ha! Those guys at AZ are always looking out for me - encouraging me to use my meagre modelling skills to solve their pernicious little riddles. Knave, bring me my spreaders! And if you haven't already counted to three, the Holy Hand Grenade of Antioch! Cheers, Bill6 points
-
Donbassaero was a Ukrainian airline which operated between 2003 and 2013. According to Wikipedia the only remarkable event in its decade of existence happened in March 2010 when a flight from Simferopol to Kiev had to be cancelled because the entire crew was drunk. One of the affected passengers was the Ukrainian deputy Attorney General so we can probably assume that the incident didn’t end well for those involved. Anyhow, Donbassaero’s spectacular black and orange livery certainly caught my eye when I spotted of one of their A320s operating for AeroSvit at Berlin Tegel in the summer of 2012. When I later discovered that decals were available from BS Modelle a model became inevitable, if only to show the ill-informed that not all airliners are white. I refurbished an old Revell A320 which was previously in the marginally less flamboyant livery of Dutch Bird. I changed the engines from CFMs to V2500s, replaced the winglets and added a few small fairings otherwise the refurbishment was a straightforward strip down and repaint. Damage during dismantling meant that the main undercarriage legs had to be replaced with metal items from Scale Aircraft Conversions, a bit over-priced but indispensable in this situation. Paint is Hycote Ford Carnival Red, Halfords Gloss Black and Holts Grey HL01. I was reminded the hard way that gloss black is almost as unforgiving as natural metal when it comes to dodgy seams! As I mentioned the main decals are by BS Modelle. It was the first time I’d used their products. The larger decals are OK although they have a slightly “home made” feel and printing white decals on white backing paper isn’t entirely helpful. Door outlines and detail decals are useless and need to be replaced. It’s also worth mentioning that BS Modelle have been accused of trying to rip off other manufacturers notably Nazca although I’m as satisfied as I can be that the Donbassaero decals are an original product. The windows are by Authentic Airliners, coroguard is by Liveries Unlimited and stencils and additional markings came from the spares box. I don’t claim total accuracy for the stencils but they make the model look reasonably “busy”. Thanks for looking and as always constructive criticism is welcome. Dave G6 points
-
And now, the end is near. And so we face the final curtain…. This Group Build has been a joy from start to finish. A huge thank you to everyone involved in making it all happen. I’ve built more models in a shorter space of time than ever before. The number of kits I would still like to do stretches out for quite some way. There’s a Hercules transport, a four stroke engine, any of the 1.32 cars to name only a few. The GB got me fired up to build! I failed to finish on one build, the SS France liner, and that was only because I wanted more out of the kit than time allowed. It’s given me a ton of enthusiasm to see the build finished. The help and encouragement shown to all, by all, throughout the GB has been one of the highlights for me. I'm certainly going to miss this one. The FROG GB is going to be good though 😁 Here’s a self-indulgent set of pictures of the party I’ve just been to…6 points
-
I am officially all airfixed out as I have no kits left that I could enter so here is my final entry.6 points
-
Many would argue and with some justification, that BM itself is a long running panto. Observant of Mars 👽6 points
-
Nearly gave up on this one but its now the only job on the bench so hoping to get it finished for Sunday. Had awful bother with the lozenges. First the Eastern Express fuselage plan went for a burton when they broke up into unworkable scraps. I got once piece to fit onto the centresection and then painted it. I went for a green/mauve dappled effect on the fuselage. Then I applied Pegasus five colour onto the wings. First time I've used them but i've found them to be very brittle. Kept on flaking off even when varnished. Never had to use decal solutions before but this time it is the only way they would stick. So I'm not going to use any after market decals to replace the small lower wing crosses, sticking with the kit transfers for this kit. I've got a few of these in the stash so I'll have another go now that I know the shortcomings of the transfers I've got but this will be ok from a respectable distance.6 points
-
Corsair Corp reacted confused as to my last post so perhaps a picture or two will help. There is so little gap between the inboard intakes that my clumsy tentacles damaged the intakes themselves. Rather than try and repair them, I cut them back and glued some laminated plastic card to the wing leading edges and carved a new set of intakes. Hopefully that clarifies matters and thanks for looking. Martian 👽6 points
-
hi folks so, to what's been going on... actually quite a bit of rework.. ..it started with adding the power panel - this is the canvas enclosed thing here on the back of the 'A' frame - it is a metal plate with some bits added, sheathed in a material bag cut from the original template with added fasteners and some wiring poking out... ..the reworking was adjusting the height & width of the fuel tank - I don't know if I misread the plans but it was too narrow at the top, so I slid it to the side and added anothe section below the brown radio... I also had to cut the end off this radio as I made it too long so the fuel gauge would not sit where it should.. after a lot of chopping & changing I got all the bits in as they can be seen in the reference pics I have... ..you can see the big wadge of tank added here, and how it was raised as well.. fortunately all the messing about will be hidden.. ..I wanted to get the armour plate & seat fitted, so had to fabricate these air vents before they could be added.. ..I found the drawing, scaled it and started to fashion it from plastic.. ..and with paint & pipes... ..then the armour plate was painted & the seat - the pics I have show the seat a different green so did this too.. ..then all the parts were added together to the sub-assembly... ..and a dry fit to make sure it all sits right with the walls... ..will be doing the elevator & rudder trim pedestal next... TTFN Peter6 points
-
When choosing a subject for the Classic Airfix Group Build, I wanted something a little unusual and outside my normal fighter/bomber related build themes. Looking over Airfix's extensive back catalogue of kits a couple of 'different' aircraft sprang to mind - the Short Skyvan of 1974 and the DHC Beaver first kitted way back in 1971. The Skyvan proved to be an elusive kit to find (since addressed), however the Beaver happened to fall into my hands at a local swap meet I attended about two weeks before this GB started. So finally, here is my completed and slightly modified Beaver kit. It took me longer than planned and there are some bits that I'm not exactly happy with, however it's another finished kit thanks to BM's fantastic Group Build programme and the many supporting members that take part. Now for those of you that have not participated in a BM GB as yet, I cannot encourage you all enough to just have a go and get involved. I'm one of those procrastinating modellers that really struggled to get any kit finished, however can now boast six completed kits this year and hopefully another two to go before this year is out. Anyway, here is a link to the full WIP thread and a few progress and final photos added for your viewing below. Cheers and thanks.. Dave (p.s - aren't we glad that this ugly 'Standing Roo' roundel was soon replaced with the more familiar hopping Roo!!). .... and the real A95-201.5 points
-
This was a fabulous kit to make, all the parts fitted really well and with good instructions, as well as a nice array of stores. My first 1/48 kit. I think I left the wing strakes a bit too long, and I haven't got the skill to fashion the three tiny canopy mirrors, plus she's a bit too satin not matt, but I hope she captures the essence of a Jag from the days when it was so much fun to hang out at the end of Coltishall's runway, or see them screaming low over Norfolk! All comments welcome ...5 points
-
Thanks all! Here are more progress shots I made in the last few weeks. The last two of the ship's boats were done. Fixed the anchor chain And move on to rigging. The Uschi's rigging thread is very easy to work with. Next update should see it completed, well ahead of the planned 11/11/2018.5 points
-
I'm waiting til the whole lot is available in UHD, as I know it's out there somewhere. Meantime, my 300mm Roci has arrived! thanks to @3DPrinting and their newly improved pipeline I've gotta say - most impressed. It's a four part "kit", with the front and rear, plus the two antenna "whiskers" separate to the nose. It's still "green" insofar as it feels slightly soft in terms of touch, but tough and doesn't bend or break easily. There are a few tiny areas of stickiness where the uncured resin hasn't quite drained away, but it's incredibly slow moving, so it's hardly surprising. I've taken the pics on a doubled-up sheet of kitchen roll so I don't get any goop on my cloth, but I think I've managed to bring out enough detail from the cream-white resin to show you just how good it is. If you're hanging on the brink of getting one, my recommendation would be to pull the trigger, and you won't be disappointed. All you need is some patience, a bit of IPA to clean up and dribbles that surface, and some sanding sticks to minimise any tiny blemishes. I've been over mine quickly and there's not much to do TBH, which is always nice I've pulled out all the "scaffolding" from insider the two hollow halves (lighting possibilities, anyone?), although I didn't really need to, and if you look very closely you'll see some tiny "pimples" here and there that are where the external scaffolding was removed. Did I mention that detail is excellent? I've got some graphics for the logos, and will have to dig out my ALPS printer to run on a Windows XP VM and see if I can create a set for myself. Deep joy... more learning how to do things! Enough blather, here's the pics: How cool is that, eh?5 points
-
And what exactly is your daughter doing on this build...nothing...Giorgio's toy. Stuart5 points
-
One of these5 points
-
This left only the two white metal wheels to clean up and fit, a little flash round the rim needed cleaning off and the holes in the centre opening up slightly so that they could be pushed over the axles and secured by bending over a tag at each end. And there it was, basic airframe completed. Total build time - 1 hour 48 minutes And a shot with a rule up close, it's around 2" long! The etch fret supplies an relief etched name plate, this was sprayed and put to dry whilst dinner was prepared and consumed, and camera battery recharged for RFI pictures5 points
-
I might take you up on that @Chewbacca; thanks. However, I might not need to. Searching through my photos I came across this [provenance unknown - but whoever took it is acknowledged and thanked]; a Leander cable deck! At least, I had filed it with my other Leander shots, so I see no reason to doubt that it’s a Leander - certainly looks like one. The kit has pretty decent cable holders (“capstans” to the non-specialist / not taught by CPO Roberts!). You can clearly see here the slips I was talking about; the things that look like giant crocodile clips on a chain. They are all of similar design and have a similar function; basically, to hold the cable (and usually the anchor). They’re essentially a pair of jaws with a hinge at one end, held closed by a loop at the other end. When dropping anchor, for instance, you get ready by preparing the anchor until it is held in position (hanging vertically below the hawse pipe) with a slip taking the weight. When ready, a matelot knocks the loop off the jaws (literally, with a maul / sledgehammer), the jaws fly open and the anchor plunges into the sea making a very vulgar row. Other slips allow you to break the cable (i.e. detach it from the anchor - usually when coming to a buoy; you connect to the buoy using anchor cable) without the risk of the cable all rushing back into the cable locker, leaving nothing on deck. The third type (the bottle screw slip - you can see one above the port cable above, directly below the centre hawse hole / Jackstaff) is what you use to hold everything tightly in place when not in use - especially the anchor itself very tightly clamped into its hawse; this lot weighs several tons, and you really don’t want it banging about loosely in a heavy sea. A loose anchor would very quickly make a large hole in the bow. Anyway. Today I have been doing two things to the model. Looking above, the two pale grey round things into which the cable disappears are called... I can’t remember! Goose Necks?? They turn the cable through 90 degrees as it comes in and out of the cable locker directly below, and when not in use are plugged to stop the cable locker topping up with oggin. Peter’s lovely clean fo’c’s’le doesn’t have these, so I made some. I tried bending some tube, but even filling it first it simply tore - the bend is very sharp. So then I carefully and slowly bent styrene rod, before cutting it and drilling out one end. It took several attempts, but this phot shows them in position (seen from aft): Though tiny, these took me a considerable time and involved some typically seamanlike swear words - but I think those will do nicely. I then turned my attention to the anchors themselves. Peter provides two options; either white metal or PE. The PE ones are more refined in detail, as you’d expect, but they lack the sheer heft of a proper anchor - anchors are not exactly refined things - so I went for the white metal ones. You are provided with full anchors (so you could pose them ready for dropping, or whatever), but when close up in their hawse you can’t see much of the stock, which means you have to file and cut a fair amount away for them to fit snugly. From L to R: the port anchor ready for fitting; the starboard anchor as yet untouched; and. PE anchor that I experimented with and then used to measure the fit with the hull - you can see how much of the stock (the vertical bit) has been removed. Finally for today, here is the port anchor glued in place (taken before the gooseneck thingies were fitted). The starboard one is also done, but you don’t need a second photo! That little lot has taken me over two hours; time to stop and have something to eat. More next week. Crisp5 points
-
Hey, I'm making a model here. I'm not making much of one yet, but here's a couple of new things. First, the little bumps on the boundary layer plates. I just used a simple arc-shaped piece of styrene card as it's not going to be real visible. No use trying to contour the edges. Hopefully you can see them here, what with white-on-white and all that. The leading edge of the intakes are moulded as separate pieces, and there is quite a bit of wonkiness on the inside corners. (Note the two big chunks of gunk on the top and bottom of the intake lip. These might look like sprue attachment points, but they're not. Just chunks of gunk.) You can see it here on the left, whilst the one on the right has been victimized by some indiscriminate filing. Presumably, if I do some fine sanding on this, it will look a bit better, but at least the wonkiness has been de-wonkyized. I wonder what AZ was thinking on that one? I think the entire area where the arresting hook goes will need to be cut out and rebuilt from scratch. Luckily, I still have some white plastic card stock and a razor saw or two. Oh, and some bandages. Cheers, Bill5 points


.thumb.JPG.3498f40362ff13ebfc4b2e45abbd545e.JPG)


.thumb.jpg.d17ff607fc7e89ed057e63fcb6f2a888.jpg)


This leaderboard is set to London/GMT+01:00