
Leaderboard


Popular Content
Showing content with the highest reputation on 07/10/18 in all areas
-
Ready for your inspection is my 1:72 Revell B-17G Flying Fortress. This is a straight from the box build, competed in the colours of 'Little Miss Mischief'. It has been pretty straight forward with little drama really (which is always a bonus!) The kit went together well, and it didn't take too long to get on to painting the exterior. As the real aircraft was crashed and patched up several times, so the kit's paintwork reflects real life (with bare metal front and wings and camo tail section. The challenge came with masking, airbrushing, masking and airbrushing to get the desired effects. That said I am really pleased with the way she has turned out. A fab kit to work on and a fantastic aircraft icon.34 points
-
This has been my first completely OOB build for a long time, and I have quite enjoyed it. The kit itself does steer that largely - I wouldn't enjoy making an OOB model from something with glaring omissions like seatbelts! Build thread here: Not much else needs to be said about this really. It is essentially a glorified paint mule to try out some ideas I had for natural metal finishes before getting to that stage of two somewhat larger and rather expensive models (both in money and my time to get to that stage). That said, I'm content with how it turned out although I will build another test model to refine my ideas a bit. Not everything went well! This one is painted with Alclad II and Colourcoats. The only thing added to the model is self adhesive car wheel balance weights, and I did the tiniest amount of modification to the ejector seat firing handles and corrected the rudder trim tab following advice I received on the forum.31 points
-
Here are some shots of my recent Hurricane conversion. The base kit was a clear-moulded 1/144 Mk I from Sweet with lengthened nose, and scratchbuilt prop, spinner, canopy, cannons and later style exhausts etc etc. Painting is with Mr Color lacquers and weathered with oils and Pergamino .5mm pale grey pencil. Hope you like it!27 points
-
Hi everyone, This is a 1/48 F-104C Starfighter built as the rather colourful 'Really George' aircraft from the 479 TFW at George AFB. The kit is the nicely detailed Hasegawa version with 2 exquisite Aim-9Bs added from Eduard. This was my first attempt at a NMF finish so I went with Alclad paints which behaved very well over a gloss black finish. You do have to be very pedantic about the surface finish though as blemishes are difficult to hide. I toned down the rivet detail on the wings a bit and then decided to make things really easy by adding some internal lighting. This was quite a challenge as the F-104 is not a large aircraft and at 1/48 scale there's not a lot of room for wires, batteries and lights! Anyway, onto the photos: Many thanks for looking!27 points
-
Quick build, just 10 days start to finish. OOB and painted as an aircraft of 204 Kokutai based at Rabaul airbase 1943. Tamiya acrylics paints used. A nice simple kit, mostly together after 2 days and the rest of the time spent was painting. Used as an airbrush exercise in free hand mottling and line painting so no pre or post shading. IMGA0449 by neil Connor, on Flickr IMGA0450 by neil Connor, on Flickr IMGA0452 by neil Connor, on Flickr IMGA0453 by neil Connor, on Flickr IMGA0448 by neil Connor, on Flickr IMGA0447 by neil Connor, on Flickr IMGA0451 by neil Connor, on Flickr Ist model for 2nd display case, 1st case now full! IMGA0454 by neil Connor, on Flickr IMGA0455 by neil Connor, on Flickr23 points
-
Hi, everyone! I present you my next model from Poland manufacturer.20 points
-
Recently finished these two after a bit of inspiration reading Valiant Wings North Africa campaign book. No issues with either build, all OOB and painted with Vallejo model air. Kittyhawk from Special Hobby was a joy to build, first Special Hobby kit and it was great.20 points
-
Hello, modelers. I present you my new model. This is my first model in the 1/48 scale and the first Japanese. On this model I learned to perform scratches and new weathering effects. Enjoy watching Several photos taken with natural sunlight.18 points
-
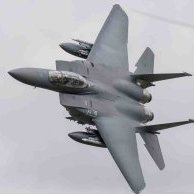
Well, I've beaten another one into submission, this time Italeri's 1/72 Warthog, Kit No. 1376. I've been fancying a Hog for a while, it's the baddest looking thing in the air, so nasty it makes a Lancaster look like VIckers Viscount. As usual, my dedication to scale, accuracy and detail is spot-on completely absent but what I lack in skill, I make up for in incompetence. The camo was brushed on freehand, attempting to follow the pattern (Pattern? You mean it's not just random splotches?) but inevitably it's slightly inaccurate quite a bit off not even close but it looks like camo so that's as far as I go. I don't bother with the add-on photo-etch detail stuff in the theory that you don't try to gold plate a Timex but I do try to get it as neat as I can with what the box provides. I think this is my best office so far. Colours are all wrong but to the untrained eye... Well, the missus has no problem with it! Yes, I know the canopy frame is supposed to be camo but I think the gloss black looks badder... Here at the Shepherds Bush Air force we're a bit casual about such things. I even got brave enough to paint a couple of little boxes inside that mysterious door under the cockpit. This may all seem simple stuff to you pros but bear in mind I still dislocate my arm patting myself on the back when I can pull off making a set of safety belts out of tape. I love a shark mouth on an American jet... ...but the next Hog has to have a Hog mouth! But this particular plane.... This specific Warthog... Is the aircraft that won... .... The Battle of Chiswick! Things were not looking good in West London. The Yuppie Barbarians from Richmond were marching on Shepherds Bush in an attempt to take Westfield Mall. The terrifying charge of the Yuppie Cavalry They'd been softening us up with wave after wave of Range Rover heavy bombers launched out of their base in Twickenham, raining rugby balls down on us and burying Goldhawk Road under a sea of leather and rubber. The QPR Anti-Aircraft unit in South Africa Stadium countered with their Gatling Frankfurter Guns, capable of firing 4300 hot dogs a minute (or 5600 of the smaller New York System Hot Weiners) but the Rovers were fitted with highly efficient stealth technology and the Rear-Mounted Jones-Gascoigne Countermeasures Package so hardly any were hit. A formation of 21 Stealth Range Rovers swoops low over Goldhawk Road station The Jones-Gascoigne Countermeasures Package in action After the Range Rover attack, the Yuppies' allies in Acton sent supersonic BMW Minicabs to strafe us with Pete Townshend's guitar picks. Squadron Leader A.C. Plonk, C/O of 6 7/8 Squadron based on Shepherds Bush Green, sent our Black Cab Interceptors to engage but, despite their superior navigational systems, tighter turn radius and advanced sarcasm, they were unable to bring down the swifter Beemers till the damage had already been done. After the guitar pick attack, the burnt out wreckage of a Shepherds Bush F35 smoulders next to a collapsed hangar. Our market stalls were in ruins, our Reliant Robins were destroyed and 6 7/8 Squadron was down to its last two Chipmunks and a Tiger Moth but the Yuppies in their Prius tanks kept rolling inexorably East up the A316. If they took the Premier Inn at the Chiswick Roundabout all would be lost. We had asked for help from our northern allies in Enfield but ever since the Great Football War of North London when Enfield sided with Highbury, Tottenham has denied them use of airspace and their Royal Enfield Fast Attack Jets, even with BSA drop tanks, lacked the range to make the detour round the M25. There was only one thing left to do... Call in the Americans. Fortunately there was an American air base on Wormwood Scrubs under the command of Lt. Col. C. Harrison Yeager, grandson of the famous............. Chester H. Yeager of Woonsocket, Rhode Island, managing editor of the Providence Journal from 1956 till 1971. Lt. Col. C. Harrison Yeager at the controls of his A10 As soon as Squadron Leader Plonk called him, Colonel Yeager, in typically generous American fashion, leapt at the opportunity to help a friend in need. He ordered his A10 loaded with maximum firepower. He ignored subtlety, bypassed overkill and went straight to "When-I'm-done-wiv-you-I'm-comin'-after-yer-family". He led the attack himself, the subwoofer thunder of his two Harley-Davidson V-Twins rattling the windows of the BBC building and aimed his trusty Warthog westward. On his first pass he dropped four 300lb Strip Club Doorman MkIV H.E. Bombs (with acoustic guidance) and on the second he released four GTGs (cluster bomb canisters of giggling teenage girls... dumb bombs, of course) but to no avail, the tanks kept silently (Prius, remember?) rolling. Acoustically-Guided 300lb SCD MkIV GTG Cluster Bomb (With iPhone Guidance System) It was then he decided to deploy his most feared weapon, the Armitage-Shanks Kitchen Sink MkII (Series 3). It had never before been used in battle, the designers were still unsure of its full capabilities and the UN didn't even know if it was legal. An A-S KS MkII (Series 3) hangs on Harry Yeager's wing next to a pair of Sidewinders But the effect was immediate. The specially modified taps created an EMP that knocked out the tanks' engines, the contents of the U-bend dissolved the Yuppies' Rolexes and the porcelain shrapnel ripped their Yves St. Laurent uniforms to shreds. The Yuppies immediately panicked and fled back to the desolate badlands south of the river. They haven't been seen east of Twickenham since but have made a couple of forays to their north, at one point briefly occupying the Airport Bowl in Hounslow but their morale was still in such tatters from their humiliation in Chiswick they were driven out by a boy scout (second class) wielding a pen-knife with two blades, a corkscrew and a thing for taking stones out of horses' hooves. Eric Drimble (13) of Hounslow flashes a victory sign after liberating the Airport Bowl For his bravery and leadership, Colonel Yeager was awarded the MG and bar (a 1973 Spridget and the Conningham Arms on Uxbridge Road, to be precise) and The Queen, in an unprecedented act, made him the Earl of Hammersmith and awarded him an OBE, making him the first American Earlobe in Britain. Harry Yeager Receives Honours From Queen And a final picture of Harry's plane with the soft filter... If it can make William Shatner handsome.... The above nonsense was born when the missus looked at the box art. "What's all that stuff under the wings?" she said. "Weapons," I said, "Those are air-to-air missiles, the brown ones are gravity bombs, the green ones are smart bombs and the big white things are air-to-ground missiles. And the black thing sticking out of the nose is a gun that will shred a forest." "Oh." she said, "Everything but the kitchen sink, eh?"16 points
-
Hi Guys, My latest build, a simple Hasegawa 1:72 F-16c USAF 86th TFW 512nd TFS. Cheers16 points
-
Latest Build. Mark DSCN3208 (3) by mwsfly9, on Flickr DSCN3209 (3) by mwsfly9, on Flickr DSCN3210 (3) by mwsfly9, on Flickr DSCN3211 (3) by mwsfly9, on Flickr DSCN3212 (3) by mwsfly9, on Flickr DSCN3213 (3) by mwsfly9, on Flickr DSCN3214 (3) by mwsfly9, on Flickr DSCN3215 (3) by mwsfly9, on Flickr DSCN3216 (3) by mwsfly9, on Flickr DSCN3217 (3) by mwsfly9, on Flickr https://farm2.staticflickr.com/1960/45135647401_380472750e_k.jpg]DSCN3220 (3) by mwsfly9, on Flickr f458_k.jpg[/img][/url]DSCN3218 (2) by mwsfly9, on FlickrDSCN3221 (3) by mwsfly9, on FlickrDSCN3219 (4) by mwsfly9, on FlickrDSCN3205 by mwsfly9, on Flickr15 points
-
Hi folks. Ever since gawping open mouthed at Mike Grant's lovely DH-2, in a prior issue of Airfix Model World, I've nursed an ambition to have a go at the trompe l'oeil effect Mike expertly rendered, giving the illusion of a semi translucent wing, revealing some sight of the structures within. The superb taube from Wingnut seemed a perfect foil to try a little French 'slight of airbrush'. First thing that whacks you in the kisser, when you lift the lid is the amazing moulding achievements in the wings. Backlighting here reveals the wafer thin flexing 'aileron' portion and the 'fingers' within. The tank in the forward cockpit was a fair target for abuse; here 'worn effects' liquid, some brush scrubbing and heat from a hairdryer distressed, cracked and flaked the top colour. A little clear varnish was misted over to gently 'fix' the damaged paint. The fully assembled and rigged interior includes a portion of the lower fuselage. As per other WW kits it's a snug fit but correctly aligned, it all slots in. The trompe l'oeil paint, viewed from above the inverted model... ...and then as nature intended. The build guide had a couple of period images that revealed the 'turned' cowling in the way depicted here, so the WW methodology was bypassed for a homespun approach that mimicked the photographs without dependency on the direction of the light. While the taube is a rigging junkie's dream, I recognise it may, at the same time, dissuade others from taking the plunge because of the perceived complexity. No need to fear it though, if you apply a few basic rules - rig the fuselage first, leaving the wings off until that's done / add the wings and rig the lowers first / rig the top sections / do all the rigging from the centre first, working outwards / use wire eyelets, tiny sections of brass tube and elastic rigging thread for safe, dependable lines and anchors / . Always a huge buzz to see your latest in print and you'll find the nine page coverage of the taube in the latest (November) issue of Airfix Model World. Wish you all well with your own projects! Till next time. Steve14 points
-
This Boeing P-26 of the 17th Pursuit Group's headquarter section was my first exhibit for Britmodeller. It is possibly the personal mount of the Deputy Group Commander, based at March Field, CA in the spring of 1935, shortly before the Peashooters were handed over to the 20th PG and the group became the 17th Attack Group. I decided to do a little upgrading on this fairly good Hobbycraft kit. Besides installing a Vector R-1340 engine and cockpit detail from Eduard (48 265) I replaced the prop blades (too short), the wheels (too narrow), the windscreen (too thick) and added hollow blast tubes, new carburettor intakes and a few more things. The following pictures show two other modifications: the additional covers around the rear of the cylinders and the gap between elevator and stabilizer (I removed, sanded and re-attached the elevators). To fix the rigging wires to the undercarriage I drilled through the fairings, rebuilt the tips with paper jackets and, after assembly, pulled Griffin Jewelry Wire through the wheel spats. (Two different grades of wire were used on the Peashooter). This method required an unusual approach of installing the wheels later. There is a couple of bugs that I spotted too late and didn't correct. The engine face plate appears a trifle too small, but it's a very nice piece and I wouldn't know how to change it apart from vacu-forming a completely new one. In hindsight it would have been easy to adjust the second small error, which is the position of the upper cable fairings on the inside of the wheel spats. They should be higher up towards the wing than shown in the instructions to have the wires go across more symmetrically. All 17th PG markings are home-made since they are not represented well on any decal sheet. Likewise, the available underwing 'ARMY' inscription (Starfighter Decals 4001), which is too wide across the span, needed to be applied letter by letter with less space in-between. Unfortunately my printer's color cartridge failed when I printed the group crest and I didn't get the texture as clear as I wanted. I thought the Matchbox 1930 Packard Victoria in 1/43 is an amusing complement to give a feeling for the era. You will notice the modified front. When I was 13 years old my father accidentally stepped on the car and broke the headlights - big drama! I hope you enjoy the pictures and my experience with the Hobbycraft kit is useful. Happy modelling! Michael References Boeing P-26A, Profile Publications No.14, Peter M. Bowers, Leatherhead Air Corps, J. V. Mizrahi, Northridge, 1970 Boeing P-26 "Peashooter", Aero Series No.22, Edward T. Maloney, Fallbrook, 1973 Boeing P-26 Variants, Aerofax Minigraph 8, Peter Bowers, Arlington, 1984 P-26, Mini in Action No.2, Larry Davis, Squadron Signal Publications, Carrollton, 1994 The Official Monogram US Army Air Service & Air Corps Aircraft Color Guide Vol.1, Robert D. Archer, Sturbridge, 1995 The P-26 has now been joined by the contemporary Kawasaki Ki-10 which I built as my contribution to the 'High Wing' groupbuild here. Both were active in China in the fall of 1937. While the Peashooter appears more advanced it was perhaps not as efficient and successful as the 'Perry'. With comparable performance ratios the Ki-10 was faster and climbed better. This juxtaposition is a fine illustration of the technology transition that occurred in the thirties.13 points
-
This is my 1/72 Planet Models Grumman XF10F-1 Jaguar. The Jaguar was the first attempt to build a practical swing wing fighter and while it was a good first try, like most such things it was not a success. I used these 2 links, both members here, as inspiration http://tailhooktopics.blogspot.com/2012/06/xf10f-pictures.html and Including using the Obscureco F9F pather seat and cutting a hole in what would have been the wing butt joint and inserting the part of the wing that was to be cut off if the wings were to be mounted in the swept-forward position which is how I decided to display it. I would rate the Planet Models kit as above average for resin kits with nice molds, fit and very few pinholes. I also had the Anigrand kit, but compared to the drawing is the Ginter book it was way undersized so I didn't use it. The kit included 2 vacuformed canopies and since it usually takes my at least 2 tries to get a vac canopy right, that was a good thing. As it turned out I got it right on my first try. The decals were everything you could ask a decal to be. Very thin, but with enough body so the could be moved around and no silvering. So on to the pictures; This next pose strike me as very bird like Next up will be the Hobbycraft F2h-3 Banshee. Enjoy.13 points
-
I've retired! 🙂 Lots of time to indulge my hobbies, so I've just thrown this one together...it's the Hasegawa 1/48 Zero built completely out of the box with the exception of seatbelts and an antenna wire. The whole airframe was painted in AK Xtreme Metal dark Aluminium, and then the top colours were painstakingly scratched either thin or through with an abrasive brush from Halfords. Hope you like it, Dean12 points
-
Apparently, I cannot pull myself away from Czech short run kits. Even in the midst of building the superb 1:32 Tamiya Spitfire, where the parts actually fit together (sometimes without the need for glue - engineered molecular adhesion perhaps?), I find myself yearning for those halcyon days of putty and sandpaper and razor saws and bandages and cursing. Oh, and beer. So here we have the AZ Model kit of the Supermarine Attacker in glorious braille scale. For those obsessed with such things, I have personally verified that this entire kit has fewer parts than the big Tamiya Spitfire rudder pedal assembly. Or nearly so anyway. The kit I have is nominally for the post-navalisation prototype and FB.1 versions of the aircraft, and comes in one of those kind of boxes that bring forth expletives from the most God-fearing of men. And here it is: There are only two sprues of plastic, plus the clear canopy and a one-piece(!) resin cockpit. It would appear that all the parts are here for the FB.2 version with the exception of the canopy. The part included in this kit is the original canopy, prior to the addition of extra framework. But framework can be painted on, so I think I can use this one should I build the FB.2. Which I might do, assuming this old Modeldecal sheet I have is still good. Along with those stickers, I also have the Airwaves photoetch set. The photoetch is designed for the Frog kit, but let's face it - Airwaves PE usually doesn't fit the kit it's intended for, so I figure I have a fighting chance it may fit a kit it's not designed for. Besides, I think I should fold the wings. I started cleaning up the parts and having a look at the instruction sheet (silly knave!) and immediately discovered that step number one is wrong. As in, they have you install the part in absolutely the wrong place. I'll take some photos and show you what I mean. Ah, short run kits...AZ is re-releasing this kit soon, and it will be interesting to see if they fix this rather egregious error. So this is my side project while the paint dries on the big Spit. My FAA collection needs more members, and this one should slot nicely in-between the Seafire and Scimitar. Which reminds me, I don't have a Seafire! Long live Extra Dark Sea Grey. Cheers, Bill11 points
-
Afternoon All The Panther/M10 was part of an attempted ruse by the German Panzer Brigade 150 during the Ardennes Offensive, later known as the Battle of the Bulge. Unfortunately for them it was unsuccessful and the Panther/M10's were knocked out. Private Francis Currey of the US 120th regiment received the Congressional Medal of Honor after he managed to knock one of the tanks out with a Bazooka. This is dragons 1/72 Panther/M10 hybrid. Not a lot of parts involved really as the M10 'shell' covers a lot of the normal panther parts. Kit was built OOB apart from the below additions: 1. I replaced grab handles and lifting points with two gauges of fuse wire for added effect. 2. Cut mesh covers for the square engine deck ventilation panels. 3. Replaced turret top crossbars with plastic rod. 4. Replicated bow turret cover with thin clear sheet. I ran into trouble with the tracks as they were very stiff, snapping into 1cm bits. Usually Dragon DS tracks are fantastic but appears these had been affected by an accidental spill of some type of solvent. I brought another old Dragon Panther purely for the tracks, the model being scrapped for parts as it was their steel hull brand. A worthy sacrifice. Paints used: Mr Color Lacquers & Tamiya enamels. Weathering: AK Interactive enamel panel washes & streak/grime/track wash. MIG pigments dry earth. Chipping/wear done with Tamiya German grey dabbed with a sponge & artists pencil for metal look in high foot traffic areas. Exhaust rust recreated with Tamiya flat brown, AK exhaust stains & MIG rust pigment. Enjoy 😄11 points
-
Thanks Giorgio - I thought it was you, thanks for the tip Thanks Ben I'm not sure how much will be visible when the canopies are on - we shall see. Thanks John Little done today as last night we had a family get together and there was wine… I did get the i/p in: I committed to the floor location, knowing that I'm going to have to shave something off to get the fuselage closed. Here's another awful close up:11 points
-
Hello, I'm new here! I had the good fortune to discover Britmodeller recently and have been reading my way through all the fantastic builds, reviews and discussions presented here. I've been so impressed and inspired by all your talent, humour, enthusiasm, insights and cups of tea that I thought I'd sign up perhaps try to take part in some small way. I didn't want to show up to the party empty handed however, so I thought I'd show some of what I'm working on at the moment. I should probably come out with it straight away and say that I'm rather into 1/144 - for better or for worse! The scale has come a long way since the bad old days of Crown and Revell micro wings. There's some great stuff out there nowadays. Although sometimes things do take the odd step backwards... They say misery loves company. So here's my Zvezda 1/144 Fairey Battle. 😅 ********************** I've been cracking on with this for a good long while now, so I'll break it up into a separate posts to get things up to speed. I've always loved the Battle. It was on my wishlist of Airfix kits as a nipper but never seemed to appear in the shops round here. Decades later, and I was still wanting one. When the Zvezda kit arrived I snatched one up quick, hoping for a fast and accurate build. Instead I got a Monopoly counter. A wargamer's piece that could be assembled in minutes and was best admired by setting it upon a broad table, and standing arms folded and well back! So... Have at it I said. The first thing I did was to sand off the fabric effect from the rear fuselage. The Battle is an all-metal aircraft and only the control surfaces were fabric covered. Once that was done I shaved down the location lugs inside the fuselage to give them a loose fit. It makes it much handier to open and close the two halves doing a lot of test fitting and measuring. The measuring is where things began to get a little out of control. Using Richard J Caruana's scale drawings and a lot of photographs I was able to start taking spot dimensions to check accuracy of the kit. As I went I found that there were quite a few key areas where Zvezda's Battle was coming up short. A little later I also obtained some slightly better drawings by Kenneth Merrick and was able to use these too. Starting out with the fuselage, I took the position of the leading edge of the wing as a sort of datum and began checking everything from there. The length of the nose was good. The position of the forward canopy was just a shade too far forward and easily corrected. The sides of the pilots cockpit were cut too low and needed some work to build them back up. The decking behind the cockpit was meant to be curved rather than flat. These things seemed fairly straightforward and I planned to make a new canopy so I wasn't all that concerned. The further back I went the more serious things became however. The rear fuselage was short be about 2.2mm. Good enough for 144th is a phrase I never liked. It's the same as saying 9mm is near enough for 1/32. Imagine if Tamiya were out by that much on one of their Spitfires. People would be howling! I was able to trace the fault to the area between the two cockpits. Adding a spacer there would make the observers position the correct length when complete too. Below are a few shots of the build thus far. The plan is to open up the cockpits and show them with a new set of canopy pieces in the open position. The cockpits have been cut out and given a more accurate outline. A temporary decking piece is in place (I later decided to make this from brass) and I've started doing the setout for the rear cockpit opening. By now I was getting nervous every time I got the calipers out. The cowling was too sharp. The tailplane too short. The wingspan was pretty good and I didn't think to look much further than that. Later I discovered that the chord of the wings was just over 1mm too narrow. It's that slab of a wing that is one of the key features which really identifies the Battle, so I resigned myself to having to fix it. Shortly after that I also found that the wings sweep back too steeply by about 2mm at the wingtips. Add to that a number of serious issues with the underside of the wings, and I very nearly put the whole lot in the bin at that point. Eventually though I plucked up some courage and got out my trusty jewellers saw. I cut the wings down the centre, then scored the wings at the position of the undercarriage (the width of these is correct for 1/72 by the way) and bent the leading edges until they pivoted forward. After that I added strips of styrene to get the wings to the correct width. Getting there... After all that I began work on the rear cockpit area. I thinned down the sidewalls of the fuselage and corresponding area between the wings so much that I began to break out in a sweat. I couldn't just detail the side walls of the fuselage as the wing root joint would be much too visible from inside. Instead I made a U-shaped tub from brass that fitted up under the sill of the cockpit aperture. I added a floor and some sidewall structure from styrene and sprue. The first try at this was a little too shallow for the plethora of Vickers drums and other equipment, so I thinned things down even further and made a new-improved tub that looked much better than the first (took a quarter of the time too!). Lots of priming and putty followed in order to correct the fuselage profiles. The decking between cockpits was cut from brass and the holes drilled and widened with the tip of a scalpel. Cutouts for landing lights were made, and various other fiddly bits. I'll leave it there for now. I hope you like it. I'll add some more soon. Thank you all!10 points
-
Hi everyone, Just finished this kit after a very slow build. It was Revell's GR4 boxing but I decided to back date it to a GR1 in my favourite grey/ green camo rather than the rather bland grey of a modern machine. Generally it went together reasonably well although it was a bit fiddly in places, particularly the flap assemblies. this was mainly due to the very unclear instructions... lots of dry fitting recommended! I went a bit mad on the extras on this kit, I used Xtradecal decals, the Eduard photo-etch cockpit set and seat belts, resin seats from CMK, jet pipes and wheels from Aires, wing seals from Shaun (available on this site😉) and my own turned pitot tube. Xtracolor enamel paints were used along with Alclads metallics and finished with Alclad semi matt clear cote. Hope you like it, gazza l10 points
-
Thanks Bill. Having to weave things in and around other jobs and duties today, but notheless pleased to say that the resin engine and cowling now fit: Oof! Look at all that resin-dust needs cleaning-off. The reverse-angle - which of course won't be seen in the final knockings: Before anyone starts commenting on the fact that my skin has become somewhat elephantine, that's an old leather-bound hotel register that I picked up from a charity shop in Lyme Regis back in the summer. It not only makes an incomparable surface for writing on but also gives a nice 30s ambience to show a Cheetah on.... Not a lot really but a significant step in getting that side of the aircraft sorted regarding engine stuff. Need to check out where the exhaust emerges of course and bung a hole and some detailing for that, plus I want to sharpen up the push rods with wire just to give a little more prominence to the more finely-detailed aspects, but otherwise that's starboard taken care of and the considerably more complex job on the port side now looms large over the build. Some working drawings are called for in this regard in order to decide exactly what level of detailing is feasible at this scale regarding all the plumbing and wiring. Take care until later in the week! Tony10 points
-
Do you know I reckon if that cowling had been about 1.5mm shallower in depth then that approach might have worked, but there you go. Thanks Martian. The glue should have cured in an hour or so so I'm going back to exactly that. I'm not sure how easy home metal-casting is Benedikt - or indeed perhaps the advisability of it with domestic facilities. It does however appear to involve the use of one of the thrusters of of our dear Martian's spacecraft: The same thought had indeed occurred to me Giorgio - if I'm going to be doing such smaller-scale or complex shapes in future I would need to build a much smaller rig than the current rather large slab. Rather than 'reinvent the wheel' though, it might simply be practicable to drill a set of smaller holes around the central region of the current rig to focus the airflow more tightly within a constrained space - if nothing else then yesterday's frolics at least yielded useful information about tolerances and sizes to this decidedly non-engineer! Right. Hope to have a little more to report later TTFN.10 points
-
This has to be my favorite tank by far. It's been in my heart since I was a wee Tempest reading the inspiring stories in Commando Comics. GOD they were so cool, they still are. Tiger Shoot was No. 2234 and revolved around a Churchill AVRE called Bessie Two. Commanded by Lt Jack Greywith, Pvt Fred Smith his Gunner, Cpl Harry Roberts his driver and Pvt Bill Stacey his radio op. Caught behind an advancing enemy attack during the Ardennes Offensive, they are forced to set up an ambush against a Tiger I which they eventually take out with a well placed 40 pound petard shot. Kit is from Dragons excellent Churchill series and makes up a Mk.IV AVRE Combat Engine in fine detail. They also do a Mk.III AVRE with the more squared turret. Fit is excellent with some putty needed to smooth the turret top & bottom. The petard assembly is a little fiddly and I hollowed out the barrel a bit more. Patience is recommended as it can be a bit fragile but solid once fitted. Recommend Tamiya thin to adhere the machine gun barrel to it's shield, this helps strengthen it. Kit was painted green base colour then bottom over painted with Mr Color RAF dark earth. An overall filter wash with Tamiya panel liner was used though I'm not entirely a fan of it. I then weathering with AK dust & dirt deposits, MIG dry earth pigments. chipping was simulated using Tamiya German Grey & Dark Brown sponged on around the edges with artists pencil for metal wear. Exhaust collector & opening was painted Dark Brown then treated with Humbrol soot & rust pigments. A thin wash of AK Interactive rust effect was run over it, brushing lightly when dry to remove the excess, leaving an excellent rusted effect. Would I recommend this kit? Aww heck yea. Dragon 1/72 armor is king. Kit: Dragon Armour Pro Churchill Mk.IV AVRE Paints: Mr Color lacquers mixed to match Weathering: AK Interactive, MIG Pigments, Humbrol powders, Tamiya panel wash Photos: Samsung phone with to much light exposure :c10 points
-
Hello all, Here is another recently completed group build entry this time for the P-47 GB; Tamiya's quite excellent OOB 1/48 Republic P-47D Thunderbolt "Bubbletop" the only additions I made were with some Eduard PE cockpit details and general placards, some additional detail to the engine and a scratch built bomb lift trolley. The model is built using the kit decals and represents an aircraft of the 78th Fighter Group's 84th (WZ) Fighter squadron based at Duxford in 1944. In the end I decided I didn't want to ruin the NMF which I was quite pleased with by varnishing the whole thing, so I picked out only the decals with some thinned Winsor & Newton Galleria acrylic varnish and I think it worked reasonably well. Another very enjoyable group build, and thank you to the hosts. Thanks for looking. Cheers, Mark .10 points
-
Hi I'm planning to start a Battle light bomber kit made by MPM. Battle is most misjudged RAF bomber, in history. Mainly used in France 1940. It took heavy losses, because RAF at the time don't had any conception how to use light bombers. Plan was simple to send Battle on missions in enemy territory with out any fighter protection, count on its speed and maneuverability, as we all know it wasn't enough. Moreover, Battle wasn't equipped with self sealing fuel tanks and protection armor, made it very vulnerable even for infantry bullets. After French campaign Battle was turned in to night bomber. I will build Battle used by 300 (Polish) Squadron in late 1940. This squadron took part in early bombing rides over the France. Battle was used until beginning of 1941, then Sq 300 was reequipped with Wellingtons. MPM kit contains resin cabin interiors and some resin parts also. The rest is made from plastic, as a short run kit I didn't expect high quality. I will require a lot of work and putty, so I recommend it for a little advanced model builders.9 points
-
Whew! Finished, in the nick of time... Airfix 03021 SA330 Puma, with Rotor Craft composite rotors, a light/lantern from an Airfix Sea King HC4 and a few scratch-built 'lumps and bumps. Main colours are Xtracolor RAF Dark Green and Lichen Green overcoated with Humbrol Matt Varnish, various other Humbrol and Revell enamels used for other details (Humbrol 163 for the Rotor blades to give some contrast with the Xtracolor shade, for instance). The only decals I used from the kit were the red lines around the door, home-made decals for the 'Danger' markings on the tale and the RAF logo on the doors, generic RAF lettering for the tail code, and small roundels from a Revell Tornado GR1.9 points
-
Hello everyone, my latest build of Eduard 1/48 Bell X-1 Mach buster. Eduard Profipack kit, scratch build nose pitot tube and wing tubes, minor scratchbuilding in wheel wells. Painted with Tamiya and Gunze acrylics, AK Interactive Extrememetall and Florymodels washes Pretty basic kit with no general fit issues. Only problem were decals which are very thin and I damaged one on tail. Fortunately Eduard support was great and they send me a spare decal sheet, free of charge . Also decided to cut flaps and put them on lower position as seen on reference photos. For every build I make custom display case with nameplate... fully made in my workshop I hope you like the result.9 points
-
I began weathering by gently airbrushing some exhaust stains to the underside of the wings, this is the first time I have airbrushed these and I was pretty happy with the results. Once dry I mixed up some black and rust weathering powder with a little decal fix and water, and ran a pin wash down the panel lines. I only wanted to lightly weather the build, I am aware she is a battle scarred beast but I didn't want to go ott. Once dry I added the guns, and antenna before satin varnishing the paintwork (I have left the bare metal gloss). So the build is complete, it has been an epic journey, lots of masking and airbrushing but I am pretty pleased with the results. I will post some more photos in the ready for inspection forum, thanks as always for joining me, for your advice and support!9 points
-
I totally forgot to give an update on this: http://www.britmodeller.com/forums/index.php?/topic/235024842-scrambled-eggs/ Three models that started as the short nosed FW190A Right now I'm trying to finish 12 Hasegawa eggplanes.9 points
-
Thanks so much! I do love the scale. 1/144 has an unfortunate reputation as being an unbuildable novelty. However when things come together well the effect can be quite wonderful. Its like a small, heavily armed butterfly just landed on your desk. 😊 Here's some more. The WOP/AG position and area forward into the bomb aimer's spot were detailed a bit further with parachute and seat. The wireless equipment was added to the rear as well, although this is only barely visible in the sealed fuselage. To get the correctly sized interior fittings to locate accurately I had to thin down the fuselage to the point where the plastic became paper thin. I was able to make good on this later when the fuselage was joined together by sealing it up with superglue and flushing everything in. The Zvezda wheelwells were incorrect too. The width was accurate for a 1/72 model, so I boxed these in to the correct dimensions. Up to this point, I had been relying quite heavily on the drawings of Richard J Caruana. After following them very closely for the first half of the build, I then compared them to photographs and Merrick's drawings. There were several key areas where things were well out of whack. One of the biggest was the dihedral and I'm so glad I caught it in time! Rather than being equal dihedral top and bottom, the upper wings are raised slightly. I needed to steam the wings and bend them up slightly to make good. Then add some putty to the upper surfaces to restore them to the correct shape. Next was the transparencies and I plug-moulded these from .35mm acrylic sheet. It took a few tries to get the size right. Again I had been using the Caruana drawings for reference, however I later found that these have a great many inaccuracies and I had to rework a lot of components. I was delighted to find I had another set of MAP plans by Kenneth Merrick though, and these turned out to be much better. By this time I decided to switch to the later style of exhausts, and pinched these from a Sweet Hurricane. The temporary prop is borrowed from the spares box, but I decided to make a more detailed one later on. That took me a month hard slog, but by that point I figured I'd established a bit of a bridgehead and was in with a fighting chance. The transparencies are mostly done, aside from some thinning, polishing and final trims. The new 14x piece prop was been made, and the wing is finally attached with a prodigious amount of filler required to tidy everything up. Below are some shots of the main assembly, resting under thickish coat of Tamiya primer. I couldn't resist a bit of period coinage for scale Next up is the scribing.9 points
-
Well, I went to look through my tape stash and realized I don't have any 4mm tape to do the 12" stripes; I have 3mm tape, if I wanted to do 9" stripes, but I'm sure that's not right, so I've ordered several candidates, which should start arriving Monday. Until then, can't really paint and mask the stripes. I did the sky band, though: 20181006_152347 by Edward IX, on Flickr And the spinner: 20181006_152511 by Edward IX, on Flickr And promptly walked my airbrush hose into the spinner, marring the paint. Rrrrgh. Will have to see how bad it looks once it dries. I've also spent a little time with Pumpkin Man, who appears in our house every October, for as long as the costume fits: 20181006_143938 by Edward IX, on Flickr9 points
-
Dry fitting for close up. Hmmm. The instructions would have you mount the floor sort of under the frame, a bit like this: Flickr …but then I don't think it will stay there on closing up: Front and back cockpits there. Doesn't look as though the extra frame bits join up either. Hmmm. I'd better stick the radio table on before I go much further: I'm getting used to the quick setting TET. If you hold the parts together, apply the cement and press a little you can see the stuff flash off almost immediately and it grips quickly. Nice. While the table was drying I fitted the cockpit floor and ran TET down one side: That shows that you shouldn't take close up photos at this scale. Ahem. I hope the i/p fits - we shall see - but that's used up my patience for today.9 points
-
Su-9 Fishpot 16 Red PVO Soviet Air Defence Force Trumpeter 1/48 Eduard Brassin Seat Master Pitot Wolfpack Exhaust Decals: kit numbers,. Iliad Design Stars Eduard plastic RS-2US missiles/ decals (MiG-21 series kits ) lots of BM help WIP to be found in the fantastic 60s NATO v Warsaw Pact in Europe group build! and with its contemporary smaller cousin: some more color soon! cheers, Werner8 points
-
Fuselage Thanks Head in the Clouds - that looks like a good tip. Think I will look into that. For now though it's back to malarkey with wood. The fuselage of this aircraft has some subtle but important shapes that, at this scale, must be modelled. For example the vertical sidewalls of the fuselage aren't vertical at all, they have distinctive ridges running along the length of the fuselage where the longerons support the fabric. =As a result the upright fuselage sidewalls consist of three 'faceted' shapes that terminate on the longeron. This photo from a few months ago might explain what I'm talking about. Ignore the red line in this case, but look at the faceted shape of the upright sidewalls in section 'C'. This shape runs the length of the fuselage but gets progressively less pronounced towards the tail and could be a tricky to model especially because the longeron under the fabric needs to be represented as nice sharp straight line. Hmmmmm…. Before I launch into that though; a few pages back Hendie was wondering what the slots on the bottom of the fuselage were. As explained at the time they are wholly accidental and need to be filled, as do one or two other bits and pieces as you will see. The filler used in this case is two-part automotive 'bog' filler. I've sung it's praises before on these pages so won't do it again. It can leave a bit of a mess... prior to sanding... but generally cleans up very nicely. This is a good reason to shy away from leaving models in a natural wood finish. I don't understand how @albergman & @Redshift can possibly even contemplate tackling subjects like this in natural wood. That's much harder than this since there's little or no opportunity to use filler and no chance to 'paint out' any surface imperfections. What they do is difficult. The brass cockpit fits in here nicely and now I can check that the representation of the longerons that run along the cockpit edge are going to project as a straight line all along the fuselage. Yep - they actually line up pretty well. 🙂 Well enough for these to be marked up anyway. And for this bit of 'stick-on-wood' to be stuck on. As mentioned above the thickness of the 'facet' in the sidewall is much greater toward the front of the cockpit than the rear so I've crudely modelled this by layering multiple layers of 'stick-on-wood' towards the front, and fewer and fewer towards the tail. Hendie's going to have a field-day making fun of this post! 😂 Now for this stuff - available from Bunnings if you live in Australia. It's very similar to plastic-wood but finer grained and more workable and can be thinned down with water. It's actually a lot like pottery clay in feel and general properties - at least when wet - but once dry it's not brittle. Good stuff this! Slop it on and cut some X's in the wood so it's got something to grip onto. Sort of smooth it and kneed it into the right shape - flatten out the steps between each of the multiple layers of stick-on-wood and fill in the angled sides of the fuselage that aren't vertical. Check that the cockpit still fits nicely (and it does!) Let the timber-mate dry out and repeat the process. Then sand it smooth. If you look closely at this picture you will see that the timber-mate has defined a bulge that runs along the side of the fuselage. It's still a bit too smooth at this stage - it doesn't look like there's a longeron under there yet - but I think I have a way around that. I'm happy at this point. Here's the mighty machine viewed from the front... and here it is from the rear. If you look closely you will notice that I've done a bit more on the wings. I might drivel on about that next time. But here's the real star of the show. As mentioned last time, my dad is a bit of dab hand with a soldering iron. Here's one of his 1/32 scale bikes that he likes to make for fun. This one might end up lying on the ground next to the Avro - temporarily abandoned by some lazy, young, student pilot who couldn't be bothered walking it off the airfield. 😡 That's it for now, Thanks for all the comments, suggestions and interest! Bandsaw Steve8 points
-
Afternoon all, Here is my recently completed entry for the ongoing, very enjoyable and massively well supported Airfix the Golden Years Group Build. Kudos to @Rabbit Leader and co hosts for organising such a successful GB. Anyway my first completion for the GB is Airfix's 1975 M.R.C.A Multi Role Combat Aircraft Tornado in the guise of the German P.01 D9591 shown on it's first flight on August 14th 1974 from Manching Air Base, Germany. I have built the kit with an approximation of dropped flaps/slats. I had to modify the head boxes of the ejections seats, 'cos they just looked silly! The decals are partly the kit supplied and my own home print. The undercarriage has been extended to represent the in-flight relaxed position, surprisingly the most fiddly part of the kit is the main undercarriage doors which do not have any way of attachment so I added a bit of plastic rod in the rough position of the door retraction arm as a sort of stay. The display base is just a bit of MDF I had, a home made motion blurred runway effect done in Corel Photopaint and some acrylic rod with afterburner decals (Corel Photopaint again) 3 layered on each side and slightly misaligned. I thoroughly enjoyed making this old kit as I remember making it when I was a nipper, well younger anyway, hope you like it, thanks for looking. Cheers, Mark.8 points
-
Hiya Folks,.... another update,...... I`ve got the decals on and next stage is to tidy up the invasion stripes; Cheers, Tony8 points
-
Tried both hendie but with mixed results (see below).... They did Giorgio. As they're just a 'skin'of residue that gets caught in the crannies, a few minutes soaking in some isopropyl alcohol and a scrub with a toothbrush removes the remaining gunk. A troubleshooting day rather than a massive step forwards but valuable experience nonetheless. A large chunk of time went initially on cleaning up the kit cowling as both sides had a pronounced 'lip' that had to be removed not just from the ring but from all those blooming blisters as well: I only need one for the final display thankfully, and did remember to scribe the panel separation lines in the right place on either side. Patent cowling-scribing jig: The spirit of Heath Robinson endureth..... Once this was spruced-up sufficiently it was on with the oven and out with the vacform rig. I'd harboured concerns about the effect those 'blisters' around the cowling were going to have, and as you can see here, 'starring' proved a major problem: I then spent about two hours trying varying grades of plastic from very thin to very thick, and raised up off the vacform surface from just a tiny amount to quite high, but to no avail. Front side down was if anything even more of a problem. Even heating up the plastic on high until it wasveeerrrry very thin and wobbly in the oven produced no better result. Each time those blisters compromised the pull. After some lunch and an afternoon nap I came back down and simply carried on with my original intention - to whit, hollowing-out the kit cowling with various shapes of birr in the Dremel: With the walls thinned I then split the cylinder and went at it from the inside with a small bulbous birr in order to carve out the blisters from the inside: I've popped the finished top part onto the original E&T Cheetah here for as proof of principle - in fact it will be the resin copy I've made of it that will eventually go inside this cowling so to finesse it in I can simply sand a little off those valve rocker covers on the tips of the cylinder bits, due to the fact that that particular detail will be hidden by the inside of the cowling. Job done. As to the resin copy itself - the front and rear have been sanded down flush and the two halves glued together (using GG): Since taking that photo I've also epoxied a cast of the rear geary/carbuurettory bits that stick out the back as well. Won't be seen of course but willgive me some structure to mount it into the nacelle. I'll pick the last remaining recalcitrant bits of plasticine out with a pin tomorrow when the glue's cured and sand down any remaining seams, then a test fist closing-up the cowling around it. There's some nice little bits of filligree stuff to drape over the engine in the Flightpath set but I need to have a closer look to see whether or not it duplicates already existing features in the original E&T moulding, which is of high quality already. Well, things didn't go quite according to plan but another vote of confidence in the Dremel/birr combination. Have a nicve evening all of you. I'm off to take some enchiladas out of the oven and then settle down with a Martini to watch an episode of the Fry/Laurie Jeeves & Wooster series. Indubitably. Tony8 points
-
My next 'large' build is Airfix's 1:72 Avro Shackleton AEW.2. Having just finished a B-17G and previously a Dornier, I thought it time to embark upon another RAF classic. I have only seen one Shackleton in the flesh as it were, at Long Marsdon airfield. Once part of a museum the aircraft has been left to decay, it is both a sorry yet haunting spectical and I feel a beautiful aircraft. The large box contains a set of detailed instructions, a colour scheme sheet, and seperate decal sheet. There are 6 detailed grey sprues (with little to no flash), and a small clear sprue. With 424 pieces the kit looks pretty complex, and will be pretty big once complete. Airfix offer a choice of 2 aircraft (I would say paint schemes, however they are painted the same), 'Dougal' or 'Ermitrude', I have decided to build 'Dougal,' the aircraft which currently resides at the Museum of Science and Industry in Manchester. I have found several online links to this aircraft, including a virtual tour, which will hopefully mean I can make my build as accurate as possible.7 points
-
Two tone with Mercury bumpers...............................7 points
-
Hi everyone,had a break from the whole model thing for a month or two but threw this together to keep my hand in. Revell 1/48 a6m5 zero built out of the box,brush painted with enamels. Kit was ok,what you would expect from a cheap kit.7 points
-
Well. I have several Seafire kits in this stash, just none built yet. So I guess that means I'm not a freak? Although Mrs. Bird would beg to differ. Now let's see...Sea Hornet - check, have the Special Hobby kit in the stash. Firebrand - check, got the CMR resin kit. Sea Venom - check, been there, done that with the CMR kit: A twin Seafang? Twin like two engines, or twin like two fuselages, ala F-82? Bliss is not normally the word I use to describe these short run kits... Behaving is not required during any Navy Bird build. In fact, it's actively discouraged, so feel free to misbehave as you feel necessary. I will have good company then, as I am usually in the naughty corner myself! Although I like the Pakistani markings, the thought of doing an aluminum finish on an AZ short run kit is too scary. This one will be British - EDSG and Sky it shall be! Yes, indeed, where did all these people come from? Yikes! I never thought that the Attacker would garner so much interest. I shall do my best to make the model look respectable, if only at a distance. Now, let's see, where we we? Right, the model. As I mentioned, step number one in the instructions is a boo-boo. Have a look here, and note where AZ have you position part number 10 on the starboard fuselage half. Note also how they've shown the outline of the cockpit on part number 10. This would require doing this: If you actually followed this instruction, you would then have to sand off ALL of the side consoles on the cockpit to make it fit. And, the intake would be partially blocked. This is obviously not right. Here is where part number 10 needs to go: Looks a bit rough, but the important point of alignment is viewed from outside the fuselage, looking into the intake. Part number 10 is the continuation of the fuselage side as it enters the intake area. Hopefully, you can see that here. Now the cockpit fits with just a bit of sanding on the sides. The louvers on the top and bottom of each intake (you can see one in the previous photo) are a bit rough. The Airwaves set provide these in photoetch, and I'm thinking of sanding off those moulded on the fuselage and using the PE. I doubt these louvers were proud of the surface, but the PE is pretty thin. Cheers, Bill7 points
-
Hello mates, here something brand new. This is my little swallow i fell in love with at Nuremberg Toy Fair. Tamiya 1:72. Started on July 05, 2018, finished on September 30, 2018. There are wheels, some etch, masks and exhausts from eduard, as well as the extra separate decals from the house. This was pure fun to build! Cheers, Tom7 points
-
Moving on to the last few details. Some of the doors have ribs, some don’t, and those that do have some ribs missing because of ejector pins. So I’m using stretched sprue to add them all: Thanks for looking, Adrian7 points
-
Don't lie.7 points
-
More of a point, what kind of freak doesn’t have a Seafire? Mind you, if you’re filling the slot between Seafire & Scimitar, there are a couple of doozies to add: Sea Hornet (sublime), Firebrand (dog), Sea Venom... Got me, too.7 points
-
Finished at last. Vertol 107-117 points
-
At last I've got one finished, definitely behind the drag curve! there are certainly some prolific modellers in this GB!! Anyway here is the 1975 Airfix MRCA Prototonka in the guise of the German P.01 D9591 shown on it's first flight on August 14th 1974 from Manching Air Base, Germany. I have built the kit with an approximation of dropped flaps/slats. I had to modify the head boxes of the ejections seats, 'cos they just looked silly! The decals are partly the kit supplied and my own home print. The undercarriage has been extended to represent the in-flight relaxed position, surprisingly the most fiddly part of the kit is the main undercarriage doors which do not have any way of attachment so I added a bit of plastic rod in the rough position of the door retraction arm as a sort of stay. The display base is just a bit of MDF I had, a home made motion blurred runway effect done in Corel Photopaint and some acrylic rod with afterburner decals (Corel Photopaint again) 3 layered on each side and slightly misaligned. Thank you to the hosts for a very well organised GB which I thoroughly enjoyed along with the kit...... well done to all, have a rest, you deserve it. Hope you like it. Cheers, Mark.7 points
-
My first experience with the Wingnut Wings kit is finished and I must admit it was a pure joy! I`ve used TaurusModels engine goodies and my own hand-carved propeller with a resin hub by ProperPlane. Painted mostly with Tamiya acrylics.6 points
-
A bit of a turret upgrade... Thanks for looking, Adrian6 points
-
I've started replacing the photobucket pics but there is a long way to go ……. bitter sweet seeing the comments from Julian, Needed to start some modelling. As its been a while I thought I'd just place the fittings around so I can see what's next I reckon the worst of the scratch building is over, so it's downhill from here LOL Watch this space Kev6 points


This leaderboard is set to London/GMT+01:00