
Leaderboard


Popular Content
Showing content with the highest reputation on 30/09/18 in all areas
-
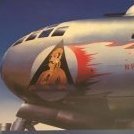
I've finished Italeri's 1/72 Short Stirling mk.1 as W7442 ("-B") of 1651 Conversion Unit (previously coded MG-M). The aircraft was lost on June 26th, 1942 during the 1000-bomber raid on Bremen. The entire crew was lost. A fisherman once caught a part of this aircraft in his nets, which turned out to be one of the escape hatches. This escape hatch was given to my father, who still has it hanging in his hallway. The Italeri kit has left my feeling very cynical about it. I would describe the kit as "mildly infuriating". Some things are right, but most of it is just wrong. But not entirely wrong, just a little bit wrong. As if the designers had five minutes to look at reference material, and then had to rely on notes and memory. I've gone from thinking it's some kind of elaborate joke on scale modelers who want to build a decent model of a Stirling to thinking that perhaps this is a kit that Italeri could have used to show investors to keep them happy. It looks okay in the box, but really isn't. As I said, the kit gets almost every detail slightly wrong, but the most obvious problem with the kit is the surface detail. I was inspired by a build from a few years ago of Revell's B-17 which the builder covered partly with Scotch tape to cover the (somewhat) exaggerated panel details of that kit. Having build Revell's B-17 myself, I can say that kit is not nearly as bad as Italeri's Stirling, nor as mildly infuriating in terms of getting the strangest things weirdly wrong. A good example of getting things weirdly wrong is the bomb bay, which I addressed. In the box, the bomb bay looks nice and detailed, with ribs and everything. But upon closer inspection, you'll notice that all the ribs are in the wrong place. Eduard's detail set is an improvement, but those ribs are also in the wrong location. In the end, I'm fairly happy with how this turned out - but the kit is frustrating, and the Scotch tape is not as neat as I had hoped, and using it poses problems in later stages of the build: it's fairly fragile in and of itself, but paint also has some problems sticking to it and so do antennas and actuators. Build thread with more details here: Now, on to the photos: I like that in the last photo you can just see the window of the hatch that I added in the floor through the crew access door. Thanks for looking - feedback is always welcome of course. Thanks to everyone who supported me during the build, and especially @12jaguar from the Stirling Project who provided tremendous help and input (and his friend James!) and @Josip for sharing the Scotch tape technique in his B-17 build thread from a couple of years ago https://www.britmodeller.com/forums/index.php?/topic/234956473-revell-b-17g-got-a-new-dress/ - Elger36 points
-
This is my latest completion, built for the P-47 Thunderbolt STGB. I scratch build a few extra parts for the cockpit and the exhaust manifold. I used an Ultracast seat and wheels, the Vector update set, which includes the open cowl flaps, intercooler exhausts, intake/oil cooler intake splitter and the tail planes with the separate elevators. Oil cooler outlets came from QuickBoost, the the 75 gallon drop tank is from the Edaurd Brassin range and the 1000 lb bombs are from Attack Squadron. Decals are from Thundercals. Build pictures here ( If you are using Chrome please click on each photo to see the accurate colour as the colours are muted in this forum in Chrome )31 points
-
Morning all! The Tornado Gr.1 kit that Revell offers in 1:72 is probably the go-to kit when it comes to modelling IDS variants in that scale. However, despite producing a fabulous 1:48 Tornado GR4 and a 1:48 F.3 ADV kit in recent years, the GR4 in 1:72 scale remains an illusive subject for Revell- having only been covered by Airfix's "attempt" (which I'll be quite honest, I forgot existed until I googled it) and the Hasegawa kit (which is around 2-4 times as expensive as the Revell kit). I've built 2 Tornado GR1's before, both of them Revell: With the impending retirement of the Tornado GR4 from RAF service next year, I thought it would appropriate to have a crack at a 1:72 Tornado GR4. Kit: I bought this particular kit from the Newark Air Museum (I highly recommend a visit there, it's by far one of the better aviation museums that I've had the pleasure of visiting) and used decals from the Xtradecal "RAF and RN Update 2014-15 Pt.1". Detailing: Although I don't strive for 100% accuracy with my builds, the key differences between a GR1 and GR4 are the presence of FLIR pod, the removal of a cannon and the introduction of more digital displays in the cockpit. Instead of going for aftermarket sets (which I hear are rather good, and I'll look at using one for my next build) I shaped and scribed a piece of scrap sprue to match the rough dimensions of the FLIR pod. The cannon was "removed" by a splash of filler and a bout of sanding, and finally the instrument panels were slightly modified to look more like those of a GR4 (although in this scale you can't see much anyway!). The weaponry of Storm Shadows and ASRAAMs were taken from a Revell Eurofighter kit. Paints: Vallejo Model Air paints were used throughout, alongside a Dark Dirt wash from UMP and landing gear weathering was aided by the application of an AK Interactive landing gear Dust wash. Conclusion: So, that's it for this build. As I've found with my previous attempts, the Revell Tornado kit is one of those kits that is "fun" to build and comes with some incredible detail (just look at those rivets!) straight out of the box. I did make a mess with one of the decals from the Xtradecal set (the "...ary" in 100th anniversary were destroyed during decal placement on the left hand side of the aircraft) and although the repair looks acceptable from a distance, close-up it's quite obvious. I believe it to be entirely my fault and I still regard Xtradecal sets as some of the finest aftermarket decals that I've used. Thanks for having a look! Best wishes, Sam24 points
-
Hi Everyone Here’s a build I did in July just for a breather, a quick bit of light relief. The only thing that drew me to it in at my LMS was the shark mouth; I mean how many of us who built kits as kids had a sharkmouth P-40 of hanging from the ceiling. This was merely a trip down memory lane and a goal to actually finish something….that’s how it started anyway. During the build I discovered that the pilot, Sgt Willian Earl Houston, was from Hastings, Hawke’s Bay, NZ; about 2 hours by road from where I live. He lost his life on 12th December 1941, when he was shot down by Erbo Graf von Kageneckaged near Tmimi, Libya. He was 19. So having accidentally picked a subject related to both my main interests (RAF and RNZAF), here’s my Airfix Tomahawk IIb built to represent AK457 of 112 Squadron in North Africa. Built from the box I added Tamiya tape for belts and Eezy Line for the ariel wires, wire brake lines. I didn’t encounter any major problems with the build. I used the salt wash technique to weather the upper surfaces, I like the subtlety of the effect. I also tried out AK Interactive’s Heavy Chipping fluid for the first time. You’ll see that the effect in places is 100% accurate at replicating the ‘chipping’ caused when a gigantic piece of masking tape is pressed onto a painted surface that has been applied to a surface it’s not meant to stick to ! Turned out to be quite a satisfying build. I hope you like it. Cheers Gaz21 points
-
Horst's 109 is done now. Built strictly out of the box to conform to IPMS/USA rules. Seat belts are paper, painted using old Eduard brass belts as stencils. Gunze Sangyo paints (as always!), weathered with oil paints, both as washes and dry brushed. [/url]IMG_6853 IMG_6850 IMG_6847 IMG_6846 IMG_6844 IMG_682921 points
-
Here a a comparison build between a Hobbycraft and an Aifix F-86 aircraft. The silver aircraft is the Hobbycraft and the Golden Hawk is the Airfix. Although the Hobbycraft is much older I did prefer this version over the AIrfix. No Measurement just build and details. I thought the Hobbycraft was more detailed. Although they are different versions the basic kit is my judgement point. I added Pavla seats to both models and sprinkled some Eduard Photo-etched in both interiors. Both models used Alclad over Black decanted Tamiya rattle can for primer. Both models have issues with details ,but Photos and distance improve the final subjects. They were both a bit of a challenge as I have to stop in mid-build to get new Golden Hawk markings. I will be better prepared in future. Stopping is not to my forte. I did add Scoops to the Golden Hawk version , I had scoops on Silver bird but was informed these are not presents I removed. Thanks for Looking Comments Welcome Cheers Bill16 points
-
This has been an absolute drama of breaking wings because the CA wouldn't stick the rigging like it was supposed to. Should you wish to continue reading this record of a disaster be it at your own risk. It started as quite a nice build. I completed a rather clean model as shown here. I was very pleased with other than the globs and CA. glue holding on the struts. When it all went wrong part one. I had put the He 51 on top of a storage box out of the way so it wouldn’t get damaged while I wait for the EZline to arrive. A day or two later I needed something from that box and I didn’t notice the He 51 was on top of it. This box has a tendency to tip when I open the draw. Guess what the draw tipped and the He 51 went flying then shattered. The top wing broke off and of cause the struts broke. I had another kit of this plane so was able to rebuild it. At the same time I fixed some large blobs of glue which I had made trying to get the struts to glue with CA. It turned quite nice. When it all went wrong part two. It was time to rig the plane. First mistake was to use the heavier EZline. I think I should have used the fine EZline. Lesson learned later. I got all the wing cables on after a major battle with CA. not sticking and ended up with a big mess around the struts again. I decided to clean it up and patch paint the wing. I was almost done when my tremor decided to drop the plane. Once again with the result of the lose of the wing. Well after that I almost binned it. Fortunately I had only broken one main strut and one of the centre ones. I found I had one strut left from the second kit and a set of centre ones. I decided to fix it up. After a week of cleaning and painting the wings again I had it ready to put together and re-rig. The struts weren’t easy to get on again because of CA. problems but I got it together. When it all went wrong part three. I commence the re-rigging. It was going well if you can say taking up to half an hour just to stick the end of one cable on and that was for 80% of them, as going well. I finally got to the last two cables which were between the main left hand wing struts. The first one went on real easily. So I thought I’m done. The second one had other ideas. After a half an hour of trying to get it to stick the tremors were getting bad again and broke the wing off once again. So back too square one. The only problem was I had no main struts left and the centre ones were broken again. When it finally went right. I first made an effort to glue the broken main strut together. Then decided it would be too weak, so I decided to have a go and slimming down a tooth pick. This worked well, although I should have made it a bit slimmer by the looks of things. I found I had one complete centre strut part from my second kit left. This is what saved the plane from the bin this time. The other side I fixed without drama. So the plane went back together with all the CA. drama of past efforts. The result was a real mess to say the least. However, the rigging was on with only the aerial to do. I thought this would be a problem. In the end it was the easiest bit of rigging I did. Think it was because I used the fine EZline on it. So now you see a heavily battled He 51. Effected by extreme weather and CA. glue. Still it is done and is in the back of my cabinet where it will stay. I finally won the battle, just. When taking photos the rudder broke off. Now the question is can I get it from the work bench to the cabinet without breaking it……. Sorry they are not the best photos. I just want to move on from it......15 points
-
Here's my latest build based on the 1/48 Hasegawa F-4EJ. Quite a lot of work was carried out on improving the surface detail. Aires seats were added and plastic card was used to enhance the cockpit. MRP paints were used throughout.14 points
-
Finished Mig-15 using AK Interactive xtreme metal paints. Very nice kit to build and paints much easier to use than Alclad!14 points
-
Hi All, second go! Takom 1/35 Chieftain, Painted with Hataka Red box paints, weathering courtesy of MIG Powders. Was a bit of a mojo restorer this one. C Chieftain by Mark Neal, on Flickr hieftain by Mark Neal, on Flickr13 points
-
Let me present you my next model. 8 years ago I made the same model but from Italeri13 points
-
Gents, I'm a modeller from Hungary in the middle of Europe. First of all some senteces about me. I am researching the post war middle-eastern conflicts and naturally I frequently target the planes from this area when building modells. Besides this I am interested in the WWII flights and planes of the aces. I'm working in the aviation business, very close to the jets, so I can say my hobby is my job. About the Mig-15. This tiny beauty was built from the old KP kit, not from the new one with curved panel lines. I have sanded all panelines and rivets which were out of the surface and polished. I used for reference the 4+ Publishing Mig-15 book and its drawings to engrave the panel lines. The cockpititself and the ejection seat is came from the Pavla, as a resin set. For the canopy I used vacuformed one. Landing gears and the gear covers,the pitots are home made pieces. To paint the model I used the paints from the vallejo model air collection, the decals are HiDecals production. It required some work hours, mostly for sanding, gap filling and polishing but I think it worthes all the effort. Enjoy this and judge Regards, Polo13 points
-
Thanks Bill - slight sheen on the pods? Got it Thanks Terry - metallic all over, got it! Thanks Dave Thanks Giorgio Thanks Simon - Stynylrez, love it Thanks Stuart Thanks Bill - yep, Stynylrez; have I said I love it? Thanks Keith We'll have a look at the white later but dirty sounds good… Thanks Selwyn Good point about 'inert' rounds - anything heavy dropped from a height is bound to make a hole! Thanks Phil, great shots Thanks Stuart Thanks Roger Thanks James After a day 'tidying up the garden' yesterday I found some masking mojo and covered up the white, then sprayed on some Tamiya Titanium: Flickr The weapon load has been done too: Need to find some black transfers for the stripes. I might have a few left over from the B-3613 points
-
This has been on my shelf of doom for over a year or so. So I decided to try and get on with the scheme I had planned for it as a way of shedding the lack of Mojo. The end result is here after a weeks of evenings doing paint touch ups and decals with some final assembly. All decals from the Airfix new tool JPT.3/4 that includes all the dayglo, with some modified, wing roundels and unit emblems etc from one of the options in the kit, a couple roundels and underwing serial from Modeldecal generic sets, fuselage serial ZF406 (from the overall dark blue option) and all stencilling from the Tucano kit, whose decals were very brittle and held together with Klear coated over wanted items a couple times before using. The crew figures had to have some surgery by way of hacking off parts of their bottoms and upper legs as they would not sit down properly enabling the canopy to close. Undercart legs and nose gar from an Aeroclub set as too is the prop. I do have the Aeroclub seats for the Tucano and have assembled one and found they do not fit!!! IT seems the cockpit floor is too shallow.....maybe? Kit ones used. A vacform Aeroclub canopy is in the box of remnants but probably won't use it. HATAKA acrylic paint used for the grey from the RAF Trainer paint set. Sprayed on beautifully! To the pics: The chap in front seat had his head turned to make it look lifelike and the guy in back a different bone dome. I don't often use figures but in this case It enabled me to avoid making a lash up of in home made seat belts. Metal main undercart legs used as I found them in the box with the other Aeroclub bits in when I bought the kit 2nd hand but used the kit wheels as they had better hub detail although they may a bit too thin. As it happened the kit legs were missing!!! The prop is white metal as too is the spinner. I used these at the last minute as they added the last bit of weight to help it from being a tailsitter. As a personal touch, I opted for a polished spinner. I did paint the plastic part correctly in black and white halves and its prop as a spare' The JP donor kit for the decals( more on this one in next post)built at almost the same time as the Tucano was progressing recently The box it came out of. Why I chose this 'off beat ' scheme you ask? Well I often wondered how some late 20th century RAF types would look if they had a policy of not updating colour schemes for any amount of reasons. And a Light Aircraft grey with dayglo scheme following on from the JP was the way I went. You could also look at it as a possible special anniversary retro scheme for No.1 FTS. After all they did paint other specials in gaudy or drab camo special one of s didn't they! It looks a bit Chipmunkesque I think..... Anyway, I hope you like it. Any comments most welcome.12 points
-
Most kind Roger. I must be a frustrated porcelain collector but it's just superb stuff Ced! Cheers Pete. It rather turned into one of those jobs that seemed so simple on paper yet yielded a number of intelrocking problems Simon. So what's new eh? 😁 Ta Bill. Between the Milliwhite for those large areas needing a good strong 'grippy' material and the Humbrol filler for smearing-in any tiny scratches, these things certainly give the confidence to tackle errors of shape, knowing that you can produce a smooth durable finish again (eventually...). Cheers Keith! At the 'tea & toast' stage today so on the mend. Bit light-headed too but putting that down to the excitement that an Anson always generates.... Thanks Benedikt! Should 'Great British Break Off' ever become a thing, consider me a contestant... I'm at that age Benedikt where you can say that your body is a temple. In the sense that the roof has collapsed and it doesn't get as many vistors as it used to.... I'm pretty sure it's just a virus as my Ma had something similar during the week and it seems to burn through you in a 2-3 days. Appreciate the concern though mate. Thanks. Andrex!? Them's posh in that Portsmouth eh? I find the Lidl Economy Roll meets my current needs. Ta Giorgio. I find because it's such a distinctive region at the rear of most aircraft that any innacuracy tends to leap out immediately when viewed from above or the rear, so needs careful scrutiny. Cheers Terry. Your photos are currently sitting on my tablet as an indispensable reference for the internals.... Like some young God (that kind that wears tracksuit bottoms with bits of modelling tape stuck to them and badly needs a shave, that is...Chav-Bacchus? ) I strode forth this morning from my recent confinement and headed benchwards. The epoxy still needed a few hours to harden-off on the other tailplane from last night but I had a plan about how to remove the existing engines from the kit. Stage 1: a nice big birr head in the Dremel and plunge-bore the centres of from behind: Stage 2: using the same birr but transferred now to the flexible 'Dremel-snake' extension, hand-hold the cowling and rotate by hand in order to hollow-out the interiors: Stage 3: check the cowling against the diameter of the replacement Cheetah: Whilst the tolerances between kit and engine are almost exact (this 'Engines & Things' engine isjust splendid btw), an obvious hiatus for cogitation was on the cards whilst working out how to get an engine inside there later on for the port side of the aircraft - the one that will have the cowling on. (For starboard the cowling will be off so this won't be an issue). Staring at the front didn't help either: Stage 4: What did the real Anson mechanics do? Read Section 8 of the maintenance manual 'Engine Installation' of course!: '...the cowling consists of two semi-circular panels supported at the front by the exhaust collector ring...' (Para. 5) Crisis averted. Whilst the interiors still need further hollowing-out in order for the panels to look convincingly thin, these parts can each be cut in half and mated around the engine then, much as the actual panels are fixed onto the aircraft. The original thickness on the left, currently thinned-down on the right: I want to get that those walls a little thinner before cutting but not too much in order to avoid warping. Best tool for this task is definitely a birr on medium-speed. Both of these cowlings have now been thinned out to the same thickness but I'll wait until a subsequent session to get the delicate job of bisecting these done. Whilst in a thinning-mode though with the birr to hand, I also had a lash at the interior of the tail fin that similarly needs thinning intenrally in order to accept the rudder: (Is anyone else seeing a tortoise with a punk-mohican in that photo?) I'd noted in a couple of photos that the rudder sits into that fin in quite a defined manner (judging by the shadows cast by it onto the rudder), so the rudder needed re-shaping at the front and thinning right down along the trailing edge to fit inside in a manner that matches the actual interface: By the time that was all taken care of the epoxy had done its thing so I was able to finish off the remaining tailplane/elevator sections: A little bit of very fine shim needed in a couple of places to get the angles fully-corrected: With the wider chord involved you can see that I'm going to have to adjust their seating into the fuselage forwards by a couple of millimteres though: Those beaks at the tips need a little further attention to get them matching though - the port one is still a bit 'sharp'. Those matters aside, the main outlines of the empennage are now coming into being quite satisfactorily. Tony11 points
-
This is Bandai's newly released B-Wing, which finally completes the set of original trilogy rebel fighters, the others having already been out for some time. I did grumble a bit about the cost of this one when I first ordered it, and I still think it's a bit on the steep side, but you can't deny that you get a fantastic kit for your money. All the aspects of the original studio model are reproduced perfectly, and features like the folding wings and rotating cockpit all work without compromising the detail and accuracy. Bandai sell a separate lighting module (originally made for Gundam kits I believe), which can be installed in the fuselage to light the engines. I picked up a Chinese copy unit very cheaply from ebay, which fits perfectly and does the job just as well as the Bandai version. In truth though, the effect isn't all that dramatic, especially as you can't really see it unless you're looking from behind. I didn't bother switching it on for most of the shots, as the camera lights tended to negate the effect. I have added one shot at the end with subdued lighting so you can see how it looks. The only additions to the kit were a couple of aluminium tubes to replace gun barrels, and a few addition stencil decals to add a little more fine detail. The full build can be found here. Thanks for looking Andy10 points
-
Hello, It's been a long time since I post something new. Well, may be because I am not a big producer! 😒 😁 So, here is my Ferguson Petit Gris from the 1/24 Heller kit. Very fine in details, Heller released a very nice kit. As I am fan of weathered models, when I felt on this picture, I knew that this one will inspire me. And with my VW Split panel And here is the link (in french) to the little WIP: WIP Petit Gris Thank you for watching and keep modeling! Lolo10 points
-
It was not. The advantage of it is that sometimes people go long stretches of forgetting I exist and I can hang out on model airplane forums and crack wise...and get paid to do it! I imagine Eduard have soured them a bit on making new Spitfires. Incidentally, the Sword XII fuselage seems to be the same length (before spinner) of an Eduard IX, if not a hair shorter -- not sure the spinner alone, big as it is, is enough to make up the length differential (which Ultimate Spitfires by Peter Caygill gives as 31' 10" for the XII and the euphemistic "other sources" (meaning Wikipedia) state as 31' 7", as opposed to the Spitfire IX's length of 31' 1". Hmmm. It's funny you mention this, as I think I've just traced my last two weeks worth of sinus troubles to leaving off the air purifier in the grotto. Er, aren't you forgetting something? In any case, I wish I'd re-read this unusually helpful review before starting on the nose of the kit, as it points out a problem I'm also experiencing, namely, that the upper cowling halves simply don't fit. But I'm getting ahead of myself. After much sanding down the nose is (probably) okay: 20180929_200622 by Edward IX, on Flickr That gives one an idea of the damage done by errant glue. CURSE YOU, CAPILLARY ACTION! You can also see the hideous wing-fuselage step at the nose, and that the carb intake is, as noted by others, too far back. 20180929_200627 by Edward IX, on Flickr Not really sure I want to saw it off and move it forward, y'know? For the gappy, gappy wing roots, I used a little plastic card to fill in the rear, and then used Mr Surfacer 1000 applied by syringe to provide a foundation, as it were, for future filling efforts later. (Future Filling Efforts is also the name of my new wave band.) 20180929_200611 by Edward IX, on Flickr And, as you can see, I added half the upper cowl. I took a lot of photos that sort of vaguely show it, but I'm lazy, so take my word for it: these do not fit. They're too wide, they aren't flat where they're supposed to meet with the kit, it's a mess. I've sanded and carved, and will probably insert a tiny shim as well, as seen in this test fit: 20180929_200358 by Edward IX, on Flickr Sword wants you to add the exhaust stubs now, but they can go f...ind themselves in opposition to my firmly held beliefs on that one. I added a backing plate of plasticard...not entirely sure what to do with the second half, but life finds a way.10 points
-
Bofors 40mm Gun and Tractor Another lovely little 1/76 vehicle from Airfix. This one from 1977. Thanks for looking.10 points
-
Completed today. Steam coaster Helen Craig (1891 - 1959), I began this model on the 15th July last, and completed it today. Total number of days worked - 27. Total building time - 47 hours. I kept losing interest and stopping work, but finally pushed myself to complete it today at 1355 BST. - Bob9 points
-
This is a very strange place for me to be as I normally only build aircraft and this is the first time I’ve ever shown an AFV…….. ….and I have to say I loved this build, it was a fun and very enjoyable build. Another first was my attempt to make her quite dirty looking. I’m not 100% sure it’s all done right but I’m learning and it was fun to do. Please enjoy. Model: Takom 1/35thZSU-57-2 Paint: Mr Hobby and Tamiya Acrylics, Model Master Metalizer Lacquer Extras: Aber Gun Barrel set Friulmodel Tracks Magic Models ZSU-57-2 Empty Shells9 points
-
More masking, including those tricky strips on the bottom of the LE, then on with Mr Hobby aqueous H333: Flickr9 points
-
This is the first time i build a Model wich is contain 100% Resin and PE part. Enjoy please !! Thanks for watch !8 points
-
Hi all Done a little bit more. I hade to use the stripes from the Kit for the loading doors on the nose as the thin lines on the S&M decals would have worked out to be on the inside of the blue area. The kit ones went on okay but the thin line is not quite the same or as thin as the lovely S&M decals ones. I have painted the area in between the decal lines and so now have the complete fuselage strip. I will coat with several coats of varnish and then hopefully will be able to mask off to paint the lower fuselage aluminium colour. Engines are now on and await a small amount of tidying before paint and the undercarriage legs. Thanks for looking All the best Chris8 points
-
I was able to add the last few details to this one over the past couple of days, finishing with rigging the rudder this morning. and that is job done. I have really enjoyed building this, and I can't remember the last time that I made use of an Airfix stand, it has been the most fun I have had on a model for a while. The rigging was worth doing and I feel that because of the extensive undercarriage rigging, really sets the look of this model off. by John L, on Flickr by John L, on Flickr by John L, on Flickr by John L, on Flickr Thanks to all those who took the time to look in on this build and for all the generous comments and encouragement along the way.8 points
-
Thanks Terry Masked up and a thin coat of Tamiya Smoke to darken up appropriate areas: Flickr Thanks to BM for that tip! Once that's dry I can reverse some of the tailplane mask and then add some more for the EDSG.8 points
-
Decals finished and tailplanes on. Just the undercarriage and a couple of aerials to get done now. Pretty confident that this will be done by the GB deadline. cheers Z8 points
-
I haven't posted for a while, loss of modelling mojo but I have finally completed the AMK 1/72 Kfir as a Colombian AF C12 I added the High Planes refuelling probe, Master brass pitot and some Eduard brass in the cockpit. The decals are from Aztec the only thing I would say about these is that the 'No Pise' markings on the trailing edge are in black and the pictures I have seen on the internet suggest they should be in red. The weathering was kept minimal as these Colombian jets seem to be kept very clean. Anyway enjoy (or not) Willy _IMG6083_1 by Phillip Wilmshurst, on Flickr _IMG6084_1 by Phillip Wilmshurst, on Flickr _IMG6088_1 by Phillip Wilmshurst, on Flickr _IMG6090_1 by Phillip Wilmshurst, on Flickr7 points
-
F-86 Sabre | Airfix | 1/72 Pakistan -- Muhammad Alam, Pilot I completed this kit in November of 2017 and felt I should post it because I mention it in a post about Alclad and Decal incompatibilities. I intended this kit to be a Norwegian F-86 as part of a project of mine to make a model of every major Norwegian fighter. As such, I intended it to be an "Airshow" finish -- That is, like a mirror (which I'd done before on a Hasagawa Sabre). The Airfix Sabre plastic seemed kind of rough, so I sanded it with progressively finer paper down to 12000 grit. When the Alclad polished aluminum was applied, it didn't look like a mirror, but more rough or weathered. At that point I chose a different subject from the same decal sheet: the Pakistani ace Muhammad Alam. Finishing: Seams filled with CA (superglue), entire surface sanded down to 12000 grit Paints: (applied from base coat to surface): Tamiya spray gloss black > Alclad polished aluminum > Alclad Dark aluminum w/ a dusting of steel > Alclad Aqua Gloss > Decals > Alclad Aqua Gloss > weathering (oil washes) > Alclad Aqua Gloss Detail paints: Testors Model Master red, black, gray (don't remember the exact color) in cockpit, Testors MM Zinc Chromate in wheel wells, Alclad aluminum and Tamiya Nato Black for landing gears/wheels Decals: Cutting Edge Decals F-86Fs & Sabers #3: foreign aircraft (ca. 1999) -- primary markings / Airfix kit decals -- stencils I didn't have a WIP, so some building notes are at the bottom. Also, I have a terrible time getting good pictures of reflective models (imagine that!), so I'm not sure these quite do it justice. Building Notes: This Airfix model was a joy to put together. I would tend to agree with critics that say the panel lines are too deep and too wide (although that seems to be improving), but for a $12 model, this is a super value. The only gripe I have is that the wing assembly was a little ill-fitting, requiring a little work on the seam on the bottom behind the landing gears. It looked really good, but after I dropped it on the concrete patio (nice and wet from a coat of Tamiya black spray paint at the time 😲), I think I damaged the plastic, because I couldn't quite get looking the same. To get different shades of Polished Aluminum, I masked panels that I wanted darker, sprayed a couple of coats uniformly over the whole aircraft, then removed the masking and sprayed a couple more coats uniformly over the whole aircraft. This way, I let the transparency of the Alclad show the black undercoat through to create different shades of the same paint. Therefore, the center panels on top of the wings were masked for the first couple coats, and then were unmasked and painted with the rest of the wing for the next couple of coats. Weathering was difficult, and ultimately inaccurate. I found very good close up pictures of Alam and his aircraft after I was finished (of course ) and they showed that his Sabre was not nearly as reflective as I depicted it. The weathering was very difficult on the slick Alclad Aqua Gloss surface, as you might expect, and seems kind of artificial to me. I should've backed off on it, if the whole aircraft was going to be so shiny. In the end, I'm very proud of the NMF, but disappointed in the weathering. Overall, the build was a ton of fun, with a good kit and great decals. Hope you enjoy. Comments, constructive criticism, questions and tips always welcome!7 points
-
This is the 1987 boxing of the Bristol Fighter F.2B with the transfers for 5 Squadron from the 1962 'Red Stripe' Header/Bag version . Build thread is here: Very enjoyable build with wood effects and rigging adding an extra challenge. Many thanks for all the input and support, BM Modellers.7 points
-
AVRO 504 K D Flight No. 4 FTS Abu Sueir, Egypt, 1920's 1/72 This is the 1978 boxing of the Airfix 504 K. It was built out of the box with a couple of scratch details such as the wind shields and aileron cable guides. I brush painted it with Xtracrylics Light Aircraft Grey and various Humbrol/Revell/Citadel acrylics. The rigging was done with Uschi's Superfine rigging thread. by John L, on Flickr by John L, on Flickr by John L, on Flickr by John L, on Flickr by John L, on Flickr7 points
-
Hi Everyone Made a lot of progress this week on Musketeer, main camo colours are on the hull, railings fitted and a bit of (over the top) weathering applied. The new colours from Colourcoats look much better to my eye than the original colours (see my earlier model of HMS Rattlesnake for a comparision, apart from the small area of MS3 she wears the same 3 colours as Musketeer but with the original colourcoats paints) Scratchbuilt the 4" AA gun for a bit of light relief..... Added quite a few seperate deck fittings to give a little detail to the build, some are based on pics some are educated guesswork based other similar ships and past experience, to my eye at least they improve the basic appearance of the kit and are pretty simple to sort and add (stole quite a few of these bits from the pile I made up for HMS Ceylon...... which I will get back to middle of next year) 4" gun support structure was completely re built when I originally assembled the kit, unfortunatly I managed to drop it when cleaning it and had to totally rebuild it again! Added raised circles to the deck around the main turrets as shown on various pics, not sure quite what they are for (guess they are to keep people away from the moving turret) but made them too small..... and in the spirit of crashing on and just enjoying myself can't be bothered to replace them!7 points
-
Hi Johnny, yes this is Halford's High Build Primer I've seen it used brilliantly by tomprobert in his marvellous builds and promised myself I'd try it I've used for car bodywork in the past and found it helped get the right levels It has helped here, after initial sanding I now have a list of places to fill, places to remove and places to leave alone S'magic our kid I think the nose section behind the nose cone joint needs fattening up a little so it has that very definitive curve Humbrol filler this afternoon, methinks Anyway I am endorsing Tom's method, it's excellent7 points
-
Well I thought I would get the aluminium out of the way first. I’m pretty pleased with it. The bar on the left wing is where I held it while spraying. This will be covered by the invasion stripes tomorrow: Canopy frames will need touching up but up but at least the canopy is nice and clear after taking the masking off. Thanks for looking, Adrian7 points
-
This is my entry, the Tamiya Thunderbolt in 1/48th scale built as a P-47D-20 from the 19th FS, 318th FG. I scratch build a few extra parts for the cockpit and the exhaust manifold. I used an Ultracast seat and wheels, the Vector update set, which includes the open cowl flaps, intercooler exhausts, intake/oil cooler intake splitter and the tail planes with the separate elevators. Oil cooler outlets came from QuickBoost, the the 75 gallon drop tank is from the Edaurd Brassin range and the 1000 lb bombs are from Attach Squadron. Decals are from Thundercals. My build thread with more pictures can be found here This was my first GB and I really enjoyed it, though next time I won't leave so much to do till the last two weeks! But the good thing is that I finished a kit a lot quick than I usually would as I'm most of the time I'm work on several kits at a time. ( If you are using Chrome please click on each photo to see the accurate colour as the colour are muted in this forum in Chrome )7 points
-
88mm Flak Gun and Sd Kfz7 Tractor. A lot of fun and a surprisingly good little kit for such an oldie. Thanks for looking7 points
-
She shrunk a bit. Couldn't resist adding detail, even on a fun build. G6 points
-
CF-104 | Hasegawa | 1/72 Canada -- F/O G.W. Sanderson, Pilot I completed this model on September 29, 2018. The work in progress is here. The decal set had a full set of numbers to make any S/N, and http://www.rwrwalker.ca/ has histories of most (maybe all) Starfighters in Canadian service. I picked one that had an exciting, but non-fatal (to the pilot) history. From the website: "With No. 448 (Test) Squadron at RCAF Station Cold Lake, Alberta in 1960s. Being operated by No. 6 (ST/R) Operational Training Unit at Cold Lake when it crashed on 9 June 1965. Pilot lost control on final approach, engine failure and technical malfunction suspected. F/O G.W. Sanderson, on his first solo on type, ejected". The CF-104 was built by Canadair under license and was used as a ground attack aircraft, despite it's interceptor origins. Consequently, a large number of Starfighters were lost in service. Reportedly, one of the more entertaining nicknames for the aircraft was "the lawn dart". The CF-104 entered service in March 1961 and the last was retired in 1987, the type being replaced by the CF-18 Hornet. Finishing: Seams filled with CA (superglue) Paints: (applied from base coat to surface): Decanted Tamiya Spray can Gloss Black > Alclad polished aluminum / Alclad Stainless steel for darker panels / Testors red for Fuel tanks and horizontal stabilizer / Mr. Color Gloss White for Wing tops / Mr. Color #117 (light blue) for under wings and bottom part of radome > Alclad Aluminum for lighter panels > Alclad Aqua Gloss > Decals > Alclad Aqua Gloss > weathering (oil washes) > Alclad Aqua Gloss Decals: Belcher Bits CF-104 decals for primary markings, kit decals for stencils Here's a close up to show the weathering and wash on the wings and fuel tanks: Closeups of the landing gears and gear bays (note the bottom seam isn't the best -- the plastic appeared to have sunk after molding, creating a concave appearance at the seam): Here it is next to a mid-80's CF-104 I completed a year and a half ago (a complete re-build of a Hasagawa kit I finished in the mid-80's -- it was a pretty bad kit): Building Notes: In general, this is a very good kit, except for the need to glue the front half assembly and back half assembly together, creating a seam that is very difficult to get looking good. I got the blue color from one of the websites out there specializing in CF-104s (I don't remember which one now). I'm on the fence about whether it's correct or not. It matches some of my reference photos, but not others, where it appears to be a type of gray. It could be that they changed colors over time. I don't know. Hope you enjoy. Comments, constructive criticism, questions and tips always welcome!6 points
-
Greetings to everyone, after a long time again, several models in process of finishing This is one of them. Unfortunately I do not have time to devote myself to this hobby About the model ... I will not say anything since it is present in the market for at least 30+ years. Old KP with all kinds of flaws, slightly upgraded, aftermarket markings, Hataka colors, washing-everything that came under my hands. I hope you will like this old guy Best regards to all ... and of course a couple of pictures at the end6 points
-
Afternoon from a sunny New Zealand A rather well known Spitfire Mk.Ia of Alan Deere called Kiwi II. Possibly the most famous NZ fighter pilot of WWII. He was with 54 Sqn at Hornchurch, July 1940 when flying this particular aircraft. I want to build Colin Greys Mk.Ia KL-T in future too as the two inseparable while at 54 Sqn. Markings come from DK Decals 1/72 Spitfire Mk.I/II Aces and were flawless in colour, density & adherence. Paints used were Mr Color lacquers. Very pleased with the overall result and weathering. Even after having to strip it back to bare plastic after a primer coat that failed to adhere. Overall a solid kit with loads of potential for weathering, this being my 7th build of this kit. There will be more as there are still 25 odd to choose from still on the DK sheet.6 points
-
Hi, everyone! Let me present you my model, builded earlier in september.6 points
-
B-10B | Williams Brothers | 1/72 I completed this kit October 5th, 2017 and felt I should post it because I mention it in a post about Alclad and Decal incompatibilities. It was a gift from my Dad, who knew I had a fascination with this aircraft. He got it from a vintage kit dealer and it is from the early '70's, although they still sell it today. Finishing: Seams filled with CA (superglue) -- couldn't really sand them because of the corrugated aluminum texture on the body. Paints: (applied from base coat to surface): Mr. Surfacer 1500 spray black > Testors French Blue (body) > Testors Model Master Deep Yellow (wings) > Alclad Aqua Gloss > Decals > Alclad Aqua Gloss > weathering (oil washes) > Alclad Aqua Gloss Detail paints: Testors MM Zinc Chromate and black in cockpit, Testors MM Zinc Chromate in wheel wells, Alclad polished aluminum and Tamiya Nato Black for landing gears/wheels, Alclad Polished aluminum sealed with Testors Metallizer sealer on propellors, Alclad steel washed with a black oil wash for engines. Decals: The kit decals were so old, they disintegrated when the hit the water, however Williams Bros. lets you order replacement sheets from their website. I didn't have a WIP, so I have some building notes at the bottom. Building Notes: This is a difficult model to build, there are few alignment pegs/slots/grooves. Although, I didn't find it as difficult as many of the reviews online made it out to be The canopy materials are extremely brittle, and when I cut the first one with sprue cutters, it put a big crack in the canopy. Also the fit of the canopies is terrible and I was scared to cut or sand them because they were so brittle. The decals were too old and disintegrated in water. The replacements from Williams, Bros. were very nice microscale decals with a variety of countries (Netherlands, Thailand, China, and several U.S. versions) I have a very hard time with getting a good finish with Testors gloss paints. I did a marble coat first, which gives very nice, subtle tonal variation in the wings (too subtle for pictures ), but the body came out sandpapery, even though I thinned the blue paint with Mr Color leveling thinner! I'm not very happy with the finish on the body. One of the things I didn't like about this kit was that the landing gears are molded so that they can be installed retracted. In order to install them extended, you have to cut the landing gear in half and insert a spacer that they provide. I did a lot of reading about different types of glue so I could pick one that would support the weight of the model. In the end I chose 5 minute epoxy. The kit didn't come with a gun. The best I could do was a 1/72 AK-47 from a Mi-24 kit from a long time ago. It's roughly the size of the gun in the front turret in the historical photos I've seen. In the end I was proud of how it turned out (in spite of the roughness of the blue color). Hope you enjoy. Comments, constructive criticism, questions and tips always welcome!6 points
-
1/48 Hawker Hurricane Mk 1. Loved this kit. So much so I have a bid on fleabay for another 2.... Brush painted with tamiya acrylics and kit decals (apart from the wing roundels). As per the build thread thought I was scuppered with the decals but came OK in the end. A little bit rough around the edges (and NO weathering whatsoever!) but it is what it is6 points
-
@john-w, @Major_Error, @Gorby, @Vince1159, @Ozzy, @thorfinn, @malpaso, @stevehnz, @bzn20, @DAG058, and @Badder for your reactions and comments. I am overwhelmed by this response. The Bridge on the River Kwai is certainly iconic. Hope to make the build worthwhile for you all to follow. Though I have to warn you, I still have to finish the Wardell Bridge Diorama. I will try and spend a few hours a week on this project, In doing so, an update will drop in now and again. Please forgive me if I drop in an update without mentioning you all. I do acknowledge who has liked the builds, and I am very grateful for that. It encourages me to keep going.6 points
-
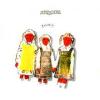
I cut the base plate from 12 mm plywood scrap. Bought 4 and 6 mm dowel for the main bridge piers. Meet my supervisor, One Fifty. He is telling me where to place the dowels. Here are some more one-fifties (12 mm) figurines. The Japanese soldiers will look normal.The POWS look anorexic (starved and exhausted to death). So I had to whitle them down. It's a terrible exercise because it really touches your heart to spend time thinning them down. I will be spending some time on these. Whitle one or two at night, a few tmes per week. I will need lots of them. Then later I will chop them up to make various postures for the diorama. Drilled holes for the main piers. Then cut the pier lengths, and started to sand them down to a taper, like a tree trunk. Overall there are 50 piers.6 points
-
I seem to have made quite a lot of progress without posting an update. It's that sort of build - straightforward, quick, and before you know it you're painting. Here it is - white and aluminium (alclad) done so far, needs some Boeing grey and some coroguard. I'll have to get those done during the week if I'm going to get it finished next weekend. The demarcation looks a bit ragged, but it's going to be under a decal so should be ok. thanks for looking Z6 points
-
Thanks @AdrianMF and @Smudge A pretty straightforward update this time. No plastic fettling, modifying, scratch building or anything like that to report - just a coat of light aircraft grey, dark sea grey and dark green. It's a very simple camouflage pattern - I had a little trouble finding good, clear photos that illustrated the camouflage on both sides, but this looks about right. Better get on with the wheels and rotors. cheers Z6 points
-
Time to call in the big guns6 points
-
After becoming frustrated with ICM/Revell´s Mustang Mk.III in 1:48 (and sending it to my spares box with most pieces on their sprue), I decided to pull this model out of my stash and build it as a relaxing build, which it was! The model offers the flaps and slats in the down position, and you can pose them up by cutting their respective mounting tabs. However, while removing the tab of one slat, I also removed a chunk of it, which was repaired by filling the area with CA. I also feared that, due to how thin the plastic on the slats was, that the plastic would damage if I used regular glue, so I used CA to glue the slats.6 points
-
New articles from Arma Hobby blog. Hurricane Mk I Model Kit Development Hurricane I – photoetched parts and decals6 points

.thumb.jpg.87669a5ffb8b13672a3d675087a46d42.jpg)


.thumb.JPG.3498f40362ff13ebfc4b2e45abbd545e.JPG)


This leaderboard is set to London/GMT+01:00