
Leaderboard


Popular Content
Showing content with the highest reputation on 16/09/18 in all areas
-
Dear Friends Having another go with Imgur. This is the Airfix Dornier with Extradecal markings for KG3 in the BoB. Used the Eduard resin MG-15 guns The guys getting over-heated bringing the bomb are from Zvesda Hope you like it? Andrew37 points
-
At the requests made in one of the threads, here are some images of the models (all 1/72nd) I still have with me. I am not very fond of doing this, because handling such an amount of models (three tables full) unavoidably produces mishaps. Needless to say, some way or another, I damaged several models: a wheel here, a tailskid there, a Pitot somewhere, many an antenna and so on and so forth. Darn! These are the images of those three tables, from different sides. TABLE ONE: TABLE TWO: TABLE THREE:35 points
-
As you may already know it`s been 50 years since the making of the BoB movie. Leonard Mosley`s `making of` book was probably one of the first books I read as a child and the front cover always drew my attention. It seemed fitting that if I ever came to make a BoB movie diorama, I would choose the front cover. Just need to find a correctly sized frame to protect the base and this will be done but as it`s a day past the actual anniversary of the real BoB, it seemed right to post this up now. The kits are 1/72 and the only really issue I had during the build has the continual humming of the movies theme tune...... Thanks for looking.35 points
-
This post is in response to a question posted on a related thread. I thought I had posted this model, but can't find it, I may have posted images of it in reference to vacuformed kits, though. I am very grateful there is even a kit of the Kangaroo but... Many moons ago Contrail released this now somewhat outdated vacuum-formed hefty kit. It is surely not state of the art, and has many inaccuracies, but it is nevertheless a starting point, if you are willing to spend time and effort. Many of its shortcomings, some subtle and some not, have to be corrected. No little time was spent on this one. Uncountable hours of research and building and no little grief has been endured in correcting the various kit's faults, let alone the complicated building and subject to start with. This rather basic kit was given a full interior and a very high number of details not present in the molds. Needless to say the almost inexhaustible jungle of struts and rigging was the happy occasion of many a well-deserved Martini. There are myriads of pieces of advise I could list regarding this kit. The kit has some obvious but fixable mistakes. Retrospectively there are two things you shouldn't do: do not follow the kit's pre-marked locations for any of the struts, they are misaligned and will cause frustration. Measure and drill your own strut locations, and try to be as accurate as you can. And do not use the white metal exhausts, radiators and props (I used the radiators and props). They are way too heavy and will give the engine gondola too much weight and mass, making it prone to detachment at the least provocation and almost surely during transport or handling, since its securing frame is too fragile. The radiators are easily scratchbuilt, the props may need plastic or resin substitutes. Able modelers may cast the kit's metal props into resin ones. The Arctic Decals set fortunately facilitated an accurate and pleasant decoration providing its usual well-researched, easy-to-handle, well printed graphics. There were many civil Kangaroos, each one with its own quirks. Fun is to be had by those wiling to take the bold step. The British did actually design very beautiful planes, but this one is more, er, sculptural one may say...looking for some redeeming adjective, and that's precisely why we love it so much.32 points
-
Hi guys, This is my daughters latest work. A small vignette she calls cloud breaker. She used the airbrush for the first time, this was very exciting for her. On my advise she didnt paint the canopy. Have fun. Greetings Lars and Lauren27 points
-
My latest build is this Tamiya F-14D. All from the box except for a pair of Aires seats. Decals are from Fightertown 48803 and represent an aircraft from VF-31. The timeline is supposed to be Christmas 2002/2003 hence the Santa hat on Felix. Thanks for looking. 4 2 url=https://flic.kr/p/MnajPg][/url]10 7 8 923 points
-
Hello all, Here's my just finished 1/48 ICM JRB-4 Twin Beech. I saw the kit with these markings at the hobbyshop a couple months ago and thought it would be nice to build something bright and colourful for a change. Painted with Tamiya (white) ,MR Paint (international orange) and Humbrol (the hinomaru), the decals came from the kit and were very nice to work with. Other than the engine cowlings with a nasty horizontal seam, the kit was a joy to build. I did change the antenna on the roof and pitot tubes under the nose to look more like the later ones. Gear doors were not used, as they are missing from the ones on photos of the real ones too. Thanks for looking, I hope you like it. Pete20 points
-
Hello I'm here again with a couple of new finnished kits. This time these are Northrop Delta with double pilot positions. First here is the Delta 1D c/n 42 when in service whithin the Royal Australian Air Force around 1943 Next is the Delta 1D c/n 74 in U.S. Coast Guard service in 1936 : And now a picture of my Northrop Delta family so far, with both single pilot aircraft I built last year : Patrick19 points
-
Hi, CASA factory was building under licence early variant of Vickers Vildebeest with Hispano Suiza V-engine (Vickers type 245, whereas Vildebeest Mk I is type 244 and Mk II is type 258 as given in instuction for model by Special Hobby). 25 of them were produced in Getafa (Spain) with exchangeable wheel/float u/c. I build this model with GB "Britts abroad". Model presents machine with serial T-17, blonging to Grupo 72 Defensa de Costas in 1938, based close to Barcelona. I have painted in my interpretation of her scheme, which is know only from this photo. Please note that floats for sure has three colours patterns whereas fiselage rather only two... Therfore I did not agree with interpretation from Molina-Mercado book followed by SH instruction, or Here is my model : I have introduced some changies to kit during build - here is thread from build (this Vickers plus two other machines) Comments welcome Regards Jerzy-Wojtek18 points
-
Thanks Stephen, Dermot and Bill A nice Sunday Roast and decision made - she's finished. With 265 photos this is the biggest album in my Flickr account and certainly the biggest model I've made to date. Thanks again to Phil ( @HP42 ) for donating the kit - very kind and I hope you like what I've done with it. An RFI seems a little cheeky as this is impossible to photograph. It won't really fit on the bench without risking knocking something off (the model or the bench): Untitled by Ced Bufton, on Flickr So the props were stuck on and she was walked around the man cave until I found somewhere safe to take some shots without having to stand on a table... A recap on the internals, never to be seen again: Of course I'll have to call the local authority for a special recycling collection for the box As I need some space (please, some SPACE) she's been put straight on the ceiling, shown here in formation with the Liberator: I hope the invisible thread is strong enough! Thanks as always to your help, support and companionship during this build and to Phil again for the kit. Now, where's that Lysander got to...18 points
-
Not my best effort, could not get the paintwork quite right and therefore could not fulfil the full potential of the kit15 points
-
You've heard the famous story about General Curtis LeMay, I presume? He pulled out an immense cigar (as was his wont) and began to smoke it near a fully-fueled and armed B-36 on alert status at a SAC base. "Sir," squeaked a nervous airman guarding the aircraft, "you can't smoke here. The plane might explode." "Son, it wouldn't dare," replied the general.15 points
-
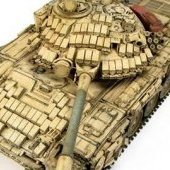
Hi all This is a homemade conversion of the Modelcollect T-80BV kit, converted to one of the recent T-80BVM configurations. I painted it with Tamiya acrylics and weathered it with Humbrol enamels. regards Alex14 points
-
#24/2018 And my dad´s next one... Eduard´s new Bf109G-10 Regensburg production, built oob, painted with Gunze and Tamiya, EZ Line for aerials. JaPo KG(J)6 book as reference, the book and Eduard go for a 74/75 camo, my dad chose a late war 75/83. All in all not a bad kit, goes together well like Eduard´s G-6. As usual, there has already been some discussion about the accuracy. Well, the oil cooler and the elevators are more G-6 style, the legs are earlier G style and, like the Hasegawa ones, about 2-3mm too long. Only Tamiya, Zvezda and Fujimi got their G legs right. Overall it looks like a G-10 and it was fun to build. Besides Me262s, also Bf109s and Fw190ies were used in the KG(J) units. Whereas earlier 109s were used for training, G-10 and K-4 were used for combat, like this machine from 1./KG(J)6, which was found wrecked at Prague-Kbely at the end of the war. Build thread here https://www.britmodeller.com/forums/index.php?/topic/235041340-against-the-odds148-messerschmitt-bf109g-10-kgj6/ DSC_0001 by Reinhard Spreitzhofer, auf Flickr DSC_0001 by Reinhard Spreitzhofer, auf Flickr DSC_0002 by Reinhard Spreitzhofer, auf Flickr DSC_0004 by Reinhard Spreitzhofer, auf Flickr DSC_0005 by Reinhard Spreitzhofer, auf Flickr DSC_0003 by Reinhard Spreitzhofer, auf Flickr DSC_0004 by Reinhard Spreitzhofer, auf Flickr DSC_0008 by Reinhard Spreitzhofer, auf Flickr DSC_0005 by Reinhard Spreitzhofer, auf Flickr DSC_0011 by Reinhard Spreitzhofer, auf Flickr DSC_0012 by Reinhard Spreitzhofer, auf Flickr DSC_0006 by Reinhard Spreitzhofer, auf Flickr DSC_0014 by Reinhard Spreitzhofer, auf Flickr DSC_0015 by Reinhard Spreitzhofer, auf Flickr DSC_0016 by Reinhard Spreitzhofer, auf Flickr DSC_0017 by Reinhard Spreitzhofer, auf Flickr DSC_0018 by Reinhard Spreitzhofer, auf Flickr and the checker gang so far DSC_0019 by Reinhard Spreitzhofer, auf Flickr DSC_0020 by Reinhard Spreitzhofer, auf Flickr DSC_0021 by Reinhard Spreitzhofer, auf Flickr DSC_0022 by Reinhard Spreitzhofer, auf Flickr12 points
-
Dear fellow Britmodellers, this is AZ Model's Messerschmitt Bf-109 G6, built from the 'Joy Pack' boxing, with Brengun photo etch and pitot from Master Model added. Decals are a mix of USK (wing markings), Hasegawa (fuselage code number), AZ Model (Italian flags) and Sky Models (small '8'). The aircraft represented served with 3. Squadrilla, 2. Gruppo Caccia, based at Villafranca airfield in late 1944. This build would have not been possible without the valuable help of fellow Britmodeller Luis Alfonso, who not only tracked down the USK decal sheet, but also a vital reference ("Italian Air Forces 1943-1945" by R.Caruana). Thank you Luis... The model was painted with Gunze/Mr.Hobby acrylics, weathering with artists oils. All photographs by Wolfgang Rabel. I realized too late that USK got the upper wing markings wrong:. the outer arm of the fasces on the starboard side should face forward. Thanks for your interest, greetings from Vienna!12 points
-
Much appreciated Chris. Is that you offering to build it for me Simon? Really - that's justy too much, I couldn't possibly &etc. &etc. Aye. And with this crowd they'd then be complaining about the lack of spoons at the counter.... I'd seen that previously chaps - it's an absolutely gorgeous bit of building isn't it? Not promising but let's see how the build get on pace-wise over the next few week. I'm inclinging to doing a bit more in the matter of some kind of base for models these days so let's see what transpires in the course of events. Quite definitely not Benedikt! Apart from the tubular framework (it's of course impossible to get that done right out of a flat medium) I'm anticipating using practically everything else on the fret. Being shiny white metal no photograph does justice to the sheer amount of surface detail that Flightpath have crammed in - it's simply astonishing at this scale. Phoenix - thanks for that. From a craftsperson of your abilities I can't fail but to feel emboldened to tackle that challenge now! Fear noought Johnny. The bit. It is being chomped at. Hi Max. Lovely to be able to thank-you in person for sharing such smashing photos! The flaps are being displayed here on the purely imaginary supposition that the importance of such a mission would have required close attention to maintenance and airworthiness, given the fact the Prime Minister himself was looking for quick results via R.V.Jones.... 'Action this day' &etc. I actually found a shot of an Annie undergoing maintenance recently that supports this whimsy not being entirely beyond the bounds of credibility... Committed to corrections now so I've extended the recess under the trailing edge of the wing out to rib 10a now: Airfix appear to have detailed the correct number of ribs, though I'm still pondering whether to sand those peaks down or fill the troughs between them as to which will method give a plausible camber to the wing when levelling the surface: The original flaps took an early bath this morning in order to soak-off the Gator's Grip: I can confirm the impressive bonding strength of GG in that even after a couple of hours of soaking, I was only able to pull away the ribs from the flap trays. The more complex structure of the flap itself is still firmly gripped and will be left overnight to see if that loosens it without the need for 'persuasion'... Having stuck a flap & tray under the scanner, I pulled them into the Silhouette design software and used them as the basis to produce set of drawings of the corrected length: Cutting those to some scrap Washi tape, the resulting masks were then tested against the wing recess: Satisfied that the dimensions were correct I then used them to mask and spray some brass sheet (of approx. the same thickness as the Flightpath etch) in order to produce some sharp outlines to score and cut out: I'll see to that set of tasks in dribs and drabs over the course of the week. Not quite back to where we were but getting there. Tony12 points
-
So I decided to risk it all in a death-or-glory shot at upping my game, As you know, many Hurricanes in service had very visible exhaust staining that seems to sort of arc up and then more sharply down. Cf: So I opted to try and replicate this. Now, this is probably wrong for the 71 Squadron Hurricane; the Eagle Squadron was flying only one or two sorties a day per aircraft, so there was probably a fair amount of time for some TLC, but I figured nothing ventured... I'm not sure the results were a complete success, or even much of a success at all. 20180915_161036 by Edward IX, on Flickr 20180915_161041 by Edward IX, on Flickr 20180915_161113 by Edward IX, on Flickr 20180915_161111 by Edward IX, on Flickr 20180915_162319 by Edward IX, on Flickr What I did was: I used my Krome with a .3 needle (too big) initially to lay down Alclad burnt metal for the exhaust stain, followed by (once I wised up), Alclad Jet Exhaust using my SOTAR with a .2 needle, then some Tamiya Medium Sea Grey mixed with white and heavily diluted. Then I rubbed it a bit with 6000 grit micro-mesh, and then I went over it with some pigments to soften up the airbrush lines. Then I went over everything (but the upperwing roundels, which need more decal softener) with Gunze flat coat, to seal in the pigments like that guy who wanted a cask of Amontillado, and here we are. 20180915_162319 by Edward IX, on Flickr 20180915_162334 by Edward IX, on Flickr After that, I added some chipping with a Prismacolor pencil (not shown).11 points
-
At the moment, no I don't. I may end up having some custom transfers made when the time comes. Between now and then I will keep my eyes open in case someone decides to release a set. They do Tony. They indicate where to support the blades when they're off the aircraft for storage/servicing etc. The blades are stored on trestles with the leading edge facing down and the trailing edge facing upwards I still have the red stripes to add to the blades Rick, I use a cheapo solder station from Amazon and standard solder most of the time. Recently I have started using Tix Products and find their solder very easy to use *Edit* Dunno what happened there... BM went and posted by itself even although I was on another page! The post came today. As they do on every day really. Even on Sundays here. But you're probably not interested in that are you? But you may be interested in what the Postie brought me..... No, not a box with lots of stamps on it. (I'll bet he had to take a drink after licking all those stamps!) No, these..... DH Venom & DH Vampire, now safely stashed in the ehhrrrr ... stash. Where I stash things y'know. I think they may become a double build sometime in the future. But now onto more pressing matters... this monstrosity of a beetleback. Notice some gaps? It is going to be an absolute pig of a thing to fit. The front edge doesn't follow the same curvature as the rest of the airframe and there are some other issues too - notice that spine running up the center of the beetleback ? Imaginary that is. It should be a double row of rivets. Fly have also decorated the front edge with rivets/screws - a very nice job. Unfortunately they don't exist there on the 1:1 Oh dear, nice research Fly. Resin to plastic.... booger, how's that going to work then? To try and give me something approaching a fit, I opted to add some scrap styrene strips around the bottom edge. These were super glued in place... Then epoxy glue was smeared around the inside to give a stronger bond between the styrene and the resin. This also means that I am now gluing styrene to styrene... eventually. But first there's a small matter of fitting the Angled drain thingies that no-one seems to know their exact purpose. It was while fitting these that I noticed that Fly have got the back end around the beetleback all wrong (easier to explain later) I found some styrene angle which looked about the right size but the wall thickness was a bit too much so I thinned it down using a square file These two resin Y shaped things are what Fly provide - again, the wrong shape and these ones are full of air bubbles. Below, the angle is fitted along with a couple of support strips In this photo you can see that I have cut away the top of the angle, leaving the two trailing strips which sort of looks like it should. Also being added is a support for the beetleback. Lots of new words have been learned today Of course I forgot to take a photo of just the beetleback fitted. I got so wrapped up in the job - the front edge was bonded to the kit with epoxy glue, and styrene cement for the bottom edge. I had to there for nearly 15 minutes holding the beetleback in place, pressing down for the styrene glue to take hold, and pressing the front edges trying to keep everything as aligned as I could with the airframe. The masking tape was to prevent glue getting on the rest of the kit. You may be able to make out a row of rivets around the lower edge of the beetleback. They shouldn't be there either. This is where Fly went screwy. On the 1:1, the airframe has a nice radius aft of the trans deck, and even the front end of the beetleback sits on top of this radius. On the bottom edge of the beetleback is a flat (almost horizontal strip) which is fastened to the airframe Fly have modeled this kit with an almost vertical area aft of the trans deck, and only the very back edge of the beetleback sits on a flat surface. I'm adding a small strip to try and represent that 'flat' mounting strip Some time later... Now looking something like a Wessex. Believe it or not but that is about 3 nights work just to get that part fitted, and I'm really not happy with it. There's a noticeable hump when viewed side on - when it should be a nice smooth transition from the trans deck to the beetleback In other news, these arrived. No warp, no mis-shapen parts. But do they look a little large on the diameter to you? I used the Fly part as reference (maybe should consider that in future!) so it fits with the kit perfectly, but I have a feeling the diameter is just a little on the large side Thoughts?11 points
-
Loosing a bit of interest lately with modelling, getting tied down trying to super detail stuff that most won't be seen when completed, I'm an impatient builder so don't have the discipline of a lot of the fantastic builders on BM who go that extra mile . So what better way then get the interest back than a oob of a Hasegawa kit, you can't fault these later offerings as they have a low part count, plenty of detail and the fit is brilliant, not a bit of filler required. I know the seats wrong in the kit but I went with it anyway, and as you can see I didn't go the full beat up finish that they really should be like towards the end of the war, I just can't seem to get that right10 points
-
A slightly different subject from the usual, the Kawanishi N1K1 Kyofu floatplane fighter known to the Allies as Rex. Hum, struggling to add the image from Imgur, any suggestions Guys? https://imgur.com/SNfR40F <blockquote class="imgur-embed-pub" lang="en" data-id="SNfR40F"><a href="//imgur.com/SNfR40F">View post on imgur.com</a></blockquote><script async src="//s.imgur.com/min/embed.js" charset="utf-8"></script>10 points
-
Good idea Steve, thought about it but having had fairly poor results with Klear lately I stuck with plan a-ish My second go worked out nicely and now I have the panel's black interior sorted Next it was closing time, with all the working class traumas that phrase implies When I was working with the upper and lower halves I was worrying about this, the upper piece is wider than the lower Anyway the first phase was to glue only the fuselage sections and leave the very distorted wing panels out of the game With this done and filed and polished ( yes I forgot to take pictures, this had to be done down in the garage with the doors open I would add in my defence) it was time to pick a wing I chose starboard, could just as easily have been port, but it wasn't So, sue me! I had decided to use tube glue to get the extra strong bond it always, sometimes, usually, kind of, gives me so I squirted a fair bit out into the upper tank fairing and wing closures Then squozed the two halve together with modelling clamps at an angle to give me plastic distortion that would let the misshapen bits join and bond Didn't work... So frantically dashed to the garage vise and squeeze together in the proper direction, dash off to make the morning cuppas Came back to find Foxy lying on the laminate bit of the garage floor so a frantic wash the joints with Tamiya Extrathin and resite the boom bit in the vise Then wrap Tamiya Tape round model and benchvise when convinced I had it as well positioned as possible Seems to have worked after I retrieved it an hour and a half later You can see I relented and popped a chair in for the/a looker Can also see that falling on the floor took out the sensitive eject mechanism and made the driver's seat go for a ride (Found and safe, so it can go back in later after I build the gunsigyht for the coaming) You can get a measure of the moulding distortion from this The upper section (I cannot call that thing a half!) needs to be squeezed down towards the fuselage whilst the glue can set but I am confident-ish that I can do it again with this side The other side was just as bad 😱 The centre fuselage took very well to treatment, so at least I'm happy about that 😇 So now! Its back into the breach, dear friends...10 points
-
GWR Prairie Tank Another quick one for me all done by hairy stick using humrol enamel paint done in the style of my 12 year old self the be decals were swapped for some after market GWR ones.9 points
-
From 13 years ago, another model of a vintage plane that precognized the future: Now, there you have an airliner. Almost an ocean liner, one could say. And, ladies and gentlemen, this was 1920. 32 passengers, mind you. Mister Vincent Burnelli developed a whole family of planes around the lifting body concept, -used much, much later in more contemporary machines. Its earlier interventions in the design field contributed to planes like the Lawson Airliner and the Continental KB-1, amazing creations on their own. Structural soundness, safety and many other qualities of the plane were sought after with the rational use of advanced design concepts. In a way, the “lifting body” is related to the flying wing, both searching for minimum drag, efficiency and structural advantages. Lifting bodies will appear much later, among other examples, in the NASA experimental planes that studied atmospheric re-entering vehicles. A similar line was pursued by French designers: De Monge (his De Monge 7.4 in 1924), Dyle-Bacalan (D.B. 70 around 1925) and Carpentier (C-1 of 1935). There is a wealth of material on the Net, so if you feel attracted to these types and concept do your homework and you will find many interesting stories and the planes and men that created them. For the purpose of this article, I would just say that this story starts in 1920, when Burnelli got associated with Mr. Remington (hence the “RB” denomination), and that there were two version of the plane, the RB-1 and the RB-2, but RB-1 got reincarnated at least once. Here we deal with RB-1's second life. You could have tons of fun trying to sort out which is which, as many of the photos on the Net are mislabelled, and some minor modifications were performed in the machines, even in the same versions. Here some clues: look at the wheels, vertical tail surfaces, engines, tapering –or not- of the aft fuselage and the protruding –or not- ailerons. And the best part as always is when sources contradict each other. The model: Boy, what a corrugated slab! It was love at first sight. A long haul enterprise, without doubt, proven by the fact that this model went on an off the building board for more than a year. After I reached the three hundred parts mark I decided that I was better off not counting them. Although it seems hard work, I can assure you that it is much worse than what it seems. All in all quite an adventure, including the hundreds of genuflections and push-ups performed to recover minute parts from the carpet, which rendered going to the gym redundant. And I’ll throw my gauntlet at the feet of the ones that dare to call it ugly.8 points
-
Soviet transport aircraft, altered from the R-6 bomber. This the aircraft with the number H-28 was used in the Polar aviation, crashed near the Yenisei River, in August 1936.8 points
-
Thanks Cookie There... and there... To be honest they've beaten me - some seem to be wrongly numbered ('Rudder Access' all over the place?) and I've now decided to 'be sensible' about them. Thanks Roger Lizzie? What Li... oh right, the one I can go back to as soon as this monster is done. Can't wait Great story, thanks PC Quite right Crisp, can't have any bad behaviour Jets were glued on before bed last night: Of course the tailplane had 'No Step' markings on it: They're not right. The instructions say there should be two small 'No Step' outboard, #15, but the six on the sheet got used up on the nacelles - I checked. This may be a good time to reveal the error I teased you with earlier: See? No, probably not... the outer 'No Step' should be one with the words above each other. Hah. Frankly, at this stage and after the jet problem (see below) I'm having trouble raising a damn. Sorry Phil. Sticking on the bomb bay doors completes the fuselage: I've now removed the BluTak and they didn't fall off so one thing went right. Most of the stencils and the markings have gone on the wing underside: So that just left four more decals - the stripy jet fronts: You know how much I hate shark mouths? These are worse. Do they go on like this? No. How about this way around? No. Are they mis-numbered (as if) and go on the other side? No. This is the best fit I got: One final blow So close and yet so far... I'm going to have lunch and decide what to do, but right now I'm leaning towards leaving them off and just getting things together...8 points
-
Thanks 72 modeller, that is a precious relic you have there. The paint has more of a blue tinge than mine. I have some pictures from the Robert Mikesh book on Japanese interiors, would love to see it in the flesh. My link was this one was from the Otsu Kokutai on Lake Biwa. I worked for a spell at a lab in Otsu on the shores of Lake Biwa and used to wonder if it was the location of the ex-seaplane base? Andrew8 points
-
Heres my 1/72 Modelcollect M983. It came with a Pershing II missile and trailer/launcher but is not equipped with a crane, generators and has the wrong wheels for this role, so I built it as a stand-alone model. I have ordered a Modelcollect MAN M1001 tractor by Modelcollct which has the correct features to tow the Pershing II. My build log can be found on Missing LYnx using this link: https://www.tapatalk.com/groups/missinglynx/group-build-2018-2-m983-hemtt-tractor-pershing-ii--t316567.html7 points
-
Thank you for the information Dennis. Thank you Tbolt. Thank you again Tbolt. Thank you for your comments John. Hi Giorgio and thank you - you are too kind. Well I had thought that I'd get this finished by today but there's still a bit to do. The problem is that there are a lot of bits and pieces that need painting, detailing, weathering and assembling. I have got some stuff done including - a lot of the weathering on the undersides: I made a start on the upper surfaces too but it's hardly noticeable in this photo!: I got the windscreen and canopy painted - here they are just resting in place: Finally I took a photo to show all the pieces that I have worked on that still need to be fitted to the aircraft. Most of them a ready to go on - I just need to finish weathering the Thunderbolt itself before they can go on: Comments and suggestions welcome. Kind regards, Stix7 points
-
Here's the canted fin that I forgot to photograph yesterday: Today I've started on the area under the front engine. Basically built it up with plastic card and then going over it with filler: Going to need some mesh for the bit in between the two fairings - thought I had some, will get hold of some this week hopefully, then going to have to press on quickly next weekend. thanks for looking Z7 points
-
No drinking within 100’ of the aircraft: no smoking less than 12 hours before flying...7 points
-
It's much easier if, like me, you're an idiot, because idiots are too stupid to be afraid.7 points
-
Hi guys, earlier this month I went on a trip to Hyakuri JASDF base in order not to miss the chance to see some of the last remaining active Phantoms in action. My friends had organised everything perfectly in advance - the land owner of the famous "peace towers" was informed prior to our arrival and we timed the trip from Saitama Pref. for a nearly dead-on arrival at 8am. Drove directly onto the land, right next to the towers, located in next to, or literally in the air base. We had planned to change location around mid-day due to movement of the sun, but we found this not to be necessary and stayed put until our departure around 3pm. The weather was perfect, sunny with the occasional clouds passing through. Location and light were so good I never had this many good shots!! Flying activity? You couldn't ask for more! Phantoms galore and a number of welcome visitors too. Komatsu F-15J's had been on deployment and were leaving on that morning. What a phantastic day!!!! Sorry, lots of pictures, I hope you're not getting bored... Cheers, Jeffrey Shouldn't your hand be on the throttle? A surprise visitor - just one pass along the runway and we almost missed it! The taxiway is VERY close: Another one-pass visitor: Underside detail? Oooooh, the blue one:6 points
-
Hey Guys, Was have to be at home due to medical necessity and didn't know how to kill the time, after watching some documentaries on YouTube decided will do a PAK FA had the kits but was damn worried about the Digi camo, at first thought hey will do the normal splinter camo but then but why not give it a shot and I decided to do, at first it was a bit of trial and errors and swearings. Eventually, it looks like what I wanted then I was worried about the serial number since it was not there with the kit, realized the new Su-57 digital camo have not got a serial number yet, phew am safe hehe, After completing it I was really happy how it has come out and thought heh will do another one and here is the first model of the splinter camo number 51. The pitot tube was really off so I scratch built it with beer can aluminum hehehe, hope both the Putin's new fighter has come out ok? Thank you, Cheers The new Digi camo with dark grey and light blue nose? The earlier one Putin's Fighter6 points
-
Bought cheap at Telford a few year back, this is Tamiya's F-84G in Thunderbirds colours. The major kit parts are coated in chrome which is both good and bad. Good - great natural finish. Bad - the chrome needs scraping off before glue is applied and the decals didn't stick to it. I did spray some panels in silver just to tone down the finish. 1. 2. 3. 4. 5.6 points
-
Hi, as promised over on the P-38L Build Thread Here are some pictures of my recent build of then Major George E. Laven, Jr.'s Lockheed P-38L-5-LO, "Itsy-Bitsy II". I was going for the old South Pacific "oxidized" look, but further weathering opinions would be welcome! Thanks for looking, Ed6 points
-
Just finished Hasegawa 1/48th P-47D Bubbletop Lifelike Decal for the P-47D-28-RE flown by Lt. Clarke Bresmeth of 405FG/510FS Ultracast resin seat with harness and bulkhead Italian Classic resin wheels Eduard Zoom PE set Alclad II and Hobby Color paint Thanks to all the participants and the hosts6 points
-
Gives a whole new meaning to the term "blowing your own trumpet "6 points
-
Finished All the best Chris6 points
-
Even without instructions it was quick but done in the same way as I would have done when I was 12 not an airbrush in sight all done by hairy stick using humrol enamel paint and considering I haven't touched them for a couple of years they have held out well.6 points
-
I saw the spoons earlier, @CedB painted them all..... AW6 points
-
Work has progressed though few updates. The kit dashboard is very simplistic and unrepresentative as I showed above in #22. So all of the detail was chiselled off and over the weeks I have been slowly scratchbuilding the various dials, switches and so on and printed some decals for the dial faces. That finally all came together this week: I've also now finished off the seat and got all of the brass fittings on the body. Ladders are base-coated with a light sand and I've spent some time this week topcoating with a thinned wash of Vallejo burnt umber. I did try the oil paint technique to replicate wood but it proved just too fiddly with the rungs all moulded in place to get an accurate representation so I opted for a simpler solution. Not sure yet if it will work. The gas tank that I also scratched in #22 was next to go on but although it was a perfect dry fit when I originally made it, I hadn't allowed for the mudguards/running boards. When I came to marry it all up the tank fouled the front mudguard and although I looked at whether I could modify it, in the end it was simpler to just start again and make another about 20% smaller. I'm waiting on the paint to dry and then that will go on. Neither the sidelights or the headlights are glazed and so the former were simply hollowed out some more with a Dremel to give a more representative outer shell thickness (still way too thick but better than the original) and then had a small disc of clear acetate glued over the front face. The headlights were slightly more complex as they had a separate front face so I had to drill out the centre leaving the outer ring and then sandwich the acetate between face and the main shell. Sidelights are now in situ (you can see the back of one of them in the photo above), the mounting yokes for the headlights are now drying and will be going on later today. More photos to follow later6 points
-
Here is a catch-up of my slow progress, filling and sanding of the fuselage mostly done, I still have to add the windscreen which may need some attention. Some nose weight went in before the fuselage halves went together for the final time Sink marks to be attended to Cabin windows get some putty Some sanding done Wingtip HF antennas replaced Engines still being worked on and all the bits being worked on6 points
-
Almost near the end. I have been doing bits in the past week and it is almost seaworthy. I had time at a local club display to do some work. The local model shipwrights had their display and us plastic guys came along for support. I spent most of Saturday arvo filling, sanding and touching up the bost and other bits. Some more filling of sinkholes, helos this time More work on the superstructure Landing craft cleaned up and paint started More work on the superstructure A lot more done, boats, cranes and boat hanger offer thing started to be fitted. Using the box top for reference6 points
-
Given the sterling reputation of c.1971 British electrical technology, as exemplified by Lucas Industries, one imagines an Airfix electric motor of the day could produce some immensely exciting lights and sounds with very little warning.6 points
-
I have got a bit more done today, mainly concentrating on the cockpit seats. I started by sketching out my plans for an improved seat frame and integral seat pan to be made out of lead foil: The padding for the seat squab looked a little undersize so I started to build it up by first cutting out some 0.6mm card: With those added I cut off the triangular bracing from the kit seat which will just be used to represent the seat padding, I also used my JLC razor saw to give some impression of separation into two separate cushions. I have also squared up the front of the seat cushion to better represent reality, on the right before, on the left after: Based on my references the seats sit a little too close to the centre console: I cut away some of the seat's mounting tabs so that they could sit a little further outboard: That will also give some clearance for the seat pan. The next job was to remove the inaccurate kit seat frames: I finished the day by dimensioning my sketch of the seat pan development: Next weekend I will cut that out from some thin lead sheet and solder up the tubular frames using some 0.5mm rod and tube. Bye for now, Nigel5 points
-
Back in business! This weekend I've got the painting done and started on the decals. Glad I chose this colour scheme - looks good, and the 26 decals are working well. cheers Z5 points
-
Hi all, it's been a while, I started this project back in February 2017 and managed to get 6 weeks done before commission work took over. By that time most of the hard work was done which just left the painting to do, well for the most part. I was working to copy VMGR-352 QB-6762 as I wanted to make sure I was working to an existing Harvest Hawk, I managed in the end to find some good reference material for 762 and I like the colour scheme so that was the final choice. I have had a bit of free time between commissions so the last two weeks I have got stuck in again. To recap, all the raised panel lines have been re scribed (Never Again, seriously!!) and I have used the Attack Squadron Harvest Hawk Conversion set which covers the AN-AAQ-30 Targeting Pod and the Hellfire Rack. I ended up using the Eduard AGM-114 Hellfire set as this was far more accurate. The Attack Squadron parts also included some very nice wheels, fuel pod, sponsons and most importantly replacement engines to correct the grim kit ones. I was tempted to use the rather nice Attack Squadron flap set but unless I was doing an inflight diorama or a maintenance diorama it was pretty pointless as the flaps would be level in reality so that idea was quickly scraped. There were a fair number of other modifications including the port parachute door which needed two launch tubes for the GBU-44 Viper Strike and GBU-176 Griffin Missiles, various windows have been filled and re positioned and the addition of the FCS Optics module either side of the parachute doors. Decals are a mixture of the kit decals and the Flying Leatherneck set, this with a little work gave me all the required numbers for the airframe in question. The walkway decals were the wrong colour and way to wide so I have masked and sprayed them on. Finished up yesterday. Thanks for Looking Danny5 points
-
Almost finished.. Finally up on her legs only a few small details are missing,..5 points
-
But how were groundcrew to know not to smoke within 100 feet of the aircraft? Oh wait, I see it now. That's looking so cool Ced.5 points
-
Today I managed to get all the decals applied and then sealed on with a couple of coats of Pledge. I should have pointed out that, as usual, I cut away all the carrier film where I could around the decals to minimise the risk of silvering. It takes a bit of time but I think it's worthwhile. Luckily it was bright and dry in the back garden this afternoon and with very little wind so, once the Pledge was dry, I gave everything a couple of coats of Humbrol's spray can matt varnish. here are some photos to show the result - the front cowl is not yet glued in place: The decals went on reasonably well but, as usual with Tamiya decals, they are alittle on the thick side: Next I need to decide what weathering I am going to do plus I still need to paint the rest of the canopy. Hopefully it won't be too long before I can get onto the final assembly. Comments and suggestions welcome. Kind regards, Stix5 points

.thumb.JPG.2ce06c4ff2300a5faba93aaeacbdab25.JPG)


Wedge-TailedEaglePortraitRaptorDomains.thumb.jpg.41a306d3445a68f0f2df773e01776ea6.jpg)


This leaderboard is set to London/GMT+01:00