
Leaderboard


Popular Content
Showing content with the highest reputation on 11/09/18 in all areas
-
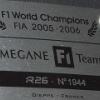
Hi, After 3 months, I finished the model. In progress: http://www.pwm.org.pl/viewtopic.php?f=12&t=86108 22/5000 I invite You to watch.51 points
-
Hi All, This is my build of the Airfix 1/48 Lightning F.6 scrambling to intercept. It's posed over a runway blur base from Coastal Kits. I had an old lighting kit lying around and decided to install it. Unfortunately the LEDs aren't bright enough to cope with the tight bends I had to put in the fibre optics for the wing tip lights so they can't be seen. The spine light works though, and I'm pleased with the afterburner glow. (It's actually more violet / blue in real life, but I had to boost the contrast of the photo and it's changed the hue a little.) This is a peach of a kit, perhaps Airfx's best. Thanks for looking in, Gareth23 points
-
Hi all, it's been a while, I started this project back in February 2017 and managed to get 6 weeks done before commission work took over. By that time most of the hard work was done which just left the painting to do, well for the most part. I was working to copy VMGR-352 QB-6762 as I wanted to make sure I was working to an existing Harvest Hawk, I managed in the end to find some good reference material for 762 and I like the colour scheme so that was the final choice. I have had a bit of free time between commissions so the last two weeks I have got stuck in again. To recap, all the raised panel lines have been re scribed (Never Again, seriously!!) and I have used the Attack Squadron Harvest Hawk Conversion set which covers the AN-AAQ-30 Targeting Pod and the Hellfire Rack. I ended up using the Eduard AGM-114 Hellfire set as this was far more accurate. The Attack Squadron parts also included some very nice wheels, fuel pod, sponsons and most importantly replacement engines to correct the grim kit ones. I was tempted to use the rather nice Attack Squadron flap set but unless I was doing an inflight diorama or a maintenance diorama it was pretty pointless as the flaps would be level in reality so that idea was quickly scraped. There were a fair number of other modifications including the port parachute door which needed two launch tubes for the GBU-44 Viper Strike and GBU-176 Griffin Missiles, various windows have been filled and re positioned and the addition of the FCS Optics module either side of the parachute doors. Decals are a mixture of the kit decals and the Flying Leatherneck set, this with a little work gave me all the required numbers for the airframe in question. The walkway decals were the wrong colour and way to wide so I have masked and sprayed them on. Finished up yesterday. Thanks for Looking Danny20 points
-
Transport aircraft providing. Used in the Polar aviation from 1945 to 1948.19 points
-
After a year of languishing part finished, I took a run at the Herald and finally completed it yesterday. It's the first vacform model I've successfully completed in over 30 years and I'm reasonably pleased with the end result.16 points
-
Good evening gents. A slight push of a Monday night to get one step closer to finishing. There has been something not quite right with the look of The big beast and I couldn’t put my finger on it but looking in the window this afternoon in Ian Allen in Brum I saw a book about Lancaster’s and I saw my issue clear as day. it’s that gap on the Bomb bay doors. It’s not on the aeroplane. 🤔 darn it. So taking the bull by the horns I popped the doors off and trimmed down the actuators and re fitted the doors. Then fitted the PE hinge type bits. And wires at the back. Huzzah, gap gone by “gapbegone” The mid turret got popped in. And the bullet belt got assembled. The rear turret got weathered. and bullets added. I’m happy with that. time for bed now. I had a pick through the stash before I ventured down stairs this evening. Hmmmmmm double build? it’s @corsaircorp‘s fault. I just can’t choose. And deffo OOB. 😇 just a thought mind. 🤔 Thanks for dropping by. Happy modeling you lot. Johnny madness I tells ya.16 points
-
I’m not sure if I got a thing for the F-14 when I bought this kit, or I bought this kit and developed a thing for the Tomcat, but either way, the Airfix 1975 edition was the first Tomcat that I built and one of my earliest models. I bought it with my own hard-earned pocket money but because my folks expected me to save, I pretended that it was a Christmas prezzie from a classmate and I finished it on Boxing Day. Things have changed on the kit buying front since then, I’m bit more upfront and when the ‘Boss’ said, you’re having too many parcels delivered and I can hardly get in your man cave, I suggested she didn’t go in there. Someone donated this kit to me (like I needed another addition to the stash....) It represents a very early Tomcat and I suspect that Airfix were really keen to get a kit out at the time. It’s got the shape right for sure, the swing wings and connected glove vanes would have been a big gimmick, the all moving tailerons less so but fragile, the cockpit very basic. I decided though not only to build it straight away, but do so from the box, as per the instructions. As it turned out, I did add some things I knew should be there, like the nav lights, tinted windscreen, glued the wings swept and the gloves vanes shut and had to fabricate the RIO’s instrument panel which was missing, but in the main, it is no frills and just as Airfix gave it to you. I was quite impressed with the decals TBH, they were in register and easy to handle and I even made a few of those stupid mistakes that I made as a 12-year old. Sorry about the photo quality, bit of a rush. Anyway, enough from me; Wolfpack Baby...14 points
-
A model from 8 years ago of a plane that brought technical innovations and streamlining to the field: There are plenty of cases of plane designs that were way ahead of their time in one regard or another. There are very few, though, that were at the same time innovative and successful. Designed by Louis Bechereau, the French Deperdussin Monocoque (for single, whole shell) of 1912 was so advanced for its time, that one can’t but be puzzled looking a contemporary planes; or even at later designs. Not only had the trademark “monocoque” fuselage –where the skin bears part of the loads-, but was also a monoplane with a carefully cowled engine. Instead of ailerons it used wing warping for lateral control. It swept the Chicago 1912 Gordon Bennett taking first and second place (Vedrines and Prevost respectively). Then –on floats- won the Schneider Trophy and it did the same at the Reims1913 edition of the Gordon Bennett again, leaving all other competitors eating dust. The Deperdussin was also the first plane to break the 100 mph barrier. The design, as it is sometimes the case with many other wonderful things, went almost unnoticed and the unwashed aviation designer masses kept insisting on biplanes, uncowled engines and other contraptions for decades after. Go figure. Both “monocoque” construction and monoplane design are a staple of today’s aviation. I was making this model for a fellow enthusiast and soon we realized that there was some confusion in the depiction of this specific machine. It took a very hefty amount of research to get things right with this little fellow. There are so many miss-identifications of the Deperdussin machines, even in prominent sites and publications, that I was indeed surprised. Carefully going through era magazines and newspapers started to shed some light and brought up a number of details used to tell one machine from another. The model you see here is indeed a representation of the Vedrines machine. The one that took 2nd, the Prevost machine, is different in some very noticeable details, among them engine, cabane, headrest, cowling, spinner and wing platform. Both also differ from previous machines and from the ones used later in Reims. Painstaking research even brought up the fact that Vedrines used to decorate the side of his mount with an image of the Mona Lisa, which I replicated. A flag is seen on the rudder on some photos, so I made decals for that too. In those times, France was the clear leader on the aviation field. No wonder F.A.I. stands for Fédération Aéronautique Internationale.14 points
-
May I present the 1958 version of the Lancaster. No rivets were lost and no filler was applied. I wanted to build it as a young lad may have done back in the day, simple use of paint and glue. I hope I have done it justice. many thanks for looking in. Ian14 points
-
Air Force Reserve 93rd Tac Fighter Squadron at the Gunsmoke air-to-ground competition September 1981, Nellis AFB. 63-7413 63-7500 63-7711 64-0655 64-0796 Thanks for looking, Sven13 points
-
Speaking of etch cutting, I got some more work done and both the flap trays finished this evening: In my giddiness at the weekend I neglected to notice that there was a rivetted panel to go on the underside of the flaps themselves, which have now been GG'ed into place also: A quick look at a flap/tray arrangement then, just to give the general idea: This is upside-down of course with the flap on top and tray on the bottom. Tony13 points
-
I cant leave well enough alone me! Absolutely no reason to do this at all, but 'itch itch itch, scratch' The observer's coal hole got a larger cover on the/some FAW2s which was given in the kit as an option although the fuselage was not opened up which left the option of doing either type A very progressive attitude Mr Rovex, hat tips to you for that Not many though, as you see the cockpit frame sits oddly on the upper fuselage and no amount of glueing would make it sit flush and smoothly faired in PPP for that maybe or more supergoo filler, I'm working on that at the mo' So I have opened the fuselage space and attended to the odd leading edge of the coalhole frame This needs filing slimmer and a scalloped front edge putting in which as a difficult call because the shape has to sit down right and look right when it does Molto sihrsc work ensued and swiss filing to boot then the little piece of clear CD case was stupor'ed into its slot And Cyano used to fill the gaps as above, this was to be polished and hopefully eliminated as a visible thing when polished Not sure I like that fogging in there... Heyho keep polishing The edges did get filled almost invisibly but There is still a foggy look to it But will ye just look at that shine, wow So now I have to take some of the superglue back to its original state and then try again The fogging is inside the superglue, not underneath as might have been thought so I assume I will have to be quite brutal to it I know the cover should be black underneath but I hope to get the effect of blacked out clear stuff as on the real Vixens and I see the fore end scalloping has reduced under the polishing regime so that is to be first to get the treatment now12 points
-
Avro Anson Mk 1, 321 Squadron St Eval, 1940. Built OOB. Upper surfaces Xtracrylix and underside Tamiya Aluminium, all brush painted. Not a bad build although fit of transparencies left a little to be desired.12 points
-
Evening All, Moa seems to have been able to stimulate some of us into searching our photographic records to find some examples of early aviation types. Here is another from me which I had not heard of until I came across a thread by Steve Cox of IPMS WW1 SIG. He built one of these from a vacuform, (cannot remember the manufacturer), so I asked if he had any plans and he generous replied with a set which I used to build this model. It is entirely from sheet, strip, rod, etc and only the wheels were from the spares box. Markings were made on my home computer. It is rigged with rolled copper wire. I have included some in progress images but there is a full build log at https://forum.ww1aircraftmodels.com/index.php?topic=6328.0 Gustav Otto was a Bavarian engineer who established a factory for building aircraft in Munich in the years just before WW1. Unusually for German designers he focused on pusher machines, and according to contemporary British sources these were copies of Farman designs. In fact this was a little unfair as it would be more accurate to say that he was inspired by the Farman designs as his machines were considerably different in outline and construction. Whereas most contemporary machines were built with wooden frames, Otto used steel tube. This was a very marked innovation for the time as was his use of elevators rather than wing warping which was common on most contemporary French and British designs. The engine was mounted on a platform above the rear of the nacelle and was an Argus of 100hp, again a more powerful plant than most of its non-German contemporaries. However the basic design went through many variations over time, as did many other contemporary designs, as Otto tried to refine and improve the basic idea. There were variously machines with four fins and rudders, twin two-wheel undercarriage units and various shapes to the nacelle. One photograph shows an Otto without any nacelle at all as on the Bristol Boxkite, with the pilot sitting fully exposed in the front of the aircraft and the passenger equally exposed behind. It would seem that by 1914 the design had settled to something like what I have tried to represent in my model, but I cannot be certain of all the details as there is little reliable information published in English. The military service career of these machines seems to have been limited to reconnaissance on the Eastern front. The Army did not like them because they were considered to be badly constructed and the Navy ordered several but these also suffered from poor construction. One machine was sent to German South West Africa in May 1914 to try to establish an air presence in the colonies. This machine was privately sponsored and sent by sea to the port of Swakopmund where it was unpacked and assembled before being flown to Windhoek the capital. The pilot, Bruno Büchner, demonstrated the machine to crowds in several communities where some people paid to have joy rides. He also carried post on a couple of occasions. In July 1914 Büchner had the aeroplane crated again and sent by sea to Dar-es-Salaam as he was unable to fly it to German East Africa because the South African government would not give him permission to fly over their territory. Büchner was in Zanzibar when he learned of the outbreak of war so he returned to Dar-es-Salaam and sailed to the meet the cruiser Königsberg. On arrival, he offered his aircraft to Oberstleutnant Paul von Lettow-Vorbeck, the commander of the Schutztruppe (defence forces). Von Lettow-Vorbeck ordered Büchner to undertake a scouting mission in the direction of Zanzibar. Flying along the coast, he spotted two gunboats which immediately opened fire. He was wounded in the arm. On landing, the plane struck deep sand and somersaulted. Büchner was thrown clear but injured, and late in the evening he arrived at his base, utterly exhausted. While he was still in hospital, another Schutztruppen officer, Leutnant Henneberger, had the plane repaired and took off. However, when he was attempting to land, the aircraft clipped the tops of palm trees and crashed. The pilot was pulled out dead from the only lightly damaged plane. After his recovery, Büchner was ordered to fit floats to his plane and to support the Königsberg, which was then lying disabled in the Rufiji Delta. The aircraft was rebuilt and sheet-metal floats were attached. It was then found that there was insufficient petrol available, and the project was cancelled. The inventive Büchner fitted the aircraft's engine to a small-gauge railway goods truck and, with this much admired Schienen-Zepp (Rail-Zepp[elin]), undertook two goods transport trips to the inland town of Morogoro. Following the occupation of the town by the British, Büchner and his wife were interned. The information about the East African venture was pointed out to me by Old Man and I would like to thank him for doing so. Otto died in 1916, but his company continued to operate until in the mid-1920's it was merged with BMW to form the Bavarian Flugzeugwerke - the chief designer for whom was Willi Messerschmitt. Thanks for looking. P12 points
-
11 points
-
Thanks all I'm back (obviously) to a cooler, drizzly Bath and a set of polishing wheels. Just in time to try them on the AK, later. I'll review the comments on the walkways and have a think later but, lazy bloke I am, I may go with the current ones (after tidying the last panel). Vienna? Nice. Very Imperial. Big palaces and buildings but felt nice and safe, which is good. Tried the food and was generally impressed, although Mrs B's diet went a bit wobbly, just like my six pack barrel. My favourites: Saw a T-Roc so they DO exist! Mine's now scheduled for December (groan). Walked around a lot, saw lots of trams but failed to find this place: There are signs to it all over the place but we seemed to be going around in circles without getting there We had a similar problem in France trying to find 'Toutes Directions' - always seemed to end up on the outskirts of town... More soon... (It means 'One Way'. It's a sort of joke. Oh, suit yourselves...)11 points
-
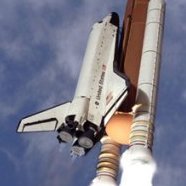
Finished the final photography. Here are three of the finished results, but to see the others, please see them here. https://www.flickr.com/photos/spacemodelsphotography/albums/7215766753240803210 points
-
Here are a few photos of my latest completion, another Grumman Wildcat but this time an F4F-4 from VF-6 onboard USS Enterprise while escorting USS Hornet on the Doolittle Raid in April 1942. The kit is from HobbyBoss with the addition of an Ultracast seat, Aires wing fold set (for the Tamiya kit) and painted with Colourcoats enamels using Montex masks for most of the markings. Duncan B10 points
-
Hi folks This is one I did a few months ago , but due to me forgetting how to upload images I didn't get round to post. This is the Tamiya T55A with eduard etch additions. The kit itself I think is one of the best Tamiya kits I have made even against the newer manufacturers (IMHO) Cheers Keith9 points
-
I used to build these as a kid, now I'm not so much of a kid but have a lot more patience, and the internet. I got the Vulcan kit for Christmas and took my time over it, finding out there was filler for the gaps in the kit I think makes a huge difference to what I did years ago. So anyway, I've just thrown together a handful of pics in no particular order of completion, but the latest was the Sea King. Sea King Vulcan Bomber Typoon, old and new Red arrow and a Tornado. The main issues I faced were waiting with the red and the yellow, I asked on a thread about this and was pretty much told to start with a matt colour and add clear coat to bring the gloss up. lesson learned. I just have one question for now. How do some of you seem to get the paint on super thin, so that the lines and joins are super pronounced? Cheers! Pete9 points
-
Another 109. Turned out VERY ropey but in my defence I wanted to do something akin to when I was a kid. So, apart from the pilot seat, built OOB, brush painted (can you tell 🤣) and kit decals (although the latest boxing - 2012 I think) although I probably should have painted the white fuselage band instead of using the decal as it did not see eye to eye with the microsol..... Not my proudest moment (*ahem*) but sure took me back to the days of "lets just touch it with my finger to see if the paint is dry yet"....... I think the hurricane I bought is waiting for me at work but I'm not back till Monday so hopefully I will have time to do that for the GB9 points
-
This is one of my VMF(A)-211 Aircraft. I have one Corsair left to complete a history story of this group of Marines. This model was done with a set of custom decals for the Commander aircraft. I only used the Eduard Cockpit Photo-Etched materials to help the seat. The rest of the cockpit was great I did use the RAM decals for this kit and they were absolutely perfect. Wolfpack RAM is 48-006 This is a good f-35 representation, but it does require a bit of patience in the construction. The CF are a little large ,but I'm ok with them. It really is a cool looking aircraft Thanks for Looking Comments are Always welcome Bill8 points
-
Hi there ! P-51D Tamiya 1:48, done about 3 years ago, I aded rivets, all markings painted with use of home made masks. Hope you like it . Regards Mirek8 points
-
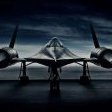
Hej! Britmodellers, having finished my up to now stölth Hammer of Thor for Modellfan 10 2018. So for all Roumormongers: Specialhobby had already a Article Nr. for the JA at the Nuremberg Fair, but they decided then to go again with Tarangus. This is my early testshot handed to me in Prague before that decision. I was free to choose the version, because no decals were ready too at that time. The shot was very, very good, i only polished the prototype canopy and you all fans will have a lot of fun with this, because there is not a lot to complain even for special Specialists on the Viggen Cheers, Tom8 points
-
RAF Emergency Set. Straight from the box but painted in war time colours rathaer than a bright red fire engine. More authentic but challenging for me as the son of a fireman and having spent my formative years living in a fire station the only colour fire engines should be is red. Painted with Citadel's Death Forest Green Trials and tribulations of the build thread here Ambulance Fire engine Both with medical team and fire crew8 points
-
This is a 1/144 Westland Lysander Mk.II from the small Japanese resin manufacturer FoxOne Studios. I built this as part of the RAF 100 GB on Kampfgruppe 144 (see full WIP thread here) but am reposting here as I've only seen one of these built up before and it might interest a few people... This is the Mk.II kit, but FoxOne also do a Mk.I and a Mk.IIISD boxing. I have both and am tempted to get cracking on the next! The kit has one of the most detailed and spectacular interiors of any kit I've yet built in this scale. No, none of it can be seen. The resin is generally very nice and fit is ok. I replaced some of the kit parts as they seemed quite clunky and over scale - I added some aerials of my own, put the messenger hook on from stretched sprue and devising the gunsight that sits on the nose. For this I cut up some 1:700 ship railings and fettled to taste. I also added some etch to the wheels but these aren't very accurate and I may yet do something to improve this. All in all I very much enjoyed this build. It was taxing at times but nothing offputting, but builds into a good representation of a Lysander with the right stance on the ground. There are some clunky elements to it, but it was fun. Yep - surface detail is a bit heavy. But so what. I will very rarely get as close to this as the camera lens is here, and from a respectable, normal distance the recessed detail looks rather nice to my eye. I avoided doing any sort of washes or weathering though - felt that really could ruin the party for everyone. Kept it to a few smudges with pastels. One thing I'm very glad of is that I devised my own scheme for this. The kit comes with some very dreary decals for a training unit based in Scotland. I built mine as a 13 Squadron kit based in France in 1940. The Lysanders took a terrible punishment in trying to observe the Wehrmacht moving through the Ardennes and were soon withdrawn from France, but I was drawn (like a scale modelling magpie) to the unusual roundel. All decals from the spares box. I intend to have a Battle of France shelf one day and this will go front, centre among a Squadron of Sweet Hurricanes, a yet to be released Blenheim or two, and perhaps the odd Zvezda Fairey Battle (and if you want to know what the modelling deities among us can do with that kit, look here - yep it's 144 alright). Finally, with a rather small human and an SEAC Hurricane I'm working on, I'm impressed at how large the Lizzie was. Oh and a 1:1 tupenny. Thanks - as ever - for looking. Angus7 points
-
With the requirement for a ground attack aircraft for use in RAF Germany, and other theatres, various aircraft were looked at, including a collaboration with the French, for a mutual ground attack/trainer aircraft. Common ground couldn't be agreed on, and BAe were approached by Saab, who had just developed the Viggen ground attack aircraft. A deal was struck where Saab would build the airframes, and then BAe, in conjunction with other British aviation companies, would fit the RR Spey engine and avionics. The Thunderbolt entered service in 1975, and served for many years, including during the Gulf Wars. 20180909_125055 by Paul Carter, on Flickr 20180909_125104 by Paul Carter, on Flickr 20180909_125117 by Paul Carter, on Flickr Kit is the Italeri 1/48 one, with a few small mods.7 points
-
Don't listen to the mermaids, Ulysses John ... Ciao7 points
-
Quick progress update: I masked up the build today ready to airbrush the NATO-Olive and yellow mix (I'm using Revell acrylics for this section.....I like airbrushing with them also). Using tape and sandwich bags I tried to make sure all the areas not requiring paint were covered. The mix airbrushed well, smooth and evenly. Now, after 2 light coats she's unmasked and drying off overnight. Thats all for now folks.7 points
-
Here is finally the RFI for the Whitley I choose to do Z6743 from No.78 Sqn RAF Bomber Command, 1941. It was shot down over Belguim on a raid to Aachen on the night 9-10 july. All four crewmen persiched. The model is off course Airfix new tool whitley, but with new markings from a DK Decal sheet which @Roger Newsomewas kind enough to donate. Thanks for that! I owe you one. I also added Eduard etch for the cockpit, and four brass .303 for the rear turret It's painted with Gunze acrylics and Tamiya, with both pre and postshades to get some more life into it. Montex provided some muche needed maskings for all windows (that greenhouse is not something to play with!), and also masks for the roundels which were duly painted. Semimatt gloss coat from MrPaint samt and an antenna wire from Uschi Van Der Rosten finished the kit. WIP can be found here The The clear piece above the front turret were removed when installing the turret, and I made a complete mess here, with a badly fitting part and lots of gaps, which I was laxy enough not to fix. It's also a bad idea to use a large blob of CA-glue to secure an antenna wire... Oh well, I did complete another model atleast, and the need for a british bomber has lessened. For awhile atleast //Christer6 points
-
Hello Here is my most recent build with this 1/72 Zvezda Yakovlev Yak-130 of the Belarus Air Force. Markings came from the 72-071 Begemot decal sheet. This is an easy kit to build except the panel lines which are not deep enough and I had to engrave again. The colours have been blended to match pictures I could get on the Web. Critics are welcome. Patrick6 points
-
Hello mates, after a break now some new stuff. I made new pictures for the Modellfan Mag 11 2018.... I will bring again other models too Cheers, Tom6 points
-
I thought you nice folk out there might like to see this build. Heller 1/72nd Texan, Aeroclub vac canopy with the rear upper fuselage modded to accept the different shape at rear end, antenna from micro strip plastic, decals by JBOT. I didn't do very much in the cockpit so no seat belts. Just the instrument panels. The canopy framing is all done with black and white decal stripes. Black applied first to prevent the white from being seen from any side, then of course the white for the external framing. The corners to the window panels are done with teeny triangular or squarish pieces of decals cut to fit relevant panes. The exhaust is resin from the CMR conversion kit which includes to vac form canopies. I opted not use these as it is of the heavily framed version and this subject has the lesser frames. Fortunately I had one of the Aeroclub ones with the correct rear section and fewer frames so perfect for this one. needed to coax the rearmost decal stripes in to a curve to follow the canopy line. For more info of the work and types within the NRC-CNRC here is a link: https://www.nrc-cnrc.gc.ca/eng/solutions/facilities/research_aircraft.html6 points
-
Another incipient attempt at scratchbuilding from 11 years ago, for the Pioneer thread. This…plane? was built in 1913 for the Great Lakes Reliability Cruise competition. During its trials, much to the dismay of its builders, pilot and bystanders, it stubbornly refused not only to get airborne, but also to taxi. The naïve advertisement that pretended to sell this invention on magazines sold it as “Faster Than Hydroplanes, Safer Than Motor Boats”, which for the second statement might be true, since it was practically stationary. Of the panoply of adventurous designs that populate the pioneer era, some are truly remarkable, almost unforgettable in their defiance to logic. And that’s precisely the reason that makes them what they are, outstanding samples of alternative thinking. Oh, poetic winds of an era of creativity, make these winged fairies fly into the vast horizons of our imagination.6 points
-
Hi Guys, this is my latest offering the Ju87 Stuka. This is one of Airfix's retools and I have to say it was a pleasure to build, with very little fiddling and fettling. It was built straight out of the box and it was my first experience using Vallejo Model Air paints. I was so impressed with the paints that I ordered all the colours to complete the models in my modest stash. The paint job was inspired by Gisbod, I hope he doesn't me copying his technique. Anyway here it is, as always comments and criticisms are very welcome. Thanks for looking.6 points
-
There is a wishful and somewhat idealistic notion amongst modellers that the information available on historical events generally becomes more detailed and accurate over time, whereas overall it is the opposite in the long run. To quote Clausius, in relation to the second law of thermodynamics: "The entropy of the universe tends to a maximum". Eyewitnesses die, Physical evidence is mostly destroyed: the relics fade and discolour and are 'restored' according to the popular theories of the day. Records are lost and deteriorate. Conspiracy theories and speculations gain ground, becoming as widely-percieved as whatever the facts originally were. People start to use other people's models, or paintings, as sources for each other, each used to prop up the next, and the snowball of assumptions and introduced errors rolls downhill, growing bigger than the actual objective evidence available, and cascading into things that "everyone knows". Like the perception that Romans and ancient Greeks had a lot of white marble statues around the place, because we see them today in museums without their paint, or that the interior of a mediaeval stone castle was stone-coloured, and lit by torches attached to the walls, because that's what is easiest for the film and TV industries to film.6 points
-
Another one from earlier this year, OOB from an old Monogram kit, plenty of filler had quite few issues with the fit but it was an old kit to be fair. Decals from the kit and went down quite nicely, some of the front stripes have bits missing because I had it my office at work and someone thought it was funny to stick something on her. Thanks for looking Darren6 points
-
Far too kind. Thank’ee Thanks Chris. I’m glad the masking came off too. 😊 Thanks oh globulus one. 👾 Thanks G. Has it really been that long. Crikey. Thanks. The Flory stuff is great. If you can airbrush it, it gives better results. It’s a really easy process, I’m sure your build will look amazing. 😄 Saucy! Thanks Bill. Thanks. Aaaand not a sausage. Stupid bloody rivets, you can see a bit of you really stare at it but I’ll say that they’re a waste of time and money.🙄 Thanks CC and yes the heart and soul of this build is all down to you my friend. I’ve got the flap ones. What the who the UC actuators again. *runs up to the top of the house......... These things? gah! Right there’s another thing. Thanks for the tip, if anyone notices anything else pipe up now. 🤣 Thankyou kind sir. Steady.... not quite yet.6 points
-
Nah, I always look like that Mike I've added an oil wash to the cockpit parts and stuck them all together, and this is now ready to be installed in the outer cockpit shell. The next part of the build is the rear of the cockpit section. This is built up around a central tube to which three panel pieces are added. Most of the fuselage panels, including these, feature tiny indented rivet fasteners along the panel lines. Some of these are a bit indistinct especially on curved pars due to moulding limitations, so I'm drilling them all a little deeper with a 0.3mm bit. There's a weird thing with the rivets on these rear fuselage panels though. For some reason the line they follow is completely out with the actual panel lines and the edges of the panels, You can see better in the shot below. This is exactly how they were moulded. I've just drilled the rivets deeper. It would be very unusual for Bandai to make an error like this so I can only assume it replicates the rivets on the studio model. Either way, it looks a bit odd. Putting that aside, the front and rear cockpit sections can then be pushed together. Going by the instructions, the cockpit is then clamped between the two fuselage halves. Doing it that way will make painting a bit trickier though, at least for me as I want to paint the cockpit assembly separately. This shouldn't prove to be a problem though, as I think I'll be able to join the two fuselage haves first, then plug the front and back cockpit sections into the ring on top of the fuselage from either end, if that makes sense. There are also a couple of detail panels that sit behind the rectangular openings in the fuselage side, and I should also be able to add these after the fuselage is together, meaning I can paint them separately too. So the next step will be to stick the fuselage together and hope I will be able to fit the cockpit afterwards Andy6 points
-
Hello everyone :) After longer absence i am publishing my newest work-1:72 UH-1N Twin Huey, USS Tarawa, Operation Desert Storm. I made it extremaly fast-3,5 week. Propobly i will give it to one of my workmates. Parts match in about 90%, except cargo bay doors. You need to make bigger holes for windows, because they are way to small (both of them-those in smaller and bigger cargo doors). I am giving this clue because US Navy Italeri packing is out of production, but parts are repacked in other colour schemes by Italeri and other producers. Good news is that the Kittyhawk is planning to US Navy's UH-1N in 1:48 scale. I painted it in oil chemicals from Humbrol and ModelMaster. 2 big issue which i had: -problem with installing glass parts with Clearfix and Micro Crystal Clear. Both of them are very thick and when i am using them, they are causing some bad marks on model surface which sometimes is very hard to remove. Anyone had similar problem? - i wanted to make very glossy surface, but after 3-4 layers of Humbrol Acryl i gave it up and failed. Which gloss varnish is giving the most gloss surface close to real one? My base coat was Humbrol 30 (very flat...)-maybe that was the problem? I am waiting for all (bad and good) comments :)5 points
-
Recently finished this fella up for the Euro Miniature Expo in Folkestone this month. I call it "I have come here to save civilians and burn heretics. And I'm all out of civilians."5 points
-
Now it could have been the exhilaration of my achievements - or more likely the wine - but I pressed on. More extra armour plating was required for the other side - as per our reference photos... ...and some more hooks for the rear... I drilled the holes - very skillfully - then remembered those pipe cleaner things... ...so I knocked up them too... I needed a lie down after that,5 points
-
Good afternoon my modelling friends. After I signed off last night I went and did a bit of 'tinkering' - whilst I was all fired up from your encouragement. Here is what I got up to... The consensus of opinion was that the Sherman needed a bit of 'cosmetic surgery' - now I'm more of a butcher than a surgeon - but I did my best. First up were the lifting hooks on the front - again thanks to @Army_Air_Force for the pictures he sent me a while back - they are really useful - so here is the 'real thing'... Now on a lot of 1/35 models I have seen these done with wire - but this is 1/76 and my eyesight wasn't the best at 10pm last night - but this is what I ended up with... passible if you screw your eyes up and squint. Then it was onto some extra armour plate... maybe a 'bit too' rounded off around the edges but it is only 8mm x 10mm and I have sausage fingers. Trust me - from the other side of the room it looks great. If you turn the light out it looks even better5 points
-
Hi, just a quick update, the Goose is now at the stage where I have blocked out all the windows, doors etc and masked the cockpit glazing, which was a pain because of the curves of the windscreen, but got there in the end, it is now ready for its first primer coat using Tamiya surface primer from the rattle can, this will show any imperfections and also I can scribe some panel lines, the primer can then be rubbed down and a final primer coat applied. Once I am happy with everything the floats will be added, and then I can start to add some paint5 points
-
All the little bits added. Final piece is the nose transparency underneath. There's no ridge or fitting so after carefully removing it from the sprue, gently sanding the does to fit, I kept thinking be really careful on checking the fit and make sure it doesn't fall inside. And what happened ... it fell in. And wouldn't come out. No amount of shaking and persuasion would work. Not lost to the carpet monster but the Anson monster. Luckily I was able to get Krystal Kleer to close over the space. it will dry clear. Finished now5 points
-
Main painting is done now following a last coat of the brown. Still some touching up to do. The canopy is just sitting there, not stuck on yet.5 points
-
I think I'll call this finished. Take 2 was a lot more successful that take 1 last year, that didn't end well.4 points
-
It was time to count the votes. 20 votes were cast by 20 members, it needed some shepherding but in the end the numbers match. There are 55 finished models - or should I say 55 separate gallery entrants as some had multiple models in one entry, and not all of them could be split for voting (like @825 built his pair of Lloyd carriers towing AT guns and the trio of Valentines - excellent builds all of them ). And the winner is... @PlaStix with his Tiger I vignette "Looking towards point 174" Congratulations! The silver medal was split between @tonyot (Hurricane Mk.I 33 Sqn and Blenheim Mk.IV GdB 1 "Lorraine"), @Ozzy(diorama Lat 32*05'N Long 23*59'N) , @Franz75 (Hs 129 8.(Pz.)/SchG 2) and @Hardtarget (P-108a Artigliere 102/40) All the participants and especially those who finished their builds and got it in the Gallery have won too - you got your models Thanks to @Enzo Matrix for running the whole Group Build circus and good luck for @TEMPESTMK5 - Patrice is already campaigning for MTO GB III . Best regards, V-P4 points
-
As one can only have five photos in the gallery I thought I would get these two in here . . . . The wings just needed a little fettling to get a snug fit as I dont tend to glue the wings in place so I can dismantle for storage. This kit has probably the best canopy of the early Lancaster kits but I think the front turret shape lets down this kit . . . There are more photos in the gallery of the completed model.4 points
-
4 points


.thumb.JPG.3498f40362ff13ebfc4b2e45abbd545e.JPG)


This leaderboard is set to London/GMT+01:00