
Leaderboard


.thumb.JPG.3498f40362ff13ebfc4b2e45abbd545e.JPG)

Popular Content
Showing content with the highest reputation on 13/08/18 in all areas
-
Hi all, here some pictures of my new model, the RF-104G Starfighter by Italeri in 1:32. Add some Eduard PE parts Brassin exhaust, MB Mk.7 seat und tyres as well as a pitot by Master. Nice kit with a great decalsheet!24 points
-
Not a new build or finisher but one I did some years ago Magna kit. I built this as a review sample for SAMI. Some of you my have or recall it. Any wayI repaired this a short while ago and while I was having a clear out today I took these pics to fill in time. Enjoy... I was thinking about giving it a repaint in to the sand / brown scheme some time. I think I still have the instructions and diagrams for it somewhere.24 points
-
Well its been a while to say the least ! Hello again everyone. After recently sorting my stash out i found a new tool Revell hunter that was in two sections . This is what became of the hunter .The kit itself is O.O.B with and added aeroclub white metal seat. The engine half was salvaged from the spares box . Everything else i have made from scratch . DSCN2667[1] by steven perriss, on Flickr DSCN2668[1] by steven perriss, on Flickr DSCN2674[1] by steven perriss, on Flickr C&C welcome Steve22 points
-
Here is my 4477th TES "Red Eagle" MiG-21 F-13. Around two dozen MiGs were operated in the USA at Tonopah to expose pilots to various MiGs. I replaced the kit seat and wheels and used aftermarket decals. Painted with MRP. Thanks for looking!21 points
-
Hi folks, Here are a few pictures of my F-84-F40 Sabre from 338 Sqn, RNoAF Ørland, in 1963. I used the Revell Canadair Sabre Mk.6 kit and added some extras, including a Martin Baker seat (from Eduard's F-8 Crusader) I also used KASL Hobby's slats and flaps together with wheels from Eduard. The very nice and thin decals are from Norwegian Vingtor. She is painted with Alclad2 and Gunze, and weathered with Ammo of Mig products. It was just a pleasant build all the way 🙂 Thank's for looking, I hope you liked it 🙂 Cheers! //Fred17 points
-
...never stops.😊 Ian, hendie, Giorgio: It appears that the League of Extraordinary Gentlemen Tedium at last has a quorum! I did start the day by spoling you with yet more tedium: Masking the prop blades. But then ruined your day by doing something exciting with silver paint... Hi James! Thanks for those kind words: I hope you're doing ok yourself? You and me both Terry! 🤪 Here's the spinners fully masked now, including those 16 tiny masks you see above that go along the leading edges of each blade: I took the precaution of pre-snapping the blade that I'd already glued-on once so that I didn't have to do it during painting...🤨 I'd given the aircraft a preliminary coat of White Aluminium before bed last night so that it had a good chance to cure overnight before further operations: On coming down this morning I was not happy with the slightly gritty appearance to the wing uppers on either side of the booms so I planed these back again with a razor blade and MM'ed them in preparation for a second go. I've noticed on quite a few blogs and forum entries a tendency for Alclad to induce a semi-paralysis in some modellers, in that everything has to go on in one rigid set of perfections of the kind you frequently see in modelling magazines. I think this is one reason why it seems so intimidating to use for some people. This is quite unnecessarily. I've learned over the course of today that within 10 minutes of application you can scrape at any offending regions and even paint splatters, after a quick rub with the finger, can be wet sanded away and paint reapplied almost immediately. The stuff sprays so beautifully that any imperfections (in my case on the part of the operator) can be rapidly dealt with on the spot, rather than it being a monolithic process that the slightest flaw will ruin. Oh, by the way. All that fancy underpainting with gloss and matt blacks and so forth. Waste of time in that it rapidly disappeared under the first coat. In the Doog's models video I posted a while back he got best results from using a Tamiya AS-12 base so having a metal base coat seems to be the key, but I couldn't get hold of any. Of well, there's a big silver B-17 in my future once the Anson's done so I'll make sure to lay some in for that. Where were we? Right. Fiddling with the top works: Here just blocking-out the regions I want there to be slight differences in: nothing mad (as you don't see these aircraft looking like demonstrators for every shade of Alclad) but just enough to try and introduce a lively response to light across the various surfaces. You can see above also that I whacked some steel down around the nose to see what that might bring to the party. If you sense I was having fun playing with this stuff. Yes!! In the shot below I've also just finished darkening the belly all the way along with steel, hence the masking tape: Note to self: remember to continue that line along the underside of the BT. Is that Peppa Pig's face in the nose? This was about the third pass around the aircraft, this time having switched from White Aluminium to the darker standard Aluminium: I don't know how obvious the variations are as it's really only when you turn the aircraft that you can really see how the light changes across the varying surfaces. I was leaving about 45-60 mins between each coat in order to make sure things had dried out sufficiently on this rather humid day. Nearly finished along the roof: From behind against the light you get a bit of a better sense of the change in surfaces: Oops! Nearly forgot to paint the BT! And this lot: In fact I completely forgot about these guys until the last minute: Right. Here she sits tonight in lustrous argent. I'm not going to touch for now for a couple of days so that today's work has plenty of time to cure and outgas. Bloody hell. That were a bit of a marathon. Hope you like what you're seeing. I'm off to make hot-dogs now and possibly a celebratory Martini. 🌭🌭🌭🌭🌭 🍸🍸🍸 Hope you guys are doing ok yourselves? Tony16 points
-
Hi, Here are a few photos of my latest model, Revell's Lancaster B III in 1/72 scale dressed in the livery of a 50 Squadron machine which took part in such raids as Peenemunde, Hamburg and Berlin during mid 1943. It took a while to build, approx 5 months but went together beautifully and a thoroughly recommended model. I hope you like it, Russ15 points
-
Hi, Aero A 101 was a light bomber-recce airplane. It was a kind of developmnet from Aero A-100. However only few parts remained unchanged. In general it was about 10% larger by wingspan, also chord of wings and by lenght of fuselage. Instead of V-engine, 12 cylinders Hispano-Suiza (case of A-100) the A 101 was powered by 1000 HP 18 cylinders licence build of Isotta Frascsini engine. There is a model of A-101 by Planete in 1/72 but I was thinking about doing this rather massive conversion since already 15 years and currently I have just did it! The whole build of two Aeros was subject of WIP Almost all produced (~50) Aero A-101 were sold by Czechoslovaks to Spanish Republican Government but about half of them (22 transported on Panama ship from Polish port Gdynia) were captured by I think German navy making blockade in Golf of Biskay and those went to Nationalists. Majority of them served in northern front in 5G17 groupe, but some were present in Andalus, in group 4 G 10 which has base in Grenada. My model of 17.12 represents machine from Grenada, 1937 The prop is rotating And just for comparison with A 100 (#20 this year, # 390 on shelvs)..... Comments welcome Regards Jerzy-Wojtek15 points
-
Hi, Recently finished my RCAF Canadair Sabre from 427 Sqdn. I used the Academy F-86F-30 kit OOB except for the Aires seat and True Details wheels. The Leading Edge decals turns it into a Hard Wing F-86-30 style from Zweibrücken, Germany in 1957. The tail markings is from the Weapons Meet Cazaux, France. Unfortunately the decals had a tendency of silvering. Painted with Mr.Paint and weathered with Ammo of Mig products. Thanks for looking 🙂 //Fred14 points
-
Thanks Bill I'll give it a few more days... Looking at the photos from Bill I've drilled two more holes further out at the front: More precise (not) instructions: No locators anywhere, obviously. This is and Eduard kit, isn't it? Checked the reference. Stuck it on: I'm going to start painting. I just don't care...12 points
-
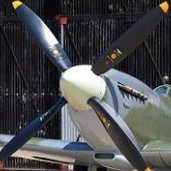
Here's my own interpretation of an early mark spitfire, notionally a mk1 and notionally 1/32 scale hand carved from basswood, walnut and oak and varnish finished. I did it as an experiment to give me something to do in my spare time, and to see if I could make something I'd be happy to put on display. There is rather a lot of artistic license being used e.g. I chickened out of gouging out the wheel wells or cutting control surfaces, so it is more spitfiresque than a finescale reproduction, however it was fun, satisfying and I'm happy with the result. Thank you all for your interest, see you for the next one.10 points
-
This was one of those builds where things just didn't go right. I even managed to loose the exhaust somehow. Just replaced it with some plastic tube bent to about the right shape. Could do with a figure to go with it, but not found one yet. Did Bronco ever bring out their modern British figures? Tim10 points
-
Hi. Here is AML's 1/72 scale Legion Condor's Heinkel He 46C.9 points
-
Thanks Ian - correct! There's film supplied for all the other windows and templates for cutting it so looks good - we shall see! Why am I labouring this so much? Everything moves and so there's lots of opportunity to get things at the wrong angle. The struts have locating pins at both ends so they should be a fairly decent reference BUT others have said they're the wrong length so I'm nervous. That said my view is that it's the internal frame and wing mount that causes the problem, hence sawing it off. THAT means that the top glazing can act as a lateral reference (I hope) BUT it moves for and aft. THIS means that the angle has to be adjusted to get the bottom strut locators in (thanks again Bill). At the moment everything moves in every direction. including springing up and down on the struts like this: Pushed down the dihedral looks OK? No point continuing to wobble bits around and have them fall apart or nudge each other out of place all the time. The answer is, of course, to fix something. Remember I glued the struts to the wings with latex glue? Let's start with those then. Lego jig: Check alignment: Tube glue in (just) the top of the struts and GO FOR IT! Looks OK. Fingers crossed...9 points
-
Gentlemen, thank you Mojo has been reinstated, just in time for the end This needs four things it does not yet have, any guesses? Ah, and the rad alt antenna straightening9 points
-
Part 2 .... MS 733 Alcyon. Lyndsey Waltons F4U-7 Remember it??? Howard 500 N500LN Conversion of a Lodestar! More tomorrow night.9 points
-
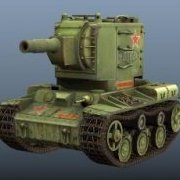
Hi all Here´s my rendition of an Israeli Tiran 5. I was inspired by Adam O`Brians superb Tiran in AFV 37, so I wanted to do a rather "used" one. Apart from the kit I used Verlindens dozer blade set, fruil tracks and Eduards exterior set and more. Most of us know how tricky it is to get the "correct" colour for IDF vehicles, but I finally landed in using a mix of Gunze H402 + H79 + flat white in different proportions. I also used oils to break up the base colour(s) even more. I didn't have a specific time period in mind. For the dozer blade, which was a first, I used Model Master "Exhaust" followed by a Gunze´s flat varnish. then airbrushed Lifecolors "light Rust" and "Rust" and to complete the first round I applied Mig´s "Gun Metal" in some areas of the blade to get a shine followed by a wash of WS and Mig´s "Middel East Dust". For overall weathering and chipping, apart from the media used on the dozer blade, I used Derwent artist pencils (black + silver), a wash of WS and Burnt Sienna which I found especially useful for the areas around the hatches plus Mig´s "chipping" colour. Anyway, thanks for reading this long and I hope you enjoy the pics 🙂 Cheers Göran7 points
-
So chaps, It's now done and dusted, what a great little project indeed. She runs a treat and is fast. First time on the water was last Friday. Click on the last picture and it takes you to the short vid clip of MTB running. Link to the build Cheers Dan7 points
-
.7 points
-
my last kit , enjoy : voila voila7 points
-
Tiny Gooney Birds! The American bird represents a C-47 of 317 Troop Carrier Group (TCG), 55 Troop Carrier Squadron (TCS) Mindoro, 1944. The Japanese plane is an L2D2 type Zero transport (“Tabby”) of the Yokosuka Naval Flying Group, 1945. Both models are 1/200 scale.7 points
-
Hi all, just finished this and will mount it to something eventually. Quite a lot im not overly happy with, not the kit itself but my modelling skills but hey, im still learning. Oob build apart from the aftermaket pitot. All critisizm and feedback more than welcome. Airfix 1:72 BAE Hawk T.Mk.1A 151 Fighter Squadron RAF Chivenor, Devon, July 837 points
-
Well, here she is, all done. Finished with a matt coat of Windsor & Newton rattle can varvish. It's been a fun/nice build and I'm happy with the finished result. The build progressed smoothly and fit was good with very little need/use of any filler which is a pleasant change from the last couple I've done. Had a few hiccups along the way but they were self-induced (didn't read the destructions properly.......note to self, read everything twice to be sure you get it right). Not sure whats up next, nothing has been procured yet, though got my eyes on a couple of things 🤤. Might go for a car next, never done one of those yet (not that I've built that many models to start with 😏, only about 10 so far). Anyways, I digress a little...........here she is.....comments, both good or bad, greatly appreciated as these will let me know where I need to improve on whatever my next project turns out to be.7 points
-
Here is the final images of my effort to make a kind of a what-if. What if an old F4U Corsair was found and flown home... You can read all about the background in the build log Thank you all for watching!7 points
-
Airfix has always made good Spitfires, and their most recent 1/72 Mk.I/Mk.IIa release is no exception. This build will be mostly out of the box; here’s the cockpit as provided in the kit – excellent! The only alterations I made were to replace the kit’s rectangular gunsight with a simple Barr and Stroud GM2 made from plastic discs and to add masking tape seatbelts. Go Airfix!6 points
-
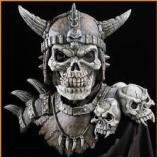
im calling this one done guys. ive had some fun and frustrations with his build. the Red LEDs and SMDs are just to illusratehis was supposed to be an IR version. thank you all for viewing. build thread6 points
-
One morning back in the autumn of 1978 I rode my motorcycle the six miles from the village where we lived into Scarborough. I don't remember what the purpose of my visit was but I ended up in the small model shop opposite the Police station. The local shop owner had been selling model kits in Scarborough for many years and had only recently moved his shop from Bar Street, a narrow one-way street in the historic part of town to the new location on the edge of the town centre. His model stock was becoming sparse but it was the period when Airfix was in difficulties and FROG had closed down. But he was selling the new NOVO kits and I bought a few from him. But on this occasion I came away with a 1/96 scale Lindberg Handley Page Victor British jet bomber. It was in a massive box and my problem was not just how I was going to get it home on my motorbike but also how I was going to smuggle it in without my stepfather seeing it as he did not approve of me building models. My Victor came in a box like this one. The kit dated from the 1950s and was a very accurate and beautifully moulded model of a PROTOTYPE Victor. It was moulded in quality white plastic with raised panel line detail and it included four jet engines in the wings which you could view by opening large hinged panels above the wing roots. This was another version of the kit that included some sort of remote control device. You can see one of the large engine access openings on the wing parts. It was later issued by Revell. The fuselage halves as they come in the kit. They represent a prototype aircraft with the shorter forward fuselage and the taller tail fin and rudder. I originally built this model very quickly straight from the box when my stepfather was not looking and was quite happy with it for a few years, but it did languish hidden away in a box on the farm while I went through a few poor career choices and change of addresses. A few years later when I was settled I reworked the model to turn it into a production B.1. This involved sawing off the nose at the leading edge of the wing roots and adding an equivalent six feet section to extend the nose. I removed a section of the tailfin to reduce it in height and added curved walls to the jet intakes as well as airbrake strakes and other small details. I painted it with Halfords Appliance White car spray. Decals came from my spares except for the tail serials which are Letraset and the XV Squadron badge which I hand painted. The model represents a Victor B.1 V-Bomber of 15 Squadron based at RAF Cottesmore around 1960. I shortened the undercarriage legs. I made the undercarriage detachable so that it can be displayed in flying mode on a home-made stand. That has been my 1950s 1/96 scale Lindberg model of the Handley Page Victor British Jet Bomber. Hope you liked it. cheers, adey6 points
-
Shall we hide the pictures, so nobody knows? No problem 😉6 points
-
Supports removed from the sprue and everything sanded: The plan has punched me in the mouth... I can't glue the supports to the fuel tank (looked that up - 150Gl tank for SDs) because I don't know the angle of the dangle (again). So I made the model submit on the jig: … and marked up the lateral position of the supports using the measurements in the instructions: Then I realised I wouldn't know the spread / angle so stuck the tank to the fuselage using Tak: … and fiddled with the supports until I ran out of patience. More later.6 points
-
Hi Giorgio and welcome! I hope you enjoyed your trip to the States I've just been back and edited this post to include a warning about the wing support positioning. Hopefully that'll save future builders a lot of pain. Right, I feel as though I can make progress now - dangerous. I've stuck the PE actuators on the wings (the tiny tie down loops can wait until later) and assembled the underside tank/carrier: The instructions are a bit vague here: … but, from the build video, that diagram with the measurements is about drilling holes for the supports. Hmmm. I think I'll assemble it and use the actual part to mark the holes.6 points
-
Just to let you know that the Build From Hell hasn’t ended yet... When I unmasked the canopies they were almost matt - I’ve since given them a coat of Future. Not sure what caused that reaction. I couldn’t clean off the residue! I tried AK True Metal on the body. It wasn’t going to give me a nice finish so I stripped it (Mr Halford’s grey primer is tough stuff!) and re did everything in Humbrol Metalcote spray polished aluminium, which polishes up a treat. Revell silver has repaired a lot of boo-boos, and I’m working through my finish list. Have to take my daughter back to college in Holland tomorrow so I will be out of action for a few days. Thanks for looking, Adrian6 points
-
This model of the Golden Hind in the 1/72 scale is from Rewell. Sails made at home, flags from a friend of Elkan. I bought the pulleys and cannons in the "Radekshipmodel" (it's a unique ship and accessories company). Wood imitation is made with Tamiya acrylic paints and Umton oil paint wiping method. The sea level was made from toilet paper and painted with acrylic spray on cars. The frame for the model was made by a brother-in-law joiner. How do you like it ?5 points
-
Airfix has always made good Spitfires, and their most recent 1/72 Mk.I/Mk.IIa release is no exception. This build will be mostly out of the box; here’s the cockpit as provided in the kit – excellent! The only alterations I made were to replace the kit’s rectangular gunsight with a simple Barr and Stroud GM2 made from plastic discs and to add masking tape seatbelts. Go Airfix!5 points
-
Hi all, well this is my new model in the work. Since now everything it's ok. I looked for color references for the interiors but at the end I choose dto use the coloured pictures that are in the little book that comes with the model. I know that the green is too dark. It's a mixture of Tamiya cockpit green and deep green. It's should have been a little bit more light. The grey parts are painted with Lifecolors "Grigio azzurro chiaro 1". I'm planing to paint the exteriors with the earlier three coulour camouflage scheme with Lifecolor Regia Aeronautica color set. Just thinking how to make aerials.5 points
-
Hi all and my latest finish, a Monogram 1/72 F-105G Wild Weasel built for a Vietnam GB elsewhere. The build thread is here if you're interested but to recap: Kit: Monogram 1/72 F-105G Build: Out of the box Paints: Halfords primer from a can. Revell Acrylics with a paint brush. Future, Flory Models Wash, W&N Matt Varnish Decals: Mix of kit and Superscale Sheet. Markings: 561st Tactical Fighter Squadron, 388th Tactical Fighter Wing, Southeast Asia 1972. This aircraft (S/N 63-8320) scored 3 Mig kills in Vietnam. I don't know if the aircraft carried kill markings but I added two under the cockpit. As a footnote, the last F-105 shot down in the Vietnam War was from the 561st and the squadron was the last to fly the F-4 Pantom II on ops. Anyway, some pics! Monogram F105G Wild Weasel_1 by Dermot Moriarty, on Flickr Monogram F105G Wild Weasel_3 by Dermot Moriarty, on Flickr Monogram F105G Wild Weasel_4 by Dermot Moriarty, on Flickr Monogram F105G Wild Weasel_7 by Dermot Moriarty, on Flickr Paints used... Monogram F105G Wild Weasel_8 by Dermot Moriarty, on Flickr She's a big 'un alright. Beside a Vietnam Navy Phantom (first Mig shootdown) Monogram F105G Wild Weasel_9 by Dermot Moriarty, on Flickr And that's it! For an old kit, it was a really enjoyable build and nicely engineered. I also love how the instruction sheet has call outs for what many of the pieces are e.g. 'ECM pods' or 'Drop tanks'......clearly aimed at the young builder. Maybe something Airfix or Revell might bring back?! Monogram F105G Wild Weasel_10 by Dermot Moriarty, on Flickr Thanks for looking and enjoy your modelling. Dermot5 points
-
As part of taking a beak from kit bashing etc. I will go back to sharing some of my old pics with you all. And, to start off by request from a member here, These are some of West Malling '85 I have just over 50 so will post these in 10's Gary Numan in attendance as part of the Harvard display team. Nice to have the opurtunity to see two B-17s together in the air!!5 points
-
It's been a while since my last post, that's because I'm a very slow builder ... here is my attempt at making a French Navy Crusader, the complete name is F-8E FN (P). P stand for "Prolongé", prolongated ... New ejection seat, various aerials (one behind the cockpit just went awol during photo session), the new Sherlock threat detector atop tail, Etc. Paints are Gunze acryls, and the lovely Aires Matra 55 Magic missiles. This peticular aircraft saw action during the Yougoslavia CAP operations. Hope you'll like her, all comments and critics most welcome. Best, Stef (#6) Click images to enlarge,5 points
-
hi all, I've just finished this for a friend and i must admit that i was pleasantly surprised by the quality of the kit considering it's age and reputation. The detail is a bit clunky but by adding resin seats (more parts in them than the whole plane!) and improving the cockpit with dial decals and scrap plastic details, i'm really please with the end result. The undercarriage also got a few embellishments to make it more interesting. Decals are from Berna, which went on okay but were slightly out of register meaning a bit of tricky touch-up painting. I'd recommend it to anyone as a fun build Andy5 points
-
20 cm scratch built rail gun and diorama, while building this latest rail gun I came across few pics on internet of this gun the day after D Day, after bombing raids being looked over by a couple of Americans at Cherbourg peninsular .These guns were placed in round pits on turntables with bunkers all round. the bunkers were destroyed but amazingly not much damaged done to guns. This model is completely scratch built including bogies, the barrel is turned aluminium and the bunker is modelled from plaster as I did not want a lot of damage to my gun I just bent a few of the handrails .5 points
-
Well folks, a while back I mentioned "at least 3 months". That was, I just noted, on May 15th. I move into my new apartment on Aug 27th so that was a pretty accurate guess! I hope to see you all back here very soon! Ian5 points
-
Time for a top up to the thread. Sorting out a big box of T2 Airfix kits gave me the opportunity to set up this shot... An original shop poster, plus all the bags and boxes shown on it. The kits were all released in 1959 so that would date the poster nicely. Heady stuff for a collector, I'm off to have a lie down for a bit...5 points
-
Hi gentlemen, this is one of my older models - Azur's 1/72 scale Heinkel He 60, finished in the markings of Legion Condor's AS/88.5 points
-
The ale sounds good, must track it down and investigate Not entirely convinced that I should resume 'fuming' after a forty year hiatus though Alan, I'll think about it... I find myself unconvinced by the radalt antennae and may revisit them and turn four into six I'll put you all out of your misery though Item: one baggage/cargo pod, starb'd wing inner station Item: one Blackburn Palouste air-portable air starter pod, port wing inner station Item: one arrester hook tail end of fuselage And Item: one windscreen wiper front screen panel Now its test time again, tedious ain't it I agreed that fixed to a base is a consideration to make so, Deck view or Concrete surface on Mother Earth? I'm unsure because I've gone unconventional by adding the 'away from home' option by hanging the Palouste off her Gentlemen your input would be very welcome 😱5 points
-
I used to play online with three of my friends before I had kids. Truly a wonderful game, and I hope I get a chance to play Il-2 Bodenplatte. I choose to imagine you lashed to the mast, foaming seawater cascading over the deck, pipe clenched betwixt your teeth, one hand on the tiller and the other carefully applying a decal. Another long day with the family, with Winston at his best and worst today. He "helped" me clean Madeleine's cage, observing that she was "kinda prickly" after learning the hard way, then followed her around shouting "EYOW [hello] EDGEGOG", before finally working up courage equal to desire and petting her soft flanks. 2018-08-12_09-08-16 by Edward IX, on Flickr All decals are now on the Il-2. 20180812_201803 by Edward IX, on Flickr I also spent an hour and some change faffing about with the many weathering products I own but don't really understand at all, and can't really see much of a difference. 20180812_204457 by Edward IX, on Flickr It's not helped by how glossy the model is right now, but a dull coat is coming soon. I also added the bomb cradles and rocket rails (but in retrospect ought to have painted what I presume are arming wires leading into the wings for the latter, oh well). It's early yet, and Mrs P has retired to bed, so I may toddle back down in search of a suitable colour for Soviet bombs. I'm tickled pink, pink! by the fact that they just painted straight over all the stencils.5 points
-
Another quick update - as I got wrapped up with Heather's Whirlwind primer problems - this is how they dried - without washes... That's not bad with dark earth paint / coarse black grit scatter / fine earth dust scatter / spots of dark earth paint / spots of black paint.... I don't think I need to blend with washes - though I probably will - I'm amazed I kind of 'pulled it off' - but if you think it can be improved - please feel free to taunt me5 points
-
A piece that was a: missing and b: not very well shaped was the arrester hook, what I had was a bent piece of similar appearance but has gone missing and was actually a fair bit thicker ISTR than the slender device on the real thing would scale down to So I set to making my own I needed a slender but straight rod, which immediately ruled out my favourite Slater's Rod which even its best friends (me) have to admit is always extruded with a curve that never wants to straighten Luckily I still have a few (thinks...must get more) Evergreen 0.025" white rods, nobody would expect them to be anything but straight as a die And they are I needed to fashion the hook on the end, for which task John Aeroclub's tubes made a good start I hope somebody takes over making them now John is having his well deserved retirement Further fettling will be taking place when the reinforcing stuporgoo has had its chance to go rock hard Oops a wopsy, better get that restraightened before I carve any more shape into it Thinks... Where did I leave the new scalpel blades???????? Ouch, found 'em5 points
-
From Westland Lysander. Written by James Kightly, published by Mushroom Model Publications. Chris5 points
-
Most kind Bill. Knackered now tonight after a busy day trying to push on paint preparations, but hopefully I can remember the blur of the last few hours. First job this morning was to rough out a scheme for treating the underpainting prior to the metalwork going on. Those last two colour photos I'd unearthed (rather late it in the day but isn't that always the way?) have been most helpful, being by far the most detailed contemporary images of sister aircraft. There are walkway marking for the wings of course (they'll go on last to avoid over-complicating the masking to unmanageable levels, bits overlaying each other and so on) but it makes sense at this stage to get the walkway and other markings that run down the length of the aircraft roof masked off. The cutter as you can see is a godsend for such jobs as masking those complex changes of direction manually with tape would be an horrendous undertaking: There's a long set that rund for'ard up to the astrodome but I'll do that later at the same time as with wing walks. The tail similarly received a blanektting and then we were ready to go: With the Alclad primer on still from previously, I was looking here to play around with adding Halfordian Grey along with Alclad's black gloss in order to begin introducing variations around the airframe: Some areas like the engine gills often seem to look lighter, whilst in other places I'm seeking to give an 'impressionistic' idea through tone of underlying structural detail, yet without slavishly going down to a rather 'illustrative' approach of turning the aircraft surface into a diagram. In the shot below you can see I've started sketching out some of these distinctions with grey: Likewise along the belly: I'm not looking to reproduce every panel here so much as rough out a grid that roughly matches the aircraft stations and stringers, using this as a guide to work back over the surface to leave some areas evident and others merging back in to the bodywork again. Here we ware now working back over the initial bold strokes with gloss black to begin reducing the contrast levels between adjacent regions: And in similar fashion below: I'll be quite honest that I haven't a clue whether much of this will be too subtle to show up under the aluminium later. The last coat of the day drying: All-in-all this paint session lasted about four hours - by far the longest continuous period I've ever painted. I have to say that the Alclad stuff behaved impeccably throughout, allied to which, since tightening the Teflon seal and stripping the air valve for a deep clean the Iwata performed Trojan flawlessly. I've recently taken to adding a bit of lube to the brush now as well and find the action nice and silky as a result. My brain's fried and Mrs. B's just called us to dinner. See you next time. Tony5 points
-
Honestly, don't be so quick to dismiss your own abilities Simon - back at Christmas I couldn't do this mullarkey either. It seems a big thing to get to grips with but really it just breaks down into a series of quite simple steps. Almost European! Kinda chomping at the bit myself Chris but finding lots of little jobs suddenly popping up. 😃 One benefit of that though has been to let me mull over the painting approach I want to adopt on this. Plus I've also learned now how to clean caked paint out the air valve of the brush so hopefully the colour wand is in tip-top condition for the next stage... Those blasted port undercarriage doors are now back in place and filled. They are by far the most irksome bits on the kit and fought back in a most recalcitrant - if not downright recidivistic - manner. Curse them but they're done.: I think I mentioned previously about wanting to replace the kit exhausts with metal ones? About 2.2mm in diameter and a rummage in the bagpipe produced a brass replacement: Hole drilled and a test fit: I'll cut that into lengths later. Cleverness - like comedy - frequently comes down to timing of course and cleverclogs should have drilled the lower inboard ones out before sticking the wings on: Looks like those inner ones will be done with the kit parts after all. It shouldn't matter though being right under the wing; it's the top and outer ones that will be prominent and needed something a bit nattier in the pipe department. One rather handy use for old bits of masking film is to act as a surface to let you mark out irregular areasthat need covering up: There's a break in the orange of that fin about 3/4 of the way down for the tail numbers to go so this method let me transfer those markings in through the scanner to act as a guide for designing the masks: Above them also are the 'negative' masks required for to go around lettering and roundels on the wings. Their boundaries were increased by about 0.6mm all the way around the inner outlines of each in order to allow for the narrow band of metal that separates marking from fluorescent panel: These were something of a trial to get in place evenly - especially around the wing roundels, where the camber of the wing had a tendency to distort the flat mask slightly when trying to ensure the narrow gap around them was equal all the way around the their edges: That's the masking on both upper and lower wings down now today, also the roundels themselves masked over, leaving only a narrow gap around their edges. I've the tail fins to mask up tomorrow and then I can turn my attention to underpainting in advance of the metal going on. Thanks for stopping by! Tony5 points
-
Hi all, First post and returning to plastic kit modelling for the first time since I was a teenager after a spell of modelling OO Gauge rail. After deciding that I no longer have the time or space for model rail, I have given that up and returned to plastic kits. Interests are Navy (all), Sci-Fi (Star Trek) and certain types of aircraft and most of my exploits will be scales that are easier for my cumbersome hands. Anyway, first up is 1/350 build of Trumpeters HMS Westminster. Always had a soft spot for Navy ships and seeing one of the Type 45's off Teignmouth sea front a few weeks back made me want to buy a couple of RN Kits. I have a second of these with HMS Montrose, although that may not get built, as I have recently put aside a Type 45 from Atlantic Models. I must admit to looking at the contents and wondering why on earth there are so many pieces for this, especially considering most probably could have been moulded on. I have found no end of issue with cutting and fitting these pieces to the kits and while I feel that they probably may be better than being moulded on, think they're a bit unnecessary (I am sure this has been done to death by others...). I have found the plastic way too soft for my liking and has you can see, there are a few issues where I have been overzealous with the knife, although the fit in general has been ok for me. I think I will try hand painting this one, to get me back into it, but will move to the airbrush I have, once I have found the confidence to use it! I have brought the WEM PE for the kit as well, although again a new area for me to explore, for which I wonder how I will survive with my club fingers! Anyway, some pictures of progress. Pic of main hull. 20180813_073047 by Bryn Jones, on Flickr Dry fitting of main parts. 20180813_073035 by Bryn Jones, on Flickr and 20180813_073015 by Bryn Jones, on Flickr and 20180813_073049 by Bryn Jones, on Flickr Small update for now. I have recently brought the Atlantic Models Type 42 in 1/350, which will be my first Resin kit and have a Type 45 on the way from Pete as well. Not worked with Resin before, but was impressed with what you got for much less than above. Cheers Bryn4 points


.thumb.jpg.0bac681e0da8e4ed7557610e98fda908.jpg)


This leaderboard is set to London/GMT+01:00